Manage cluster with GitOps
GitOps Support (optional)
EKS Anywhere supports a GitOps workflow for the management of your cluster.
When you create a cluster with GitOps enabled, EKS Anywhere will automatically commit your cluster configuration to the provided GitHub repository and install a GitOps toolkit on your cluster which watches that committed configuration file. You can then manage the scale of the cluster by making changes to the version controlled cluster configuration file and committing the changes. Once a change has been detected by the GitOps controller running in your cluster, the scale of the cluster will be adjusted to match the committed configuration file.
If you’d like to learn more about GitOps, and the associated best practices, check out this introduction from Weaveworks .
NOTE: Installing a GitOps controller can be done during cluster creation or through upgrade. In the event that GitOps installation fails, EKS Anywhere cluster creation will continue.
Supported Cluster Properties
Currently, you can manage a subset of cluster properties with GitOps:
Management Cluster
Cluster:
workerNodeGroupConfigurations.countworkerNodeGroupConfigurations.machineGroupRef.name
WorkerNodes VSphereMachineConfig:
datastorediskGiBfoldermemoryMiBnumCPUsresourcePooltemplateusers
Workload Cluster
Cluster:
kubernetesVersioncontrolPlaneConfiguration.countcontrolPlaneConfiguration.machineGroupRef.nameworkerNodeGroupConfigurations.countworkerNodeGroupConfigurations.machineGroupRef.nameidentityProviderRefs(Only forkind:OIDCConfig,kind:AWSIamConfigis immutable)
ControlPlane / Etcd / WorkerNodes VSphereMachineConfig:
datastorediskGiBfoldermemoryMiBnumCPUsresourcePooltemplateusers
OIDCConfig:
clientIDgroupsClaimgroupsPrefixissuerUrlrequiredClaims.claimrequiredClaims.valueusernameClaimusernamePrefix
Any other changes to the cluster configuration in the git repository will be ignored. If an immutable field has been changed in a Git repository, there are two ways to find the error message:
- If a notification webhook is set up, check the error message in notification channel.
- Check the Flux Kustomization Controller log:
kubectl logs -f -n flux-system kustomize-controller-******for error message containing text similar toInvalid value: 1: field is immutable
Getting Started with EKS Anywhere GitOps with Github
In order to use GitOps to manage cluster scaling, you need a couple of things:
- A GitHub account
- A cluster configuration file with a
GitOpsConfig, referenced with agitOpsRefin your Cluster spec - A Personal Access Token (PAT) for the GitHub account , with permissions to create, clone, and push to a repo
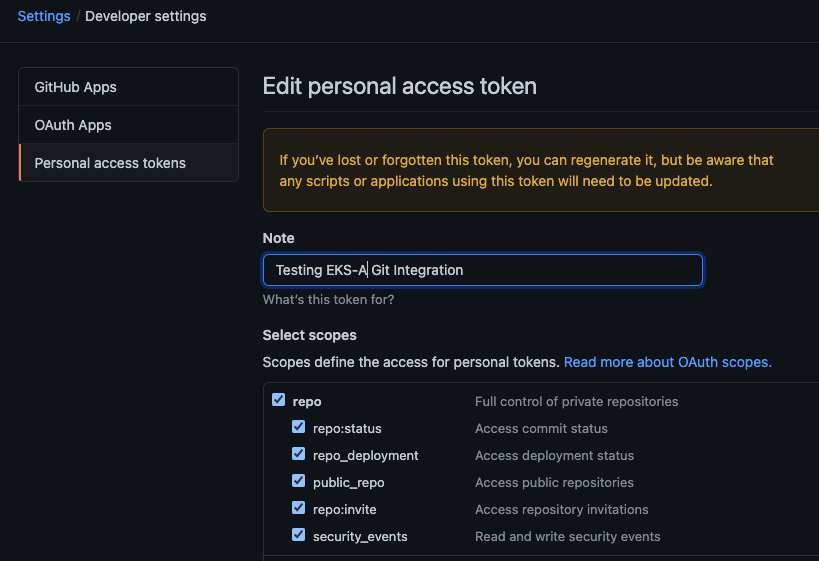
Create a GitHub Personal Access Token
Create a Personal Access Token (PAT)
to access your provided GitHub repository.
It must be scoped for all repo permissions.
NOTE: GitOps configuration only works with hosted github.com and will not work on a self-hosted GitHub Enterprise instances.
This PAT should have at least the following permissions:
NOTE: The PAT must belong to the
ownerof therepositoryor, if using an organization as theowner, the creator of thePATmust have repo permission in that organization.
You need to set your PAT as the environment variable $EKSA_GITHUB_TOKEN to use it during cluster creation:
export EKSA_GITHUB_TOKEN=ghp_MyValidPersonalAccessTokenWithRepoPermissions
Create GitOps configuration repo
If you have an existing repo you can set that as your repository name in the configuration.
If you specify a repo in your FluxConfig which does not exist EKS Anywhere will create it for you.
If you would like to create a new repo you can click here
to create a new repo.
If your repository contains multiple cluster specification files, store them in sub-folders and specify the configuration path in your cluster specification.
In order to accommodate the management cluster feature, the CLI will now structure the repo directory following a new convention:
clusters
└── management-cluster
    ├── flux-system
    │   └── ...
    ├── management-cluster
    │   └── eksa-system
    │       └── eksa-cluster.yaml
    │       └── kustomization.yaml
    ├── workload-cluster-1
    │   └── eksa-system
    │       └── eksa-cluster.yaml
    └── workload-cluster-2
        └── eksa-system
            └── eksa-cluster.yaml
By default, Flux kustomization reconciles at the management cluster’s root level (./clusters/management-cluster), so both the management cluster and all the workload clusters it manages are synced.
Example GitOps cluster configuration for Github
apiVersion: anywhere.eks.amazonaws.com/v1alpha1
kind: Cluster
metadata:
  name: mynewgitopscluster
spec:
... # collapsed cluster spec fields
# Below added for gitops support
  gitOpsRef:
    kind: FluxConfig
    name: my-cluster-name
---
apiVersion: anywhere.eks.amazonaws.com/v1alpha1
kind: FluxConfig
metadata:
  name: my-cluster-name
spec:
    github:
      personal: true
      repository: mygithubrepository
      owner: mygithubusername
Create a GitOps enabled cluster
Generate your cluster configuration and add the GitOps configuration. For a full spec reference see the Cluster Spec reference .
NOTE: After your cluster has been created the cluster configuration will automatically be committed to your git repo.
-
Create an EKS Anywhere cluster with GitOps enabled.
CLUSTER_NAME=gitops
eksctl anywhere create cluster -f ${CLUSTER_NAME}.yaml
Enable GitOps in an existing cluster
You can also install Flux and enable GitOps in an existing cluster by running the upgrade command with updated cluster configuration. For a full spec reference see the Cluster Spec reference .
-
Upgrade an EKS Anywhere cluster with GitOps enabled.
CLUSTER_NAME=gitops
eksctl anywhere upgrade cluster -f ${CLUSTER_NAME}.yaml
Test GitOps controller
After your cluster has been created, you can test the GitOps controller by modifying the cluster specification.
-
Clone your git repo and modify the cluster specification. The default path for the cluster file is:
clusters/$CLUSTER_NAME/eksa-system/eksa-cluster.yaml -
Modify the
workerNodeGroupConfigurations[0].countfield with your desired changes. -
Commit the file to your git repository
git add eksa-cluster.yaml git commit -m 'Scaling nodes for test' git push origin main -
The Flux controller will automatically make the required changes.
If you updated your node count, you can use this command to see the current node state.
kubectl get nodes
Getting Started with EKS Anywhere GitOps with any Git source
You can configure EKS Anywhere to use a generic git repository as the source of truth for GitOps by providing a FluxConfig with a git configuration.
EKS Anywhere requires a valid SSH Known Hosts file and SSH Private key in order to connect to your repository and bootstrap Flux.
Create a Git repository for use by EKS Anywhere and Flux
When using the git provider, EKS Anywhere requires that the configuration repository be pre-initialized.
You may re-use an existing repo or use the same repo for multiple management clusters.
Create the repository through your git provider and initialize it with a README.md documenting the purpose of the repository.
Create a Private Key for use by EKS Anywhere and Flux
EKS Anywhere requires a private key to authenticate to your git repository, push the cluster configuration, and configure Flux for ongoing management and monitoring of that configuration. The private key should have permissions to read and write from the repository in question.
It is recommended that you create a new private key for use exclusively by EKS Anywhere.
You can use ssh-keygen to generate a new key.
ssh-keygen -t ecdsa -C "my_email@example.com"
Please consult the documentation for your git provider to determine how to add your corresponding public key; for example, if using Github enterprise, you can find the documentation for adding a public key to your github account here .
Add your private key to your SSH agent on your management machine
When using a generic git provider, EKS Anywhere requires that your management machine has a running SSH agent and the private key be added to that SSH agent.
You can start an SSH agent and add your private key by executing the following in your current session:
eval "$(ssh-agent -s)" && ssh-add $EKSA_GIT_PRIVATE_KEY
Create an SSH Known Hosts file for use by EKS Anywhere and Flux
EKS Anywhere needs an SSH known hosts file to verify the identity of the remote git host.
A path to a valid known hosts file must be provided to the EKS Anywhere command line via the environment variable EKSA_GIT_KNOWN_HOSTS.
For example, if you have a known hosts file at /home/myUser/.ssh/known_hosts that you want EKS Anywhere to use, set the environment variable EKSA_GIT_KNOWN_HOSTS to the path to that file, /home/myUser/.ssh/known_hosts.
export EKSA_GIT_KNOWN_HOSTS=/home/myUser/.ssh/known_hosts
While you can use your pre-existing SSH known hosts file, it is recommended that you generate a new known hosts file for use by EKS Anywhere that contains only the known-hosts entries required for your git host and key type.
For example, if you wanted to generate a known hosts file for a git server located at example.com with key type ecdsa, you can use the OpenSSH utility ssh-keyscan:
ssh-keyscan -t ecdsa example.com >> my_eksa_known_hosts
This will generate a known hosts file which contains only the entry necessary to verify the identity of example.com when using an ecdsa based private key file.
Example FluxConfig cluster configuration for a generic git provider
For a full spec reference see the Cluster Spec reference .
A common repositoryUrl value can be of the format ssh://git@provider.com/$REPO_OWNER/$REPO_NAME.git. This may differ from the default SSH URL given by your provider. Consider these differences between github and CodeCommit URLs:
- The github.com user interface provides an SSH URL containing a
:before the repository owner, rather than a/. Make sure to replace this:with a/, if present. - The CodeCommit SSH URL must include SSH-KEY-ID in format
ssh://<SSH-Key-ID>@git-codecommit.<region>.amazonaws.com/v1/repos/<repository>.
apiVersion: anywhere.eks.amazonaws.com/v1alpha1
kind: Cluster
metadata:
  name: mynewgitopscluster
spec:
... # collapsed cluster spec fields
# Below added for gitops support
  gitOpsRef:
    kind: FluxConfig
    name: my-cluster-name
---
apiVersion: anywhere.eks.amazonaws.com/v1alpha1
kind: FluxConfig
metadata:
  name: my-cluster-name
spec:
    git:
      repositoryUrl: ssh://git@provider.com/myAccount/myClusterGitopsRepo.git
      sshKeyAlgorithm: ecdsa
Manage separate workload clusters using Gitops
Follow these steps if you want to use your initial cluster to create and manage separate workload clusters via Gitops.
Prerequisites
-
An existing EKS Anywhere cluster with Gitops enabled. If your existing cluster does not have Gitops installed, see Enable Gitops in an existing cluster. .
-
A cluster configuration file for your new workload cluster.
Create cluster using Gitops
-
Clone your git repo and add the new cluster specification. Be sure to follow the directory structure defined here :
clusters/<management-cluster-name>/$CLUSTER_NAME/eksa-system/eksa-cluster.yamlNOTE: Specify the
namespacefor all EKS Anywhere objects when you are using GitOps to create new workload clusters (even for thedefaultnamespace, usenamespace: defaulton those objects).Ensure workload cluster object names are distinct from management cluster object names. Be sure to set the
managementClusterfield to identify the name of the management cluster.Make sure there is a
kustomization.yamlfile under the namespace directory for the management cluster. Creating a Gitops enabled management cluster witheksctlshould create thekustomization.yamlfile automatically. -
Commit the file to your git repository.
git add clusters/<management-cluster-name>/$CLUSTER_NAME/eksa-system/eksa-cluster.yaml git commit -m 'Creating new workload cluster' git push origin main -
The Flux controller will automatically make the required changes. You can list the workload clusters managed by the management cluster.
export KUBECONFIG=${PWD}/${MGMT_CLUSTER_NAME}/${MGMT_CLUSTER_NAME}-eks-a-cluster.kubeconfig kubectl get clusters -
Check the state of a cluster using
kubectlto show the cluster object with its status.The
statusfield on the cluster object field holds information about the current state of the cluster.kubectl get clusters w01 -o yamlThe cluster has been fully upgraded once the status of the
Readycondition is markedTrue. See the cluster status guide for more information. -
The kubeconfig for your new cluster is stored as a secret on the management cluster. You can get credentials and run the test application on your new workload cluster as follows:
kubectl get secret -n eksa-system w01-kubeconfig -o jsonpath='{.data.value}' | base64 —decode > w01.kubeconfig
export KUBECONFIG=w01.kubeconfig
kubectl apply -f "https://anywhere.eks.amazonaws.com/manifests/hello-eks-a.yaml"
Upgrade cluster using Gitops
-
To upgrade the cluster using Gitops, modify the workload cluster yaml file with the desired changes. As an example, to upgrade a cluster with version 1.24 to 1.25 you would change your spec:
 apiVersion: anywhere.eks.amazonaws.com/v1alpha1
 kind: Cluster
 metadata:
   name: dev
   namespace: default
 spec:
   controlPlaneConfiguration:
     count: 1
     endpoint:
       host: "198.18.99.49"
     machineGroupRef:
       kind: VSphereMachineConfig
       name: dev
       ...
   kubernetesVersion: "1.25"
   ...
NOTE: If you have a custom machine image for your nodes you may also need to update your MachineConfig with a new
template. -
Commit the file to your git repository.
git add eksa-cluster.yaml
git commit -m 'Upgrading kubernetes version on new workload cluster'
git push origin main
For a comprehensive list of upgradeable fields for VSphere, Snow, and Nutanix, see the upgradeable attributes section .
Delete cluster using Gitops
- To delete the cluster using Gitops, delete the workload cluster yaml file from your repository and commit those changes.
git rm eksa-cluster.yaml
git commit -m 'Deleting workload cluster'
git push origin main