This is the multi-page printable view of this section. Click here to print.
Create Bare Metal cluster
- 1: Overview
- 2: Tinkerbell Concepts
- 3: Requirements for EKS Anywhere on Bare Metal
- 4: Preparing Bare Metal for EKS Anywhere
- 5: Create Bare Metal cluster
- 6: Configure for Bare Metal
- 7: Customize Bare Metal
1 - Overview
Creating a Bare Metal cluster
The following diagram illustrates what happens when you create an EKS Anywhere cluster on bare metal. You can run EKS Anywhere on bare metal as a single node cluster with the Kubernetes control plane and workloads co-located on a single server, as a multi-node cluster with the Kubernetes control plane and workloads co-located on the same servers, and as a multi-node cluster with the Kubernetes control plane and worker nodes on different, dedicated servers.
Start creating a Bare Metal cluster
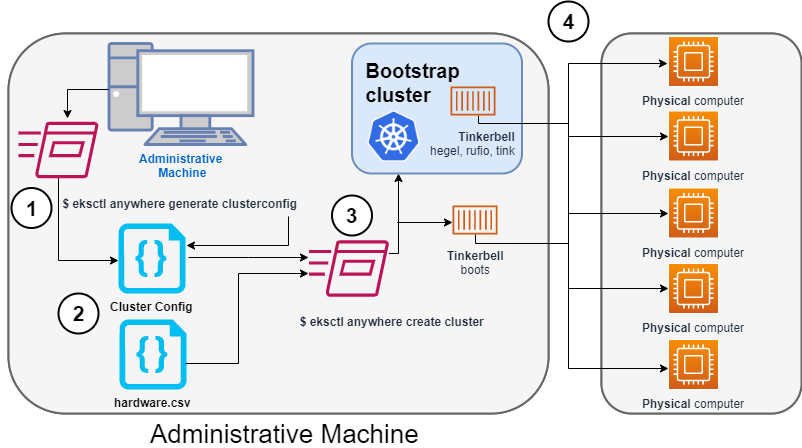
1. Generate a config file for Bare Metal
Identify the provider (--provider tinkerbell) and the cluster name to the eksctl anywhere generate clusterconfig command and direct the output into a cluster config .yaml file.
2. Modify the config file and hardware CSV file
Modify the generated cluster config file to suit your situation.
Details about this config file are contained on the Bare Metal Config
page.
Create a hardware configuration file (hardware.csv) as described in Prepare hardware inventory
.
3. Launch the cluster creation
Run the eksctl anywhere create cluster command, providing the cluster config and hardware CSV files.
To see details on the cluster creation process, increase verbosity (-v=9 provides maximum verbosity).
4. Create bootstrap cluster and provision hardware
The cluster creation process starts by creating a temporary Kubernetes bootstrap cluster on the Administrative machine. Containerized components of the Tinkerbell provisioner run either as pods on the bootstrap cluster (Hegel, Rufio, and Tink) or directly as containers on Docker (Boots). Those Tinkerbell components drive the provisioning of the operating systems and Kubernetes components on each of the physical computers.
With the information gathered from the cluster specification and the hardware CSV file, three custom resource definitions (CRDs) are created. These include:
- Hardware custom resources: Which store hardware information for each machine
- Template custom resources: Which store the tasks and actions
- Workflow custom resources: Which put together the complete hardware and template information for each machine. There are different workflows for control plane and worker nodes.
As the bootstrap cluster comes up and Tinkerbell components are started, you should see messages like the following:
$ eksctl anywhere create cluster --hardware-csv hardware.csv -f eksa-mgmt-cluster.yaml
Performing setup and validations
Tinkerbell Provider setup is valid
Validate certificate for registry mirror
Create preflight validations pass
Creating new bootstrap cluster
Provider specific pre-capi-install-setup on bootstrap cluster
Installing cluster-api providers on bootstrap cluster
Provider specific post-setup
Creating new workload cluster
At this point, Tinkerbell will try to boot up the machines in the target cluster.
Continuing cluster creation
Tinkerbell takes over the activities for creating provisioning the Bare Metal machines to become the new target cluster. See Overview of Tinkerbell in EKS Anywhere for examples of commands you can run to watch over this process.
1. Tinkerbell network boots and configures nodes
- Rufio uses BMC information to set the power state for the first control plane node it wants to provision.
- When the node boots from its NIC, it talks to the Boots DHCP server, which fetches the kernel and initramfs (HookOS) needed to network boot the machine.
- With HookOS running on the node, the operating system identified by
IMG_URLin the cluster specification is copied to the identifiedDEST_DISKon the machine. - The Hegel components provides data stores that contain information used by services such as cloud-init to configure each system.
- Next, the workflow is run on the first control plane node, followed by network booting and running the workflow for each subsequent control plane node.
- Once the control plane is up, worker nodes are network booted and workflows are run to deploy each node.
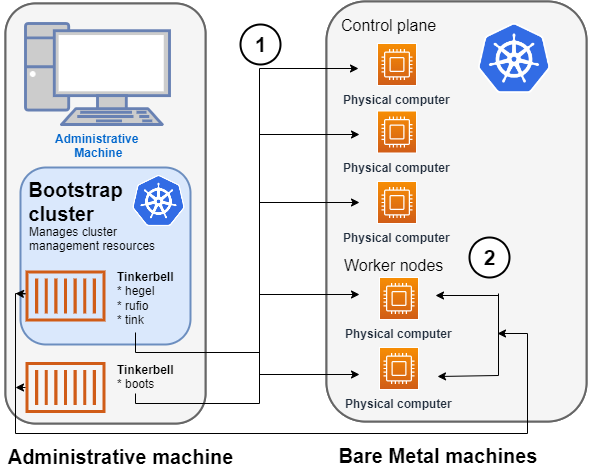
2. Tinkerbell components move to the target cluster
Once all the defined nodes are added to the cluster, the Tinkerbell components and associated data are moved to run as pods on worker nodes in the new workload cluster.
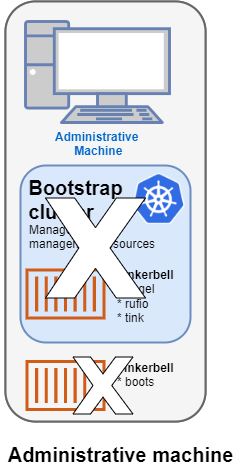
Deleting Tinkerbell from Admin machine
All Tinkerbell-related pods and containers are then deleted from the Admin machine.
Further management of tinkerbell and related information can be done using from the new cluster, using tools such as kubectl.
Using Tinkerbell on EKS Anywhere
The sections below step through how Tinkerbell is integrated with EKS Anywhere to deploy a Bare Metal cluster. While based on features described in Tinkerbell Documentation , EKS Anywhere has modified and added to Tinkerbell components such that the entire Tinkerbell stack is now Kubernetes-friendly and can run on a Kubernetes cluster.
Create bare metal CSV file
The information that Tinkerbell uses to provision machines for the target EKS Anywhere cluster needs to be gathered in a CSV file with the following format:
hostname,bmc_ip,bmc_username,bmc_password,mac,ip_address,netmask,gateway,nameservers,labels,disk
eksa-cp01,10.10.44.1,root,PrZ8W93i,CC:48:3A:00:00:01,10.10.50.2,255.255.254.0,10.10.50.1,8.8.8.8,type=cp,/dev/sda
...
Each physical, bare metal machine is represented by a comma-separated list of information on a single line. It includes information needed to identify each machine (the NIC’s MAC address), network boot the machine, point to the disk to install on, and then configure and start the installed system. See Preparing hardware inventory for details on the content and format of that file.
Modify the cluster specification file
Before you create a cluster using the Bare Metal configuration file, you can make Tinkerbell-related changes to that file. In particular, TinkerbellDatacenterConfig fields, TinkerbellMachineConfig fields, and Tinkerbell Actions can be added or modified.
Tinkerbell actions vary based on the operating system you choose for your EKS Anywhere cluster. Actions are stored internally and not shown in the generated cluster specification file, so you must add those sections yourself to change from the defaults (see Ubuntu TinkerbellTemplateConfig example and Bottlerocket TinkerbellTemplateConfig example for details).
In most cases, you don’t need to touch the default actions.
However, you might want to modify an action (for example to change kexec to a reboot action if the hardware requires it) or add an action to further configure the installed system.
Examples in Advanced Bare Metal cluster configuration show a few actions you might want to add.
Once you have made all your modifications, you can go ahead and create the cluster. The next section describes how Tinkerbell works during cluster creation to provision your Bare Metal machines and prepare them to join the EKS Anywhere cluster.
2 - Tinkerbell Concepts
NOTE: The Boots service has been renamed to Smee by the upstream Tinkerbell community. Any reference to Boots or Smee refer to the same service. The commands for the logs and expected pods mentioned in this doc are still the proper commands to run.
EKS Anywhere uses Tinkerbell to provision machines for a Bare Metal cluster. Understanding what Tinkerbell is and how it works with EKS Anywhere can help you take advantage of advanced provisioning features or overcome provisioning problems you encounter.
As someone deploying an EKS Anywhere cluster on Bare Metal, you have several opportunities to interact with Tinkerbell:
- Create a hardware CSV file: You are required to create a hardware CSV file that contains an entry for every physical machine you want to add at cluster creation time.
- Create an EKS Anywhere cluster: By modifying the Bare Metal configuration file used to create a cluster, you can change some Tinkerbell settings or add actions to define how the operating system on each machine is configured.
- Monitor provisioning: You can follow along with the Tinkerbell Overview in this page to monitor the progress of your hardware provisioning, as Tinkerbell finds machines and attempts to network boot, configure, and restart them.
When you run the command to create an EKS Anywhere Bare Metal cluster, a set of Tinkerbell components start up on the Admin machine. One of these components runs in a container on Docker (Boots), while other components run as either controllers or services in pods on the Kubernetes kind cluster that is started up on the Admin machine. Tinkerbell components include Boots, Hegel, Rufio, and Tink.
Tinkerbell Boots service (Smee service)
The Boots service runs in a single container to handle the DHCP service and network booting activities. In particular, Boots hands out IP addresses, serves iPXE binaries via HTTP and TFTP, delivers an iPXE script to the provisioned machines, and runs a syslog server.
Boots is different from the other Tinkerbell services because the DHCP service it runs must listen directly to layer 2 traffic. (The kind cluster running on the Admin machine doesn’t have the ability to have pods listening on layer 2 networks, which is why Boots is run directly on Docker instead, with host networking enabled.)
Because Boots is running as a container in Docker, you can see the output in the logs for the Boots container by running:
docker logs boots
From the logs output, you will see iPXE try to network boot each machine. If the process doesn’t get all the information it wants from the DHCP server, it will time out. You can see iPXE loading variables, loading a kernel and initramfs (via DHCP), then booting into that kernel and initramfs: in other words, you will see everything that happens with iPXE before it switches over to the kernel and initramfs. The kernel, initramfs, and all images retrieved later are obtained remotely over HTTP and HTTPS.
Tinkerbell Hegel, Rufio, and Tink components
After Boots comes up on Docker, a small Kubernetes kind cluster starts up on the Admin machine. Other Tinkerbell components run as pods on that kind cluster. Those components include:
- Hegel: Manages Tinkerbell’s metadata service. The Hegel service gets its metadata from the hardware specification stored in Kubernetes in the form of custom resources. The format that it serves is similar to an Ec2 metadata format.
- Rufio: Handles talking to BMCs (which manages things like starting and stopping systems with IPMI or Redfish). The Rufio Kubernetes controller sets things such as power state, persistent boot order. BMC authentication is managed with Kubernetes secrets.
- Tink: The Tink service consists of three components: Tink server, Tink controller, and Tink worker. The Tink controller manages hardware data, templates you want to execute, and the workflows that each target specific hardware you are provisioning. The Tink worker is a small binary that runs inside of HookOS and talks to the Tink server. The worker sends the Tink server its MAC address and asks the server for workflows to run. The Tink worker will then go through each action, one-by-one, and try to execute it.
To see those services and controllers running on the kind bootstrap cluster, type:
kubectl get pods -n eksa-system
NAME                                      READY STATUS    RESTARTS AGE
hegel-sbchp                               1/1   Running   0        3d
rufio-controller-manager-5dcc568c79-9kllz 1/1   Running   0        3d
tink-controller-manager-54dc786db6-tm2c5  1/1   Running   0        3d
tink-server-5c494445bc-986sl              1/1   Running   0        3d
Provisioning hardware with Tinkerbell
After you start up the cluster create process, the following is the general workflow that Tinkerbell performs to begin provisioning the bare metal machines and prepare them to become part of the EKS Anywhere target cluster. You can set up kubectl on the Admin machine to access the bootstrap cluster and follow along:
export KUBECONFIG=${PWD}/${CLUSTER_NAME}/generated/${CLUSTER_NAME}.kind.kubeconfig
Power up the nodes
Tinkerbell starts by finding a node from the hardware list (based on MAC address) and contacting it to identify a baseboard management job (job.bmc) that runs a set of baseboard management tasks (task.bmc).
To see that information, type:
kubectl get job.bmc -A
NAMESPACE    NAME                                           AGE
eksa-system  mycluster-md-0-1656099863422-vxvh2-provision   12m
kubectl get tasks.bmc -A
NAMESPACE    NAME                                                AGE
eksa-system  mycluster-md-0-1656099863422-vxh2-provision-task-0  55s
eksa-system  mycluster-md-0-1656099863422-vxh2-provision-task-1  51s
eksa-system  mycluster-md-0-1656099863422-vxh2-provision-task-2  47s
The following shows snippets from the tasks.bmc output that represent the three tasks: Power Off, enable network boot, and Power On.
kubectl describe tasks.bmc -n eksa-system mycluster-md-0-1656099863422-vxh2-provision-task-0
...
  Task:
    Power Action:  Off
Status:
  Completion Time:   2022-06-27T20:32:59Z
  Conditions:
    Status:    True
    Type:      Completed
kubectl describe tasks.bmc -n eksa-system mycluster-md-0-1656099863422-vxh2-provision-task-1
...
  Task:
    One Time Boot Device Action:
      Device:
        pxe
      Efi Boot:  true
Status:
  Completion Time:   2022-06-27T20:33:04Z
  Conditions:
    Status:    True
    Type:      Completed
kubectl describe tasks.bmc -n eksa-system mycluster-md-0-1656099863422-vxh2-provision-task-2
  Task:
    Power Action:  on
Status:
  Completion Time:   2022-06-27T20:33:10Z
  Conditions:
    Status:    True
    Type:      Completed
Rufio converts the baseboard management jobs into task objects, then goes ahead and executes each task. To see Rufio logs, type:
kubectl logs -n eksa-system rufio-controller-manager-5dcc568c79-9kllz | less
Network booting the nodes
Next the Boots service netboots the machine and begins streaming the HookOS (vmlinuz and initramfs) to the machine.
HookOS runs in memory and provides the installation environment.
To watch the Boots log messages as each node powers up, type:
docker logs boots
You can search the output for vmlinuz and initramfs to watch as the HookOS is downloaded and booted from memory on each machine.
Running workflows
Once the HookOS is up, Tinkerbell begins running the tasks and actions contained in the workflows. This is coordinated between the Tink worker, running in memory within the HookOS on the machine, and the Tink server on the kind cluster. To see the workflows being run, type the following:
kubectl get workflows.tinkerbell.org -n eksa-system
NAME                                TEMPLATE                            STATE
mycluster-md-0-1656099863422-vxh2   mycluster-md-0-1656099863422-vxh2   STATE_RUNNING
This shows the workflow for the first machine that is being provisioned.
Add -o yaml to see details of that workflow template:
kubectl get workflows.tinkerbell.org -n eksa-system -o yaml
...
status:
  state: STATE_RUNNING
  tasks:
  - actions
    - environment:
        COMPRESSED: "true"
        DEST_DISK: /dev/sda
        IMG_URL: https://anywhere-assets.eks.amazonaws.com/releases/bundles/11/artifacts/raw/1-22/bottlerocket-v1.22.10-eks-d-1-22-8-eks-a-11-amd64.img.gz
      image: public.ecr.aws/eks-anywhere/tinkerbell/actions/image2disk:6c0f0d437bde2c836d90b000312c8b25fa1b65e1-eks-a-15
      name: stream-image
      seconds: 35
      startedAt: "2022-06-27T20:37:39Z"
      status: STATE_SUCCESS
...
You can see that the first action in the workflow is to stream (stream-image) the operating system to the destination disk (DEST_DISK) on the machine.
In this example, the Bottlerocket operating system that will be copied to disk (/dev/sda) is being served from the location specified by IMG_URL.
The action was successful (STATE_SUCCESS) and it took 35 seconds.
Each action and its status is shown in this output for the whole workflow. To see details of the default actions for each supported operating system, see the Ubuntu TinkerbellTemplateConfig example and Bottlerocket TinkerbellTemplateConfig example.
In general, the actions include:
- Streaming the operating system image to disk on each machine.
- Configuring the network interfaces on each machine.
- Setting up the cloud-init or similar service to add users and otherwise configure the system.
- Identifying the data source to add to the system.
- Setting the kernel to pivot to the installed system (using kexec) or having the system reboot to bring up the installed system from disk.
If all goes well, you will see all actions set to STATE_SUCCESS, except for the kexec-image action. That should show as STATE_RUNNING for as long as the machine is running.
You can review the CAPT logs to see provisioning activity. For example, at the start of a new provisioning event, you would see something like the following:
kubectl logs -n capt-system capt-controller-manager-9f8b95b-frbq | less
..."Created BMCJob to get hardware ready for provisioning"...
You can follow this output to see the machine as it goes through the provisioning process.
After the node is initialized, completes all the Tinkerbell actions, and is booted into the installed operating system (Ubuntu or Bottlerocket), the new system starts cloud-init to do further configuration. At this point, the system will reach out to the Tinkerbell Hegel service to get its metadata.
If something goes wrong, viewing Hegel files can help you understand why a stuck system that has booted into Ubuntu or Bottlerocket has not joined the cluster yet. To see the Hegel logs, get the internal IP address for one of the new nodes. Then check for the names of Hegel logs and display the contents of one of those logs, searching for the IP address of the node:
kubectl get nodes -o wide
NAME        STATUS   ROLES                 AGE    VERSION               INTERNAL-IP    ...
eksa-da04   Ready    control-plane,master  9m5s   v1.22.10-eks-7dc61e8  10.80.30.23
kubectl get pods -n eksa-system | grep hegel
hegel-n7ngs
kubectl logs -n eksa-system hegel-n7ngs
..."Retrieved IP peer IP..."userIP":"10.80.30.23...
If the log shows you are getting requests from the node, the problem is not a cloud-init issue.
After the first machine successfully completes the workflow, each other machine repeats the same process until the initial set of machines is all up and running.
Tinkerbell moves to target cluster
Once the initial set of machines is up and the EKS Anywhere cluster is running, all the Tinkerbell services and components (including Boots) are moved to the new target cluster and run as pods on that cluster. Those services are deleted on the kind cluster on the Admin machine.
Reviewing the status
At this point, you can change your kubectl credentials to point at the new target cluster to get information about Tinkerbell services on the new cluster. For example:
export KUBECONFIG=${PWD}/${CLUSTER_NAME}/${CLUSTER_NAME}-eks-a-cluster.kubeconfig
First check that the Tinkerbell pods are all running by listing pods from the eksa-system namespace:
kubectl get pods -n eksa-system
NAME                                        READY   STATUS    RESTARTS   AGE
smee-5dc66b5d4-klhmj                       1/1     Running   0          3d
hegel-sbchp                                 1/1     Running   0          3d
rufio-controller-manager-5dcc568c79-9kllz   1/1     Running   0          3d
tink-controller-manager-54dc786db6-tm2c5    1/1     Running   0          3d
tink-server-5c494445bc-986sl                1/1     Running   0          3d
Next, check the list of Tinkerbell machines.
If all of the machines were provisioned successfully, you should see true under the READY column for each one.
kubectl get tinkerbellmachine -A
NAMESPACE    NAME                                                   CLUSTER    STATE  READY  INSTANCEID                          MACHINE
eksa-system  mycluster-control-plane-template-1656099863422-pqq2q   mycluster         true   tinkerbell://eksa-system/eksa-da04  mycluster-72p72
You can also check the machines themselves. Watch the PHASE change from Provisioning to Provisioned to Running. The Running phase indicates that the machine is now running as a node on the new cluster:
kubectl get machines -n eksa-system
NAME              CLUSTER    NODENAME    PROVIDERID                         PHASE    AGE  VERSION
mycluster-72p72   mycluster  eksa-da04   tinkerbell://eksa-system/eksa-da04 Running  7m25s   v1.22.10-eks-1-22-8
Once you have confirmed that all your machines are successfully running as nodes on the target cluster, there is not much for Tinkerbell to do. It stays around to continue running the DHCP service and to be available to add more machines to the cluster.
3 - Requirements for EKS Anywhere on Bare Metal
To run EKS Anywhere on Bare Metal, you need to meet the hardware and networking requirements described below.
Administrative machine
Set up an Administrative machine as described in Install EKS Anywhere.
Compute server requirements
The minimum number of physical machines needed to run EKS Anywhere on bare metal is 1. To configure EKS Anywhere to run on a single server, set controlPlaneConfiguration.count to 1, and omit workerNodeGroupConfigurations from your cluster configuration.
The recommended number of physical machines for production is at least:
- Control plane physical machines: 3
- Worker physical machines: 2
The compute hardware you need for your Bare Metal cluster must meet the following capacity requirements:
- vCPU: 2
- Memory: 8GB RAM
- Storage: 25GB
Operating system requirements
If you intend on using a non-Bottlerocket OS you must build it using image-builder. See the OS Management Artifacts
page for help building the OS.
Upgrade requirements
If you are running a standalone cluster with only one control plane node, you will need at least one additional, temporary machine for each control plane node grouping. For cluster with multiple control plane nodes, you can perform a rolling upgrade with or without an extra temporary machine. For worker node upgrades, you can perform a rolling upgrade with or without an extra temporary machine.
When upgrading without an extra machine, keep in mind that your control plane and your workload must be able to tolerate node unavailability. When upgrading with extra machine(s), you will need additional temporary machine(s) for each control plane and worker node grouping. Refer to Upgrade Bare Metal Cluster and Advanced configuration for upgrade rollout strategy .
NOTE: For single-node clusters that require an additional temporary machine for upgrading, if you don’t want to set up the extra hardware, you may recreate the cluster for upgrading and handle data recovery manually.
Network requirements
Each machine should include the following features:
-
Network Interface Cards: at least one NIC is required. For network/PXE boot mode, it must be capable of network booting. See Boot Modes for boot configuration options.
-
BMC integration (recommended): an IPMI or Redfish implementation (such a Dell iDRAC, RedFish-compatible, legacy or HP iLO) on the computer’s motherboard or on a separate expansion card. This feature is used to allow remote management of the machine, such as turning the machine on and off.
NOTE: BMC integration is not required for an EKS Anywhere cluster. However, without BMC integration, upgrades are not supported and you will have to physically turn machines off and on when appropriate.
Here are other network requirements:
-
For network/PXE boot mode (default): All EKS Anywhere machines, including the Admin, control plane and worker machines, must be on the same layer 2 network and have network connectivity to the BMC (IPMI, Redfish, and so on).
For ISO boot mode: Layer 2 network connectivity is not required. Machines only need Layer 3 (routable) connectivity to the management cluster and BMC access for virtual media mounting. See Boot Modes for details on boot mode options.
-
For network/PXE boot mode: You must be able to run DHCP on the control plane/worker machine network. DHCP is not required for ISO boot mode.
NOTE: If you have another DHCP service running on the network, you need to prevent it from interfering with the EKS Anywhere DHCP service. You can do that by configuring the other DHCP service to explicitly block all MAC addresses and exclude all IP addresses that you plan to use with your EKS Anywhere clusters.
Verifying Layer 2 Connectivity (PXE boot mode)
If machines are not PXE booting, verify layer 2 connectivity between the Admin machine and the machines being provisioned. DHCP requests from the machines should appear in the Boots (Smee) logs.
To verify DHCP traffic is reaching the Admin machine, run on the Admin machine:
sudo tcpdump -i any port 67 or port 68
When a machine attempts to PXE boot, you should see DHCP DISCOVER/REQUEST packets. If no packets appear, there is a layer 2 network connectivity issue (VLAN misconfiguration, switch port settings, etc.).
-
If you have not followed the steps for airgapped environments , then the administrative machine and the target workload environment need network access (TCP/443) to:
-
public.ecr.aws -
anywhere-assets.eks.amazonaws.com: to download the EKS Anywhere binaries, manifests and OVAs -
distro.eks.amazonaws.com: to download EKS Distro binaries and manifests -
d2glxqk2uabbnd.cloudfront.net: for EKS Anywhere and EKS Distro ECR container images -
api.ecr.us-west-2.amazonaws.com: for EKS Anywhere package authentication matching your region) -
d5l0dvt14r5h8.cloudfront.net: for EKS Anywhere package ECR container images -
api.github.com: only if GitOps is enabled -
sts.amazonaws.com: only if AWS IAM Authenticator is enabled
-
-
Two IP addresses routable from the cluster, but excluded from DHCP offering:
Understanding the Two Required IPs
Control Plane Endpoint IP (
controlPlaneConfiguration.endpoint.host):- Virtual IP for the Kubernetes API server
- Managed by kube-vip on control plane nodes
- Used by kubectl and all Kubernetes clients
- Must be reachable from admin machine and all cluster nodes
Tinkerbell IP (
tinkerbellIP):- Virtual IP for Tinkerbell stack services (Smee, Tink-server, Hegel)
- Used during node provisioning and lifecycle operations
- Must be reachable from all machines being provisioned
- On workload clusters, should be the same as the management cluster’s Tinkerbell IP
Both IPs must be:
- Outside the DHCP range
- Routable from the cluster subnet
- Not assigned to any physical interface
Below are some suggestions to ensure that these IP addresses are never handed out by your DHCP server. You may need to contact your network engineer to manage these addresses:
-
Pick IP addresses reachable from the cluster subnet that are excluded from the DHCP range or
-
Create an IP reservation for these addresses on your DHCP server. This is usually accomplished by adding a dummy mapping of this IP address to a non-existent mac address.
-
Ports must be open to the Admin machine and cluster machines as described in the Cluster Networking documentation .
Validated hardware
Through extensive testing in a variety of on-premises environments, we have validated Amazon EKS Anywhere on bare metal works without modification on most modern hardware that meets the above requirements. Compatibility is determined by the host operating system selected when Building Node Images . Installation may require you to Customize HookOS for EKS Anywhere on Bare Metal to add drivers, or modify configuration specific to your environment. Bottlerocket support for bare metal was deprecated with the EKS Anywhere v0.19 release.
4 - Preparing Bare Metal for EKS Anywhere
After gathering hardware described in Bare Metal Requirements , you need to prepare the hardware and create a CSV file describing that hardware.
Prepare hardware
To prepare your computer hardware for EKS Anywhere, you need to connect your computer hardware and do some configuration. Once the hardware is in place, you need to:
- Obtain IP and MAC addresses for your machines' NICs.
- Obtain IP addresses for your machines' BMC interfaces.
- Obtain the gateway address for your network to reach the Internet.
- Obtain the IP address for your DNS servers.
- Make sure the following settings are in place:
- UEFI is enabled on all target cluster machines, unless you are provisioning RHEL systems. Enable legacy BIOS on any RHEL machines.
- Netboot (PXE or HTTP) boot is enabled for the NIC on each machine for which you provided the MAC address. This is the interface on which the operating system will be provisioned.
- IPMI over LAN and/or Redfish is enabled on all BMC interfaces.
- Go to the BMC settings for each machine and set the IP address (bmc_ip), username (bmc_username), and password (bmc_password) to use later in the CSV file.
Prepare hardware inventory
Create a CSV file to provide information about all physical machines that you are ready to add to your target Bare Metal cluster.
Hardware CSV vs kubectl: When to Use Each
Hardware CSV creates the initial hardware catalog (Hardware objects, BMC Machines, credentials).
Use hardware CSV for:
- Initial cluster creation
- Adding new hardware when insufficient hardware available for scaling/upgrades
Use kubectl for hardware management:
- Adding hardware after initial creation:
eksctl anywhere generate hardware -z hardware.csv > hardware.yaml && kubectl apply -f hardware.yaml
For cluster operations (scaling, upgrades):
- Update
countin cluster specification - System automatically selects from available hardware (those without
ownerNamelabel) - If insufficient hardware: Add more via hardware CSV with
--hardware-csvflag or kubectl apply, then perform operation
Do NOT use CSV for:
- Removing hardware from cluster (use CAPI machine delete annotations)
- Trying to force specific hardware selection during operations (system auto-selects based on availability)
for operational examples.
NOTE: While using kubectl, GitOps and Terraform for workload cluster creation, please make sure to refer to this section .
The following is an example of an EKS Anywhere Bare Metal hardware CSV file:
hostname,bmc_ip,bmc_username,bmc_password,mac,ip_address,netmask,gateway,nameservers,labels,disk
eksa-cp01,10.10.44.1,root,PrZ8W93i,CC:48:3A:00:00:01,10.10.50.2,255.255.254.0,10.10.50.1,8.8.8.8|8.8.4.4,type=cp,/dev/sda
eksa-cp02,10.10.44.2,root,Me9xQf93,CC:48:3A:00:00:02,10.10.50.3,255.255.254.0,10.10.50.1,8.8.8.8|8.8.4.4,type=cp,/dev/sda
eksa-cp03,10.10.44.3,root,Z8x2M6hl,CC:48:3A:00:00:03,10.10.50.4,255.255.254.0,10.10.50.1,8.8.8.8|8.8.4.4,type=cp,/dev/sda
eksa-wk01,10.10.44.4,root,B398xRTp,CC:48:3A:00:00:04,10.10.50.5,255.255.254.0,10.10.50.1,8.8.8.8|8.8.4.4,type=worker,/dev/sda
eksa-wk02,10.10.44.5,root,w7EenR94,CC:48:3A:00:00:05,10.10.50.6,255.255.254.0,10.10.50.1,8.8.8.8|8.8.4.4,type=worker,/dev/sda
The CSV file is a comma-separated list of values in a plain text file, holding information about the physical machines in the datacenter that are intended to be a part of the cluster creation process. Each line represents a physical machine (not a virtual machine).
The following sections describe each value.
hostname
The hostname assigned to the machine.
bmc_ip (optional)
The IP address assigned to the BMC interface on the machine.
bmc_username (optional)
The username assigned to the BMC interface on the machine.
bmc_password (optional)
The password associated with the bmc_username assigned to the BMC interface on the machine.
mac
The MAC address of the network interface card (NIC) that provides access to the host computer.
ip_address
The IP address providing access to the host computer.
netmask
The netmask associated with the ip_address value.
In the example above, a /23 subnet mask is used, allowing you to use up to 510 IP addresses in that range.
gateway
IP address of the interface that provides access (the gateway) to the Internet.
nameservers
The IP address of the server that you want to provide DNS service to the cluster.
labels
The optional labels field can consist of a key/value pair to use in conjunction with the hardwareSelector field when you set up your Bare Metal configuration.
The key/value pair is connected with an equal (=) sign.
For example, a TinkerbellMachineConfig with a hardwareSelector containing type: cp will match entries in the CSV containing type=cp in its label definition.
disk
The device name of the disk on which the operating system will be installed.
For example, it could be /dev/sda for the first SCSI disk or /dev/nvme0n1 for the first NVME storage device.
vlan_id (optional)
The VLAN ID to assign to the machine’s network interface. Use this field when machines need to be provisioned on a specific VLAN.
Hardware Management
Hardware Objects and Spare Nodes
EKS Anywhere creates Kubernetes hardware objects for all entries in the hardware.csv file, regardless of the node count specified in your cluster configuration. Any machines in the CSV file that exceed the count specified in your cluster configuration are automatically treated as spare nodes.
For example, if your cluster configuration specifies:
controlPlaneConfiguration:
  count: 1
workerNodeGroupConfigurations:
- count: 1
But your hardware.csv contains 3 control plane entries and 3 worker entries:
cplane-0,XX:XX:XX:XX:XX:01,10.162.10.131,...
cplane-1,XX:XX:XX:XX:XX:02,10.162.10.132,...
cplane-2,XX:XX:XX:XX:XX:03,10.162.10.133,...
worker-0,XX:XX:XX:XX:XX:04,10.162.10.134,...
worker-1,XX:XX:XX:XX:XX:05,10.162.10.135,...
worker-2,XX:XX:XX:XX:XX:06,10.162.10.136,...
EKS Anywhere will create Hardware objects for all 6 machines, but initially only use cplane-0 and worker-0 for the cluster. The remaining machines (cplane-1, cplane-2, worker-1, and worker-2) will be treated as spare nodes.
Important Considerations for Hardware Lifecycle Management
During operations like rolling upgrades, EKS Anywhere’s selection of spare nodes is not deterministic. Any of the available spare nodes could be selected for use during maintenance operations. If you repurpose machines that were previously part of your EKS Anywhere cluster but still have hardware objects in the system:
- During subsequent cluster operations (like upgrades), these repurposed machines could be selected as spare nodes
- If BMC credentials are still valid, the machine may be automatically re-imaged, potentially destroying any workloads running on the repurposed machine
Best Practices for Hardware Management
To avoid unintended consequences when managing your hardware:
- Align CSV with Intended Use: Ensure your hardware.csv only contains entries for machines intended for immediate cluster use or as designated spares
- Clean Up Hardware Objects: Regularly audit and remove Hardware objects for machines that have been repurposed for other uses
- Manage BMC Credentials: Remove or rotate BMC credentials for hardware that has been repurposed to prevent unintended re-imaging
- Hardware Inventory: Maintain an up-to-date inventory of which physical machines are currently part of the cluster, designated as spares, or repurposed for other workloads
5 - Create Bare Metal cluster
EKS Anywhere supports a Bare Metal provider for EKS Anywhere deployments. EKS Anywhere allows you to provision and manage Kubernetes clusters based on Amazon EKS software on your own infrastructure.
This document walks you through setting up EKS Anywhere on Bare Metal as a standalone, self-managed cluster or combined set of management/workload clusters. See Cluster topologies for details.
Note: Before you create your cluster, you have the option of validating the EKS Anywhere bundle manifest container images by following instructions in the Verify Cluster Images page.
Prerequisite checklist
EKS Anywhere needs:
- To be run on an Admin machine that has certain machine requirements .
- To run a cluster in an airgapped environment (optional)
- To meet networking requirements
- To meet certain Bare Metal requirements for hardware and network configuration.
- To have some Bare Metal preparation be in place before creating an EKS Anywhere cluster.
Steps
The following steps are divided into two sections:
- Create an initial cluster (used as a management or self-managed cluster)
- Create zero or more workload clusters from the management cluster
Create an initial cluster
Follow these steps to create an EKS Anywhere cluster that can be used either as a management cluster or as a self-managed cluster (for running workloads itself).
-
Optional Configuration
Set License Environment Variable
Add a license to any cluster for which you want to receive paid support. If you are creating a licensed cluster, set and export the license variable (see License cluster if you are licensing an existing cluster):
export EKSA_LICENSE='my-license-here'After you have created your
eksa-mgmt-cluster.yamland set your credential environment variables, you will be ready to create the cluster.Configure Curated Packages
The Amazon EKS Anywhere Curated Packages are only available to customers with the Amazon EKS Anywhere Enterprise Subscription. To request a free trial, talk to your Amazon representative or connect with one here . Cluster creation will succeed if authentication is not set up, but some warnings may be generated. Detailed package configurations can be found here.
If you are going to use packages, set up authentication. These credentials should have limited capabilities:
export EKSA_AWS_ACCESS_KEY_ID="your*access*id" export EKSA_AWS_SECRET_ACCESS_KEY="your*secret*key" export EKSA_AWS_REGION="us-west-2" -
Set an environment variable for your cluster name:
export CLUSTER_NAME=mgmt -
Generate a cluster config file for your Bare Metal provider (using tinkerbell as the provider type).
eksctl anywhere generate clusterconfig $CLUSTER_NAME --provider tinkerbell > eksa-mgmt-cluster.yaml -
Modify the cluster config (
eksa-mgmt-cluster.yaml) by referring to the Bare Metal configuration reference documentation. -
Create the cluster, using the
hardware.csvfile you made in Bare Metal preparation .For a regular cluster create (with internet access), type the following:
eksctl anywhere create cluster \
   --hardware-csv hardware.csv \
   -f eksa-mgmt-cluster.yaml \
   # --install-packages packages.yaml \ # uncomment to install curated packages at cluster creation
For an airgapped cluster create, follow Preparation for airgapped deployments instructions, then type the following:
eksctl anywhere create cluster --hardware-csv hardware.csv \ -f $CLUSTER_NAME.yaml \ --bundles-override ./eks-anywhere-downloads/bundle-release.yaml \ # --install-packages packages.yaml \ # uncomment to install curated packages at cluster creation -
Once the cluster is created you can use it with the generated
KUBECONFIGfile in your local directory:export KUBECONFIG=${PWD}/${CLUSTER_NAME}/${CLUSTER_NAME}-eks-a-cluster.kubeconfig -
Check the cluster nodes:
To check that the cluster completed, list the machines to see the control plane and worker nodes:
kubectl get machines -AExample command output:
NAMESPACE NAME CLUSTER NODENAME PROVIDERID PHASE AGE VERSION eksa-system mgmt-47zj8 mgmt eksa-node01 tinkerbell://eksa-system/eksa-node01 Running 1h v1.23.7-eks-1-23-4 eksa-system mgmt-md-0-7f79df46f-wlp7w mgmt eksa-node02 tinkerbell://eksa-system/eksa-node02 Running 1h v1.23.7-eks-1-23-4 ... -
Check the cluster:
You can now use the cluster as you would any Kubernetes cluster. To try it out, run the test application with:
export CLUSTER_NAME=mgmt
export KUBECONFIG=${PWD}/${CLUSTER_NAME}/${CLUSTER_NAME}-eks-a-cluster.kubeconfig
kubectl apply -f "https://anywhere.eks.amazonaws.com/manifests/hello-eks-a.yaml"
Verify the test application in Deploy test workload.
Create separate workload clusters
Follow these steps if you want to use your initial cluster to create and manage separate workload clusters.
-
Set License Environment Variable (Optional)
Add a license to any cluster for which you want to receive paid support. If you are creating a licensed cluster, set and export the license variable (see License cluster if you are licensing an existing cluster):
export EKSA_LICENSE='my-license-here' -
Generate a workload cluster config:
CLUSTER_NAME=w01
eksctl anywhere generate clusterconfig $CLUSTER_NAME \
   --provider tinkerbell > eksa-w01-cluster.yaml
Refer to the initial config described earlier for the required and optional settings. Ensure workload cluster object names (
Cluster,TinkerbellDatacenterConfig,TinkerbellMachineConfig, etc.) are distinct from management cluster object names. Keep thetinkerbellIPof workload cluster the same astinkerbellIPof the management cluster. -
Be sure to set the
managementClusterfield to identify the name of the management cluster.For example, the management cluster, mgmt is defined for our workload cluster w01 as follows:
apiVersion: anywhere.eks.amazonaws.com/v1alpha1 kind: Cluster metadata: name: w01 spec: managementCluster: name: mgmt -
Create a workload cluster
To create a new workload cluster from your management cluster run this command, identifying:
- The workload cluster YAML file
- The initial cluster’s credentials (this causes the workload cluster to be managed from the management cluster)
Create a workload cluster in one of the following ways:
-
eksctl CLI: To create a workload cluster with eksctl, run:
eksctl anywhere create cluster \
    -f eksa-w01-cluster.yaml  \
    --kubeconfig mgmt/mgmt-eks-a-cluster.kubeconfig \
    # --install-packages packages.yaml \ # uncomment to install curated packages at cluster creation
    # --hardware-csv <hardware.csv> \ # uncomment to add more hardware
    # --bundles-override ./eks-anywhere-downloads/bundle-release.yaml \ # uncomment for airgapped install
As noted earlier, adding the
--kubeconfigoption tellseksctlto use the management cluster identified by that kubeconfig file to create a different workload cluster. -
kubectl CLI: The cluster lifecycle feature lets you use kubectl to talk to the Kubernetes API to create a workload cluster. kubectl can also be used for management cluster operations (scaling, Kubernetes version upgrades), except when upgrading the EKS Anywhere CLI version which requires
eksctl anywhere upgrade. To use kubectl, run:kubectl apply -f eksa-w01-cluster.yaml --kubeconfig mgmt/mgmt-eks-a-cluster.kubeconfigTo check the state of a cluster managed with the cluster lifecyle feature, use
kubectlto show the cluster object with its status.The
statusfield on the cluster object field holds information about the current state of the cluster.kubectl get clusters w01 -o yamlThe cluster has been fully upgraded once the status of the
Readycondition is markedTrue. See the cluster status guide for more information. -
GitOps: See Manage separate workload clusters with GitOps
-
Terraform: See Manage separate workload clusters with Terraform
NOTE: For kubectl, GitOps and Terraform:
- The baremetal controller does not support scaling upgrades and Kubernetes version upgrades in the same request.
- While creating a new workload cluster if you need to add additional machines for the target workload cluster, run:
eksctl anywhere generate hardware -z updated-hardware.csv > updated-hardware.yaml kubectl apply -f updated-hardware.yaml - For creating multiple workload clusters, it is essential that the hardware labels and selectors defined for a given workload cluster are unique to that workload cluster. For instance, for an EKS Anywhere cluster named
eksa-workload1, the hardware that is assigned for this cluster should have labels that are only going to be used for this cluster liketype=eksa-workload1-cpandtype=eksa-workload1-worker. Another workload cluster namedeksa-workload2can have labels liketype=eksa-workload2-cpandtype=eksa-workload2-worker. Please note that even though labels can be arbitrary, they need to be unique for each workload cluster. Not specifying unique cluster labels can cause cluster creations to behave in unexpected ways which may lead to unsuccessful creations and unstable clusters. See the hardware selectors section for more information
-
Check the workload cluster:
You can now use the workload cluster as you would any Kubernetes cluster. Change your credentials to point to the new workload cluster (for example,
mgmt-w01), then run the test application with:export CLUSTER_NAME=mgmt-w01 export KUBECONFIG=${PWD}/${CLUSTER_NAME}/${CLUSTER_NAME}-eks-a-cluster.kubeconfig kubectl apply -f "https://anywhere.eks.amazonaws.com/manifests/hello-eks-a.yaml"Verify the test application in the deploy test application section.
-
Add more workload clusters:
To add more workload clusters, go through the same steps for creating the initial workload, copying the config file to a new name (such as
eksa-w02-cluster.yaml), modifying resource names, and running the create cluster command again.
Next steps:
-
See the Cluster management section for more information on common operational tasks like deleting the cluster.
-
See the Package management section for more information on post-creation curated packages installation.
6 - Configure for Bare Metal
This is a generic template with detailed descriptions below for reference. The following additional optional configuration can also be included:
- CNI
- Host OS Config
- Proxy
- Gitops
- IAM Authenticator
- OIDC
- Registry Mirror
- Machine Health Checks
- API Server Extra Args
To generate your own cluster configuration, follow instructions from the Create Bare Metal cluster section and modify it using descriptions below. For information on how to add cluster configuration settings to this file for advanced node configuration, see Advanced Bare Metal cluster configuration .
NOTE: Bare Metal cluster creation with RHEL 9 raw OS images requires advanced cluster configurations to be set. To create Bare Metal RHEL 9 clusters, modify the cluster configurations using descriptions below and follow Advanced Bare Metal cluster configuration .
apiVersion: anywhere.eks.amazonaws.com/v1alpha1
kind: Cluster
metadata:
  name: my-cluster-name
spec:
  clusterNetwork:
    cniConfig:
      cilium: {}
    pods:
      cidrBlocks:
      - 192.168.0.0/16
    services:
      cidrBlocks:
      - 10.96.0.0/12
  controlPlaneConfiguration:
    count: 1
    endpoint:
      host: "<Control Plane Endpoint IP>"
    machineGroupRef:
      kind: TinkerbellMachineConfig
      name: my-cluster-name-cp
  datacenterRef:
    kind: TinkerbellDatacenterConfig
    name: my-cluster-name
  kubernetesVersion: "1.35"
  managementCluster:
    name: my-cluster-name
  workerNodeGroupConfigurations:
  - count: 1
    machineGroupRef:
      kind: TinkerbellMachineConfig
      name: my-cluster-name
    name: md-0

---
apiVersion: anywhere.eks.amazonaws.com/v1alpha1
kind: TinkerbellDatacenterConfig
metadata:
  name: my-cluster-name
spec:
  tinkerbellIP: "<Tinkerbell IP>"

---
apiVersion: anywhere.eks.amazonaws.com/v1alpha1
kind: TinkerbellMachineConfig
metadata:
  name: my-cluster-name-cp
spec:
  hardwareSelector: {}
  osFamily: ubuntu
  templateRef: {}
  users:
  - name: ec2-user
    sshAuthorizedKeys:
    - ssh-rsa AAAAB3NzaC1yc2... jwjones@833efcab1482.home.example.com

---
apiVersion: anywhere.eks.amazonaws.com/v1alpha1
kind: TinkerbellMachineConfig
metadata:
  name: my-cluster-name
spec:
  hardwareSelector: {}
  osFamily: ubuntu
  templateRef:
    kind: TinkerbellTemplateConfig
    name: my-cluster-name
  users:
  - name: ec2-user
    sshAuthorizedKeys:
    - ssh-rsa AAAAB3NzaC1yc2... jwjones@833efcab1482.home.example.com
Cluster Fields
name (required)
Name of your cluster (my-cluster-name in this example).
clusterNetwork (required)
Network configuration.
clusterNetwork.cniConfig (required)
CNI plugin configuration. Supports cilium.
clusterNetwork.cniConfig.cilium.policyEnforcementMode (optional)
Optionally specify a policyEnforcementMode of default, always or never.
clusterNetwork.cniConfig.cilium.egressMasqueradeInterfaces (optional)
Optionally specify a network interface name or interface prefix used for masquerading. See EgressMasqueradeInterfaces option.
clusterNetwork.cniConfig.cilium.skipUpgrade (optional)
When true, skip Cilium maintenance during upgrades. Also see Use a custom CNI.
clusterNetwork.cniConfig.cilium.routingMode (optional)
Optionally specify the routing mode. Accepts default and direct. Also see RoutingMode
option.
clusterNetwork.cniConfig.cilium.ipv4NativeRoutingCIDR (optional)
Optionally specify the CIDR to use when RoutingMode is set to direct. When specified, Cilium assumes networking for this CIDR is preconfigured and hands traffic destined for that range to the Linux network stack without applying any SNAT.
clusterNetwork.cniConfig.cilium.ipv6NativeRoutingCIDR (optional)
Optionally specify the IPv6 CIDR to use when RoutingMode is set to direct. When specified, Cilium assumes networking for this CIDR is preconfigured and hands traffic destined for that range to the Linux network stack without applying any SNAT.
clusterNetwork.cniConfig.cilium.cniExclusive (optional)
Controls whether Cilium should remove other CNI configuration files. When true (default), Cilium removes other CNI configs; when false, it leaves them alone. For more information, see CNI Exclusive Mode configuration.
clusterNetwork.pods.cidrBlocks[0] (required)
The pod subnet specified in CIDR notation. Only 1 pod CIDR block is permitted. The CIDR block should not conflict with the host or service network ranges.
clusterNetwork.services.cidrBlocks[0] (required)
The service subnet specified in CIDR notation. Only 1 service CIDR block is permitted. This CIDR block should not conflict with the host or pod network ranges.
clusterNetwork.dns.resolvConf.path (optional)
File path to a file containing a custom DNS resolver configuration.
controlPlaneConfiguration (required)
Specific control plane configuration for your Kubernetes cluster.
controlPlaneConfiguration.count (required)
Number of control plane nodes. This number needs to be odd to maintain ETCD quorum.
controlPlaneConfiguration.endpoint.host (required)
A unique IP you want to use for the control plane in your EKS Anywhere cluster. Choose an IP in your network range that does not conflict with other machines.
NOTE: This IP should be outside the network DHCP range as it is a floating IP that gets assigned to one of the control plane nodes for kube-apiserver loadbalancing.
controlPlaneConfiguration.machineGroupRef (required)
Refers to the Kubernetes object with Tinkerbell-specific configuration for your nodes. See TinkerbellMachineConfig Fields below.
controlPlaneConfiguration.taints (optional)
A list of taints to apply to the control plane nodes of the cluster.
Replaces the default control plane taint (For k8s versions prior to 1.24, node-role.kubernetes.io/master. For k8s versions 1.24+, node-role.kubernetes.io/control-plane). The default control plane components will tolerate the provided taints.
NOTE: Taints are immutable for bare metal clusters and cannot be modified after cluster creation.
NOTE: The taints provided will be used instead of the default control plane taint. Any pods that you run on the control plane nodes must tolerate the taints you provide in the control plane configuration.
controlPlaneConfiguration.labels (optional)
A list of labels to apply to the control plane nodes of the cluster. This is in addition to the labels that EKS Anywhere will add by default.
NOTE: Labels are immutable for bare metal clusters and cannot be modified after cluster creation.
controlPlaneConfiguration.upgradeRolloutStrategy (optional)
Configuration parameters for upgrade strategy.
controlPlaneConfiguration.upgradeRolloutStrategy.type (optional)
Default: RollingUpdate
Type of rollout strategy. Supported values: RollingUpdate,InPlace.
NOTE: The upgrade rollout strategy type must be the same for all control plane and worker nodes.
controlPlaneConfiguration.upgradeRolloutStrategy.rollingUpdate (optional)
Configuration parameters for customizing rolling upgrade behavior.
NOTE: The rolling update parameters can only be configured if
upgradeRolloutStrategy.typeisRollingUpdate.
controlPlaneConfiguration.upgradeRolloutStrategy.rollingUpdate.maxSurge (optional)
Default: 1
This can not be 0 if maxUnavailable is 0.
The maximum number of machines that can be scheduled above the desired number of machines.
Example: When this is set to n, the new worker node group can be scaled up immediately by n when the rolling upgrade starts. Total number of machines in the cluster (old + new) never exceeds (desired number of machines + n). Once scale down happens and old machines are brought down, the new worker node group can be scaled up further ensuring that the total number of machines running at any time does not exceed the desired number of machines + n.
controlPlaneConfiguration.skipLoadBalancerDeployment (optional)
Optional field to skip deploying the control plane load balancer. Make sure your infrastructure can handle control plane load balancing when you set this field to true. In most cases, you should not set this field to true.
datacenterRef (required)
Refers to the Kubernetes object with Tinkerbell-specific configuration. See TinkerbellDatacenterConfig Fields below.
kubernetesVersion (required)
The Kubernetes version you want to use for your cluster. The Kubernetes versions supported by your EKS Anywhere version are tabulated in this section.
Known issue related to Kubernetes versions whose minor version is a multiple of 10
managementCluster (required)
Identifies the name of the management cluster. If your cluster spec is for a standalone or management cluster, this value is the same as the cluster name.
workerNodeGroupConfigurations (optional)
This takes in a list of node groups that you can define for your workers.
You can omit workerNodeGroupConfigurations when creating Bare Metal clusters. If you omit workerNodeGroupConfigurations, control plane nodes will not be tainted and all pods will run on the control plane nodes. This mechanism can be used to deploy Bare Metal clusters on a single server. You can also run multi-node Bare Metal clusters without workerNodeGroupConfigurations.
NOTE: Empty
workerNodeGroupConfigurationsis not supported when Kubernetes version <= 1.21.
workerNodeGroupConfigurations[*].count (optional)
Number of worker nodes. (default: 1) It will be ignored if the cluster autoscaler curated package
is installed and autoscalingConfiguration is used to specify the desired range of replicas.
Refers to troubleshooting machine health check remediation not allowed and choose a sufficient number to allow machine health check remediation.
workerNodeGroupConfigurations[*].machineGroupRef (required)
Refers to the Kubernetes object with Tinkerbell-specific configuration for your nodes. See TinkerbellMachineConfig Fields below.
workerNodeGroupConfigurations[*].name (required)
Name of the worker node group (default: md-0)
workerNodeGroupConfigurations[*].autoscalingConfiguration (optional)
Configuration parameters for Cluster Autoscaler.
NOTE: Autoscaling configuration is not supported when using the
InPlaceupgrade rollout strategy.
workerNodeGroupConfigurations[*].autoscalingConfiguration.minCount (optional)
Minimum number of nodes for this node group’s autoscaling configuration.
workerNodeGroupConfigurations[*].autoscalingConfiguration.maxCount (optional)
Maximum number of nodes for this node group’s autoscaling configuration.
workerNodeGroupConfigurations[*].taints (optional)
A list of taints to apply to the nodes in the worker node group.
NOTE: Taints are immutable for bare metal clusters and cannot be modified after cluster creation.
At least one node group must not have NoSchedule or NoExecute taints applied to it.
workerNodeGroupConfigurations[*].labels (optional)
A list of labels to apply to the nodes in the worker node group. This is in addition to the labels that EKS Anywhere will add by default.
NOTE: Labels are immutable for bare metal clusters and cannot be modified after cluster creation.
workerNodeGroupConfigurations[*].kubernetesVersion (optional)
The Kubernetes version you want to use for this worker node group. The Kubernetes versions supported by your EKS Anywhere version are tabulated in this section.
Known issue related to Kubernetes versions whose minor version is a multiple of 10
Must be less than or equal to the cluster kubernetesVersion defined at the root level of the cluster spec. The worker node Kubernetes version must be no more than two minor Kubernetes versions lower than the cluster control plane’s Kubernetes version. Removing workerNodeGroupConfiguration.kubernetesVersion will trigger an upgrade of the node group to the kubernetesVersion defined at the root level of the cluster spec.
workerNodeGroupConfigurations[*].upgradeRolloutStrategy (optional)
Configuration parameters for upgrade strategy.
workerNodeGroupConfigurations[*].upgradeRolloutStrategy.type (optional)
Default: RollingUpdate
Type of rollout strategy. Supported values: RollingUpdate,InPlace.
NOTE: The upgrade rollout strategy type must be the same for all control plane and worker nodes.
workerNodeGroupConfigurations[*].upgradeRolloutStrategy.rollingUpdate (optional)
Configuration parameters for customizing rolling upgrade behavior.
NOTE: The rolling update parameters can only be configured if
upgradeRolloutStrategy.typeisRollingUpdate.
workerNodeGroupConfigurations[*].upgradeRolloutStrategy.rollingUpdate.maxSurge (optional)
Default: 1
This can not be 0 if maxUnavailable is 0.
The maximum number of machines that can be scheduled above the desired number of machines.
Example: When this is set to n, the new worker node group can be scaled up immediately by n when the rolling upgrade starts. Total number of machines in the cluster (old + new) never exceeds (desired number of machines + n). Once scale down happens and old machines are brought down, the new worker node group can be scaled up further ensuring that the total number of machines running at any time does not exceed the desired number of machines + n.
workerNodeGroupConfigurations[*].upgradeRolloutStrategy.rollingUpdate.maxUnavailable (optional)
Default: 0
This can not be 0 if MaxSurge is 0.
The maximum number of machines that can be unavailable during the upgrade.
Example: When this is set to n, the old worker node group can be scaled down by n machines immediately when the rolling upgrade starts. Once new machines are ready, old worker node group can be scaled down further, followed by scaling up the new worker node group, ensuring that the total number of machines unavailable at all times during the upgrade never falls below n.
TinkerbellDatacenterConfig Fields
tinkerbellIP (required)
Required field to identify the IP address of the Tinkerbell service. This IP address must be a unique IP in the network range that does not conflict with other IPs. Once the Tinkerbell services move from the Admin machine to run on the target cluster, this IP address makes it possible for the stack to be used for future provisioning needs. When separate management and workload clusters are supported in Bare Metal, the IP address becomes a necessity.
osImageURL (required)
Required field to set the operating system. In order to use Ubuntu or RHEL see building baremetal node images
. This field is also useful if you want to provide a customized operating system image or simply host the standard image locally. To upgrade a node or group of nodes to a new operating system version (ie. RHEL 8.7 to RHEL 8.8), modify this field to point to the new operating system image URL and run upgrade cluster command
.
The osImageURL must contain the Cluster.Spec.KubernetesVersion or Cluster.Spec.WorkerNodeGroupConfiguration[].KubernetesVersion version (in case of modular upgrade). For example, if the Kubernetes version is 1.35, the osImageURL name should include 1.35, 1_35, 1-35 or 135.
NOTE: osImageURL field cannot be set both in the
TinkerbellDatacenterConfigandTinkerbellMachineConfigobjects. If this value is set forTinkerbellDatacenterConfig, osImageURL has to be set to empty string""for all theTinkerbellMachineConfigs.
hookImagesURLPath (optional)
Optional field to replace the HookOS image. This field is useful if you want to provide a customized HookOS image or simply host the standard image locally. See Artifacts for details.
isoBoot (optional)
Optional field (boolean) to enable the ISO boot mode. Use this field to enable ISO mounting and boot for OS installation. See Boot Modes for details.
hookIsoURL (optional)
Optional field (string URL) to override the default AWS hosted location for the HookOS ISO. Use this field to host the HookOS ISO locally. See Boot Modes for details.
Important: HTTP Server Requirements for Hosting HookOS
When hosting HookOS images locally, your HTTP server must support HTTP Range requests (RFC 7233). BMC virtual media uses Range requests to stream the ISO in chunks.
Servers that work: Apache, nginx, or any server that returns 206 Partial Content for Range requests.
Servers that do NOT work: Python’s built-in python3 -m http.server (returns 200 OK for Range requests, ignoring the Range header).
If ISO boot fails with no clear error, verify your server supports Range requests:
curl -I -H "Range: bytes=0-1000" http://your-server/hook.iso
# Should return: HTTP/1.1 206 Partial Content
# NOT: HTTP/1.1 200 OK
Example TinkerbellDatacenterConfig.spec
spec:
  tinkerbellIP: "192.168.0.10"                                          # Available, routable IP
  osImageURL: "http://my-web-server/ubuntu-v1.23.7-eks-a-12-amd64.gz"   # Full URL to the OS Image hosted locally
  hookImagesURLPath: "http://my-web-server/hook"                        # Path to the hook images. This path must contain vmlinuz-x86_64 and initramfs-x86_64
  isoBoot: false                                                        # Set to true to enable the ISO boot mode
  hookIsoURL: "http://my-web-server/hook-x86_64-efi-initrd.iso"         # Full URL to the HookOS ISO image hosted locally
This is the folder structure for my-web-server:
my-web-server
├── hook
│   ├── initramfs-x86_64
│   └── vmlinuz-x86_64
├── ubuntu-v1.23.7-eks-a-12-amd64.gz
└── hook-x86_64-efi-initrd.iso
skipLoadBalancerDeployment (optional)
Optional field to skip deploying the default load balancer for Tinkerbell stack.
EKS Anywhere for Bare Metal uses kube-vip load balancer by default to expose the Tinkerbell stack externally.
You can disable this feature by setting this field to true.
NOTE: If you skip load balancer deployment, you will have to ensure that the Tinkerbell stack is available at tinkerbellIP once the cluster creation is finished. One way to achieve this is by using the MetalLB package.
loadBalancerInterface (optional)
Optional field to configure a custom load balancer interface for Tinkerbell stack.
TinkerbellMachineConfig Fields
In the example, there are TinkerbellMachineConfig sections for control plane (my-cluster-name-cp) and worker (my-cluster-name) machine groups.
The following fields identify information needed to configure the nodes in each of those groups.
NOTE: Currently, you can only have one machine group for all machines in the control plane, although you can have multiple machine groups for the workers.
hardwareSelector (optional)
Use hardwareSelector to add key/value pair labels to match particular machines that you identified in the CSV file where you defined the machines in your cluster.
Choose any label name you like.
For example, if you had added the label node=cp-machine to the machines listed in your CSV file that you want to be control plane nodes, the following hardwareSelector field would cause those machines to be added to the control plane:
---
apiVersion: anywhere.eks.amazonaws.com/v1alpha1
kind: TinkerbellMachineConfig
metadata:
  name: my-cluster-name-cp
spec:
  hardwareSelector:
    node: "cp-machine"
NOTE: Either
hardwareSelectororhardwareAffinitymust be specified, but not both. UsehardwareSelectorfor simple single-label matching, orhardwareAffinityfor advanced selection with multiple terms and weighted preferences.
hardwareAffinity (optional)
Use hardwareAffinity for advanced hardware selection when you need more control than hardwareSelector provides. This field allows you to specify required and preferred affinity terms using Kubernetes-style label selectors.
The hardwareAffinity field has two sub-fields:
required: A list of hardware affinity terms that are OR’d together. Hardware must match at least one term to be considered. At least one required term must be specified.preferred: A list of weighted hardware affinity terms. Hardware matching these terms are preferred according to the weights provided (1-100), but are not required.
hardwareAffinity.required
Required hardware affinity terms. Each term contains a labelSelector with matchLabels and/or matchExpressions. Multiple terms in the required array are implicitly OR’d together - hardware must match at least one term to be eligible for selection.
hardwareAffinity.preferred
Preferred hardware affinity terms with weights. Each term contains:
weight: A value from 1-100 indicating preference strengthhardwareAffinityTerm: The affinity term with alabelSelector
Example: Simple required affinity
---
apiVersion: anywhere.eks.amazonaws.com/v1alpha1
kind: TinkerbellMachineConfig
metadata:
  name: my-cluster-name-cp
spec:
  hardwareAffinity:
    required:
    - labelSelector:
        matchLabels:
          node: "cp-machine"
  osFamily: ubuntu
Example: Multiple required terms (OR’d together)
When you specify multiple items in the required array, they are implicitly OR’d together. Hardware must match at least one of the terms to be eligible. In this example, hardware in either rack-1 OR rack-2 will be selected:
---
apiVersion: anywhere.eks.amazonaws.com/v1alpha1
kind: TinkerbellMachineConfig
metadata:
  name: my-cluster-name-cp
spec:
  hardwareAffinity:
    required:
    - labelSelector:
        matchLabels:
          rack: "rack-1"
    - labelSelector:
        matchLabels:
          rack: "rack-2"
  osFamily: ubuntu
Example: Required with preferred terms
---
apiVersion: anywhere.eks.amazonaws.com/v1alpha1
kind: TinkerbellMachineConfig
metadata:
  name: my-cluster-name-workers
spec:
  hardwareAffinity:
    required:
    - labelSelector:
        matchLabels:
          role: "worker"
    preferred:
    - weight: 100
      hardwareAffinityTerm:
        labelSelector:
          matchLabels:
            gpu: "true"
    - weight: 50
      hardwareAffinityTerm:
        labelSelector:
          matchLabels:
            ssd: "true"
  osFamily: ubuntu
Example: Using matchExpressions for complex selection
---
apiVersion: anywhere.eks.amazonaws.com/v1alpha1
kind: TinkerbellMachineConfig
metadata:
  name: my-cluster-name-cp
spec:
  hardwareAffinity:
    required:
    - labelSelector:
        matchExpressions:
        - key: rack
          operator: In
          values:
          - rack-1
          - rack-2
          - rack-3
  osFamily: ubuntu
NOTE: Either
hardwareSelectororhardwareAffinitymust be specified, but not both. UsehardwareSelectorfor simple single-label matching, orhardwareAffinityfor advanced selection with multiple terms and weighted preferences.
osFamily (required)
Operating system on the machine. Permitted values: ubuntu and redhat (Default: ubuntu).
osImageURL (required)
Required field to set the operating system. In order to use Ubuntu or RHEL see building baremetal node images
. This field is also useful if you want to provide a customized operating system image or simply host the standard image locally. To upgrade a node or group of nodes to a new operating system version (ie. RHEL 8.7 to RHEL 8.8), modify this field to point to the new operating system image URL and run upgrade cluster command
. The osImageURL must contain the Cluster.Spec.KubernetesVersion or Cluster.Spec.WorkerNodeGroupConfiguration[].KubernetesVersion version (in case of modular upgrade). For example, if the Kubernetes version is 1.35, the osImageURL name should include 1.35, 1_35, 1-35 or 135.
NOTE: If this value is set for a single
TinkerbellMachineConfig, osImageURL has to be set for all theTinkerbellMachineConfigs. osImageURL field cannot be set both in theTinkerbellDatacenterConfigandTinkerbellMachineConfigobjects. If set forTinkerbellMachineConfig, the value must be set to empty string""forTinkerbellDatacenterConfig
templateRef (optional)
Identifies the template that defines the actions that will be applied to the TinkerbellMachineConfig.
See TinkerbellTemplateConfig fields below.
EKS Anywhere will generate default templates based on osFamily during the create command.
You can override this default template by providing your own template here.
users (optional)
The name of the user you want to configure to access your virtual machines through SSH.
The default is ec2-user.
Currently, only one user is supported.
users[0].sshAuthorizedKeys (optional)
The SSH public keys you want to configure to access your machines through SSH (as described below). Only 1 is supported at this time.
users[0].sshAuthorizedKeys[0] (optional)
This is the SSH public key that will be placed in authorized_keys on all EKS Anywhere cluster machines so you can SSH into
them. The user will be what is defined under name above. For example:
ssh -i <private-key-file> <user>@<machine-IP>
The default is generating a key in your $(pwd)/<cluster-name> folder when not specifying a value.
hostOSConfig (optional)
Optional host OS configurations for the EKS Anywhere Kubernetes nodes. More information in the Host OS Configuration section.
Advanced Bare Metal cluster configuration
When you generate a Bare Metal cluster configuration, by default, the TinkerbellTemplateConfig is not shown in the generated configuration file. The TinkerbellTemplateConfig defines the actions to provision each node, such as getting installation media, configuring networking, adding users, and otherwise configuring the node. Internally, EKS Anywhere generates a default TinkerbellTemplateConfig based on the operating system family you choose. The default TinkerbellTemplateConfig is sufficient for most use cases.
If your use case necessitates that the operating system have additional configuration, you can add a TinkerbellTemplateConfig to your cluster configuration file with your own customizations. To do this, start with the default TinkerbellTemplateConfig generated by EKS Anywhere and modify it as needed. To generate the default TinkerbellTemplateConfig, use the following command:
eksctl anywhere generate tinkerbelltemplateconfig -f eksa-mgmt-cluster.yaml
Now you can add your own Actions for configuring nodes. We highly recommend that you do not modify the first and the last Actions in the default TinkerbellTemplateConfig. The first Action streams the OS image to the disk, and the last Action reboots the node. See the upstream Tinkerbell documentation for more information on Templates
and Actions
.
IMPORTANT: When upgrading to a new EKS Anywhere version, the default template structure may change to incorporate improvements or support new features. Before customizing a template for use with a new EKS Anywhere version, always regenerate the default template using the command above to ensure you have the latest template structure. Failure to use an updated template during upgrades may result in provisioning failures or unexpected behavior. It is recommended to regenerate and review the default template with each EKS Anywhere version upgrade, then reapply your customizations to the updated template.
The following shows the default TinkerbellTemplateConfig generated by eksctl anywhere generate tinkerbelltemplateconfig.
Ubuntu
---
apiVersion: anywhere.eks.amazonaws.com/v1alpha1
kind: TinkerbellTemplateConfig
metadata:
  name: my-cluster-name
spec:
  template:
    global_timeout: 6000
    id: ""
    name: my-cluster-name
    tasks:
    - actions:
      - environment:
          COMPRESSED: "true"
          DEST_DISK: '{{ index .Hardware.Disks 0 }}'
          IMG_URL: https://my-file-server/ubuntu-2204-kube-v1.30.gz
        image: 127.0.0.1/embedded/image2disk
        name: stream image to disk
        timeout: 600
      - environment:
          CONTENTS: |
            {{ if (index .Hardware.Interfaces 0).DHCP.VLANID }}network:
                version: 2
                renderer: networkd
                ethernets:
                    mainif:
                        match:
                            macaddress: {{ (index .Hardware.Interfaces 0).DHCP.MAC }}
                        set-name: mainif

                vlans:
                    vlan{{ (index .Hardware.Interfaces 0).DHCP.VLANID }}:
                        id: {{ (index .Hardware.Interfaces 0).DHCP.VLANID }}
                        link: mainif
                        addresses:
                        - {{ (index .Hardware.Interfaces 0).DHCP.IP.Address }}/{{ netmaskToCIDR (index .Hardware.Interfaces 0).DHCP.IP.Netmask }}
                        nameservers:
                            addresses: [{{ range $i, $ns := (index .Hardware.Interfaces 0).DHCP.NameServers }}{{if $i}}, {{end}}{{$ns}}{{end}}]
                        {{- if (index .Hardware.Interfaces 0).DHCP.IP.Gateway }}
                        routes:
                            - to: default
                              via: {{ (index .Hardware.Interfaces 0).DHCP.IP.Gateway }}
                        {{- end }}
            {{ else }}network:
                version: 2
                renderer: networkd
                ethernets:
                    id0:
                        match:
                            macaddress: {{ (index .Hardware.Interfaces 0).DHCP.MAC }}
                        addresses:
                            - {{ (index .Hardware.Interfaces 0).DHCP.IP.Address }}/{{ netmaskToCIDR (index .Hardware.Interfaces 0).DHCP.IP.Netmask }}
                        nameservers:
                            addresses: [{{ range $i, $ns := (index .Hardware.Interfaces 0).DHCP.NameServers }}{{if $i}}, {{end}}{{$ns}}{{end}}]
                        routes:
                            - to: default
                              via: {{ (index .Hardware.Interfaces 0).DHCP.IP.Gateway }}
            {{ end }}
          DEST_DISK: '{{ formatPartition ( index .Hardware.Disks 0 ) 2 }}'
          DEST_PATH: /etc/netplan/config.yaml
          DIRMODE: "0755"
          FS_TYPE: ext4
          GID: "0"
          MODE: "0644"
          UID: "0"
        image: 127.0.0.1/embedded/writefile
        name: write netplan config
        pid: host
        timeout: 90
      - environment:
          CONTENTS: 'network: {config: disabled}'
          DEST_DISK: '{{ formatPartition ( index .Hardware.Disks 0 ) 2 }}'
          DEST_PATH: /etc/cloud/cloud.cfg.d/99-disable-network-config.cfg
          DIRMODE: "0700"
          FS_TYPE: ext4
          GID: "0"
          MODE: "0600"
          UID: "0"
        image: 127.0.0.1/embedded/writefile
        name: disable cloud-init network capabilities
        timeout: 90
      - environment:
          CONTENTS: |
            datasource:
              Ec2:
                metadata_urls: [http://<admin-machine-ip>:50061, http://<tinkerbellIP-from-cluster-config>:50061]
                strict_id: false
            manage_etc_hosts: localhost
            warnings:
              dsid_missing_source: off
          DEST_DISK: '{{ formatPartition ( index .Hardware.Disks 0 ) 2 }}'
          DEST_PATH: /etc/cloud/cloud.cfg.d/10_tinkerbell.cfg
          DIRMODE: "0700"
          FS_TYPE: ext4
          GID: "0"
          MODE: "0600"
          UID: "0"
        image: 127.0.0.1/embedded/writefile
        name: add cloud-init config
        timeout: 90
      - environment:
          CONTENTS: "datasource: Ec2\n"
          DEST_DISK: '{{ formatPartition ( index .Hardware.Disks 0 ) 2 }}'
          DEST_PATH: /etc/cloud/ds-identify.cfg
          DIRMODE: "0700"
          FS_TYPE: ext4
          GID: "0"
          MODE: "0600"
          UID: "0"
        image: 127.0.0.1/embedded/writefile
        name: add cloud-init ds config
        timeout: 90
      - image: 127.0.0.1/embedded/reboot
        name: reboot
        pid: host
        timeout: 90
        volumes:
        - /worker:/worker
      name: my-cluster-name
      volumes:
      - /dev:/dev
      - /dev/console:/dev/console
      - /lib/firmware:/lib/firmware:ro
      worker: '{{.device_1}}'
    version: "0.1"
Red Hat Enterprise Linux
---
apiVersion: anywhere.eks.amazonaws.com/v1alpha1
kind: TinkerbellTemplateConfig
metadata:
  name: my-cluster-name
spec:
  template:
    global_timeout: 6000
    id: ""
    name: my-cluster-name
    tasks:
    - actions:
      - environment:
          COMPRESSED: "true"
          DEST_DISK: '{{ index .Hardware.Disks 0 }}'
          IMG_URL: https://my-file-server/rhel-9-kube-v1.30.0.gz
        image: 127.0.0.1/embedded/image2disk
        name: stream image to disk
        timeout: 600
      - environment:
          CONTENTS: |
            {{ if (index .Hardware.Interfaces 0).DHCP.VLANID }}[connection]
            id=vlan-connection
            type=vlan
            autoconnect=yes
            autoconnect-priority=10

            [ethernet]
            mac-address={{ (index .Hardware.Interfaces 0).DHCP.MAC }}

            [vlan]
            flags=1
            id={{ (index .Hardware.Interfaces 0).DHCP.VLANID }}
            mac-address={{ (index .Hardware.Interfaces 0).DHCP.MAC }}

            [ipv4]
            address1={{ (index .Hardware.Interfaces 0).DHCP.IP.Address }}/{{ netmaskToCIDR (index .Hardware.Interfaces 0).DHCP.IP.Netmask }}
            dns={{ range $i, $ns := (index .Hardware.Interfaces 0).DHCP.NameServers }}{{if $i}};{{end}}{{$ns}}{{end}};
            gateway={{ (index .Hardware.Interfaces 0).DHCP.IP.Gateway }}
            method=manual

            [ipv6]
            addr-gen-mode=default
            method=ignore
            {{ else }}[connection]
            id=static-connection
            type=ethernet
            autoconnect=yes
            autoconnect-priority=10

            [ethernet]
            mac-address={{ (index .Hardware.Interfaces 0).DHCP.MAC }}

            [ipv4]
            address1={{ (index .Hardware.Interfaces 0).DHCP.IP.Address }}/{{ netmaskToCIDR (index .Hardware.Interfaces 0).DHCP.IP.Netmask }}
            dns={{ range $i, $ns := (index .Hardware.Interfaces 0).DHCP.NameServers }}{{if $i}};{{end}}{{$ns}}{{end}};
            gateway={{ (index .Hardware.Interfaces 0).DHCP.IP.Gateway }}
            method=manual

            [ipv6]
            addr-gen-mode=default
            method=ignore
            {{ end }}
          DEST_DISK: '{{ formatPartition ( index .Hardware.Disks 0 ) 1 }}'
          DEST_PATH: /etc/NetworkManager/system-connections/static-connection.nmconnection
          DIRMODE: "0755"
          FS_TYPE: ext4
          GID: "0"
          MODE: "0600"
          UID: "0"
        image: 127.0.0.1/embedded/writefile
        name: write network manager config
        pid: host
        timeout: 90
      - environment:
          CONTENTS: 'network: {config: disabled}'
          DEST_DISK: '{{ formatPartition ( index .Hardware.Disks 0 ) 1 }}'
          DEST_PATH: /etc/cloud/cloud.cfg.d/99-disable-network-config.cfg
          DIRMODE: "0700"
          FS_TYPE: ext4
          GID: "0"
          MODE: "0600"
          UID: "0"
        image: 127.0.0.1/embedded/writefile
        name: disable cloud-init network capabilities
        timeout: 90
      - environment:
          CONTENTS: |
            datasource:
              Ec2:
                metadata_urls: ['http://<admin-machine-ip>:50061','http://<tinkerbellIP-from-cluster-config>:50061']
                strict_id: false
            manage_etc_hosts: localhost
            warnings:
              dsid_missing_source: off
          DEST_DISK: '{{ formatPartition ( index .Hardware.Disks 0 ) 1 }}'
          DEST_PATH: /etc/cloud/cloud.cfg.d/10_tinkerbell.cfg
          DIRMODE: "0700"
          FS_TYPE: ext4
          GID: "0"
          MODE: "0600"
          UID: "0"
        image: 127.0.0.1/embedded/writefile
        name: add cloud-init config
        timeout: 90
      - environment:
          CONTENTS: |
                        datasource: Ec2
          DEST_DISK: '{{ formatPartition ( index .Hardware.Disks 0 ) 1 }}'
          DEST_PATH: /etc/cloud/ds-identify.cfg
          DIRMODE: "0700"
          FS_TYPE: ext4
          GID: "0"
          MODE: "0600"
          UID: "0"
        image: 127.0.0.1/embedded/writefile
        name: add cloud-init ds config
        timeout: 90
      - image: 127.0.0.1/embedded/reboot
        name: reboot
        pid: host
        timeout: 90
        volumes:
        - /worker:/worker
      name: my-cluster-name
      volumes:
      - /dev:/dev
      - /dev/console:/dev/console
      - /lib/firmware:/lib/firmware:ro
      worker: '{{.device_1}}'
    version: "0.1"
TinkerbellTemplateConfig fields
Each Action has its own set of environment variables that are used to configure the Action. EKS Anywhere embeds a set of images into HookOS. This means that when these images are used in an Action they will not be pulled from any external registry. No external network communication is needed to use them. These Actions are prefixed with 127.0.0.1/embedded.
NOTE: Actions are user-defined and can include any container image that is available to HookOS. You can create your own Action images if the embedded Action images do not meet your requirements.
The following describes the embedded Action images that are available in HookOS and their configuration options.
cexec
127.0.0.1/embedded/cexec
The cexec Action executes either within a chroot environment or within the HookOS filesystem. The primary use case is to provision files and an Operating System to disk, and then execute something that resides within that filesystem.
All options can be set either via environment variables or CLI flags. CLI flags take precedence over environment variables, which take precedence over default values.
| Env variable | Flag | Type | Default Value | Required | Description |
|---|---|---|---|---|---|
BLOCK_DEVICE |
--block-device |
string | "" | yes | The block device to mount. |
FS_TYPE |
--fs-type |
string | "" | yes | The filesystem type of the block device. |
CHROOT |
--chroot |
string | "" | no | If set to y (or a non empty string), the Action will execute the given command within a chroot environment. This option is DEPRECATED. Future versions will always chroot. |
CMD_LINE |
--cmd-line |
string | "" | yes | The command to execute. |
DEFAULT_INTERPRETER |
--default-interpreter |
string | "" | no | The default interpreter to use when executing commands. This is useful when you need to execute multiple commands. |
UPDATE_RESOLV_CONF |
--update-resolv-conf |
boolean | false | no | If set to true, the cexec Action will update the /etc/resolv.conf file within the chroot environment with the /etc/resolv.conf from the host. |
JSON_OUTPUT |
--json-output |
boolean | true | no | If set to true, the cexec Action will log output in JSON format. This defaults to true. If set to false, the cexec Action will log output in plain text format. |
Any environment variables you set on the Action will be available to the command you execute.
For example, if you set DEBIAN_FRONTEND: noninteractive as an environment variable (DEBIAN_FRONTEND=noninteractive), it will be available to the command you execute.
writefile
127.0.0.1/embedded/writefile
The writefile Action will mount a block device and write a file to a destination path on its filesystem.
| Env variable | Type | Required | Description |
|---|---|---|---|
DEST_DISK |
string | yes | The block device to mount. |
FS_TYPE |
string | yes | The filesystem type of the block device. |
DEST_PATH |
string | yes | The path to write the file to. |
CONTENTS |
string | yes | The contents of the file to write. |
UID |
string | yes | The user ID to set on the file. |
GID |
string | yes | The group ID to set on the file. |
MODE |
string | yes | The permission bits to set on the file. |
DIRMODE |
string | yes | The permission bits to set on the directory. |
The follow field must be set on the Action.
pid: host
image2disk
127.0.0.1/embedded/image2disk
The image2disk Action will stream either a compressed or not compressed remote image (raw) to a block device.
| Env variable | Type | Default Value | Required | Description |
|---|---|---|---|---|
| IMG_URL | string | "" | yes | URL of the image to be streamed. |
| DEST_DISK | string | "" | yes | Block device to which the image is written. |
| COMPRESSED | bool | false | no | Decompress the image before writing it to the disk. |
| RETRY_ENABLED | bool | false | no | Retry the Action, using exponential backoff, for the duration specified in RETRY_DURATION_MINUTES before failing. |
| RETRY_DURATION_MINUTES | int | 10 | no | Duration for which the Action will retry before failing. |
| PROGRESS_INTERVAL_SECONDS | int | 3 | no | Interval at which the progress of the image transfer will be logged. |
| TEXT_LOGGING | bool | false | no | Output from the Action will be logged in a more human friendly text format, JSON format is used by default. |
oci2disk
127.0.0.1/embedded/oci2disk
The oci2disk Action provides the capability of streaming a raw (compressed) disk image from an OCI compliant-registry to a local block device.
| Env variable | Type | Default Value | Required | Description |
|---|---|---|---|---|
| IMG_URL | string | "" | yes | URL of the image to be streamed. |
| DEST_DISK | string | "" | yes | Block device to which the image is written. |
| COMPRESSED | bool | false | no | Decompress the image before writing it to the disk. |
kexec
127.0.0.1/embedded/kexec
The kexec Action makes use of the Linux kexec function
to boot directly into a kernel.
| Env variable | Type | Default Value | Required | Description |
|---|---|---|---|---|
| BLOCK_DEVICE | string | "" | yes | The block device to mount. |
| FS_TYPE | string | "" | yes | The filesystem type of the block device. |
| KERNEL_PATH | string | "" | no | The path to the kernel to boot. When not supplied the kernel path will discovered from /boot/grub/grub.cfg on the BLOCK_DEVICE. |
| INITRD_PATH | string | "" | yes | The path to the initial ramdisk to boot. |
| CMD_LINE | string | "" | no | The command line to pass to the kernel. When not supplied, the kernel cmdline parameters will discovered from /boot/grub/grub.cfg on the BLOCK_DEVICE. |
NOTE: There are known issues related to drivers with some hardware that may make it necessary to replace the
kexecAction image with therebootAction image.
reboot
127.0.0.1/embedded/reboot
The reboot Action will reboot the machine.
The follow fields must be set on the Action.
pid: host
volumes:
  - /worker:/worker
Custom Tinkerbell action examples
The following example shows how to add a .deb package (openssl) to a Red Hat Enterprise Linux installation:
- environment:
    BLOCK_DEVICE: '{{ formatPartition ( index .Hardware.Disks 0 ) 1 }}' # /dev/sda1
    CHROOT: "y"
    CMD_LINE: apt -y update && apt -y install openssl
    DEFAULT_INTERPRETER: /bin/sh -c
    FS_TYPE: ext4
  image: 127.0.0.1/embedded/cexec
  name: install openssl
  timeout: 90
The following shows an example of adding a new user (tinkerbell) to an Ubuntu installation:
- environment:
    BLOCK_DEVICE: '{{ formatPartition ( index .Hardware.Disks 0 ) 2 }}' # /dev/sda2
    FS_TYPE: ext4
    CHROOT: y
    DEFAULT_INTERPRETER: "/bin/sh -c"
    CMD_LINE: "useradd --password $(openssl passwd -1 tinkerbell) --shell /bin/bash --create-home --groups sudo tinkerbell"
  image: 127.0.0.1/embedded/cexec
  name: create a user
  timeout: 90
Look for more examples as they are added to the Tinkerbell examples page.
7 - Customize Bare Metal
7.1 - Boot modes for EKS Anywhere on Bare Metal
In order to install an Operating System on a machine, the machine needs to boot into the EKS Anywhere Operating System Installation Environment (HookOS). This is accomplished in one of two ways. The first is via the network, also known as PXE boot. This is the default mode. The second is via a virtual CD/DVD device. In EKS Anywhere this is also known as ISO boot.
Network Boot
This is the default boot method used for machines in EKS Anywhere. This method requires the EKS Anywhere Bootstrap and Management Clusters to have layer 2 network access to the machines being booted. The network boot process hands out the initial bootloader location via DHCP. In EKS Anywhere this is the iPXE bootloader. The iPXE bootloader then downloads the EKS Anywhere OSIE image and boots into it. The following is a simplified sequence diagram of the network boot process:
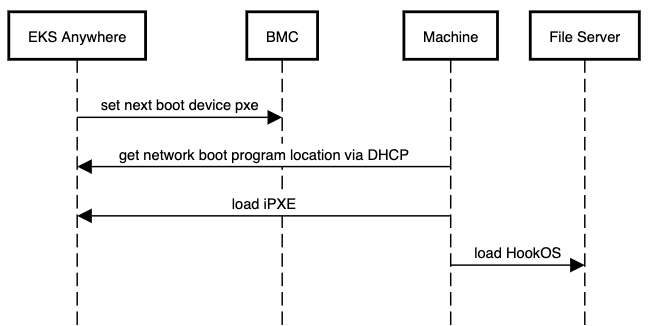
Cluster Spec Configuration - Network Boot
As this is the default method, no additional configuration is required. Follow the installation instructions as normal.
ISO Boot
This method does not require the EKS Anywhere Bootstrap and Management Clusters to have layer 2 network access to the machines being booted. It does not use DHCP or require layer 2 network access. Instead, the EKS Anywhere HookOS image is provided as a CD/DVD ISO file by the Tinkerbell stack. The HookOS ISO is then attached to the machine via the BMC as a virtual CD/DVD device. The machine is then booted into the virtual CD/DVD device and HookOS boots up. The following is a simplified sequence diagram of the ISO boot process:
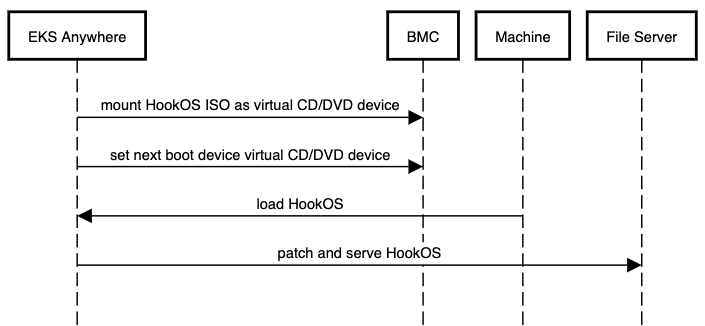
Cluster Spec Configuration - ISO Boot
To enable the ISO boot method there is one required field and one optional field.
- Required:
TinkerbellDatacenterConfig.spec.isoBoot- Set this field totrueto enable the ISO boot mode. - Optional:
TinkerbellDatacenterConfig.spec.isoURL- This field is a string value that specifies the URL to the HookOS ISO file. If this field is not provided, the default HookOS ISO file will be used.
Important
In order to use the ISO boot mode all of the following must be true:
- The BMC info for all machines must be provided in the hardware.csv file.
- All BMCs must have virtual media mounting capabilities with remote HTTP(S) support.
- All BMCs must have Redfish enabled and Redfish must have virtual media mounting capabilities.
spec:
  isoBoot: true
  hookIsoURL: "http://example.com/hookos.iso"
It is highly recommended that the HookOS ISO file is available locally in your environment and its location is specified in the hookIsoURL field. The default location for the HookOS ISO file is hosted in the cloud by AWS. This means that the Tinkerbell stack, and more specifically the Smee service, will need internet access to this location and Smee will need to pull from this location every time a machine is booted. This can lead to slow boot times and potential boot failures if the internet connection is slow, constrained, or lost.
Run the following commmand to download the HookOS ISO file:
BUNDLE_URL=$(eksctl anywhere version | grep "https://anywhere-assets.eks.amazonaws.com/releases/bundles" | tr -d ' ' | cut -d":" -f2,3)
IMAGE=$(curl -SsL $BUNDLE_URL | grep -E 'uri: .*hook-x86_64-efi-initrd.iso' | uniq | tr -d ' ' | cut -d":" -f2,3)
wget $IMAGE
Make this file available via a web server and put the full URL where this ISO is downloadable in the hookIsoURL field.
7.2 - Customize HookOS for EKS Anywhere on Bare Metal
To network boot bare metal machines in EKS Anywhere clusters, machines acquire a kernel and initial ramdisk that is referred to as HookOS. A default HookOS is provided when you create an EKS Anywhere cluster. However, there may be cases where you want and/or need to customize the default HookOS, such as to add drivers required to boot your particular type of hardware.
The following procedure describes how to customize and build HookOS. For more information on Tinkerbell’s HookOS Installation Environment, see the Tinkerbell Hook repo .
System requirements
>= 2G memory>= 4 CPU cores# the more cores the better for kernel building.>= 20G disk space
Dependencies
Be sure to install all the following dependencies.
jqenvsubstpigzdockercurlbash>= 4.4gitfindutils
-
Clone the Hook repo or your fork of that repo:
git clone https://github.com/tinkerbell/hook.git cd hook/ -
Run the Linux kernel menuconfig TUI and configure the kernel as needed. Save the config before you exit. The result of this step will be a modified kernel configuration file (
./kernel/configs/generic-6.6.y-x86_64)../build.sh kernel-config hook-latest-lts-amd64 -
Build the kernel container image. The result of this step will be a container image. Use
docker images quay.io/tinkerbell/hook-kernelto see it../build.sh kernel hook-latest-lts-amd64 -
Add the embedded Action images. This creates the file,
images.txt, in theimages/hook-embeddeddirectory and runs the script,images/hook-embedded/pull-images.sh, to pull and embed the images in the HookOS initramfs. The result of this step will be a populated images file:images/hook-embedded/images.txtand a Docker directory cache of images:images/hook-embedded/images/.BUNDLE_URL=$(eksctl anywhere version | grep "https://anywhere-assets.eks.amazonaws.com/releases/bundles" | tr -d ' ' | cut -d":" -f2,3) IMAGES=$(curl -s $BUNDLE_URL | grep "public.ecr.aws/eks-anywhere/tinkerbell/actions/\|public.ecr.aws/eks-anywhere/tinkerbell/tink/tink-worker" | sort | uniq | tr -d ' ' | cut -d":" -f2,3) images_file="images/hook-embedded/images.txt" rm "$images_file" while read -r image; do action_name=$(basename "$image" | cut -d":" -f1) echo "$image 127.0.0.1/embedded/$action_name" >> "$images_file" done <<< "$IMAGES" (cd images/hook-embedded; ./pull-images.sh) -
Build the HookOS kernel and initramfs artifacts. The
sudocommand is needed as the image embedding step uses Docker-in-Docker (DinD) which changes file ownerships to the root user. The result of this step will be the kernel and initramfs. These files are located at./out/hook/vmlinuz-latest-lts-x86_64and./out/hook/initramfs-latest-lts-x86_64respectively.sudo ./build.sh linuxkit hook-latest-lts-amd64Note: If you did not customize the kernel configuration, you can use the latest upstream built kernel by setting the
USE_LATEST_BUILT_KERNELtoyes. Run this command instead of the previous one.sudo ./build.sh linuxkit hook-latest-lts-amd64 USE_LATEST_BUILT_KERNEL=yes -
Rename the kernel and initramfs files to
vmlinuz-x86_64andinitramfs-x86_64respectively.mv ./out/hook/vmlinuz-latest-lts-x86_64 ./out/hook/vmlinuz-x86_64 mv ./out/hook/initramfs-latest-lts-x86_64 ./out/hook/initramfs-x86_64 -
To use the kernel (
vmlinuz-x86_64) and initial ram disk (initramfs-x86_64) when you build your EKS Anywhere cluster, see the description of thehookImagesURLPathfield in your cluster configuration file.
7.3 - DHCP options for EKS Anywhere
In order to facilitate network booting machines, EKS Anywhere bare metal runs its own DHCP server, Boots (a standalone service in the Tinkerbell stack). There can be numerous reasons why you may want to use an existing DHCP service instead of Boots: Security, compliance, access issues, existing layer 2 constraints, existing automation, and so on.
In environments where there is an existing DHCP service, this DHCP service can be configured to interoperate with EKS Anywhere. This document will cover how to make your existing DHCP service interoperate with EKS Anywhere bare metal. In this scenario EKS Anywhere will have no layer 2 DHCP responsibilities.
Note: Currently, Boots is responsible for more than just DHCP. So Boots can’t be entirely avoided in the provisioning process.
Additional Services in Boots
- HTTP and TFTP servers for iPXE binaries
- HTTP server for iPXE script
- Syslog server (receiver)
Process
As a prerequisite, your existing DHCP must serve host/address/static reservations
for all machines that EKS Anywhere bare metal will be provisioning. This means that the IPAM details you enter into your hardware.csv
must be used to create host/address/static reservations in your existing DHCP service.
Now, you configure your existing DHCP service to provide the location of the iPXE binary and script. This is a two-step interaction between machines and the DHCP service and enables the provisioning process to start.
-
Step 1: The machine broadcasts a request to network boot. Your existing DHCP service then provides the machine with all IPAM info as well as the location of the Tinkerbell iPXE binary (
ipxe.efi). The machine configures its network interface with the IPAM info then downloads the Tinkerbell iPXE binary from the location provided by the DHCP service and runs it. -
Step 2: Now with the Tinkerbell iPXE binary loaded and running, iPXE again broadcasts a request to network boot. The DHCP service again provides all IPAM info as well as the location of the Tinkerbell iPXE script (
auto.ipxe). iPXE configures its network interface using the IPAM info and then downloads the Tinkerbell iPXE script from the location provided by the DHCP service and runs it.
Note The
auto.ipxeis an iPXE script that tells iPXE from where to download the HookOS kernel and initrd so that they can be loaded into memory.
The following diagram illustrates the process described above. Note that the diagram only describes the network booting parts of the DHCP interaction, not the exchange of IPAM info.
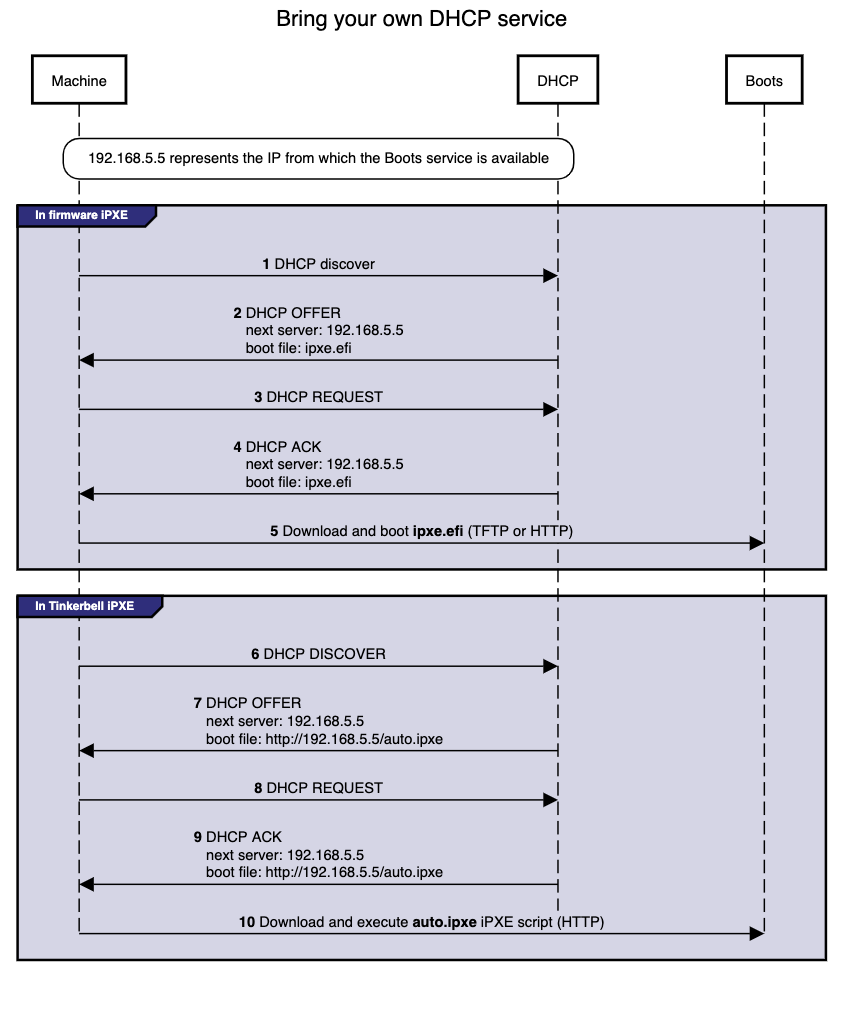
Configuration
Below you will find code snippets showing how to add the two-step process from above to an existing DHCP service. Each config checks if DHCP option 77 (user class option
) equals “Tinkerbell”. If it does match, then the Tinkerbell iPXE script (auto.ipxe) will be served. If option 77 does not match, then the iPXE binary (ipxe.efi) will be served.
DHCP option: next server
Most DHCP services define a next server option. This option generally corresponds to either DHCP option 66 or the DHCP header sname, reference.
This option is used to tell a machine where to download the initial bootloader, reference.
Special consideration is required for the next server value when using EKS Anywhere to create your initial management cluster. This is because during this initial create phase a temporary bootstrap cluster is created and used to provision the management cluster.
The bootstrap cluster runs the Tinkerbell stack. When the management cluster is successfully created, the Tinkerbell stack is redeployed to the management cluster and the bootstrap cluster is deleted. This means that the IP address of the Tinkerbell stack will change.
As a temporary and one-time step, the IP address used by the existing DHCP service for next server will need to be the IP address of the temporary bootstrap cluster. This will be the IP of the Admin node or if you use the cli flag --tinkerbell-bootstrap-ip then that IP should be used for the next server in your existing DHCP service.
Once the management cluster is created, the IP address used by the existing DHCP service for next server will need to be updated to the tinkerbellIP. This IP is defined in your cluster spec at tinkerbellDatacenterConfig.spec.tinkerbellIP. The next server IP will not need to be updated again.
Note: The upgrade phase of a management cluster or the creation of any workload clusters will not require you to change the
next serverIP in the config of your existing DHCP service.
Code snippets
The following code snippets are generic examples of the config needed to enable the two-step process to an existing DHCP service. It does not cover the IPAM info that is also required.
dnsmasq.conf
dhcp-match=tinkerbell, option:user-class, Tinkerbell
dhcp-boot=tag:!tinkerbell,ipxe.efi,none,192.168.2.112
dhcp-boot=tag:tinkerbell,http://192.168.2.112/auto.ipxe
kea.json
{
    "Dhcp4": {
        "client-classes": [
            {
                "name": "tinkerbell",
                "test": "substring(option[77].hex,0,10) == 'Tinkerbell'",
                "boot-file-name": "http://192.168.2.112/auto.ipxe"
            },
            {
                "name": "default",
                "test": "not(substring(option[77].hex,0,10) == 'Tinkerbell')",
                "boot-file-name": "ipxe.efi"
            }
        ],
        "subnet4": [
            {
                "next-server": "192.168.2.112"
            }
        ]
    }
}
dhcpd.conf
 if exists user-class and option user-class = "Tinkerbell" {
     filename "http://192.168.2.112/auto.ipxe";
 } else {
     filename "ipxe.efi";
 }
 next-server "192.168.1.112";
Please follow the ipxe.org guide on how to configure Microsoft DHCP server.