This is the multi-page printable view of this section. Click here to print.
Create CloudStack cluster
- 1: Requirements for EKS Anywhere on CloudStack
- 2: Preparing CloudStack for EKS Anywhere
- 3: Create CloudStack cluster
- 4: CloudStack configuration
1 - Requirements for EKS Anywhere on CloudStack
To run EKS Anywhere, you will need:
Prepare Administrative machine
Set up an Administrative machine as described in Install EKS Anywhere .
Prepare a CloudStack environment
To prepare a CloudStack environment to run EKS Anywhere, you need the following:
-
A CloudStack 4.14 or later environment. CloudStack 4.16 is used for examples in these docs.
-
Capacity to deploy 6-10 VMs.
-
One shared network in CloudStack to use for the cluster. EKS Anywhere clusters need access to CloudStack through the network to enable self-managing and storage capabilities.
-
A Red Hat Enterprise Linux qcow2 image built using the
image-buildertool as described in artifacts . -
User credentials (CloudStack API key and Secret key) to create VMs and attach networks in CloudStack.
-
One IP address routable from the cluster but excluded from DHCP offering. This IP address is to be used as the Control Plane Endpoint IP. Below are some suggestions to ensure that this IP address is never handed out by your DHCP server. You may need to contact your network engineer.
- Pick an IP address reachable from the cluster subnet which is excluded from DHCP range OR
- Alter DHCP ranges to leave out an IP address(s) at the top and/or the bottom of the range OR
- Create an IP reservation for this IP on your DHCP server. This is usually accomplished by adding a dummy mapping of this IP address to a non-existent mac address.
Each VM will require:
- 2 vCPUs
- 8GB RAM
- 25GB Disk
The administrative machine and the target workload environment will need network access (TCP/443) to:
- CloudStack endpoint (must be accessible to EKS Anywhere clusters)
- public.ecr.aws
- anywhere-assets.eks.amazonaws.com (http://anywhere-assets.eks.amazonaws.com/) (to download the EKS Anywhere binaries and manifests)
- distro.eks.amazonaws.com (http://distro.eks.amazonaws.com/) (to download EKS Distro binaries and manifests)
- d2glxqk2uabbnd.cloudfront.net (http://d2glxqk2uabbnd.cloudfront.net/) (for EKS Anywhere and EKS Distro ECR container images)
- api.ecr.us-west-2.amazonaws.com (http://api.ecr.us-west-2.amazonaws.com/) (for EKS Anywhere package authentication matching your region)
- d5l0dvt14r5h8.cloudfront.net (http://d5l0dvt14r5h8.cloudfront.net/) (for EKS Anywhere package ECR container images)
- api.github.com (http://api.github.com/) (only if GitOps is enabled)
- sts.amazonaws.com (only if AWS IAM Authenticator is enabled)
CloudStack information needed before creating the cluster
You need at least the following information before creating the cluster. See CloudStack configuration for a complete list of options and Preparing CloudStack for instructions on creating the assets.
- Static IP Addresses: You will need one IP address for the management cluster control plane endpoint, and a separate one for the controlplane of each workload cluster you add.
Let’s say you are going to have the management cluster and two workload clusters. For those, you would need three IP addresses, one for each. All of those addresses will be configured the same way in the configuration file you will generate for each cluster.
A static IP address will be used for each control plane VM in your EKS Anywhere cluster. Choose IP addresses in your network range that do not conflict with other VMs and make sure they are excluded from your DHCP offering. An IP address will be the value of the property controlPlaneConfiguration.endpoint.host in the config file of the management cluster. A separate IP address must be assigned for each workload cluster.
- CloudStack datacenter: You need the name of the CloudStack Datacenter plus the following for each Availability Zone (availabilityZones). Most items can be represented by name or ID:
- Account (account): Account with permission to create a cluster (optional, admin by default).
- Credentials (credentialsRef): Credentials provided in an ini file used to access the CloudStack API endpoint. See CloudStack Getting started for details.
- Domain (domain): The CloudStack domain in which to deploy the cluster (optional, ROOT by default)
- Management endpoint (managementApiEndpoint): Endpoint for a cloudstack client to make API calls to client.
- Zone network (zone.network): Either name or ID of the network.
- CloudStack machine configuration: For each set of machines (for example, you could configure separate set of machines for control plane, worker, and etcd nodes), obtain the following information. This must be predefined in the cloudStack instance and identified by name or ID:
- Compute offering (computeOffering): Choose an existing compute offering (such as
large-instance), reflecting the amount of resources to apply to each VM. - Operating system (template): Identifies the operating system image to use (such as rhel8-k8s-118).
- Users (users.name): Identifies users and SSH keys needed to access the VMs.
- Compute offering (computeOffering): Choose an existing compute offering (such as
2 - Preparing CloudStack for EKS Anywhere
Before you can create an EKS Anywhere cluster in CloudStack, you must do some setup on your CloudStack environment. This document helps you get what you need to fulfill the prerequisites described in the Requirements and values you need for CloudStack configuration .
Set up a domain and user credentials
Either use the ROOT domain or create a new domain to deploy your EKS Anywhere cluster. One or more users are grouped under a domain. This example creates a user account for the domain with a Domain Administrator role. From the apachecloudstack console:
-
Select Domains.
-
Select Add Domain.
-
Fill in the Name for the domain (
eksain this example) and select OK. -
Select Accounts -> Add Account, then fill in the form to add a user with
DomainAdminrole, as shown in the following figure: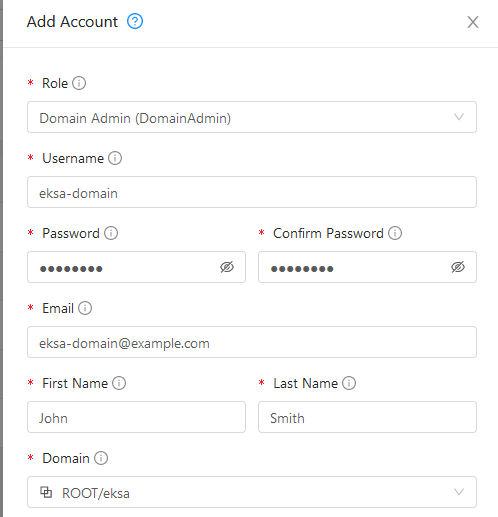
-
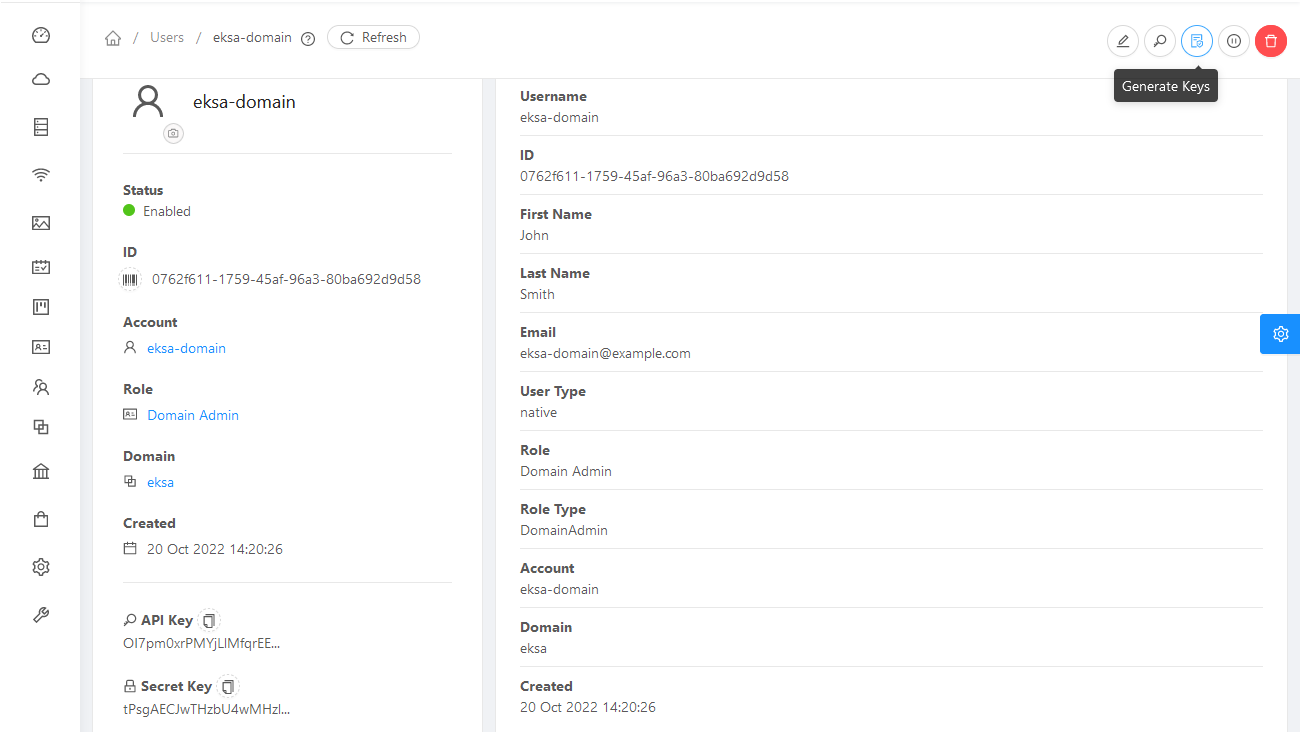
To generate API credentials for the user, select Accounts->
-> View Users -> and select the Generate Keys button. -
Select OK to confirm key generation. The API Key and Secret Key should appear as shown in the following figure:
-
Copy the API Key and Secret Key to a credentials file to use when you generate your cluster. For example:
[Global]
api-url = http://10.0.0.2:8080/client/api
api-key = OI7pm0xrPMYjLlMfqrEEj...
secret-key = tPsgAECJwTHzbU4wMH...
Import template
You need to build at least one operating system image and import it as a template to use for your cluster nodes. Currently, only Red Hat Enterprise Linux 8 images are supported. To build a RHEL-based image to use with EKS Anywhere, see Build node images .
-
Make your image accessible from you local machine or from a URL that is accessible to your CloudStack setup.
-
Select Images -> Templates, then select either Register Template from URL or Select local Template. The following figure lets you register a template from URL:
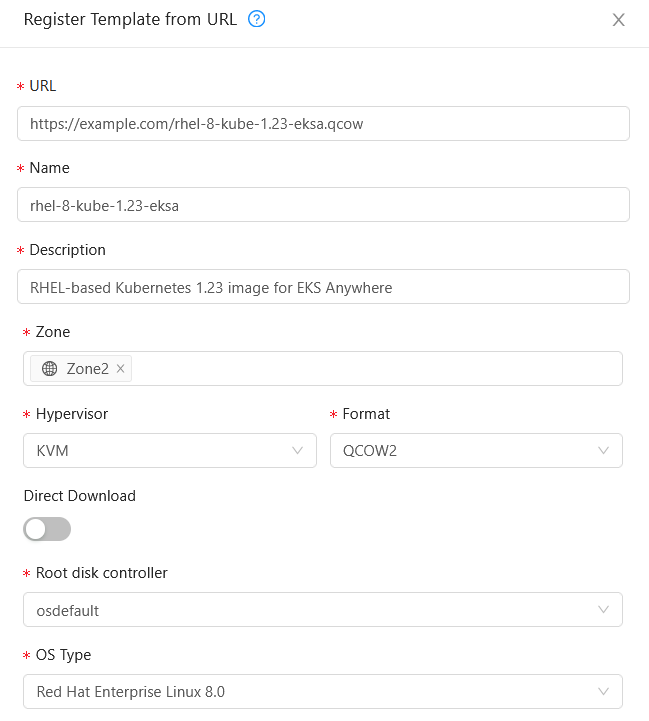
This example imports a RHEL image (QCOW2), identifies the zone from which it will be available, uses KVM as the hypervisor, uses the osdefault Root disk controller, and identifies the OS Type as Red Hat Enterprise Linux 8.0. Select OK to save the template.
-
Note the template name and zone so you can use it later when you deploy your cluster.
Create CloudStack configurations
Take a look at the following CloudStack configuration settings before creating your EKS Anywhere cluster. You will need to identify many of these assets when you create you cluster specification:
DatacenterConfig information
Here is how to get information to go into the CloudStackDatacenterConfig section of the CloudStack cluster configuration file:
-
Domain: Select Domains, then select your domain name from under the ROOT domain. Select View Users, not the user with the Domain Admin role, and consider setting limits to what each user can consume from the Resources and Configure Limits tabs.
-
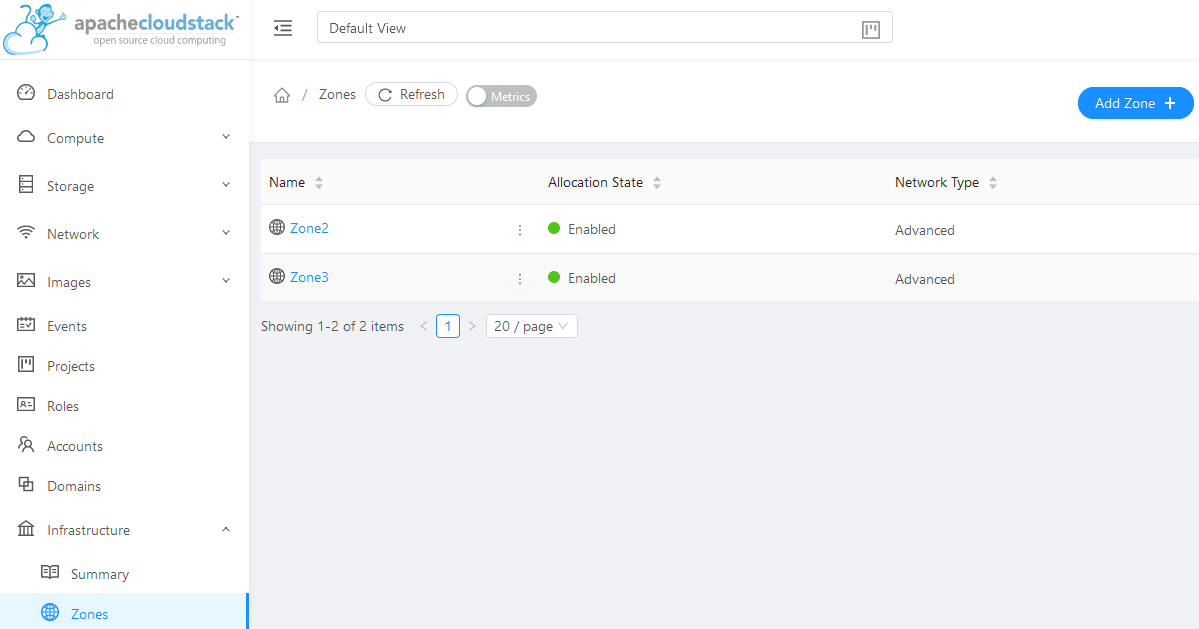
Zones: Select Infrastructure -> Zones. Find a Zone where you can deploy your cluster or create a new one.
-
Network: Select Network -> Guest networks. Choose a network to use for your cluster or create a new one.
Here is what some of that information would look like in a cluster configuration:
apiVersion: anywhere.eks.amazonaws.com/v1alpha1
kind: CloudStackDatacenterConfig
metadata:
  name: my-cluster-name-datacenter
spec:
  availabilityZones:
  - account: admin
    credentialsRef: global
    domain: eksa
    managementApiEndpoint: ""
    name: az-1
    zone:
      name: Zone2
      network:
        name: "SharedNet2"
MachineConfig information
Here is how to get information to go into CloudStackMachineConfig sections of the CloudStack cluster configuration file:
-
computeOffering: Select Service Offerings -> Compute Offerings to see a list of available combinations of CPU cores, CPU, and memory to apply to your node instances. See the following figure for an example:
-
template: Select Images -> Templates to see available operating system image templates.
-
diskOffering: Select Storage -> Volumes, the select Create Volume, if you want to create disk storage to attach to your nodes (optional). You can use this to store logs or other data you want saved outside of the nodes. When you later create the cluster configuration, you can identify things like where you want the device mounted, the type of file system, labels and other information.
-
AffinityGroupIds: Select Compute -> Affinity Groups, then select Add new affinity group (optional). By creating an affinity group, you can tell all VMs from a set of instances to either all run on different physical hosts (anti-affinity) or just run anywhere they can (affinity).
Here is what some of that information would look like in a cluster configuration:
apiVersion: anywhere.eks.amazonaws.com/v1alpha1
kind: CloudStackMachineConfig
metadata:
  name: my-cluster-name-cp
spec:
  computeOffering:
    name: "Medium Instance"
  template:
    name: "rhel9-kube-1.35-eksa"
  diskOffering:
    name: "Small"
    mountPath: "/data-small"
    device: "/dev/vdb"
    filesystem: "ext4"
    label: "data_disk"
  symlinks:
    /var/log/kubernetes: /data-small/var/log/kubernetes
  affinityGroupIds:
  - control-plane-anti-affinity
3 - Create CloudStack cluster
Important: AWS CloudStack Availability
Effective with EKS Anywhere release v0.26, AWS will remove the Cluster API providers for CloudStack and AWS Snow from the EKS Anywhere distribution. Following this release, these providers will no longer be maintained, updated, or supported by AWS. Customers currently using these providers are encouraged to find alternative solutions.EKS Anywhere supports a CloudStack provider for EKS Anywhere deployments. This document walks you through setting up EKS Anywhere on CloudStack in a way that:
- Deploys an initial cluster on your CloudStack environment. That cluster can be used as a standalone cluster (to run workloads) or a management cluster (to create and manage other clusters)
- Deploys zero or more workload clusters from the management cluster
If your initial cluster is a management cluster, it is intended to stay in place so you can use it later to modify, upgrade, and delete workload clusters. Using a management cluster makes it faster to provision and delete workload clusters. Also it lets you keep CloudStack credentials for a set of clusters in one place: on the management cluster. The alternative is to simply use your initial cluster to run workloads. See Cluster topologies for details.
Important
Creating an EKS Anywhere management cluster is the recommended model. Separating management features into a separate, persistent management cluster provides a cleaner model for managing the lifecycle of workload clusters (to create, upgrade, and delete clusters), while workload clusters run user applications. This approach also reduces provider permissions for workload clusters.Note: Before you create your cluster, you have the option of validating the EKS Anywhere bundle manifest container images by following instructions in the Verify Cluster Images page.
Prerequisite Checklist
EKS Anywhere needs to:
- Be run on an Admin machine that has certain machine requirements .
- Have certain resources from your CloudStack deployment available.
- Have some preparation done before creating an EKS Anywhere cluster.
Also, see the Ports and protocols page for information on ports that need to be accessible from control plane, worker, and Admin machines.
Steps
The following steps are divided into two sections:
- Create an initial cluster (used as a management or standalone cluster)
- Create zero or more workload clusters from the management cluster
Create an initial cluster
Follow these steps to create an EKS Anywhere cluster that can be used either as a management cluster or as a standalone cluster (for running workloads itself).
-
Optional Configuration
Set License Environment Variable
Add a license to any cluster for which you want to receive paid support. If you are creating a licensed cluster, set and export the license variable (see License cluster if you are licensing an existing cluster):
export EKSA_LICENSE='my-license-here'After you have created your
eksa-mgmt-cluster.yamland set your credential environment variables, you will be ready to create the cluster.Configure Curated Packages
The Amazon EKS Anywhere Curated Packages are only available to customers with the Amazon EKS Anywhere Enterprise Subscription. To request a free trial, talk to your Amazon representative or connect with one here . Cluster creation will succeed if authentication is not set up, but some warnings may be genered. Detailed package configurations can be found here .
If you are going to use packages, set up authentication. These credentials should have limited capabilities :
export EKSA_AWS_ACCESS_KEY_ID="your*access*id" export EKSA_AWS_SECRET_ACCESS_KEY="your*secret*key" export EKSA_AWS_REGION="us-west-2" -
Generate an initial cluster config (named
mgmtfor this example):export CLUSTER_NAME=mgmt eksctl anywhere generate clusterconfig $CLUSTER_NAME \ --provider cloudstack > eksa-mgmt-cluster.yaml -
Create credential file
Create a credential file (for example,
cloud-config) and add the credentials needed to access your CloudStack environment. The file should include:- api-key: Obtained from CloudStack
- secret-key: Obtained from CloudStack
- api-url: The URL to your CloudStack API endpoint
For example:
[Global]
api-key     =  -Dk5uB0DE3aWng
secret-key  =  -0DQLunsaJKxCEEHn44XxP80tv6v_RB0DiDtdgwJ
api-url     =  http://172.16.0.1:8080/client/api
You can have multiple credential entries. To match this example, you would enter
globalas the credentialsRef in the cluster config file for your CloudStack availability zone. You can configure multiple credentials for multiple availability zones. -
Modify the initial cluster config (
eksa-mgmt-cluster.yaml) as follows:- Refer to Cloudstack configuration for information on configuring this cluster config for a CloudStack provider.
- Add Optional configuration settings as needed.
- Create at least two control plane nodes, three worker nodes, and three etcd nodes, to provide high availability and rolling upgrades.
-
Set Environment Variables
Convert the credential file into base64 and set the following environment variable to that value:
export EKSA_CLOUDSTACK_B64ENCODED_SECRET=$(base64 -i cloud-config) -
Create cluster
For a regular cluster create (with internet access), type the following:
eksctl anywhere create cluster \
   -f eksa-mgmt-cluster.yaml \
   # --install-packages packages.yaml \ # uncomment to install curated packages at cluster creation
For an airgapped cluster create, follow Preparation for airgapped deployments instructions, then type the following:
eksctl anywhere create cluster \ -f eksa-mgmt-cluster.yaml \ --bundles-override ./eks-anywhere-downloads/bundle-release.yaml \ # --install-packages packages.yaml \ # uncomment to install curated packages at cluster creation -
Once the cluster is created you can use it with the generated
KUBECONFIGfile in your local directory:export KUBECONFIG=${PWD}/${CLUSTER_NAME}/${CLUSTER_NAME}-eks-a-cluster.kubeconfig -
Check the cluster nodes:
To check that the cluster completed, list the machines to see the control plane, etcd, and worker nodes:
kubectl get machines -AExample command output
NAMESPACE   NAME                PROVIDERID           PHASE    VERSION
eksa-system mgmt-b2xyz          cloudstack:/xxxxx    Running  v1.23.1-eks-1-21-5
eksa-system mgmt-etcd-r9b42     cloudstack:/xxxxx    Running
eksa-system mgmt-md-8-6xr-rnr   cloudstack:/xxxxx    Running  v1.23.1-eks-1-21-5
...
The etcd machine doesn’t show the Kubernetes version because it doesn’t run the kubelet service.
-
Check the initial cluster’s CRD:
To ensure you are looking at the initial cluster, list the CRD to see that the name of its management cluster is itself:
kubectl get clusters mgmt -o yamlExample command output
...
kubernetesVersion: "1.35"
managementCluster:
  name: mgmt
workerNodeGroupConfigurations:
...
Note
The initial cluster is now ready to deploy workload clusters. However, if you just want to use it to run workloads, you can deploy pod workloads directly on the initial cluster without deploying a separate workload cluster and skip the section on running separate workload clusters. To make sure the cluster is ready to run workloads, run the test application in the Deploy test workload section.
Create separate workload clusters
Follow these steps if you want to use your initial cluster to create and manage separate workload clusters.
-
Set License Environment Variable (Optional)
Add a license to any cluster for which you want to receive paid support. If you are creating a licensed cluster, set and export the license variable (see License cluster if you are licensing an existing cluster):
export EKSA_LICENSE='my-license-here' -
Generate a workload cluster config:
CLUSTER_NAME=w01 eksctl anywhere generate clusterconfig $CLUSTER_NAME \ --provider cloudstack > eksa-w01-cluster.yaml -
Modify the workload cluster config (
eksa-w01-cluster.yaml) as follows. Refer to the initial config described earlier for the required and optional settings. In particular:- Ensure workload cluster object names (
Cluster,CloudDatacenterConfig,CloudStackMachineConfig, etc.) are distinct from management cluster object names.
- Ensure workload cluster object names (
-
Be sure to set the
managementClusterfield to identify the name of the management cluster.For example, the management cluster, mgmt is defined for our workload cluster w01 as follows:
apiVersion: anywhere.eks.amazonaws.com/v1alpha1 kind: Cluster metadata: name: w01 spec: managementCluster: name: mgmt -
Create a workload cluster in one of the following ways:
-
GitOps: See Manage separate workload clusters with GitOps
-
Terraform: See Manage separate workload clusters with Terraform
NOTE:
spec.users[0].sshAuthorizedKeysmust be specified to SSH into your nodes when provisioning a cluster throughGitOpsorTerraform, as the EKS Anywhere Cluster Controller will not generate the keys likeeksctl CLIdoes when the field is empty. -
eksctl CLI: To create a workload cluster with
eksctl, run:eksctl anywhere create cluster \ -f eksa-w01-cluster.yaml \ # --install-packages packages.yaml \ # uncomment to install curated packages at cluster creation --kubeconfig mgmt/mgmt-eks-a-cluster.kubeconfigAs noted earlier, adding the
--kubeconfigoption tellseksctlto use the management cluster identified by that kubeconfig file to create a different workload cluster. -
kubectl CLI: The cluster lifecycle feature lets you use
kubectl, or other tools that that can talk to the Kubernetes API, to create a workload cluster. To usekubectl, run:kubectl apply -f eksa-w01-cluster.yamlTo check the state of a cluster managed with the cluster lifecyle feature, use
kubectlto show the cluster object with its status.The
statusfield on the cluster object field holds information about the current state of the cluster.kubectl get clusters w01 -o yamlThe cluster has been fully upgraded once the status of the
Readycondition is markedTrue. See the cluster status guide for more information.
-
-
To check the workload cluster, get the workload cluster credentials and run a test workload:
-
If your workload cluster was created with
eksctl, change your credentials to point to the new workload cluster (for example,w01), then run the test application with:export CLUSTER_NAME=w01 export KUBECONFIG=${PWD}/${CLUSTER_NAME}/${CLUSTER_NAME}-eks-a-cluster.kubeconfig kubectl apply -f "https://anywhere.eks.amazonaws.com/manifests/hello-eks-a.yaml" -
If your workload cluster was created with GitOps or Terraform, the kubeconfig for your new cluster is stored as a secret on the management cluster. You can get credentials and run the test application as follows:
kubectl get secret -n eksa-system w01-kubeconfig -o jsonpath=‘{.data.value}' | base64 —decode > w01.kubeconfig
export KUBECONFIG=w01.kubeconfig
kubectl apply -f "https://anywhere.eks.amazonaws.com/manifests/hello-eks-a.yaml"
-
-
Add more workload clusters:
To add more workload clusters, go through the same steps for creating the initial workload, copying the config file to a new name (such as
eksa-w02-cluster.yaml), modifying resource names, and running the create cluster command again.
Next steps
-
See the Cluster management section for more information on common operational tasks like scaling and deleting the cluster.
-
See the Package management section for more information on post-creation curated packages installation.
Optional configuration
Disable KubeVIP
The KubeVIP deployment used for load balancing Kube API Server requests can be disabled by setting an environment variable that will be interpreted by the eksctl anywhere create cluster command. Disabling the KubeVIP deployment is useful if you wish to use an external load balancer for load balancing Kube API Server requests. When disabling the KubeVIP load balancer you become responsible for hosting the Spec.ControlPlaneConfiguration.Endpoint.Host IP which must route requests to a Kube API Server instance of the cluster being provisioned.
export CLOUDSTACK_KUBE_VIP_DISABLED=true
4 - CloudStack configuration
This is a generic template with detailed descriptions below for reference. The following additional optional configuration can also be included:
- CNI
- IAM Roles for Service Accounts
- IAM Authenticator
- OIDC
- GitOps
- Proxy
- Registry Mirror
- Machine Health Checks
- API Server Extra Args
apiVersion: anywhere.eks.amazonaws.com/v1alpha1
kind: Cluster
metadata:
  name: my-cluster-name
spec:
  clusterNetwork:
    cniConfig:
      cilium: {}
    pods:
      cidrBlocks:
      - 192.168.0.0/16
    services:
      cidrBlocks:
      - 10.96.0.0/12
  controlPlaneConfiguration:
    count: 3
    endpoint:
      host: ""
    machineGroupRef:
      kind: CloudStackMachineConfig
      name: my-cluster-name-cp
    taints:
    - key: ""
      value: ""
      effect: ""
    labels:
      "<key1>": ""
      "<key2>": ""
  datacenterRef:
    kind: CloudStackDatacenterConfig
    name: my-cluster-name
  externalEtcdConfiguration:
    count: 3
    machineGroupRef:
      kind: CloudStackMachineConfig
      name: my-cluster-name-etcd
  kubernetesVersion: "1.35"
  managementCluster:
    name: my-cluster-name
  workerNodeGroupConfigurations:
  - count: 2
    machineGroupRef:
      kind: CloudStackMachineConfig
      name: my-cluster-name
    taints:
    - key: ""
      value: ""
      effect: ""
    labels:
      "<key1>": ""
      "<key2>": ""
---
apiVersion: anywhere.eks.amazonaws.com/v1alpha1
kind: CloudStackDatacenterConfig
metadata:
  name: my-cluster-name-datacenter
spec:
  availabilityZones:
  - account: admin
    credentialsRef: global
    domain: domain1
    managementApiEndpoint: ""
    name: az-1
    zone:
      name: zone1
      network:
        name: "net1"
---
apiVersion: anywhere.eks.amazonaws.com/v1alpha1
kind: CloudStackMachineConfig
metadata:
  name: my-cluster-name-cp
spec:
  computeOffering:
    name: "m4-large"
  users:
  - name: capc
    sshAuthorizedKeys:
    - ssh-rsa AAAA...
  template:
    name: "rhel8-k8s-118"
  diskOffering:
    name: "Small"
    mountPath: "/data-small"
    device: "/dev/vdb"
    filesystem: "ext4"
    label: "data_disk"
  symlinks:
    /var/log/kubernetes: /data-small/var/log/kubernetes
  affinityGroupIds:
  - control-plane-anti-affinity
---
apiVersion: anywhere.eks.amazonaws.com/v1alpha1
kind: CloudStackMachineConfig
metadata:
  name: my-cluster-name
spec:
  computeOffering:
    name: "m4-large"
  users:
  - name: capc
    sshAuthorizedKeys:
    - ssh-rsa AAAA...
  template:
    name: "rhel8-k8s-118"
  diskOffering:
    name: "Small"
    mountPath: "/data-small"
    device: "/dev/vdb"
    filesystem: "ext4"
    label: "data_disk"
  symlinks:
    /var/log/pods: /data-small/var/log/pods
    /var/log/containers: /data-small/var/log/containers
  affinityGroupIds:
  - worker-affinity
  userCustomDetails:
    foo: bar
---
apiVersion: anywhere.eks.amazonaws.com/v1alpha1
kind: CloudStackMachineConfig
metadata:
  name: my-cluster-name-etcd
spec:
  computeOffering: {}
    name: "m4-large"
  users:
  - name: "capc"
    sshAuthorizedKeys:
    - "ssh-rsa AAAAB3N...
  template:
    name: "rhel8-k8s-118"
  diskOffering:
    name: "Small"
    mountPath: "/data-small"
    device: "/dev/vdb"
    filesystem: "ext4"
    label: "data_disk"
  symlinks:
    /var/lib: /data-small/var/lib
  affinityGroupIds:
  - etcd-affinity
---
Cluster Fields
name (required)
Name of your cluster my-cluster-name in this example
clusterNetwork (required)
Network configuration.
clusterNetwork.cniConfig (required)
CNI plugin configuration. Supports cilium.
clusterNetwork.cniConfig.cilium.policyEnforcementMode (optional)
Optionally specify a policyEnforcementMode of default, always or never.
clusterNetwork.cniConfig.cilium.egressMasqueradeInterfaces (optional)
Optionally specify a network interface name or interface prefix used for masquerading. See EgressMasqueradeInterfaces option.
clusterNetwork.cniConfig.cilium.skipUpgrade (optional)
When true, skip Cilium maintenance during upgrades. Also see Use a custom CNI.
clusterNetwork.cniConfig.cilium.routingMode (optional)
Optionally specify the routing mode. Accepts default and direct. Also see RoutingMode
option.
clusterNetwork.cniConfig.cilium.ipv4NativeRoutingCIDR (optional)
Optionally specify the CIDR to use when RoutingMode is set to direct. When specified, Cilium assumes networking for this CIDR is preconfigured and hands traffic destined for that range to the Linux network stack without applying any SNAT.
clusterNetwork.cniConfig.cilium.ipv6NativeRoutingCIDR (optional)
Optionally specify the IPv6 CIDR to use when RoutingMode is set to direct. When specified, Cilium assumes networking for this CIDR is preconfigured and hands traffic destined for that range to the Linux network stack without applying any SNAT.
clusterNetwork.cniConfig.cilium.cniExclusive (optional)
Controls whether Cilium should remove other CNI configuration files. When true (default), Cilium removes other CNI configs; when false, it leaves them alone. For more information, see CNI Exclusive Mode configuration.
clusterNetwork.pods.cidrBlocks[0] (required)
The pod subnet specified in CIDR notation. Only 1 pod CIDR block is permitted. The CIDR block should not conflict with the host or service network ranges.
clusterNetwork.services.cidrBlocks[0] (required)
The service subnet specified in CIDR notation. Only 1 service CIDR block is permitted. This CIDR block should not conflict with the host or pod network ranges.
clusterNetwork.dns.resolvConf.path (optional)
File path to a file containing a custom DNS resolver configuration.
controlPlaneConfiguration (required)
Specific control plane configuration for your Kubernetes cluster.
controlPlaneConfiguration.count (required)
Number of control plane nodes
controlPlaneConfiguration.endpoint.host (required)
A unique IP you want to use for the control plane VM in your EKS Anywhere cluster. Choose an IP in your network range that does not conflict with other VMs.
NOTE: This IP should be outside the network DHCP range as it is a floating IP that gets assigned to one of the control plane nodes for kube-apiserver loadbalancing. Suggestions on how to ensure this IP does not cause issues during cluster creation process are here
controlPlaneConfiguration.machineGroupRef (required)
Refers to the Kubernetes object with CloudStack specific configuration for your nodes. See CloudStackMachineConfig Fields below.
controlPlaneConfiguration.taints (optional)
A list of taints to apply to the control plane nodes of the cluster.
Replaces the default control plane taint, node-role.kubernetes.io/master. The default control plane components will tolerate the provided taints.
Modifying the taints associated with the control plane configuration will cause new nodes to be rolled-out, replacing the existing nodes.
NOTE: The taints provided will be used instead of the default control plane taint
node-role.kubernetes.io/master. Any pods that you run on the control plane nodes must tolerate the taints you provide in the control plane configuration.
controlPlaneConfiguration.labels (optional)
A list of labels to apply to the control plane nodes of the cluster. This is in addition to the labels that EKS Anywhere will add by default.
A special label value is supported by the CAPC provider:
    labels:
      cluster.x-k8s.io/failure-domain: ds.meta_data.failuredomain
The ds.meta_data.failuredomain value will be replaced with a failuredomain name where the node is deployed, such as az-1.
Modifying the labels associated with the control plane configuration will cause new nodes to be rolled out, replacing the existing nodes.
datacenterRef (required)
Refers to the Kubernetes object with CloudStack environment specific configuration. See CloudStackDatacenterConfig Fields below.
externalEtcdConfiguration.count (optional)
Number of etcd members
externalEtcdConfiguration.machineGroupRef (optional)
Refers to the Kubernetes object with CloudStack specific configuration for your etcd members. See CloudStackMachineConfig Fields below.
kubernetesVersion (required)
The Kubernetes version you want to use for your cluster. The Kubernetes versions supported by your EKS Anywhere version are tabulated in this section.
Known issue related to Kubernetes versions whose minor version is a multiple of 10
managementCluster (required)
Identifies the name of the management cluster. If this is a standalone cluster or if it were serving as the management cluster for other workload clusters, this will be the same as the cluster name.
workerNodeGroupConfigurations (required)
This takes in a list of node groups that you can define for your workers. You may define one or more worker node groups.
workerNodeGroupConfigurations[*].count (optional)
Number of worker nodes. (default: 1) It will be ignored if the cluster autoscaler curated package
is installed and autoscalingConfiguration is used to specify the desired range of replicas.
Refers to troubleshooting machine health check remediation not allowed and choose a sufficient number to allow machine health check remediation.
workerNodeGroupConfigurations[*].machineGroupRef (required)
Refers to the Kubernetes object with CloudStack specific configuration for your nodes. See CloudStackMachineConfig Fields below.
workerNodeGroupConfigurations[*].name (required)
Name of the worker node group (default: md-0)
workerNodeGroupConfigurations[*].autoscalingConfiguration.minCount (optional)
Minimum number of nodes for this node group’s autoscaling configuration.
workerNodeGroupConfigurations[*].autoscalingConfiguration.maxCount (optional)
Maximum number of nodes for this node group’s autoscaling configuration.
workerNodeGroupConfigurations[*].taints (optional)
A list of taints to apply to the nodes in the worker node group.
Modifying the taints associated with a worker node group configuration will cause new nodes to be rolled-out, replacing the existing nodes associated with the configuration.
At least one node group must not have NoSchedule or NoExecute taints applied to it.
workerNodeGroupConfigurations[*].labels (optional)
A list of labels to apply to the nodes in the worker node group. This is in addition to the labels that EKS Anywhere will add by default. A special label value is supported by the CAPC provider:
    labels:
      cluster.x-k8s.io/failure-domain: ds.meta_data.failuredomain
The ds.meta_data.failuredomain value will be replaced with a failuredomain name where the node is deployed, such as az-1.
Modifying the labels associated with a worker node group configuration will cause new nodes to be rolled out, replacing the existing nodes associated with the configuration.
workerNodeGroupConfigurations[*].kubernetesVersion (optional)
The Kubernetes version you want to use for this worker node group. The Kubernetes versions supported by your EKS Anywhere version are tabulated in this section.
Known issue related to Kubernetes versions whose minor version is a multiple of 10
Must be less than or equal to the cluster kubernetesVersion defined at the root level of the cluster spec. The worker node Kubernetes version must be no more than two minor Kubernetes versions lower than the cluster control plane’s Kubernetes version. Removing workerNodeGroupConfiguration.kubernetesVersion will trigger an upgrade of the node group to the kubernetesVersion defined at the root level of the cluster spec.
CloudStackDatacenterConfig
availabilityZones.account (optional)
Account used to access CloudStack.
As long as you pass valid credentials, through availabilityZones.credentialsRef, this value is not required.
availabilityZones.credentialsRef (required)
If you passed credentials through the environment variable EKSA_CLOUDSTACK_B64ENCODED_SECRET noted in Create CloudStack production cluster
, you can identify those credentials here.
For that example, you would use the profile name global.
You can instead use a previously created secret on the Kubernetes cluster in the eksa-system namespace.
availabilityZones.domain (optional)
CloudStack domain to deploy the cluster. The default is ROOT.
availabilityZones.managementApiEndpoint (required)
Location of the CloudStack API management endpoint. For example, http://10.11.0.2:8080/client/api.
availabilityZones.{id,name} (required)
Name or ID of the CloudStack zone on which to deploy the cluster.
availabilityZones.zone.network.{id,name} (required)
CloudStack network name or ID to use with the cluster.
CloudStackMachineConfig
In the example above, there are separate CloudStackMachineConfig sections for the control plane (my-cluster-name-cp), worker (my-cluster-name) and etcd (my-cluster-name-etcd) nodes.
computeOffering.{id,name} (required)
Name or ID of the CloudStack compute instance.
users[0].name (optional)
The name of the user you want to configure to access your virtual machines through ssh. You can add as many users object as you want.
The default is capc.
users[0].sshAuthorizedKeys (optional)
The SSH public keys you want to configure to access your virtual machines through ssh (as described below). Only 1 is supported at this time.
users[0].sshAuthorizedKeys[0] (optional)
This is the SSH public key that will be placed in authorized_keys on all EKS Anywhere cluster VMs so you can ssh into
them. The user will be what is defined under name above. For example:
ssh -i <private-key-file> <user>@<VM-IP>
The default is generating a key in your $(pwd)/<cluster-name> folder when not specifying a value.
template.{id,name} (required)
The VM template to use for your EKS Anywhere cluster. Currently, a VM based on RHEL 8.6 is required.
This can be a name or ID.
The template.name must contain the Cluster.Spec.KubernetesVersion or Cluster.Spec.WorkerNodeGroupConfiguration[].KubernetesVersion version (in case of modular upgrade). For example, if the Kubernetes version is 1.35, the template.name field name should include 1.35, 1_35, 1-35 or 135.
See the Artifacts
page for instructions for building RHEL-based images.
diskOffering (optional)
Name representing a disk you want to mount into nodes for this CloudStackMachineConfig
diskOffering.mountPath (optional)
Mount point on which to mount the disk.
diskOffering.device (optional)
Device name of the disk partition to mount.
diskOffering.filesystem (optional)
File system type used to format the filesystem on the disk.
diskOffering.label (optional)
Label to apply to the disk partition.
symlinks (optional)
Symbolic link of a directory or file you want to mount from the host filesystem to the mounted filesystem.
userCustomDetails (optional)
Add key/value pairs to nodes in a CloudStackMachineConfig.
These can be used for things like identifying sets of nodes that you want to add to a security group that opens selected ports.
affinityGroupIDs (optional)
Group ID to attach to the set of host systems to indicate how affinity is done for services on those systems.
affinity (optional)
Allows you to set pro and anti affinity for the CloudStackMachineConfig.
This can be used in a mutually exclusive fashion with the affinityGroupIDs field.