This is the multi-page printable view of this section.
Click here to print.
Return to the regular view of this page.
Amazon EKS Anywhere
EKS Anywhere documentation homepage
EKS Anywhere is container management software built by AWS that makes it easier to run and manage Kubernetes clusters on-premises and at the edge. EKS Anywhere is built on EKS Distro
, which is the same reliable and secure Kubernetes distribution used by Amazon Elastic Kubernetes Service (EKS)
in AWS Cloud. EKS Anywhere simplifies Kubernetes cluster management through the automation of undifferentiated heavy lifting such as infrastructure setup and Kubernetes cluster lifecycle operations.
Unlike Amazon EKS in AWS Cloud, EKS Anywhere is a user-managed product that runs on user-managed infrastructure. You are responsible for cluster lifecycle operations and maintenance of your EKS Anywhere clusters. EKS Anywhere does not have any strict dependencies on AWS regional services and is a fit for isolated or air-gapped environments.
If you have on-premises or edge environments with reliable connectivity to an AWS Region, consider using EKS Hybrid Nodes
or EKS on Outposts
to benefit from AWS-managed EKS control planes and a consistent experience with EKS in the AWS Cloud.
The tenets of the EKS Anywhere project are:
- Simple: Make using a Kubernetes distribution simple and boring (reliable and secure).
- Opinionated Modularity: Provide opinionated defaults about the best components to include with Kubernetes, but give customers the ability to swap them out
- Open: Provide open source tooling backed, validated and maintained by Amazon
- Ubiquitous: Enable customers and partners to integrate a Kubernetes distribution in the most common tooling.
- Stand Alone: Provided for use anywhere without AWS dependencies
- Better with AWS: Enable AWS customers to easily adopt additional AWS services
1 - Overview
Important: AWS CloudStack Availability
Effective with EKS Anywhere release v0.26, AWS will remove the Cluster API providers for CloudStack and AWS Snow from the EKS Anywhere distribution. Following this release, these providers will no longer be maintained, updated, or supported by AWS. Customers currently using these providers are encouraged to find alternative solutions.
What is EKS Anywhere?
EKS Anywhere is container management software built by AWS that makes it easier to run and manage Kubernetes clusters on-premises and at the edge. EKS Anywhere is built on EKS Distro
, which is the same reliable and secure Kubernetes distribution used by Amazon Elastic Kubernetes Service (EKS)
in AWS Cloud. EKS Anywhere simplifies Kubernetes cluster management through the automation of undifferentiated heavy lifting such as infrastructure setup and Kubernetes cluster lifecycle operations.
Unlike Amazon EKS in AWS Cloud, EKS Anywhere is a user-managed product that runs on user-managed infrastructure. You are responsible for cluster lifecycle operations and maintenance of your EKS Anywhere clusters. EKS Anywhere is open source and free to use at no cost. You can optionally purchase EKS Anywhere Enterprise Subscriptions
to receive support for your EKS Anywhere clusters and for access to EKS Anywhere Curated Packages
and extended support for Kubernetes versions.
EKS Anywhere Curated Packages are software packages that are built, tested, and supported by AWS and extend the core functionalities of Kubernetes on your EKS Anywhere clusters.
EKS Anywhere supports many different types of infrastructure including VMWare vSphere, Bare Metal, Nutanix, Apache CloudStack, and AWS Snow. You can run EKS Anywhere without a connection to AWS Cloud and in air-gapped environments, or you can optionally connect to AWS Cloud to integrate with other AWS services. You can use the EKS Connector
to view your EKS Anywhere clusters in the Amazon EKS console, AWS IAM to authenticate to your EKS Anywhere clusters, IAM Roles for Service Accounts (IRSA) to authenticate Pods with other AWS services, and AWS Distro for OpenTelemetry to send metrics to Amazon Managed Prometheus for monitoring cluster resources.
If you have on-premises or edge environments with reliable connectivity to an AWS Region, consider using EKS Hybrid Nodes
or EKS on Outposts
to benefit from the AWS-managed EKS control plane and consistent experience with EKS in AWS Cloud.
EKS Anywhere is built on the Kubernetes sub-project called Cluster API
(CAPI), which is focused on providing declarative APIs and tooling to simplify the provisioning, upgrading, and operating of multiple Kubernetes clusters. While EKS Anywhere simplifies and abstracts the CAPI primitives, it is useful to understand the basics of CAPI when using EKS Anywhere.
Why EKS Anywhere?
- Simplify and automate Kubernetes management on-premises
- Unify Kubernetes distribution and support across on-premises, edge, and cloud environments
- Run in isolated or air-gapped on-premises environments
- Adopt modern operational practices and tools on-premises
- Build on open source standards
Common Use Cases
- Modernize on-premises applications from virtual machines to containers
- Internal development platforms to standardize how teams consume Kubernetes across the organization
- Telco 5G Radio Access Networks (RAN) and Core workloads
- Regulated services in private data centers on-premises
What’s Next?
1.1 - Frequently Asked Questions
Frequently asked questions about EKS Anywhere
General
Where can I deploy EKS Anywhere?
EKS Anywhere is designed to run on user-managed infrastructure in user-managed environments. EKS Anywhere supports different types of infrastructure including VMware vSphere, bare metal, Nutanix, AWS Snowball Edge, and Apache CloudStack.
Can I run EKS Anywhere in the cloud?
No, EKS Anywhere is not supported to run in AWS or other clouds, and EC2 instances cannot be used as the infrastructure for EKS Anywhere clusters. This includes EC2 instances running in AWS Regions, Local Zones, and Outposts.
What operating systems can I use with EKS Anywhere?
EKS Anywhere provides Bottlerocket, a Linux-based container-native operating system built by AWS, as the default node operating system for clusters on VMware vSphere. You can alternatively use Ubuntu and Red Hat Enterprise Linux (RHEL) as the node operating system. You can only use a single node operating system per cluster. Bottlerocket is the only operating system distributed and fully supported by AWS. If you are using the other operating systems, you must build the operating system images and configure EKS Anywhere to use the images you built when installing or updating clusters. AWS will assist with troubleshooting and configuration guidance for Ubuntu and RHEL as part of EKS Anywhere Enterprise Subscriptions. For official support for Ubuntu and RHEL operating systems, you must purchase support through their respective vendors.
Does EKS Anywhere require a connection to AWS?
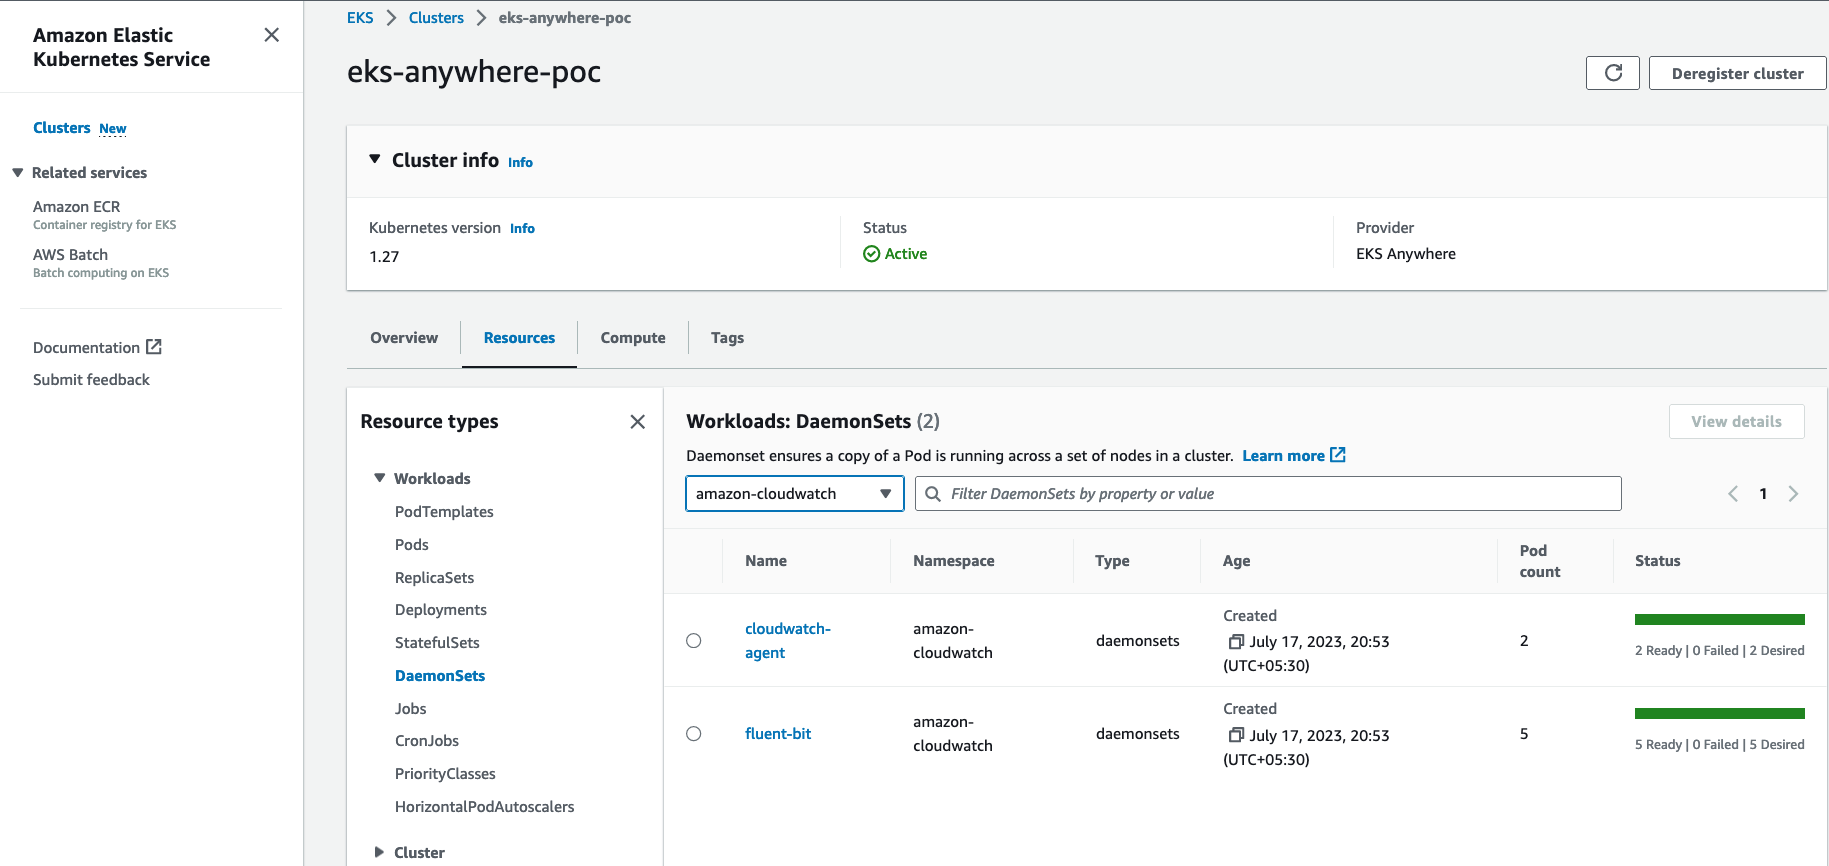
EKS Anywhere can run connected to an AWS Region or disconnected from an AWS Region, including in air-gapped environments. If you run EKS Anywhere connected to an AWS Region, you can view your clusters in the Amazon EKS console with the EKS Connector and can optionally use AWS IAM for cluster authentication, AWS IAM Roles for Service Accounts (IRSA), cert-manager with Amazon Certificate Manager, the AWS Distro for OpenTelemetry (ADOT) collector with Amazon Managed Prometheus, and FluentBit with Amazon CloudWatch Logs.
What are the differences between EKS Anywhere and EKS Hybrid Nodes?
EKS Hybrid Nodes
is a feature of Amazon EKS, a managed Kubernetes service, whereas EKS Anywhere is AWS-supported Kubernetes management software that you manage. EKS Hybrid Nodes is a fit for customers with on-premises environments that can be connected to the cloud, whereas EKS Anywhere is a fit for customers with isolated or air-gapped on-premises environments.
With EKS Hybrid Nodes, AWS manages the security, availability, and scalability of the Kubernetes control plane, which is hosted in AWS Cloud, and only nodes run on your infrastructure. With EKS Anywhere, you are responsible for managing the Kubernetes clusters that run entirely on your infrastructure. EKS Hybrid Nodes uses a “bring-your-own-infrastructure” approach where you are responsible for the provisioning and management of the infrastructure used for your hybrid nodes compute with your own choice of tooling whereas EKS Anywhere integrates with Cluster API (CAPI) to provision and manage the infrastructure used as nodes in EKS Anywhere clusters.
With EKS Hybrid Nodes, there are no upfront commitments or minimum fees and you pay for the hourly use of your cluster and nodes as you use them. The EKS Hybrid Nodes fee is based on vCPU of the connected hybrid nodes. With EKS Anywhere, you can purchase EKS Anywhere Enterprise Subscriptions for a one-year or three-year term on a per cluster basis.
What are the differences between EKS Anywhere and ECS Anywhere?
ECS Anywhere
is a feature of Amazon ECS that can be used to run containers on your on-premises infrastructure. ECS Anywhere is similar to EKS Hybrid Nodes, where the ECS control plane runs in an AWS Region, managed by ECS, and you connect your on-premises hosts as instances to your ECS clusters to enable tasks to be scheduled on your on-premises ECS instances. With EKS Anywhere, you are responsible for managing the Kubernetes clusters that run entirely on your infrastructure.
Architecture
What infrastructure do I need to get started with EKS Anywhere?
To get started with EKS Anywhere, you need 1 admin machine
and at least 1 VM for the control plane and 1 VM for the worker node if you are running on VMware vSphere, Nutanix, AWS Snowball Edge, or Apache CloudStack. If you are running on bare metal, you need at least 1 admin machine
and 1 physical server for the co-located control plane and worker node.
What infrastructure do I need to run EKS Anywhere in production?
To use EKS Anywhere in production, it is generally recommended to run separate management and workload clusters, see EKS Anywhere Architecture
for more information. It is recommended to run both the management cluster and workload clusters in a highly available fashion with the Kubernetes control plane instances spread across multiple virtual or physical hosts. For management clusters, management components are run on worker nodes that are separate from the Kubernetes control plane machines. For workload clusters, application workloads are run on worker nodes that are separate from the Kubernetes control plane machines, unless you are running on bare metal which allows for co-locating the Kubernetes control plane and worker nodes on the same physical machines.
If you are using VMware vSphere, Nutanix, AWS Snowball Edge, or Apache CloudStack for your infrastructure, it is recommended to run at least 3 separate virtual machines for the etcd instances of the Kubernetes control plane, which can be configured with the externalEctdConfiguration setting of the EKS Anywhere cluster specification. For more information, see the installation Overview
and the requirements for using EKS Anywhere for each infrastructure provider below.
What permissions does EKS Anywhere need to manage infrastructure used for the cluster?
EKS Anywhere needs permissions to create the virtual machines that are used as nodes in EKS Anywhere clusters. If you are running EKS Anywhere on bare metal, EKS Anywhere needs to be able to remotely manage your bare metal servers for network booting. You must configure these permissions before creating EKS Anywhere clusters.
What components does EKS Anywhere use?
EKS Anywhere is built on the Kubernetes sub-project called Cluster API
(CAPI), which is focused on providing declarative APIs and tooling to simplify the provisioning, upgrading, and operating of multiple Kubernetes clusters. EKS Anywhere inherits many of the same architectural patterns and concepts that exist in CAPI. Reference the CAPI documentation
to learn more about the core CAPI concepts.
EKS Anywhere has four categories of components, all based on open source software:
- Administrative / CLI components: Responsible for lifecycle operations of management or standalone clusters, building images, and collecting support diagnostics. Admin / CLI components run on Admin machines or image building machines.
- Management components: Responsible for infrastructure and cluster lifecycle management (create, update, upgrade, scale, delete). Management components run on standalone or management clusters.
- Cluster components: Components that make up a Kubernetes cluster where applications run. Cluster components run on standalone, management, and workload clusters.
- Curated packages: Amazon-curated software packages that extend the core functionalities of Kubernetes on your EKS Anywhere clusters
For more information on EKS Anywhere components, reference EKS Anywhere Architecture.
What interfaces can I use to manage EKS Anywhere clusters?
The tools available for cluster lifecycle operations (create, update, upgrade, scale, delete) vary based on the EKS Anywhere architecture you run. You must use the eksctl CLI for cluster lifecycle operations with standalone clusters and management clusters. If you are running a management / workload cluster architecture, you can use the management cluster to manage one-to-many downstream workload clusters. With the management cluster architecture, you can use the eksctl CLI, any Kubernetes API-compatible client, or Infrastructure as Code (IAC) tooling such as Terraform and GitOps to manage the lifecycle of workload clusters. For details on the differences between the architecture options, reference the Architecture page .
To perform cluster lifecycle operations for standalone, management, or workload clusters, you modify the EKS Anywhere Cluster specification, which is a Kubernetes Custom Resource for EKS Anywhere clusters. When you modify a field in an existing Cluster specification, EKS Anywhere reconciles the infrastructure and Kubernetes components until they match the new desired state you defined.
EKS Anywhere Enterprise Subscriptions
For more information on EKS Anywhere Enterprise Subscriptions, see the Overview of support for EKS Anywhere.
What is included in EKS Anywhere Enterprise Subscriptions?
EKS Anywhere Enterprise Subscriptions include support for EKS Anywhere clusters, access to EKS Anywhere Curated Packages, and access to extended support for Kubernetes versions. If you do not have an EKS Anywhere Enterprise Subscription, you cannot get support for EKS Anywhere clusters through AWS Support.
How much do EKS Anywhere Enterprise Subscriptions cost?
For pricing information, visit the EKS Anywhere Pricing
page.
How can I purchase an EKS Anywhere Enterprise Subscription?
Reference the Purchase Subscriptions
documentation for instructions on how to purchase.
Is there a free trial for EKS Anywhere Enterprise Subscriptions?
Free trial access to EKS Anywhere Curated Packages is available upon request. Free trial access to EKS Anywhere Curated Packages does not include troubleshooting support for your EKS Anywhere deployments. Contact your AWS account team for more information.
1.2 - Partners
EKS Anywhere validated partners
Amazon EKS Anywhere maintains relationships with third-party vendors to provide add-on solutions for EKS Anywhere clusters.
A complete list of these partners is maintained on the Amazon EKS Anywhere Partners
page.
See Conformitron: Validate third-party software with Amazon EKS and Amazon EKS Anywhere
for information on how conformance testing and quality assurance is done on this software.
The following shows validated EKS Anywhere partners whose products have passed conformance test for specific EKS Anywhere providers and versions:
Kubernetes Version :  1.31
Date of Conformance Test : 2024-12-17

Following ISV Partners have Validated their Conformance :

VENDOR_PRODUCT   VENDOR_PRODUCT_TYPE          VENDOR_PRODUCT_VERSION
aqua             aqua-enforcer                2022.4.20
dynatrace        dynatrace                    1.3.0
kong             kong-enterprise              2.27.0
accuknox         kubearmor                    v1.3.2
kubecost         cost-analyzer                2.4.3
nirmata          enterprise-kyverno           1.6.10
lacework         polygraph                    6.11.0
newrelic         nri-bundle                   5.0.101
perfectscale     perfectscale                 v0.0.38
pulumi           pulumi-kubernetes-operator   0.3.0
solo.io          solo-istiod                  1.18.3-eks-a
stormforge       optimize-live                2.16.1
tetrate.io       tetrate-istio-distribution   1.18.1
hashicorp        vault                        0.25.0
STCLab           wave-autoscale               1.10.0
vSphere provider validated partners
Kubernetes Version :  1.31
Date of Conformance Test : 2024-12-17

Following ISV Partners have Validated their Conformance :

VENDOR_PRODUCT   VENDOR_PRODUCT_TYPE          VENDOR_PRODUCT_VERSION
aqua             aqua-enforcer                2022.4.20
dynatrace        dynatrace                    1.3.0
kong             kong-enterprise              2.27.0
accuknox         kubearmor                    v1.3.2
kubecost         cost-analyzer                2.4.3
nirmata          enterprise-kyverno           1.6.10
lacework         polygraph                    6.11.0
newrelic         nri-bundle                   5.0.101
perfectscale     perfectscale                 v0.0.38
pulumi           pulumi-kubernetes-operator   0.3.0
solo.io          solo-istiod                  1.18.3-eks-a
stormforge       optimize-live                2.16.1
tetrate.io       tetrate-istio-distribution   1.18.1
hashicorp        vault                        0.25.0
STCLab           wave-autoscale               1.10.0
AWS Hybrid Nodes provider validated partners
Kubernetes Version :  1.30
Date of Conformance Test : 2024-12-17

Following ISV Partners have Validated their Conformance :

VENDOR_PRODUCT   VENDOR_PRODUCT_TYPE          VENDOR_PRODUCT_VERSION
aqua             aqua-enforcer                2022.4.20
dynatrace        dynatrace                    1.3.0
kong             kong-enterprise              2.27.0
accuknox         kubearmor                    v1.3.2
kubecost         cost-analyzer                2.4.3
nirmata          enterprise-kyverno           1.6.10
lacework         polygraph                    6.11.0
newrelic         nri-bundle                   5.0.95
perfectscale     perfectscale                 v0.0.38
pulumi           pulumi-kubernetes-operator   0.3.0
solo.io          solo-istiod                  1.18.3-eks-a
stormforge       optimize-live                2.16.1
tetrate.io       tetrate-istio-distribution   1.18.1
hashicorp        vault                        0.25.0
STCLab           wave-autoscale               1.10.0
AWS Auto Mode provider validated partners
Kubernetes Version :  1.31
Date of Conformance Test : 2024-12-17

Following ISV Partners have Validated their Conformance :

VENDOR_PRODUCT   VENDOR_PRODUCT_TYPE          VENDOR_PRODUCT_VERSION
aqua             aqua-enforcer                2022.4.20
dynatrace        dynatrace                    1.3.0
kong             kong-enterprise              2.27.0
accuknox         kubearmor                    v1.3.2
kubecost         cost-analyzer                2.4.3
nirmata          enterprise-kyverno           1.6.10
lacework         polygraph                    6.11.0
perfectscale     perfectscale                 v0.0.38
pulumi           pulumi-kubernetes-operator   0.3.0
solo.io          solo-istiod                  1.18.3-eks-a
stormforge       optimize-live                2.16.1
tetrate.io       tetrate-istio-distribution   1.18.1
hashicorp        vault                        0.25.0
STCLab           wave-autoscale               1.10.0
AWS Cloud provider validated partners
Kubernetes Version :  1.28
Date of Conformance Test : 2024-12-17

Following ISV Partners have Validated their Conformance :

VENDOR_PRODUCT   VENDOR_PRODUCT_TYPE          VENDOR_PRODUCT_VERSION
aqua             aqua-enforcer                2022.4.20
dynatrace        dynatrace                    1.3.0
kong             kong-enterprise              2.27.0
accuknox         kubearmor                    v1.3.2
kubecost         cost-analyzer                2.4.3
nirmata          enterprise-kyverno           1.6.10
lacework         polygraph                    6.11.0
newrelic         nri-bundle                   5.0.101
perfectscale     perfectscale                 v0.0.38
pulumi           pulumi-kubernetes-operator   0.3.0
solo.io          solo-istiod                  1.18.3-eks-a
stormforge       optimize-live                2.16.1
tetrate.io       tetrate-istio-distribution   1.18.1
hashicorp        vault                        0.25.0
STCLab           wave-autoscale               1.10.0
AWS Snow provider validated partners
Kubernetes Version :  1.29
Date of Conformance Test : 2024-12-17

Following ISV Partners have Validated their Conformance :

VENDOR_PRODUCT   VENDOR_PRODUCT_TYPE          VENDOR_PRODUCT_VERSION
aqua             aqua-enforcer                2022.4.20
dynatrace        dynatrace                    1.3.0
kong             kong-enterprise              2.27.0
accuknox         kubearmor                    v1.3.2
kubecost         cost-analyzer                2.4.3
nirmata          enterprise-kyverno           1.6.10
lacework         polygraph                    6.11.0
newrelic         nri-bundle                   5.0.101
perfectscale     perfectscale                 v0.0.38
pulumi           pulumi-kubernetes-operator   0.3.0
solo.io          solo-istiod                  1.18.3-eks-a
stormforge       optimize-live                2.16.1
tetrate.io       tetrate-istio-distribution   1.18.1
hashicorp        vault                        0.25.0
STCLab           wave-autoscale               1.10.0
2 - What's New
New EKS Anywhere releases, features, and fixes
2.1 - Changelog
Changelog for EKS Anywhere releases
Announcements
- If you are upgrading your management cluster to
v0.22.x patch versions prior to v0.22.3, you may encounter a bug related to extended Kubernetes versions support that blocks lifecycle management (LCM) operations on workload clusters running versions prior to v0.22.0. To avoid this issue, we recommend upgrading your management cluster directly to v0.22.3 before performing any workload cluster LCM operations.
- If you are running EKS Anywhere versions
v0.22.0 or v0.22.1 in an air-gapped environment with proxy enabled, you may be affected by a Helm v3.17.1 bug that impacts proxy functionality in air-gapped environments. To resolve this, we recommend upgrading to EKS Anywhere v0.22.2 or above. More details can be found here
- Due to a bug in Cilium introduced in 1.14, which is present in
v0.21.0-v0.21.6, we recommend that you upgrade to v0.21.7 or above to fix an issue when using hostport. More details listed here
- Due to a bug in the
sigs.k8s.io/yaml module that EKS Anywhere uses, Kubernetes versions whose minor versions are multiples of 10, such as 1.30, 1.40, etc, will be parsed as float64 instead of string if specified without quotes in the cluster config file. This causes the trailing zero to get dropped and be evaluated as 1.3 and 1.4 respectively. This issue has been fixed in EKS Anywhere release v0.21.5 so we recommend you to upgrade to that version for a better user experience. If you are unable to upgrade to v0.21.5, you must use single or double quotes around Kubernetes version(s) whose minor versions are multiples of 10.
Refer to the following links for more information regarding this issue:
- EKS Anywhere release
v0.19.0 introduces support for creating Kubernetes version v1.29 clusters. A conformance test was promoted in Kubernetes v1.29 that verifies that Services serving different L4 protocols with the same port number can co-exist in a Kubernetes cluster. This is not supported in Cilium, the CNI deployed on EKS Anywhere clusters, because Cilium currently does not differentiate between TCP and UDP protocols for Kubernetes Services. Hence EKS Anywhere v1.29 and above clusters will not pass this specific conformance test. This service protocol differentiation is being tracked in an upstream Cilium issue and will be supported in a future Cilium release. A future release of EKS Anywhere will include the patched Cilium version when it is available.
Refer to the following links for more information regarding the conformance test:
- The Bottlerocket project will not be releasing bare metal variants for Kubernetes versions v1.29 and beyond. Hence Bottlerocket is not a supported operating system for creating EKS Anywhere bare metal clusters with Kubernetes versions v1.29 and above. However, Bottlerocket is still supported for bare metal clusters running Kubernetes versions v1.28 and below.
Refer to the following links for more information regarding the deprecation:
- On January 31, 2024, a High-severity vulnerability CVE-2024-21626 was published affecting all
runc versions <= v1.1.11. This CVE has been fixed in runc version v1.1.12, which has been included in EKS Anywhere release v0.18.6. In order to fix this CVE in your new/existing EKS-A cluster, you MUST build or download new OS images pertaining to version v0.18.6 and create/upgrade your cluster with these images.
Refer to the following links for more information on the steps to mitigate the CVE.
- On October 11, 2024, a security issue CVE-2024-9594 was discovered in the Kubernetes Image Builder where default credentials are enabled during the image build process when using the Nutanix, OVA, QEMU or raw providers. The credentials can be used to gain root access. The credentials are disabled at the conclusion of the image build process. Kubernetes clusters are only affected if their nodes use VM images created via the Image Builder project. Clusters using virtual machine images built with Kubernetes Image Builder
version v0.1.37 or earlier are affected if built with the Nutanix, OVA, QEMU or raw providers. These images built using previous versions of image-builder will be vulnerable only during the image build process, if an attacker was able to reach the VM where the image build was happening, login using these default credentials and modify the image at the time the image build was occurring. This CVE has been fixed in image-builder versions >= v0.1.38, which has been included in EKS Anywhere releases v0.19.11 and v0.20.8.
General Information
- When upgrading to a new minor version, a new OS image must be created using the new image-builder CLI pertaining to that release.
Planned updates to supported kubernetes versions
- Kubernetes 1.32 reaches end of standard support on April 30, 2026
- Extended support continues until April 30, 2027 for clusters with valid license tokens
- Clusters will continue to function but will not receive CVE patches or bug fixes after standard support ends
- Kubernetes 1.29 reaches end of extended support on April 30, 2026
- No further patches will be available after this date
- Existing clusters will continue to function but upgrading is strongly recommended
For complete version support details, see the Kubernetes version support table
.
Supported OS version details
|
vSphere |
Bare Metal |
Nutanix |
CloudStack |
Snow |
| Ubuntu 20.04 |
✔ |
✔ |
✔ |
— |
✔ |
| Ubuntu 22.04 |
✔ |
✔ |
✔ |
— |
— |
| Ubuntu 24.04 |
✔ |
✔ |
✔ |
— |
— |
| Bottlerocket 1.56.0 |
✔ |
— |
— |
— |
— |
| RHEL 8.x |
✔ |
✔ |
✔ |
✔ |
— |
| RHEL 9.x |
✔ |
✔ |
✔ |
✔ |
— |
* Starting with EKS-A minor release v0.25.0, the bundled Kubernetes Image Builder will no longer support Ubuntu 20.04 LTS builds, as Ubuntu 20.04 LTS Standard Support has ended, and the upstream Kubernetes Image Builder no longer supports Ubuntu 20.04 LTS.
* RHEL 8’s kernel version (4.18) is not supported by kubeadm for Kubernetes versions 1.32 and above (see Kubernetes GitHub issue #129462
). As a result, EKS Anywhere does not support using RHEL 8 as the node operating system for Kubernetes versions 1.32 and above.
Changed
- EKS Distro:
- New EKS-Distro base images
- Bottlerocket:
v1.54.0 to v1.56.0
- Cert-manager:
v1.19.3 to v1.19.4
- Cilium:
v1.18.5 to v1.18.7
- Cluster-api-provider-nutanix:
v1.6.1 to v1.6.2
- Helm:
v4.1.0 go v4.1.3
- rancher/local-path-provisioner
v0.0.34 to v0.0.35
- replicatedhq/troubleshoot:
v0.123.17 to v0.123.18
Fixed
- Patch kube-vip to retry exponentially on transient 403/401 errors (#5267
)
- Patch BMCLib to try all matching slots during virtual media mount to fix ISO boot workflow on IDRAC 10 (#5263
)
Planned updates to supported kubernetes versions
- Kubernetes 1.32 reaches end of standard support on April 30, 2026
- Extended support continues until April 30, 2027 for clusters with valid license tokens
- Clusters will continue to function but will not receive CVE patches or bug fixes after standard support ends
- Kubernetes 1.29 reaches end of extended support on April 30, 2026
- No further patches will be available after this date
- Existing clusters will continue to function but upgrading is strongly recommended
For complete version support details, see the Kubernetes version support table
.
Supported OS version details
|
vSphere |
Bare Metal |
Nutanix |
CloudStack |
Snow |
| Ubuntu 22.04 |
✔ |
✔ |
✔ |
— |
✔ |
| Ubuntu 24.04 |
✔ |
✔ |
✔ |
— |
— |
| Bottlerocket 1.54.0 |
✔ |
— |
— |
— |
— |
| RHEL 8.x |
✔ |
✔ |
✔ |
✔ |
— |
| RHEL 9.x |
✔ |
✔ |
✔ |
✔ |
— |
* Starting with EKS-A minor release v0.25.0, the bundled Kubernetes Image Builder no longer supports Ubuntu 20.04 LTS builds, as Ubuntu 20.04 LTS Standard Support has ended, and the upstream Kubernetes Image Builder no longer supports Ubuntu 20.04 LTS.
* RHEL 8’s kernel version (4.18) is not supported by kubeadm for Kubernetes versions 1.32 and above (see Kubernetes GitHub issue #129462
). As a result, EKS Anywhere does not support using RHEL 8 as the node operating system for Kubernetes versions 1.32 and above.
Added
- Support for Kubernetes v1.35 (#10517
, #5112
)
- Migrate all Cluster API resources to v1beta2 contract (#10545
, #10547
- Add HardwareAffinity field to TinkerbellMachineConfig API for advanced hardware selection using Kubernetes-style label selectors with required and preferred terms (#10472
)
- Add Intel ICE E800 series out-of-tree driver support in Hook (#5156
)
- Consolidate tinkerbell components into a single mono-repo with unified helm chart (#10518
, #5074
Changed
- EKS Distro:
- Cluster API (CAPI):
v1.11.1 to v1.12.2
- Cluster API Provider vSphere:
v1.13.1 to v1.15.2
- Cluster API Provider Tinkerbell:
v0.6.5 to v0.6.6
- Cluster API Provider AWS Snow:
v0.2.8 to v0.2.9
- Bottlerocket:
v1.51.0 to v1.54.0
- Cert-manager:
v1.18.5 to v1.19.3
- Cilium:
v1.17.12 to v1.18.5
- Helm:
v3.16.4 to v4.1.0
- Image builder:
v0.1.44 to v0.1.48
- Kind:
v0.29.0 to v0.31.0
- Cri-tools:
v1.34.0 to v1.35.0
- Kube-rbac-proxy:
v0.20.0 to v0.20.2
- CloudStack cloudmonkey:
6.4.0 to 6.5.0
- etcdadm-controller:
v1.0.26 to v1.0.27
- etcdadm-bootstrap-provider:
v1.0.18 to v1.0.19
Planned updates to provider support
- Starting with EKS-A minor release v0.26, EKS-A will no longer include Cluster API providers for CloudStack or AWS Snow, and AWS will no longer support these providers. Users are encouraged to find alternative support.
Removed
- Dropped Kubernetes v1.28 support (#5128
)
- Dropped Ubuntu 20.04 image-builder support
- Removed unused old tinkerbell components from bundle (#10612
)
Planned updates to supported kubernetes versions
- Kubernetes 1.32 reaches end of standard support on April 30, 2026
- Extended support continues until April 30, 2027 for clusters with valid license tokens
- Clusters will continue to function but will not receive CVE patches or bug fixes after standard support ends
- Kubernetes 1.29 reaches end of extended support on April 30, 2026
- No further patches will be available after this date
- Existing clusters will continue to function but upgrading is strongly recommended
For complete version support details, see the Kubernetes version support table
.
Supported OS version details
|
vSphere |
Bare Metal |
Nutanix |
CloudStack |
Snow |
| Ubuntu 20.04 |
✔ |
✔ |
✔ |
— |
✔ |
| Ubuntu 22.04 |
✔ |
✔ |
✔ |
— |
— |
| Ubuntu 24.04 |
✔ |
✔ |
✔ |
— |
— |
| Bottlerocket 1.56.0 |
✔ |
— |
— |
— |
— |
| RHEL 8.x |
✔ |
✔ |
✔ |
✔ |
— |
| RHEL 9.x |
✔ |
✔ |
✔ |
✔ |
— |
* Starting with EKS-A minor release v0.25.0, the bundled Kubernetes Image Builder will no longer support Ubuntu 20.04 LTS builds, as Ubuntu 20.04 LTS Standard Support has ended, and the upstream Kubernetes Image Builder no longer supports Ubuntu 20.04 LTS.
* RHEL 8’s kernel version (4.18) is not supported by kubeadm for Kubernetes versions 1.32 and above (see Kubernetes GitHub issue #129462
). As a result, EKS Anywhere does not support using RHEL 8 as the node operating system for Kubernetes versions 1.32 and above.
Changed
- EKS Distro:
- New EKS-Distro base images
- Cert-manager:
v1.18.5 to v1.18.6
- Cilium:
v1.17.12 to v1.17.13
- fluxcd/flux2:
v2.7.5 to v2.8.3
- fluxcd/helm-controller:
v1.4.5 to v1.5.3
- fluxcd/notification-controller:
v1.7.5 to v1.8.2
Fixed
- Patch BMCLib to try all matching slots during virtual media mount to fix ISO boot workflow on IDRAC 10 (#5264
)
Planned updates to supported kubernetes versions
- Kubernetes 1.32 reaches end of standard support on April 30, 2026
- Extended support continues until April 30, 2027 for clusters with valid license tokens
- Clusters will continue to function but will not receive CVE patches or bug fixes after standard support ends
- Kubernetes 1.29 reaches end of extended support on April 30, 2026
- No further patches will be available after this date
- Existing clusters will continue to function but upgrading is strongly recommended
For complete version support details, see the Kubernetes version support table
.
Supported OS version details
|
vSphere |
Bare Metal |
Nutanix |
CloudStack |
Snow |
| Ubuntu 20.04 |
✔ |
✔ |
✔ |
— |
✔ |
| Ubuntu 22.04 |
✔ |
✔ |
✔ |
— |
— |
| Ubuntu 24.04 |
✔ |
✔ |
✔ |
— |
— |
| Bottlerocket 1.56.0 |
✔ |
— |
— |
— |
— |
| RHEL 8.x |
✔ |
✔ |
✔ |
✔ |
— |
| RHEL 9.x |
✔ |
✔ |
✔ |
✔ |
— |
* Starting with EKS-A minor release v0.25.0, the bundled Kubernetes Image Builder will no longer support Ubuntu 20.04 LTS builds, as Ubuntu 20.04 LTS Standard Support has ended, and the upstream Kubernetes Image Builder no longer supports Ubuntu 20.04 LTS.
* RHEL 8’s kernel version (4.18) is not supported by kubeadm for Kubernetes versions 1.32 and above (see Kubernetes GitHub issue #129462
). As a result, EKS Anywhere does not support using RHEL 8 as the node operating system for Kubernetes versions 1.32 and above.
Changed
- EKS Distro:
- New EKS-Distro base images
- Bottlerocket:
v1.54.0 to v1.56.0
- aws/etcdadm-bootstrap-provider
1.0.18 to 1.0.19
- aws/etcdadm-bootstrap-controller
v1.0.26 to v1.0.27
- replicatedhq/troubleshoot
v0.123.17 to v0.123.18
- rancher/local-path-provisioner
v0.0.34 to v0.0.35
Fixed
- Patch kube-vip to retry exponentially on transient 403/401 errors (#5257
)
- Patch Tinkerbell and Rufio to use a BMCLib forks with fixes for Idrac 10 (#5248
)
- Add a patch to bump bmclib to include virtual media mount fix (#5222
)
Planned updates to supported kubernetes versions
- Kubernetes 1.32 reaches end of standard support on April 30, 2026
- Extended support continues until April 30, 2027 for clusters with valid license tokens
- Clusters will continue to function but will not receive CVE patches or bug fixes after standard support ends
- Kubernetes 1.29 reaches end of extended support on April 30, 2026
- No further patches will be available after this date
- Existing clusters will continue to function but upgrading is strongly recommended
For complete version support details, see the Kubernetes version support table
.
Supported OS version details
|
vSphere |
Bare Metal |
Nutanix |
CloudStack |
Snow |
| Ubuntu 20.04 |
✔ |
✔ |
✔ |
— |
✔ |
| Ubuntu 22.04 |
✔ |
✔ |
✔ |
— |
— |
| Ubuntu 24.04 |
✔ |
✔ |
✔ |
— |
— |
| Bottlerocket 1.51.0 |
✔ |
— |
— |
— |
— |
| RHEL 8.x |
✔ |
✔ |
✔ |
✔ |
— |
| RHEL 9.x |
✔ |
✔ |
✔ |
✔ |
— |
* Starting with EKS-A minor release v0.25.0, the bundled Kubernetes Image Builder will no longer support Ubuntu 20.04 LTS builds, as Ubuntu 20.04 LTS Standard Support has ended, and the upstream Kubernetes Image Builder no longer supports Ubuntu 20.04 LTS.
* RHEL 8’s kernel version (4.18) is not supported by kubeadm for Kubernetes versions 1.32 and above (see Kubernetes GitHub issue #129462
). As a result, EKS Anywhere does not support using RHEL 8 as the node operating system for Kubernetes versions 1.32 and above.
Changed
-
EKS Distro:
-
cilium v1.17.10 to v1.17.12
-
kube-vip v1.0.2 to v1.0.4
-
cert-manager v1.18.3 to v1.18.5
-
fluxcd/flux2 v2.7.0 to v2.7.5
-
fluxcd/notification-controller v1.7.1 to v1.7.5
-
fluxcd/helm-controller v1.4.0 to v1.4.5
-
fluxcd/kustomize-controller v1.7.0 to v1.7.3
-
fluxcd/source-controller v1.7.0 to v1.7.4
-
replicatedhq/troubleshoot v0.123.12 to v0.123.17
-
rancher/local-path-provisioner v0.0.32 to v0.0.34
Fixed
- Fixed bottlerocket hostOSConfiguration values getting lost during upgrade to EKS-A v0.24 from previous minor versions (5103
)
- Improved garbage collection of cluster resources for Nutanix provider (10494
)
- Fixed Snow provider support for k8s 1.34 by migrating containerd configuration to v2 format (#10491
)
Supported OS version details
|
vSphere |
Bare Metal |
Nutanix |
CloudStack |
Snow |
| Ubuntu 20.04 |
✔ |
✔ |
✔ |
— |
✔ |
| Ubuntu 22.04 |
✔ |
✔ |
✔ |
— |
— |
| Ubuntu 24.04 |
✔ |
✔ |
✔ |
— |
— |
| Bottlerocket 1.51.0 |
✔ |
— |
— |
— |
— |
| RHEL 8.x |
✔ |
✔ |
✔ |
✔ |
— |
| RHEL 9.x |
✔ |
✔ |
✔ |
✔ |
— |
* RHEL 8’s kernel version (4.18) is not supported by kubeadm for Kubernetes versions 1.32 and above (see Kubernetes GitHub issue #129462
). As a result, EKS Anywhere does not support using RHEL 8 as the node operating system for Kubernetes versions 1.32 and above.
Bug Fixes
- Use cluster spec for worker maxSurge validation instead of generated CAPI object (#10465
)
- Remove older etcd machines after new etcd machines are rolled out (#5055
)
- Fix containerd socket race condition in kind node image build (#5063
)
Other Changes
- Docs for newly released package versions (#10454
)
- Improve ADOT and IRSA docs: automate RBAC, dedicated ServiceAccounts (#10458
)
- Update documentation: CAPI cluster pause/resume behavior during management cluster upgrades (#10470
)
Supported OS version details
|
vSphere |
Bare Metal |
Nutanix |
CloudStack |
Snow |
| Ubuntu 20.04 |
✔ |
✔ |
✔ |
— |
✔ |
| Ubuntu 22.04 |
✔ |
✔ |
✔ |
— |
— |
| Ubuntu 24.04 |
✔ |
✔ |
✔ |
— |
— |
| Bottlerocket 1.51.0 |
✔ |
— |
— |
— |
— |
| RHEL 8.x |
✔ |
✔ |
✔ |
✔ |
— |
| RHEL 9.x |
✔ |
✔ |
✔ |
✔ |
— |
* RHEL 8’s kernel version (4.18) is not supported by kubeadm for Kubernetes versions 1.32 and above (see Kubernetes GitHub issue #129462
). As a result, EKS Anywhere does not support using RHEL 8 as the node operating system for Kubernetes versions 1.32 and above.
Changed
- EKS Distro:
- New EKS-Distro base images with CVE fixes for Amazon Linux 2 and Amazon Linux 2023
- Cilium:
v1.17.8-0 to v1.17.10-0
- Kube-vip:
v1.0.0 to v1.0.2
- cloud-provider-nutanix:
v0.5.2 to v0.5.5
- cloud-provider-vsphere 1-33:
v1.33.0 to v1.33.1
- cloud-provider-vsphere 1-32:
v1.32.2 to v1.32.3
- cluster-api-provider-aws-snow
v0.2.7 to v0.2.8
- Cert-manager:
v1.18.2 to v1.18.3
- cluster-api-provider-nutanix:
v1.6.1 to v1.6.2
- Rufio:
55a6a8c to 126069b950a57d571df90dfec7cd98e6d64692be
Fixed
- Update custom TinkerbellTemplateConfig to use new static IPAM logic (#10340
)
- Set DHCP relay sourceInterface from LoadBalancerInterface config (#10424
)
- Eliminate race condition in package ctlr installation (#10433
)
Supported OS version details
|
vSphere |
Bare Metal |
Nutanix |
CloudStack |
Snow |
| Ubuntu 20.04 |
✔ |
✔ |
✔ |
— |
✔ |
| Ubuntu 22.04 |
✔ |
✔ |
✔ |
— |
— |
| Ubuntu 24.04 |
✔ |
✔ |
✔ |
— |
— |
| Bottlerocket 1.51.0 |
✔ |
— |
— |
— |
— |
| RHEL 8.x |
✔ |
✔ |
✔ |
✔ |
— |
| RHEL 9.x |
✔ |
✔ |
✔ |
✔ |
— |
* RHEL 8’s kernel version (4.18) is not supported by kubeadm for Kubernetes versions 1.32 and above (see Kubernetes GitHub issue #129462
). As a result, EKS Anywhere does not support using RHEL 8 as the node operating system for Kubernetes versions 1.32 and above.
Added
- Enable second network interface configuration for VSphere (Bottlerocket) (#4972
,#4998
,#10373
)
- Add support for skipping BMC contact checks for specific Rufio Machines (#10362
,#10366
)
- Allow user to specify ssh_timeout and ssh_handshake_attempts in image-builder CLI (#4975
)
- Support Ubuntu24.04 on Nutanix
Changed
- EKS Distro:
- Troubleshoot:
v0.122.0 to v0.123.12
Fixed
- Fix Bottlerocket cert renewal: Add 30s sleep and duplicate container (#10360
)
Supported OS version details
|
vSphere |
Bare Metal |
Nutanix |
CloudStack |
Snow |
| Ubuntu 20.04 |
✔ |
✔ |
✔ |
— |
✔ |
| Ubuntu 22.04 |
✔ |
✔ |
✔ |
— |
— |
| Ubuntu 24.04 |
✔ |
✔ |
— |
— |
— |
| Bottlerocket 1.50.0 |
✔ |
— |
— |
— |
— |
| RHEL 8.x |
✔ |
✔ |
✔ |
✔ |
— |
| RHEL 9.x |
✔ |
✔ |
✔ |
✔ |
— |
* RHEL 8’s kernel version (4.18) is not supported by kubeadm for Kubernetes versions 1.32 and above (see Kubernetes GitHub issue #129462
). As a result, EKS Anywhere does not support using RHEL 8 as the node operating system for Kubernetes versions 1.32 and above.
Added
- Support for Kubernetes v1.34
- Enable second network interface configuration for VSphere (Ubuntu, Redhat) #10211
- Configure Audit Policy content for Control Plane nodes #10004
- Add support for protection of system resources from admission webhooks #10179
- Add support for First-party Supported Cilium CNI #10157
, #10256
, #10158
- Add Cilium helmValues feature support to configure cilium parameters #10161
, #10222
- Add diagnostic address flag to eksa controller, etcdadm-bootstrap-provider and etcdadm-controller to support secure serving of metrics, pprof endpoint, and dynamic log level changes in production #10282
, #49
, #73
- VSphere image clone builder #4784
- Support addition or removal of aws iam authentication using cluster upgrade #9897
- Enable support for in-place upgrades on RedHat for Bare Metal clusters #10290
- Allow toggling Cilium skipUpgrade from true to false #10231
- EKS Distro:
- Containerd:
v2.1.4 for Kubernetes 1.34
- Autoscaler:
cluster-autoscaler-1.34.1 for Kubernetes 1.34
Changed
- Cluster-api (CAPI):
v1.10.2 to v1.11.1
- Runc:
v1.1.15 to 1.3.3 (CVE-2025-31133
, CVE-2025-52565
, CVE-2025-52881
)
- Cert-manager:
v1.17.2 to v1.18.2
- kube-rbac-proxy:
v0.19.1 to v0.20.0
- Cri-tools:
v1.33.0 to v1.34.0
- Govmomi:
v0.51.0 to v0.52.0
- Flux:
- Cli:
v2.6.4 to v2.7.0
- Source Controller:
v1.6.2 to v1.7.0
- Helm Controller:
v1.3.0 to v1.4.0
- Kustomize Controller:
v1.6.1 to v1.7.0
- Notification Controller:
v1.6.0 to v1.7.1
- Troubleshoot:
v0.121.2 to v0.122.0
- Image builder CLI:
v0.6.0 to 0.7.0
- Kube-vip:
v0.9.2 to v1.0.0
- etcdadm-controller:
v1.0.24 to v1.0.26
- etcdadm-bootstrap-provider:
v1.0.16 to v1.0.18
- controller-runtime:
v0.20.4 to v0.21.0
Supported OS version details
|
vSphere |
Bare Metal |
Nutanix |
CloudStack |
Snow |
| Ubuntu 20.04 |
✔ |
✔ |
✔ |
— |
✔ |
| Ubuntu 22.04 |
✔ |
✔ |
✔ |
— |
— |
| Bottlerocket 1.50.0 |
✔ |
— |
— |
— |
— |
| RHEL 8.x |
✔ |
✔ |
✔ |
✔ |
— |
| RHEL 9.x |
✔ |
✔ |
✔ |
✔ |
— |
Changed
- EKS Distro:
- containerd
v1.7.28 to v1.7.30
- rancher/local-path-provisioner
v0.0.32 to v0.0.34
Fixed
- Ensure maxSurge value updates in Tinkerbell machine configurations are properly applied during ongoing cluster upgrades instead of using stale values (#10466
)
Supported OS version details
|
vSphere |
Bare Metal |
Nutanix |
CloudStack |
Snow |
| Ubuntu 20.04 |
✔ |
✔ |
✔ |
— |
✔ |
| Ubuntu 22.04 |
✔ |
✔ |
✔ |
— |
— |
| Bottlerocket 1.50.0 |
✔ |
— |
— |
— |
— |
| RHEL 8.x |
✔ |
✔ |
✔ |
✔ |
— |
| RHEL 9.x |
✔ |
✔ |
✔ |
✔ |
— |
* RHEL 8’s kernel version (4.18) is not supported by kubeadm for Kubernetes versions 1.32 and above (see Kubernetes GitHub issue #129462
). As a result, EKS Anywhere does not support using RHEL 8 as the node operating system for Kubernetes versions 1.32 and above.
Changed
- EKS Distro:
- New EKS-Distro base images with CVE fixes for Amazon Linux 2 and Amazon Linux 2023
- cloud-provider-nutanix
v0.5.3 to v0.5.5
- cluster-api-provider-aws-snow
v0.2.7 to v0.2.8
- eks-anywhere-packages:
v0.4.8 to v0.4.9
Added
- Add support for skipping BMC contact checks for specific Rufio Machines #10368
Fixed
- Set DHCP relay sourceInterface from LoadBalancerInterface config (#10425
)
- Eliminate race condition in package ctlr installation (#10434
)
- Fix Bottlerocket cert renewal: Add 30s sleep and duplicate container (#10435
)
Supported OS version details
|
vSphere |
Bare Metal |
Nutanix |
CloudStack |
Snow |
| Ubuntu 20.04 |
✔ |
✔ |
✔ |
— |
✔ |
| Ubuntu 22.04 |
✔ |
✔ |
✔ |
— |
— |
| Bottlerocket 1.50.0 |
✔ |
— |
— |
— |
— |
| RHEL 8.x |
✔ |
✔ |
✔ |
✔ |
— |
| RHEL 9.x |
✔ |
✔ |
✔ |
✔ |
— |
* RHEL 8’s kernel version (4.18) is not supported by kubeadm for Kubernetes versions 1.32 and above (see Kubernetes GitHub issue #129462
). As a result, EKS Anywhere does not support using RHEL 8 as the node operating system for Kubernetes versions 1.32 and above.
Changed
- Runc:
v1.1.15 to 1.3.3 (CVE-2025-31133
, CVE-2025-52565
, CVE-2025-52881
)
- cloud-provider-nutanix
v0.5.2 to v0.5.3
- cluster-api-provider-nutanix
v1.6.1 to v1.6.2
- cloud-provider-vsphere 1-33
v1.33.0 to v1.33.1
- cloud-provider-vsphere 1-32
v1.32.2 to v1.32.3
- cluster-api-provider-aws-snow
v0.2.6 to v0.2.7
- Upgraded tinkerbell/ipxedust and tinkerbell/rufio to latest versions
Added
- Enable support for in-place upgrades on RedHat for Bare Metal clusters #10290
Fixed
- Collect management cluster support bundle as well when target is a workload cluster #10277
Supported OS version details
|
vSphere |
Bare Metal |
Nutanix |
CloudStack |
Snow |
| Ubuntu 20.04 |
✔ |
✔ |
✔ |
— |
✔ |
| Ubuntu 22.04 |
✔ |
✔ |
✔ |
— |
— |
| Bottlerocket 1.46.0 |
✔ |
— |
— |
— |
— |
| RHEL 8.x |
✔ |
✔ |
✔ |
✔ |
— |
| RHEL 9.x |
✔ |
✔ |
✔ |
✔ |
— |
* RHEL 8’s kernel version (4.18) is not supported by kubeadm for Kubernetes versions 1.32 and above (see Kubernetes GitHub issue #129462
). As a result, EKS Anywhere does not support using RHEL 8 as the node operating system for Kubernetes versions 1.32 and above.
Changed
Added
- Configure static IPAM through Tinkerbell templates for Ubuntu and Redhat (#10163
)
Fixed
- Fix Hook OS iso image booting in blind mode (#4879
)
- Remove DHCP info accessed during Tinkerbell Workflows (#4887
)
Supported OS version details
|
vSphere |
Bare Metal |
Nutanix |
CloudStack |
Snow |
| Ubuntu 20.04 |
✔ |
✔ |
✔ |
— |
✔ |
| Ubuntu 22.04 |
✔ |
✔ |
✔ |
— |
— |
| Bottlerocket 1.46.0 |
✔ |
— |
— |
— |
— |
| RHEL 8.x |
✔ |
✔ |
✔ |
✔ |
— |
| RHEL 9.x |
✔ |
✔ |
✔ |
✔ |
— |
* RHEL 8’s kernel version (4.18) is not supported by kubeadm for Kubernetes versions 1.32 and above (see Kubernetes GitHub issue #129462
). As a result, EKS Anywhere does not support using RHEL 8 as the node operating system for Kubernetes versions 1.32 and above.
Changed
Added
- Support configuring builder vm disk_size for building raw images using image-builder (#4841
)
- Support configuring os minor version for redhat images using image-builder (#4844
)
Fixed
- Apply hardware CSV entries during workload cluster upgrades (#10103
)
Supported OS version details
|
vSphere |
Bare Metal |
Nutanix |
CloudStack |
Snow |
| Ubuntu 20.04 |
✔ |
✔ |
✔ |
— |
✔ |
| Ubuntu 22.04 |
✔ |
✔ |
✔ |
— |
— |
| Bottlerocket 1.40.0 |
✔ |
— |
— |
— |
— |
| RHEL 8.x |
✔ |
✔ |
✔ |
✔ |
— |
| RHEL 9.x |
✔ |
✔ |
✔ |
✔ |
— |
* RHEL 8’s kernel version (4.18) is not supported by kubeadm for Kubernetes versions 1.32 and above (see Kubernetes GitHub issue #129462
). As a result, EKS Anywhere does not support using RHEL 8 as the node operating system for Kubernetes versions 1.32 and above.
Changed
-
EKS Distro:
-
New EKS-Distro base images with CVE fixes for Amazon Linux 2
-
eks-anywhere-packages: v0.4.6 to v0.4.8
-
cert-manager: v1.17.2 to v1.17.4
-
containerd: v1.7.27 to v1.7.28
Fixed
- Pull tink-worker and action images into hook-os at build time (#10032
)
- Honour bundles override flag while installing package controller using helm chart (#10010
)
Supported OS version details
|
vSphere |
Bare Metal |
Nutanix |
CloudStack |
Snow |
| Ubuntu 20.04 |
✔ |
✔ |
✔ |
— |
✔ |
| Ubuntu 22.04 |
✔ |
✔ |
✔ |
— |
— |
| Bottlerocket 1.33.0 |
✔ |
— |
— |
— |
— |
| RHEL 8.x |
✔ |
✔ |
✔ |
✔ |
— |
| RHEL 9.x |
✔ |
✔ |
✔ |
✔ |
— |
* RHEL 8’s kernel version (4.18) is not supported by kubeadm for Kubernetes versions 1.32 and above (see Kubernetes GitHub issue #129462
). As a result, EKS Anywhere does not support using RHEL 8 as the node operating system for Kubernetes versions 1.32 and above.
Added
- Add certificate renewal command for control-plane and external etcd components for Ubuntu, Rhel and Bottlerocket OS (#9781
,#9782
)
- Enable control plane tolerations for Tinkerbell stack components (#9972
, #4748
)
- Support external CNI (#9956
)
Changed
-
EKS Distro:
-
Cluster API Provider Cloudstack: v0.6.0 to v0.6.1
-
local-path-provisioner: v0.0.31 to v0.0.32
-
etcdadm-bootstrap-provider: v1.0.15 to v1.0.16
-
cloud-provider-nutanix: v0.5.0 to v0.5.2
Fixed
- Fix workload cluster aws.kubeconfig file (#9905
)
Supported OS version details
|
vSphere |
Bare Metal |
Nutanix |
CloudStack |
Snow |
| Ubuntu 20.04 |
✔ |
✔ |
✔ |
— |
✔ |
| Ubuntu 22.04 |
✔ |
✔ |
✔ |
— |
— |
| Bottlerocket 1.33.0 |
✔ |
— |
— |
— |
— |
| RHEL 8.x |
✔ |
✔ |
✔ |
✔ |
— |
| RHEL 9.x |
✔ |
✔ |
✔ |
✔ |
— |
Added
Changed
- Added EKS-D for 1-33::
- Cert-manager:
v1.16.5 to v1.17.2
- Cluster API:
v1.9.6 to v1.10.2
- Cluster API Provider Cloudstack:
v0.5.0 to v0.6.0
- Cluster API Provider Nutanix:
v1.5.4 to v1.6.1
- Cluster API Provider Tinkerbell:
v0.6.4 to v0.6.5
- Cluster API Provider vSphere:
v1.12.0 to v1.13.0
- Controller-runtime:
v0.16.5 to v0.20.4
- Kube-rbac-proxy:
v0.19.0 to v0.19.1
- Cri-tools:
v1.32.0 to v1.33.0
- Flux:
- Cli:
v2.5.1 to v2.6.0
- Helm Controller:
v1.2.0 to v1.3.0
- Kustomize Controller:
v1.5.1 to v1.6.0
- Notification Controller:
v1.5.0 to v1.6.0
- Source Controller:
v1.5.0 to v1.6.0
- Govmomi:
v0.48.1 to v0.50.0
- Image builder:
v0.1.42 to v0.1.44
- Kind:
v0.26.0 to v0.29.0
- Kube-vip:
v0.8.10 to v0.9.1
- Troubleshoot:
v0.117.0 to v0.119.0
Removed
- With CAPI diagnostics enabled, removed the redundant kube-rbac-proxy metrics server from the CloudStack provider controller.
- Removed vSphere failure domain feature gate
VSPHERE_FAILURE_DOMAIN_ENABLED which gradated to GA in this version(#9827
)
Supported OS version details
|
vSphere |
Bare Metal |
Nutanix |
CloudStack |
Snow |
| Ubuntu 20.04 |
✔ |
✔ |
✔ |
— |
✔ |
| Ubuntu 22.04 |
✔ |
✔ |
✔ |
— |
— |
| Bottlerocket 1.46.0 |
✔ |
— |
— |
— |
— |
| RHEL 8.x |
✔ |
✔ |
✔ |
✔ |
— |
| RHEL 9.x |
✔ |
✔ |
✔ |
✔ |
— |
Changed
- EKS Distro:
- Containerd:
v1.7.27 to v1.7.28
- cloud-provider-nutanix:
v0.5.0 to v0.5.2
- local-path-provisioner:
v0.0.31 to v0.0.32
Fixed
- Apply hardware CSV entries during workload cluster upgrades (#10103
)
- Pull locally embedded tink-worker image (#10031
)
- Enable control plane tolerations for Tinkerbell stack components (#9971
)
- Generate kubeconfig file for workload cluster with aws iam authentication (#9905
)
Supported OS version details
|
vSphere |
Bare Metal |
Nutanix |
CloudStack |
Snow |
| Ubuntu 20.04 |
✔ |
✔ |
✔ |
— |
✔ |
| Ubuntu 22.04 |
✔ |
✔ |
✔ |
— |
— |
| Bottlerocket 1.32.0 |
✔ |
— |
— |
— |
— |
| RHEL 8.x |
✔ |
✔ |
✔ |
✔ |
— |
| RHEL 9.x |
✔ |
✔ |
✔ |
✔ |
— |
Changed
- EKS Distro:
- Cluster API Provider Vsphere:
v1.12.0 to v1.12.1
Fixed
- Fix filesystem permission errors caused by cexec action in custom Tinkerbell template (#4699
)
- Update corefile-migration patch to support CoreDNS v1.12.1 (#4714
)
- More robust iPXE script with interface checks, retries, VLAN fallback (#4733
)
- For baremtal upgrades, apply hardware objects after updating the schema (#9880
)
Supported OS version details
|
vSphere |
Bare Metal |
Nutanix |
CloudStack |
Snow |
| Ubuntu 20.04 |
✔ |
✔ |
✔ |
— |
✔ |
| Ubuntu 22.04 |
✔ |
✔ |
✔ |
— |
— |
| Bottlerocket 1.32.0 |
✔ |
— |
— |
— |
— |
| RHEL 8.x |
✔ |
✔ |
✔ |
✔ |
— |
| RHEL 9.x |
✔ |
✔ |
✔ |
✔ |
— |
Changed
- EKS Distro:
- Cert-manager:
v1.16.4 to v1.16.5
- Cluster API Provider Nutanix:
v1.5.3 to v1.5.4
- Cluster API Provider Tinkerbell:
v0.6.4 to v0.6.5
- Cilium:
v1.15.14-eksa.1 to v1.15.16-eksa.1
- Kube-rbac-proxy:
v0.19.0 to v0.19.1
Fixed
- Tinkerbell workflow updates running into Rate limit issues during concurrent provisioning (#4616
)
- Some Tinkerbell workflows getting stuck at STATE_PENDING (#4616
)
- Honor the –no-timeouts flag during BMC checks (#9786
)
- Improve latency for BMC interactions (#9791
)
- Add retries around mount action to address race conditions in device becoming available (#4639
)
- Validate Eks-distro manifest signature for extended kubernetes version support (#9801
)
Supported OS version details
|
vSphere |
Bare Metal |
Nutanix |
CloudStack |
Snow |
| Ubuntu 20.04 |
✔ |
✔ |
✔ |
— |
✔ |
| Ubuntu 22.04 |
✔ |
✔ |
✔ |
— |
— |
| Bottlerocket 1.32.0 |
✔ |
— |
— |
— |
— |
| RHEL 8.x |
✔ |
✔ |
✔ |
✔ |
— |
| RHEL 9.x |
✔ |
✔ |
✔ |
✔ |
— |
Changed
- EKS Distro:
- kube-vip:
v0.8.9 to v0.8.10
- New base images with CVE fixes for Amazon Linux 2
Fixed
- Assign multiple vcenter tags to a machine (#9707
)
- Fix an issue when creating vSphere group via EKS-A CLI (#9458
)
- Expose CLI flag on Smee to bind interface (#9720
)
- VSphere failure domain delete cluster bug fix (#9711
)
Supported OS version details
|
vSphere |
Bare Metal |
Nutanix |
CloudStack |
Snow |
| Ubuntu 20.04 |
✔ |
✔ |
✔ |
— |
✔ |
| Ubuntu 22.04 |
✔ |
✔ |
✔ |
— |
— |
| Bottlerocket 1.32.0 |
✔ |
— |
— |
— |
— |
| RHEL 8.x |
✔ |
✔ |
✔ |
✔ |
— |
| RHEL 9.x |
✔ |
✔ |
✔ |
✔ |
— |
Changed
- EKS Distro:
- New base images with CVE fixes for Amazon Linux 2
Fixed
- Fix bundles override flag issue for upgrade cluster command (#9672
)
- Address vulnerability GO-2025-3595
in golang.org/x/net package v0.37.0 (#9668
)
Supported OS version details
|
vSphere |
Bare Metal |
Nutanix |
CloudStack |
Snow |
| Ubuntu 20.04 |
✔ |
✔ |
✔ |
— |
✔ |
| Ubuntu 22.04 |
✔ |
✔ |
✔ |
— |
— |
| Bottlerocket 1.32.0 |
✔ |
— |
— |
— |
— |
| RHEL 8.x |
✔ |
✔ |
✔ |
✔ |
— |
| RHEL 9.x |
✔ |
✔ |
✔ |
✔ |
— |
Added
- Add support for specifying vm_version in the image builder config (#4510
)
Fixed
- Skip bundle signature validation for EKS-A versions prior to v0.22.0 (#9587
)
Supported OS version details
|
vSphere |
Bare Metal |
Nutanix |
CloudStack |
Snow |
| Ubuntu 20.04 |
✔ |
✔ |
✔ |
— |
✔ |
| Ubuntu 22.04 |
✔ |
✔ |
✔ |
— |
— |
| Bottlerocket 1.32.0 |
✔ |
— |
— |
— |
— |
| RHEL 8.x |
✔ |
✔ |
✔ |
✔ |
— |
| RHEL 9.x |
✔ |
✔ |
✔ |
✔ |
— |
Changed
- EKS Distro:
- Helm:
v3.17.1 to v3.16.4
- Rufio:
v0.6.4 to v0.6.5
- Cilium:
v1.15.13-eksa.2 to v1.15.14-eksa.1
- Curated package controller:
v0.4.5 to v0.4.6
- Capas:
v0.2.0 to v0.2.1
- Containerd:
v1.7.26 to v1.7.27
Added
- Support for RHEL 9 for vSphere provider
Fixed
- Fix airgapped proxy enviroment issue with the new Helm version
v3.17.1 by downgrading helm to v3.16.4 (#4497
)
Supported OS version details
|
vSphere |
Bare Metal |
Nutanix |
CloudStack |
Snow |
| Ubuntu 20.04 |
✔ |
✔ |
✔ |
— |
✔ |
| Ubuntu 22.04 |
✔ |
✔ |
✔ |
— |
— |
| Bottlerocket 1.32.0 |
✔ |
— |
— |
— |
— |
| RHEL 8.x |
✔ |
✔ |
✔ |
✔ |
— |
| RHEL 9.x |
— |
✔ |
✔ |
✔ |
— |
Changed
- EKS Distro:
- Golang:
1.21 to 1.23 (#9312
)
- CAPAS:
v0.1.30 to v0.2.0
Fixed
- Address vulnerability GO-2025-3503
in golang.org/x/net package v0.33.0 (#9405
)
- Fixing cilium routingMode parameters in helm configuration (#9401
)
- Update RHEL OS version validation from image builder (#4423
)
- Update Bottlerocket host containers source extraction logic (#4400
)
Supported OS version details
|
vSphere |
Bare Metal |
Nutanix |
CloudStack |
Snow |
| Ubuntu 20.04 |
✔ |
✔ |
✔ |
— |
✔ |
| Ubuntu 22.04 |
✔ |
✔ |
✔ |
— |
— |
| Bottlerocket 1.32.0 |
✔ |
- |
— |
— |
— |
| RHEL 8.x (*) |
✔ |
✔ |
✔ |
✔ |
— |
| RHEL 9.x |
— |
✔ |
✔ |
✔ |
— |
* RHEL 8’s kernel version (4.18) is not supported by kubeadm for Kubernetes versions 1.32 and above (see Kubernetes GitHub issue #129462
). As a result, EKS Anywhere does not support using RHEL 8 as the node operating system for Kubernetes versions 1.32 and above.
Added
- Support for Kubernetes v1.32
- Extended support for Kubernetes versions (#6793
, #4174
, #9112
, #9115
, #9150
, #9209
, #9218
, #9222
, #9225
)
- Support for deploying EKS-A clusters across vSphere Failure Domains. Available behind feature flag
VSPHERE_FAILURE_DOMAIN_ENABLED (#9239
)
- Enable hardware Provisioning through ISO booting for baremetal Provider (#9213
). Provides an alternative for customers who do not have L2 connectivity between management and workload clusters as this feature removes the dependency on DHCP for bare metal deployments.
Changed
- Added EKS-D for 1-32:
- Cert Manager:
v1.15.3 to v1.16.3
- Cilium:
v1.14.12 to v1.15.13
- Cluster API:
v1.8.3 to v1.9.4
- Cluster API Provider Nutanix:
v1.4.0 to v1.5.3
- Cluster API Provider Tinkerbell:
v0.5.3 to v0.6.4
- Cluster API Provider vSphere:
v1.11.2 to v1.12.0
- Cri-tools:
v1.31.1 to v1.32.0
- Flux:
v2.4.0 to v2.5.0
- Govmomi:
v0.44.1 to v0.48.1
- Helm:
v3.16.4 to v3.17.1
- Image builder:
v0.1.40 to v0.1.41
- Kind:
v0.24.0 to v0.26.0
- Kube-vip:
v0.8.0 to v0.8.9
- Tinkerbell Stack:
- Rufio:
v0.4.1 to v0.6.4
- Hegel:
v0.12.0 to v0.14.2
- Hook:
v0.9.1 to v0.10.0
- Troubleshoot:
v0.107.4 to v0.117.0
Removed
- Support for Kubernetes v1.27
Supported OS version details
|
vSphere |
Bare Metal |
Nutanix |
CloudStack |
Snow |
| Ubuntu 20.04 |
✔ |
✔ |
✔ |
— |
✔ |
| Ubuntu 22.04 |
✔ |
✔ |
✔ |
— |
— |
| Bottlerocket 1.26.2 |
✔ |
— |
— |
— |
— |
| RHEL 8.x |
✔ |
✔ |
✔ |
✔ |
— |
| RHEL 9.x |
— |
✔ |
✔ |
✔ |
— |
Changed
- EKS Distro:
- Golang:
1.21 to 1.23 (#9382
)
- Image builder:
v0.1.40 to v0.1.42
- Curated package controller:
v0.4.5 to v0.4.6
- Containerd:
v1.7.25 to v1.7.27
Fixed
- Assign multiple vcenter tags to a machine (#9707
)
- Fix an issue when creating vSphere group via EKS-A CLI (#9458
)
Supported OS version details
|
vSphere |
Bare Metal |
Nutanix |
CloudStack |
Snow |
| Ubuntu 20.04 |
✔ |
✔ |
✔ |
— |
✔ |
| Ubuntu 22.04 |
✔ |
✔ |
✔ |
— |
— |
| Bottlerocket 1.26.2 |
✔ |
— |
— |
— |
— |
| RHEL 8.x |
✔ |
✔ |
✔ |
✔ |
— |
| RHEL 9.x |
— |
✔ |
✔ |
✔ |
— |
Changed
- EKS Distro:
- Cilium:
v1.14.12-eksa.2 to v1.14.12-eksa.3
- cluster-api-provider-aws-snow:
v0.1.27 to v0.1.30
- New base images with CVE fixes for Amazon Linux 2
Fixed
- Update cilium 1.14 to fix issue with hostport functionality (#4330
)
- Add namespace to external etcd ref (#9252
)
Supported OS version details
|
vSphere |
Bare Metal |
Nutanix |
CloudStack |
Snow |
| Ubuntu 20.04 |
✔ |
✔ |
✔ |
— |
✔ |
| Ubuntu 22.04 |
✔ |
✔ |
✔ |
— |
— |
| Bottlerocket 1.26.2 |
✔ |
— |
— |
— |
— |
| RHEL 8.x |
✔ |
✔ |
✔ |
✔ |
— |
| RHEL 9.x |
— |
✔ |
✔ |
✔ |
— |
Changed
- EKS Distro:
- local-path-provisioner:
v0.0.30 to v0.0.31
- New base images with CVE fixes for Amazon Linux 2
Fixed
- Update corefile-migration patch to support CoreDNS v1.11.4 (#4285
)
Supported OS version details
|
vSphere |
Bare Metal |
Nutanix |
CloudStack |
Snow |
| Ubuntu 20.04 |
✔ |
✔ |
✔ |
— |
✔ |
| Ubuntu 22.04 |
✔ |
✔ |
✔ |
— |
— |
| Bottlerocket 1.26.2 |
✔ |
— |
— |
— |
— |
| RHEL 8.x |
✔ |
✔ |
✔ |
✔ |
— |
| RHEL 9.x |
— |
✔ |
✔ |
✔ |
— |
Changed
- EKS Distro:
- Cert Manager:
v1.15.3 to v1.15.5
- containerd:
v1.7.23 to v1.7.25
- kube-vip:
v0.8.7 to v0.8.9
- linuxkit:
v1.5.2 to v1.5.3
- hook:
v0.9.1 to v0.9.2
- New base images with CVE fixes for Amazon Linux 2
Fixed
- Ensure Kubernetes version is always parsed as string (#9188
)
Supported OS version details
|
vSphere |
Bare Metal |
Nutanix |
CloudStack |
Snow |
| Ubuntu 20.04 |
✔ |
✔ |
✔ |
— |
✔ |
| Ubuntu 22.04 |
✔ |
✔ |
✔ |
— |
— |
| Bottlerocket 1.26.2 |
✔ |
— |
— |
— |
— |
| RHEL 8.x |
✔ |
✔ |
✔ |
✔ |
— |
| RHEL 9.x |
— |
✔ |
✔ |
✔ |
— |
Changed
Supported OS version details
|
vSphere |
Bare Metal |
Nutanix |
CloudStack |
Snow |
| Ubuntu 20.04 |
✔ |
✔ |
✔ |
— |
✔ |
| Ubuntu 22.04 |
✔ |
✔ |
✔ |
— |
— |
| Bottlerocket 1.26.2 |
✔ |
— |
— |
— |
— |
| RHEL 8.x |
✔ |
✔ |
✔ |
✔ |
— |
| RHEL 9.x |
— |
✔ |
✔ |
✔ |
— |
Changed
- EKS Distro:
- Helm:
v3.16.3 to v3.16.4
- Metallb:
v0.14.8 to v0.14.9
- New base images with CVE fixes for Amazon Linux 2
Fixed
- Add kube-vip and optional list of ip addresses to CCM node ip addresses ignore list for Nutanix Provider. (#9072
)
Supported OS version details
|
vSphere |
Bare Metal |
Nutanix |
CloudStack |
Snow |
| Ubuntu 20.04 |
✔ |
✔ |
✔ |
— |
✔ |
| Ubuntu 22.04 |
✔ |
✔ |
✔ |
— |
— |
| Bottlerocket 1.26.1 |
✔ |
* |
— |
— |
— |
| RHEL 8.x |
✔ |
✔ |
✔ |
✔ |
— |
| RHEL 9.x |
— |
✔ |
✔ |
✔ |
— |
* EKS Anywhere issue regarding deprecation of Bottlerocket bare metal variants
Upgraded
- Bumped EKS-D:
- Kube-rbac-proxy:
v0.18.1 to v0.18.2
- Kube-vip:
v0.8.6 to v0.8.7
Fixed
- Fix iam kubeconfig generation in workload clusters #9048
- Update collectors for curated packages namespaces #9044
- Fixed redhat image builds for ansible version v10.0.0 and up #4109
Supported OS version details
|
vSphere |
Bare Metal |
Nutanix |
CloudStack |
Snow |
| Ubuntu 20.04 |
✔ |
✔ |
✔ |
— |
✔ |
| Ubuntu 22.04 |
✔ |
✔ |
✔ |
— |
— |
| Bottlerocket 1.26.1 |
✔ |
* |
— |
— |
— |
| RHEL 8.x |
✔ |
✔ |
✔ |
✔ |
— |
| RHEL 9.x |
— |
✔ |
✔ |
✔ |
— |
* EKS Anywhere issue regarding deprecation of Bottlerocket bare metal variants
Upgraded
- Bumped EKS-D:
- Cluster API Provider vSphere:
v1.11.2 to v1.11.3
- Govmomi:
v0.44.1 to v0.46.1
- Helm:
v3.16.2 to v3.16.3
- Troubleshoot:
v0.107.4 to v0.107.5
Supported OS version details
|
vSphere |
Bare Metal |
Nutanix |
CloudStack |
Snow |
| Ubuntu 20.04 |
✔ |
✔ |
✔ |
— |
✔ |
| Ubuntu 22.04 |
✔ |
✔ |
✔ |
— |
— |
| Bottlerocket 1.26.1 |
✔ |
* |
— |
— |
— |
| RHEL 8.x |
✔ |
✔ |
✔ |
✔ |
— |
| RHEL 9.x |
— |
✔ |
✔ |
✔ |
— |
* EKS Anywhere issue regarding deprecation of Bottlerocket bare metal variants
Added
- Support for Kubernetes v1.31
- Support for configuring tinkerbell stack load balancer interface in cluster spec (#8805
)
- GPU support for Nutanix provider (#8745
)
- Support for worker nodes failure domains on Nutanix (#8837
)
Upgraded
- Added EKS-D for 1-31:
- Cert Manager:
v1.14.7 to v1.15.3
- Cilium:
v1.13.20 to v1.14.12
- Cluster API:
v1.7.2 to v1.8.3
- Cluster API Provider CloudStack:
v0.4.10-rc.1 to v0.5.0
- Cluster API Provider Nutanix:
v1.3.5 to v1.4.0
- Cluster API Provider vSphere:
v1.10.4 to v1.11.2
- Cri-tools:
v1.30.1 to v1.31.1
- Flux:
v2.3.0 to v2.4.0
- Govmomi:
v0.37.3 to v0.44.1
- Kind:
v0.23.0 to v0.24.0
- Kube-vip:
v0.7.0 to v0.8.0
- Tinkerbell Stack:
- Rufio:
v0.3.3 to v0.4.1
- Hook:
v0.8.1 to v0.9.1
- Troubleshoot:
v0.93.2 to v0.107.4
Changed
- Use HookOS embedded images in Tinkerbell Templates by default (#8708
and #3471
)
Removed
- Support for Kubernetes v1.26
Supported OS version details
|
vSphere |
Bare Metal |
Nutanix |
CloudStack |
Snow |
| Ubuntu 20.04 |
✔ |
✔ |
✔ |
— |
✔ |
| Ubuntu 22.04 |
✔ |
✔ |
✔ |
— |
— |
| Bottlerocket 1.20.5 |
✔ |
— |
— |
— |
— |
| RHEL 8.x |
✔ |
✔ |
✔ |
✔ |
— |
| RHEL 9.x |
— |
✔ |
✔ |
✔ |
— |
Upgraded
- EKS Distro:
- eks-anywhere-packages:
v0.4.4 to v0.4.5
- image-builder:
v0.1.39 to v0.1.40
- containerd:
v1.7.23 to v1.7.24
Supported OS version details
|
vSphere |
Bare Metal |
Nutanix |
CloudStack |
Snow |
| Ubuntu 20.04 |
✔ |
✔ |
✔ |
— |
✔ |
| Ubuntu 22.04 |
✔ |
✔ |
✔ |
— |
— |
| Bottlerocket 1.20.5 |
✔ |
— |
— |
— |
— |
| RHEL 8.x |
✔ |
✔ |
✔ |
✔ |
— |
| RHEL 9.x |
— |
✔ |
✔ |
✔ |
— |
Changed
- EKS Distro:
- cloud-provider-nutanix:
v0.3.2 to v0.4.1
- kube-rbac-proxy:
v0.18.1 to v0.18.2
- kube-vip:
v0.8.6 to v0.8.7
Fixed
- Add retries for transient error
server doesn't have a Resource type errors after clusterctl move. (#9065
)
Supported OS version details
|
vSphere |
Bare Metal |
Nutanix |
CloudStack |
Snow |
| Ubuntu 20.04 |
✔ |
✔ |
✔ |
— |
✔ |
| Ubuntu 22.04 |
✔ |
✔ |
✔ |
— |
— |
| Bottlerocket 1.20.5 |
✔ |
— |
— |
— |
— |
| RHEL 8.x |
✔ |
✔ |
✔ |
✔ |
— |
| RHEL 9.x |
— |
✔ |
✔ |
✔ |
— |
Changed
- cilium:
v1.13.20-eksa.1 to v1.13.21-eksa.5
- cloud-provider-vsphere
v1.29.1 to v1.29.2v1.30.1 to v1.30.2
- EKS Distro:
- cluster-api-provider-vsphere(CAPV):
v1.10.3 to v1.10.4
- etcdadm-bootstrap-provider:
v1.0.14 to v1.0.15
- kube-vip:
v0.8.4 to v0.8.6
Fixed
- Release init-lock when the owner machine fails to launch. (#41
)
Supported OS version details
|
vSphere |
Bare Metal |
Nutanix |
CloudStack |
Snow |
| Ubuntu 20.04 |
✔ |
✔ |
✔ |
— |
✔ |
| Ubuntu 22.04 |
✔ |
✔ |
✔ |
— |
— |
| Bottlerocket 1.20.5 |
✔ |
— |
— |
— |
— |
| RHEL 8.x |
✔ |
✔ |
✔ |
✔ |
— |
| RHEL 9.x |
— |
✔ |
✔ |
✔ |
— |
Changed
- EKS Distro:
- image-builder:
v0.1.36 to v0.1.39
- cluster-api-provider-vsphere(CAPV):
v1.10.3 to v1.10.4
- etcdadm-controller:
v1.0.23 to v1.0.24
- etcdadm-bootstrap-provider:
v1.0.13 to v1.0.14
- kube-vip:
v0.8.3 to v0.8.4
- containerd:
v1.7.22 to v1.7.23
- runc:
v1.1.14 to v1.1.15
- local-path-provisioner:
v0.0.29 to v0.0.30
Fixed
- Skip hardware validation logic for InPlace upgrades. #8779
- Status reconciliation of etcdadm cluster in etcdadm-controller when etcd-machines are unhealthy. #63
- Skip generating AWS IAM Kubeconfig on cluster upgrade. #8851
Supported OS version details
|
vSphere |
Bare Metal |
Nutanix |
CloudStack |
Snow |
| Ubuntu 20.04 |
✔ |
✔ |
✔ |
— |
✔ |
| Ubuntu 22.04 |
✔ |
✔ |
✔ |
— |
— |
| Bottlerocket 1.20.5 |
✔ |
— |
— |
— |
— |
| RHEL 8.x |
✔ |
✔ |
✔ |
✔ |
— |
| RHEL 9.x |
— |
✔ |
✔ |
✔ |
— |
Changed
- EKS Distro:
- cilium:
v1.13.19 to v1.13.20
- image-builder:
v0.1.30 to v0.1.36
- cluster-api-provider-vsphere(CAPV):
v1.10.2 to v1.10.3
Fixed
- Fixed support for efi on rhel 9 raw builds. (#3824
)
Supported OS version details
|
vSphere |
Bare Metal |
Nutanix |
CloudStack |
Snow |
| Ubuntu 20.04 |
✔ |
✔ |
✔ |
— |
✔ |
| Ubuntu 22.04 |
✔ |
✔ |
✔ |
— |
— |
| Bottlerocket 1.20.5 |
✔ |
— |
— |
— |
— |
| RHEL 8.x |
✔ |
✔ |
✔ |
✔ |
— |
| RHEL 9.x |
— |
✔ |
✔ |
✔ |
— |
Changed
- EKS Distro:
- cilium:
v1.13.18 to v1.13.19
- containerd
v1.7.21 to v.1.7.22
- etcdadm-controller:
v1.0.22 to v1.0.23
- kube-vip:
v0.8.2 to v0.8.3
- Kube-rbac-proxy:
v0.18.0 to v0.18.1
Added
- Enable EFI boot support on RHEL9 images for bare-meal. (#3684
)
Fixed
- Status reconciliation of etcdadm cluster in etcdadm-controller when
etcd-machines are unhealthy. (#63
)
- Skip hardware validation logic for InPlace upgrades. ([#8779]https://github.com/aws/eks-anywhere/pull/8779))
Supported OS version details
|
vSphere |
Bare Metal |
Nutanix |
CloudStack |
Snow |
| Ubuntu 20.04 |
✔ |
✔ |
✔ |
— |
✔ |
| Ubuntu 22.04 |
✔ |
✔ |
✔ |
— |
— |
| Bottlerocket 1.20.5 |
✔ |
— |
— |
— |
— |
| RHEL 8.x |
✔ |
✔ |
✔ |
✔ |
— |
| RHEL 9.x |
— |
✔ |
✔ |
✔ |
— |
Changed
- EKS Distro:
- Tinkerbell Stack:
- runc
v1.1.13 to v1.1.14
- containerd
v1.7.20 to v.1.7.21
- local-path-provisioner
v0.0.28 to v0.0.29
Fixed
- Rollout new nodes for OSImageURL change on spec without changing K8s version (#8656
)
Supported OS version details
|
vSphere |
Bare Metal |
Nutanix |
CloudStack |
Snow |
| Ubuntu 20.04 |
✔ |
✔ |
✔ |
— |
✔ |
| Ubuntu 22.04 |
✔ |
✔ |
✔ |
— |
— |
| Bottlerocket 1.20.5 |
✔ |
— |
— |
— |
— |
| RHEL 8.x |
✔ |
✔ |
✔ |
✔ |
— |
| RHEL 9.x |
— |
✔ |
✔ |
✔ |
— |
Changed
- EKS Distro:
- EKS Anywhere Packages Controller:
v0.4.3 to v0.4.4
- Helm:
v3.15.3 to v3.15.4
Fixed
- Fix Kubelet Configuration apply when host OS config is specified. (#8606
)
Supported OS version details
|
vSphere |
Bare Metal |
Nutanix |
CloudStack |
Snow |
| Ubuntu 20.04 |
✔ |
✔ |
✔ |
— |
✔ |
| Ubuntu 22.04 |
✔ |
✔ |
✔ |
— |
— |
| Bottlerocket 1.20.5 |
✔ |
— |
— |
— |
— |
| RHEL 8.x |
✔ |
✔ |
✔ |
✔ |
— |
| RHEL 9.x |
— |
✔ |
✔ |
✔ |
— |
Changed
Added
- Enable Tinkerbell stack to use dhcprelay instead of using smee in hostNetwork mode. (#8568
)
Fixed
- Enable
lb_class_only env var on kube-vip so that it only manages IP for services with LoadBalancerClass set to kube-vip.io/kube-vip-class on the service. (#8493
)
- Nil pointer panic for etcdadm-controller when
apiserver-etcd-client secret got deleted. (#62
)
Changed
- kube-vip:
v0.8.1 to v0.8.2
- cilium:
v1.13.16 to v1.13.18
- cert-manager:
v1.14.5 to v1.14.7
- etcdadm-controller:
v1.0.21 to v1.0.22
- local-path-provisioner:
v0.0.27 to v0.0.28
Supported OS version details
|
vSphere |
Bare Metal |
Nutanix |
CloudStack |
Snow |
| Ubuntu 20.04 |
✔ |
✔ |
✔ |
— |
✔ |
| Ubuntu 22.04 |
✔ |
✔ |
✔ |
— |
— |
| Bottlerocket 1.20.0 |
✔ |
— |
— |
— |
— |
| Bottlerocket 1.19.4 |
— |
* |
— |
— |
— |
| RHEL 8.x |
✔ |
✔ |
✔ |
✔ |
— |
| RHEL 9.x |
— |
✔ |
✔ |
✔ |
— |
* EKS Anywhere issue regarding deprecation of Bottlerocket bare metal variants
Changed
Fixed
- Fix panic when datacenter obj is not found (8495
)
- Fix Subnet Validation Bug for Nutanix provider (8499
)
- Fix machine config panic when ref object not found (8533
)
Supported OS version details
|
vSphere |
Bare Metal |
Nutanix |
CloudStack |
Snow |
| Ubuntu 20.04 |
✔ |
✔ |
✔ |
— |
✔ |
| Ubuntu 22.04 |
✔ |
✔ |
✔ |
— |
— |
| Bottlerocket 1.20.0 |
✔ |
— |
— |
— |
— |
| Bottlerocket 1.19.4 |
— |
* |
— |
— |
— |
| RHEL 8.x |
✔ |
✔ |
✔ |
✔ |
— |
| RHEL 9.x |
— |
✔ |
✔ |
✔ |
— |
* EKS Anywhere issue regarding deprecation of Bottlerocket bare metal variants
Changed
Fixed
- Fix cluster status reconciliation for control plane and worker nodes (8455
)
Supported OS version details
|
vSphere |
Bare Metal |
Nutanix |
CloudStack |
Snow |
| Ubuntu 20.04 |
✔ |
✔ |
✔ |
— |
✔ |
| Ubuntu 22.04 |
✔ |
✔ |
✔ |
— |
— |
| Bottlerocket 1.20.0 |
✔ |
— |
— |
— |
— |
| Bottlerocket 1.19.4 |
— |
* |
— |
— |
— |
| RHEL 8.x |
✔ |
✔ |
✔ |
✔ |
— |
| RHEL 9.x |
— |
✔ |
✔ |
✔ |
— |
* EKS Anywhere issue regarding deprecation of Bottlerocket bare metal variants
Added
- Support for Kubernetes v1.30
- Support for configuring kube-apiserver flags in cluster spec (#7755
)
- Redhat 9 support for Bare Metal (#3032
)
- Support for configuring kubelet settings in cluster spec (#7708
)
- Support for control plane failure domains on Nutanix (#8192
)
Changed
- Generate cluster config command includes OSImageURL in tinkerbell machine config objects (#8226
)
- Added EKS-D for 1-30:
- Cilium:
v1.13.9 to v1.13.16
- Cluster API:
v1.6.1 to v1.7.2
- Cluster API Provider vSphere:
v1.8.5 to v1.10.0
- Cluster API Provider Nutanix:
v1.2.3 to v1.3.5
- Flux:
v2.2.3 to v2.3.0
- Kube-vip:
v0.7.0 to v0.8.0
- Image-builder:
v0.1.24 to v0.1.26
- Kind:
v0.22.0 to v0.23.0
- Etcdadm Controller:
v1.0.17 to v1.0.21
- Tinkerbell Stack:
- Cluster API Provider Tinkerbell:
v0.4.0 to v0.5.3
- Hegel:
v0.10.1 to v0.12.0
- Rufio:
afd7cd82fa08dae8f9f3ffac96eb030176f3abbd to v0.3.3
- Tink:
v0.8.0 to v0.10.0
- Boots/Smee:
v0.8.1 to v0.11.0
- Hook:
9d54933a03f2f4c06322969b06caa18702d17f66 to v0.8.1
- Charts:
v0.4.5
Note: The Boots service has been renamed to Smee by the upstream tinkerbell community with this version upgrade. Any reference to Boots or Smee in our docs refer to the same service.
Removed
- Support for Kubernetes v1.25
- Support for certain curated packages CLI commands (#8240
)
Fixed
- CLI commands for packages to honor the registry mirror setup in cluster spec (#8026
)
Supported OS version details
|
vSphere |
Bare Metal |
Nutanix |
CloudStack |
Snow |
| Ubuntu 20.04 |
✔ |
✔ |
✔ |
— |
✔ |
| Ubuntu 22.04 |
✔ |
✔ |
✔ |
— |
— |
| Bottlerocket 1.20.5 |
✔ |
* |
— |
— |
— |
| RHEL 8.x |
✔ |
✔ |
✔ |
✔ |
— |
| RHEL 9.x |
— |
— |
✔ |
✔ |
— |
* EKS Anywhere issue regarding deprecation of Bottlerocket bare metal variants
Upgraded
- EKS Distro:
- Image-builder:
v0.1.36 to v0.1.39 (CVE-2024-9594
)
- containerd:
v1.7.22 to v1.7.23
- Cilium:
v1.13.19 to v1.13.20
- etcdadm-controller:
v1.0.23 to v1.0.24
- etcdadm-bootstrap-provider:
v1.0.13 to v1.0.14
- local-path-provisioner:
v0.0.29 to v0.0.30
- runc:
v1.1.14 to v1.1.15
Fixed
- Skip hardware validation logic for InPlace upgrades. #8779
- Status reconciliation of etcdadm cluster in etcdadm-controller when etcd-machines are unhealthy. #63
- Skip generating AWS IAM Kubeconfig on cluster upgrade. #8851
Supported OS version details
|
vSphere |
Bare Metal |
Nutanix |
CloudStack |
Snow |
| Ubuntu 20.04 |
✔ |
✔ |
✔ |
— |
✔ |
| Ubuntu 22.04 |
✔ |
✔ |
✔ |
— |
— |
| Bottlerocket 1.20.0 |
✔ |
* |
— |
— |
— |
| RHEL 8.x |
✔ |
✔ |
✔ |
✔ |
— |
| RHEL 9.x |
— |
— |
✔ |
✔ |
— |
* EKS Anywhere issue regarding deprecation of Bottlerocket bare metal variants
Upgraded
- EKS Distro:
- EKS Anywhere Packages:
v0.4.3 to v0.4.4
- Cilium:
v1.13.18 to v1.13.19
- containerd:
v1.7.20 to v1.7.22
- runc:
v1.1.13 to v1.1.14
- local-path-provisioner:
v0.0.28 to v0.0.29
- etcdadm-controller:
v1.0.22 to v1.0.23
- New base images with CVE fixes for Amazon Linux 2
Supported OS version details
|
vSphere |
Bare Metal |
Nutanix |
CloudStack |
Snow |
| Ubuntu 20.04 |
✔ |
✔ |
✔ |
— |
✔ |
| Ubuntu 22.04 |
✔ |
✔ |
✔ |
— |
— |
| Bottlerocket 1.19.2 |
✔ |
* |
— |
— |
— |
| RHEL 8.x |
✔ |
✔ |
✔ |
✔ |
— |
| RHEL 9.x |
— |
— |
✔ |
✔ |
— |
* EKS Anywhere issue regarding deprecation of Bottlerocket bare metal variants
Upgraded
-
Kube-rbac-proxy: v0.16.0 to v0.16.1
-
Containerd: v1.7.13 to v1.7.20
-
Kube VIP: v0.7.0 to v0.7.2
-
Helm: v3.14.3 to v3.14.4
-
Cluster API Provider vSphere: v1.8.5 to v1.8.10
-
Runc: v1.1.12 to v1.1.13
-
EKS Distro:
Changed
- Added additional validation before marking controlPlane and workers ready #8455
Fixed
- Fix panic when datacenter obj is not found #8494
Supported OS version details
|
vSphere |
Bare Metal |
Nutanix |
CloudStack |
Snow |
| Ubuntu 20.04 |
✔ |
✔ |
✔ |
— |
✔ |
| Ubuntu 22.04 |
✔ |
✔ |
✔ |
— |
— |
| Bottlerocket 1.19.2 |
✔ |
* |
— |
— |
— |
| RHEL 8.x |
✔ |
✔ |
✔ |
✔ |
— |
| RHEL 9.x |
— |
— |
✔ |
✔ |
— |
* EKS Anywhere issue regarding deprecation of Bottlerocket bare metal variants
Upgraded
- Cluster API Provider Nutanix:
v1.3.3 to v1.3.5
- Image Builder:
v0.1.24 to v0.1.26
- EKS Distro:
Changed
- Updated cluster status reconciliation logic for worker node groups with autoscaling
configuration #8254
- Added logic to apply new hardware on baremetal cluster upgrades #8288
Fixed
- Fixed bug when installer does not create CCM secret for Nutanix workload cluster #8191
- Fixed upgrade workflow for registry mirror certificates in EKS Anywhere packages #7114
Supported OS version details
|
vSphere |
Bare Metal |
Nutanix |
CloudStack |
Snow |
| Ubuntu 20.04 |
✔ |
✔ |
✔ |
— |
✔ |
| Ubuntu 22.04 |
✔ |
✔ |
✔ |
— |
— |
| Bottlerocket 1.19.2 |
✔ |
* |
— |
— |
— |
| RHEL 8.x |
✔ |
✔ |
✔ |
✔ |
— |
| RHEL 9.x |
— |
— |
✔ |
✔ |
— |
* EKS Anywhere issue regarding deprecation of Bottlerocket bare metal variants
Changed
- Backporting dependency bumps to fix vulnerabilities #8118
- Upgraded EKS-D:
Fixed
- Fixed cluster directory being created with root ownership #8120
Supported OS version details
|
vSphere |
Bare Metal |
Nutanix |
CloudStack |
Snow |
| Ubuntu 20.04 |
✔ |
✔ |
✔ |
— |
✔ |
| Ubuntu 22.04 |
✔ |
✔ |
✔ |
— |
— |
| Bottlerocket 1.19.2 |
✔ |
* |
— |
— |
— |
| RHEL 8.x |
✔ |
✔ |
✔ |
✔ |
— |
| RHEL 9.x |
— |
— |
✔ |
✔ |
— |
* EKS Anywhere issue regarding deprecation of Bottlerocket bare metal variants
Changed
- Upgraded EKS-Anywhere Packages from
v0.4.2 to v0.4.3
Fixed
- Fixed registry mirror with authentication for EKS Anywhere packages
Supported OS version details
|
vSphere |
Bare Metal |
Nutanix |
CloudStack |
Snow |
| Ubuntu 20.04 |
✔ |
✔ |
✔ |
— |
✔ |
| Ubuntu 22.04 |
✔ |
✔ |
✔ |
— |
— |
| Bottlerocket 1.19.2 |
✔ |
* |
— |
— |
— |
| RHEL 8.x |
✔ |
✔ |
✔ |
✔ |
— |
| RHEL 9.x |
— |
— |
✔ |
✔ |
— |
* EKS Anywhere issue regarding deprecation of Bottlerocket bare metal variants
Changed
- Support Docs site for penultime EKS-A version #8010
- Update Ubuntu 22.04 ISO URLs to latest stable release #3114
- Upgraded EKS-D:
Fixed
- Added processor for Tinkerbell Template Config #7816
- Added nil check for eksa-version when setting etcd url #8018
- Fixed registry mirror secret credentials set to empty #7933
Supported OS version details
|
vSphere |
Bare Metal |
Nutanix |
CloudStack |
Snow |
| Ubuntu 20.04 |
✔ |
✔ |
✔ |
— |
✔ |
| Ubuntu 22.04 |
✔ |
✔ |
✔ |
— |
— |
| Bottlerocket 1.19.2 |
✔ |
* |
— |
— |
— |
| RHEL 8.x |
✔ |
✔ |
✔ |
✔ |
— |
| RHEL 9.x |
— |
— |
✔ |
✔ |
— |
* EKS Anywhere issue regarding deprecation of Bottlerocket bare metal variants
Changed
- Updated helm to v3.14.3 #3050
Fixed
Supported OS version details
|
vSphere |
Bare Metal |
Nutanix |
CloudStack |
Snow |
| Ubuntu 20.04 |
✔ |
✔ |
✔ |
— |
✔ |
| Ubuntu 22.04 |
✔ |
✔ |
✔ |
— |
— |
| Bottlerocket 1.19.2 |
✔ |
* |
— |
— |
— |
| RHEL 8.x |
✔ |
✔ |
✔ |
✔ |
— |
| RHEL 9.x |
— |
— |
✔ |
✔ |
— |
* EKS Anywhere issue regarding deprecation of Bottlerocket bare metal variants
Changed
- Update CAPC to 0.4.10-rc1 #3105
- Upgraded EKS-D:
Fixed
- Fixing tinkerbell action image URIs while using registry mirror with proxy cache.
Supported OS version details
|
vSphere |
Bare Metal |
Nutanix |
CloudStack |
Snow |
| Ubuntu 20.04 |
✔ |
✔ |
✔ |
— |
✔ |
| Ubuntu 22.04 |
✔ |
✔ |
✔ |
— |
— |
| Bottlerocket 1.19.2 |
✔ |
* |
— |
— |
— |
| RHEL 8.x |
✔ |
✔ |
✔ |
✔ |
— |
| RHEL 9.x |
— |
— |
✔ |
✔ |
— |
* EKS Anywhere issue regarding deprecation of Bottlerocket bare metal variants
Changed
Added
- Preflight check for upgrade management components such that it ensures management components is at most 1 EKS Anywhere minor version greater than the EKS Anywhere version of cluster components #7800
.
Fixed
- EKS Anywhere package bundles
ending with 152, 153, 154, 157 have image tag issues which have been resolved in bundle 158. Example for kubernetes version v1.29 we have
public.ecr.aws/eks-anywhere/eks-anywhere-packages-bundles:v1-29-158
- Fixed InPlace custom resources from being created again after a successful node upgrade due to delay in objects in client cache #7779
.
- Fixed #7623
by encoding the basic auth credentials to base64 when using them in templates #7829
.
- Added a fix
for error that may occur during upgrading management components where if the cluster object is modified by another process before applying, it throws the conflict error prompting a retry.
Supported OS version details
|
vSphere |
Bare Metal |
Nutanix |
CloudStack |
Snow |
| Ubuntu 20.04 |
✔ |
✔ |
✔ |
— |
✔ |
| Ubuntu 22.04 |
✔ |
✔ |
✔ |
— |
— |
| Bottlerocket 1.19.0 |
✔ |
* |
— |
— |
— |
| RHEL 8.x |
✔ |
✔ |
✔ |
✔ |
— |
| RHEL 9.x |
— |
— |
✔ |
✔ |
— |
* EKS Anywhere issue regarding deprecation of Bottlerocket bare metal variants
Added
- Support for Kubernetes v1.29
- Support for in-place EKS Anywhere and Kubernetes version upgrades on Bare Metal clusters
- Support for horizontally scaling
etcd count in clusters with external etcd deployments (#7127
)
- External
etcd support for Nutanix (#7550
)
- Etcd encryption for Nutanix (#7565
)
- Nutanix Cloud Controller Manager integration (#7534
)
- Enable image signing for all images used in cluster operations
- RedHat 9 support for CloudStack (#2842
)
- New
upgrade management-components command which upgrades management components independently of cluster components (#7238
)
- New
upgrade plan management-components command which provides new release versions for the next management components upgrade (#7447
)
- Make
maxUnhealthy count configurable for control plane and worker machines (#7281
)
Changed
- Unification of controller and CLI workflows for cluster lifecycle operations such as create, upgrade, and delete
- Perform CAPI Backup on workload cluster during upgrade(#7364
)
- Extend
maxSurge and maxUnavailable configuration support to all providers
- Upgraded Cilium to v1.13.19
- Upgraded EKS-D:
- Cluster API Provider AWS Snow:
v0.1.26 to v0.1.27
- Cluster API:
v1.5.2 to v1.6.1
- Cluster API Provider vSphere:
v1.7.4 to v1.8.5
- Cluster API Provider Nutanix:
v1.2.3 to v1.3.1
- Flux:
v2.0.0 to v2.2.3
- Kube-vip:
v0.6.0 to v0.7.0
- Image-builder:
v0.1.19 to v0.1.24
- Kind:
v0.20.0 to v0.22.0
Removed
Fixed
- Validate OCI namespaces for registry mirror on Bottlerocket (#7257
)
- Make Cilium reconciler use provider namespace when generating network policy (#7705
)
- EKS Anywhere v0.18.7 Admin AMI with CVE fixes for Amazon Linux 2
Supported Operating Systems
|
vSphere |
Bare Metal |
Nutanix |
CloudStack |
Snow |
| Ubuntu 20.04 |
✔ |
✔ |
✔ |
— |
✔ |
| Ubuntu 22.04 |
✔ |
✔ |
✔ |
— |
— |
| Bottlerocket 1.19.0 |
✔ |
✔ |
— |
— |
— |
| RHEL 8.7 |
✔ |
✔ |
✔ |
✔ |
— |
| RHEL 9.x |
— |
— |
✔ |
— |
— |
- EKS Anywhere v0.18.6 Admin AMI with CVE fixes for
runc
- New base images with CVE fixes for Amazon Linux 2
- Bottlerocket
v1.15.1 to 1.19.0
- runc
v1.1.10 to v1.1.12 (CVE-2024-21626
)
- containerd
v1.7.11 to v.1.7.12
Supported Operating Systems
|
vSphere |
Bare Metal |
Nutanix |
CloudStack |
Snow |
| Ubuntu 20.04 |
✔ |
✔ |
✔ |
— |
✔ |
| Ubuntu 22.04 |
✔ |
✔ |
✔ |
— |
— |
| Bottlerocket 1.19.0 |
✔ |
✔ |
— |
— |
— |
| RHEL 8.x |
✔ |
✔ |
✔ |
✔ |
— |
| RHEL 9.x |
— |
— |
✔ |
— |
— |
- New EKS Anywhere Admin AMI with CVE fixes for Amazon Linux 2
- New base images with CVE fixes for Amazon Linux 2
Supported Operating Systems
|
vSphere |
Bare Metal |
Nutanix |
CloudStack |
Snow |
| Ubuntu 20.04 |
✔ |
✔ |
✔ |
— |
✔ |
| Ubuntu 22.04 |
✔ |
✔ |
✔ |
— |
— |
| Bottlerocket 1.15.1 |
✔ |
✔ |
— |
— |
— |
| RHEL 8.7 |
✔ |
✔ |
✔ |
✔ |
— |
| RHEL 9.x |
— |
— |
✔ |
— |
— |
Feature
- Nutanix: Enable api-server audit logging for Nutanix (#2664
)
Bug
- CNI reconciler now properly pulls images from registry mirror instead of public ECR in airgapped environments: #7170
Supported Operating Systems
|
vSphere |
Bare Metal |
Nutanix |
CloudStack |
Snow |
| Ubuntu 20.04 |
✔ |
✔ |
✔ |
— |
✔ |
| Ubuntu 22.04 |
✔ |
✔ |
✔ |
— |
— |
| Bottlerocket 1.15.1 |
✔ |
✔ |
— |
— |
— |
| RHEL 8.7 |
✔ |
✔ |
✔ |
✔ |
— |
| RHEL 9.x |
— |
— |
✔ |
— |
— |
Fixed
- Etcdadm: Renew client certificates when nodes rollover (etcdadm/#56
)
- Include DefaultCNIConfigured condition in Cluster Ready status except when Skip Upgrades is enabled (#7132
)
- EKS Distro (Kubernetes):
v1.25.15 to v1.25.16v1.26.10 to v1.26.11v1.27.7 to v1.27.8v1.28.3 to v1.28.4
- Etcdadm Controller:
v1.0.15 to v1.0.16
Supported Operating Systems
|
vSphere |
Bare Metal |
Nutanix |
CloudStack |
Snow |
| Ubuntu 20.04 |
✔ |
✔ |
✔ |
— |
✔ |
| Ubuntu 22.04 |
✔ |
✔ |
✔ |
— |
— |
| Bottlerocket 1.15.1 |
✔ |
✔ |
— |
— |
— |
| RHEL 8.7 |
✔ |
✔ |
✔ |
✔ |
— |
| RHEL 9.x |
— |
— |
✔ |
— |
— |
Fixed
- Image Builder: Correctly parse
no_proxy inputs when both Red Hat Satellite and Proxy is used in image-builder. (#2664
)
- vSphere: Fix template tag validation by specifying the full template path (#6437
)
- Bare Metal: Skip
kube-vip deployment when TinkerbellDatacenterConfig.skipLoadBalancerDeployment is set to true. (#6990
)
Other
- Security: Patch incorrect conversion between uint64 and int64 (#7048
)
- Security: Fix incorrect regex for matching curated package registry URL (#7049
)
- Security: Patch malicious tarballs directory traversal vulnerability (#7057
)
Supported Operating Systems
|
vSphere |
Bare Metal |
Nutanix |
CloudStack |
Snow |
| Ubuntu 20.04 |
✔ |
✔ |
✔ |
— |
✔ |
| Ubuntu 22.04 |
✔ |
✔ |
✔ |
— |
— |
| Bottlerocket 1.15.1 |
✔ |
✔ |
— |
— |
— |
| RHEL 8.7 |
✔ |
✔ |
✔ |
✔ |
— |
| RHEL 9.x |
— |
— |
✔ |
— |
— |
- EKS Distro (Kubernetes):
v1.25.14 to v1.25.15v1.26.9 to v1.26.10v1.27.6 to v1.27.7v1.28.2 to v1.28.3
- Etcdadm Bootstrap Provider:
v1.0.9 to v1.0.10
- Etcdadm Controller:
v1.0.14 to v1.0.15
- Cluster API Provider CloudStack:
v0.4.9-rc7 to v0.4.9-rc8
- EKS Anywhere Packages Controller :
v0.3.12 to v0.3.13
Bug
- Bare Metal: Ensure the Tinkerbell stack continues to run on management clusters when worker nodes are scaled to 0 (#2624
)
Supported Operating Systems
|
vSphere |
Bare Metal |
Nutanix |
CloudStack |
Snow |
| Ubuntu 20.04 |
✔ |
✔ |
✔ |
— |
✔ |
| Ubuntu 22.04 |
✔ |
✔ |
✔ |
— |
— |
| Bottlerocket 1.15.1 |
✔ |
✔ |
— |
— |
— |
| RHEL 8.7 |
✔ |
✔ |
✔ |
✔ |
— |
| RHEL 9.x |
— |
— |
✔ |
— |
— |
Supported OS version details
|
vSphere |
Bare Metal |
Nutanix |
CloudStack |
Snow |
| Ubuntu |
20.04 |
20.04 |
20.04 |
Not supported |
20.04 |
|
22.04 |
22.04 |
22.04 |
Not supported |
Not supported |
| Bottlerocket |
1.15.1 |
1.15.1 |
Not supported |
Not supported |
Not supported |
| RHEL |
8.7 |
8.7 |
9.x, 8.7 |
8.7 |
Not supported |
Added
- Etcd encryption for CloudStack and vSphere: #6557
- Generate TinkerbellTemplateConfig command: #3588
- Support for modular Kubernetes version upgrades with bare metal: #6735
- OSImageURL added to Tinkerbell Machine Config
- Bare metal out-of-band webhook: #5738
- Support for Kubernetes v1.28
- Support for air gapped image building: #6457
- Support for RHEL 8 and RHEL 9 for Nutanix provider: #6822
- Support proxy configuration on Redhat image building #2466
- Support Redhat Satellite in image building #2467
Changed
- KinD-less upgrades: #6622
- Management cluster upgrades don’t require a local bootstrap cluster anymore.
- The control plane of management clusters can be upgraded through the API. Previously only changes to the worker nodes were allowed.
- Increased control over upgrades by separating external etcd reconciliation from control plane nodes: #6496
- Upgraded Cilium to 1.12.15
- Upgraded EKS-D:
- Cluster API Provider CloudStack:
v0.4.9-rc6 to v0.4.9-rc7
- Cluster API Provider AWS Snow:
v0.1.26 to v0.1.27
- Upgraded CAPI to
v1.5.2
Removed
- Support for Kubernetes v1.23
Fixed
- Fail on
eksctl anywhere upgrade cluster plan -f: #6716
- Error out when management kubeconfig is not present for workload cluster operations: 6501
- Empty vSphereMachineConfig users fails CLI upgrade: 5420
- CLI stalls on upgrade with Flux Gitops: 6453
Bug
- CNI reconciler now properly pulls images from registry mirror instead of public ECR in airgapped environments: #7170
- Waiting for control plane to be fully upgraded: #6764
Other
- Check for k8s version in the Cloudstack template name: #7130
Supported Operating Systems
|
vSphere |
Bare Metal |
Nutanix |
CloudStack |
Snow |
| Ubuntu 20.04 |
✔ |
✔ |
✔ |
— |
✔ |
| Ubuntu 22.04 |
✔ |
✔ |
✔ |
— |
— |
| Bottlerocket 1.14.3 |
✔ |
✔ |
— |
— |
— |
| RHEL 8.7 |
✔ |
✔ |
_ |
✔ |
— |
- Cluster API Provider CloudStack:
v0.4.9-rc7 to v0.4.9-rc8
Supported Operating Systems
|
vSphere |
Bare Metal |
Nutanix |
CloudStack |
Snow |
| Ubuntu 20.04 |
✔ |
✔ |
✔ |
— |
✔ |
| Ubuntu 22.04 |
✔ |
✔ |
✔ |
— |
— |
| Bottlerocket 1.14.3 |
✔ |
✔ |
— |
— |
— |
| RHEL 8.7 |
✔ |
✔ |
_ |
✔ |
— |
Supported OS version details
|
vSphere |
Bare Metal |
Nutanix |
CloudStack |
Snow |
| Ubuntu |
20.04 |
20.04 |
20.04 |
Not supported |
20.04 |
|
22.04 |
22.04 |
22.04 |
Not supported |
Not supported |
| Bottlerocket |
1.14.3 |
1.14.3 |
Not supported |
Not supported |
Not supported |
| RHEL |
8.7 |
8.7 |
Not supported |
8.7 |
Not supported |
Added
- Enabled audit logging for
kube-apiserver on baremetal provider (#6779
).
Supported OS version details
|
vSphere |
Bare Metal |
Nutanix |
CloudStack |
Snow |
| Ubuntu |
20.04 |
20.04 |
20.04 |
Not supported |
20.04 |
|
22.04 |
22.04 |
22.04 |
Not supported |
Not supported |
| Bottlerocket |
1.14.3 |
1.14.3 |
Not supported |
Not supported |
Not supported |
| RHEL |
8.7 |
8.7 |
Not supported |
8.7 |
Not supported |
Fixed
- Fixed cli upgrade mgmt kubeconfig flag (#6666
)
- Ignore node taints when scheduling Cilium preflight daemonset (#6697
)
- Baremetal: Prevent bare metal machine config references from changing to existing machine configs (#6674
)
Supported OS version details
|
vSphere |
Bare Metal |
Nutanix |
CloudStack |
Snow |
| Ubuntu |
20.04 |
20.04 |
20.04 |
Not supported |
20.04 |
|
22.04 |
22.04 |
22.04 |
Not supported |
Not supported |
| Bottlerocket |
1.14.0 |
1.14.0 |
Not supported |
Not supported |
Not supported |
| RHEL |
8.7 |
8.7 |
Not supported |
8.7 |
Not supported |
Fixed
- Bare Metal: Ensure new worker node groups can reference new machine configs (#6615
)
- Bare Metal: Fix
writefile action to ensure Bottlerocket configs write content or error (#2441
)
Added
- Added support for configuring healthchecks on EtcdadmClusters using
etcdcluster.cluster.x-k8s.io/healthcheck-retries annotation (aws/etcdadm-controller#44
)
- Add check for making sure quorum is maintained before deleting etcd machines (aws/etcdadm-controller#46
)
Changed
Supported OS version details
|
vSphere |
Bare Metal |
Nutanix |
CloudStack |
Snow |
| Ubuntu |
20.04 |
20.04 |
20.04 |
Not supported |
20.04 |
|
22.04 |
22.04 |
22.04 |
Not supported |
Not supported |
| Bottlerocket |
1.14.0 |
1.14.0 |
Not supported |
Not supported |
Not supported |
| RHEL |
8.7 |
8.7 |
Not supported |
8.7 |
Not supported |
Fixed
- Fix worker node groups being rolled when labels adjusted #6330
- Fix worker node groups being rolled out when taints are changed #6482
- Fix vSphere template tags validation to run on the control plane and etcd
VSpherMachinesConfig #6591
- Fix Bare Metal upgrade with custom pod CIDR #6442
Added
- Add validation for missing management cluster kubeconfig during workload cluster operations #6501
Supported OS version details
|
vSphere |
Bare Metal |
Nutanix |
CloudStack |
Snow |
| Ubuntu |
20.04 |
20.04 |
20.04 |
Not supported |
20.04 |
|
22.04 |
22.04 |
22.04 |
Not supported |
Not supported |
| Bottlerocket |
1.14.0 |
1.14.0 |
Not supported |
Not supported |
Not supported |
| RHEL |
8.7 |
8.7 |
Not supported |
8.7 |
Not supported |
Note: We have updated the image-builder docs to include the latest enhancements. Please refer to the image-builder docs
for more details.
Added
- Add support for AWS CodeCommit repositories in FluxConfig with git configuration #4290
- Add new information to the EKS Anywhere Cluster status #5628
:
- Add the
ControlPlaneInitialized, ControlPlaneReady, DefaultCNIConfigured, WorkersReady, and Ready conditions.
- Add the
observedGeneration field.
- Add the
failureReason field.
- Add support for different machine templates for control plane, etcd, and worker node in vSphere provider #4255
- Add support for different machine templates for control plane, etcd, and worker node in Cloudstack provider #6291
- Add support for Kubernetes version 1.25, 1.26, and 1.27 to CloudStack provider #6167
- Add bootstrap cluster backup in the event of cluster upgrade error #6086
- Add support for organizing virtual machines into categories with the Nutanix provider #6014
- Add support for configuring
egressMasqueradeInterfaces option in Cilium CNI via EKS Anywhere cluster spec #6018
- Add support for a flag for create and upgrade cluster to skip the validation
--skip-validations=vsphere-user-privilege
- Add support for upgrading control plane nodes separately from worker nodes for vSphere, Nutanix, Snow, and Cloudstack providers #6180
- Add preflight validation to prevent skip eks-a minor version upgrades #5688
- Add preflight check to block using kindnetd CNI in all providers except Docker [#6097]https://github.com/aws/eks-anywhere/issues/6097
- Added feature to configure machine health checks for API managed clusters and a new way to configure health check timeouts via the EKKSA spec. [#6176]https://github.com/aws/eks-anywhere/pull/6176
Upgraded
- Cluster API Provider vSphere:
v1.6.1 to v1.7.0
- Cluster API Provider Cloudstack:
v0.4.9-rc5 to v0.4.9-rc6
- Cluster API Provider Nutanix:
v1.2.1 to v1.2.3
Cilium Upgrades
-
Cilium: v1.11.15 to v1.12.11
Note: If you are using the vSphere provider with the Redhat OS family, there is a known issue with VMWare and the new Cilium version that only affects our Redhat variants. To prevent this from affecting your upgrade from EKS Anywhere v0.16 to v0.17, we are adding a temporary daemonset to disable UDP offloading on the nodes before upgrading Cilium. After your cluster is upgraded, the daemonset will be deleted. This note is strictly informational as this change requires no additional effort from the user.
Changed
- Change the default node startup timeout from 10m to 20m in Bare Metal provider #5942
- EKS Anywhere now fails on pre-flights if a user does not have required permissions. #5865
eksaVersion field in the cluster spec is added for better representing CLI version and dependencies in EKS-A cluster #5847
- vSphere datacenter insecure and thumbprint is now mutable for upgrades when using full lifecycle API [6143]https://github.com/aws/eks-anywhere/issues/6143
Fixed
- Fix cluster creation failure when the
<Provider>DatacenterConfig is missing apiVersion field #6096
- Allow registry mirror configurations to be mutable for Bottlerocket OS #2336
- Patch an issue where mutable fields in the EKS Anywhere CloudStack API failed to trigger upgrades #5910
- image builder: Fix runtime issue with git in image-builder v0.16.2 binary #2360
- Bare Metal: Fix issue where metadata requests that return non-200 responses were incorrectly treated as OK #2256
Known Issues:
- Upgrading Docker clusters from previous versions of EKS Anywhere may not work on Linux hosts due to an issue in the Cilium 1.11 to 1.12 upgrade. Docker clusters is meant solely for testing and not recommended or support for production use cases. There is currently no fixed planned.
- If you are installing EKS Anywhere Packages, Kubernetes versions 1.23-1.25 are incompatible with Kubernetes versions 1.26-1.27 due to an API difference. This means that you may not have worker nodes on Kubernetes version <= 1.25 when the control plane nodes are on Kubernetes version >= 1.26. Therefore, if you are upgrading your control plane nodes to 1.26, you must upgrade all nodes to 1.26 to avoid failures.
- There is a known bug
with systemd >= 249 and all versions of Cilium. This is currently known to only affect Ubuntu 22.04. This will be fixed in future versions of EKS Anywhere. To work around this issue, run one of the follow options on all nodes.
Option A
# Does not persist across reboots.
sudo ip rule add from all fwmark 0x200/0xf00 lookup 2004 pref 9
sudo ip rule add from all fwmark 0xa00/0xf00 lookup 2005 pref 10
sudo ip rule add from all lookup local pref 100
Option B
# Does persist across reboots.
# Add these values /etc/systemd/networkd.conf
[Network]
ManageForeignRoutes=no
ManageForeignRoutingPolicyRules=no
Deprecated
- The bundlesRef field in the cluster spec is now deprecated in favor of the new
eksaVersion field. This field will be deprecated in three versions.
Removed
- Installing vSphere CSI Driver as part of vSphere cluster creation. For more information on how to self-install the driver refer to the documentation here
⚠️ Breaking changes
- CLI:
--force-cleanup has been removed from create cluster, upgrade cluster and delete cluster commands. For more information on how to troubleshoot issues with the bootstrap cluster refer to the troubleshooting guide (1
and 2
). #6384
Changed
- Bump up the worker count for etcdadm-controller from 1 to 10 #34
- Add 2X replicas hard limit for rolling out new etcd machines #37
Fixed
- Fix code panic in healthcheck loop in etcdadm-controller #41
- Fix deleting out of date machines in etcdadm-controller #40
Fixed
- Fix support for having management cluster and workload cluster in different namespaces #6414
Changed
- During management cluster upgrade, if the backup of CAPI objects of all workload clusters attached to the management cluster fails before upgrade starts, EKS Anywhere will only backup the management cluster #6360
- Update kubectl wait retry policy to retry on TLS handshake errors #6373
Removed
- Removed the validation for checking management cluster bundle compatibility on create/upgrade workload cluster #6365
Fixes
- CLI: Ensure importing packages and bundles honors the insecure flag #6056
- vSphere: Fix credential configuration when using the full lifecycle controller #6058
- Bare Metal: Fix handling of Hardware validation errors in Tinkerbell full lifecycle cluster provisioning #6091
- Bare Metal: Fix parsing of bare metal cluster configurations containing embedded PEM certs #6095
Upgrades
- AWS Cloud Provider: v1.27.0 to v1.27.1
- EKS Distro:
- Kubernetes v1.24.13 to v1.24.15
- Kubernetes v1.25.9 to v1.25.11
- Kubernetes v1.26.4 to v1.26.6
- Kubernetes v1.27.1 to v1.27.3
- Cluster API Provider Snow: v0.1.25 to v0.1.26
Added
- Workload clusters full lifecycle API support for CloudStack provider (#2754
)
- Enable proxy configuration for Bare Metal provider (#5925
)
- Kubernetes 1.27 support (#5929
)
- Support for upgrades for clusters with pod disruption budgets (#5697
)
- BottleRocket network config uses mac addresses instead of interface names for configuring interfaces for the Bare Metal provider (#3411
)
- Allow users to configure additional BottleRocket settings
- kernel sysctl settings (#5304
)
- boot kernel parameters (#5359
)
- custom trusted cert bundles (#5625
)
- Add support for IRSA on Nutanix (#5698
)
- Add support for aws-iam-authenticator on Nutanix (#5698
)
- Enable proxy configuration for Nutanix (#5779
)
Upgraded
- Management cluster upgrades will only move management cluster’s components to bootstrap cluster and back. (#5914
)
Fixed
- CloudStack control plane host port is only defaulted in CAPI objects if not provided. (#5792
) (#5736
)
Deprecated
- Add warning to deprecate disableCSI through CLI (#5918
). Refer to the deprecation section
in the vSphere provider documentation for more information.
Removed
Fixed
- Add validation for tinkerbell ip for workload cluster to match management cluster (#5798
)
- Update datastore usage validation to account for space that will free up during upgrade (#5524
)
- Expand GITHUB_TOKEN regex to support fine-grained access tokens (#5764
)
- Display the timeout flags in CLI help (#5637
)
Added
- Added bundles-override to package cli commands (#5695
)
Fixed
Supported OS version details
|
vSphere |
Baremetal |
Nutanix |
Cloudstack |
Snow |
| Ubuntu |
20.04 |
20.04 |
20.04 |
Not supported |
20.04 |
| Bottlerocket |
1.13.1 |
1.13.1 |
Not supported |
Not supported |
Not supported |
| RHEL |
8.7 |
8.7 |
Not supported |
8.7 |
Not supported |
Added
- Support for no-timeouts to more EKS Anywhere operations (#5565
)
Changed
- Use kubectl for kube-proxy upgrader calls (#5609
)
Fixed
- Fixed the failure to delete a Tinkerbell workload cluster due to an incorrect SSH key update during reconciliation (#5554
)
- Fixed
machineGroupRef updates for CloudStack and Vsphere (#5313
)
Supported OS version details
|
vSphere |
Baremetal |
Nutanix |
Cloudstack |
Snow |
| Ubuntu |
20.04 |
20.04 |
20.04 |
Not supported |
20.04 |
| Bottlerocket |
1.13.1 |
1.13.1 |
Not supported |
Not supported |
Not supported |
| RHEL |
8.7 |
8.7 |
Not supported |
8.7 |
Not supported |
Added
Upgraded
- Cilium updated from version
v1.11.10 to version v1.11.15
Fixed
- Fix http client in file reader to honor the provided HTTP_PROXY, HTTPS_PROXY and NO_PROXY env variables (#5488
)
Supported OS version details
|
vSphere |
Baremetal |
Nutanix |
Cloudstack |
Snow |
| Ubuntu |
20.04 |
20.04 |
20.04 |
Not supported |
20.04 |
| Bottlerocket |
1.13.1 |
1.13.1 |
Not supported |
Not supported |
Not supported |
| RHEL |
8.7 |
8.7 |
Not supported |
8.7 |
Not supported |
Added
- Workload clusters full lifecycle API support for Bare Metal provider (#5237
)
- IRSA support for Bare Metal (#4361
)
- Support for mixed disks within the same node grouping for BareMetal clusters (#3234
)
- Workload clusters full lifecycle API support for Nutanix provider (#5190
)
- OIDC support for Nutanix (#4711
)
- Registry mirror support for Nutanix (#5236
)
- Support for linking EKS Anywhere node VMs to Nutanix projects (#5266
)
- Add
CredentialsRef to NutanixDatacenterConfig to specify Nutanix credentials for workload clusters (#5114
)
- Support for taints and labels for Nutanix provider (#5172
)
- Support for InsecureSkipVerify for RegistryMirrorConfiguration across all providers. Currently only supported for Ubuntu and RHEL OS. (#1647
)
- Support for configuring of Bottlerocket settings. (#707
)
- Support for using a custom CNI (#5217
)
- Ability to configure NTP servers on EKS Anywhere nodes for vSphere and Tinkerbell providers (#4760
)
- Support for nonRootVolumes option in SnowMachineConfig (#5199
)
- Validate template disk size with vSphere provider using Bottlerocket (#1571
)
- Allow users to specify
cloneMode for different VSphereMachineConfig (#4634
)
- Validate management cluster bundles version is the same or newer than bundle version used to upgrade a workload cluster(#5105
)
- Set hostname for Bottlerocket nodes (#3629
)
- Curated Package controller as a package (#831
)
- Curated Package Credentials Package (#829
)
- Enable Full Cluster Lifecycle for curated packages (#807
)
- Curated Package Controller Configuration in Cluster Spec (#5031
)
Upgraded
- Bottlerocket upgraded from
v1.13.0 to v1.13.1
- Upgrade EKS Anywhere admin AMI to Kernel 5.15
- Tinkerbell stack upgraded (#3233
):
- Cluster API Provider Tinkerbell
v0.4.0
- Hegel
v0.10.1
- Rufio
v0.2.1
- Tink
v0.8.0
- Curated Package Harbor upgraded from
2.5.1 to 2.7.1
- Curated Package Prometheus upgraded from
2.39.1 to 2.41.0
- Curated Package Metallb upgraded from
0.13.5 to 0.13.7
- Curated Package Emissary upgraded from
3.3.0 to 3.5.1
Fixed
- Applied a patch that fixes vCenter sessions leak (#1767
)
Breaking changes
- Removed support for Kubernetes 1.21
Fixed
- Fix clustermanager no-timeouts option (#5445
)
Fixed
- Fix kubectl get call to point to full API name (#5342
)
- Expand all kubectl calls to fully qualified names (#5347
)
Added
--no-timeouts flag in create and upgrade commands to disable timeout for all wait operations- Management resources backup procedure with clusterctl
Added
--aws-region flag to copy packages command.
Upgraded
- CAPAS from
v0.1.22 to v0.1.24.
Added
- Enabled support for Kubernetes version 1.25
Added
- support for authenticated pulls from registry mirror (#4796
)
- option to override default nodeStartupTimeout in machine health check (#4800
)
- Validate control plane endpoint with pods and services CIDR blocks(#4816
)
Fixed
- Fixed a issue where registry mirror settings weren’t being applied properly on Bottlerocket nodes for Tinkerbell provider
Added
- Add support for EKS Anywhere on AWS Snow (#1042
)
- Static IP support for BottleRocket (#4359
)
- Add registry mirror support for curated packages
- Add copy packages command (#4420
)
Fixed
- Improve management cluster name validation for workload clusters
Added
- Multi-region support for all supported curated packages
Fixed
- Fixed nil pointer in
eksctl anywhere upgrade plan command
Added
- Workload clusters full lifecycle API support for vSphere and Docker (#1090
)
- Single node cluster support for Bare Metal provider
- Cilium updated to version
v1.11.10
- CLI high verbosity log output is automatically included in the support bundle after a CLI
cluster command error (#1703
implemented by #4289
)
- Allow to configure machine health checks timeout through a new flag
--unhealthy-machine-timeout (#3918
implemented by #4123
)
- Ability to configure rolling upgrade for Bare Metal and Cloudstack via
maxSurge and maxUnavailable parameters
- New Nutanix Provider
- Workload clusters support for Bare Metal
- VM Tagging support for vSphere VM’s created in the cluster (#4228
)
- Support for new curated packages:
- Updated curated packages' versions:
- ADOT
v0.23.0 upgraded from v0.21.1
- Emissary
v3.3.0 upgraded from v3.0.0
- Metallb
v0.13.7 upgraded from v0.13.5
- Support for packages controller to create target namespaces #601
- (For more EKS Anywhere packages info: v0.13.0
)
Fixed
- Kubernetes version upgrades from 1.23 to 1.24 for Docker clusters (#4266
)
- Added missing docker login when doing authenticated registry pulls
Breaking changes
- Removed support for Kubernetes 1.20
Added
- Add support for Kubernetes 1.24 (CloudStack support to come in future releases)#3491
Fixed
- Fix authenticated registry mirror validations
- Fix capc bug causing orphaned VM’s in slow environments
- Bundle activation problem for package controller
Changed
- Setting minimum wait time for nodes and machinedeployments (#3868, fixes #3822)
Fixed
- Fixed worker node count pointer dereference issue (#3852)
- Fixed eks-anywhere-packages reference in go.mod (#3902)
- Surface dropped error in Cloudstack validations (#3832)
⚠️ Breaking changes
- Certificates signed with SHA-1 are not supported anymore for Registry Mirror. Users with a registry mirror and providing a custom CA cert will need to rotate the certificate served by the registry mirror endpoint before using the new EKS-A version. This is true for both new clusters (
create cluster command) and existing clusters (upgrade cluster command).
- The
--source option was removed from several package commands. Use either --kube-version for registry or --cluster for cluster.
Added
- Add support for EKS Anywhere with provider CloudStack
- Add support to upgrade Bare Metal cluster
- Add support for using Registry Mirror for Bare Metal
- Redhat-based node image support for vSphere, CloudStack and Bare Metal EKS Anywhere clusters
- Allow authenticated image pull using Registry Mirror for Ubuntu on vSphere cluster
- Add option to disable vSphere CSI driver #3148
- Add support for skipping load balancer deployment for Bare Metal so users can use their own load balancers #3608
- Add support to configure aws-iam-authenticator on workload clusters independent of management cluster #2814
- Add EKS Anywhere Packages support for remote management on workload clusters. (For more EKS Anywhere packages info: v0.12.0
)
- Add new EKS Anywhere Packages
- AWS Distro for OpenTelemetry (ADOT)
- Cert Manager
- Cluster Autoscaler
- Metrics Server
Fixed
- Remove special cilium network policy with
policyEnforcementMode set to always due to lack of pod network connectivity for vSphere CSI
- Fixed #3391
#3560
for AWSIamConfig upgrades on EKS Anywhere workload clusters
Added
- Add validate session permission for vsphere
Fixed
- Fix datacenter naming bug for vSphere #3381
- Fix os family validation for vSphere
- Fix controller overwriting secret for vSphere #3404
- Fix unintended rolling upgrades when upgrading from an older EKS-A version for CloudStack
Added
- Add some bundleRef validation
- Enable kube-rbac-proxy on CloudStack cluster controller’s metrics port
Fixed
- Fix issue with fetching EKS-D CRDs/manifests with retries
- Update BundlesRef when building a Spec from file
- Fix worker node upgrade inconsistency in Cloudstack
Added
- Add a preflight check to validate vSphere user’s permissions #2744
Changed
- Make
DiskOffering in CloudStackMachineConfig optional
Fixed
- Fix upgrade failure when flux is enabled #3091
#3093
- Add token-refresher to default images to fix import/download images commands
- Improve retry logic for transient issues with kubectl applies and helm pulls #3167
- Fix issue fetching curated packages images
Added
- Add
--insecure flag to import/download images commands #2878
Breaking Changes
- EKS Anywhere no longer distributes Ubuntu OVAs for use with EKS Anywhere clusters. Building your own Ubuntu-based nodes as described in Building node images
is the only supported way to get that functionality.
Added
- Add support for Kubernetes 1.23 #2159
- Add support for Support Bundle for validating control plane IP with vSphere provider
- Add support for aws-iam-authenticator on Bare Metal
- Curated Packages General Availability
- Added Emissary Ingress Curated Package
Changed
- Install and enable GitOps in the existing cluster with upgrade command
Changed
- Updated EKS Distro versions to latest release
Fixed
- Fixed control plane nodes not upgraded for same kube version #2636
Added
- Added support for EKS Anywhere on bare metal with provider tinkerbell
. EKS Anywhere on bare metal supports complete provisioning cycle, including power on/off and PXE boot for standing up a cluster with the given hardware data.
- Support for node CIDR mask config exposed via the cluster spec. #488
Changed
- Upgraded cilium from 1.9 to 1.10. #1124
- Changes for EKS Anywhere packages v0.10.0
Fixed
- Fix issue using self-signed certificates for registry mirror #1857
Fixed
- Fix issue by avoiding processing Snow images when URI is empty
Added
- Adding support to EKS Anywhere for a generic git provider as the source of truth for GitOps configuration management. #9
- Allow users to configure Cloud Provider and CSI Driver with different credentials. #1730
- Support to install, configure and maintain operational components that are secure and tested by Amazon on EKS Anywhere clusters.#2083
- A new Workshop section has been added to EKS Anywhere documentation.
- Added support for curated packages behind a feature flag #1893
Fixed
- Fix issue specifying proxy configuration for helm template command #2009
Fixed
- Fix issue with upgrading cluster from a previous minor version #1819
Fixed
- Fix issue with downloading artifacts #1753
Added
- SSH keys and Users are now mutable #1208
- OIDC configuration is now mutable #676
- Add support for Cilium’s policy enforcement mode #726
Changed
- Install Cilium networking through Helm instead of static manifest
v0.7.2
- 2022-02-28
Fixed
- Fix issue with downloading artifacts #1327
v0.7.1
- 2022-02-25
Added
- Support for taints in worker node group configurations #189
- Support for taints in control plane configurations #189
- Support for labels in worker node group configuration #486
- Allow removal of worker node groups using the
eksctl anywhere upgrade command #1054
v0.7.0
- 2022-01-27
Added
- Support for
aws-iam-authenticator
as an authentication option in EKS-A clusters #90
- Support for multiple worker node groups in EKS-A clusters #840
- Support for IAM Role for Service Account (IRSA) #601
- New command
upgrade plan cluster lists core component changes affected by upgrade cluster #499
- Support for workload cluster’s control plane and etcd upgrade through GitOps #1007
- Upgrading a Flux managed cluster previously required manual steps. These steps have now been automated.
#759
, #1019
- Cilium CNI will now be upgraded by the
upgrade cluster command #326
Changed
- EKS-A now uses Cluster API (CAPI) v1.0.1 and v1beta1 manifests, upgrading from v0.3.23 and v1alpha3 manifests.
- Kubernetes components and etcd now use TLS_ECDHE_RSA_WITH_AES_128_GCM_SHA256 as the
configured TLS cipher suite #657
,
#759
- Automated git repository structure changes during Flux component
upgrade workflow #577
v0.6.0 - 2021-10-29
Added
- Support to create and manage workload clusters #94
- Support for upgrading eks-anywhere components #93
, Cluster upgrades
- IMPORTANT: Currently upgrading existing flux managed clusters requires performing a few additional steps
. The fix for upgrading the existing clusters will be published in
0.6.1 release
to improve the upgrade experience.
- k8s CIS compliance #193
- Support bundle improvements #92
- Ability to upgrade control plane nodes before worker nodes #100
- Ability to use your own container registry #98
- Make namespace configurable for anywhere resources #177
Fixed
- Fix ova auto-import issue for multi-datacenter environments #437
- OVA import via EKS-A CLI sometimes fails #254
- Add proxy configuration to etcd nodes for bottlerocket #195
Removed
- overrideClusterSpecFile field in cluster config
v0.5.0
Added
2.2 - Release Alerts
SNS Alerts for EKS Anywhere releases
EKS Anywhere uses Amazon Simple Notification Service (SNS) to notify availability of a new release.
It is recommended that your clusters are kept up to date with the latest EKS Anywhere release.
Please follow the instructions below to subscribe to SNS notification.
- Sign in to your AWS Account
- Select us-east-1 region
- Go to the SNS Console
- In the left navigation pane, choose “Subscriptions”
- On the Subscriptions page, choose “Create subscription”
- On the Create subscription page, in the Details section enter the following information
- Choose Create Subscription
- In few minutes, you will receive an email asking you to confirm the subscription
- Click the confirmation link in the email
3 - Concepts
The Concepts section contains an overview of the EKS Anywhere architecture, components, versioning, and support.
Most of the content in the EKS Anywhere documentation is specific to how EKS Anywhere deploys and manages Kubernetes clusters. For information on Kubernetes itself, reference the Kubernetes documentation.
3.1 - EKS Anywhere Architecture
EKS Anywhere architecture overview
EKS Anywhere supports many different types of infrastructure including VMWare vSphere, bare metal, Nutanix, Apache CloudStack, and AWS Snow. EKS Anywhere is built on the Kubernetes sub-project called Cluster API
(CAPI), which is focused on providing declarative APIs and tooling to simplify the provisioning, upgrading, and operating of multiple Kubernetes clusters. EKS Anywhere inherits many of the same architectural patterns and concepts that exist in CAPI. Reference the CAPI documentation
to learn more about the core CAPI concepts.
Components
Each EKS Anywhere version includes all components required to create and manage EKS Anywhere clusters.
Administrative / CLI components
Responsible for lifecycle operations of management or standalone clusters, building images, and collecting support diagnostics. Admin / CLI components run on Admin machines or image building machines.
| Component |
Description |
| eksctl CLI |
Command-line tool to create, upgrade, and delete management, standalone, and optionally workload clusters. |
| image-builder |
Command-line tool to build Ubuntu and RHEL node images |
| diagnostics collector |
Command-line tool to produce support diagnostics bundle |
Management components
Responsible for infrastructure and cluster lifecycle management (create, update, upgrade, scale, delete). Management components run on standalone or management clusters.
| Component |
Description |
| CAPI controller |
Controller that manages core Cluster API objects such as Cluster, Machine, MachineHealthCheck etc. |
| EKS Anywhere lifecycle controller |
Controller that manages EKS Anywhere objects such as EKS Anywhere Clusters, EKS-A Releases, FluxConfig, GitOpsConfig, AwsIamConfig, OidcConfig |
| Curated Packages controller |
Controller that manages EKS Anywhere Curated Package objects |
| Kubeadm controller |
Controller that manages Kubernetes control plane objects |
| Etcdadm controller |
Controller that manages etcd objects |
| Provider-specific controllers |
Controller that interacts with infrastructure provider (vSphere, bare metal etc.) and manages the infrastructure objects |
| EKS Anywhere CRDs |
Custom Resource Definitions that EKS Anywhere uses to define and control infrastructure, machines, clusters, and other objects |
Cluster components
Components that make up a Kubernetes cluster where applications run. Cluster components run on standalone, management, and workload clusters.
| Component |
Description |
| Kubernetes |
Kubernetes components that include kube-apiserver, kube-controller-manager, kube-scheduler, kubelet, kubectl |
| etcd |
Etcd database used for Kubernetes control plane datastore |
| Cilium |
Container Networking Interface (CNI) |
| CoreDNS |
In-cluster DNS |
| kube-proxy |
Network proxy that runs on each node |
| containerd |
Container runtime |
| kube-vip |
Load balancer that runs on control plane to balance control plane IPs |
Deployment Architectures
EKS Anywhere supports two deployment architectures:
-
Standalone clusters: If you are only running a single EKS Anywhere cluster, you can deploy a standalone cluster. This deployment type runs the EKS Anywhere management components on the same cluster that runs workloads. Standalone clusters must be managed with the eksctl CLI. A standalone cluster is effectively a management cluster, but in this deployment type, only manages itself.
-
Management cluster with separate workload clusters: If you plan to deploy multiple EKS Anywhere clusters, it’s recommended to deploy a management cluster with separate workload clusters. With this deployment type, the EKS Anywhere management components are only run on the management cluster, and the management cluster can be used to perform cluster lifecycle operations on a fleet of workload clusters. The management cluster must be managed with the eksctl CLI, whereas workload clusters can be managed with the eksctl CLI or with Kubernetes API-compatible clients such as kubectl, GitOps, or Terraform.
If you use the management cluster architecture, the management cluster must run on the same infrastructure provider as your workload clusters. For example, if you run your management cluster on vSphere, your workload clusters must also run on vSphere. If you run your management cluster on bare metal, your workload cluster must run on bare metal. Similarly, all nodes in workload clusters must run on the same infrastructure provider. You cannot have control plane nodes on vSphere, and worker nodes on bare metal.
Both deployment architectures can run entirely disconnected from the internet and AWS Cloud. For information on deploying EKS Anywhere in airgapped environments, reference the Airgapped Installation page.
Standalone Clusters
Technically, standalone clusters are the same as management clusters, with the only difference being that standalone clusters are only capable of managing themselves. Regardless of the deployment architecture you choose, you always start by creating a standalone cluster from an Admin machine.
When you first create a standalone cluster, a temporary Kind bootstrap cluster is used on your Admin machine to pull down the required components and bootstrap your standalone cluster on the infrastructure of your choice.
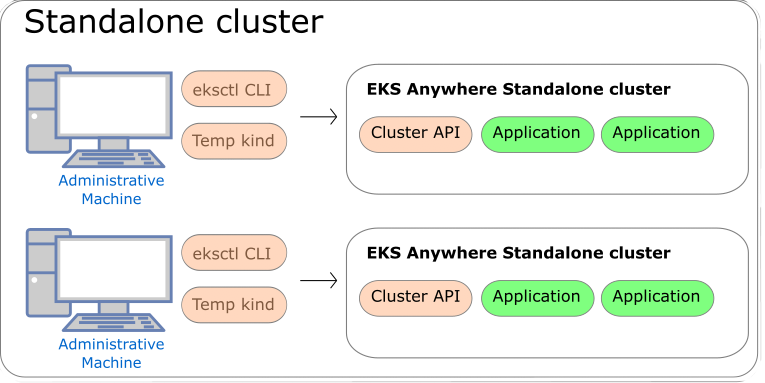
Management Clusters
Management clusters are long-lived EKS Anywhere clusters that can create and manage a fleet of EKS Anywhere workload clusters. Management clusters run both management and cluster components. Workload clusters run cluster components only and are where your applications run. Management clusters enable you to centrally manage your workload clusters with Kubernetes API-compatible clients such as kubectl, GitOps, or Terraform, and prevent management components from interfering with the resource usage of your applications running on workload clusters.
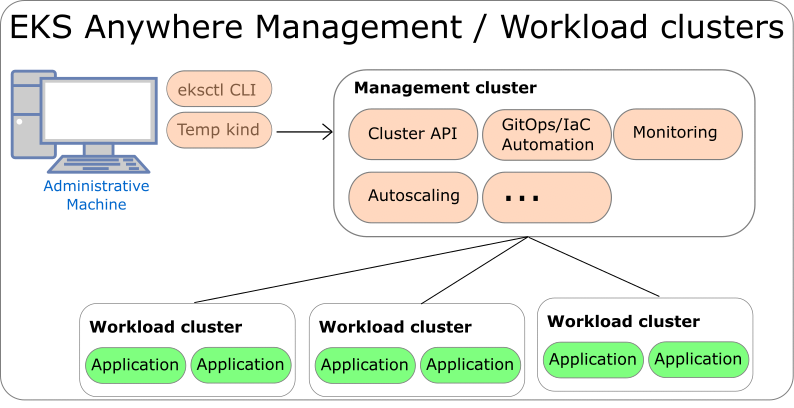
3.2 - EKS Anywhere and Kubernetes version lifecycle
EKS Anywhere and Kubernetes version support policy and release cycle
This page contains information on the EKS Anywhere release cycle and support for Kubernetes versions.
Each EKS Anywhere version contains at least four Kubernetes versions. When creating new clusters, we recommend that you use the latest available Kubernetes version supported by EKS Anywhere. However, you can create new EKS Anywhere clusters with any Kubernetes version that the EKS Anywhere version supports. To create new clusters or upgrade existing clusters with a Kubernetes version under extended support, you must have a valid and unexpired license token for the cluster you are creating or upgrading.
EKS Anywhere versions
Each EKS Anywhere version includes all components required to create and manage EKS Anywhere clusters. This includes but is not limited to:
- Administrative / CLI components (eksctl CLI, image-builder, diagnostics-collector)
- Management components (Cluster API controller, EKS Anywhere controller, provider-specific controllers)
- Cluster components (Kubernetes, Cilium)
You can find details about each EKS Anywhere release in the EKS Anywhere release manifest
. The release manifest contains references to the corresponding bundle manifest for each EKS Anywhere version. Within the bundle manifest, you will find the components included in a specific EKS Anywhere version. The images running in your deployment use the same URI values specified in the bundle manifest for that component. For example, see the bundle manifest
for EKS Anywhere version v0.21.7.
EKS Anywhere follows a 4-month release cadence for minor versions and a 2-week cadence for patch versions. Common vulnerabilities and exposures (CVE) patches and bug fixes, including those for the supported Kubernetes versions, are included in the latest EKS Anywhere minor version (version N). High and critical CVE patches and bug fixes are also backported to the penultimate EKS Anywhere minor version (version N-1), which follows a monthly patch release cadence.
Reference the table below for release dates and patch support for each EKS Anywhere version. This table shows the Kubernetes versions that are supported in each EKS Anywhere version.
| EKS Anywhere Version |
Supported Kubernetes Versions |
Release Date |
Receiving Patches |
| 0.25 |
1.35, 1.34, 1.33, 1.32, 1.31, 1.30, 1.29 |
March 1, 2026 |
Yes |
| 0.24 |
1.34, 1.33, 1.32, 1.31, 1.30, 1.29, 1.28 |
November 6, 2025 |
Yes |
| 0.23 |
1.33, 1.32, 1.31, 1.30, 1.29, 1.28 |
June 30, 2025 |
No |
| 0.22 |
1.32, 1.31, 1.30, 1.29, 1.28 |
February 28, 2025 |
No |
| 0.21 |
1.31, 1.30, 1.29, 1.28, 1.27 |
October 30, 2024 |
No |
| 0.20 |
1.30, 1.29, 1.28, 1.27, 1.26 |
June 28, 2024 |
No |
| 0.19 |
1.29, 1.28, 1.27, 1.26, 1.25 |
February 29, 2024 |
No |
| 0.18 |
1.28, 1.27, 1.26, 1.25, 1.24 |
October 30, 2023 |
No |
| 0.17 |
1.27, 1.26, 1.25, 1.24, 1.23 |
August 16, 2023 |
No |
| 0.16 |
1.27, 1.26, 1.25, 1.24, 1.23 |
June 1, 2023 |
No |
| 0.15 |
1.26, 1.25, 1.24, 1.23, 1.22 |
March 30, 2023 |
No |
| 0.14 |
1.25, 1.24, 1.23, 1.22, 1.21 |
January 19, 2023 |
No |
- Older EKS Anywhere versions are omitted from this table for brevity, reference the EKS Anywhere GitHub
for older versions.
Kubernetes versions
The release and support schedule for Kubernetes versions in EKS Anywhere aligns with the Amazon EKS release and support schedule, including both standard and extended support for Kubernetes versions, as documented on the Amazon EKS Kubernetes release calendar.
A Kubernetes version is under standard support in EKS Anywhere for 14 months after its release in EKS Anywhere. Extended support for Kubernetes versions was released in EKS Anywhere version v0.22.0 and adds an additional 12 months of CVE patches and critical bug fixes for the Kubernetes version. To use Kubernetes versions under extended support with EKS Anywhere clusters, you must have a valid and unexpired license token for each cluster you will create or upgrade with extended support Kubernetes versions. The patch releases for Kubernetes versions are included in EKS Anywhere according to the EKS Anywhere version release schedule defined in the previous section.
Unlike Amazon EKS in the cloud, there are no automatic upgrades in EKS Anywhere and you have full control over when you upgrade. On the end of the extended support date, you can still create new EKS Anywhere clusters with that Kubernetes version if the EKS Anywhere version includes it. Any existing EKS Anywhere clusters with the unsupported Kubernetes version continue to function. As new Kubernetes versions become available in EKS Anywhere, we recommend that you proactively update your clusters to use the latest available Kubernetes version to remain on versions that receive CVE patches and bug fixes. You can continue to get troubleshooting support for your EKS Anywhere clusters running on unsupported Kubernetes versions if you have an EKS Anywhere Enterprise Subscription. However, if there is an issue that requires code changes, the only resolution is to upgrade as patches are no longer made available for Kubernetes versions that have exited extended support.
Reference the table below for release and support dates for each Kubernetes version in EKS Anywhere. The Release Date column denotes the EKS Anywhere release date when the Kubernetes version was first supported in EKS Anywhere.
| Kubernetes Version |
Release Date |
End of standard support |
End of extended support |
| 1.35 |
March 1, 2026 |
April 30, 2027 |
April 30, 2028 |
| 1.34 |
November 6, 2025 |
December 31, 2026 |
December 31, 2027 |
| 1.33 |
June 30, 2025 |
August 31, 2026 |
August 31, 2027 |
| 1.32 |
February 28, 2025 |
April 30, 2026 |
April 30, 2027 |
| 1.31 |
October 30, 2024 |
December 31, 2025 |
December 31, 2026 |
| 1.30 |
June 28, 2024 |
August 31, 2025 |
August 31, 2026 |
| 1.29 |
February 29, 2024 |
April 30, 2025 |
April 30, 2026 |
| 1.28 |
October 30, 2023 |
December 31, 2024 |
December 31, 2025 |
| 1.27 |
June 1, 2023 |
February 28, 2025 |
|
| 1.26 |
March 30, 2023 |
October 30, 2024 |
|
| 1.25 |
January 19, 2023 |
June 28, 2024 |
|
- Older Kubernetes versions are omitted from this table for brevity, reference the EKS Anywhere GitHub
for older versions.
Operating System versions
Bottlerocket, Ubuntu, and Red Hat Enterprise Linux (RHEL) can be used as operating systems for nodes in EKS Anywhere clusters. Reference the table below for operating system version support in EKS Anywhere. For information on operating system management in EKS Anywhere, reference the Operating System Management Overview page
| OS |
OS Versions |
EKS Anywhere version |
| Ubuntu |
24.04 |
0.24 |
| 22.04 |
0.17 |
|
|
20.04 |
0.5 |
| Bottlerocket |
1.54.0 |
0.25 |
| 1.50.0 |
0.24 |
|
| 1.48.0 |
0.23 |
|
|
1.26.1 |
0.21 |
|
1.20.0 |
0.20 |
|
1.19.1 |
0.19 |
|
1.15.1 |
0.18 |
| RHEL |
9.x* |
0.18 |
|
8.x |
0.12 |
*Bare Metal, CloudStack and Nutanix only
- For details on supported operating systems for Admin machines, see the Admin Machine page.
- Older Bottlerocket versions are omitted from this table for brevity
Frequently Asked Questions (FAQs)
1. Where can I find details of the changes included in an EKS Anywhere version?
For changes included in an EKS Anywhere version, reference the EKS Anywhere Changelog.
2. How can I be notified of new EKS Anywhere version releases?
To configure notifications for new EKS Anywhere versions, follow the instructions on the Release Alerts page.
3. Does EKS Anywhere have extended support for Kubernetes versions?
Yes. Extended support for Kubernetes versions was released in EKS Anywhere version v0.22.0 and adds an additional 12 months of CVE patches and critical bug fixes for the Kubernetes version. To use Kubernetes versions under extended support with EKS Anywhere clusters, you must have an EKS Anywhere Enterprise Subscription, and a valid and unexpired license token for each cluster you will create or upgrade with extended support Kubernetes versions. You must use EKS Anywhere version v0.22.0 or above to use extended support for Kubernetes versions.
4. What happens on the end of support date for a Kubernetes version?
Unlike Amazon EKS in the cloud, there are no forced upgrades with EKS Anywhere. On the end of support date, you can still create new EKS Anywhere clusters with the unsupported Kubernetes version if the EKS Anywhere version includes it. Existing EKS Anywhere clusters with unsupported Kubernetes versions continue to function. However, you will not be able to receive CVE patches or bug fixes for unsupported Kubernetes versions. Troubleshooting support, configuration guidance, and upgrade assistance is available for all Kubernetes and EKS Anywhere versions for customers with EKS Anywhere Enterprise Subscriptions.
5. What EKS Anywhere versions are supported if you have the EKS Anywhere Enterprise Subscription?
If you have purchased an EKS Anywhere Enterprise Subscription, AWS will provide troubleshooting support, configuration guidance, and upgrade assistance for your licensed clusters, irrespective of the EKS Anywhere version it’s running on. However, as the CVE patches and bug fixes are only included in the latest and penultimate EKS Anywhere versions, it is recommended to use either of these releases to manage your deployments and keep them up to date. With an EKS Anywhere Enterprise Subscription, AWS will assist you in upgrading your licensed clusters to the latest EKS Anywhere version.
6. Can I use different EKS Anywhere versions for my management cluster and workload clusters?
Yes, the management cluster can be upgraded to newer EKS Anywhere versions than the workload clusters that it manages. However, a maximum skew of one EKS Anywhere minor version for management and workload clusters. This means the management cluster can be at most one EKS Anywhere minor version newer than the workload clusters (ie. management cluster with v0.22.x and workload clusters with v0.21.x). In the event that you want to upgrade your management cluster to a version that does not satisfy this condition, we recommend upgrading the workload cluster’s EKS Anywhere version first to match the current management cluster’s EKS Anywhere version, followed by an upgrade to your desired EKS Anywhere version for the management cluster.
NOTE: Workload clusters can only be created with or upgraded to the same EKS Anywhere version that the management cluster was created with.
For example, if you create your management cluster with v0.22.0, you can only create workload clusters with v0.22.0. However, if you create your management cluster with version v0.21.0 and then upgrade to v0.22.0, you can create workload clusters with either EKS Anywhere version v0.21.0 or v0.22.0.
7. Can I skip EKS Anywhere minor versions during upgrades (such as going from v0.20.x directly to v0.22.x)?
No, it is not recommended to skip EKS Anywhere versions during upgrade. Regular upgrade reliability testing is only performed for sequential version upgrades (ie. going from version 0.20.x to 0.21.x, then from version 0.21.x to 0.22.x). However, you can choose to skip EKS Anywhere patch versions (ie. upgrade from v0.21.3 to v0.21.5).
8. What is the difference between an EKS Anywhere minor version versus a patch version?
An EKS Anywhere minor version includes new EKS Anywhere capabilities, bug fixes, security patches, and new Kubernetes minor versions if they are available. An EKS Anywhere patch version generally includes only bug fixes, security patches, and Kubernetes patch version increments. EKS Anywhere patch versions are released more frequently than EKS Anywhere minor versions so you can receive the latest security and bug fixes sooner. For example, patch releases for the latest EKS Anywhere version follow a biweekly release cadence and patches for the penultimate EKS Anywhere version follow a monthly cadence.
9. What kind of fixes are patched in the latest EKS Anywhere minor version?
The latest EKS Anywhere minor version will receive CVE patches and bug fixes for EKS Anywhere components and the Kubernetes versions that are supported by the corresponding EKS Anywhere version. New curated packages versions, if any, will be made available as upgrades for this minor version.
10. What kind of fixes are patched in the penultimate EKS Anywhere minor version?
The penultimate EKS Anywhere minor version receives high and critical CVE patches and updates only to those Kubernetes versions that are supported by the corresponding EKS Anywhere version. New curated packages versions, if any, will be made available as upgrades for this minor version.
11. Can I get notified when support is ending for a Kubernetes version on EKS Anywhere?
Not automatically. You should check this page regularly and take note of the end of support date for the Kubernetes version you’re using and plan your upgrades accordingly.
3.3 - Support for EKS Anywhere
Overview of EKS Anywhere Enterprise Subscriptions
EKS Anywhere is available as open source software that you can run on hardware in your data center or edge environment.
You can purchase EKS Anywhere Enterprise Subscriptions to receive support for your EKS Anywhere clusters and for access to EKS Anywhere Curated Packages
and extended support for Kubernetes versions
. You can only receive support for your EKS Anywhere clusters that are licensed under an active EKS Anywhere Enterprise Subscription. EKS Anywhere Enterprise Subscriptions are available for a 1-year or 3-year term, and are priced on a per cluster basis.
You must have an EKS Anywhere Enterprise Subscription to access EKS Anywhere Curated Packages and EKS Anywhere extended support for Kubernetes versions.
EKS Anywhere Enterprise Subscriptions include support for the following components.
- EKS Distro (see documentation
for components)
- EKS Anywhere core components such as the Cilium CNI, Flux GitOps controller, kube-vip, EKS Anywhere CLI, EKS Anywhere controllers, image builder, and EKS Connector
- EKS Anywhere cluster lifecycle operations such as creating, scaling, and upgrading
- EKS Anywhere troubleshooting, general guidance, and best practices
- EKS Anywhere Curated Packages (see Overview of curated packages
for more information)
- EKS Anywhere extended support for Kubernetes versions (see Version lifecycle
for more information)
- Bottlerocket node operating system
See the following links for more information on EKS Anywhere Enterprise Subscriptions
If you are using EKS Anywhere and have not purchased a subscription, you can file an issue in the EKS Anywhere GitHub Repository,
and someone will get back to you as soon as possible. If you discover a potential security issue in this project, we ask that you notify AWS/Amazon Security via the vulnerability reporting page.
Please do not create a public GitHub issue for security problems.
Frequently Asked Questions (FAQs)
1. How much does an EKS Anywhere Enterprise Subscription cost?
For pricing information, visit the EKS Anywhere Pricing
page.
2. How can I purchase an EKS Anywhere Enterprise Subscription?
Reference the Purchase Subscriptions
documentation for instructions on how to purchase.
3. Are subscriptions I previously purchased manually integrated into the EKS console?
No, EKS Anywhere Enterprise Subscriptions purchased manually before October 2023 cannot be viewed or managed through the EKS console, APIs, and AWS CLI.
4. Can I cancel my subscription in the EKS console, APIs, and AWS CLI?
You can cancel your subscription within the first 7 days of purchase by filing an AWS Support case. When you cancel your subscription within the first 7 days, you are not charged for the subscription. To cancel your subscription outside of the 7-day time period, contact your AWS account team.
5. Can I cancel my subscription after I use it to file an AWS Support case?
No, if you have used your subscription to file an AWS Support case requesting EKS Anywhere support, then we are unable to cancel the subscription or refund the purchase regardless of the 7-day grace period, since you have leveraged support as part of the subscription.
6. In which AWS Regions can I purchase subscriptions?
You can purchase subscriptions in all AWS Regions
, except the Asia Pacific (Thailand), Mexico (Central), AWS GovCloud (US) Regions, and the China Regions.
7. Can I renew my subscription through the EKS console, APIs, and AWS CLI?
Yes, you can configure auto renewal during subscription creation or at any time during your subscription term. When auto renewal is enabled for your subscription, the subscription and associated licenses will be automatically renewed for the term of the existing subscription (1-year or 3-years). The 7-day cancellation period does not apply to renewals. You do not need to reapply licenses to your EKS Anywhere clusters when subscriptions are automatically renewed.
8. Can I edit my subscription through the EKS console, APIs, and AWS CLI?
You can edit the auto renewal and tags configurations for your subscription with the EKS console, APIs, and AWS CLI. To change the term or license quantity for a subscription, you must create a new subscription.
9. What happens when a subscription expires?
When subscriptions expire, licenses associated with the subscription can no longer be used for new support cases, access to EKS Anywhere Curated Packages is revoked, clusters cannot be created or upgraded with Kubernetes versions under extended support, and billing for the subscription stops. Support cases created during the active subscription period will continue to be serviced. You will receive emails 3 months, 1 month, and 1 week before subscriptions expire, and an alert is presented in the EKS console for approaching expiration dates. Subscriptions can be viewed with the EKS console, APIs, and AWS CLI after expiration.
10. How do I use the licenses for my subscription?
When you create a subscription, licenses are created based on the quantity you pass when you create the subscription and the licenses can be viewed in the EKS console. There are two key parts of the license, the license ID string and the license token. In EKS Anywhere versions v0.21.x and below, the license ID string was applied as a Kubernetes Secret to EKS Anywhere clusters and used when support cases are created to validate the cluster is eligible for support. The license token was introduced in EKS Anywhere version v0.22.0 and all existing EKS Anywhere subscriptions have been updated with a license token for each license.
You can use either the license ID string or the license token when you create AWS Support cases for your EKS Anywhere clusters. To use extended support for Kubernetes versions in EKS Anywhere, available for EKS Anywhere version v0.22.0 and above, your clusters must have a valid and unexpired license token to be able to create and upgrade clusters using the Kubernetes extended support versions.
11. How do I apply licenses to my EKS Anywhere clusters?
Reference the License cluster
documentation for instructions on how to apply licenses your EKS Anywhere clusters.
12. Can I share licenses with other AWS accounts?
The licenses created for your subscriptions cannot be shared with AWS Resource Access Manager (RAM) but they can be shared through your own manual, secure mechanisms. It is generally recommended to create the subscription with the AWS account that will be used to operate the EKS Anywhere clusters.
13. Can I share access to curated packages with other AWS accounts?
Yes, reference the Share curated packages access
documentation for instructions on how to share access to curated packages with other AWS accounts in your organization.
14. Is there an option to pay for subscriptions upfront?
If you need to pay upfront for subscriptions, please contact your AWS account team.
15. Is there a free trial for EKS Anywhere Enterprise Subscriptions?
There is no free trial for EKS Anywhere Enterprise Subscriptions. A flexible pilot program is available for the EKS-A Enterprise Subscription, providing customers with a 3-month support subscription term.
3.4 - EKS Anywhere Curated Packages
Overview of EKS Anywhere Curated Packages
Note
EKS Anywhere Curated Packages are only available to customers with EKS Anywhere Enterprise Subscriptions. To request evaluation access to EKS Anywhere Curated Packages, talk to your AWS account team or connect with one
here.
Overview
EKS Anywhere Curated Packages are Amazon-curated software packages that extend the core functionalities of Kubernetes on your EKS Anywhere clusters. If you operate EKS Anywhere clusters on-premises, you probably install additional software to ensure the security and reliability of your clusters. However, you may be spending a lot of effort searching for the right software, tracking updates, and testing them for compatibility. Now with the EKS Anywhere Curated Packages, you can rely on Amazon to provide trusted, up-to-date, and compatible software packages that are supported by Amazon, reducing the need for multiple vendor support agreements.
- Amazon-built: All container images of the packages are built from source code by Amazon, including the open source (OSS) packages. OSS package images are built from the open source upstream.
- Amazon-scanned: Amazon scans the container images including the OSS package images daily for security vulnerabilities and provides remediation.
- Amazon-signed: Amazon signs the package bundle manifest (a Kubernetes manifest) for the list of curated packages. The manifest is signed with AWS Key Management Service (AWS KMS) managed private keys. The curated packages are installed and managed by a package controller on the clusters. Amazon provides validation of signatures through an admission control webhook in the package controller and the public keys distributed in the bundle manifest file.
- Amazon-tested: Amazon tests the compatibility of all curated packages including the OSS packages with each new version of EKS Anywhere.
- Amazon-supported: All curated packages, including the curated OSS packages, are supported under EKS Anywhere Enterprise Subscriptions.
The main components of EKS Anywhere Curated Packages are the package controller
, the package build artifacts
and the command line interface
. The package controller will run in a pod in an EKS Anywhere cluster. The package controller will manage the lifecycle of all curated packages.
Curated package list
FAQ
1. Can I use other software that isn’t in the list of curated packages?
Yes. You can use your choice of optional software with EKS Anywhere. However, if the software you use is not included in the list of components covered by EKS Anywhere Enterprise subscriptions, then you cannot get support for that software through AWS Support. Amazon does not provide testing, security patching, software updates, or customer support for the self-managed software you run on EKS Anywhere clusters.
2. Can I install software that’s on the curated package list but not sourced from the EKS Anywhere repository?
Yes, you do not have to use the specific software included in EKS Anywhere Curated Packages. However, if for example, you deploy a Harbor image that is not built and signed by Amazon, Amazon will not provide testing or customer support to your self-built images.
3.5 - Compare EKS Anywhere and Amazon EKS
Comparing EKS Anywhere features to Amazon EKS
EKS Anywhere provides an installable software package for creating and operating Kubernetes clusters on-premises and automation tooling for cluster lifecycle operations. EKS Anywhere is a fit for isolated and air-gapped environments, and for users who prefer to manage their own Kubernetes clusters on-premises.
Amazon Elastic Kubernetes Service (Amazon EKS) is a managed Kubernetes service where the Kubernetes control plane is managed by AWS, and users can choose to run applications on EKS Auto Mode, AWS Fargate, EC2 instances in AWS Regions, AWS Local Zones, or AWS Outposts, or on customer-managed infrastructure with EKS Hybrid Nodes. If you have on-premises or edge environments with reliable connectivity to an AWS Region, consider using EKS Hybrid Nodes
or EKS on Outposts
to benefit from the AWS-managed EKS control plane and consistent experience with EKS in AWS Cloud.
EKS Anywhere and Amazon EKS are certified Kubernetes conformant, so existing applications that run on upstream Kubernetes are compatible with EKS Anywhere and Amazon EKS.
Comparing EKS Anywhere to EKS on Outposts
Like EKS Anywhere, EKS on Outposts enables customers to run Kubernetes workloads on-premises and at the edge.
The main differences are:
- EKS on Outposts requires a reliable connection to AWS Regions. EKS Anywhere can run in isolated or air-gapped environments.
- With EKS on Outposts, AWS provides AWS-managed infrastructure and AWS services such as Amazon EC2 for compute, Amazon VPC for networking, and Amazon EBS for storage. EKS Anywhere runs on customer-managed infrastructure and interfaces with customer-provided compute (vSphere, bare metal, Nutanix, etc.), networking, and storage.
- With EKS on Outposts, the Kubernetes control plane is managed by AWS. With EKS Anywhere, customers are responsible for managing the Kubernetes cluster lifecycle with EKS Anywhere automation tooling.
- Customers can use EKS on Outposts with the same console, APIs, and tools they use to run EKS clusters in AWS Cloud. With EKS Anywhere, customers can use the eksctl CLI or Kubernetes API-compatible tooling to manage their clusters.
For more information, see the EKS on Outposts documentation.
Comparing EKS Anywhere to EKS Hybrid Nodes
Like EKS Anywhere, EKS Hybrid Nodes enables customers to run Kubernetes workloads on-premises and at the edge. Both EKS Anywhere and EKS Hybrid Nodes run on customer-managed infrastructure (VMware vSphere, bare metal, Nutanix, etc.).
The main differences are:
- EKS Hybrid Nodes requires a reliable connection to AWS Regions. EKS Anywhere can run in isolated or air-gapped environments.
- With EKS Hybrid Nodes, the Kubernetes control plane is managed by AWS. With EKS Anywhere, customers are responsible for managing the Kubernetes cluster lifecycle with EKS Anywhere automation tooling.
- Customers can use EKS Hybrid Nodes with the same console, APIs, and tools they use to run EKS clusters in AWS Cloud. With EKS Anywhere, customers can use the eksctl CLI or Kubernetes API-compatible tooling to manage their clusters.
For more information, see the EKS Hybrid Nodes documentation.
3.6 -
-
Standalone clusters: If you are only running a single EKS Anywhere cluster, you can deploy a standalone cluster. This deployment type runs the EKS Anywhere management components on the same cluster that runs workloads. Standalone clusters must be managed with the eksctl CLI. A standalone cluster is effectively a management cluster, but in this deployment type, only manages itself.
-
Management cluster with separate workload clusters: If you plan to deploy multiple EKS Anywhere clusters, it’s recommended to deploy a management cluster with separate workload clusters. With this deployment type, the EKS Anywhere management components are only run on the management cluster, and the management cluster can be used to perform cluster lifecycle operations on a fleet of workload clusters. The management cluster must be managed with the eksctl CLI, whereas workload clusters can be managed with the eksctl CLI or with Kubernetes API-compatible clients such as kubectl, GitOps, or Terraform.
4 - Installation
How to install the EKS Anywhere CLI, set up prerequisites, and create EKS Anywhere clusters
This section explains how to set up and run EKS Anywhere. The pages in this section are purposefully ordered, and we recommend stepping through the pages one-by-one until you are ready to choose an infrastructure provider for your EKS Anywhere cluster.
4.1 - Overview
Overview of the EKS Anywhere cluster creation process
Overview
Kubernetes clusters require infrastructure capacity for the Kubernetes control plane, etcd, and worker nodes. EKS Anywhere provisions and manages this capacity on your behalf when you create EKS Anywhere clusters by interacting with the underlying infrastructure interfaces. Today, EKS Anywhere supports vSphere, bare metal, Snow, Apache CloudStack and Nutanix infrastructure providers. EKS Anywhere can also run on Docker for dev/test and non-production deployments only.
If you are creating your first EKS Anywhere cluster, you must first prepare an Administrative machine (Admin machine) where you install and run the EKS Anywhere CLI. The EKS Anywhere CLI (eksctl anywhere) is the primary tool you will use to create and manage your first cluster.
Your interface for configuring EKS Anywhere clusters is the cluster specification yaml (cluster spec). This cluster spec is where you define cluster configuration including cluster name, network, Kubernetes version, control plane settings, worker node settings, and operating system. You also specify environment-specific configuration in the cluster spec for vSphere, bare metal, Snow, CloudStack, and Nutanix. When you perform cluster lifecycle operations, you modify the cluster spec, and then apply the cluster spec changes to your cluster in a declarative manner.
Before creating EKS Anywhere clusters, you must determine the operating system you will use. EKS Anywhere supports Bottlerocket, Ubuntu, and Red Hat Enterprise Linux (RHEL). All operating systems are not supported on each infrastructure provider. If you are using Ubuntu or RHEL, you must build your images before creating your cluster. For details reference the Operating System Management documenation
During initial cluster creation, the EKS Anywhere CLI performs the following high-level actions
- Confirms the target cluster environment is available
- Confirms authentication succeeds to the target environment
- Performs infrastructure provider-specific validations
- Creates a bootstrap cluster (Kind cluster) on the Admin machine
- Installs Cluster API (CAPI) and EKS-A core components on the bootstrap cluster
- Creates the EKS Anywhere cluster on the infrastructure provider
- Moves the Cluster API and EKS-A core components from the bootstrap cluster to the EKS Anywhere cluster
- Shuts down the bootstrap cluster
During initial cluster creation, you can observe the progress through the EKS Anywhere CLI output and by monitoring the CAPI and EKS-A controller manager logs on the bootstrap cluster. To access the bootstrap cluster, use the kubeconfig file in the <cluster-name>/generated/<cluster-name>.kind.kubeconfig file location.
After initial cluster creation, you can access your cluster using the kubeconfig file, which is located in the <cluster-name>/<cluster-name>-eks-a-cluster.kubeconfig file location. You can SSH to the nodes that EKS Anywhere created on your behalf with the keys in the <cluster-name>/eks-a-id_rsa location by default.
While you do not need to maintain your Admin machine, you must save your kubeconfig, SSH keys, and EKS Anywhere cluster spec to a safe location if you intend to use a different Admin machine in the future.
See the Admin machine
page for details and requirements to get started setting up your Admin machine.
Infrastructure Providers
EKS Anywhere uses an infrastructure provider model for creating, upgrading, and managing Kubernetes clusters that is based on the Kubernetes Cluster API
(CAPI) project.
Like CAPI, EKS Anywhere runs a Kind
cluster on the Admin machine to act as a bootstrap cluster. However, instead of using CAPI directly with the clusterctl command to manage EKS Anywhere clusters, you use the eksctl anywhere command which simplifies that operation.
Before creating your first EKS Anywhere cluster, you must choose your infrastructure provider and ensure the requirements for that environment are met. Reference the infrastructure provider-specific sections below for more information.
Deployment Architectures
EKS Anywhere supports two deployment architectures:
-
Standalone clusters: If you are only running a single EKS Anywhere cluster, you can deploy a standalone cluster. This deployment type runs the EKS Anywhere management components on the same cluster that runs workloads. Standalone clusters must be managed with the eksctl CLI. A standalone cluster is effectively a management cluster, but in this deployment type, only manages itself.
-
Management cluster with separate workload clusters: If you plan to deploy multiple EKS Anywhere clusters, it’s recommended to deploy a management cluster with separate workload clusters. With this deployment type, the EKS Anywhere management components are only run on the management cluster, and the management cluster can be used to perform cluster lifecycle operations on a fleet of workload clusters. The management cluster must be managed with the eksctl CLI, whereas workload clusters can be managed with the eksctl CLI or with Kubernetes API-compatible clients such as kubectl, GitOps, or Terraform.
For details on the EKS Anywhere architectures, see the Architecture page.
EKS Anywhere software
When setting up your Admin machine, you need Internet access to the repositories hosting the EKS Anywhere software.
EKS Anywhere software is divided into two types of components: The EKS Anywhere CLI for managing clusters and the cluster components and controllers used to run workloads and configure clusters.
- Command line tools: Binaries installed on the Admin machine include
eksctl, eksctl-anywhere, kubectl, and aws-iam-authenticator.
- Cluster components and controllers: These components are listed on the artifacts
page for each provider.
If you are operating behind a firewall that limits access to the Internet, you can configure EKS Anywhere to use a proxy service
to connect to the Internet.
For more information on the software used in EKS Distro, which includes the Kubernetes release and related software in EKS Anywhere, see the EKS Distro Releases
page.
4.2 - 1. Admin Machine
Steps for setting up the Admin Machine
Warning
The Administrative machine (Admin machine) is required to run cluster lifecycle operations, but EKS Anywhere clusters do not require a continuously running Admin machine to function. During cluster creation, critical cluster artifacts including the kubeconfig file, SSH keys, and the full cluster specification yaml are saved to the Admin machine. These files are required when running any subsequent cluster lifecycle operations. For this reason, it is recommended to save a backup of these files and to use the same Admin machine for all subsequent cluster lifecycle operations.
EKS Anywhere will create and manage Kubernetes clusters on multiple providers.
Currently we support creating development clusters locally using Docker and production clusters from providers listed on the providers
page.
Creating an EKS Anywhere cluster begins with setting up an Administrative machine where you run all EKS Anywhere lifecycle operations as well as Docker, kubectl and prerequisite utilites.
From here you will need to install eksctl
, a CLI tool for creating and managing clusters on EKS, and the eksctl-anywhere
plugin, an extension to create and manage EKS Anywhere clusters on-premises, on your Administrative machine.
You can then proceed to the cluster networking
and provider specific steps
.
See Create cluster workflow
for an overview of the cluster creation process.
NOTE: For Snow provider, if you ordered a Snowball Edge device with EKS Anywhere enabled, it is preconfigured with an Admin AMI which contains the necessary binaries, dependencies, and artifacts to create an EKS Anywhere cluster. Skip to the steps on Create Snow production cluster
to get started with EKS Anywhere on Snow.
Administrative machine prerequisites
System and network requirements
- Mac OS 10.15+ / Ubuntu 22.04 LTS or 24.04 LTS / RHEL or Rocky Linux 8.8+
- 4 CPU cores
- 16GB memory
- 30GB free disk space
- If you are running in an airgapped environment, the Admin machine must be amd64.
- If you are running EKS Anywhere on bare metal, the Admin machine must be on the same Layer 2 network as the cluster machines.
Here are a few other things to keep in mind:
-
If you are using Ubuntu, use the Docker CE installation instructions to install Docker and not the Snap installation, as described here.
-
If you are using EKS Anywhere v0.15 or earlier and Ubuntu 21.10 or 22.04, you will need to switch from cgroups v2 to cgroups v1. For details, see Troubleshooting Guide.
-
If you are using Docker Desktop, you need to know that:
- For EKS Anywhere Bare Metal, Docker Desktop is not supported
- For EKS Anywhere vSphere, if you are using EKS Anywhere v0.15 or earlier and Mac OS Docker Desktop 4.4.2 or newer
"deprecatedCgroupv1": true must be set in ~/Library/Group\ Containers/group.com.docker/settings.json.
Via Homebrew (macOS and Linux)
You can install eksctl and eksctl-anywhere with homebrew
.
This package will also install kubectl and the aws-iam-authenticator which will be helpful to test EKS Anywhere clusters.
brew install aws/tap/eks-anywhere
Manually (macOS and Linux)
Install the latest release of eksctl.
The EKS Anywhere plugin requires eksctl version 0.66.0 or newer.
curl "https://github.com/eksctl-io/eksctl/releases/latest/download/eksctl_$(uname -s)_amd64.tar.gz" \
    --silent --location \
    | tar xz -C /tmp
sudo install -m 0755 /tmp/eksctl /usr/local/bin/eksctl
Install the eksctl-anywhere plugin.
RELEASE_VERSION=$(curl https://anywhere-assets.eks.amazonaws.com/releases/eks-a/manifest.yaml --silent --location | yq ".spec.latestVersion")
EKS_ANYWHERE_TARBALL_URL=$(curl https://anywhere-assets.eks.amazonaws.com/releases/eks-a/manifest.yaml --silent --location | yq ".spec.releases[] | select(.version==\"$RELEASE_VERSION\").eksABinary.$(uname -s | tr A-Z a-z).uri")
curl $EKS_ANYWHERE_TARBALL_URL \
    --silent --location \
    | tar xz ./eksctl-anywhere
sudo install -m 0755 ./eksctl-anywhere /usr/local/bin/eksctl-anywhere
Install the kubectl Kubernetes command line tool.
This can be done by following the instructions here
.
Or you can install the latest kubectl directly with the following.
export OS="$(uname -s | tr A-Z a-z)" ARCH=$(test "$(uname -m)" = 'x86_64' && echo 'amd64' || echo 'arm64')
curl -LO "https://dl.k8s.io/release/$(curl -L -s https://dl.k8s.io/release/stable.txt)/bin/${OS}/${ARCH}/kubectl"
sudo install -m 0755 ./kubectl /usr/local/bin/kubectl
Upgrade eksctl-anywhere
If you installed eksctl-anywhere via homebrew you can upgrade the binary with
brew update
brew upgrade aws/tap/eks-anywhere
If you installed eksctl-anywhere manually you should follow the installation steps to download the latest release.
You can verify your installed version with
Prepare for airgapped deployments (optional)
For more information on how to prepare the Administrative machine for airgapped environments, go to the Airgapped
page.
Deploy a cluster
Once you have the tools installed, go to the EKS Anywhere providers
page for instructions on creating a cluster on your chosen provider.
4.3 - 2. Airgapped (optional)
Configure EKS Anywhere for airgapped environments
EKS Anywhere can be used in airgapped environments, where clusters are not connected to the internet or external networks.
The following diagrams illustrate how to set up for cluster creation in an airgapped environment:
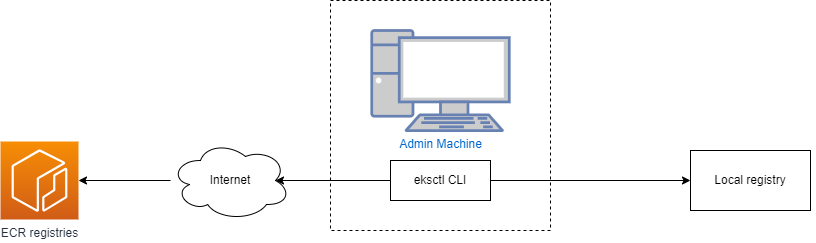
If you are planning to run EKS Anywhere in an airgapped environments, before you create a cluster, you must temporarily connect your Admin machine to the internet to install the eksctl CLI and pull the required EKS Anywhere dependencies.
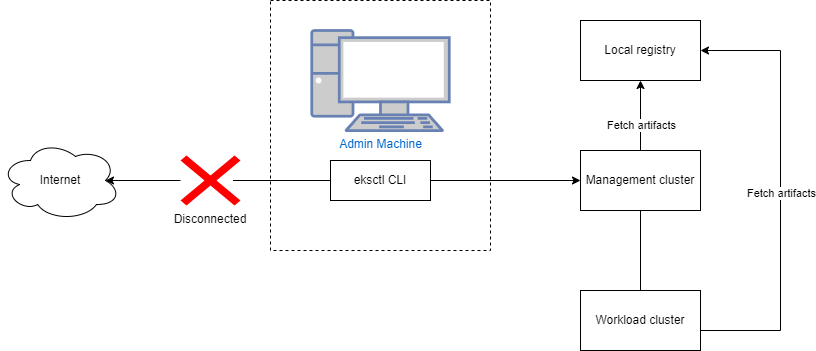
Once these dependencies are downloaded and imported in a local registry, you no longer need internet access. In the EKS Anywhere cluster specification, you can configure EKS Anywhere to use your local registry mirror. When the registry mirror configuration is set in the EKS Anywhere cluster specification, EKS Anywhere configures containerd to pull from that registry instead of Amazon ECR during cluster creation and lifecycle operations. For more information, reference the Registry Mirror Configuration documentation.
If you are using Ubuntu or RHEL as the operating system for nodes in your EKS Anywhere cluster, you must connect to the internet while building the images with the EKS Anywhere image-builder tool. After building the operating system images, you can configure EKS Anywhere to pull the operating system images from a location of your chosing in the EKS Anywhere cluster specification. For more information on the image building process and operating system cluster specification, reference the Operating System Management documentation.
Overview
The process for preparing your airgapped environment for EKS Anywhere is summarized by the following steps:
- Use the
eksctl anywhere CLI to download EKS Anywhere artifacts. These artifacts are yaml files that contain the list and locations of the EKS Anywhere dependencies.
- Use the
eksctl anywhere CLI to download EKS Anywhere images. These images include EKS Anywhere dependencies including EKS Distro components, Cluster API provider components, and EKS Anywhere components such as the EKS Anywhere controllers, Cilium CNI, kube-vip, and cert-manager.
- Set up your local registry following the steps in the Registry Mirror Configuration documentation.
- Use the
eksctl anywhere CLI to import the EKS Anywhere images to your local registry.
- Optionally use the
eksctl anywhere CLI to copy EKS Anywhere Curated Packages images to your local registry.
Prerequisites
- An existing Admin machine
- Docker running on the Admin machine
- At least 80GB in storage space on the Admin machine to temporarily store the EKS Anywhere images locally before importing them to your local registry. Currently, when downloading images, EKS Anywhere pulls all dependencies for all infrastructure providers and supported Kubernetes versions.
- The download and import images commands must be run on an amd64 machine to import amd64 images to the registry mirror.
Procedure
-
Download the EKS Anywhere artifacts that contain the list and locations of the EKS Anywhere dependencies. A compressed file eks-anywhere-downloads.tar.gz will be downloaded. You can use the eksctl anywhere download artifacts --dry-run command to see the list of artifacts it will download.
eksctl anywhere download artifacts
-
Decompress the eks-anywhere-downloads.tar.gz file using the following command. This will create an eks-anywhere-downloads folder.
tar -xvf eks-anywhere-downloads.tar.gz
-
Download the EKS Anywhere image dependencies to the Admin machine. This command may take several minutes (10+) to complete. To monitor the progress of the command, you can run with the -v 6 command line argument, which will show details of the images that are being pulled. Docker must be running for the following command to succeed.
eksctl anywhere download images -o images.tar
-
Set up a local registry mirror to host the downloaded EKS Anywhere images and configure your Admin machine with the certificates and authentication information if your registry requires it. For details, refer to the Registry Mirror Configuration documentation.
-
Import images to the local registry mirror using the following command. Set REGISTRY_MIRROR_URL to the url of the local registry mirror you created in the previous step. This command may take several minutes to complete. To monitor the progress of the command, you can run with the -v 6 command line argument. When using self-signed certificates for your registry, you should run with the --insecure command line argument to indicate skipping TLS verification while pushing helm charts and bundles.
export REGISTRY_MIRROR_URL=<registryurl>
eksctl anywhere import images -i images.tar -r ${REGISTRY_MIRROR_URL} \
   --bundles ./eks-anywhere-downloads/bundle-release.yaml
-
Optionally import curated packages to your registry mirror. The curated packages images are copied from Amazon ECR to your local registry mirror in a single step, as opposed to separate download and import steps. Follow the Curated Packages documentation.
If the previous steps succeeded, all of the required EKS Anywhere dependencies are now present in your local registry. Before you create your EKS Anywhere cluster, configure registryMirrorConfiguration in your EKS Anywhere cluster specification with the information for your local registry. For details see the Registry Mirror Configuration documentation.
NOTE: If you are running EKS Anywhere on bare metal, you must configure osImageURL and hookImagesURLPath in your EKS Anywhere cluster specification with the location of your node operating system image and the hook OS image. For details, reference the bare metal configuration documentation.
Next Steps
4.3.1 -
-
Download the EKS Anywhere artifacts that contain the list and locations of the EKS Anywhere dependencies. A compressed file eks-anywhere-downloads.tar.gz will be downloaded. You can use the eksctl anywhere download artifacts --dry-run command to see the list of artifacts it will download.
eksctl anywhere download artifacts
-
Decompress the eks-anywhere-downloads.tar.gz file using the following command. This will create an eks-anywhere-downloads folder.
tar -xvf eks-anywhere-downloads.tar.gz
-
Download the EKS Anywhere image dependencies to the Admin machine. This command may take several minutes (10+) to complete. To monitor the progress of the command, you can run with the -v 6 command line argument, which will show details of the images that are being pulled. Docker must be running for the following command to succeed.
eksctl anywhere download images -o images.tar
-
Set up a local registry mirror to host the downloaded EKS Anywhere images and configure your Admin machine with the certificates and authentication information if your registry requires it. For details, refer to the Registry Mirror Configuration documentation.
-
Import images to the local registry mirror using the following command. Set REGISTRY_MIRROR_URL to the url of the local registry mirror you created in the previous step. This command may take several minutes to complete. To monitor the progress of the command, you can run with the -v 6 command line argument. When using self-signed certificates for your registry, you should run with the --insecure command line argument to indicate skipping TLS verification while pushing helm charts and bundles.
export REGISTRY_MIRROR_URL=<registryurl>
eksctl anywhere import images -i images.tar -r ${REGISTRY_MIRROR_URL} \
   --bundles ./eks-anywhere-downloads/bundle-release.yaml
-
Optionally import curated packages to your registry mirror. The curated packages images are copied from Amazon ECR to your local registry mirror in a single step, as opposed to separate download and import steps. Follow the Curated Packages documentation.
4.4 - 3. Cluster Networking
EKS Anywhere cluster networking
Cluster Networking
EKS Anywhere clusters use the clusterNetwork field in the cluster spec to allocate pod and service IPs. Once the cluster is created, the pods.cidrBlocks, services.cidrBlocks and nodes.cidrMaskSize fields are immutable. As a result, extra care should be taken to ensure that there are sufficient IPs and IP blocks available when provisioning large clusters.
apiVersion: anywhere.eks.amazonaws.com/v1alpha1
kind: Cluster
metadata:
  name: my-cluster-name
spec:
  clusterNetwork:
    pods:
      cidrBlocks:
      - 192.168.0.0/16
    services:
      cidrBlocks:
      - 10.96.0.0/12
The cluster pods.cidrBlocks is subdivided between nodes with a default block of size /24 per node, which can also be configured via
the nodes.cidrMaskSize field. This node CIDR block is then used to assign pod IPs on the node.
Warning
The maximum number of nodes will be limited to the number of subnets of size /24 (or nodes.cidrMaskSize if configured) that can fit in the cluster pods.cidrBlocks.
The maximum number of pods per node is also limited by the size of the node CIDR block. For example with the default /24 node CIDR mask size, there are a maximum of 256 IPs available for pods. Kubernetes recommends no more than 110 pods per node.
Ports and Protocols
EKS Anywhere requires that various ports on control plane and worker nodes be open.
Some Kubernetes-specific ports need open access only from other Kubernetes nodes, while others are exposed externally.
Beyond Kubernetes ports, someone managing an EKS Anywhere cluster must also have external access to ports on the underlying EKS Anywhere provider (such as VMware) and to external tooling (such as Jenkins).
If you are responsible for network firewall rules between nodes on your EKS Anywhere clusters, the following tables describe both Kubernetes and EKS Anywhere-specific ports you should be aware of.
Kubernetes control plane
The following table represents the ports published by the Kubernetes project that must be accessible on any Kubernetes control plane.
| Protocol |
Direction |
Port Range |
Purpose |
Used By |
| TCP |
Inbound |
6443 |
Kubernetes API server |
All |
| TCP |
Inbound |
10250 |
Kubelet API |
Self, Control plane |
| TCP |
Inbound |
10259 |
kube-scheduler |
Self |
| TCP |
Inbound |
10257 |
kube-controller-manager |
Self |
Although etcd ports are included in control plane section, you can also host your own
etcd cluster externally or on custom ports.
| Protocol |
Direction |
Port Range |
Purpose |
Used By |
| TCP |
Inbound |
2379-2380 |
etcd server client API |
kube-apiserver, etcd |
Use the following to access the SSH service on the control plane and etcd nodes:
| Protocol |
Direction |
Port Range |
Purpose |
Used By |
| TCP |
Inbound |
22 |
SSHD server |
SSH clients |
Kubernetes worker nodes
The following table represents the ports published by the Kubernetes project that must be accessible from worker nodes.
| Protocol |
Direction |
Port Range |
Purpose |
Used By |
| TCP |
Inbound |
10250 |
Kubelet API |
Self, Control plane |
| TCP |
Inbound |
30000-32767 |
NodePort Services
|
All |
The API server port that is sometimes switched to 443.
Alternatively, the default port is kept as is and API server is put behind a load balancer that listens on 443 and routes the requests to API server on the default port.
Use the following to access the SSH service on the worker nodes:
| Protocol |
Direction |
Port Range |
Purpose |
Used By |
| TCP |
Inbound |
22 |
SSHD server |
SSH clients |
On the Admin machine for a Bare Metal provider, the following ports need to be accessible to all the nodes in the cluster, from the same level 2 network, for initially network booting:
| Protocol |
Direction |
Port Range |
Purpose |
Used By |
| UDP |
Inbound |
67 |
Boots DHCP |
All nodes, for network boot |
| UDP |
Inbound |
69 |
Boots TFTP |
All nodes, for network boot |
| UDP |
Inbound |
514 |
Boots Syslog |
All nodes, for provisioning logs |
| TCP |
Inbound |
80 |
Boots HTTP |
All nodes, for network boot |
| TCP |
Inbound |
42113 |
Tink-server gRPC |
All nodes, talk to Tinkerbell |
| TCP |
Inbound |
50061 |
Hegel HTTP |
All nodes, talk to Tinkerbell |
| TCP |
Outbound |
623 |
Rufio IPMI |
All nodes, out-of-band power and next boot (optional
) |
| TCP |
Outbound |
80,443 |
Rufio Redfish |
All nodes, out-of-band power and next boot (optional
) |
VMware provider
The following table displays ports that need to be accessible from the VMware provider running EKS Anywhere:
| Protocol |
Direction |
Port Range |
Purpose |
Used By |
| TCP |
Inbound |
443 |
vCenter Server |
vCenter API endpoint |
| TCP |
Inbound |
6443 |
Kubernetes API server |
Kubernetes API endpoint |
| TCP |
Inbound |
2379 |
Manager |
Etcd API endpoint |
| TCP |
Inbound |
2380 |
Manager |
Etcd API endpoint |
Nutanix provider
The following table displays ports that need to be accessible from the Nutanix provider running EKS Anywhere:
| Protocol |
Direction |
Port Range |
Purpose |
Used By |
| TCP |
Inbound |
9440 |
Prism Central Server |
Prism Central API endpoint |
| TCP |
Inbound |
6443 |
Kubernetes API server |
Kubernetes API endpoint |
| TCP |
Inbound |
2379 |
Manager |
Etcd API endpoint |
| TCP |
Inbound |
2380 |
Manager |
Etcd API endpoint |
Snow provider
In addition to the Ports Required to Use AWS Services on an AWS Snowball Edge Device
, the following table displays ports that need to be accessible from the Snow provider running EKS Anywhere:
| Protocol |
Direction |
Port Range |
Purpose |
Used By |
| TCP |
Inbound |
9092 |
Device Controller |
EKS Anywhere and CAPAS controller |
| TCP |
Inbound |
8242 |
EC2 HTTPS endpoint |
EKS Anywhere and CAPAS controller |
| TCP |
Inbound |
6443 |
Kubernetes API server |
Kubernetes API endpoint |
| TCP |
Inbound |
2379 |
Manager |
Etcd API endpoint |
| TCP |
Inbound |
2380 |
Manager |
Etcd API endpoint |
A variety of control plane management tools are available to use with EKS Anywhere.
One example is Jenkins.
| Protocol |
Direction |
Port Range |
Purpose |
Used By |
| TCP |
Inbound |
8080 |
Jenkins Server |
HTTP Jenkins endpoint |
| TCP |
Inbound |
8443 |
Jenkins Server |
HTTPS Jenkins endpoint |
4.5 - 4. Choose provider
Choose an infrastructure provider for EKS Anywhere clusters
EKS Anywhere supports many different types of infrastructure including VMWare vSphere, bare metal, Snow, Nutanix, and Apache CloudStack. You can also run EKS Anywhere on Docker for dev/test use cases only. EKS Anywhere clusters can only run on a single infrastructure provider. For example, you cannot have some vSphere nodes, some bare metal nodes, and some Snow nodes in a single EKS Anywhere cluster. Management clusters also must run on the same infrastructure provider as workload clusters.
Detailed information on each infrastructure provider can be found in the sections below. Review the infrastructure provider’s prerequisites in-depth before creating your first cluster.
4.6 - Create vSphere cluster
Create an EKS Anywhere cluster on vSphere
4.6.1 - Overview
Overview of EKS Anywhere cluster creation on vSphere
Creating a vSphere cluster
The following diagram illustrates what happens when you start the cluster creation process.
Start creating a vSphere cluster
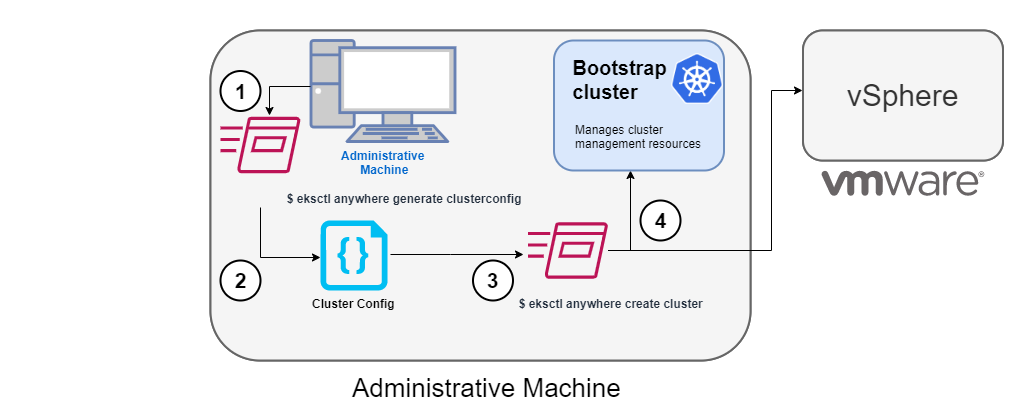
1. Generate a config file for vSphere
To this command, you identify the name of the provider (-p vsphere) and a cluster name and redirect the output to a file.
The result is a config file template that you need to modify for the specific instance of your provider.
2. Modify the config file
Using the generated cluster config file, make modifications to suit your situation.
Details about this config file are contained on the vSphere Config
page.
3. Launch the cluster creation
Once you have modified the cluster configuration file, use eksctl anywhere create cluster -f $CLUSTER_NAME.yaml starts the cluster creation process.
To see details on the cluster creation process, increase verbosity (-v=9 provides maximum verbosity).
4. Authenticate and create bootstrap cluster
After authenticating to vSphere and validating the assets there, the cluster creation process starts off creating a temporary Kubernetes bootstrap cluster on the Administrative machine.
To begin, the cluster creation process runs a series of govc
commands to check on the vSphere environment:
-
Checks that the vSphere environment is available.
-
Using the URL and credentials provided in the cluster spec files, authenticates to the vSphere provider.
-
Validates that the datacenter and the datacenter network exists.
-
Validates that the identified datastore (to store your EKS Anywhere cluster) exists, that the folder holding your EKS Anywhere cluster VMs exists, and that the resource pools containing compute resources exist.
If you have multiple VSphereMachineConfig objects in your config file, you will see these validations repeated.
-
Validates the virtual machine templates to be used for the control plane and worker nodes (such as ubuntu-2004-kube-v1.20.7).
If all validations pass, you will see this message:
✅ Vsphere Provider setup is valid
Next, the process runs the kind
command to build a single-node Kubernetes bootstrap cluster on the Administrative machine.
This includes pulling the kind node image, preparing the node, writing the configuration, starting the control-plane, and installing CNI. You will see:
After this point the bootstrap cluster is installed, but not yet fully configured.
Continuing cluster creation
The following diagram illustrates the activities that occur next:
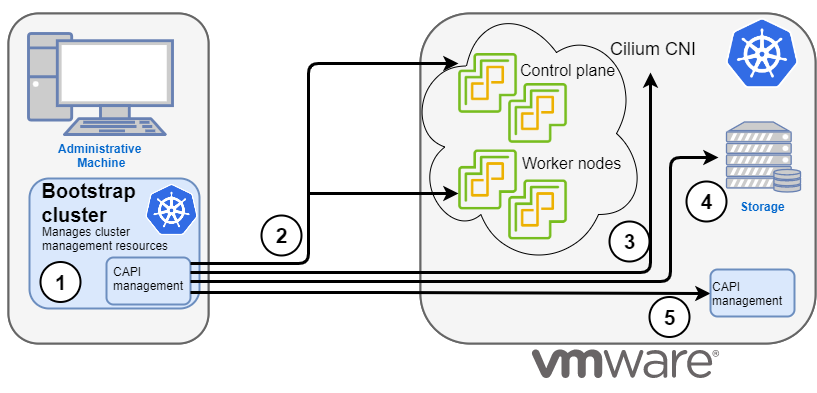
1. Add CAPI management
Cluster API (CAPI) management is added to the bootstrap cluster to direct the creation of the target cluster.
2. Set up cluster
Configure the control plane and worker nodes.
3. Add Cilium networking
Add Cilium as the CNI plugin to use for networking between the cluster services and pods.
4. Add CAPI to target cluster
Add the CAPI service to the target cluster in preparation for it to take over management of the cluster after the cluster creation is completed and the bootstrap cluster is deleted.
The bootstrap cluster can then begin moving the CAPI objects over to the target cluster, so it can take over the management of itself.
With the bootstrap cluster running and configured on the Administrative machine, the creation of the target cluster begins.
It uses kubectl to apply a target cluster configuration as follows:
-
Once etcd, the control plane, and the worker nodes are ready, it applies the networking configuration to the target cluster.
-
CAPI providers are configured on the target cluster, in preparation for the target cluster to take over responsibilities for running the components needed to manage itself.
-
With CAPI running on the target cluster, CAPI objects for the target cluster are moved from the bootstrap cluster to the target cluster’s CAPI service (done internally with the clusterctl command).
-
Add Kubernetes CRDs and other addons that are specific to EKS Anywhere.
-
The cluster configuration is saved.
Once etcd, the control plane, and the worker nodes are ready, it applies the networking configuration to the workload cluster:
Installing networking on workload cluster
After that, the CAPI providers are configured on the workload cluster, in preparation for the workload cluster to take over responsibilities for running the components needed to manage itself:
Installing cluster-api providers on workload cluster
With CAPI running on the workload cluster, CAPI objects for the workload cluster are moved from the bootstrap cluster to the workload cluster’s CAPI service (done internally with the clusterctl command):
Moving cluster management from bootstrap to workload cluster
At this point, the cluster creation process will add Kubernetes CRDs and other addons that are specific to EKS Anywhere.
That configuration is applied directly to the cluster:
Installing EKS-A custom components (CRD and controller) on workload cluster
Creating EKS-A CRDs instances on workload cluster
Installing GitOps Toolkit on workload cluster
If you did not specify GitOps support, starting the flux service is skipped:
GitOps field not specified, bootstrap flux skipped
The cluster configuration is saved:
Writing cluster config file
With the cluster up, and the CAPI service running on the new cluster, the bootstrap cluster is no longer needed and is deleted:
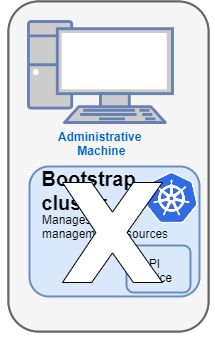
At this point, cluster creation is complete.
You can now use your target cluster as either:
- A standalone cluster (to run workloads) or
- A management cluster (to optionally create one or more workload clusters)
Creating workload clusters (optional)
As described in Create separate workload clusters
, you can use the cluster you just created as a management cluster to create and manage one or more workload clusters on the same vSphere provider as follows:
- Use
eksctl to generate a cluster config file for the new workload cluster.
- Modify the cluster config with a new cluster name and different vSphere resources.
- Use
eksctl to create the new workload cluster from the new cluster config file and credentials from the initial management cluster.
4.6.2 - Requirements for EKS Anywhere on VMware vSphere
VMware vSphere provider requirements for EKS Anywhere
To run EKS Anywhere, you will need:
Prepare Administrative machine
Set up an Administrative machine as described in Install EKS Anywhere
.
Prepare a VMware vSphere environment
To prepare a VMware vSphere environment to run EKS Anywhere, you need the following:
-
A vSphere 7 or 8 environment running vCenter.
-
Capacity to deploy 6-10 VMs.
-
DHCP service running in vSphere environment in the primary VM network for your workload cluster.
-
One network in vSphere to use for the cluster. EKS Anywhere clusters need access to vCenter through the network to enable self-managing and storage capabilities.
-
An OVA
imported into vSphere and converted into a template for the workload VMs
-
It’s critical that you set up your vSphere user credentials properly.
-
One IP address routable from cluster but excluded from DHCP offering.
This IP address is to be used as the Control Plane Endpoint IP.
Below are some suggestions to ensure that this IP address is never handed out by your DHCP server.
You may need to contact your network engineer.
- Pick an IP address reachable from cluster subnet which is excluded from DHCP range OR
- Alter DHCP ranges to leave out an IP address(s) at the top and/or the bottom of the range OR
- Create an IP reservation for this IP on your DHCP server. This is usually accomplished by adding
a dummy mapping of this IP address to a non-existent mac address.
Each VM will require:
- 2 vCPUs
- 8GB RAM
- 25GB Disk
The administrative machine and the target workload environment will need network access (TCP/443) to:
- vCenter endpoint (must be accessible to EKS Anywhere clusters)
- public.ecr.aws
- anywhere-assets.eks.amazonaws.com (to download the EKS Anywhere binaries, manifests and OVAs)
- distro.eks.amazonaws.com (to download EKS Distro binaries and manifests)
- d2glxqk2uabbnd.cloudfront.net (for EKS Anywhere and EKS Distro ECR container images)
- api.ecr.us-west-2.amazonaws.com (for EKS Anywhere package authentication matching your region)
- d5l0dvt14r5h8.cloudfront.net (for EKS Anywhere package ECR container images)
- api.github.com (only if GitOps is enabled)
- sts.amazonaws.com (only if AWS IAM Authenticator is enabled)
You need to get the following information before creating the cluster:
-
Static IP Addresses:
You will need one IP address for the management cluster control plane endpoint, and a separate IP address for the control plane of each workload cluster you add.
Let’s say you are going to have the management cluster and two workload clusters.
For those, you would need three IP addresses, one for each cluster.
All of those addresses will be configured the same way in the configuration file you will generate for each cluster.
All EKS Anywhere clusters require a static IP for the control plane endpoint. The IP should be excluded from your DHCP range.
An IP address will be the value of the property controlPlaneConfiguration.endpoint.host in the config file of the management cluster.
A separate IP address must be assigned for each workload cluster.
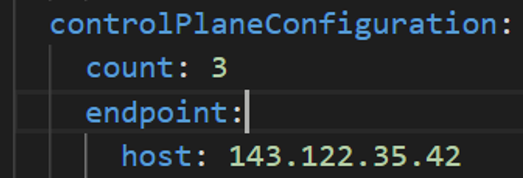
-
vSphere Datacenter Name: The vSphere datacenter to deploy the EKS Anywhere cluster on.
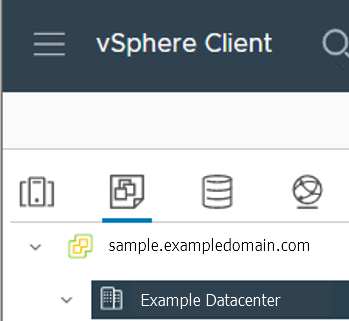
-
VM Network Name: The VM network to deploy your EKS Anywhere cluster on.
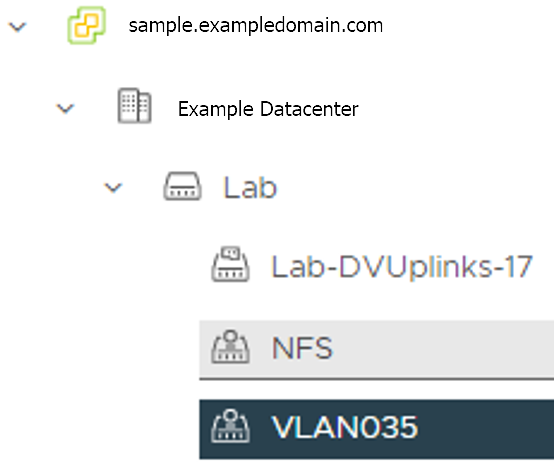
-
vCenter Server Domain Name: The vCenter server fully qualified domain name or IP address. If the server IP is used, the thumbprint must be set or insecure must be set to true.

-
thumbprint (required if insecure=false): The SHA1 thumbprint of the vCenter server certificate which is only required if you have a self-signed certificate for your vSphere endpoint.
There are several ways to obtain your vCenter thumbprint.
If you have govc installed,
you can run the following command in the Administrative machine terminal, and take a note of the output:
govc about.cert -thumbprint -k
-
template: The VM template to use for your EKS Anywhere cluster.
This template was created when you imported the OVA file
into vSphere.
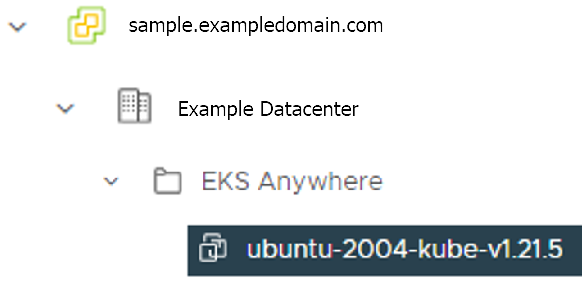
-
datastore: The vSphere datastore
to deploy your EKS Anywhere cluster on.
-
folder:
The folder
parameter in VSphereMachineConfig allows you to organize the VMs of an EKS Anywhere cluster.
With this, each cluster can be organized as a folder in vSphere.
You will have a separate folder for the management cluster and each cluster you are adding.
-
resourcePool:
The vSphere resource pools for your VMs in the EKS Anywhere cluster. If there is a resource pool: /<datacenter>/host/<resource-pool-name>/Resources
4.6.3 - Preparing vSphere for EKS Anywhere
Set up a vSphere provider to prepare it for EKS Anywhere
Certain resources must be in place with appropriate user permissions to create an EKS Anywhere cluster using the vSphere provider.
Configuring Folder Resources
Create a VM folder:
For each user that needs to create workload clusters, have the vSphere administrator create a VM folder.
That folder will host:
- A nested folder for the management cluster and another one for each workload cluster.
- Each cluster VM in its own nested folder under this folder.
vm/
├── YourVMFolder/
    ├── mgmt-cluster <------ Folder with vms for management cluster
        ├── mgmt-cluster-7c2sp
        ├── mgmt-cluster-etcd-2pbhp
        ├── mgmt-cluster-md-0-5c5844bcd8xpjcln-9j7xh
    ├── worload-cluster-0 <------ Folder with vms for workload cluster 0
        ├── workload-cluster-0-8dk3j
        ├── workload-cluster-0-etcd-20ksa
        ├── workload-cluster-0-md-0-6d964979ccxbkchk-c4qjf
    ├── worload-cluster-1 <------ Folder with vms for workload cluster 1
        ├── workload-cluster-1-59cbn
        ├── workload-cluster-1-etcd-qs6wv
        ├── workload-cluster-1-md-0-756bcc99c9-9j7xh
To see how to create folders on vSphere, see the vSphere Create a Folder
documentation.
Configuring vSphere User, Group, and Roles
You need a vSphere user with the right privileges to let you create EKS Anywhere clusters on top of your vSphere cluster.
To configure a new user via CLI, you will need two things:
- a set of vSphere admin credentials with the ability to create users and groups. If you do not have the rights to create new groups and users, you can invoke govc commands directly as outlined here.
- a
user.yaml file:
apiVersion: "eks-anywhere.amazon.com/v1"
kind: vSphereUser
spec:
  username: "eksa"                # optional, default eksa
  group: "MyExistingGroup"        # optional, default EKSAUsers
  globalRole: "MyGlobalRole"      # optional, default EKSAGlobalRole
  userRole: "MyUserRole"          # optional, default EKSAUserRole
  adminRole: "MyEKSAAdminRole"    # optional, default EKSACloudAdminRole
  datacenter: "MyDatacenter"
  vSphereDomain: "vsphere.local"  # this should be the domain used when you login, e.g. YourUsername@vsphere.local
  connection:
    server: "https://my-vsphere.internal.acme.com"
    insecure: false
  objects:
    networks:
      - !!str "/MyDatacenter/network/My Network"
    datastores:
      - !!str "/MyDatacenter/datastore/MyDatastore2"
    resourcePools:
      - !!str "/MyDatacenter/host/Cluster-03/MyResourcePool" # NOTE: see below if you do not want to use a resource pool
    folders:
      - !!str "/MyDatacenter/vm/OrgDirectory/MyVMs"
    templates:
      - !!str "/MyDatacenter/vm/Templates/MyTemplates"
NOTE: If you do not want to create a resource pool, you can instead specify the cluster directly as /MyDatacenter/host/Cluster-03 in user.yaml, where Cluster-03 is your cluster name. In your cluster spec, you will need to specify /MyDatacenter/host/Cluster-03/Resources for the resourcePool field.
Set the admin credentials as environment variables:
export EKSA_VSPHERE_USERNAME=<ADMIN_VSPHERE_USERNAME>
export EKSA_VSPHERE_PASSWORD=<ADMIN_VSPHERE_PASSWORD>
If the user does not already exist, you can create the user and all the specified group and role objects by running:
eksctl anywhere exp vsphere setup user -f user.yaml --password '<NewUserPassword>'
If the user or any of the group or role objects already exist, use the force flag instead to overwrite Group-Role-Object mappings for the group, roles, and objects specified in the user.yaml config file:
eksctl anywhere exp vsphere setup user -f user.yaml --force
Please note that there is one more manual step to configure global permissions here
.
If you do not have the rights to create a new user, you can still configure the necessary roles and permissions using the govc cli
.
#! /bin/bash
# govc calls to configure a user with minimal permissions
set -x
set -e

EKSA_USER='<Username>@<UserDomain>'
USER_ROLE='EKSAUserRole'
GLOBAL_ROLE='EKSAGlobalRole'
ADMIN_ROLE='EKSACloudAdminRole'

FOLDER_VM='/YourDatacenter/vm/YourVMFolder'
FOLDER_TEMPLATES='/YourDatacenter/vm/Templates'

NETWORK='/YourDatacenter/network/YourNetwork'
DATASTORE='/YourDatacenter/datastore/YourDatastore'
RESOURCE_POOL='/YourDatacenter/host/Cluster-01/Resources/YourResourcePool'

govc role.create "$GLOBAL_ROLE" $(curl https://raw.githubusercontent.com/aws/eks-anywhere/main/pkg/config/static/globalPrivs.json | jq .[] | tr '\n' ' ' | tr -d '"')

govc role.create "$USER_ROLE" $(curl https://raw.githubusercontent.com/aws/eks-anywhere/main/pkg/config/static/eksUserPrivs.json | jq .[] | tr '\n' ' ' | tr -d '"')

govc role.create "$ADMIN_ROLE" $(curl https://raw.githubusercontent.com/aws/eks-anywhere/main/pkg/config/static/adminPrivs.json | jq .[] | tr '\n' ' ' | tr -d '"')

govc permissions.set -group=false -principal "$EKSA_USER"  -role "$GLOBAL_ROLE" /

govc permissions.set -group=false -principal "$EKSA_USER"  -role "$ADMIN_ROLE" "$FOLDER_VM"

govc permissions.set -group=false -principal "$EKSA_USER"  -role "$ADMIN_ROLE" "$FOLDER_TEMPLATES"

govc permissions.set -group=false -principal "$EKSA_USER"  -role "$USER_ROLE" "$NETWORK"

govc permissions.set -group=false -principal "$EKSA_USER"  -role "$USER_ROLE" "$DATASTORE"

govc permissions.set -group=false -principal "$EKSA_USER"  -role "$USER_ROLE" "$RESOURCE_POOL"
NOTE: If you do not want to create a resource pool, you can instead specify the cluster directly as /MyDatacenter/host/Cluster-03 in user.yaml, where Cluster-03 is your cluster name. In your cluster spec, you will need to specify /MyDatacenter/host/Cluster-03/Resources for the resourcePool field.
Please note that there is one more manual step to configure global permissions here
.
Add a vCenter User
Ask your VSphere administrator to add a vCenter user that will be used for the provisioning of the EKS Anywhere cluster in VMware vSphere.
- Log in with the vSphere Client to the vCenter Server.
- Specify the user name and password for a member of the vCenter Single Sign-On Administrators group.
- Navigate to the vCenter Single Sign-On user configuration UI.
- From the Home menu, select Administration.
- Under Single Sign On, click Users and Groups.
- If vsphere.local is not the currently selected domain, select it from the drop-down menu.
You cannot add users to other domains.
- On the Users tab, click Add.
- Enter a user name and password for the new user. The maximum number of characters allowed for the user name is 300. You cannot change the user name after you create a user. The password must meet the password policy requirements for the system.
- Click Add.
For more details, see vSphere Add vCenter Single Sign-On Users
documentation.
Create and define user roles
When you add a user for creating clusters, that user initially has no privileges to perform management operations.
So you have to add this user to groups with the required permissions, or assign a role or roles with the required permission to this user.
Three roles are needed to be able to create the EKS Anywhere cluster:
-
Create a global custom role: For example, you could name this EKS Anywhere Global.
Define it for the user on the vCenter domain level and its children objects.
Create this role with the following privileges:
> Content Library
* Add library item
* Check in a template
* Check out a template
* Create local library
* Update files
> vSphere Tagging
* Assign or Unassign vSphere Tag
* Assign or Unassign vSphere Tag on Object
* Create vSphere Tag
* Create vSphere Tag Category
* Delete vSphere Tag
* Delete vSphere Tag Category
* Edit vSphere Tag
* Edit vSphere Tag Category
* Modify UsedBy Field For Category
* Modify UsedBy Field For Tag
> Sessions
* Validate session
-
Create a user custom role: The second role is also a custom role that you could call, for example, EKSAUserRole.
Define this role with the following objects and children objects.
- The pool resource level and its children objects.
This resource pool that our EKS Anywhere VMs will be part of.
- The storage object level and its children objects.
This storage that will be used to store the cluster VMs.
- The network VLAN object level and its children objects.
This network that will host the cluster VMs.
- The VM and Template folder level and its children objects.
Create this role with the following privileges:
> Content Library
* Add library item
* Check in a template
* Check out a template
* Create local library
> Datastore
* Allocate space
* Browse datastore
* Low level file operations
> Folder
* Create folder
> vSphere Tagging
* Assign or Unassign vSphere Tag
* Assign or Unassign vSphere Tag on Object
* Create vSphere Tag
* Create vSphere Tag Category
* Delete vSphere Tag
* Delete vSphere Tag Category
* Edit vSphere Tag
* Edit vSphere Tag Category
* Modify UsedBy Field For Category
* Modify UsedBy Field For Tag
> Network
* Assign network
> Resource
* Assign virtual machine to resource pool
> Scheduled task
* Create tasks
* Modify task
* Remove task
* Run task
> Profile-driven storage
* Profile-driven storage view
> Storage views
* View
> vApp
* Import
> Virtual machine
* Change Configuration
  - Add existing disk
  - Add new disk
  - Add or remove device
  - Advanced configuration
  - Change CPU count
  - Change Memory
  - Change Settings
  - Configure Raw device
  - Extend virtual disk
  - Modify device settings
  - Remove disk
* Edit Inventory
  - Create from existing
  - Create new
  - Remove
* Interaction
  - Power off
  - Power on
* Provisioning
  - Clone template
  - Clone virtual machine
  - Create template from virtual machine
  - Customize guest
  - Deploy template
  - Mark as template
  - Read customization specifications
* Snapshot management
  - Create snapshot
  - Remove snapshot
  - Revert to snapshot
-
Create a default Administrator role: The third role is the default system role Administrator that you define to the user on the folder level and its children objects (VMs and OVA templates) that was created by the VSphere admistrator for you.
To create a role and define privileges check Create a vCenter Server Custom Role
and Defined Privileges
pages.
Manually set Global Permissions role in Global Permissions UI
vSphere does not currently support a public API for setting global permissions. Because of this, you will need to manually assign the Global Role you created to your user or group in the Global Permissions UI.
Make sure to select the Propagate to children box so the permissions get propagated down properly.
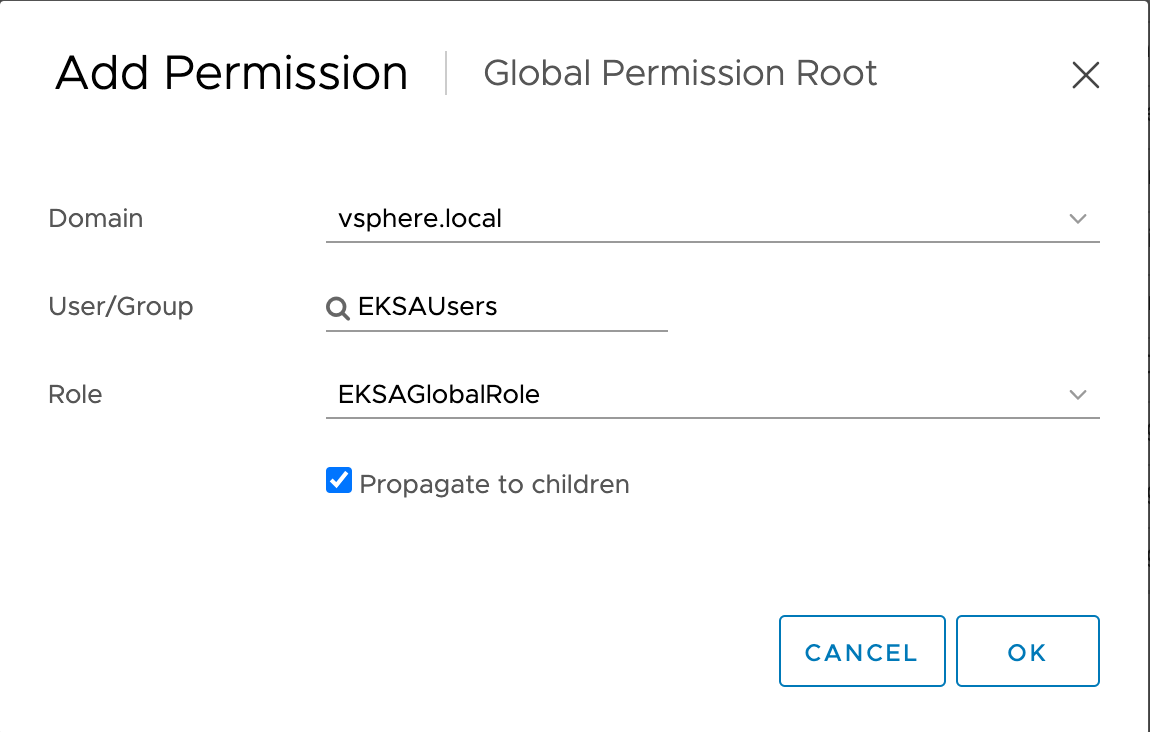
Deploy an OVA Template
If the user creating the cluster has permission and network access to create and tag a template, you can skip these steps because EKS Anywhere will automatically download the OVA and create the template if it can.
If the user does not have the permissions or network access to create and tag the template, follow this guide.
The OVA contains the operating system (Ubuntu, Bottlerocket, or RHEL) for a specific EKS Distro Kubernetes release and EKS Anywhere version.
The following example uses Ubuntu as the operating system, but a similar workflow would work for Bottlerocket or RHEL.
Steps to deploy the OVA
- Go to the artifacts
page and download or build the OVA template with the newest EKS Distro Kubernetes release to your computer.
- Log in to the vCenter Server.
- Right-click the folder you created above and select Deploy OVF Template.
The Deploy OVF Template wizard opens.
- On the Select an OVF template page, select the Local file option, specify the location of the OVA template you downloaded to your computer, and click Next.
- On the Select a name and folder page, enter a unique name for the virtual machine or leave the default generated name, if you do not have other templates with the same name within your vCenter Server virtual machine folder.
The default deployment location for the virtual machine is the inventory object where you started the wizard, which is the folder you created above. Click Next.
- On the Select a compute resource page, select the resource pool where to run the deployed VM template, and click Next.
- On the Review details page, verify the OVF or OVA template details and click Next.
- On the Select storage page, select a datastore to store the deployed OVF or OVA template and click Next.
- On the Select networks page, select a source network and map it to a destination network. Click Next.
- On the Ready to complete page, review the page and Click Finish.
For details, see Deploy an OVF or OVA Template
To build your own Ubuntu OVA template check the Building your own Ubuntu OVA
section.
To use the deployed OVA template to create the VMs for the EKS Anywhere cluster, you have to tag it with specific values for the os and eksdRelease keys.
The value of the os key is the operating system of the deployed OVA template, which is ubuntu in our scenario.
The value of the eksdRelease holds kubernetes and the EKS-D release used in the deployed OVA template.
Check the following Customize OVAs
page for more details.
Steps to tag the deployed OVA template:
- Go to the artifacts
page and take notes of the tags and values associated with the OVA template you deployed in the previous step.
- In the vSphere Client, select Menu → Tags & Custom Attributes.
- Select the Tags tab and click Tags.
- Click New.
- In the Create Tag dialog box, copy the
os tag name associated with your OVA that you took notes of, which in our case is os:ubuntu and paste it as the name for the first tag required.
- Specify the tag category
os if it exist or create it if it does not exist.
- Click Create.
- Now to add the release tag, repeat steps 2-4.
- In the Create Tag dialog box, copy the
os tag name associated with your OVA that you took notes of, which in our case is eksdRelease:kubernetes-1-21-eks-8 and paste it as the name for the second tag required.
- Specify the tag category
eksdRelease if it exist or create it if it does not exist.
- Click Create.
- Navigate to the VM and Template tab.
- Select the folder that was created.
- Select deployed template and click Actions.
- From the drop-down menu, select Tags and Custom Attributes → Assign Tag.
- Select the tags we created from the list and confirm the operation.
4.6.4 - Create vSphere cluster
Create an EKS Anywhere cluster on VMware vSphere
EKS Anywhere supports a VMware vSphere provider for EKS Anywhere deployments.
This document walks you through setting up EKS Anywhere on vSphere in a way that:
- Deploys an initial cluster on your vSphere environment. That cluster can be used as a self-managed cluster (to run workloads) or a management cluster (to create and manage other clusters)
- Deploys zero or more workload clusters from the management cluster
If your initial cluster is a management cluster, it is intended to stay in place so you can use it later to modify, upgrade, and delete workload clusters.
Using a management cluster makes it faster to provision and delete workload clusters.
Also it lets you keep vSphere credentials for a set of clusters in one place: on the management cluster.
The alternative is to simply use your initial cluster to run workloads.
See Cluster topologies
for details.
Important
Creating an EKS Anywhere management cluster is the recommended model.
Separating management features into a separate, persistent management cluster
provides a cleaner model for managing the lifecycle of workload clusters (to create, upgrade, and delete clusters), while workload clusters run user applications.
This approach also reduces provider permissions for workload clusters.
Note: Before you create your cluster, you have the option of validating the EKS Anywhere bundle manifest container images by following instructions in the Verify Cluster Images
page.
Prerequisite Checklist
EKS Anywhere needs to:
Also, see the Ports and protocols
page for information on ports that need to be accessible from control plane, worker, and Admin machines.
Steps
The following steps are divided into two sections:
- Create an initial cluster (used as a management or self-managed cluster)
- Create zero or more workload clusters from the management cluster
Create an initial cluster
Follow these steps to create an EKS Anywhere cluster that can be used either as a management cluster or as a self-managed cluster (for running workloads itself).
-
Optional Configuration
Set License Environment Variable
Add a license to any cluster for which you want to receive paid support. If you are creating a licensed cluster, set and export the license variable (see License cluster
if you are licensing an existing cluster):
export EKSA_LICENSE='my-license-here'
After you have created your eksa-mgmt-cluster.yaml and set your credential environment variables, you will be ready to create the cluster.
Configure Curated Packages
The Amazon EKS Anywhere Curated Packages are only available to customers with the Amazon EKS Anywhere Enterprise Subscription. To request a free trial, talk to your Amazon representative or connect with one here
. Cluster creation will succeed if authentication is not set up, but some warnings may be genered. Detailed package configurations can be found here
.
If you are going to use packages, set up authentication. These credentials should have limited capabilities
:
export EKSA_AWS_ACCESS_KEY_ID="your*access*id"
export EKSA_AWS_SECRET_ACCESS_KEY="your*secret*key"
export EKSA_AWS_REGION="us-west-2"
-
Generate an initial cluster config (named mgmt for this example):
CLUSTER_NAME=mgmt
eksctl anywhere generate clusterconfig $CLUSTER_NAME \
   --provider vsphere > eksa-mgmt-cluster.yaml
-
Modify the initial cluster config (eksa-mgmt-cluster.yaml) as follows:
- Refer to vsphere configuration
for information on configuring this cluster config for a vSphere provider.
- Add Optional
configuration settings as needed.
See Github provider
to see how to identify your Git information.
- Create at least two control plane nodes, three worker nodes, and three etcd nodes, to provide high availability and rolling upgrades.
-
Set Credential Environment Variables
Before you create the initial cluster, you will need to set and export these environment variables for your vSphere user name and password.
Make sure you use single quotes around the values so that your shell does not interpret the values:
export EKSA_VSPHERE_USERNAME='billy'
export EKSA_VSPHERE_PASSWORD='t0p$ecret'
Note
If you have a username in the form of domain_name/user_name, you must specify it as user_name@domain_name to
avoid errors in cluster creation. For example, vsphere.local/admin should be specified as admin@vsphere.local.
-
Create cluster
For a regular cluster create (with internet access), type the following:
eksctl anywhere create cluster \
   -f eksa-mgmt-cluster.yaml \
   # --install-packages packages.yaml \ # uncomment to install curated packages at cluster creation
For an airgapped cluster create, follow Preparation for airgapped deployments
instructions, then type the following:
eksctl anywhere create cluster \
   -f eksa-mgmt-cluster.yaml \
   --bundles-override ./eks-anywhere-downloads/bundle-release.yaml \
   # --install-packages packages.yaml \ # uncomment to install curated packages at cluster creation
-
Once the cluster is created you can use it with the generated KUBECONFIG file in your local directory:
export KUBECONFIG=${PWD}/${CLUSTER_NAME}/${CLUSTER_NAME}-eks-a-cluster.kubeconfig
-
Check the cluster nodes:
To check that the cluster completed, list the machines to see the control plane, etcd, and worker nodes:
Example command output
NAMESPACE   NAME                PROVIDERID        PHASE    VERSION
eksa-system mgmt-b2xyz          vsphere:/xxxxx    Running  v1.24.2-eks-1-24-5
eksa-system mgmt-etcd-r9b42     vsphere:/xxxxx    Running
eksa-system mgmt-md-8-6xr-rnr   vsphere:/xxxxx    Running  v1.24.2-eks-1-24-5
...
The etcd machine doesn’t show the Kubernetes version because it doesn’t run the kubelet service.
-
Check the initial cluster’s CRD:
To ensure you are looking at the initial cluster, list the CRD to see that the name of its management cluster is itself:
kubectl get clusters mgmt -o yaml
Example command output
...
kubernetesVersion: "1.35"
managementCluster:
  name: mgmt
workerNodeGroupConfigurations:
...
Note
The initial cluster is now ready to deploy workload clusters.
However, if you just want to use it to run workloads, you can deploy pod workloads directly on the initial cluster without deploying a separate workload cluster and skip the section on running separate workload clusters.
To make sure the cluster is ready to run workloads, run the test application in the
Deploy test workload section.
Create separate workload clusters
Follow these steps if you want to use your initial cluster to create and manage separate workload clusters.
-
Set License Environment Variable (Optional)
Add a license to any cluster for which you want to receive paid support. If you are creating a licensed cluster, set and export the license variable (see License cluster
if you are licensing an existing cluster):
export EKSA_LICENSE='my-license-here'
-
Generate a workload cluster config:
CLUSTER_NAME=w01
eksctl anywhere generate clusterconfig $CLUSTER_NAME \
   --provider vsphere > eksa-w01-cluster.yaml
Refer to the initial config described earlier for the required and optional settings.
NOTE: Ensure workload cluster object names (Cluster, vSphereDatacenterConfig, vSphereMachineConfig, etc.) are distinct from management cluster object names.
-
Be sure to set the managementCluster field to identify the name of the management cluster.
For example, the management cluster, mgmt is defined for our workload cluster w01 as follows:
apiVersion: anywhere.eks.amazonaws.com/v1alpha1
kind: Cluster
metadata:
  name: w01
spec:
  managementCluster:
    name: mgmt
-
Create a workload cluster in one of the following ways:
-
GitOps: See Manage separate workload clusters with GitOps
-
Terraform: See Manage separate workload clusters with Terraform
NOTE: spec.users[0].sshAuthorizedKeys must be specified to SSH into your nodes when provisioning a cluster through GitOps or Terraform, as the EKS Anywhere Cluster Controller will not generate the keys like eksctl CLI does when the field is empty.
-
eksctl CLI: To create a workload cluster with eksctl, run:
eksctl anywhere create cluster \
    -f eksa-w01-cluster.yaml  \
    --kubeconfig mgmt/mgmt-eks-a-cluster.kubeconfig \
    # --install-packages packages.yaml \ # uncomment to install curated packages at cluster creation
As noted earlier, adding the --kubeconfig option tells eksctl to use the management cluster identified by that kubeconfig file to create a different workload cluster.
-
kubectl CLI: The cluster lifecycle feature lets you use kubectl, or other tools that that can talk to the Kubernetes API, to create a workload cluster. To use kubectl, run:
kubectl apply -f eksa-w01-cluster.yaml
To check the state of a cluster managed with the cluster lifecyle feature, use kubectl to show the cluster object with its status.
The status field on the cluster object field holds information about the current state of the cluster.
kubectl get clusters w01 -o yaml
The cluster has been fully upgraded once the status of the Ready condition is marked True.
See the cluster status
guide for more information.
-
To check the workload cluster, get the workload cluster credentials and run a test workload:
-
If your workload cluster was created with eksctl,
change your credentials to point to the new workload cluster (for example, w01), then run the test application with:
export CLUSTER_NAME=w01
export KUBECONFIG=${PWD}/${CLUSTER_NAME}/${CLUSTER_NAME}-eks-a-cluster.kubeconfig
kubectl apply -f "https://anywhere.eks.amazonaws.com/manifests/hello-eks-a.yaml"
-
If your workload cluster was created with GitOps or Terraform, the kubeconfig for your new cluster is stored as a secret on the management cluster.
You can get credentials and run the test application as follows:
kubectl get secret -n eksa-system w01-kubeconfig -o jsonpath='{.data.value}' | base64 —decode > w01.kubeconfig
export KUBECONFIG=w01.kubeconfig
kubectl apply -f "https://anywhere.eks.amazonaws.com/manifests/hello-eks-a.yaml"
-
Add more workload clusters:
To add more workload clusters, go through the same steps for creating the initial workload, copying the config file to a new name (such as eksa-w02-cluster.yaml), modifying resource names, and running the create cluster command again.
Next steps
-
See the Cluster management
section for more information on common operational tasks like scaling and deleting the cluster.
-
See the Package management
section for more information on post-creation curated packages installation.
4.6.5 - Configure for vSphere
Full EKS Anywhere configuration reference for a VMware vSphere cluster.
This is a generic template with detailed descriptions below for reference.
Key: Resources are in green ; Links to field descriptions are in blue
apiVersion: anywhere.eks.amazonaws.com/v1alpha1
kind: Cluster
metadata:
   name: my-cluster-name             # Name of the cluster (required)
spec:
   clusterNetwork:                   # Cluster network configuration (required)
      cniConfig:                     # Cluster CNI plugin - default: cilium (required)
         cilium: {}
      pods:
         cidrBlocks:                 # Internal Kubernetes subnet CIDR block for pods (required)
            - 192.168.0.0/16
      services:
         cidrBlocks:                 # Internal Kubernetes subnet CIDR block for services (required)
            - 10.96.0.0/12
   controlPlaneConfiguration:        # Specific cluster control plane config (required)
      count: 2                       # Number of control plane nodes (required)
      endpoint:                      # IP for control plane endpoint on your network (required)
         host: xxx.xxx.xxx.xxx
      machineGroupRef:               # vSphere-specific Kubernetes node config (required)
        kind: VSphereMachineConfig
        name: my-cluster-machines
      taints:                        # Taints applied to control plane nodes
      - key: "key1"
        value: "value1"
        effect: "NoSchedule"
      labels:                        # Labels applied to control plane nodes
        "key1": "value1"
        "key2": "value2"
   datacenterRef:                    # Kubernetes object with vSphere-specific config
      kind: VSphereDatacenterConfig
      name: my-cluster-datacenter
   externalEtcdConfiguration:
     count: 3                        # Number of etcd members
     machineGroupRef:                # vSphere-specific Kubernetes etcd config
        kind: VSphereMachineConfig
        name: my-cluster-machines
   kubernetesVersion: "1.35"         # Kubernetes version to use for the cluster (required)
   workerNodeGroupConfigurations:    # List of node groups you can define for workers (required)
   - count: 2                        # Number of worker nodes
     machineGroupRef:                # vSphere-specific Kubernetes node objects (required)
       kind: VSphereMachineConfig
       name: my-cluster-machines
     name: md-0                      # Name of the worker nodegroup (required)
     taints:                         # Taints to apply to worker node group nodes
     - key: "key1"
       value: "value1"
       effect: "NoSchedule"
     labels:                         # Labels to apply to worker node group nodes
       "key1": "value1"
       "key2": "value2"
     failureDomains:                 # List of failure domains used for this worker node group
     - failuredomain-01
---
apiVersion: anywhere.eks.amazonaws.com/v1alpha1
kind: VSphereDatacenterConfig
metadata:
   name: my-cluster-datacenter
spec:
  datacenter: "datacenter1"          # vSphere datacenter name on which to deploy EKS Anywhere (required)
  server: "myvsphere.local"          # FQDN or IP address of vCenter server (required)
  network: "network1"                # Path to the VM network on which to deploy EKS Anywhere (required)
  insecure: false                    # Set to true if vCenter does not have a valid certificate
  thumbprint: "1E:3B:A1:4C:B2:..."   # SHA1 thumprint of vCenter server certificate (required if insecure=false)
  failureDomains:                    # List of failure domains used for the worker nodes
  - name: failuredomain-01
    computeCluster: "computeCluster-1"
    resourcePool: "resourcePool1"
    datastore: "dataStore1"
    folder: "folder1"
    network: "network1"
  - name: failuredomain-02
    computeCluster: "computeCluster-2"
    resourcePool: "resourcePool2"
    datastore: "dataStore2"
    folder: "folder2"
    network: "network2"

---
apiVersion: anywhere.eks.amazonaws.com/v1alpha1
kind: VSphereMachineConfig
metadata:
   name: my-cluster-machines
spec:
  diskGiB:  25                         # Size of disk on VMs, if no snapshots
  datastore: "datastore1"              # Path to vSphere datastore to deploy EKS Anywhere on (required)
  folder: "folder1"                    # Path to VM folder for EKS Anywhere cluster VMs (required)
  numCPUs: 2                           # Number of CPUs on virtual machines
  memoryMiB: 8192                      # Size of RAM on VMs
  osFamily: "bottlerocket"             # Operating system on VMs
  networks: # Configure second network interface on workernode (optional)
  - "network-1"
  - "network-2"
  resourcePool: "resourcePool1"        # vSphere resource pool for EKS Anywhere VMs (required)
  storagePolicyName: "storagePolicy1"  # Storage policy name associated with VMs
  template: "bottlerocket-kube-v1-31"  # VM template for EKS Anywhere (required for RHEL/Ubuntu-based OVAs)
  cloneMode: "fullClone"               # Clone mode to use when cloning VMs from the template
  users:                               # Add users to access VMs via SSH
  - name: "ec2-user"                   # Name of each user set to access VMs
    sshAuthorizedKeys:                 # SSH keys for user needed to access VMs
    - "ssh-rsa AAAAB3NzaC1yc2E..."
  tags:                                # List of tags to attach to cluster VMs, in URN format
  - "urn:vmomi:InventoryServiceTag:5b3e951f-4e1d-4511-95b1-5ba1ea97245c:GLOBAL"
  - "urn:vmomi:InventoryServiceTag:cfee03d0-0189-4f27-8c65-fe75086a86cd:GLOBAL"
The following additional optional configuration can also be included:
Cluster Fields
name (required)
Name of your cluster my-cluster-name in this example
clusterNetwork (required)
Network configuration.
clusterNetwork.cniConfig (required)
CNI plugin configuration. Supports cilium.
clusterNetwork.cniConfig.cilium.policyEnforcementMode (optional)
Optionally specify a policyEnforcementMode of default, always or never.
clusterNetwork.cniConfig.cilium.egressMasqueradeInterfaces (optional)
Optionally specify a network interface name or interface prefix used for
masquerading. See EgressMasqueradeInterfaces
option.
clusterNetwork.cniConfig.cilium.skipUpgrade (optional)
When true, skip Cilium maintenance during upgrades. Also see Use a custom
CNI.
clusterNetwork.cniConfig.cilium.routingMode (optional)
Optionally specify the routing mode. Accepts default and direct. Also see RoutingMode
option.
clusterNetwork.cniConfig.cilium.ipv4NativeRoutingCIDR (optional)
Optionally specify the CIDR to use when RoutingMode is set to direct.
When specified, Cilium assumes networking for this CIDR is preconfigured and
hands traffic destined for that range to the Linux network stack without
applying any SNAT.
clusterNetwork.cniConfig.cilium.ipv6NativeRoutingCIDR (optional)
Optionally specify the IPv6 CIDR to use when RoutingMode is set to direct.
When specified, Cilium assumes networking for this CIDR is preconfigured and
hands traffic destined for that range to the Linux network stack without
applying any SNAT.
clusterNetwork.cniConfig.cilium.cniExclusive (optional)
Controls whether Cilium should remove other CNI configuration files.
When true (default), Cilium removes other CNI configs; when false, it leaves them alone.
For more information, see CNI Exclusive Mode configuration.
clusterNetwork.pods.cidrBlocks[0] (required)
The pod subnet specified in CIDR notation. Only 1 pod CIDR block is permitted.
The CIDR block should not conflict with the host or service network ranges.
clusterNetwork.services.cidrBlocks[0] (required)
The service subnet specified in CIDR notation. Only 1 service CIDR block is
permitted.
This CIDR block should not conflict with the host or pod network ranges.
clusterNetwork.dns.resolvConf.path (optional)
File path to a file containing a custom DNS resolver configuration.
controlPlaneConfiguration (required)
Specific control plane configuration for your Kubernetes cluster.
controlPlaneConfiguration.count (required)
Number of control plane nodes
controlPlaneConfiguration.machineGroupRef (required)
Refers to the Kubernetes object with vsphere specific configuration for your nodes. See VSphereMachineConfig Fields
below.
controlPlaneConfiguration.endpoint.host (required)
A unique IP you want to use for the control plane VM in your EKS Anywhere cluster. Choose an IP in your network
range that does not conflict with other VMs.
NOTE: This IP should be outside the network DHCP range as it is a floating IP that gets assigned to one of
the control plane nodes for kube-apiserver loadbalancing. Suggestions on how to ensure this IP does not cause issues during cluster
creation process are here
controlPlaneConfiguration.taints (optional)
A list of taints to apply to the control plane nodes of the cluster.
Replaces the default control plane taint. For k8s versions prior to 1.24, it replaces node-role.kubernetes.io/master. For k8s versions 1.24+, it replaces node-role.kubernetes.io/control-plane. The default control plane components will tolerate the provided taints.
Modifying the taints associated with the control plane configuration will cause new nodes to be rolled-out, replacing the existing nodes.
NOTE: The taints provided will be used instead of the default control plane taint.
Any pods that you run on the control plane nodes must tolerate the taints you provide in the control plane configuration.
controlPlaneConfiguration.labels (optional)
A list of labels to apply to the control plane nodes of the cluster. This is in addition to the labels that
EKS Anywhere will add by default.
Modifying the labels associated with the control plane configuration will cause new nodes to be rolled out, replacing
the existing nodes.
workerNodeGroupConfigurations (required)
This takes in a list of node groups that you can define for your workers.
You may define one or more worker node groups.
workerNodeGroupConfigurations[*].count (optional)
Number of worker nodes. (default: 1) It will be ignored if the cluster autoscaler curated package
is installed and autoscalingConfiguration is used to specify the desired range of replicas.
Refers to troubleshooting machine health check remediation not allowed
and choose a sufficient number to allow machine health check remediation.
workerNodeGroupConfigurations[*].machineGroupRef (required)
Refers to the Kubernetes object with vsphere specific configuration for your nodes. See VSphereMachineConfig Fields
below.
workerNodeGroupConfigurations[*].name (required)
Name of the worker node group (default: md-0)
workerNodeGroupConfigurations[*].autoscalingConfiguration.minCount (optional)
Minimum number of nodes for this node group’s autoscaling configuration.
workerNodeGroupConfigurations[*].autoscalingConfiguration.maxCount (optional)
Maximum number of nodes for this node group’s autoscaling configuration.
workerNodeGroupConfigurations[*].taints (optional)
A list of taints to apply to the nodes in the worker node group.
Modifying the taints associated with a worker node group configuration will cause new nodes to be rolled-out, replacing the existing nodes associated with the configuration.
At least one node group must NOT have NoSchedule or NoExecute taints applied to it.
workerNodeGroupConfigurations[*].labels (optional)
A list of labels to apply to the nodes in the worker node group. This is in addition to the labels that
EKS Anywhere will add by default.
Modifying the labels associated with a worker node group configuration will cause new nodes to be rolled out, replacing
the existing nodes associated with the configuration.
workerNodeGroupConfigurations[*].kubernetesVersion (optional)
The Kubernetes version you want to use for this worker node group. The Kubernetes versions supported by your EKS Anywhere version are tabulated in this
section.
Known issue related to Kubernetes versions whose minor version is a multiple of 10
Must be less than or equal to the cluster kubernetesVersion defined at the root level of the cluster spec. The worker node Kubernetes version must be no more than two minor Kubernetes versions lower than the cluster control plane’s Kubernetes version. Removing workerNodeGroupConfiguration.kubernetesVersion will trigger an upgrade of the node group to the kubernetesVersion defined at the root level of the cluster spec.
workerNodeGroupConfigurations[*].failureDomains (optional)
The failure domains you want to use for this worker node group. This feature is available behind feature flag VSPHERE_FAILURE_DOMAIN_ENABLED. Set environment variable as below to enable this feature.
export VSPHERE_FAILURE_DOMAIN_ENABLED=true
Failure domains must be selected from the predefined list of failure domains defined in VSphereDatacenterConfig.failureDomains
externalEtcdConfiguration.count (optional)
Number of etcd members
externalEtcdConfiguration.machineGroupRef (optional)
Refers to the Kubernetes object with vsphere specific configuration for your etcd members. See VSphereMachineConfig Fields
below.
datacenterRef (required)
Refers to the Kubernetes object with vsphere environment specific configuration. See VSphereDatacenterConfig Fields
below.
kubernetesVersion (required)
The Kubernetes version you want to use for your cluster. The Kubernetes versions supported by your EKS Anywhere version are tabulated in this
section.
Known issue related to Kubernetes versions whose minor version is a multiple of 10
VSphereDatacenterConfig Fields
datacenter (required)
The name of the vSphere datacenter to deploy the EKS Anywhere cluster on. For example SDDC-Datacenter.
network (required)
The path to the VM network to deploy your EKS Anywhere cluster on. For example, /<DATACENTER>/network/<NETWORK_NAME>.
Use govc find -type n to see a list of networks.
server (required)
The vCenter server fully qualified domain name or IP address. If the server IP is used, the thumbprint must be set
or insecure must be set to true.
insecure (optional)
Set insecure to true if the vCenter server does not have a valid certificate. (Default: false)
thumbprint (required if insecure=false)
The SHA1 thumbprint of the vCenter server certificate which is only required if you have a self signed certificate.
There are several ways to obtain your vCenter thumbprint. The easiest way is if you have govc installed, you
can run:
govc about.cert -thumbprint -k
Another way is from the vCenter web UI, go to Administration/Certificate Management and click view details of the
machine certificate. The format of this thumbprint does not exactly match the format required though and you will
need to add : to separate each hexadecimal value.
Another way to get the thumbprint is use this command with your servers certificate in a file named ca.crt:
openssl x509 -sha1 -fingerprint -in ca.crt -noout
If you specify the wrong thumbprint, an error message will be printed with the expected thumbprint. If no valid
certificate is being used, insecure must be set to true.
failuredomains (optional)
The list of failure domains to distribute worker nodes across the infrastructure.This feature is available behind feature flag VSPHERE_FAILURE_DOMAIN_ENABLED. Set environment variable as below to enable this feature.
export VSPHERE_FAILURE_DOMAIN_ENABLED=true
failureDomains[0].name
Name is used as a unique identifier for each failure domain.
failureDomains[0].computeCluster
ComputeCluster is the name or inventory path of the computecluster in which the VM is created/located.
failureDomains[0].resourcePool
ResourcePool is the name or inventory path of the resource pool in which the VM is created/located.
failureDomains[0].datastore
Datastore is the name or inventory path of the datastore in which the VM is created/located.
failureDomains[0].folder
Folder is the name or inventory path of the folder in which the the VM is created/located.
failureDomains[0].network
Network is the name or inventory path of the network which will be added to the VM.
VSphereMachineConfig Fields
memoryMiB (optional)
Size of RAM on virtual machines (Default: 8192)
numCPUs (optional)
Number of CPUs on virtual machines (Default: 2)
osFamily (optional)
Operating System on virtual machines. Permitted values: bottlerocket, ubuntu, redhat (Default: bottlerocket)
diskGiB (optional)
Size of disk on virtual machines if snapshots aren’t included (Default: 25)
networks (optional)
The path to the VM network to deploy your EKS Anywhere cluster on. For example, /<DATACENTER>/network/<NETWORK_NAME>. Use the array to specify the networks you want to use, the first network in the array will serve as the primary interface and is highly recommended to use the same network configured in datacenter section.Use govc find -type n to see a list of networks
Important Limitations
- Multi-Network Interface Support:
- Multiple network interfaces are only supported on worker nodes and NOT supported on controlplane node
- Maximum of 2 network interfaces per worker node.
- Operating System Compatibility:
- EKSA CLI v0.24.0+: Ubuntu and RHEL operating systems supported
- EKSA CLI v0.24.1+: Bottlerocket operating system supported
users (optional)
The users you want to configure to access your virtual machines. Only one is permitted at this time
users[0].name (optional)
The name of the user you want to configure to access your virtual machines through ssh.
The default is ec2-user if osFamily=bottlrocket and capv if osFamily=ubuntu
users[0].sshAuthorizedKeys (optional)
The SSH public keys you want to configure to access your virtual machines through ssh (as described below). Only 1 is supported at this time.
users[0].sshAuthorizedKeys[0] (optional)
This is the SSH public key that will be placed in authorized_keys on all EKS Anywhere cluster VMs so you can ssh into
them. The user will be what is defined under name above. For example:
ssh -i <private-key-file> <user>@<VM-IP>
The default is generating a key in your $(pwd)/<cluster-name> folder when not specifying a value
template (optional)
The VM template to use for your EKS Anywhere cluster. This template was created when you
imported the OVA file into vSphere
.
This is a required field if you are using Ubuntu-based or RHEL-based OVAs.
The template must contain the Cluster.Spec.KubernetesVersion or Cluster.Spec.WorkerNodeGroupConfiguration[].KubernetesVersion version (in case of modular upgrade). For example, if the Kubernetes version is 1.35, template must include 1.35, 1_35, 1-35 or 135.
cloneMode (optional)
cloneMode defines the clone mode to use when creating the cluster VMs from the template. Allowed values are:
fullClone: With full clone, the cloned VM is a separate independent copy of the template. This makes provisioning the VMs a bit slower at the cost of better customization and performance.linkedClone: With linked clone, the cloned VM shares the parent template’s virtual disk. This makes provisioning the VMs faster while also saving the disk space. Linked clone does not allow customizing the disk size.
The template should meet the following properties to use linkedClone:
- The template needs to have a snapshot
- The template’s disk size must match the VSphereMachineConfig’s diskGiB
If this field is not specified, EKS Anywhere tries to determine the clone mode based on the following criteria:
- It uses linkedClone if the template has snapshots and the template diskSize matches the machineConfig DiskGiB.
- Otherwise, it uses use full clone.
datastore (required)
The path to the vSphere datastore
to deploy your EKS Anywhere cluster on, for example /<DATACENTER>/datastore/<DATASTORE_NAME>.
Use govc find -type s to get a list of datastores.
folder (required)
The path to a VM folder for your EKS Anywhere cluster VMs. This allows you to organize your VMs. If the folder does not exist,
it will be created for you. If the folder is blank, the VMs will go in the root folder.
For example /<DATACENTER>/vm/<FOLDER_NAME>/....
Use govc find -type f to get a list of existing folders.
resourcePool (required)
The vSphere Resource pools
for your VMs in the EKS Anywhere cluster. Examples of resource pool values include:
- If there is no resource pool:
/<datacenter>/host/<cluster-name>/Resources
- If there is a resource pool:
/<datacenter>/host/<cluster-name>/Resources/<resource-pool-name>
- The wild card option
*/Resources also often works.
Use govc find -type p to get a list of available resource pools.
storagePolicyName (optional)
The storage policy name associated with your VMs. Generally this can be left blank.
Use govc storage.policy.ls to get a list of available storage policies.
Optional list of tags to attach to your cluster VMs in the URN format.
Example:
  tags:
  - urn:vmomi:InventoryServiceTag:8e0ce079-0675-47d6-8665-16ada4e6dabd:GLOBAL
hostOSConfig (optional)
Optional host OS configurations for the EKS Anywhere Kubernetes nodes.
More information in the Host OS Configuration
section.
Optional VSphere Credentials
Use the following environment variables to configure the Cloud Provider with different credentials.
EKSA_VSPHERE_CP_USERNAME
Username for Cloud Provider (Default: $EKSA_VSPHERE_USERNAME).
EKSA_VSPHERE_CP_PASSWORD
Password for Cloud Provider (Default: $EKSA_VSPHERE_PASSWORD).
4.6.6 - Customize vSphere
Customizing EKS Anywhere on vSphere
4.6.6.1 - Import OVAs
Importing EKS Anywhere OVAs to vSphere
If you want to specify an OVA template, you will need to import OVA files into vSphere before you can use it in your EKS Anywhere cluster.
This guide was written using VMware Cloud on AWS,
but the VMware OVA import guide can be found here.
Note
If you don’t specify a template in the cluster spec file, EKS Anywhere will use the proper default one for the Kubernetes minor version and OS family you specified in the spec file.
If the template doesn’t exist, it will import the appropriate OVA into vSphere and add the necessary tags.
The default OVA for a Kubernetes minor version + OS family will change over time, for example, when a new EKS Distro version is released. In that case, new clusters will use the new OVA (EKS Anywhere will import it automatically).
Warning
Do not power on the imported OVA directly as it can cause some undesired configurations on the OS template and affect cluster creation. If you want to explore or modify the OS, please follow the instructions to
customize the OVA.
EKS Anywhere supports the following operating system families
- Bottlerocket (default)
- Ubuntu
- RHEL
A list of OVAs for this release can be found on the artifacts page.
Using vCenter Web User Interface
-
Right click on your Datacenter, select Deploy OVF Template
-
Select an OVF template using URL or selecting a local OVF file and click on Next. If you are not able to select an
OVF template using URL, download the file and use Local file option.
Note: If you are using Bottlerocket OVAs, please select local file option.
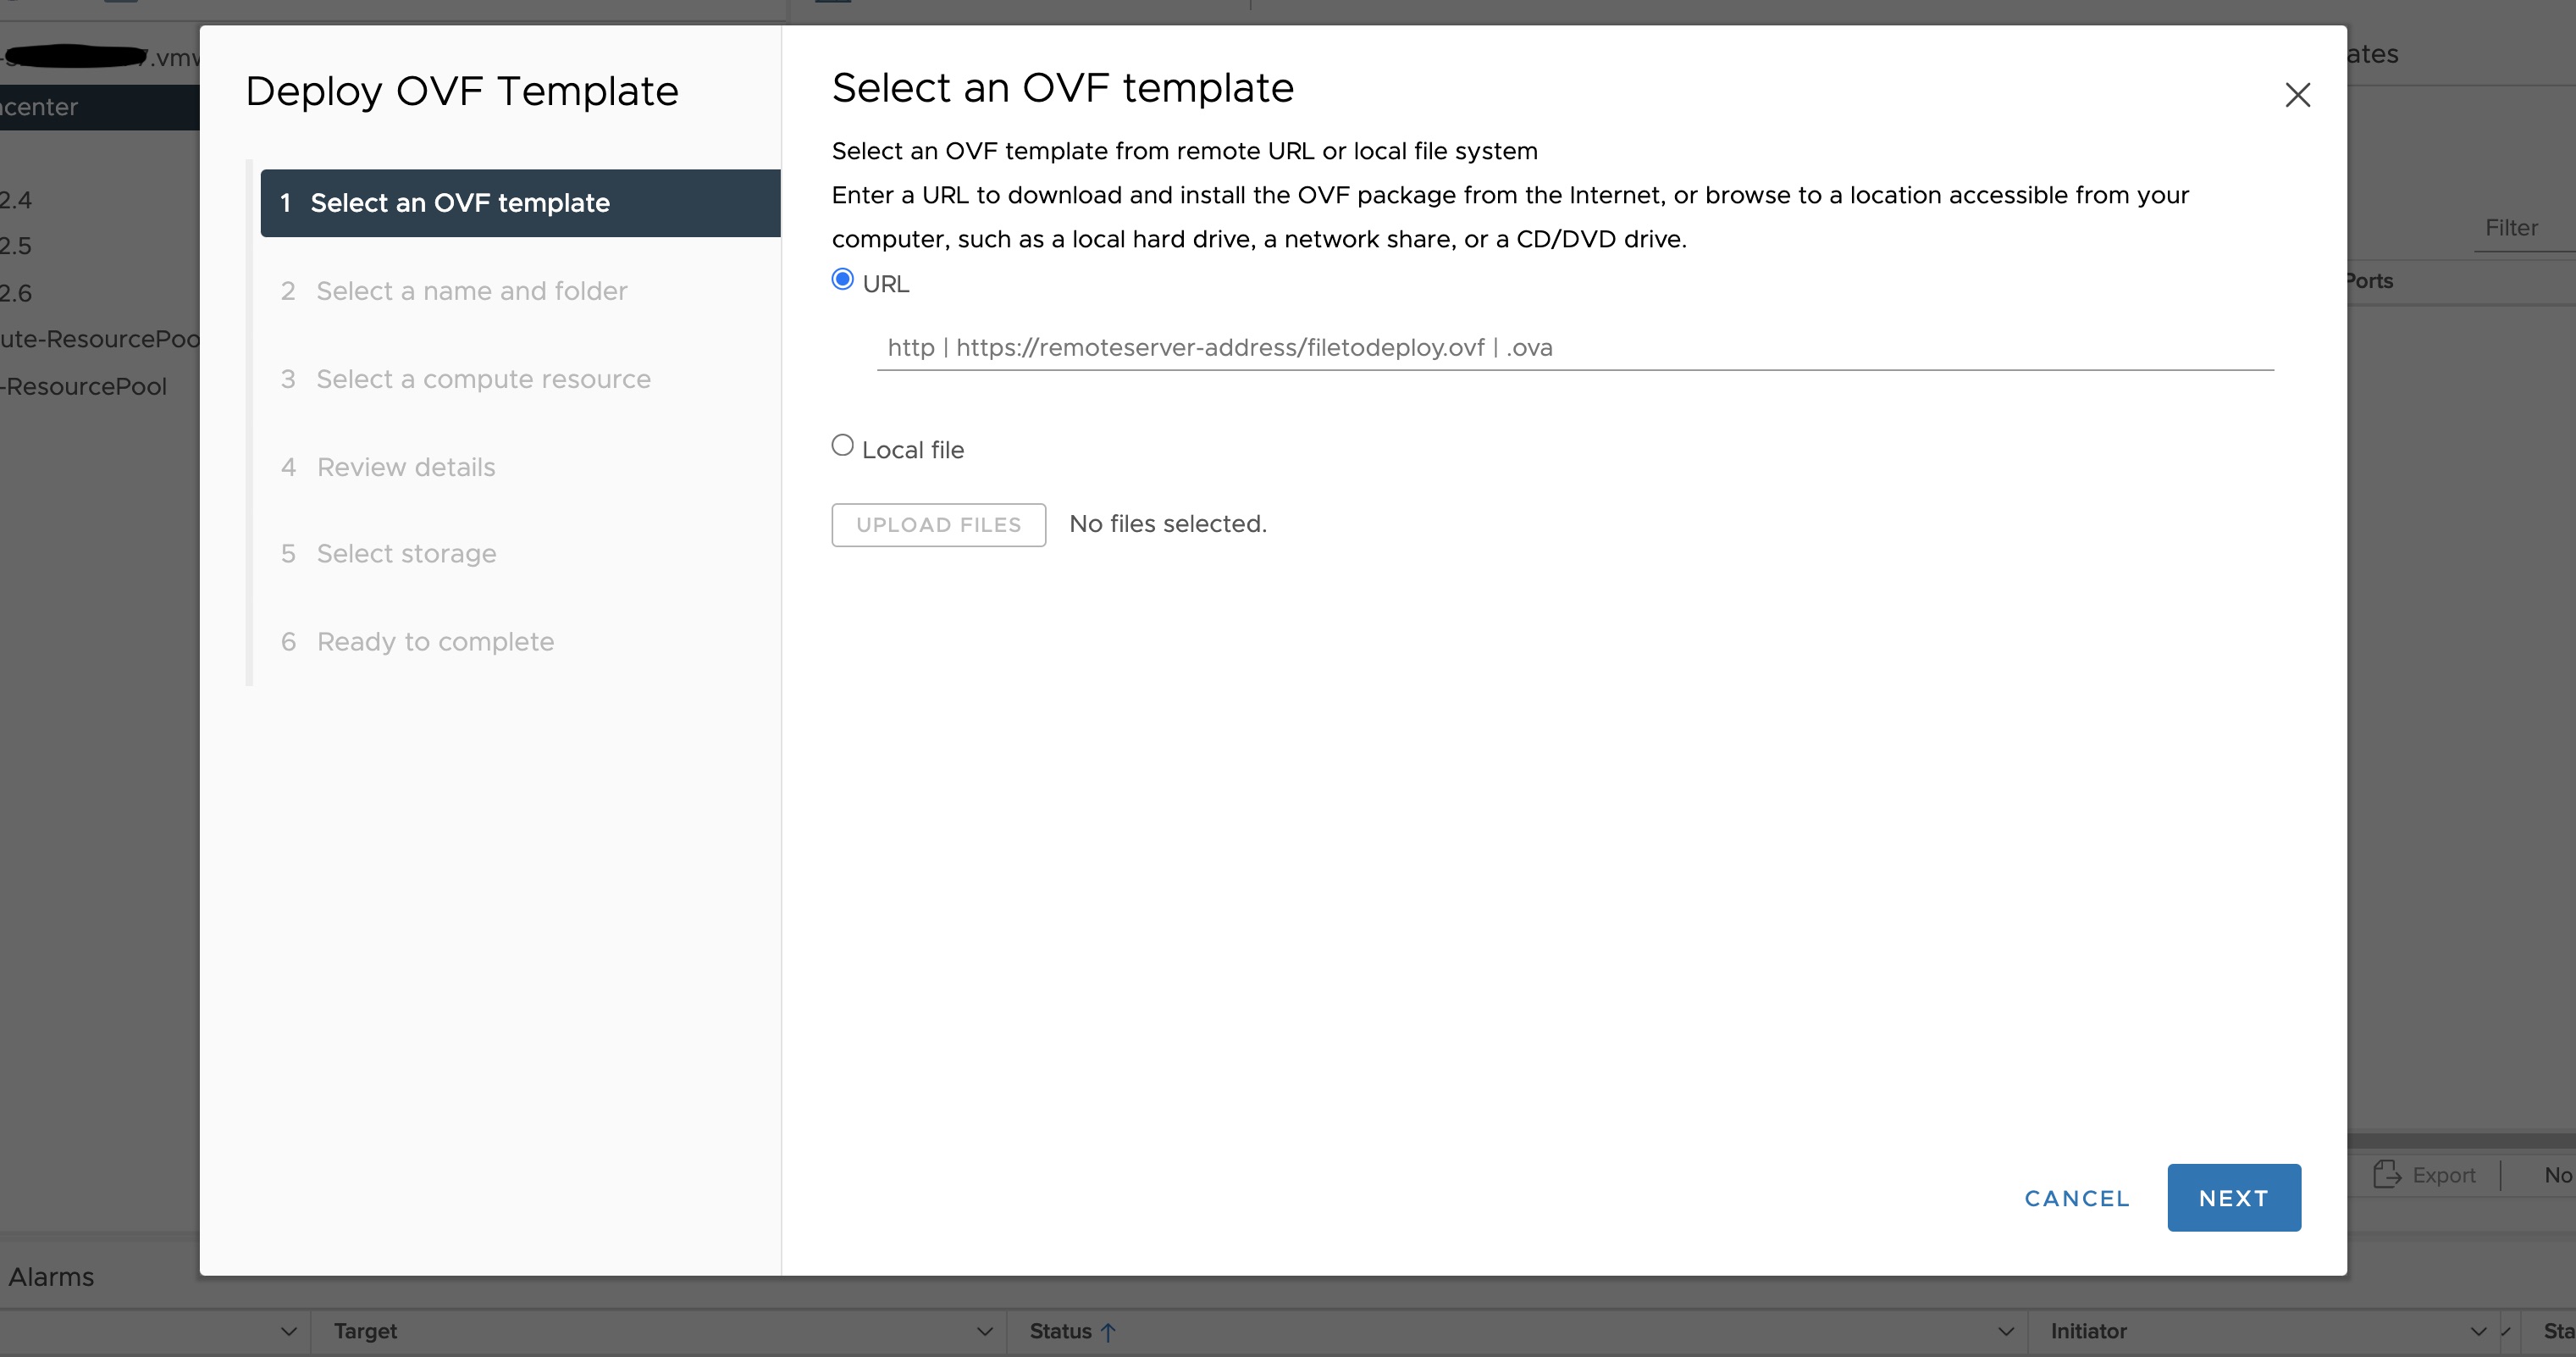
-
Select a folder where you want to deploy your OVF package (most of our OVF templates are under SDDC-Datacenter
directory) and click on Next. You cannot have an OVF template with the same name in one directory. For workload
VM templates, leave the Kubernetes version in the template name for reference. A workload VM template will
support at least one prior Kubernetes major versions.
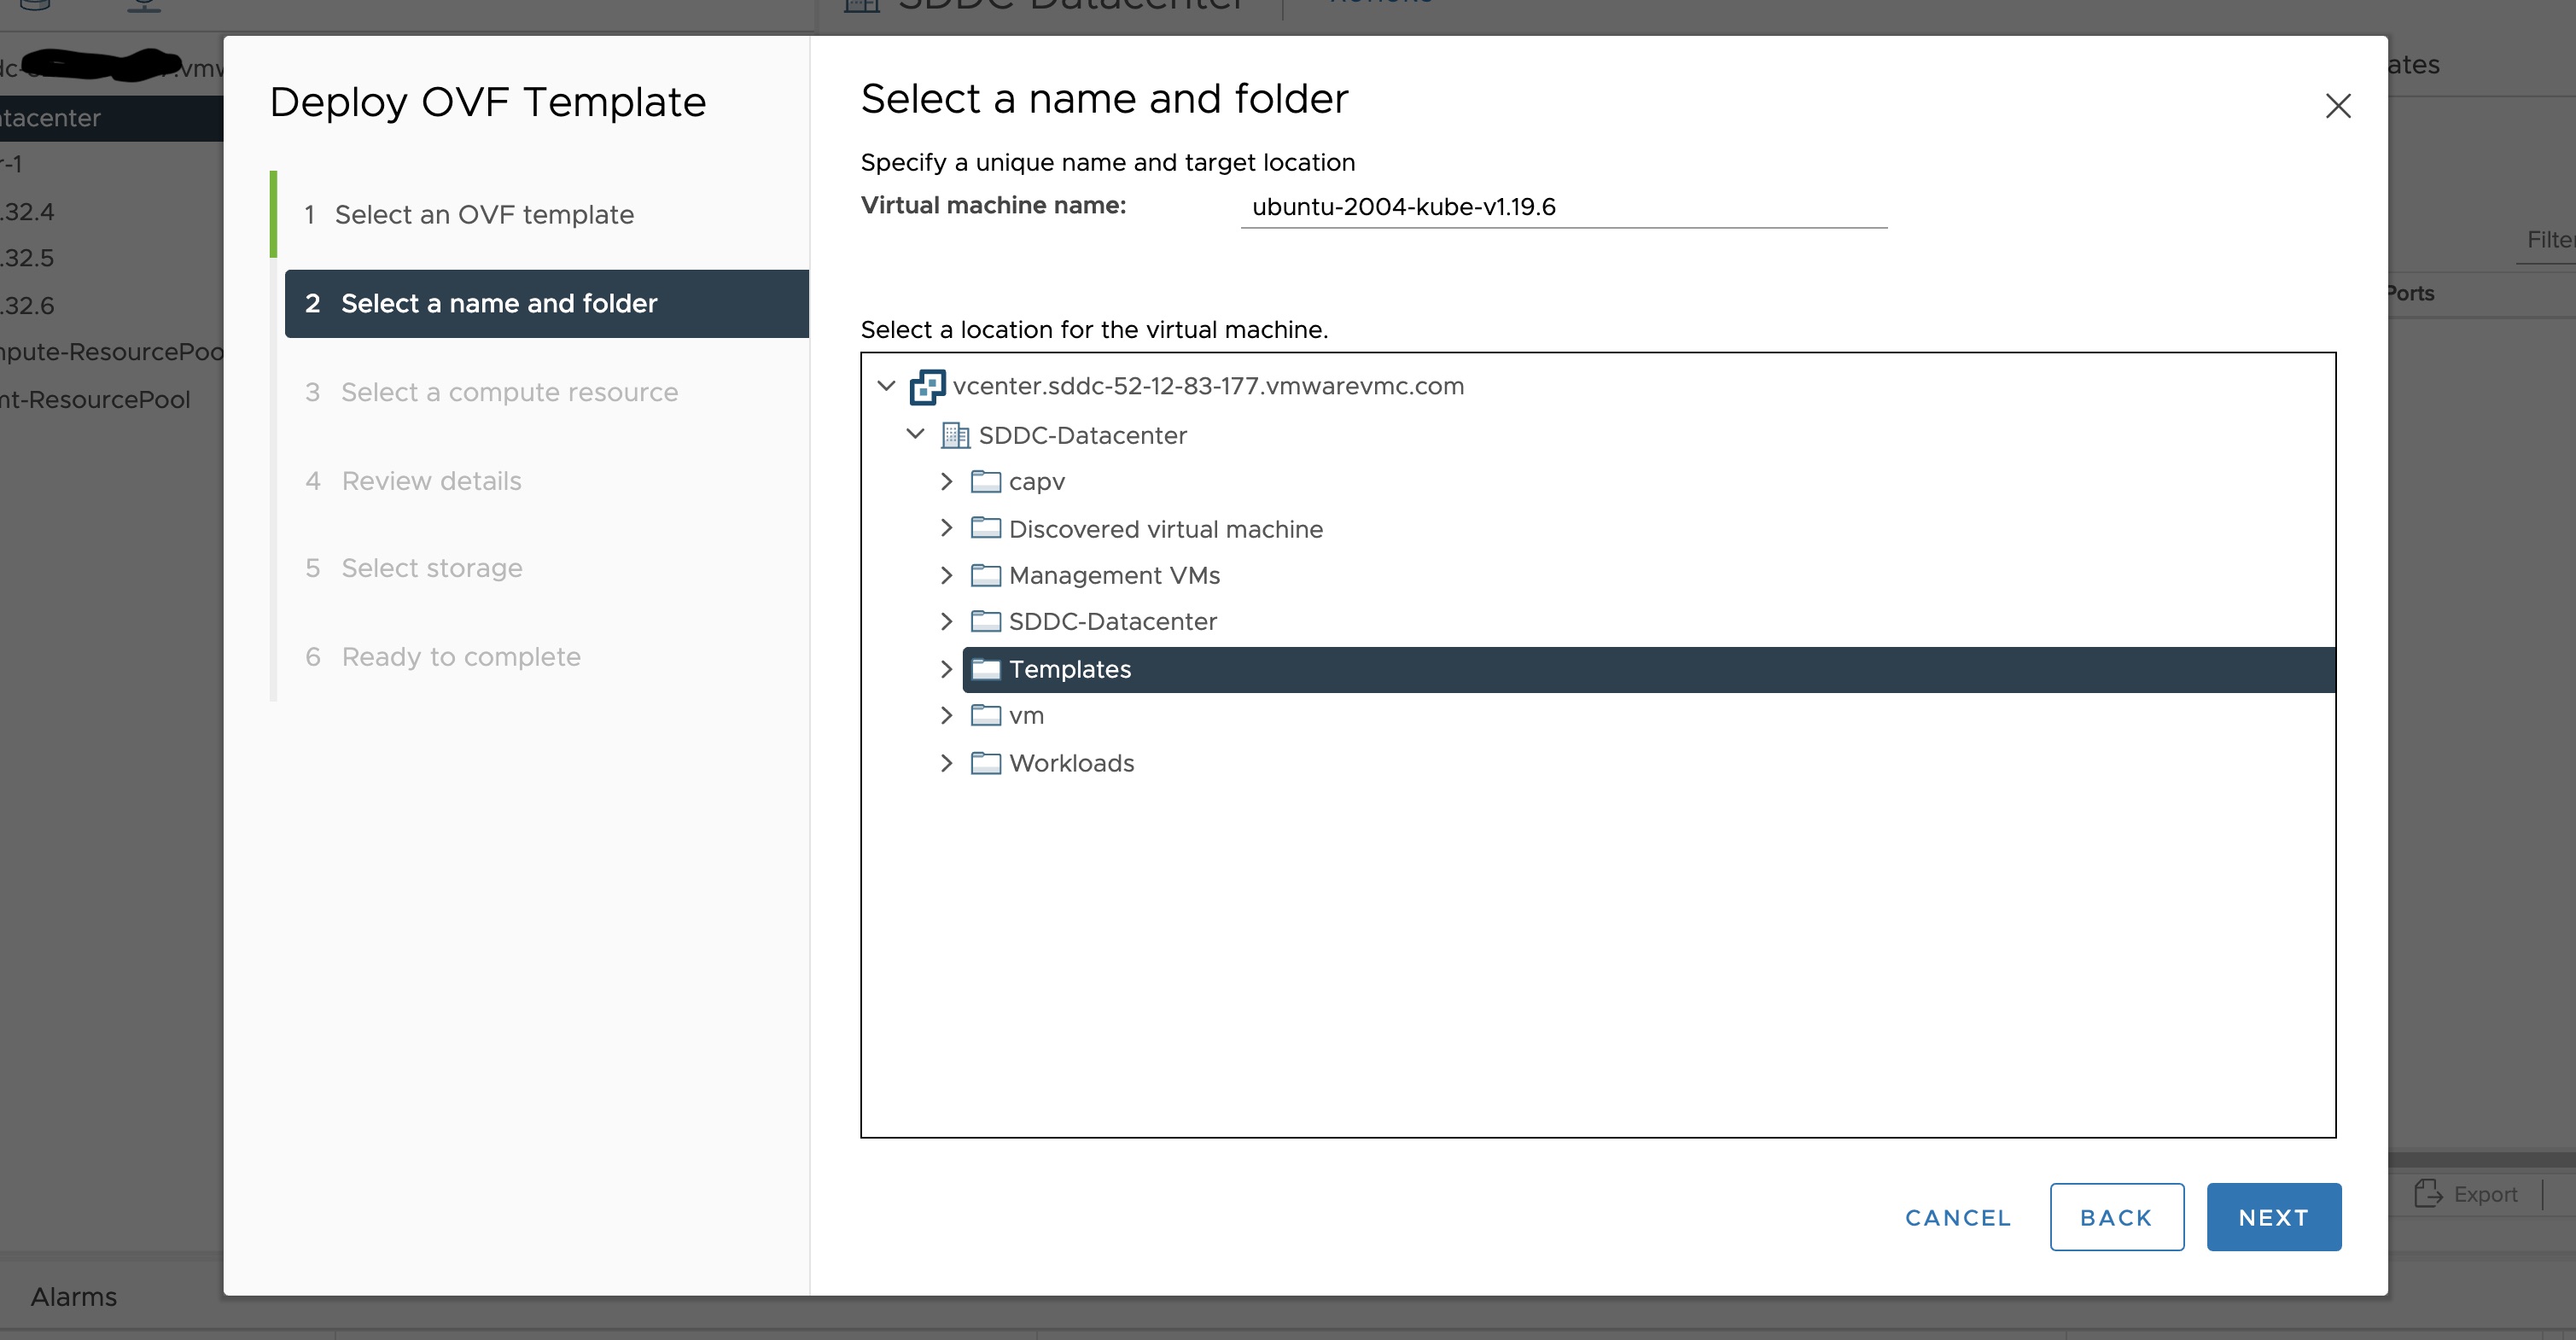
-
Select any compute resource to run (from cluster-1, 10.2.34.5, etc..) the deployed VM and click on Next
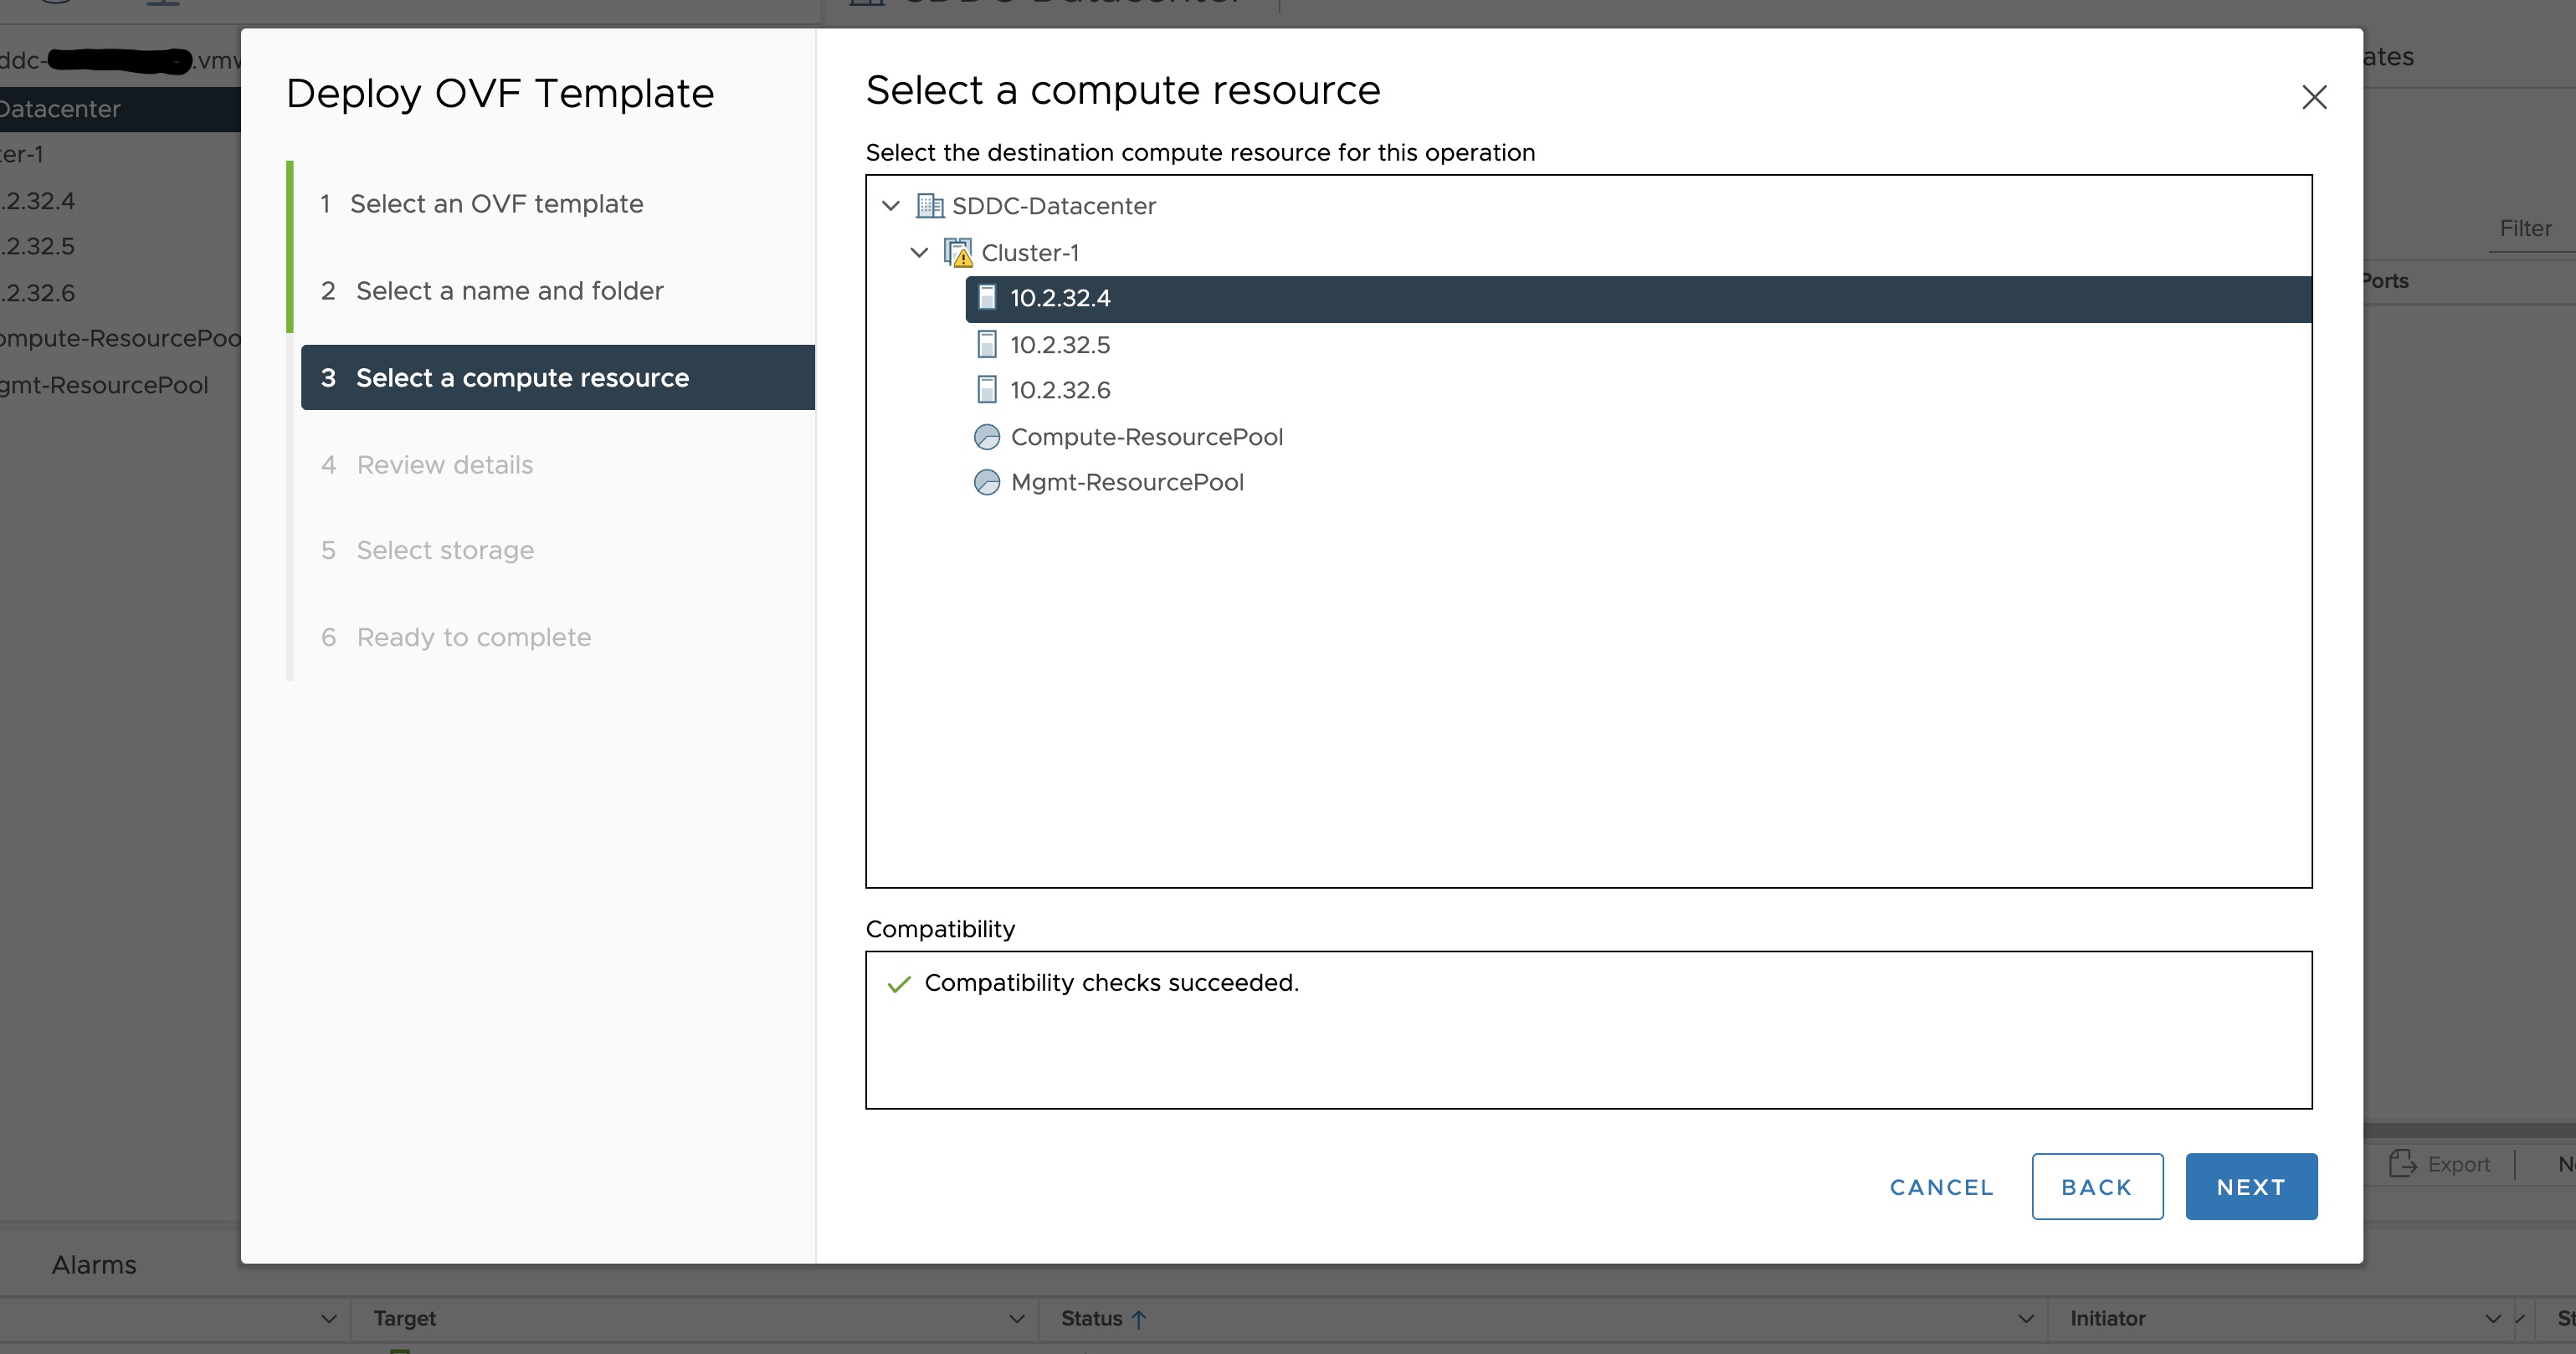
-
Review the details and click Next.
-
Accept the agreement and click Next.
-
Select the appropriate storage (e.g. “WorkloadDatastore“) and click Next.
-
Select destination network (e.g. “sddc-cgw-network-1”) and click Next.
-
Finish.
-
Snapshot the VM. Right click on the imported VM and select Snapshots -> Take Snapshot…
(It is highly recommended that you snapshot the VM. This will reduce the time it takes to provision
machines and cluster creation will be faster. If you prefer not to take snapshot, skip to step 13)

-
Name your template (e.g. “root”) and click Create.
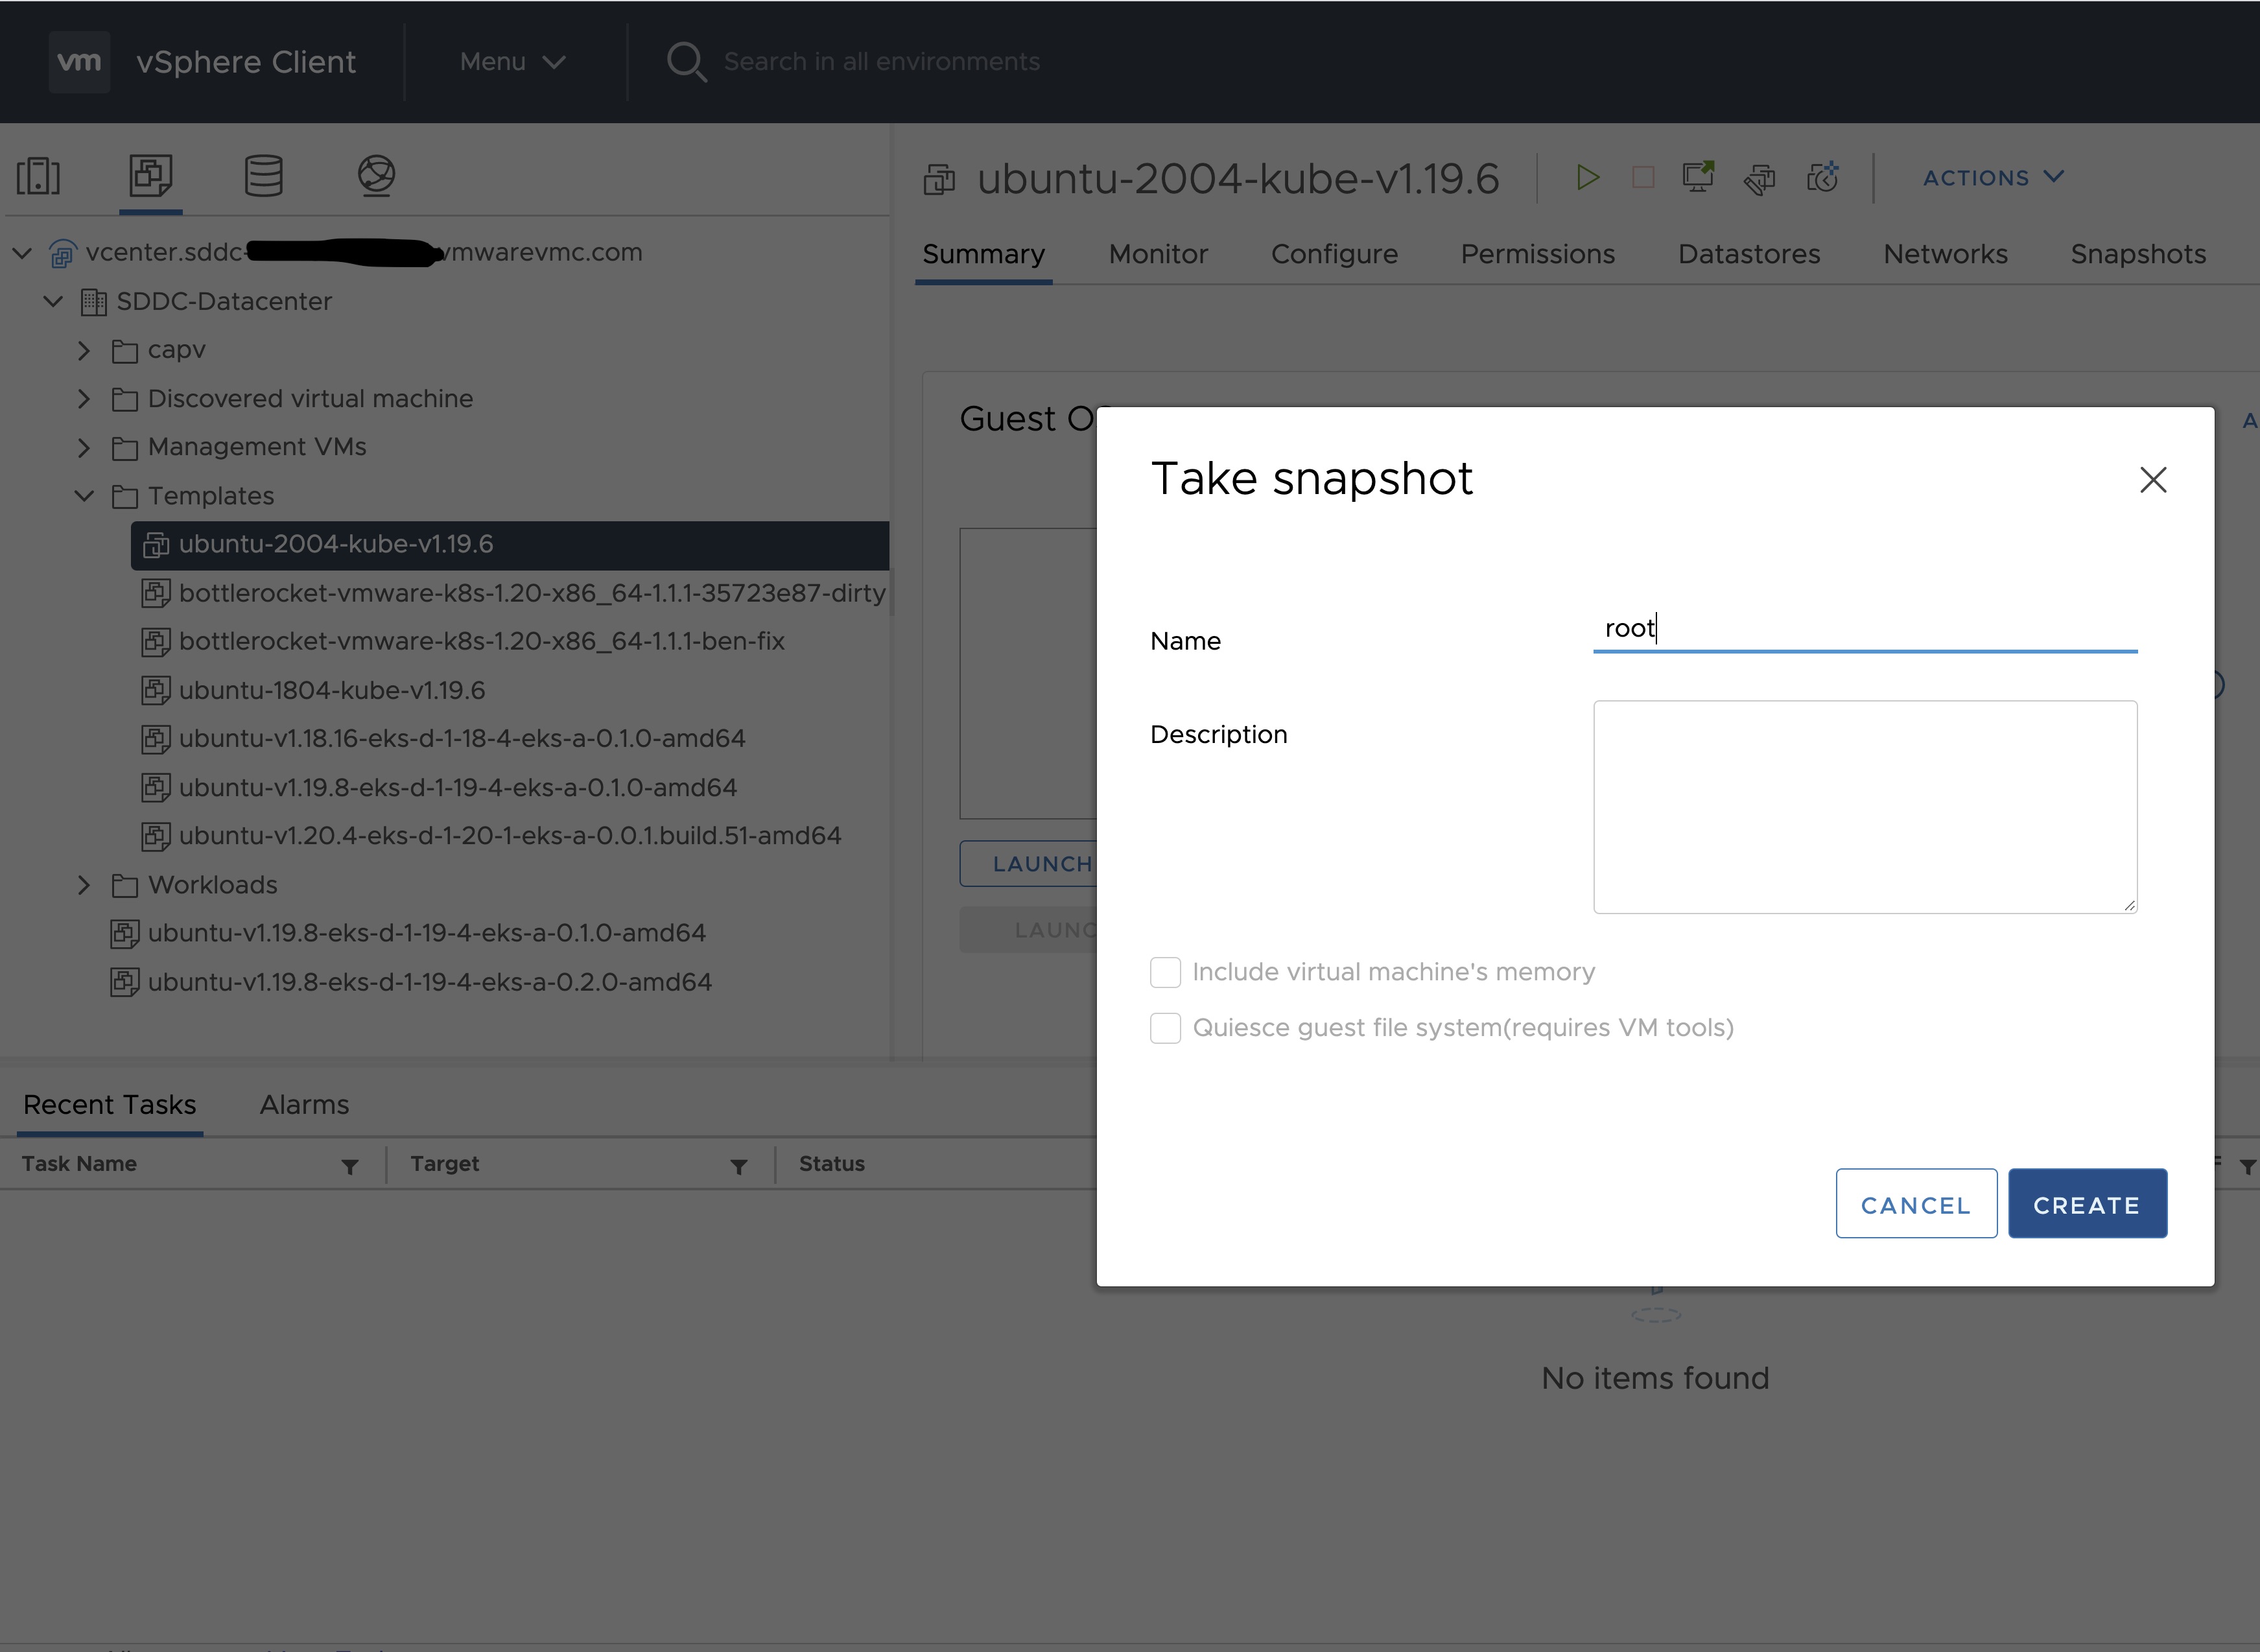
-
Snapshots for the imported VM should now show up under the Snapshots tab for the VM.
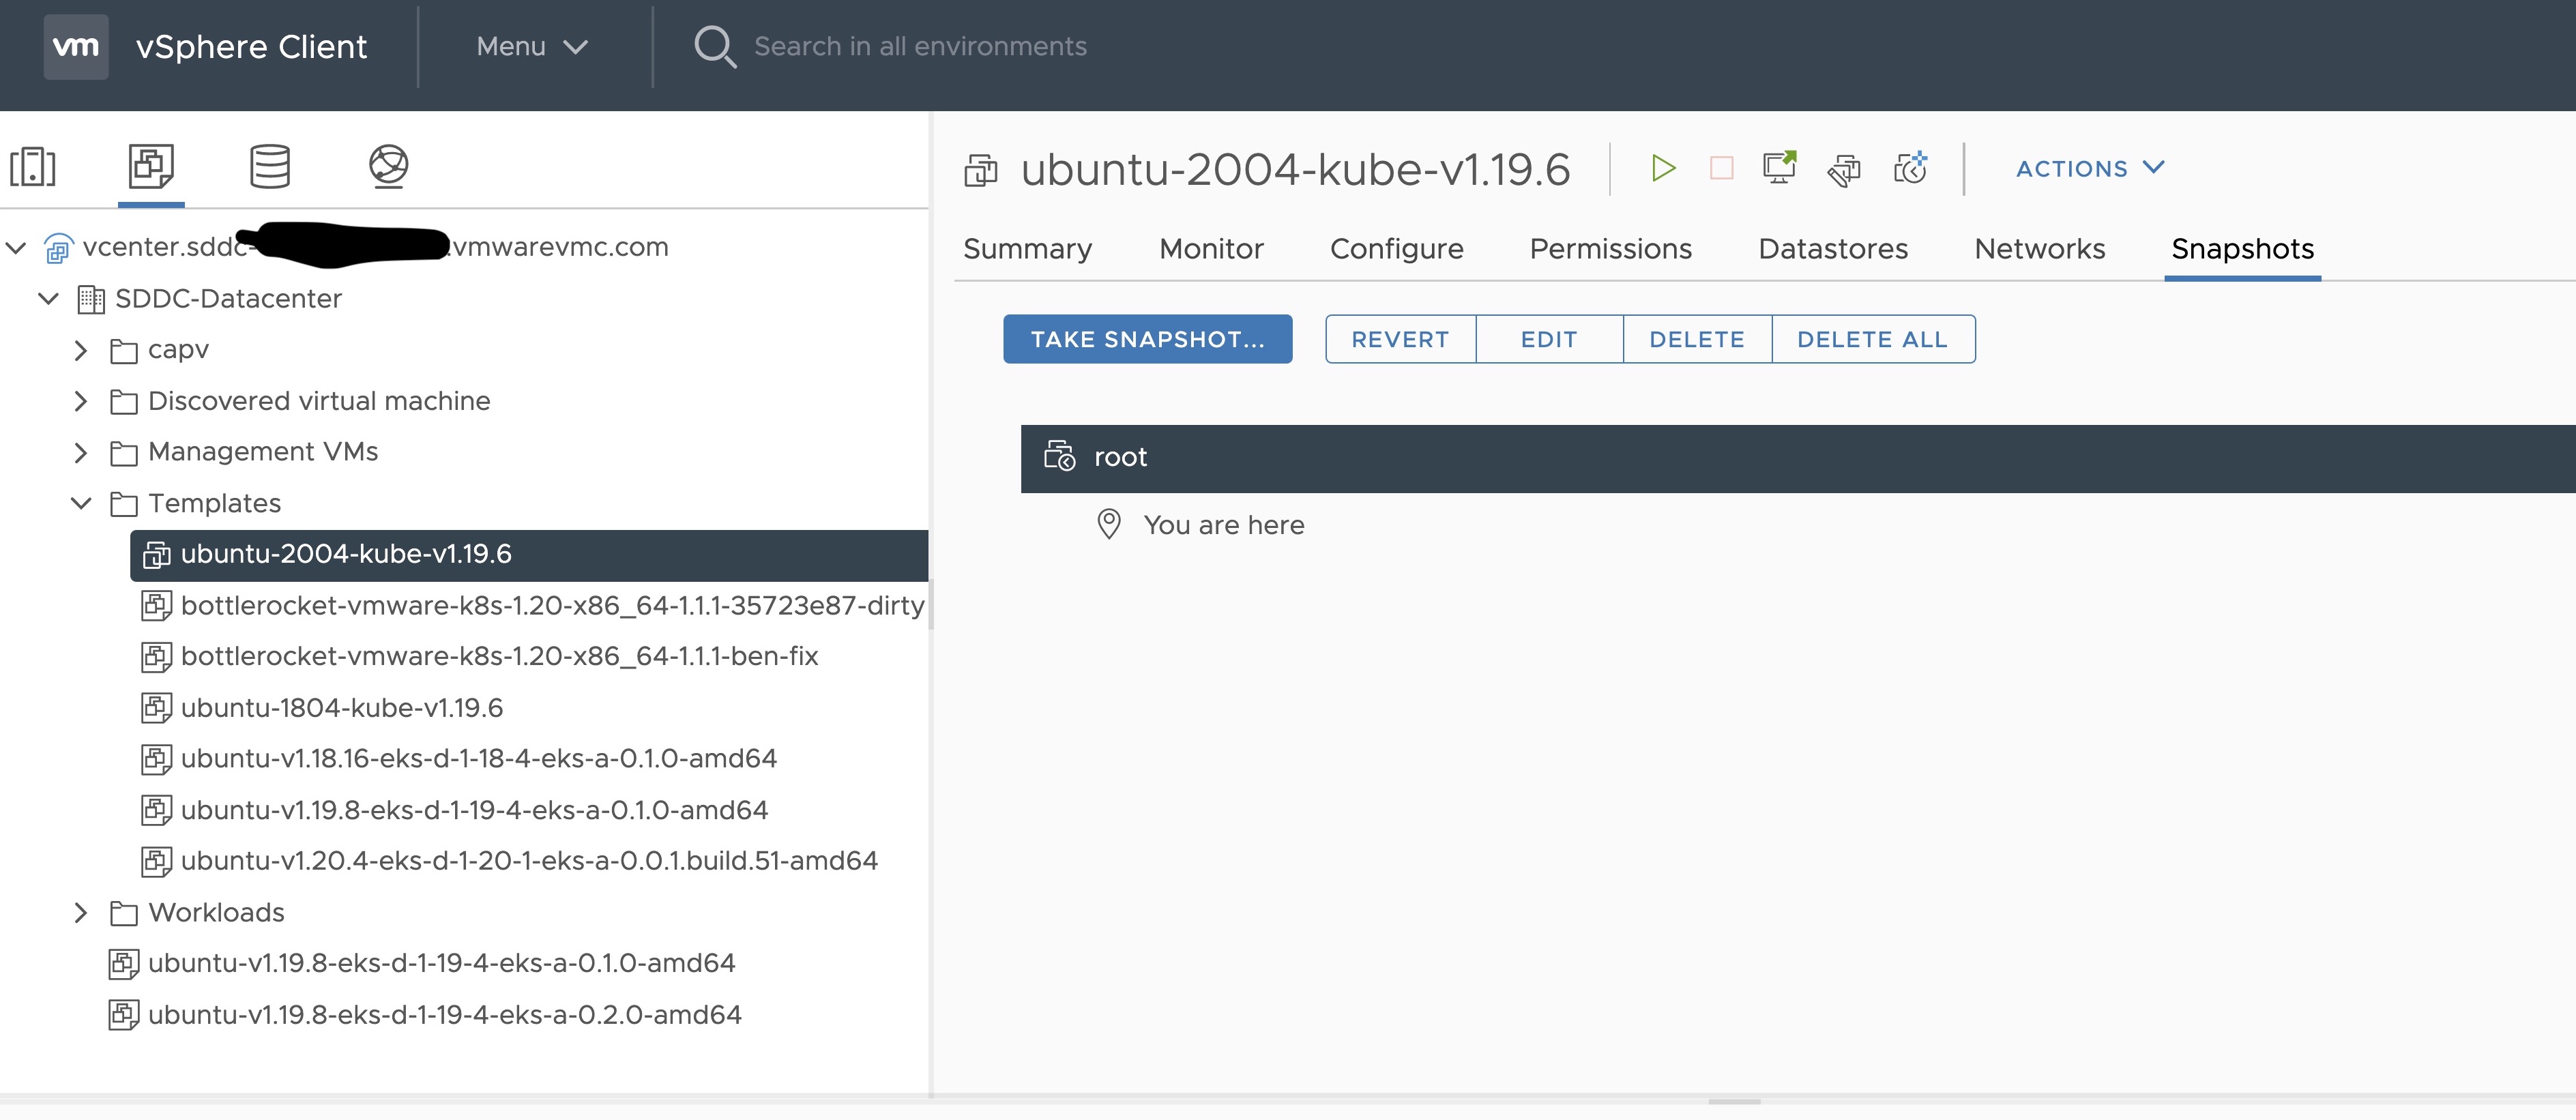
-
Right click on the imported VM and select Template and Convert to Template
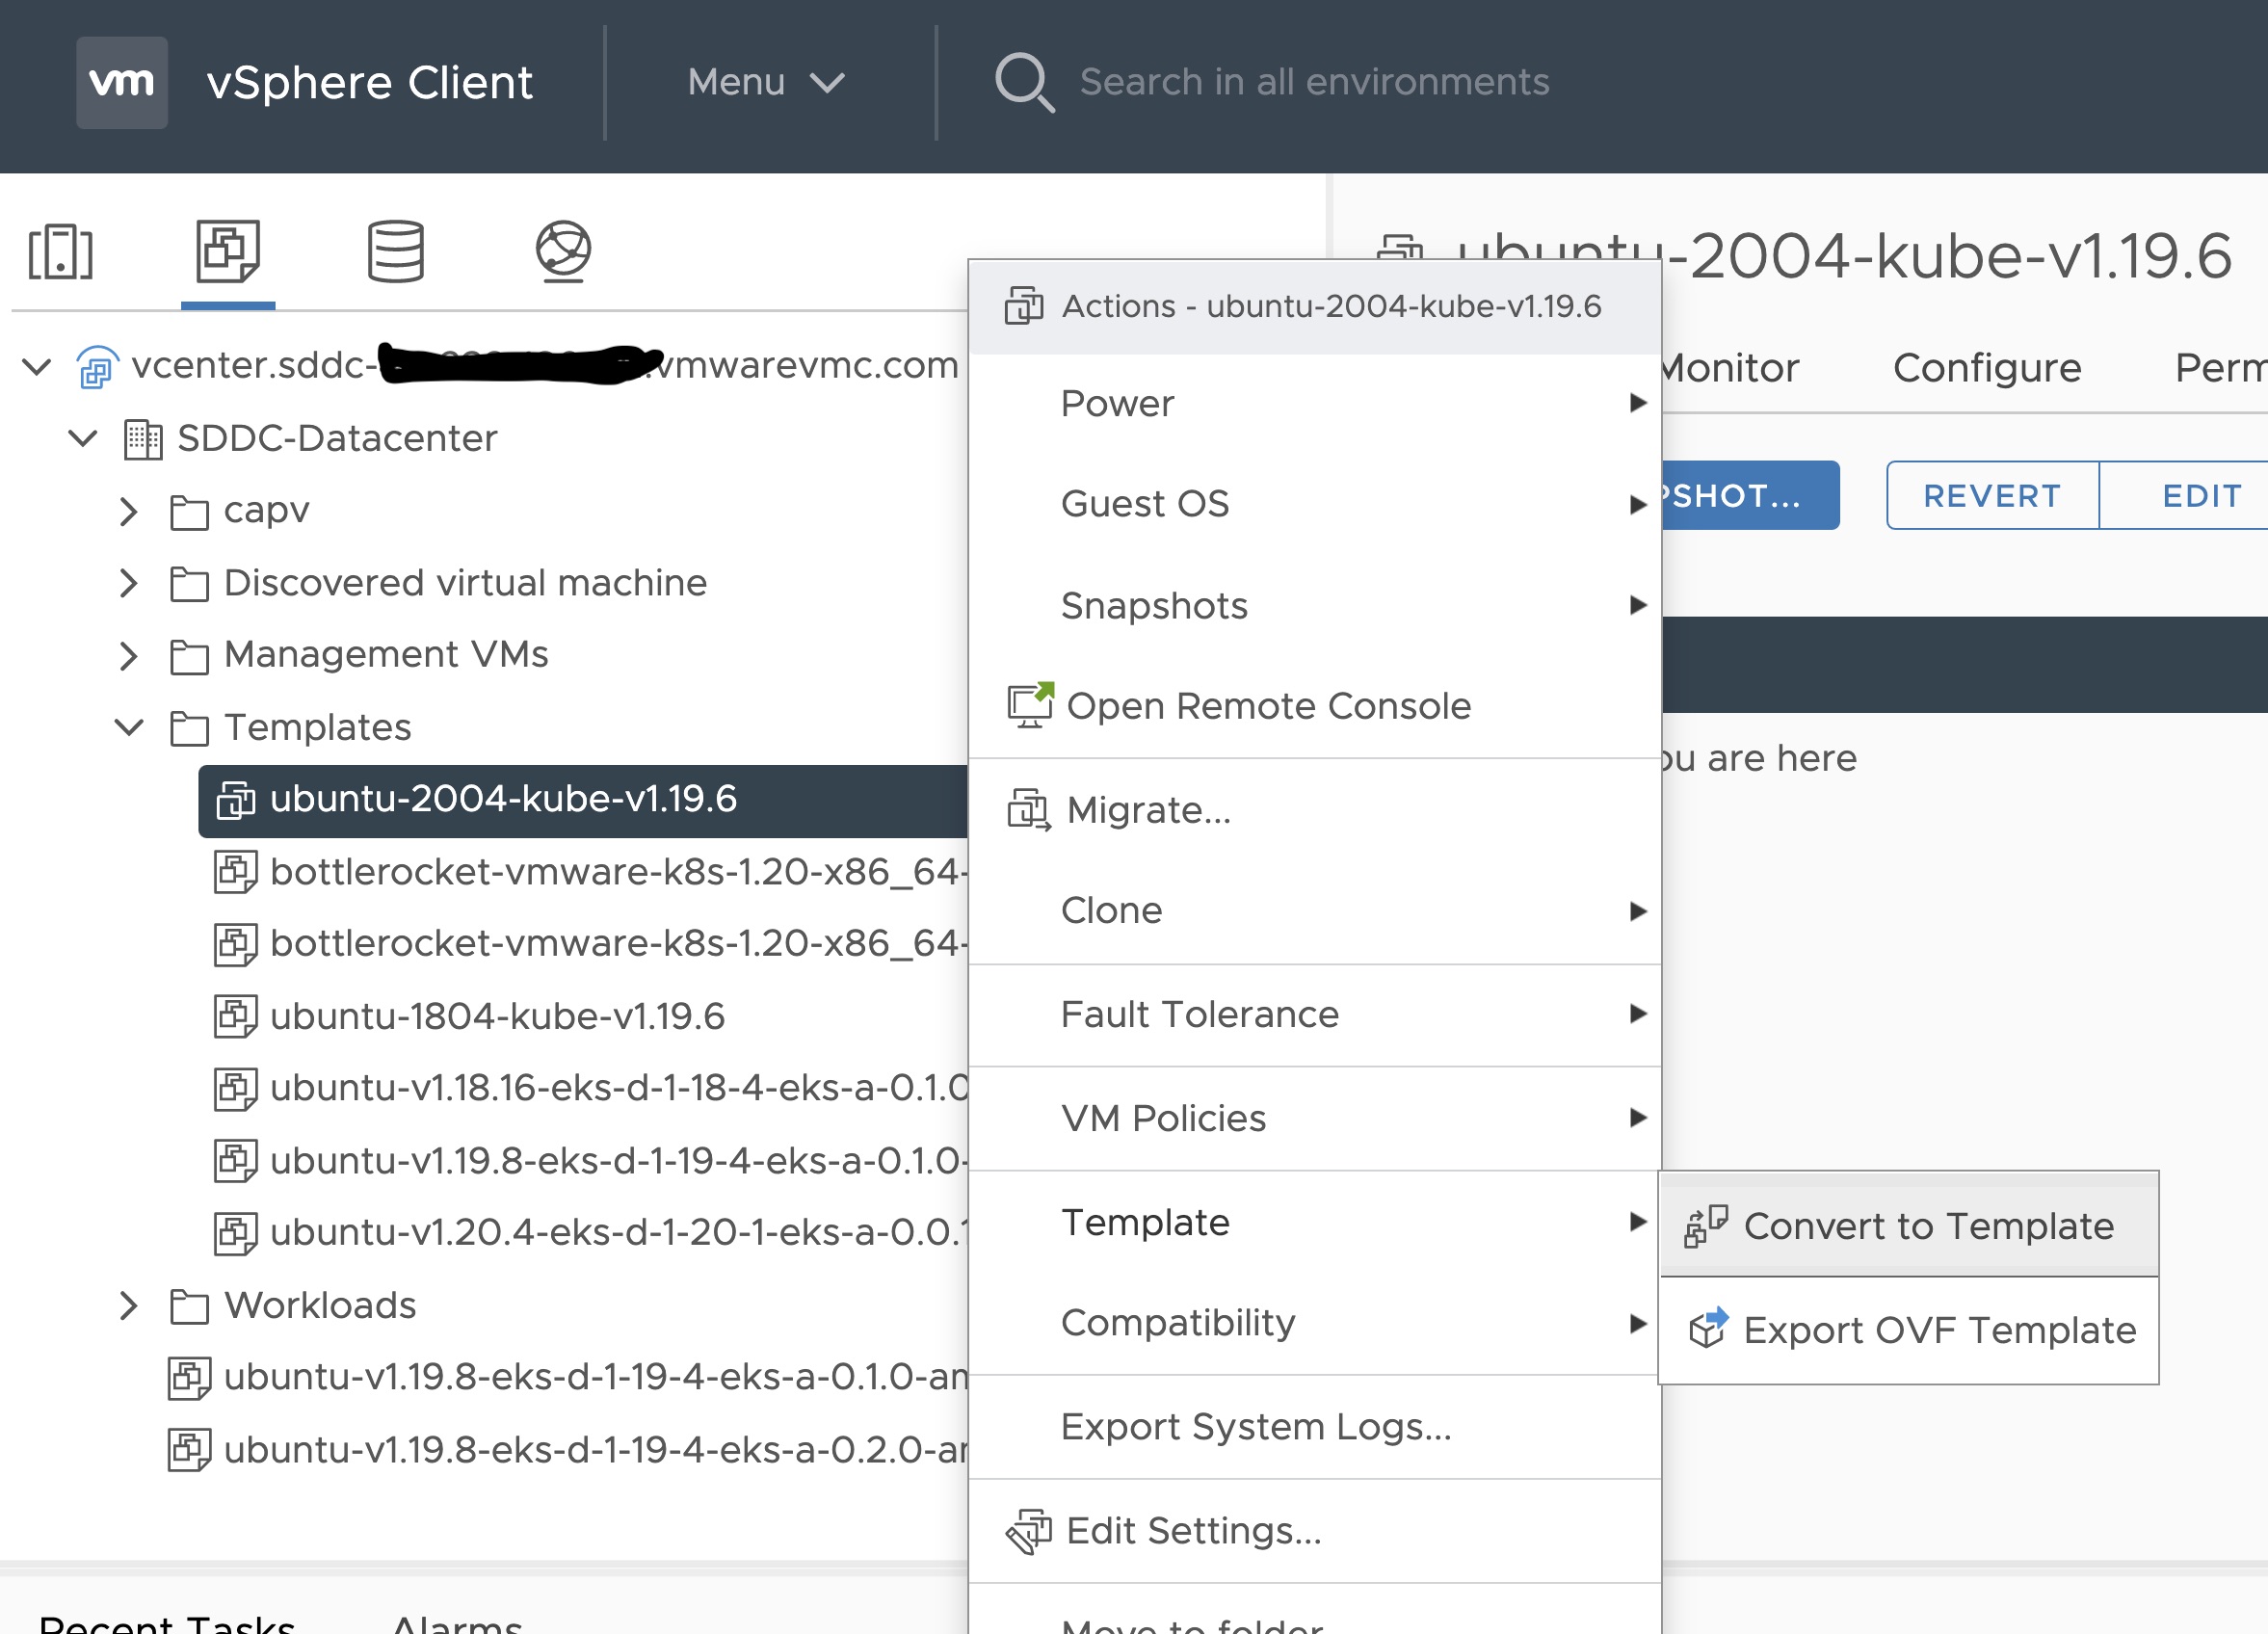
Steps to deploy a template using GOVC (CLI)
To deploy a template using govc, you must first ensure that you have
GOVC installed
. You need to set and export three
environment variables to run govc GOVC_USERNAME, GOVC_PASSWORD and GOVC_URL.
-
Import the template to a content library in vCenter using URL or selecting a local OVA file
Using URL:
govc library.import -k -pull <library name> <URL for the OVA file>
Using a file from the local machine:
govc library.import <library name> <path to OVA file on local machine>
-
Deploy the template
govc library.deploy -pool <resource pool> -folder <folder location to deploy template> /<library name>/<template name> <name of new VM>
2a. If using Bottlerocket template for newer Kubernetes version than 1.21, resize disk 1 to 22G
govc vm.disk.change -vm <template name> -disk.label "Hard disk 1" -size 22G
2b. If using Bottlerocket template for Kubernetes version 1.21, resize disk 2 to 20G
govc vm.disk.change -vm <template name> -disk.label "Hard disk 2" -size 20G
-
Take a snapshot of the VM (It is highly recommended that you snapshot the VM. This will reduce the time it takes to provision machines
and cluster creation will be faster. If you prefer not to take snapshot, skip this step)
govc snapshot.create -vm ubuntu-2004-kube-v1.25.6 root
-
Mark the new VM as a template
govc vm.markastemplate <name of new VM>
Important Additional Steps to Tag the OVA
Using vCenter UI
Tag to indicate OS family
- Select the template that was newly created in the steps above and navigate to Summary -> Tags.
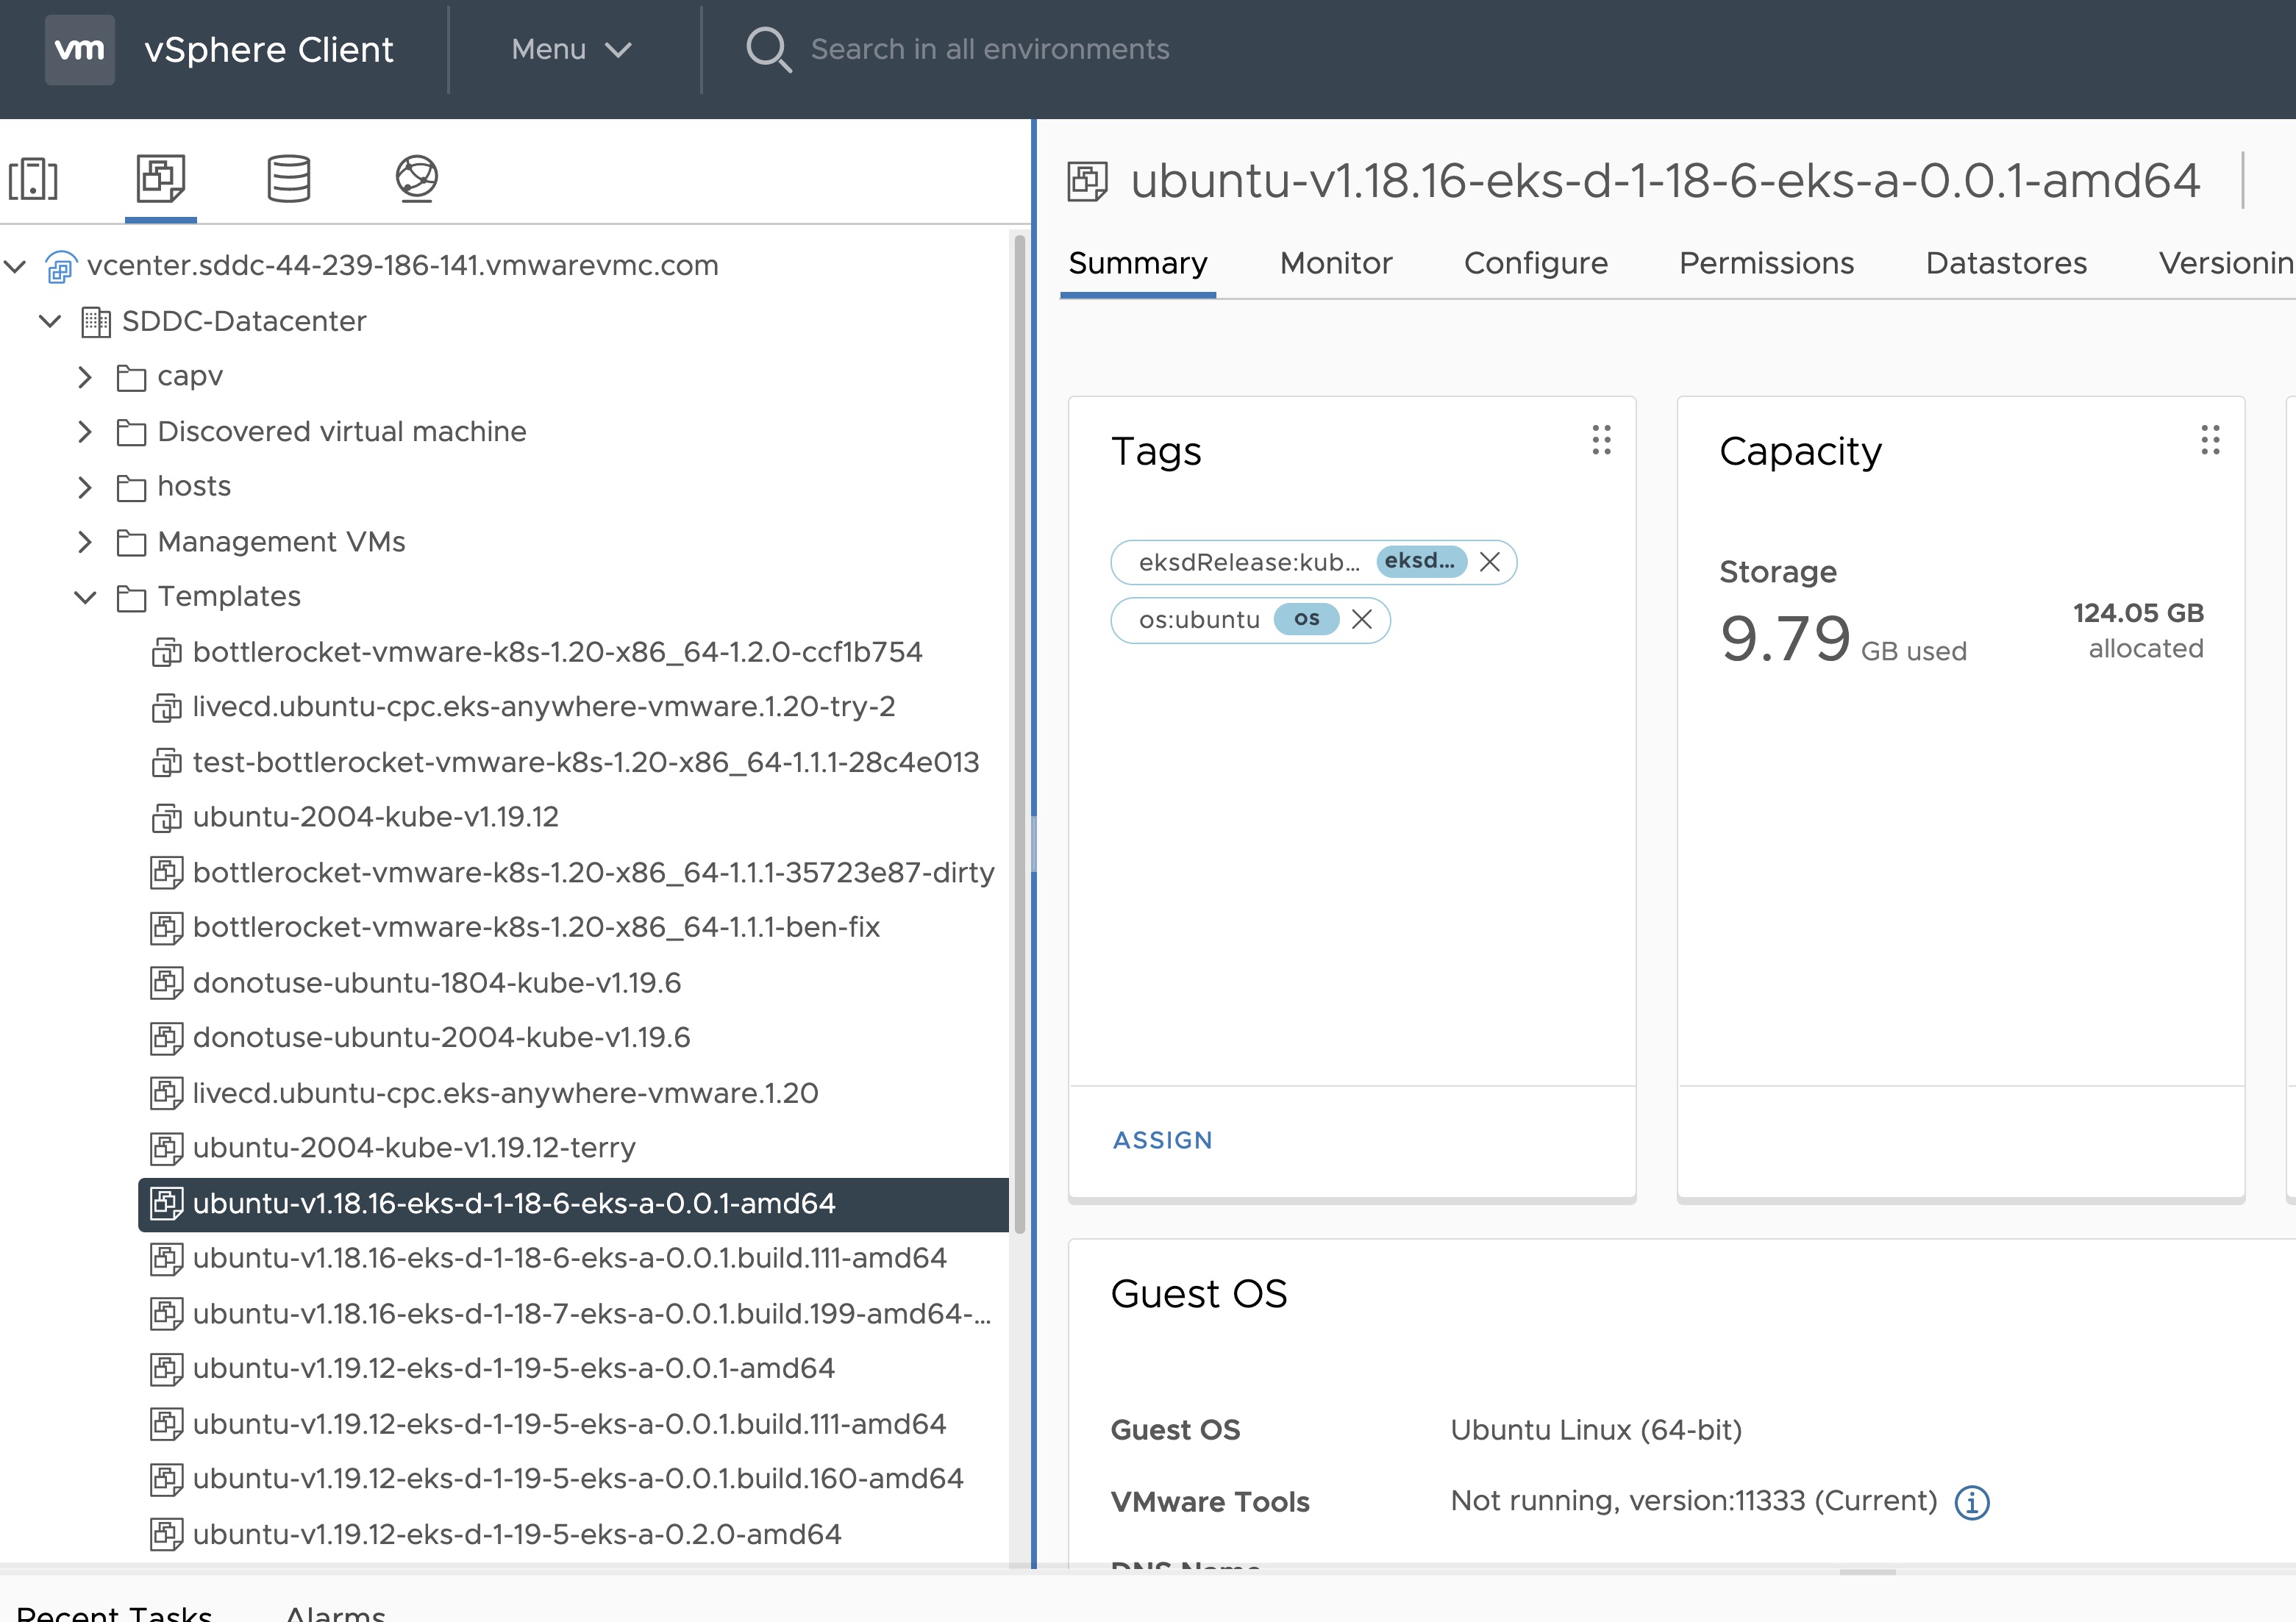
- Click Assign -> Add Tag to create a new tag and attach it
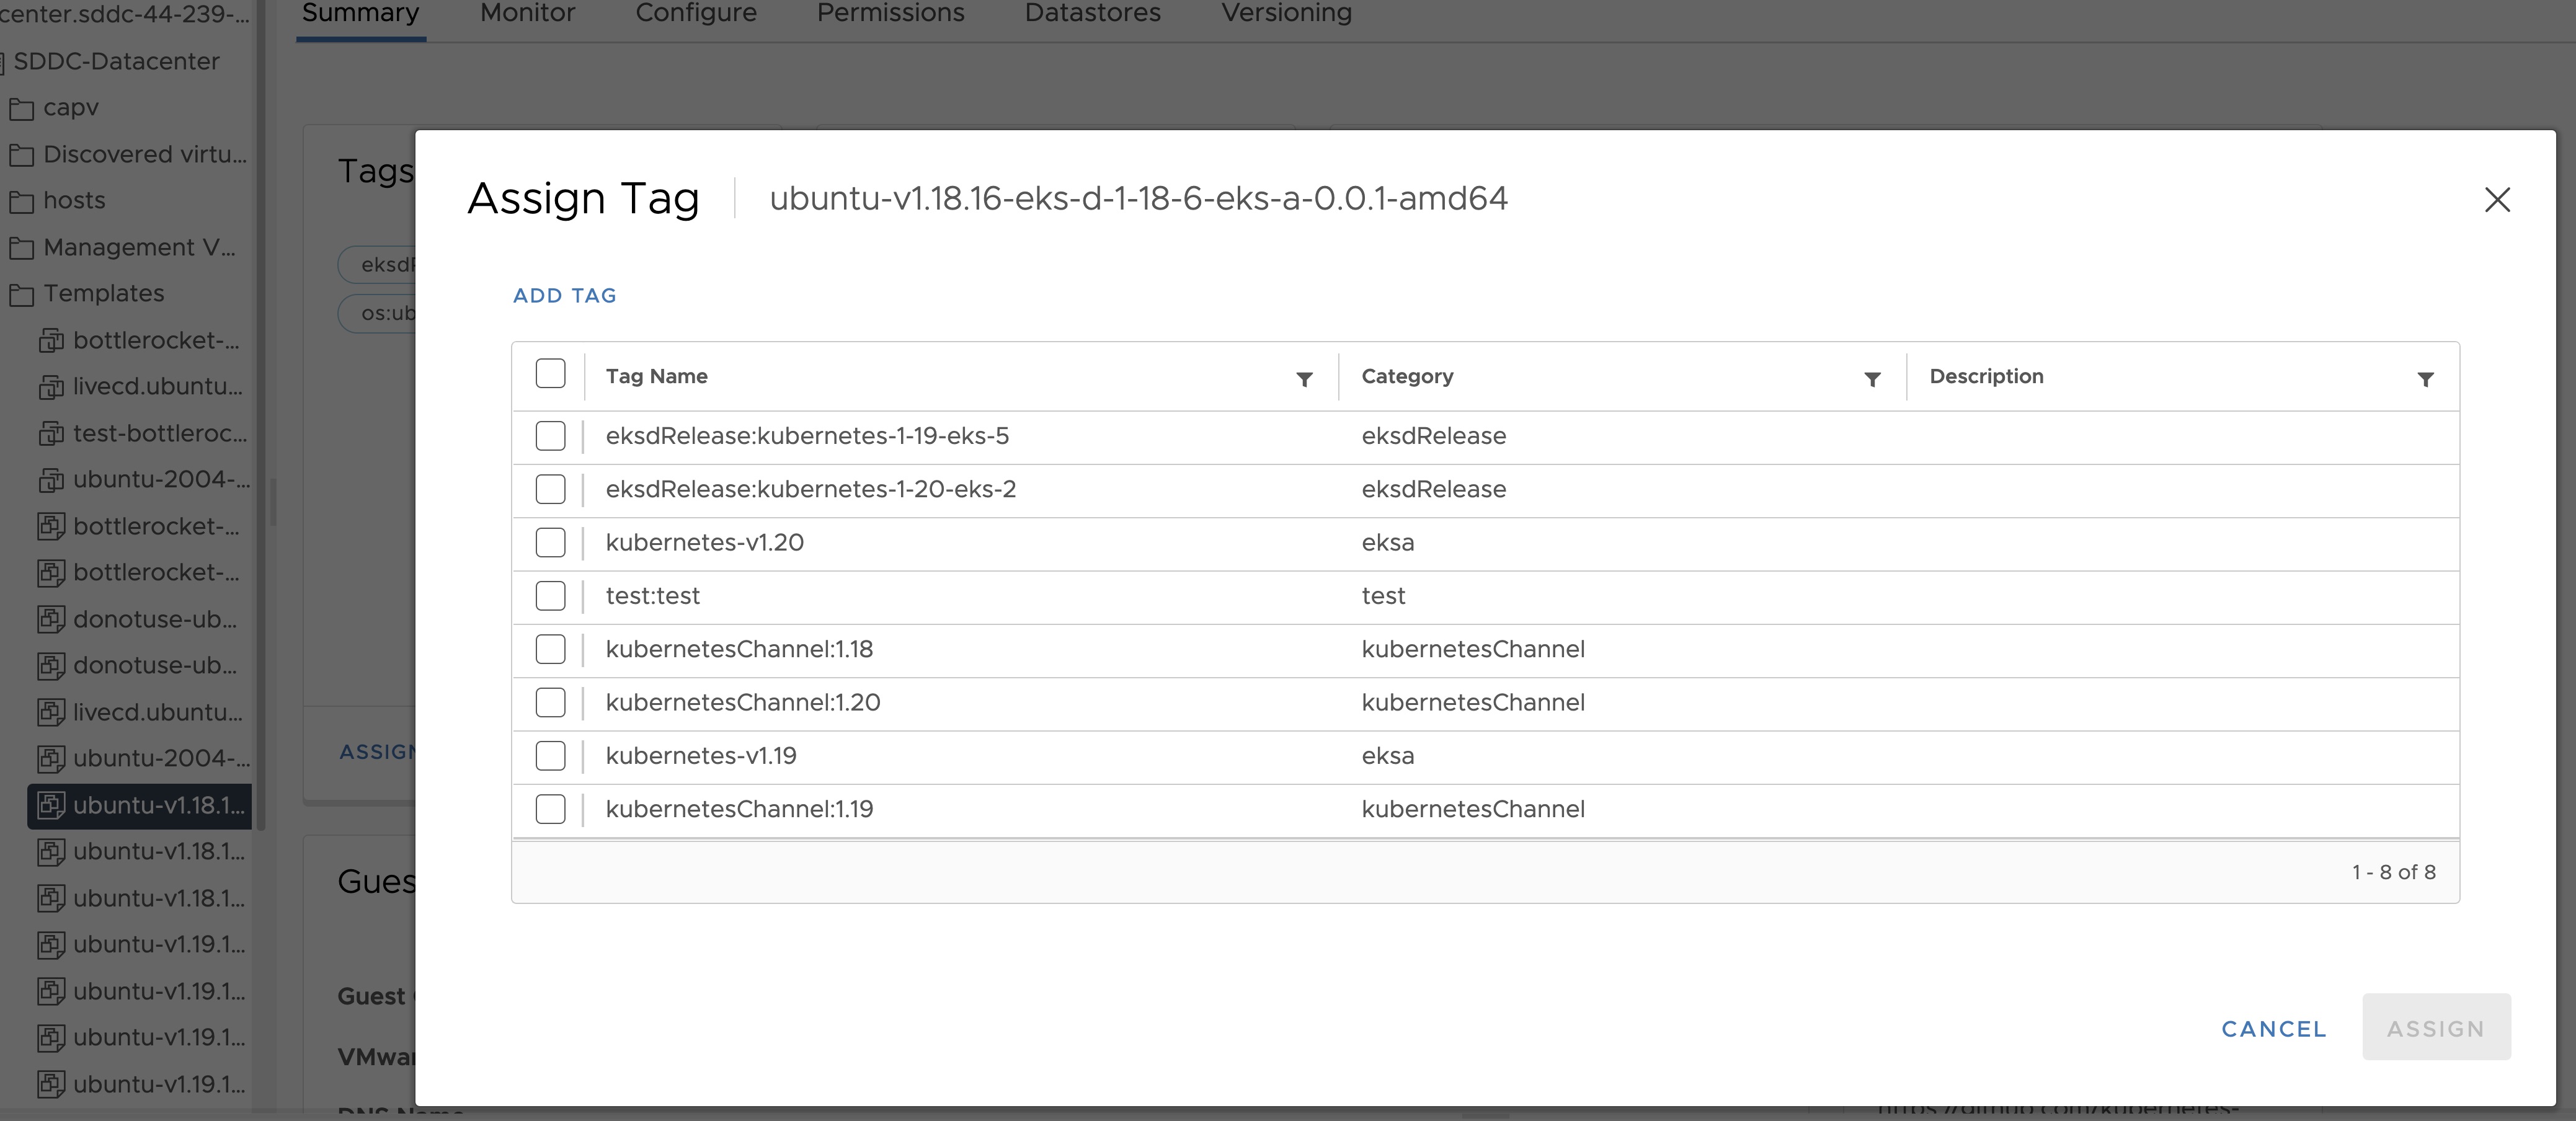
- Name the tag os:ubuntu or os:bottlerocket
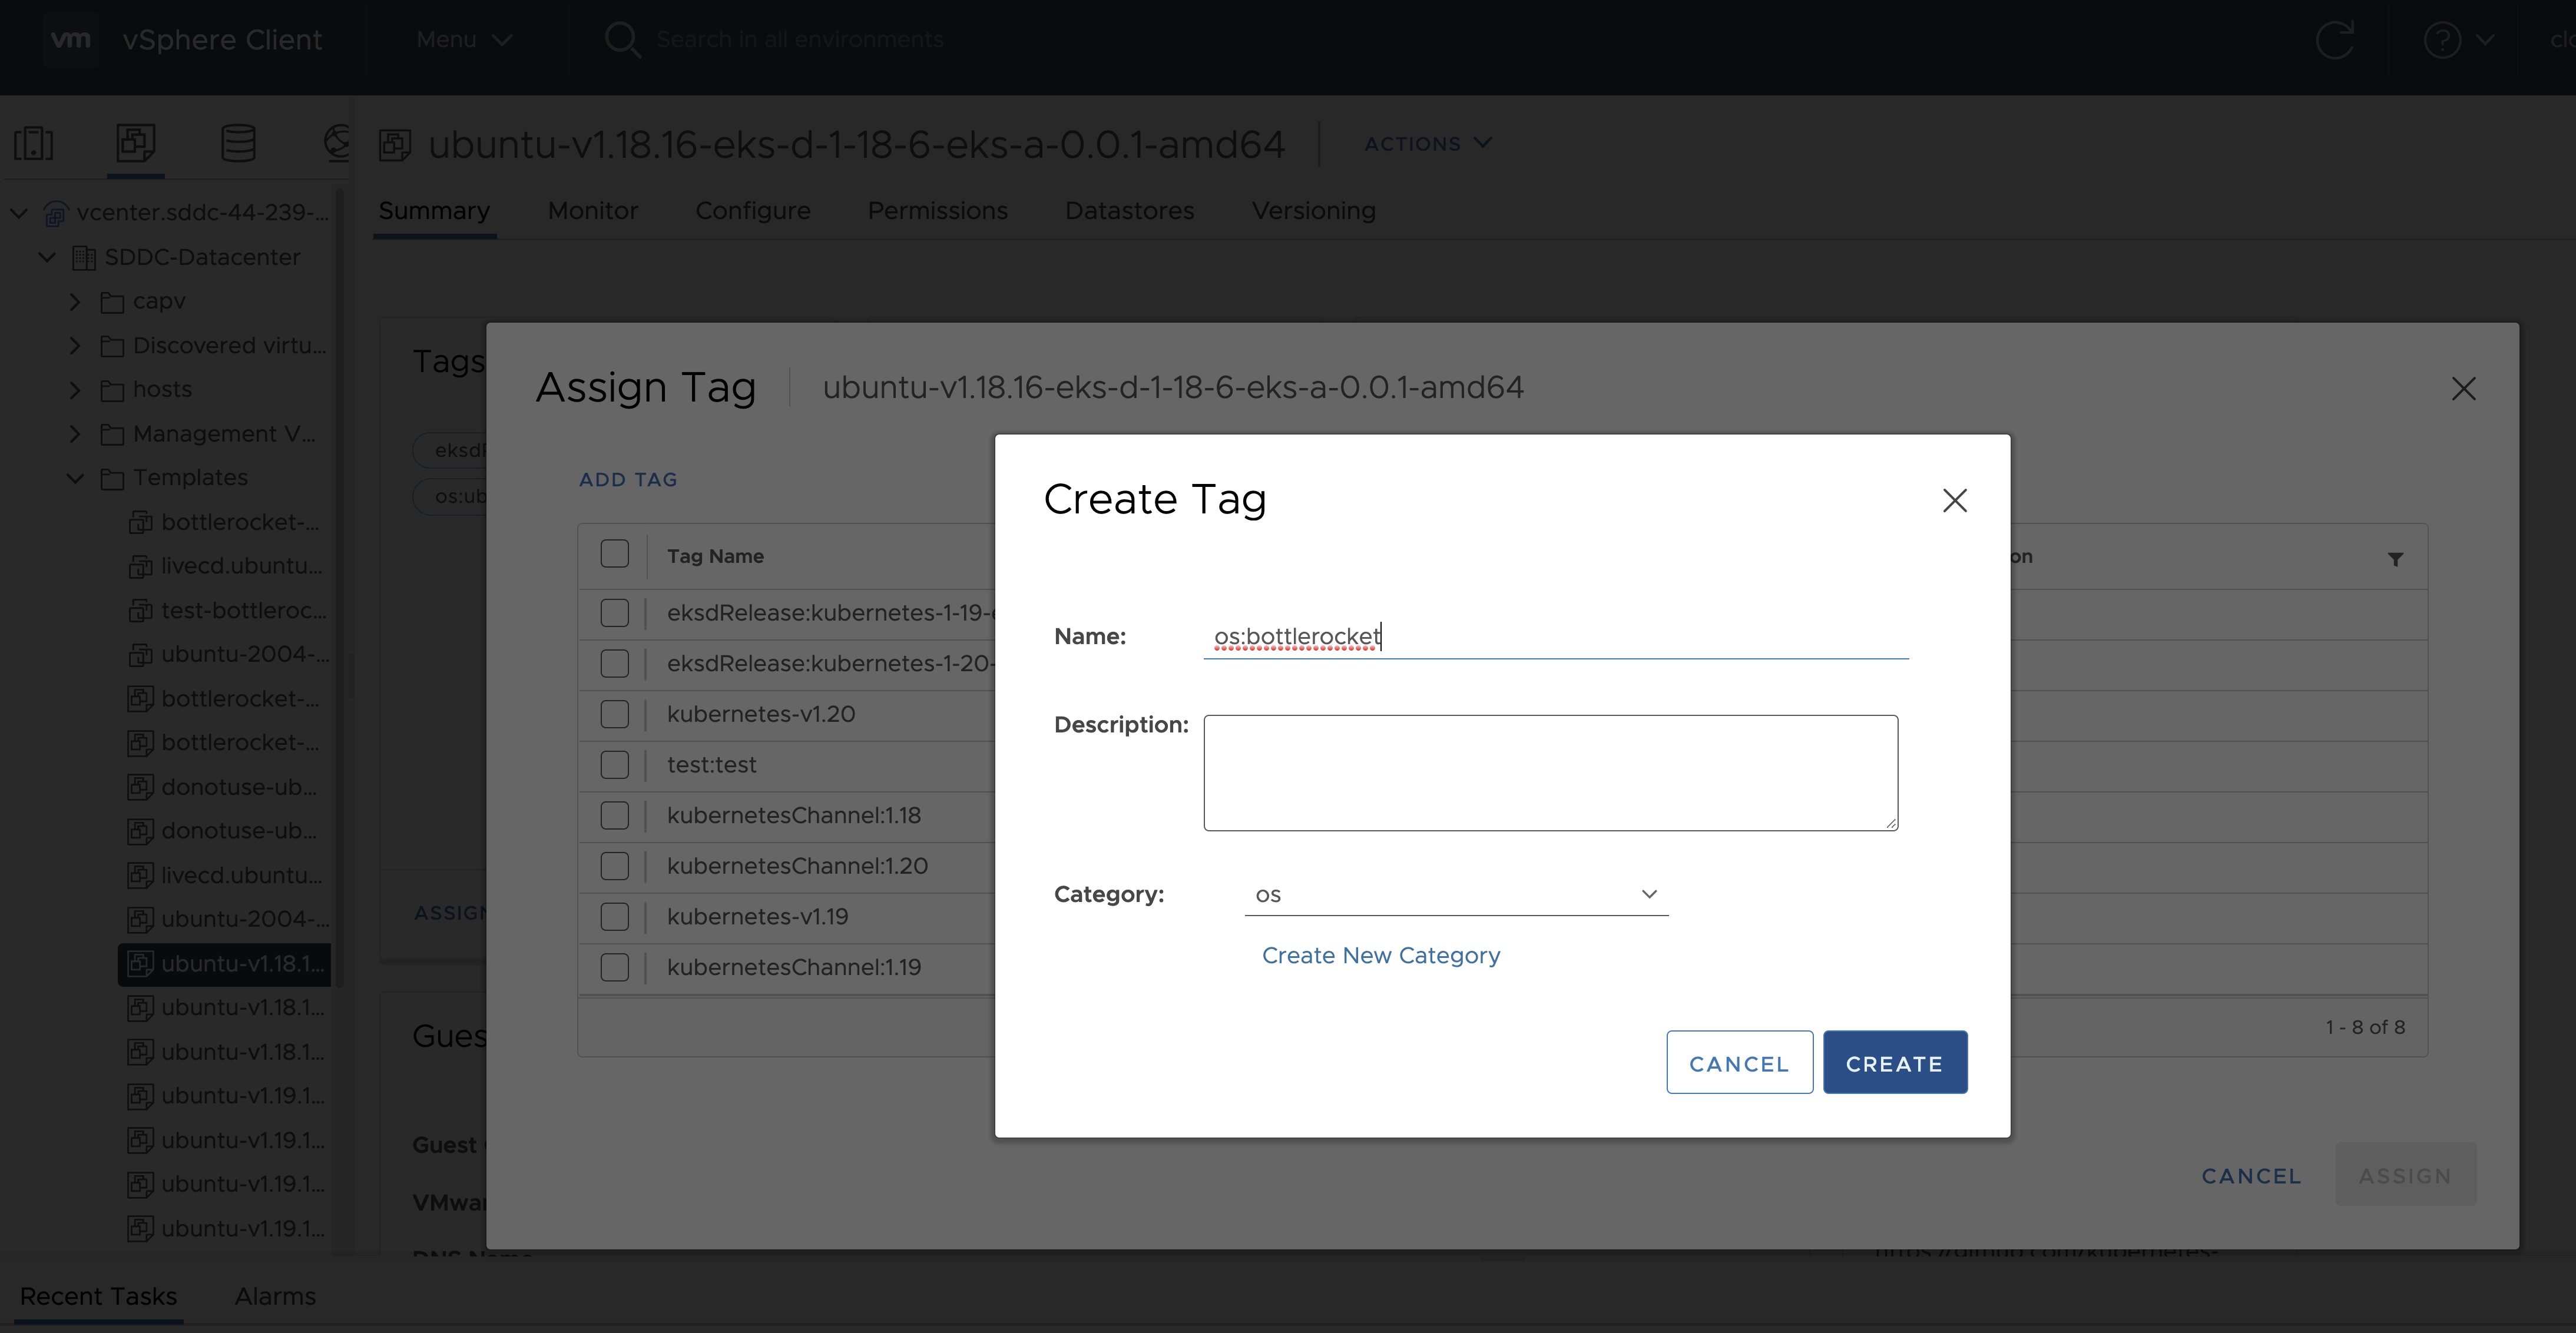
Tag to indicate eksd release
- Select the template that was newly created in the steps above and navigate to Summary -> Tags.
- Click Assign -> Add Tag to create a new tag and attach it
- Name the tag eksdRelease:{eksd release for the selected ova}, for example eksdRelease:kubernetes-1-25-eks-5 for the 1.25 ova. You can find the rest of eksd releases in the previous section
. If it’s the first time you add an
eksdRelease tag, you would need to create the category first. Click on “Create New Category” and name it eksdRelease.
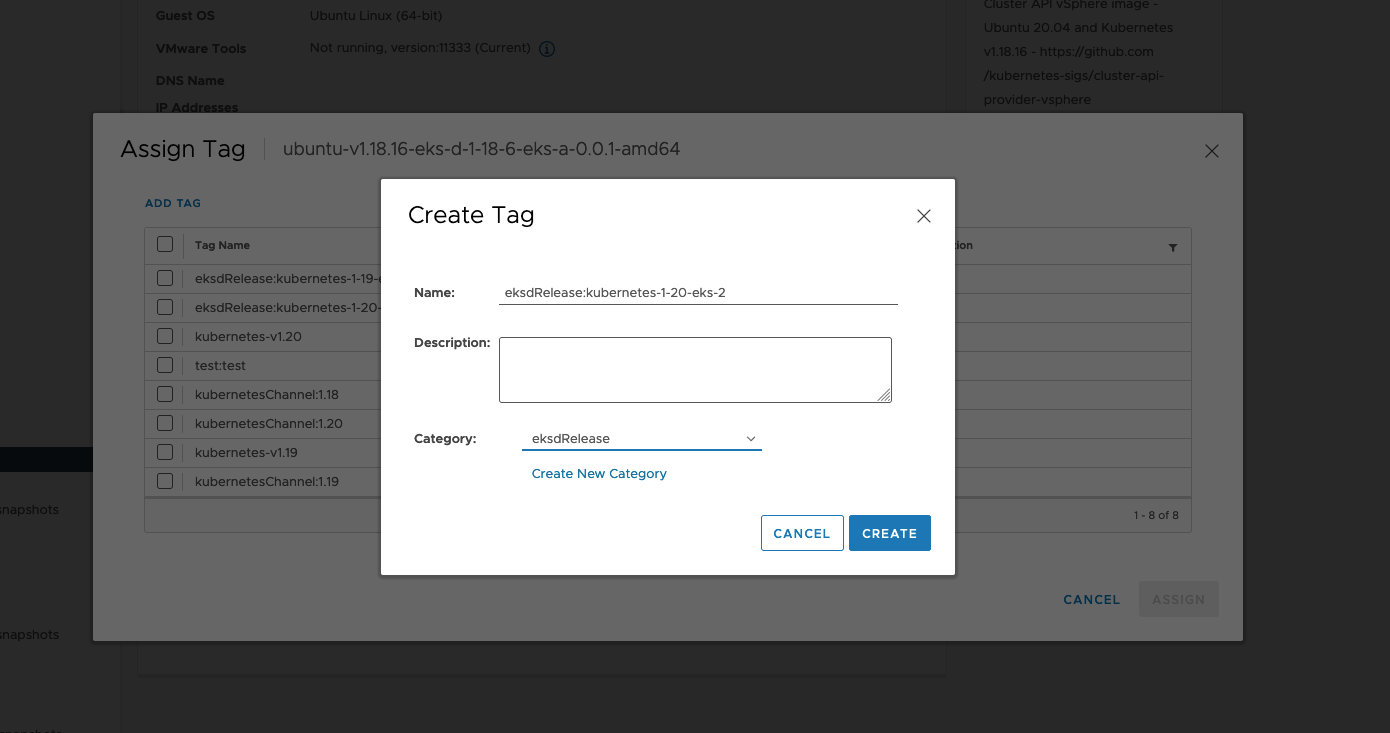
Using govc
Tag to indicate OS family
- Create tag category
govc tags.category.create -t VirtualMachine os
- Create tags os:ubuntu and os:bottlerocket
govc tags.create -c os os:bottlerocket
govc tags.create -c os os:ubuntu
- Attach newly created tag to the template
govc tags.attach os:bottlerocket <Template Path>
govc tags.attach os:ubuntu <Template Path>
- Verify tag is attached to the template
govc tags.ls <Template Path>
Tag to indicate eksd release
- Create tag category
govc tags.category.create -t VirtualMachine eksdRelease
- Create the proper eksd release Tag, depending on your template. You can find the eksd releases in the previous section
. For example eksdRelease:kubernetes-1-25-eks-5 for the 1.25 template.
govc tags.create -c eksdRelease eksdRelease:kubernetes-1-25-eks-5
- Attach newly created tag to the template
govc tags.attach eksdRelease:kubernetes-1-25-eks-5 <Template Path>
- Verify tag is attached to the template
govc tags.ls <Template Path>
Note
If the tags above are not applied as shown exactly, eks-a template validations will fail and CLI will abort
After you are done you can use the template for your workload cluster.
4.6.6.2 - Custom Ubuntu OVAs
Customizing Imported Ubuntu OVAs
There may be a need to make specific configuration changes on the imported ova template before using it to create/update EKS-A clusters.
Set up SSH Access for Imported OVA
SSH user and key need to be configured in order to allow SSH login to the VM template
Clone template to VM
Create an environment variable to hold the name of modified VM/template
export VM=<vm-name>
Clone the imported OVA template to create VM
govc vm.clone -on=false -vm=<full-path-to-imported-template> - folder=<full-path-to-folder-that-will-contain-the-VM> -ds=<datastore> $VM
Create a metadata.yaml file
instance-id: cloud-vm
local-hostname: cloud-vm
network:
  version: 2
  ethernets:
    nics:
      match:
        name: ens*
      dhcp4: yes
Create a userdata.yaml file
#cloud-config

users:
  - default
  - name: <username>
    primary_group: <username>
    sudo: ALL=(ALL) NOPASSWD:ALL
    groups: sudo, wheel
    ssh_import_id: None
    lock_passwd: true
    ssh_authorized_keys:
    - <user's ssh public key>
Export environment variable containing the cloud-init metadata and userdata
export METADATA=$(gzip -c9 <metadata.yaml | { base64 -w0 2>/dev/null || base64; }) \
       USERDATA=$(gzip -c9 <userdata.yaml | { base64 -w0 2>/dev/null || base64; })
Assign metadata and userdata to VM’s guestinfo
govc vm.change -vm "${VM}" \
  -e guestinfo.metadata="${METADATA}" \
  -e guestinfo.metadata.encoding="gzip+base64" \
  -e guestinfo.userdata="${USERDATA}" \
  -e guestinfo.userdata.encoding="gzip+base64"
Power the VM on
govc vm.power -on “$VM”
Customize the VM
Once the VM is powered on and fetches an IP address, ssh into the VM using your private key corresponding to the public key specified in userdata.yaml
ssh -i <private-key-file> username@<VM-IP>
At this point, you can make the desired configuration changes on the VM. The following sections describe some of the things you may want to do:
Add a Certificate Authority
Copy your CA certificate under /usr/local/share/ca-certificates and run sudo update-ca-certificates which will place the certificate under the /etc/ssl/certs directory.
Add Authentication Credentials for a Private Registry
If /etc/containerd/config.toml is not present initially, the default configuration can be generated by running the containerd config default > /etc/containerd/config.toml command. To configure a credential for a specific registry, create/modify the /etc/containerd/config.toml as follows:
# explicitly use v2 config format
version = 2

# The registry host has to be a domain name or IP. Port number is also
# needed if the default HTTPS or HTTP port is not used.
[plugins."io.containerd.grpc.v1.cri".registry.configs."registry1-host:port".auth]
  username = ""
  password = ""
  auth = ""
  identitytoken = ""
 # The registry host has to be a domain name or IP. Port number is also
 # needed if the default HTTPS or HTTP port is not used.
[plugins."io.containerd.grpc.v1.cri".registry.configs."registry2-host:port".auth]
  username = ""
  password = ""
  auth = ""
  identitytoken = ""
Restart containerd service with the sudo systemctl restart containerd command.
Convert VM to a Template
After you have customized the VM, you need to convert it to a template.
Cleanup the machine and power off the VM
This step is needed because of a known issue in Ubuntu
which results in the clone VMs getting the same DHCP IP
sudo su
echo -n > /etc/machine-id
rm /var/lib/dbus/machine-id
ln -s /etc/machine-id /var/lib/dbus/machine-id
cloud-init clean -l --machine-id
Delete the hostname from file
/etc/hostname
Delete the networking config file
rm -rf /etc/netplan/50-cloud-init.yaml
Edit the cloud init config to turn preserve_hostname to false
vi /etc/cloud/cloud.cfg
Power the VM down
govc vm.power -off "$VM"
Take a snapshot of the VM
It is recommended to take a snapshot of the VM as it reduces the provisioning time for the machines and makes cluster creation faster.
If you do snapshot the VM, you will not be able to customize the disk size of your cluster VMs. If you prefer not to take a snapshot, skip this step.
govc snapshot.create -vm "$VM" root
Convert VM to template
govc vm.markastemplate $VM
Tag the template appropriately as described here
Use this customized template to create/upgrade EKS Anywhere clusters
4.6.7 -
- vCenter endpoint (must be accessible to EKS Anywhere clusters)
- public.ecr.aws
- anywhere-assets.eks.amazonaws.com (to download the EKS Anywhere binaries, manifests and OVAs)
- distro.eks.amazonaws.com (to download EKS Distro binaries and manifests)
- d2glxqk2uabbnd.cloudfront.net (for EKS Anywhere and EKS Distro ECR container images)
- api.ecr.us-west-2.amazonaws.com (for EKS Anywhere package authentication matching your region)
- d5l0dvt14r5h8.cloudfront.net (for EKS Anywhere package ECR container images)
- api.github.com (only if GitOps is enabled)
- sts.amazonaws.com (only if AWS IAM Authenticator is enabled)
4.7 - Create Bare Metal cluster
Create an EKS Anywhere cluster on Bare Metal
4.7.1 - Overview
Overview of EKS Anywhere cluster creation on bare metal
The following diagram illustrates what happens when you create an EKS Anywhere cluster on bare metal. You can run EKS Anywhere on bare metal as a single node cluster with the Kubernetes control plane and workloads co-located on a single server, as a multi-node cluster with the Kubernetes control plane and workloads co-located on the same servers, and as a multi-node cluster with the Kubernetes control plane and worker nodes on different, dedicated servers.
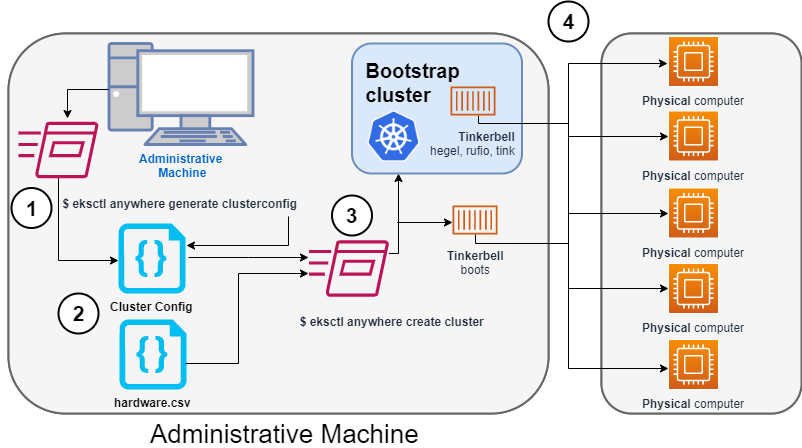
Identify the provider (--provider tinkerbell) and the cluster name to the eksctl anywhere generate clusterconfig command and direct the output into a cluster config .yaml file.
2. Modify the config file and hardware CSV file
Modify the generated cluster config file to suit your situation.
Details about this config file are contained on the Bare Metal Config
page.
Create a hardware configuration file (hardware.csv) as described in Prepare hardware inventory
.
3. Launch the cluster creation
Run the eksctl anywhere create cluster command, providing the cluster config and hardware CSV files.
To see details on the cluster creation process, increase verbosity (-v=9 provides maximum verbosity).
4. Create bootstrap cluster and provision hardware
The cluster creation process starts by creating a temporary Kubernetes bootstrap cluster on the Administrative machine.
Containerized components of the Tinkerbell provisioner run either as pods on the bootstrap cluster (Hegel, Rufio, and Tink) or directly as containers on Docker (Boots).
Those Tinkerbell components drive the provisioning of the operating systems and Kubernetes components on each of the physical computers.
With the information gathered from the cluster specification and the hardware CSV file, three custom resource definitions (CRDs) are created.
These include:
- Hardware custom resources: Which store hardware information for each machine
- Template custom resources: Which store the tasks and actions
- Workflow custom resources: Which put together the complete hardware and template information for each machine. There are different workflows for control plane and worker nodes.
As the bootstrap cluster comes up and Tinkerbell components are started, you should see messages like the following:
$ eksctl anywhere create cluster --hardware-csv hardware.csv -f eksa-mgmt-cluster.yaml
Performing setup and validations
Tinkerbell Provider setup is valid
Validate certificate for registry mirror
Create preflight validations pass
Creating new bootstrap cluster
Provider specific pre-capi-install-setup on bootstrap cluster
Installing cluster-api providers on bootstrap cluster
Provider specific post-setup
Creating new workload cluster
At this point, Tinkerbell will try to boot up the machines in the target cluster.
Continuing cluster creation
Tinkerbell takes over the activities for creating provisioning the Bare Metal machines to become the new target cluster.
See Overview of Tinkerbell in EKS Anywhere
for examples of commands you can run to watch over this process.
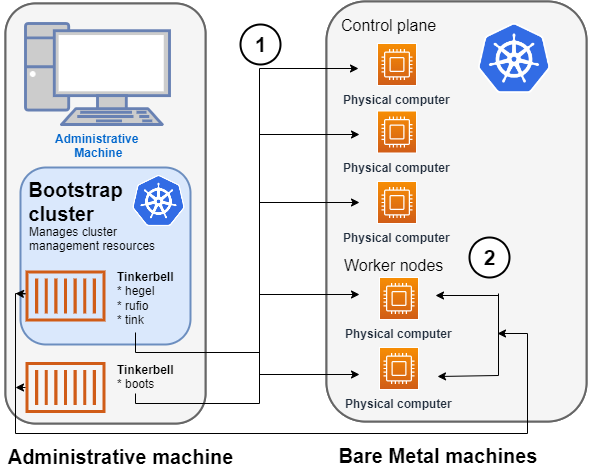
- Rufio uses BMC information to set the power state for the first control plane node it wants to provision.
- When the node boots from its NIC, it talks to the Boots DHCP server, which fetches the kernel and initramfs (HookOS) needed to network boot the machine.
- With HookOS running on the node, the operating system identified by
IMG_URL in the cluster specification is copied to the identified DEST_DISK on the machine.
- The Hegel components provides data stores that contain information used by services such as cloud-init to configure each system.
- Next, the workflow is run on the first control plane node, followed by network booting and running the workflow for each subsequent control plane node.
- Once the control plane is up, worker nodes are network booted and workflows are run to deploy each node.
2. Tinkerbell components move to the target cluster
Once all the defined nodes are added to the cluster, the Tinkerbell components and associated data are moved to run as pods on worker nodes in the new workload cluster.
Deleting Tinkerbell from Admin machine
All Tinkerbell-related pods and containers are then deleted from the Admin machine.
Further management of tinkerbell and related information can be done using from the new cluster, using tools such as kubectl.
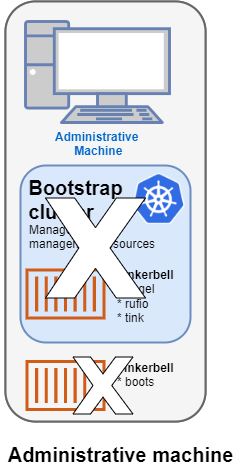
Using Tinkerbell on EKS Anywhere
The sections below step through how Tinkerbell is integrated with EKS Anywhere to deploy a Bare Metal cluster.
While based on features described in Tinkerbell Documentation
,
EKS Anywhere has modified and added to Tinkerbell components such that the entire Tinkerbell stack is now Kubernetes-friendly and can run on a Kubernetes cluster.
The information that Tinkerbell uses to provision machines for the target EKS Anywhere cluster needs to be gathered in a CSV file with the following format:
hostname,bmc_ip,bmc_username,bmc_password,mac,ip_address,netmask,gateway,nameservers,labels,disk
eksa-cp01,10.10.44.1,root,PrZ8W93i,CC:48:3A:00:00:01,10.10.50.2,255.255.254.0,10.10.50.1,8.8.8.8,type=cp,/dev/sda
...
Each physical, bare metal machine is represented by a comma-separated list of information on a single line.
It includes information needed to identify each machine (the NIC’s MAC address), network boot the machine, point to the disk to install on, and then configure and start the installed system.
See Preparing hardware inventory
for details on the content and format of that file.
Modify the cluster specification file
Before you create a cluster using the Bare Metal configuration file, you can make Tinkerbell-related changes to that file.
In particular, TinkerbellDatacenterConfig fields, TinkerbellMachineConfig fields, and Tinkerbell Actions
can be added or modified.
Tinkerbell actions vary based on the operating system you choose for your EKS Anywhere cluster.
Actions are stored internally and not shown in the generated cluster specification file, so you must add those sections yourself to change from the defaults (see Ubuntu TinkerbellTemplateConfig example and Bottlerocket TinkerbellTemplateConfig example for details).
In most cases, you don’t need to touch the default actions.
However, you might want to modify an action (for example to change kexec to a reboot action if the hardware requires it) or add an action to further configure the installed system.
Examples in Advanced Bare Metal cluster configuration show a few actions you might want to add.
Once you have made all your modifications, you can go ahead and create the cluster.
The next section describes how Tinkerbell works during cluster creation to provision your Bare Metal machines and prepare them to join the EKS Anywhere cluster.
4.7.2 - Tinkerbell Concepts
Overview of Tinkerbell and network booting for EKS Anywhere on Bare Metal
NOTE: The Boots service has been renamed to Smee by the upstream Tinkerbell community. Any reference to Boots or Smee refer to the same service. The commands for the logs and
expected pods mentioned in this doc are still the proper commands to run.
EKS Anywhere uses Tinkerbell
to provision machines for a Bare Metal cluster.
Understanding what Tinkerbell is and how it works with EKS Anywhere can help you take advantage of advanced provisioning features or overcome provisioning problems you encounter.
As someone deploying an EKS Anywhere cluster on Bare Metal, you have several opportunities to interact with Tinkerbell:
- Create a hardware CSV file: You are required to create a hardware CSV file
that contains an entry for every physical machine you want to add at cluster creation time.
- Create an EKS Anywhere cluster: By modifying the Bare Metal configuration file
used to create a cluster, you can change some Tinkerbell settings or add actions to define how the operating system on each machine is configured.
- Monitor provisioning: You can follow along with the Tinkerbell Overview in this page to monitor the progress of your hardware provisioning, as Tinkerbell finds machines and attempts to network boot, configure, and restart them.
When you run the command to create an EKS Anywhere Bare Metal cluster, a set of Tinkerbell components start up on the Admin machine. One of these components runs in a container on Docker (Boots), while other components run as either controllers or services in pods on the Kubernetes kind
cluster that is started up on the Admin machine. Tinkerbell components include Boots, Hegel, Rufio, and Tink.
Tinkerbell Boots service (Smee service)
The Boots service runs in a single container to handle the DHCP service and network booting activities.
In particular, Boots hands out IP addresses, serves iPXE binaries via HTTP and TFTP, delivers an iPXE script to the provisioned machines, and runs a syslog server.
Boots is different from the other Tinkerbell services because the DHCP service it runs must listen directly to layer 2 traffic.
(The kind cluster running on the Admin machine doesn’t have the ability to have pods listening on layer 2 networks, which is why Boots is run directly on Docker instead, with host networking enabled.)
Because Boots is running as a container in Docker, you can see the output in the logs for the Boots container by running:
From the logs output, you will see iPXE try to network boot each machine.
If the process doesn’t get all the information it wants from the DHCP server, it will time out.
You can see iPXE loading variables, loading a kernel and initramfs (via DHCP), then booting into that kernel and initramfs: in other words, you will see everything that happens with iPXE before it switches over to the kernel and initramfs.
The kernel, initramfs, and all images retrieved later are obtained remotely over HTTP and HTTPS.
Tinkerbell Hegel, Rufio, and Tink components
After Boots comes up on Docker, a small Kubernetes kind cluster starts up on the Admin machine.
Other Tinkerbell components run as pods on that kind cluster. Those components include:
- Hegel: Manages Tinkerbell’s metadata service.
The Hegel service gets its metadata from the hardware specification stored in Kubernetes in the form of custom resources.
The format that it serves is similar to an Ec2 metadata format.
- Rufio: Handles talking to BMCs (which manages things like starting and stopping systems with IPMI or Redfish).
The Rufio Kubernetes controller sets things such as power state, persistent boot order.
BMC authentication is managed with Kubernetes secrets.
- Tink: The Tink service consists of three components: Tink server, Tink controller, and Tink worker.
The Tink controller manages hardware data, templates you want to execute, and the workflows that each target specific hardware you are provisioning.
The Tink worker is a small binary that runs inside of HookOS and talks to the Tink server.
The worker sends the Tink server its MAC address and asks the server for workflows to run.
The Tink worker will then go through each action, one-by-one, and try to execute it.
To see those services and controllers running on the kind bootstrap cluster, type:
kubectl get pods -n eksa-system
NAME                                      READY STATUS    RESTARTS AGE
hegel-sbchp                               1/1   Running   0        3d
rufio-controller-manager-5dcc568c79-9kllz 1/1   Running   0        3d
tink-controller-manager-54dc786db6-tm2c5  1/1   Running   0        3d
tink-server-5c494445bc-986sl              1/1   Running   0        3d
Provisioning hardware with Tinkerbell
After you start up the cluster create process, the following is the general workflow that Tinkerbell performs to begin provisioning the bare metal machines and prepare them to become part of the EKS Anywhere target cluster.
You can set up kubectl on the Admin machine to access the bootstrap cluster and follow along:
export KUBECONFIG=${PWD}/${CLUSTER_NAME}/generated/${CLUSTER_NAME}.kind.kubeconfig
Power up the nodes
Tinkerbell starts by finding a node from the hardware list (based on MAC address) and contacting it to identify a baseboard management job (job.bmc) that runs a set of baseboard management tasks (task.bmc).
To see that information, type:
NAMESPACE    NAME                                           AGE
eksa-system  mycluster-md-0-1656099863422-vxvh2-provision   12m
NAMESPACE    NAME                                                AGE
eksa-system  mycluster-md-0-1656099863422-vxh2-provision-task-0  55s
eksa-system  mycluster-md-0-1656099863422-vxh2-provision-task-1  51s
eksa-system  mycluster-md-0-1656099863422-vxh2-provision-task-2  47s
The following shows snippets from the tasks.bmc output that represent the three tasks: Power Off, enable network boot, and Power On.
kubectl describe tasks.bmc -n eksa-system mycluster-md-0-1656099863422-vxh2-provision-task-0
...
  Task:
    Power Action:  Off
Status:
  Completion Time:   2022-06-27T20:32:59Z
  Conditions:
    Status:    True
    Type:      Completed
kubectl describe tasks.bmc -n eksa-system mycluster-md-0-1656099863422-vxh2-provision-task-1
...
  Task:
    One Time Boot Device Action:
      Device:
        pxe
      Efi Boot:  true
Status:
  Completion Time:   2022-06-27T20:33:04Z
  Conditions:
    Status:    True
    Type:      Completed
kubectl describe tasks.bmc -n eksa-system mycluster-md-0-1656099863422-vxh2-provision-task-2
  Task:
    Power Action:  on
Status:
  Completion Time:   2022-06-27T20:33:10Z
  Conditions:
    Status:    True
    Type:      Completed
Rufio converts the baseboard management jobs into task objects, then goes ahead and executes each task. To see Rufio logs, type:
kubectl logs -n eksa-system rufio-controller-manager-5dcc568c79-9kllz | less
Network booting the nodes
Next the Boots service netboots the machine and begins streaming the HookOS (vmlinuz and initramfs) to the machine.
HookOS runs in memory and provides the installation environment.
To watch the Boots log messages as each node powers up, type:
You can search the output for vmlinuz and initramfs to watch as the HookOS is downloaded and booted from memory on each machine.
Running workflows
Once the HookOS is up, Tinkerbell begins running the tasks and actions contained in the workflows.
This is coordinated between the Tink worker, running in memory within the HookOS on the machine, and the Tink server on the kind cluster.
To see the workflows being run, type the following:
kubectl get workflows.tinkerbell.org -n eksa-system
NAME                                TEMPLATE                            STATE
mycluster-md-0-1656099863422-vxh2   mycluster-md-0-1656099863422-vxh2   STATE_RUNNING
This shows the workflow for the first machine that is being provisioned.
Add -o yaml to see details of that workflow template:
kubectl get workflows.tinkerbell.org -n eksa-system -o yaml
...
status:
  state: STATE_RUNNING
  tasks:
  - actions
    - environment:
        COMPRESSED: "true"
        DEST_DISK: /dev/sda
        IMG_URL: https://anywhere-assets.eks.amazonaws.com/releases/bundles/11/artifacts/raw/1-22/bottlerocket-v1.22.10-eks-d-1-22-8-eks-a-11-amd64.img.gz
      image: public.ecr.aws/eks-anywhere/tinkerbell/actions/image2disk:6c0f0d437bde2c836d90b000312c8b25fa1b65e1-eks-a-15
      name: stream-image
      seconds: 35
      startedAt: "2022-06-27T20:37:39Z"
      status: STATE_SUCCESS
...
You can see that the first action in the workflow is to stream (stream-image) the operating system to the destination disk (DEST_DISK) on the machine.
In this example, the Bottlerocket operating system that will be copied to disk (/dev/sda) is being served from the location specified by IMG_URL.
The action was successful (STATE_SUCCESS) and it took 35 seconds.
Each action and its status is shown in this output for the whole workflow.
To see details of the default actions for each supported operating system, see the Ubuntu TinkerbellTemplateConfig example and Bottlerocket TinkerbellTemplateConfig example.
In general, the actions include:
- Streaming the operating system image to disk on each machine.
- Configuring the network interfaces on each machine.
- Setting up the cloud-init or similar service to add users and otherwise configure the system.
- Identifying the data source to add to the system.
- Setting the kernel to pivot to the installed system (using kexec) or having the system reboot to bring up the installed system from disk.
If all goes well, you will see all actions set to STATE_SUCCESS, except for the kexec-image action. That should show as STATE_RUNNING for as long as the machine is running.
You can review the CAPT logs to see provisioning activity.
For example, at the start of a new provisioning event, you would see something like the following:
kubectl logs -n capt-system capt-controller-manager-9f8b95b-frbq | less
..."Created BMCJob to get hardware ready for provisioning"...
You can follow this output to see the machine as it goes through the provisioning process.
After the node is initialized, completes all the Tinkerbell actions, and is booted into the installed operating system (Ubuntu or Bottlerocket), the new system starts cloud-init to do further configuration.
At this point, the system will reach out to the Tinkerbell Hegel service to get its metadata.
If something goes wrong, viewing Hegel files can help you understand why a stuck system that has booted into Ubuntu or Bottlerocket has not joined the cluster yet.
To see the Hegel logs, get the internal IP address for one of the new nodes. Then check for the names of Hegel logs and display the contents of one of those logs, searching for the IP address of the node:
kubectl get nodes -o wide
NAME        STATUS   ROLES                 AGE    VERSION               INTERNAL-IP    ...
eksa-da04   Ready    control-plane,master  9m5s   v1.22.10-eks-7dc61e8  10.80.30.23
kubectl get pods -n eksa-system | grep hegel
hegel-n7ngs
kubectl logs -n eksa-system hegel-n7ngs
..."Retrieved IP peer IP..."userIP":"10.80.30.23...
If the log shows you are getting requests from the node, the problem is not a cloud-init issue.
After the first machine successfully completes the workflow, each other machine repeats the same process until the initial set of machines is all up and running.
Tinkerbell moves to target cluster
Once the initial set of machines is up and the EKS Anywhere cluster is running, all the Tinkerbell services and components (including Boots) are moved to the new target cluster and run as pods on that cluster.
Those services are deleted on the kind cluster on the Admin machine.
Reviewing the status
At this point, you can change your kubectl credentials to point at the new target cluster to get information about Tinkerbell services on the new cluster. For example:
export KUBECONFIG=${PWD}/${CLUSTER_NAME}/${CLUSTER_NAME}-eks-a-cluster.kubeconfig
First check that the Tinkerbell pods are all running by listing pods from the eksa-system namespace:
kubectl get pods -n eksa-system
NAME                                        READY   STATUS    RESTARTS   AGE
smee-5dc66b5d4-klhmj                       1/1     Running   0          3d
hegel-sbchp                                 1/1     Running   0          3d
rufio-controller-manager-5dcc568c79-9kllz   1/1     Running   0          3d
tink-controller-manager-54dc786db6-tm2c5    1/1     Running   0          3d
tink-server-5c494445bc-986sl                1/1     Running   0          3d
Next, check the list of Tinkerbell machines.
If all of the machines were provisioned successfully, you should see true under the READY column for each one.
kubectl get tinkerbellmachine -A
NAMESPACE    NAME                                                   CLUSTER    STATE  READY  INSTANCEID                          MACHINE
eksa-system  mycluster-control-plane-template-1656099863422-pqq2q   mycluster         true   tinkerbell://eksa-system/eksa-da04  mycluster-72p72
You can also check the machines themselves.
Watch the PHASE change from Provisioning to Provisioned to Running.
The Running phase indicates that the machine is now running as a node on the new cluster:
kubectl get machines -n eksa-system
NAME              CLUSTER    NODENAME    PROVIDERID                         PHASE    AGE  VERSION
mycluster-72p72   mycluster  eksa-da04   tinkerbell://eksa-system/eksa-da04 Running  7m25s   v1.22.10-eks-1-22-8
Once you have confirmed that all your machines are successfully running as nodes on the target cluster, there is not much for Tinkerbell to do.
It stays around to continue running the DHCP service and to be available to add more machines to the cluster.
4.7.3 - Requirements for EKS Anywhere on Bare Metal
Bare Metal provider requirements for EKS Anywhere
To run EKS Anywhere on Bare Metal, you need to meet the hardware and networking requirements described below.
Administrative machine
Set up an Administrative machine as described in Install EKS Anywhere.
Compute server requirements
The minimum number of physical machines needed to run EKS Anywhere on bare metal is 1. To configure EKS Anywhere to run on a single server, set controlPlaneConfiguration.count to 1, and omit workerNodeGroupConfigurations from your cluster configuration.
The recommended number of physical machines for production is at least:
- Control plane physical machines: 3
- Worker physical machines: 2
The compute hardware you need for your Bare Metal cluster must meet the following capacity requirements:
- vCPU: 2
- Memory: 8GB RAM
- Storage: 25GB
Operating system requirements
If you intend on using a non-Bottlerocket OS you must build it using image-builder. See the OS Management Artifacts
page for help building the OS.
Upgrade requirements
If you are running a standalone cluster with only one control plane node, you will need at least one additional, temporary machine for each control plane node grouping. For cluster with multiple control plane nodes, you can perform a rolling upgrade with or without an extra temporary machine. For worker node upgrades, you can perform a rolling upgrade with or without an extra temporary machine.
When upgrading without an extra machine, keep in mind that your control plane and your workload must be able to tolerate node unavailability. When upgrading with extra machine(s), you will need additional temporary machine(s) for each control plane and worker node grouping. Refer to Upgrade Bare Metal Cluster
and Advanced configuration for upgrade rollout strategy
.
NOTE: For single-node clusters that require an additional temporary machine for upgrading, if you don’t want to set up the extra hardware, you may recreate the cluster for upgrading and handle data recovery manually.
Network requirements
Each machine should include the following features:
-
Network Interface Cards: at least one NIC is required. For network/PXE boot mode, it must be capable of network booting. See Boot Modes
for boot configuration options.
-
BMC integration (recommended): an IPMI or Redfish implementation (such a Dell iDRAC, RedFish-compatible, legacy or HP iLO) on the computer’s motherboard or on a separate expansion card. This feature is used to allow remote management of the machine, such as turning the machine on and off.
NOTE: BMC integration is not required for an EKS Anywhere cluster. However, without BMC integration, upgrades are not supported and you will have to physically turn machines off and on when appropriate.
Here are other network requirements:
-
For network/PXE boot mode (default): All EKS Anywhere machines, including the Admin, control plane and worker machines, must be on the same layer 2 network and have network connectivity to the BMC (IPMI, Redfish, and so on).
For ISO boot mode: Layer 2 network connectivity is not required. Machines only need Layer 3 (routable) connectivity to the management cluster and BMC access for virtual media mounting. See Boot Modes
for details on boot mode options.
-
For network/PXE boot mode: You must be able to run DHCP on the control plane/worker machine network. DHCP is not required for ISO boot mode.
NOTE: If you have another DHCP service running on the network, you need to prevent it from interfering with the EKS Anywhere DHCP service. You can do that by configuring the other DHCP service to explicitly block all MAC addresses and exclude all IP addresses that you plan to use with your EKS Anywhere clusters.
Verifying Layer 2 Connectivity (PXE boot mode)
If machines are not PXE booting, verify layer 2 connectivity between the Admin machine and the machines being provisioned. DHCP requests from the machines should appear in the Boots (Smee) logs.
To verify DHCP traffic is reaching the Admin machine, run on the Admin machine:
sudo tcpdump -i any port 67 or port 68
When a machine attempts to PXE boot, you should see DHCP DISCOVER/REQUEST packets. If no packets appear, there is a layer 2 network connectivity issue (VLAN misconfiguration, switch port settings, etc.).
-
If you have not followed the steps for airgapped environments
, then the administrative machine and the target workload environment need network access (TCP/443) to:
-
public.ecr.aws
-
anywhere-assets.eks.amazonaws.com: to download the EKS Anywhere binaries, manifests and OVAs
-
distro.eks.amazonaws.com: to download EKS Distro binaries and manifests
-
d2glxqk2uabbnd.cloudfront.net: for EKS Anywhere and EKS Distro ECR container images
-
api.ecr.us-west-2.amazonaws.com: for EKS Anywhere package authentication matching your region)
-
d5l0dvt14r5h8.cloudfront.net: for EKS Anywhere package ECR container images
-
api.github.com: only if GitOps is enabled
-
sts.amazonaws.com: only if AWS IAM Authenticator is enabled
-
Two IP addresses routable from the cluster, but excluded from DHCP offering:
Understanding the Two Required IPs
Control Plane Endpoint IP (controlPlaneConfiguration.endpoint.host):
- Virtual IP for the Kubernetes API server
- Managed by kube-vip on control plane nodes
- Used by kubectl and all Kubernetes clients
- Must be reachable from admin machine and all cluster nodes
Tinkerbell IP (tinkerbellIP):
- Virtual IP for Tinkerbell stack services (Smee, Tink-server, Hegel)
- Used during node provisioning and lifecycle operations
- Must be reachable from all machines being provisioned
- On workload clusters, should be the same as the management cluster’s Tinkerbell IP
Both IPs must be:
- Outside the DHCP range
- Routable from the cluster subnet
- Not assigned to any physical interface
Below are some suggestions to ensure that these IP addresses are never handed out by your DHCP server. You may need to contact your network engineer to manage these addresses:
-
Pick IP addresses reachable from the cluster subnet that are excluded from the DHCP range or
-
Create an IP reservation for these addresses on your DHCP server. This is usually accomplished by adding a dummy mapping of this IP address to a non-existent mac address.
-
Ports must be open to the Admin machine and cluster machines as described in the Cluster Networking documentation
.
Validated hardware
Through extensive testing in a variety of on-premises environments, we have validated Amazon EKS Anywhere on bare metal works without modification on most modern hardware that meets the above requirements. Compatibility is determined by the host operating system selected when Building Node Images
. Installation may require you to Customize HookOS for EKS Anywhere on Bare Metal
to add drivers, or modify configuration specific to your environment. Bottlerocket support for bare metal was deprecated with the EKS Anywhere v0.19 release.
4.7.4 - Preparing Bare Metal for EKS Anywhere
Set up a Bare Metal cluster to prepare it for EKS Anywhere
After gathering hardware described in Bare Metal Requirements
, you need to prepare the hardware and create a CSV file describing that hardware.
Prepare hardware
To prepare your computer hardware for EKS Anywhere, you need to connect your computer hardware and do some configuration.
Once the hardware is in place, you need to:
- Obtain IP and MAC addresses for your machines' NICs.
- Obtain IP addresses for your machines' BMC interfaces.
- Obtain the gateway address for your network to reach the Internet.
- Obtain the IP address for your DNS servers.
- Make sure the following settings are in place:
- UEFI is enabled on all target cluster machines, unless you are provisioning RHEL systems. Enable legacy BIOS on any RHEL machines.
- Netboot (PXE or HTTP) boot is enabled for the NIC on each machine for which you provided the MAC address. This is the interface on which the operating system will be provisioned.
- IPMI over LAN and/or Redfish is enabled on all BMC interfaces.
- Go to the BMC settings for each machine and set the IP address (bmc_ip), username (bmc_username), and password (bmc_password) to use later in the CSV file.
Prepare hardware inventory
Create a CSV file to provide information about all physical machines that you are ready to add to your target Bare Metal cluster.
Hardware CSV vs kubectl: When to Use Each
Hardware CSV creates the initial hardware catalog (Hardware objects, BMC Machines, credentials).
Use hardware CSV for:
- Initial cluster creation
- Adding new hardware when insufficient hardware available for scaling/upgrades
Use kubectl for hardware management:
- Adding hardware after initial creation:
eksctl anywhere generate hardware -z hardware.csv > hardware.yaml && kubectl apply -f hardware.yaml
For cluster operations (scaling, upgrades):
- Update
count in cluster specification
- System automatically selects from available hardware (those without
ownerName label)
- If insufficient hardware: Add more via hardware CSV with
--hardware-csv flag or kubectl apply, then perform operation
Do NOT use CSV for:
- Removing hardware from cluster (use CAPI machine delete annotations)
- Trying to force specific hardware selection during operations (system auto-selects based on availability)
See Scale Bare Metal Cluster
for operational examples.
NOTE: While using kubectl, GitOps and Terraform for workload cluster creation, please make sure to refer to this section
.
The following is an example of an EKS Anywhere Bare Metal hardware CSV file:
hostname,bmc_ip,bmc_username,bmc_password,mac,ip_address,netmask,gateway,nameservers,labels,disk
eksa-cp01,10.10.44.1,root,PrZ8W93i,CC:48:3A:00:00:01,10.10.50.2,255.255.254.0,10.10.50.1,8.8.8.8|8.8.4.4,type=cp,/dev/sda
eksa-cp02,10.10.44.2,root,Me9xQf93,CC:48:3A:00:00:02,10.10.50.3,255.255.254.0,10.10.50.1,8.8.8.8|8.8.4.4,type=cp,/dev/sda
eksa-cp03,10.10.44.3,root,Z8x2M6hl,CC:48:3A:00:00:03,10.10.50.4,255.255.254.0,10.10.50.1,8.8.8.8|8.8.4.4,type=cp,/dev/sda
eksa-wk01,10.10.44.4,root,B398xRTp,CC:48:3A:00:00:04,10.10.50.5,255.255.254.0,10.10.50.1,8.8.8.8|8.8.4.4,type=worker,/dev/sda
eksa-wk02,10.10.44.5,root,w7EenR94,CC:48:3A:00:00:05,10.10.50.6,255.255.254.0,10.10.50.1,8.8.8.8|8.8.4.4,type=worker,/dev/sda
The CSV file is a comma-separated list of values in a plain text file, holding information about the physical machines in the datacenter that are intended to be a part of the cluster creation process.
Each line represents a physical machine (not a virtual machine).
The following sections describe each value.
hostname
The hostname assigned to the machine.
bmc_ip (optional)
The IP address assigned to the BMC interface on the machine.
bmc_username (optional)
The username assigned to the BMC interface on the machine.
bmc_password (optional)
The password associated with the bmc_username assigned to the BMC interface on the machine.
mac
The MAC address of the network interface card (NIC) that provides access to the host computer.
ip_address
The IP address providing access to the host computer.
netmask
The netmask associated with the ip_address value.
In the example above, a /23 subnet mask is used, allowing you to use up to 510 IP addresses in that range.
gateway
IP address of the interface that provides access (the gateway) to the Internet.
nameservers
The IP address of the server that you want to provide DNS service to the cluster.
labels
The optional labels field can consist of a key/value pair to use in conjunction with the hardwareSelector field when you set up your Bare Metal configuration.
The key/value pair is connected with an equal (=) sign.
For example, a TinkerbellMachineConfig with a hardwareSelector containing type: cp will match entries in the CSV containing type=cp in its label definition.
disk
The device name of the disk on which the operating system will be installed.
For example, it could be /dev/sda for the first SCSI disk or /dev/nvme0n1 for the first NVME storage device.
vlan_id (optional)
The VLAN ID to assign to the machine’s network interface. Use this field when machines need to be provisioned on a specific VLAN.
Hardware Management
Hardware Objects and Spare Nodes
EKS Anywhere creates Kubernetes hardware objects for all entries in the hardware.csv file, regardless of the node count specified in your cluster configuration. Any machines in the CSV file that exceed the count specified in your cluster configuration are automatically treated as spare nodes.
For example, if your cluster configuration specifies:
controlPlaneConfiguration:
  count: 1
workerNodeGroupConfigurations:
- count: 1
But your hardware.csv contains 3 control plane entries and 3 worker entries:
cplane-0,XX:XX:XX:XX:XX:01,10.162.10.131,...
cplane-1,XX:XX:XX:XX:XX:02,10.162.10.132,...
cplane-2,XX:XX:XX:XX:XX:03,10.162.10.133,...
worker-0,XX:XX:XX:XX:XX:04,10.162.10.134,...
worker-1,XX:XX:XX:XX:XX:05,10.162.10.135,...
worker-2,XX:XX:XX:XX:XX:06,10.162.10.136,...
EKS Anywhere will create Hardware objects for all 6 machines, but initially only use cplane-0 and worker-0 for the cluster. The remaining machines (cplane-1, cplane-2, worker-1, and worker-2) will be treated as spare nodes.
Important Considerations for Hardware Lifecycle Management
During operations like rolling upgrades, EKS Anywhere’s selection of spare nodes is not deterministic. Any of the available spare nodes could be selected for use during maintenance operations.
If you repurpose machines that were previously part of your EKS Anywhere cluster but still have hardware objects in the system:
- During subsequent cluster operations (like upgrades), these repurposed machines could be selected as spare nodes
- If BMC credentials are still valid, the machine may be automatically re-imaged, potentially destroying any workloads running on the repurposed machine
Best Practices for Hardware Management
To avoid unintended consequences when managing your hardware:
- Align CSV with Intended Use: Ensure your hardware.csv only contains entries for machines intended for immediate cluster use or as designated spares
- Clean Up Hardware Objects: Regularly audit and remove Hardware objects for machines that have been repurposed for other uses
- Manage BMC Credentials: Remove or rotate BMC credentials for hardware that has been repurposed to prevent unintended re-imaging
- Hardware Inventory: Maintain an up-to-date inventory of which physical machines are currently part of the cluster, designated as spares, or repurposed for other workloads
4.7.5 - Create Bare Metal cluster
Create a cluster on Bare Metal
EKS Anywhere supports a Bare Metal provider for EKS Anywhere deployments.
EKS Anywhere allows you to provision and manage Kubernetes clusters based on Amazon EKS software on your own infrastructure.
This document walks you through setting up EKS Anywhere on Bare Metal as a standalone, self-managed cluster or combined set of management/workload clusters.
See Cluster topologies
for details.
Note: Before you create your cluster, you have the option of validating the EKS Anywhere bundle manifest container images by following instructions in the Verify Cluster Images
page.
Prerequisite checklist
EKS Anywhere needs:
Steps
The following steps are divided into two sections:
- Create an initial cluster (used as a management or self-managed cluster)
- Create zero or more workload clusters from the management cluster
Create an initial cluster
Follow these steps to create an EKS Anywhere cluster that can be used either as a management cluster or as a self-managed cluster (for running workloads itself).
-
Optional Configuration
Set License Environment Variable
Add a license to any cluster for which you want to receive paid support. If you are creating a licensed cluster, set and export the license variable (see License cluster
if you are licensing an existing cluster):
export EKSA_LICENSE='my-license-here'
After you have created your eksa-mgmt-cluster.yaml and set your credential environment variables, you will be ready to create the cluster.
Configure Curated Packages
The Amazon EKS Anywhere Curated Packages are only available to customers with the Amazon EKS Anywhere Enterprise Subscription. To request a free trial, talk to your Amazon representative or connect with one here
. Cluster creation will succeed if authentication is not set up, but some warnings may be generated. Detailed package configurations can be found here.
If you are going to use packages, set up authentication. These credentials should have limited capabilities:
export EKSA_AWS_ACCESS_KEY_ID="your*access*id"
export EKSA_AWS_SECRET_ACCESS_KEY="your*secret*key"
export EKSA_AWS_REGION="us-west-2"
-
Set an environment variable for your cluster name:
-
Generate a cluster config file for your Bare Metal provider (using tinkerbell as the provider type).
eksctl anywhere generate clusterconfig $CLUSTER_NAME --provider tinkerbell > eksa-mgmt-cluster.yaml
-
Modify the cluster config (eksa-mgmt-cluster.yaml) by referring to the Bare Metal configuration
reference documentation.
-
Create the cluster, using the hardware.csv file you made in Bare Metal preparation
.
For a regular cluster create (with internet access), type the following:
eksctl anywhere create cluster \
   --hardware-csv hardware.csv \
   -f eksa-mgmt-cluster.yaml \
   # --install-packages packages.yaml \ # uncomment to install curated packages at cluster creation
For an airgapped cluster create, follow Preparation for airgapped deployments
instructions, then type the following:
eksctl anywhere create cluster
   --hardware-csv hardware.csv \
   -f $CLUSTER_NAME.yaml \
   --bundles-override ./eks-anywhere-downloads/bundle-release.yaml \
   # --install-packages packages.yaml \ # uncomment to install curated packages at cluster creation
-
Once the cluster is created you can use it with the generated KUBECONFIG file in your local directory:
export KUBECONFIG=${PWD}/${CLUSTER_NAME}/${CLUSTER_NAME}-eks-a-cluster.kubeconfig
-
Check the cluster nodes:
To check that the cluster completed, list the machines to see the control plane and worker nodes:
Example command output:
NAMESPACE     NAME                        CLUSTER   NODENAME        PROVIDERID                              PHASE     AGE   VERSION
eksa-system   mgmt-47zj8                  mgmt      eksa-node01     tinkerbell://eksa-system/eksa-node01    Running   1h    v1.23.7-eks-1-23-4
eksa-system   mgmt-md-0-7f79df46f-wlp7w   mgmt      eksa-node02     tinkerbell://eksa-system/eksa-node02    Running   1h    v1.23.7-eks-1-23-4
...
-
Check the cluster:
You can now use the cluster as you would any Kubernetes cluster.
To try it out, run the test application with:
export CLUSTER_NAME=mgmt
export KUBECONFIG=${PWD}/${CLUSTER_NAME}/${CLUSTER_NAME}-eks-a-cluster.kubeconfig
kubectl apply -f "https://anywhere.eks.amazonaws.com/manifests/hello-eks-a.yaml"
Verify the test application in Deploy test workload.
Create separate workload clusters
Follow these steps if you want to use your initial cluster to create and manage separate workload clusters.
-
Set License Environment Variable (Optional)
Add a license to any cluster for which you want to receive paid support. If you are creating a licensed cluster, set and export the license variable (see License cluster
if you are licensing an existing cluster):
export EKSA_LICENSE='my-license-here'
-
Generate a workload cluster config:
CLUSTER_NAME=w01
eksctl anywhere generate clusterconfig $CLUSTER_NAME \
   --provider tinkerbell > eksa-w01-cluster.yaml
Refer to the initial config described earlier for the required and optional settings.
Ensure workload cluster object names (Cluster, TinkerbellDatacenterConfig, TinkerbellMachineConfig, etc.) are distinct from management cluster object names. Keep the tinkerbellIP of workload cluster the same as tinkerbellIP of the management cluster.
-
Be sure to set the managementCluster field to identify the name of the management cluster.
For example, the management cluster, mgmt is defined for our workload cluster w01 as follows:
apiVersion: anywhere.eks.amazonaws.com/v1alpha1
kind: Cluster
metadata:
  name: w01
spec:
  managementCluster:
    name: mgmt
-
Create a workload cluster
To create a new workload cluster from your management cluster run this command, identifying:
- The workload cluster YAML file
- The initial cluster’s credentials (this causes the workload cluster to be managed from the management cluster)
Create a workload cluster in one of the following ways:
-
eksctl CLI: To create a workload cluster with eksctl, run:
eksctl anywhere create cluster \
    -f eksa-w01-cluster.yaml  \
    --kubeconfig mgmt/mgmt-eks-a-cluster.kubeconfig \
    # --install-packages packages.yaml \ # uncomment to install curated packages at cluster creation
    # --hardware-csv <hardware.csv> \ # uncomment to add more hardware
    # --bundles-override ./eks-anywhere-downloads/bundle-release.yaml \ # uncomment for airgapped install
As noted earlier, adding the --kubeconfig option tells eksctl to use the management cluster identified by that kubeconfig file to create a different workload cluster.
-
kubectl CLI: The cluster lifecycle feature lets you use kubectl to talk to the Kubernetes API to create a workload cluster. kubectl can also be used for management cluster operations (scaling, Kubernetes version upgrades), except when upgrading the EKS Anywhere CLI version which requires eksctl anywhere upgrade. To use kubectl, run:
kubectl apply -f eksa-w01-cluster.yaml --kubeconfig mgmt/mgmt-eks-a-cluster.kubeconfig
To check the state of a cluster managed with the cluster lifecyle feature, use kubectl to show the cluster object with its status.
The status field on the cluster object field holds information about the current state of the cluster.
kubectl get clusters w01 -o yaml
The cluster has been fully upgraded once the status of the Ready condition is marked True.
See the cluster status
guide for more information.
-
GitOps: See Manage separate workload clusters with GitOps
-
Terraform: See Manage separate workload clusters with Terraform
NOTE: For kubectl, GitOps and Terraform:
-
Check the workload cluster:
You can now use the workload cluster as you would any Kubernetes cluster.
Change your credentials to point to the new workload cluster (for example, mgmt-w01), then run the test application with:
export CLUSTER_NAME=mgmt-w01
export KUBECONFIG=${PWD}/${CLUSTER_NAME}/${CLUSTER_NAME}-eks-a-cluster.kubeconfig
kubectl apply -f "https://anywhere.eks.amazonaws.com/manifests/hello-eks-a.yaml"
Verify the test application in the deploy test application section.
-
Add more workload clusters:
To add more workload clusters, go through the same steps for creating the initial workload, copying the config file to a new name (such as eksa-w02-cluster.yaml), modifying resource names, and running the create cluster command again.
Next steps:
-
See the Cluster management
section for more information on common operational tasks like deleting the cluster.
-
See the Package management
section for more information on post-creation curated packages installation.
4.7.6 - Configure for Bare Metal
Full EKS Anywhere configuration reference for a Bare Metal cluster.
This is a generic template with detailed descriptions below for reference.
The following additional optional configuration can also be included:
To generate your own cluster configuration, follow instructions from the Create Bare Metal cluster
section and modify it using descriptions below.
For information on how to add cluster configuration settings to this file for advanced node configuration, see Advanced Bare Metal cluster configuration
.
NOTE: Bare Metal cluster creation with RHEL 9 raw OS images requires advanced cluster configurations to be set. To create Bare Metal RHEL 9 clusters, modify the cluster configurations using descriptions below and follow Advanced Bare Metal cluster configuration
.
apiVersion: anywhere.eks.amazonaws.com/v1alpha1
kind: Cluster
metadata:
name: my-cluster-name
spec:
clusterNetwork:
cniConfig:
cilium: {}
pods:
cidrBlocks:
- 192.168.0.0/16
services:
cidrBlocks:
- 10.96.0.0/12
controlPlaneConfiguration:
count: 1
endpoint:
host: "<Control Plane Endpoint IP>"
machineGroupRef:
kind: TinkerbellMachineConfig
name: my-cluster-name-cp
datacenterRef:
kind: TinkerbellDatacenterConfig
name: my-cluster-name
kubernetesVersion: "1.35"
managementCluster:
name: my-cluster-name
workerNodeGroupConfigurations:
- count: 1
machineGroupRef:
kind: TinkerbellMachineConfig
name: my-cluster-name
name: md-0
---
apiVersion: anywhere.eks.amazonaws.com/v1alpha1
kind: TinkerbellDatacenterConfig
metadata:
name: my-cluster-name
spec:
tinkerbellIP: "<Tinkerbell IP>"
---
apiVersion: anywhere.eks.amazonaws.com/v1alpha1
kind: TinkerbellMachineConfig
metadata:
name: my-cluster-name-cp
spec:
hardwareSelector: {}
osFamily: ubuntu
templateRef: {}
users:
- name: ec2-user
sshAuthorizedKeys:
- ssh-rsa AAAAB3NzaC1yc2... jwjones@833efcab1482.home.example.com
---
apiVersion: anywhere.eks.amazonaws.com/v1alpha1
kind: TinkerbellMachineConfig
metadata:
name: my-cluster-name
spec:
hardwareSelector: {}
osFamily: ubuntu
templateRef:
kind: TinkerbellTemplateConfig
name: my-cluster-name
users:
- name: ec2-user
sshAuthorizedKeys:
- ssh-rsa AAAAB3NzaC1yc2... jwjones@833efcab1482.home.example.com
Cluster Fields
name (required)
Name of your cluster (my-cluster-name in this example).
clusterNetwork (required)
Network configuration.
clusterNetwork.cniConfig (required)
CNI plugin configuration. Supports cilium.
clusterNetwork.cniConfig.cilium.policyEnforcementMode (optional)
Optionally specify a policyEnforcementMode of default, always or never.
clusterNetwork.cniConfig.cilium.egressMasqueradeInterfaces (optional)
Optionally specify a network interface name or interface prefix used for
masquerading. See EgressMasqueradeInterfaces
option.
clusterNetwork.cniConfig.cilium.skipUpgrade (optional)
When true, skip Cilium maintenance during upgrades. Also see Use a custom
CNI.
clusterNetwork.cniConfig.cilium.routingMode (optional)
Optionally specify the routing mode. Accepts default and direct. Also see RoutingMode
option.
clusterNetwork.cniConfig.cilium.ipv4NativeRoutingCIDR (optional)
Optionally specify the CIDR to use when RoutingMode is set to direct.
When specified, Cilium assumes networking for this CIDR is preconfigured and
hands traffic destined for that range to the Linux network stack without
applying any SNAT.
clusterNetwork.cniConfig.cilium.ipv6NativeRoutingCIDR (optional)
Optionally specify the IPv6 CIDR to use when RoutingMode is set to direct.
When specified, Cilium assumes networking for this CIDR is preconfigured and
hands traffic destined for that range to the Linux network stack without
applying any SNAT.
clusterNetwork.cniConfig.cilium.cniExclusive (optional)
Controls whether Cilium should remove other CNI configuration files.
When true (default), Cilium removes other CNI configs; when false, it leaves them alone.
For more information, see CNI Exclusive Mode configuration.
clusterNetwork.pods.cidrBlocks[0] (required)
The pod subnet specified in CIDR notation. Only 1 pod CIDR block is permitted.
The CIDR block should not conflict with the host or service network ranges.
clusterNetwork.services.cidrBlocks[0] (required)
The service subnet specified in CIDR notation. Only 1 service CIDR block is
permitted.
This CIDR block should not conflict with the host or pod network ranges.
clusterNetwork.dns.resolvConf.path (optional)
File path to a file containing a custom DNS resolver configuration.
controlPlaneConfiguration (required)
Specific control plane configuration for your Kubernetes cluster.
controlPlaneConfiguration.count (required)
Number of control plane nodes.
This number needs to be odd to maintain ETCD quorum.
controlPlaneConfiguration.endpoint.host (required)
A unique IP you want to use for the control plane in your EKS Anywhere cluster. Choose an IP in your network
range that does not conflict with other machines.
NOTE: This IP should be outside the network DHCP range as it is a floating IP that gets assigned to one of
the control plane nodes for kube-apiserver loadbalancing.
controlPlaneConfiguration.machineGroupRef (required)
Refers to the Kubernetes object with Tinkerbell-specific configuration for your nodes. See TinkerbellMachineConfig Fields below.
controlPlaneConfiguration.taints (optional)
A list of taints to apply to the control plane nodes of the cluster.
Replaces the default control plane taint (For k8s versions prior to 1.24, node-role.kubernetes.io/master. For k8s versions 1.24+, node-role.kubernetes.io/control-plane). The default control plane components will tolerate the provided taints.
NOTE: Taints are immutable for bare metal clusters and cannot be modified after cluster creation.
NOTE: The taints provided will be used instead of the default control plane taint.
Any pods that you run on the control plane nodes must tolerate the taints you provide in the control plane configuration.
controlPlaneConfiguration.labels (optional)
A list of labels to apply to the control plane nodes of the cluster. This is in addition to the labels that
EKS Anywhere will add by default.
NOTE: Labels are immutable for bare metal clusters and cannot be modified after cluster creation.
controlPlaneConfiguration.upgradeRolloutStrategy (optional)
Configuration parameters for upgrade strategy.
controlPlaneConfiguration.upgradeRolloutStrategy.type (optional)
Default: RollingUpdate
Type of rollout strategy. Supported values: RollingUpdate,InPlace.
NOTE: The upgrade rollout strategy type must be the same for all control plane and worker nodes.
controlPlaneConfiguration.upgradeRolloutStrategy.rollingUpdate (optional)
Configuration parameters for customizing rolling upgrade behavior.
NOTE: The rolling update parameters can only be configured if upgradeRolloutStrategy.type is RollingUpdate.
controlPlaneConfiguration.upgradeRolloutStrategy.rollingUpdate.maxSurge (optional)
Default: 1
This can not be 0 if maxUnavailable is 0.
The maximum number of machines that can be scheduled above the desired number of machines.
Example: When this is set to n, the new worker node group can be scaled up immediately by n when the rolling upgrade starts. Total number of machines in the cluster (old + new) never exceeds (desired number of machines + n). Once scale down happens and old machines are brought down, the new worker node group can be scaled up further ensuring that the total number of machines running at any time does not exceed the desired number of machines + n.
controlPlaneConfiguration.skipLoadBalancerDeployment (optional)
Optional field to skip deploying the control plane load balancer. Make sure your infrastructure can handle control plane load balancing when you set this field to true. In most cases, you should not set this field to true.
datacenterRef (required)
Refers to the Kubernetes object with Tinkerbell-specific configuration. See TinkerbellDatacenterConfig Fields below.
kubernetesVersion (required)
The Kubernetes version you want to use for your cluster. The Kubernetes versions supported by your EKS Anywhere version are tabulated in this
section.
Known issue related to Kubernetes versions whose minor version is a multiple of 10
managementCluster (required)
Identifies the name of the management cluster.
If your cluster spec is for a standalone or management cluster, this value is the same as the cluster name.
workerNodeGroupConfigurations (optional)
This takes in a list of node groups that you can define for your workers.
You can omit workerNodeGroupConfigurations when creating Bare Metal clusters. If you omit workerNodeGroupConfigurations, control plane nodes will not be tainted and all pods will run on the control plane nodes. This mechanism can be used to deploy Bare Metal clusters on a single server. You can also run multi-node Bare Metal clusters without workerNodeGroupConfigurations.
NOTE: Empty workerNodeGroupConfigurations is not supported when Kubernetes version <= 1.21.
workerNodeGroupConfigurations[*].count (optional)
Number of worker nodes. (default: 1) It will be ignored if the cluster autoscaler curated package
is installed and autoscalingConfiguration is used to specify the desired range of replicas.
Refers to troubleshooting machine health check remediation not allowed
and choose a sufficient number to allow machine health check remediation.
workerNodeGroupConfigurations[*].machineGroupRef (required)
Refers to the Kubernetes object with Tinkerbell-specific configuration for your nodes. See TinkerbellMachineConfig Fields below.
workerNodeGroupConfigurations[*].name (required)
Name of the worker node group (default: md-0)
workerNodeGroupConfigurations[*].autoscalingConfiguration (optional)
Configuration parameters for Cluster Autoscaler.
NOTE: Autoscaling configuration is not supported when using the InPlace upgrade rollout strategy.
workerNodeGroupConfigurations[*].autoscalingConfiguration.minCount (optional)
Minimum number of nodes for this node group’s autoscaling configuration.
workerNodeGroupConfigurations[*].autoscalingConfiguration.maxCount (optional)
Maximum number of nodes for this node group’s autoscaling configuration.
workerNodeGroupConfigurations[*].taints (optional)
A list of taints to apply to the nodes in the worker node group.
NOTE: Taints are immutable for bare metal clusters and cannot be modified after cluster creation.
At least one node group must not have NoSchedule or NoExecute taints applied to it.
workerNodeGroupConfigurations[*].labels (optional)
A list of labels to apply to the nodes in the worker node group. This is in addition to the labels that
EKS Anywhere will add by default.
NOTE: Labels are immutable for bare metal clusters and cannot be modified after cluster creation.
workerNodeGroupConfigurations[*].kubernetesVersion (optional)
The Kubernetes version you want to use for this worker node group. The Kubernetes versions supported by your EKS Anywhere version are tabulated in this
section.
Known issue related to Kubernetes versions whose minor version is a multiple of 10
Must be less than or equal to the cluster kubernetesVersion defined at the root level of the cluster spec. The worker node Kubernetes version must be no more than two minor Kubernetes versions lower than the cluster control plane’s Kubernetes version. Removing workerNodeGroupConfiguration.kubernetesVersion will trigger an upgrade of the node group to the kubernetesVersion defined at the root level of the cluster spec.
workerNodeGroupConfigurations[*].upgradeRolloutStrategy (optional)
Configuration parameters for upgrade strategy.
workerNodeGroupConfigurations[*].upgradeRolloutStrategy.type (optional)
Default: RollingUpdate
Type of rollout strategy. Supported values: RollingUpdate,InPlace.
NOTE: The upgrade rollout strategy type must be the same for all control plane and worker nodes.
workerNodeGroupConfigurations[*].upgradeRolloutStrategy.rollingUpdate (optional)
Configuration parameters for customizing rolling upgrade behavior.
NOTE: The rolling update parameters can only be configured if upgradeRolloutStrategy.type is RollingUpdate.
workerNodeGroupConfigurations[*].upgradeRolloutStrategy.rollingUpdate.maxSurge (optional)
Default: 1
This can not be 0 if maxUnavailable is 0.
The maximum number of machines that can be scheduled above the desired number of machines.
Example: When this is set to n, the new worker node group can be scaled up immediately by n when the rolling upgrade starts. Total number of machines in the cluster (old + new) never exceeds (desired number of machines + n). Once scale down happens and old machines are brought down, the new worker node group can be scaled up further ensuring that the total number of machines running at any time does not exceed the desired number of machines + n.
workerNodeGroupConfigurations[*].upgradeRolloutStrategy.rollingUpdate.maxUnavailable (optional)
Default: 0
This can not be 0 if MaxSurge is 0.
The maximum number of machines that can be unavailable during the upgrade.
Example: When this is set to n, the old worker node group can be scaled down by n machines immediately when the rolling upgrade starts. Once new machines are ready, old worker node group can be scaled down further, followed by scaling up the new worker node group, ensuring that the total number of machines unavailable at all times during the upgrade never falls below n.
TinkerbellDatacenterConfig Fields
tinkerbellIP (required)
Required field to identify the IP address of the Tinkerbell service.
This IP address must be a unique IP in the network range that does not conflict with other IPs.
Once the Tinkerbell services move from the Admin machine to run on the target cluster, this IP address makes it possible for the stack to be used for future provisioning needs.
When separate management and workload clusters are supported in Bare Metal, the IP address becomes a necessity.
osImageURL (required)
Required field to set the operating system. In order to use Ubuntu or RHEL see building baremetal node images
. This field is also useful if you want to provide a customized operating system image or simply host the standard image locally. To upgrade a node or group of nodes to a new operating system version (ie. RHEL 8.7 to RHEL 8.8), modify this field to point to the new operating system image URL and run upgrade cluster command
.
The osImageURL must contain the Cluster.Spec.KubernetesVersion or Cluster.Spec.WorkerNodeGroupConfiguration[].KubernetesVersion version (in case of modular upgrade). For example, if the Kubernetes version is 1.35, the osImageURL name should include 1.35, 1_35, 1-35 or 135.
NOTE: osImageURL field cannot be set both in the TinkerbellDatacenterConfig and TinkerbellMachineConfig objects. If this value is set for TinkerbellDatacenterConfig, osImageURL has to be set to empty string "" for all the TinkerbellMachineConfigs.
hookImagesURLPath (optional)
Optional field to replace the HookOS image.
This field is useful if you want to provide a customized HookOS image or simply host the standard image locally.
See Artifacts
for details.
isoBoot (optional)
Optional field (boolean) to enable the ISO boot mode.
Use this field to enable ISO mounting and boot for OS installation.
See Boot Modes
for details.
hookIsoURL (optional)
Optional field (string URL) to override the default AWS hosted location for the HookOS ISO.
Use this field to host the HookOS ISO locally.
See Boot Modes
for details.
Important: HTTP Server Requirements for Hosting HookOS
When hosting HookOS images locally, your HTTP server must support HTTP Range requests (RFC 7233). BMC virtual media uses Range requests to stream the ISO in chunks.
Servers that work: Apache, nginx, or any server that returns 206 Partial Content for Range requests.
Servers that do NOT work: Python’s built-in python3 -m http.server (returns 200 OK for Range requests, ignoring the Range header).
If ISO boot fails with no clear error, verify your server supports Range requests:
curl -I -H "Range: bytes=0-1000" http://your-server/hook.iso
# Should return: HTTP/1.1 206 Partial Content
# NOT: HTTP/1.1 200 OK
Example TinkerbellDatacenterConfig.spec
spec:
tinkerbellIP: "192.168.0.10" # Available, routable IP
osImageURL: "http://my-web-server/ubuntu-v1.23.7-eks-a-12-amd64.gz" # Full URL to the OS Image hosted locally
hookImagesURLPath: "http://my-web-server/hook" # Path to the hook images. This path must contain vmlinuz-x86_64 and initramfs-x86_64
isoBoot: false # Set to true to enable the ISO boot mode
hookIsoURL: "http://my-web-server/hook-x86_64-efi-initrd.iso" # Full URL to the HookOS ISO image hosted locally
This is the folder structure for my-web-server:
my-web-server
├── hook
│ ├── initramfs-x86_64
│ └── vmlinuz-x86_64
├── ubuntu-v1.23.7-eks-a-12-amd64.gz
└── hook-x86_64-efi-initrd.iso
skipLoadBalancerDeployment (optional)
Optional field to skip deploying the default load balancer for Tinkerbell stack.
EKS Anywhere for Bare Metal uses kube-vip load balancer by default to expose the Tinkerbell stack externally.
You can disable this feature by setting this field to true.
NOTE: If you skip load balancer deployment, you will have to ensure that the Tinkerbell stack is available at tinkerbellIP
once the cluster creation is finished. One way to achieve this is by using the MetalLB
package.
loadBalancerInterface (optional)
Optional field to configure a custom load balancer interface for Tinkerbell stack.
TinkerbellMachineConfig Fields
In the example, there are TinkerbellMachineConfig sections for control plane (my-cluster-name-cp) and worker (my-cluster-name) machine groups.
The following fields identify information needed to configure the nodes in each of those groups.
NOTE: Currently, you can only have one machine group for all machines in the control plane, although you can have multiple machine groups for the workers.
hardwareSelector (optional)
Use hardwareSelector to add key/value pair labels to match particular machines that you identified in the CSV file where you defined the machines in your cluster.
Choose any label name you like.
For example, if you had added the label node=cp-machine to the machines listed in your CSV file that you want to be control plane nodes, the following hardwareSelector field would cause those machines to be added to the control plane:
---
apiVersion: anywhere.eks.amazonaws.com/v1alpha1
kind: TinkerbellMachineConfig
metadata:
name: my-cluster-name-cp
spec:
hardwareSelector:
node: "cp-machine"
NOTE: Either hardwareSelector or hardwareAffinity must be specified, but not both. Use hardwareSelector for simple single-label matching, or hardwareAffinity for advanced selection with multiple terms and weighted preferences.
hardwareAffinity (optional)
Use hardwareAffinity for advanced hardware selection when you need more control than hardwareSelector provides. This field allows you to specify required and preferred affinity terms using Kubernetes-style label selectors.
The hardwareAffinity field has two sub-fields:
required: A list of hardware affinity terms that are OR’d together. Hardware must match at least one term to be considered. At least one required term must be specified.preferred: A list of weighted hardware affinity terms. Hardware matching these terms are preferred according to the weights provided (1-100), but are not required.
hardwareAffinity.required
Required hardware affinity terms. Each term contains a labelSelector with matchLabels and/or matchExpressions. Multiple terms in the required array are implicitly OR’d together - hardware must match at least one term to be eligible for selection.
hardwareAffinity.preferred
Preferred hardware affinity terms with weights. Each term contains:
weight: A value from 1-100 indicating preference strengthhardwareAffinityTerm: The affinity term with a labelSelector
Example: Simple required affinity
---
apiVersion: anywhere.eks.amazonaws.com/v1alpha1
kind: TinkerbellMachineConfig
metadata:
name: my-cluster-name-cp
spec:
hardwareAffinity:
required:
- labelSelector:
matchLabels:
node: "cp-machine"
osFamily: ubuntu
Example: Multiple required terms (OR’d together)
When you specify multiple items in the required array, they are implicitly OR’d together. Hardware must match at least one of the terms to be eligible. In this example, hardware in either rack-1 OR rack-2 will be selected:
---
apiVersion: anywhere.eks.amazonaws.com/v1alpha1
kind: TinkerbellMachineConfig
metadata:
name: my-cluster-name-cp
spec:
hardwareAffinity:
required:
- labelSelector:
matchLabels:
rack: "rack-1"
- labelSelector:
matchLabels:
rack: "rack-2"
osFamily: ubuntu
Example: Required with preferred terms
---
apiVersion: anywhere.eks.amazonaws.com/v1alpha1
kind: TinkerbellMachineConfig
metadata:
name: my-cluster-name-workers
spec:
hardwareAffinity:
required:
- labelSelector:
matchLabels:
role: "worker"
preferred:
- weight: 100
hardwareAffinityTerm:
labelSelector:
matchLabels:
gpu: "true"
- weight: 50
hardwareAffinityTerm:
labelSelector:
matchLabels:
ssd: "true"
osFamily: ubuntu
Example: Using matchExpressions for complex selection
---
apiVersion: anywhere.eks.amazonaws.com/v1alpha1
kind: TinkerbellMachineConfig
metadata:
name: my-cluster-name-cp
spec:
hardwareAffinity:
required:
- labelSelector:
matchExpressions:
- key: rack
operator: In
values:
- rack-1
- rack-2
- rack-3
osFamily: ubuntu
NOTE: Either hardwareSelector or hardwareAffinity must be specified, but not both. Use hardwareSelector for simple single-label matching, or hardwareAffinity for advanced selection with multiple terms and weighted preferences.
osFamily (required)
Operating system on the machine. Permitted values: ubuntu and redhat (Default: ubuntu).
osImageURL (required)
Required field to set the operating system. In order to use Ubuntu or RHEL see building baremetal node images
. This field is also useful if you want to provide a customized operating system image or simply host the standard image locally. To upgrade a node or group of nodes to a new operating system version (ie. RHEL 8.7 to RHEL 8.8), modify this field to point to the new operating system image URL and run upgrade cluster command
. The osImageURL must contain the Cluster.Spec.KubernetesVersion or Cluster.Spec.WorkerNodeGroupConfiguration[].KubernetesVersion version (in case of modular upgrade). For example, if the Kubernetes version is 1.35, the osImageURL name should include 1.35, 1_35, 1-35 or 135.
NOTE: If this value is set for a single TinkerbellMachineConfig, osImageURL has to be set for all the TinkerbellMachineConfigs. osImageURL field cannot be set both in the TinkerbellDatacenterConfig and TinkerbellMachineConfig objects. If set for TinkerbellMachineConfig, the value must be set to empty string "" for TinkerbellDatacenterConfig
templateRef (optional)
Identifies the template that defines the actions that will be applied to the TinkerbellMachineConfig.
See TinkerbellTemplateConfig fields below.
EKS Anywhere will generate default templates based on osFamily during the create command.
You can override this default template by providing your own template here.
users (optional)
The name of the user you want to configure to access your virtual machines through SSH.
The default is ec2-user.
Currently, only one user is supported.
users[0].sshAuthorizedKeys (optional)
The SSH public keys you want to configure to access your machines through SSH (as described below). Only 1 is supported at this time.
users[0].sshAuthorizedKeys[0] (optional)
This is the SSH public key that will be placed in authorized_keys on all EKS Anywhere cluster machines so you can SSH into
them. The user will be what is defined under name above. For example:
ssh -i <private-key-file> <user>@<machine-IP>
The default is generating a key in your $(pwd)/<cluster-name> folder when not specifying a value.
hostOSConfig (optional)
Optional host OS configurations for the EKS Anywhere Kubernetes nodes.
More information in the Host OS Configuration
section.
When you generate a Bare Metal cluster configuration, by default, the TinkerbellTemplateConfig is not shown in the generated configuration file. The TinkerbellTemplateConfig defines the actions to provision each node, such as getting installation media, configuring networking, adding users, and otherwise configuring the node. Internally, EKS Anywhere generates a default TinkerbellTemplateConfig based on the operating system family you choose. The default TinkerbellTemplateConfig is sufficient for most use cases.
If your use case necessitates that the operating system have additional configuration, you can add a TinkerbellTemplateConfig to your cluster configuration file with your own customizations. To do this, start with the default TinkerbellTemplateConfig generated by EKS Anywhere and modify it as needed. To generate the default TinkerbellTemplateConfig, use the following command:
eksctl anywhere generate tinkerbelltemplateconfig -f eksa-mgmt-cluster.yaml
Now you can add your own Actions for configuring nodes. We highly recommend that you do not modify the first and the last Actions in the default TinkerbellTemplateConfig. The first Action streams the OS image to the disk, and the last Action reboots the node. See the upstream Tinkerbell documentation for more information on Templates
and Actions
.
IMPORTANT: When upgrading to a new EKS Anywhere version, the default template structure may change to incorporate improvements or support new features. Before customizing a template for use with a new EKS Anywhere version, always regenerate the default template using the command above to ensure you have the latest template structure. Failure to use an updated template during upgrades may result in provisioning failures or unexpected behavior. It is recommended to regenerate and review the default template with each EKS Anywhere version upgrade, then reapply your customizations to the updated template.
The following shows the default TinkerbellTemplateConfig generated by eksctl anywhere generate tinkerbelltemplateconfig.
Ubuntu
---
apiVersion: anywhere.eks.amazonaws.com/v1alpha1
kind: TinkerbellTemplateConfig
metadata:
name: my-cluster-name
spec:
template:
global_timeout: 6000
id: ""
name: my-cluster-name
tasks:
- actions:
- environment:
COMPRESSED: "true"
DEST_DISK: '{{ index .Hardware.Disks 0 }}'
IMG_URL: https://my-file-server/ubuntu-2204-kube-v1.30.gz
image: 127.0.0.1/embedded/image2disk
name: stream image to disk
timeout: 600
- environment:
CONTENTS: |
{{ if (index .Hardware.Interfaces 0).DHCP.VLANID }}network:
version: 2
renderer: networkd
ethernets:
mainif:
match:
macaddress: {{ (index .Hardware.Interfaces 0).DHCP.MAC }}
set-name: mainif
vlans:
vlan{{ (index .Hardware.Interfaces 0).DHCP.VLANID }}:
id: {{ (index .Hardware.Interfaces 0).DHCP.VLANID }}
link: mainif
addresses:
- {{ (index .Hardware.Interfaces 0).DHCP.IP.Address }}/{{ netmaskToCIDR (index .Hardware.Interfaces 0).DHCP.IP.Netmask }}
nameservers:
addresses: [{{ range $i, $ns := (index .Hardware.Interfaces 0).DHCP.NameServers }}{{if $i}}, {{end}}{{$ns}}{{end}}]
{{- if (index .Hardware.Interfaces 0).DHCP.IP.Gateway }}
routes:
- to: default
via: {{ (index .Hardware.Interfaces 0).DHCP.IP.Gateway }}
{{- end }}
{{ else }}network:
version: 2
renderer: networkd
ethernets:
id0:
match:
macaddress: {{ (index .Hardware.Interfaces 0).DHCP.MAC }}
addresses:
- {{ (index .Hardware.Interfaces 0).DHCP.IP.Address }}/{{ netmaskToCIDR (index .Hardware.Interfaces 0).DHCP.IP.Netmask }}
nameservers:
addresses: [{{ range $i, $ns := (index .Hardware.Interfaces 0).DHCP.NameServers }}{{if $i}}, {{end}}{{$ns}}{{end}}]
routes:
- to: default
via: {{ (index .Hardware.Interfaces 0).DHCP.IP.Gateway }}
{{ end }}
DEST_DISK: '{{ formatPartition ( index .Hardware.Disks 0 ) 2 }}'
DEST_PATH: /etc/netplan/config.yaml
DIRMODE: "0755"
FS_TYPE: ext4
GID: "0"
MODE: "0644"
UID: "0"
image: 127.0.0.1/embedded/writefile
name: write netplan config
pid: host
timeout: 90
- environment:
CONTENTS: 'network: {config: disabled}'
DEST_DISK: '{{ formatPartition ( index .Hardware.Disks 0 ) 2 }}'
DEST_PATH: /etc/cloud/cloud.cfg.d/99-disable-network-config.cfg
DIRMODE: "0700"
FS_TYPE: ext4
GID: "0"
MODE: "0600"
UID: "0"
image: 127.0.0.1/embedded/writefile
name: disable cloud-init network capabilities
timeout: 90
- environment:
CONTENTS: |
datasource:
Ec2:
metadata_urls: [http://<admin-machine-ip>:50061, http://<tinkerbellIP-from-cluster-config>:50061]
strict_id: false
manage_etc_hosts: localhost
warnings:
dsid_missing_source: off
DEST_DISK: '{{ formatPartition ( index .Hardware.Disks 0 ) 2 }}'
DEST_PATH: /etc/cloud/cloud.cfg.d/10_tinkerbell.cfg
DIRMODE: "0700"
FS_TYPE: ext4
GID: "0"
MODE: "0600"
UID: "0"
image: 127.0.0.1/embedded/writefile
name: add cloud-init config
timeout: 90
- environment:
CONTENTS: "datasource: Ec2\n"
DEST_DISK: '{{ formatPartition ( index .Hardware.Disks 0 ) 2 }}'
DEST_PATH: /etc/cloud/ds-identify.cfg
DIRMODE: "0700"
FS_TYPE: ext4
GID: "0"
MODE: "0600"
UID: "0"
image: 127.0.0.1/embedded/writefile
name: add cloud-init ds config
timeout: 90
- image: 127.0.0.1/embedded/reboot
name: reboot
pid: host
timeout: 90
volumes:
- /worker:/worker
name: my-cluster-name
volumes:
- /dev:/dev
- /dev/console:/dev/console
- /lib/firmware:/lib/firmware:ro
worker: '{{.device_1}}'
version: "0.1"
Red Hat Enterprise Linux
---
apiVersion: anywhere.eks.amazonaws.com/v1alpha1
kind: TinkerbellTemplateConfig
metadata:
name: my-cluster-name
spec:
template:
global_timeout: 6000
id: ""
name: my-cluster-name
tasks:
- actions:
- environment:
COMPRESSED: "true"
DEST_DISK: '{{ index .Hardware.Disks 0 }}'
IMG_URL: https://my-file-server/rhel-9-kube-v1.30.0.gz
image: 127.0.0.1/embedded/image2disk
name: stream image to disk
timeout: 600
- environment:
CONTENTS: |
{{ if (index .Hardware.Interfaces 0).DHCP.VLANID }}[connection]
id=vlan-connection
type=vlan
autoconnect=yes
autoconnect-priority=10
[ethernet]
mac-address={{ (index .Hardware.Interfaces 0).DHCP.MAC }}
[vlan]
flags=1
id={{ (index .Hardware.Interfaces 0).DHCP.VLANID }}
mac-address={{ (index .Hardware.Interfaces 0).DHCP.MAC }}
[ipv4]
address1={{ (index .Hardware.Interfaces 0).DHCP.IP.Address }}/{{ netmaskToCIDR (index .Hardware.Interfaces 0).DHCP.IP.Netmask }}
dns={{ range $i, $ns := (index .Hardware.Interfaces 0).DHCP.NameServers }}{{if $i}};{{end}}{{$ns}}{{end}};
gateway={{ (index .Hardware.Interfaces 0).DHCP.IP.Gateway }}
method=manual
[ipv6]
addr-gen-mode=default
method=ignore
{{ else }}[connection]
id=static-connection
type=ethernet
autoconnect=yes
autoconnect-priority=10
[ethernet]
mac-address={{ (index .Hardware.Interfaces 0).DHCP.MAC }}
[ipv4]
address1={{ (index .Hardware.Interfaces 0).DHCP.IP.Address }}/{{ netmaskToCIDR (index .Hardware.Interfaces 0).DHCP.IP.Netmask }}
dns={{ range $i, $ns := (index .Hardware.Interfaces 0).DHCP.NameServers }}{{if $i}};{{end}}{{$ns}}{{end}};
gateway={{ (index .Hardware.Interfaces 0).DHCP.IP.Gateway }}
method=manual
[ipv6]
addr-gen-mode=default
method=ignore
{{ end }}
DEST_DISK: '{{ formatPartition ( index .Hardware.Disks 0 ) 1 }}'
DEST_PATH: /etc/NetworkManager/system-connections/static-connection.nmconnection
DIRMODE: "0755"
FS_TYPE: ext4
GID: "0"
MODE: "0600"
UID: "0"
image: 127.0.0.1/embedded/writefile
name: write network manager config
pid: host
timeout: 90
- environment:
CONTENTS: 'network: {config: disabled}'
DEST_DISK: '{{ formatPartition ( index .Hardware.Disks 0 ) 1 }}'
DEST_PATH: /etc/cloud/cloud.cfg.d/99-disable-network-config.cfg
DIRMODE: "0700"
FS_TYPE: ext4
GID: "0"
MODE: "0600"
UID: "0"
image: 127.0.0.1/embedded/writefile
name: disable cloud-init network capabilities
timeout: 90
- environment:
CONTENTS: |
datasource:
Ec2:
metadata_urls: ['http://<admin-machine-ip>:50061','http://<tinkerbellIP-from-cluster-config>:50061']
strict_id: false
manage_etc_hosts: localhost
warnings:
dsid_missing_source: off
DEST_DISK: '{{ formatPartition ( index .Hardware.Disks 0 ) 1 }}'
DEST_PATH: /etc/cloud/cloud.cfg.d/10_tinkerbell.cfg
DIRMODE: "0700"
FS_TYPE: ext4
GID: "0"
MODE: "0600"
UID: "0"
image: 127.0.0.1/embedded/writefile
name: add cloud-init config
timeout: 90
- environment:
CONTENTS: |
datasource: Ec2
DEST_DISK: '{{ formatPartition ( index .Hardware.Disks 0 ) 1 }}'
DEST_PATH: /etc/cloud/ds-identify.cfg
DIRMODE: "0700"
FS_TYPE: ext4
GID: "0"
MODE: "0600"
UID: "0"
image: 127.0.0.1/embedded/writefile
name: add cloud-init ds config
timeout: 90
- image: 127.0.0.1/embedded/reboot
name: reboot
pid: host
timeout: 90
volumes:
- /worker:/worker
name: my-cluster-name
volumes:
- /dev:/dev
- /dev/console:/dev/console
- /lib/firmware:/lib/firmware:ro
worker: '{{.device_1}}'
version: "0.1"
TinkerbellTemplateConfig fields
Each Action has its own set of environment variables that are used to configure the Action. EKS Anywhere embeds a set of images into HookOS. This means that when these images are used in an Action they will not be pulled from any external registry. No external network communication is needed to use them. These Actions are prefixed with 127.0.0.1/embedded.
NOTE:
Actions are user-defined and can include any container image that is available to HookOS. You can create your own Action images if the embedded Action images do not meet your requirements.
The following describes the embedded Action images that are available in HookOS and their configuration options.
cexec
127.0.0.1/embedded/cexec
The cexec Action executes either within a chroot environment or within the HookOS filesystem. The primary use case is to provision files and an Operating System to disk, and then execute something that resides within that filesystem.
All options can be set either via environment variables or CLI flags.
CLI flags take precedence over environment variables, which take precedence over default values.
| Env variable |
Flag |
Type |
Default Value |
Required |
Description |
BLOCK_DEVICE |
--block-device |
string |
"" |
yes |
The block device to mount. |
FS_TYPE |
--fs-type |
string |
"" |
yes |
The filesystem type of the block device. |
CHROOT |
--chroot |
string |
"" |
no |
If set to y (or a non empty string), the Action will execute the given command within a chroot environment. This option is DEPRECATED. Future versions will always chroot. |
CMD_LINE |
--cmd-line |
string |
"" |
yes |
The command to execute. |
DEFAULT_INTERPRETER |
--default-interpreter |
string |
"" |
no |
The default interpreter to use when executing commands. This is useful when you need to execute multiple commands. |
UPDATE_RESOLV_CONF |
--update-resolv-conf |
boolean |
false |
no |
If set to true, the cexec Action will update the /etc/resolv.conf file within the chroot environment with the /etc/resolv.conf from the host. |
JSON_OUTPUT |
--json-output |
boolean |
true |
no |
If set to true, the cexec Action will log output in JSON format. This defaults to true. If set to false, the cexec Action will log output in plain text format. |
Any environment variables you set on the Action will be available to the command you execute.
For example, if you set DEBIAN_FRONTEND: noninteractive as an environment variable (DEBIAN_FRONTEND=noninteractive), it will be available to the command you execute.
writefile
127.0.0.1/embedded/writefile
The writefile Action will mount a block device and write a file to a destination path on its filesystem.
| Env variable |
Type |
Required |
Description |
DEST_DISK |
string |
yes |
The block device to mount. |
FS_TYPE |
string |
yes |
The filesystem type of the block device. |
DEST_PATH |
string |
yes |
The path to write the file to. |
CONTENTS |
string |
yes |
The contents of the file to write. |
UID |
string |
yes |
The user ID to set on the file. |
GID |
string |
yes |
The group ID to set on the file. |
MODE |
string |
yes |
The permission bits to set on the file. |
DIRMODE |
string |
yes |
The permission bits to set on the directory. |
The follow field must be set on the Action.
image2disk
127.0.0.1/embedded/image2disk
The image2disk Action will stream either a compressed or not compressed remote image (raw) to a block device.
| Env variable |
Type |
Default Value |
Required |
Description |
| IMG_URL |
string |
"" |
yes |
URL of the image to be streamed. |
| DEST_DISK |
string |
"" |
yes |
Block device to which the image is written. |
| COMPRESSED |
bool |
false |
no |
Decompress the image before writing it to the disk. |
| RETRY_ENABLED |
bool |
false |
no |
Retry the Action, using exponential backoff, for the duration specified in RETRY_DURATION_MINUTES before failing. |
| RETRY_DURATION_MINUTES |
int |
10 |
no |
Duration for which the Action will retry before failing. |
| PROGRESS_INTERVAL_SECONDS |
int |
3 |
no |
Interval at which the progress of the image transfer will be logged. |
| TEXT_LOGGING |
bool |
false |
no |
Output from the Action will be logged in a more human friendly text format, JSON format is used by default. |
oci2disk
127.0.0.1/embedded/oci2disk
The oci2disk Action provides the capability of streaming a raw (compressed) disk image from an OCI compliant-registry to a local block device.
| Env variable |
Type |
Default Value |
Required |
Description |
| IMG_URL |
string |
"" |
yes |
URL of the image to be streamed. |
| DEST_DISK |
string |
"" |
yes |
Block device to which the image is written. |
| COMPRESSED |
bool |
false |
no |
Decompress the image before writing it to the disk. |
kexec
127.0.0.1/embedded/kexec
The kexec Action makes use of the Linux kexec function
to boot directly into a kernel.
| Env variable |
Type |
Default Value |
Required |
Description |
| BLOCK_DEVICE |
string |
"" |
yes |
The block device to mount. |
| FS_TYPE |
string |
"" |
yes |
The filesystem type of the block device. |
| KERNEL_PATH |
string |
"" |
no |
The path to the kernel to boot. When not supplied the kernel path will discovered from /boot/grub/grub.cfg on the BLOCK_DEVICE. |
| INITRD_PATH |
string |
"" |
yes |
The path to the initial ramdisk to boot. |
| CMD_LINE |
string |
"" |
no |
The command line to pass to the kernel. When not supplied, the kernel cmdline parameters will discovered from /boot/grub/grub.cfg on the BLOCK_DEVICE. |
NOTE:
There are known issues related to drivers with some hardware that may make it necessary to replace the kexec Action image with the reboot Action image.
reboot
127.0.0.1/embedded/reboot
The reboot Action will reboot the machine.
The follow fields must be set on the Action.
pid: host
volumes:
- /worker:/worker
Custom Tinkerbell action examples
The following example shows how to add a .deb package (openssl) to a Red Hat Enterprise Linux installation:
- environment:
BLOCK_DEVICE: '{{ formatPartition ( index .Hardware.Disks 0 ) 1 }}' # /dev/sda1
CHROOT: "y"
CMD_LINE: apt -y update && apt -y install openssl
DEFAULT_INTERPRETER: /bin/sh -c
FS_TYPE: ext4
image: 127.0.0.1/embedded/cexec
name: install openssl
timeout: 90
The following shows an example of adding a new user (tinkerbell) to an Ubuntu installation:
- environment:
BLOCK_DEVICE: '{{ formatPartition ( index .Hardware.Disks 0 ) 2 }}' # /dev/sda2
FS_TYPE: ext4
CHROOT: y
DEFAULT_INTERPRETER: "/bin/sh -c"
CMD_LINE: "useradd --password $(openssl passwd -1 tinkerbell) --shell /bin/bash --create-home --groups sudo tinkerbell"
image: 127.0.0.1/embedded/cexec
name: create a user
timeout: 90
Look for more examples as they are added to the Tinkerbell examples
page.
4.7.7 - Customize Bare Metal
Customizing EKS Anywhere on Bare Metal
4.7.7.1 - Boot modes for EKS Anywhere on Bare Metal
OS installation boot modes for EKS Anywhere on Bare Metal
In order to install an Operating System on a machine, the machine needs to boot into the EKS Anywhere Operating System Installation Environment (HookOS). This is accomplished in one of two ways. The first is via the network, also known as PXE boot. This is the default mode. The second is via a virtual CD/DVD device. In EKS Anywhere this is also known as ISO boot.
Network Boot
This is the default boot method used for machines in EKS Anywhere. This method requires the EKS Anywhere Bootstrap and Management Clusters to have layer 2 network access to the machines being booted. The network boot process hands out the initial bootloader location via DHCP. In EKS Anywhere this is the iPXE bootloader. The iPXE bootloader then downloads the EKS Anywhere OSIE image and boots into it. The following is a simplified sequence diagram of the network boot process:
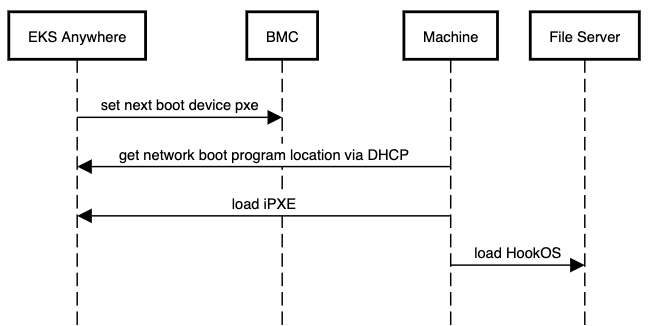
Cluster Spec Configuration - Network Boot
As this is the default method, no additional configuration is required. Follow the installation instructions as normal.
ISO Boot
This method does not require the EKS Anywhere Bootstrap and Management Clusters to have layer 2 network access to the machines being booted. It does not use DHCP or require layer 2 network access. Instead, the EKS Anywhere HookOS image is provided as a CD/DVD ISO file by the Tinkerbell stack. The HookOS ISO is then attached to the machine via the BMC as a virtual CD/DVD device. The machine is then booted into the virtual CD/DVD device and HookOS boots up. The following is a simplified sequence diagram of the ISO boot process:
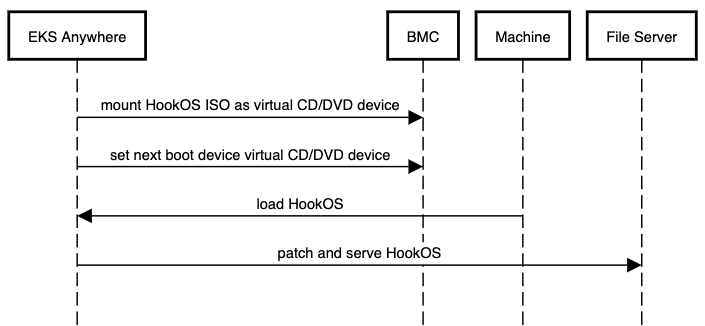
Cluster Spec Configuration - ISO Boot
To enable the ISO boot method there is one required field and one optional field.
- Required:
TinkerbellDatacenterConfig.spec.isoBoot - Set this field to true to enable the ISO boot mode.
- Optional:
TinkerbellDatacenterConfig.spec.isoURL - This field is a string value that specifies the URL to the HookOS ISO file. If this field is not provided, the default HookOS ISO file will be used.
Important
In order to use the ISO boot mode all of the following must be true:
- The BMC info for all machines must be provided in the hardware.csv file.
- All BMCs must have virtual media mounting capabilities with remote HTTP(S) support.
- All BMCs must have Redfish enabled and Redfish must have virtual media mounting capabilities.
spec:
isoBoot: true
hookIsoURL: "http://example.com/hookos.iso"
It is highly recommended that the HookOS ISO file is available locally in your environment and its location is specified in the hookIsoURL field. The default location for the HookOS ISO file is hosted in the cloud by AWS. This means that the Tinkerbell stack, and more specifically the Smee service, will need internet access to this location and Smee will need to pull from this location every time a machine is booted. This can lead to slow boot times and potential boot failures if the internet connection is slow, constrained, or lost.
Run the following commmand to download the HookOS ISO file:
BUNDLE_URL=$(eksctl anywhere version | grep "https://anywhere-assets.eks.amazonaws.com/releases/bundles" | tr -d ' ' | cut -d":" -f2,3)
IMAGE=$(curl -SsL $BUNDLE_URL | grep -E 'uri: .*hook-x86_64-efi-initrd.iso' | uniq | tr -d ' ' | cut -d":" -f2,3)
wget $IMAGE
Make this file available via a web server and put the full URL where this ISO is downloadable in the hookIsoURL field.
4.7.7.2 - Customize HookOS for EKS Anywhere on Bare Metal
Customizing HookOS for EKS Anywhere on Bare Metal
To network boot bare metal machines in EKS Anywhere clusters, machines acquire a kernel and initial ramdisk that is referred to as HookOS.
A default HookOS is provided when you create an EKS Anywhere cluster.
However, there may be cases where you want and/or need to customize the default HookOS, such as to add drivers required to boot your particular type of hardware.
The following procedure describes how to customize and build HookOS.
For more information on Tinkerbell’s HookOS Installation Environment, see the Tinkerbell Hook repo
.
System requirements
>= 2G memory>= 4 CPU cores # the more cores the better for kernel building.>= 20G disk space
Dependencies
Be sure to install all the following dependencies.
jqenvsubstpigzdockercurlbash >= 4.4gitfindutils
-
Clone the Hook repo or your fork of that repo:
git clone https://github.com/tinkerbell/hook.git
cd hook/
-
Run the Linux kernel menuconfig
TUI and configure the kernel as needed. Save the config before you exit.
The result of this step will be a modified kernel configuration file (./kernel/configs/generic-6.6.y-x86_64).
./build.sh kernel-config hook-latest-lts-amd64
-
Build the kernel container image. The result of this step will be a container image. Use docker images quay.io/tinkerbell/hook-kernel to see it.
./build.sh kernel hook-latest-lts-amd64
-
Add the embedded Action images. This creates the file, images.txt, in the images/hook-embedded directory and runs the script, images/hook-embedded/pull-images.sh, to pull and embed the images in the HookOS initramfs.
The result of this step will be a populated images file: images/hook-embedded/images.txt and a Docker directory cache of images: images/hook-embedded/images/.
BUNDLE_URL=$(eksctl anywhere version | grep "https://anywhere-assets.eks.amazonaws.com/releases/bundles" | tr -d ' ' | cut -d":" -f2,3)
IMAGES=$(curl -s $BUNDLE_URL | grep "public.ecr.aws/eks-anywhere/tinkerbell/actions/\|public.ecr.aws/eks-anywhere/tinkerbell/tink/tink-worker" | sort | uniq | tr -d ' ' | cut -d":" -f2,3)
images_file="images/hook-embedded/images.txt"
rm "$images_file"
while read -r image; do
action_name=$(basename "$image" | cut -d":" -f1)
echo "$image 127.0.0.1/embedded/$action_name" >> "$images_file"
done <<< "$IMAGES"
(cd images/hook-embedded; ./pull-images.sh)
-
Build the HookOS kernel and initramfs artifacts. The sudo command is needed as the image embedding step uses Docker-in-Docker (DinD) which changes file ownerships to the root user.
The result of this step will be the kernel and initramfs. These files are located at ./out/hook/vmlinuz-latest-lts-x86_64 and ./out/hook/initramfs-latest-lts-x86_64 respectively.
sudo ./build.sh linuxkit hook-latest-lts-amd64
Note: If you did not customize the kernel configuration, you can use the latest upstream built kernel by setting the USE_LATEST_BUILT_KERNEL to yes. Run this command instead of the previous one.
sudo ./build.sh linuxkit hook-latest-lts-amd64 USE_LATEST_BUILT_KERNEL=yes
-
Rename the kernel and initramfs files to vmlinuz-x86_64 and initramfs-x86_64 respectively.
mv ./out/hook/vmlinuz-latest-lts-x86_64 ./out/hook/vmlinuz-x86_64
mv ./out/hook/initramfs-latest-lts-x86_64 ./out/hook/initramfs-x86_64
-
To use the kernel (vmlinuz-x86_64) and initial ram disk (initramfs-x86_64) when you build your EKS Anywhere cluster, see the description of the hookImagesURLPath
field in your cluster configuration file.
4.7.7.3 - DHCP options for EKS Anywhere
Using your existing DHCP service with EKS Anywhere Bare Metal
In order to facilitate network booting machines, EKS Anywhere bare metal runs its own DHCP server, Boots (a standalone service in the Tinkerbell stack). There can be numerous reasons why you may want to use an existing DHCP service instead of Boots: Security, compliance, access issues, existing layer 2 constraints, existing automation, and so on.
In environments where there is an existing DHCP service, this DHCP service can be configured to interoperate with EKS Anywhere. This document will cover how to make your existing DHCP service interoperate with EKS Anywhere bare metal. In this scenario EKS Anywhere will have no layer 2 DHCP responsibilities.
Note: Currently, Boots is responsible for more than just DHCP. So Boots can’t be entirely avoided in the provisioning process.
Additional Services in Boots
- HTTP and TFTP servers for iPXE binaries
- HTTP server for iPXE script
- Syslog server (receiver)
Process
As a prerequisite, your existing DHCP must serve host/address/static reservations
for all machines that EKS Anywhere bare metal will be provisioning. This means that the IPAM details you enter into your hardware.csv
must be used to create host/address/static reservations in your existing DHCP service.
Now, you configure your existing DHCP service to provide the location of the iPXE binary and script. This is a two-step interaction between machines and the DHCP service and enables the provisioning process to start.
-
Step 1: The machine broadcasts a request to network boot. Your existing DHCP service then provides the machine with all IPAM info as well as the location of the Tinkerbell iPXE binary (ipxe.efi). The machine configures its network interface with the IPAM info then downloads the Tinkerbell iPXE binary from the location provided by the DHCP service and runs it.
-
Step 2: Now with the Tinkerbell iPXE binary loaded and running, iPXE again broadcasts a request to network boot. The DHCP service again provides all IPAM info as well as the location of the Tinkerbell iPXE script (auto.ipxe). iPXE configures its network interface using the IPAM info and then downloads the Tinkerbell iPXE script from the location provided by the DHCP service and runs it.
Note The auto.ipxe is an iPXE script
that tells iPXE from where to download the HookOS
kernel and initrd so that they can be loaded into memory.
The following diagram illustrates the process described above. Note that the diagram only describes the network booting parts of the DHCP interaction, not the exchange of IPAM info.
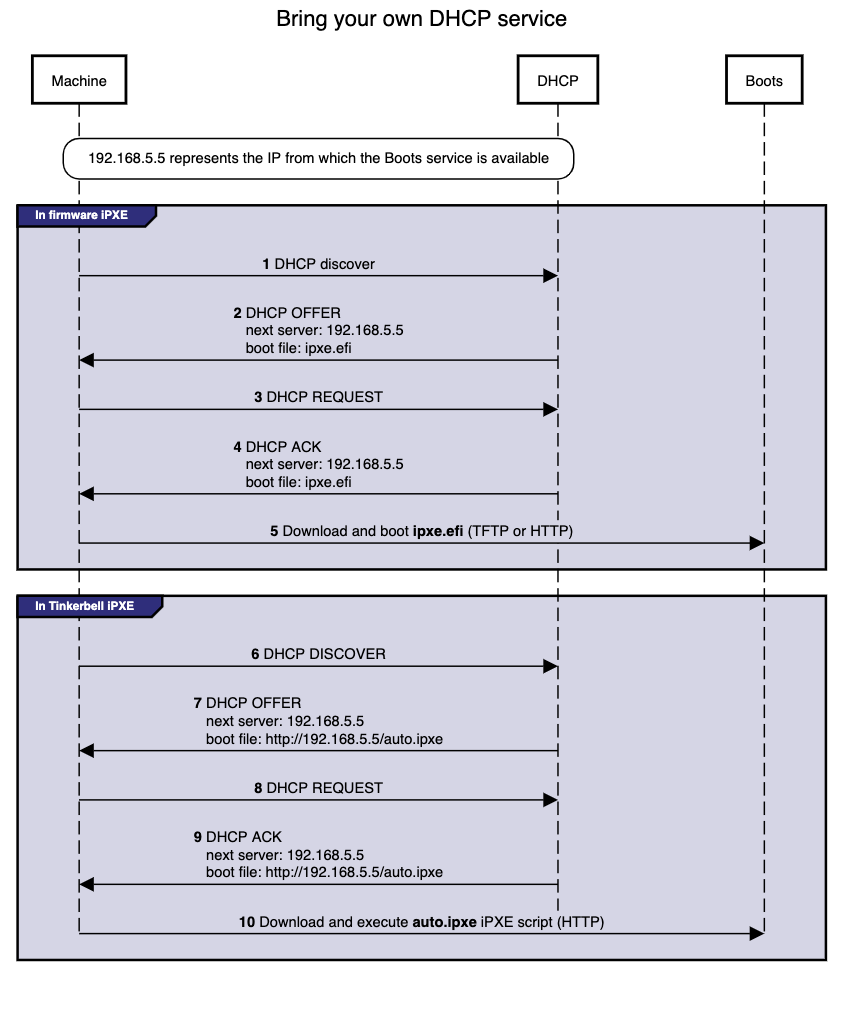
Configuration
Below you will find code snippets showing how to add the two-step process from above to an existing DHCP service. Each config checks if DHCP option 77 (user class option
) equals “Tinkerbell”. If it does match, then the Tinkerbell iPXE script (auto.ipxe) will be served. If option 77 does not match, then the iPXE binary (ipxe.efi) will be served.
DHCP option: next server
Most DHCP services define a next server option. This option generally corresponds to either DHCP option 66 or the DHCP header sname, reference.
This option is used to tell a machine where to download the initial bootloader, reference.
Special consideration is required for the next server value when using EKS Anywhere to create your initial management cluster. This is because during this initial create phase a temporary bootstrap cluster is created and used to provision the management cluster.
The bootstrap cluster runs the Tinkerbell stack. When the management cluster is successfully created, the Tinkerbell stack is redeployed to the management cluster and the bootstrap cluster is deleted. This means that the IP address of the Tinkerbell stack will change.
As a temporary and one-time step, the IP address used by the existing DHCP service for next server will need to be the IP address of the temporary bootstrap cluster. This will be the IP of the Admin node or if you use the cli flag --tinkerbell-bootstrap-ip then that IP should be used for the next server in your existing DHCP service.
Once the management cluster is created, the IP address used by the existing DHCP service for next server will need to be updated to the tinkerbellIP. This IP is defined in your cluster spec at tinkerbellDatacenterConfig.spec.tinkerbellIP. The next server IP will not need to be updated again.
Note: The upgrade phase of a management cluster or the creation of any workload clusters will not require you to change the next server IP in the config of your existing DHCP service.
Code snippets
The following code snippets are generic examples of the config needed to enable the two-step process to an existing DHCP service. It does not cover the IPAM info that is also required.
dnsmasq
dnsmasq.conf
dhcp-match=tinkerbell, option:user-class, Tinkerbell
dhcp-boot=tag:!tinkerbell,ipxe.efi,none,192.168.2.112
dhcp-boot=tag:tinkerbell,http://192.168.2.112/auto.ipxe
Kea DHCP
kea.json
{
"Dhcp4": {
"client-classes": [
{
"name": "tinkerbell",
"test": "substring(option[77].hex,0,10) == 'Tinkerbell'",
"boot-file-name": "http://192.168.2.112/auto.ipxe"
},
{
"name": "default",
"test": "not(substring(option[77].hex,0,10) == 'Tinkerbell')",
"boot-file-name": "ipxe.efi"
}
],
"subnet4": [
{
"next-server": "192.168.2.112"
}
]
}
}
ISC DHCP
dhcpd.conf
if exists user-class and option user-class = "Tinkerbell" {
filename "http://192.168.2.112/auto.ipxe";
} else {
filename "ipxe.efi";
}
next-server "192.168.1.112";
Microsoft DHCP server
Please follow the ipxe.org guide
on how to configure Microsoft DHCP server.
4.8 - Create Snow cluster
Create an EKS Anywhere cluster on Snow
4.8.1 - Create Snow cluster
Create an EKS Anywhere cluster on AWS Snowball Edge
EKS Anywhere supports an AWS Snow provider for EKS Anywhere deployments.
This document walks you through setting up EKS Anywhere on Snow as a standalone, self-managed cluster or combined set of management/workload clusters.
See Cluster topologies
for details.
Note: Before you create your cluster, you have the option of validating the EKS Anywhere bundle manifest container images by following instructions in the Verify Cluster Images
page.
Prerequisite checklist
EKS Anywhere on Snow needs:
Also, see the Ports and protocols
page for information on ports that need to be accessible from control plane, worker, and Admin machines.
Steps
The following steps are divided into two sections:
- Create an initial cluster (used as a management or standalone cluster)
- Create zero or more workload clusters from the management cluster
Create an initial cluster
Follow these steps to create an EKS Anywhere cluster that can be used either as a management cluster or as a standalone cluster (for running workloads itself).
-
Optional Configuration
Set License Environment Variable
Add a license to any cluster for which you want to receive paid support. If you are creating a licensed cluster, set and export the license variable (see License cluster
if you are licensing an existing cluster):
export EKSA_LICENSE='my-license-here'
After you have created your eksa-mgmt-cluster.yaml and set your credential environment variables, you will be ready to create the cluster.
Configure Curated Packages
The Amazon EKS Anywhere Curated Packages are only available to customers with the Amazon EKS Anywhere Enterprise Subscription. To request a free trial, talk to your Amazon representative or connect with one here
. Cluster creation will succeed if authentication is not set up, but some warnings may be genered. Detailed package configurations can be found here
.
If you are going to use packages, set up authentication. These credentials should have limited capabilities
:
export EKSA_AWS_ACCESS_KEY_ID="your*access*id"
export EKSA_AWS_SECRET_ACCESS_KEY="your*secret*key"
export EKSA_AWS_REGION="us-west-2"
-
Set an environment variables for your cluster name
-
Generate a cluster config file for your Snow provider
eksctl anywhere generate clusterconfig $CLUSTER_NAME --provider snow > eksa-mgmt-cluster.yaml
-
Optionally import images to private registry
This optional step imports EKS Anywhere artifacts and release bundle to a local registry. This is required for air-gapped installation.
eksctl anywhere import images \
--input /usr/lib/eks-a/artifacts/artifacts.tar.gz \
--bundles /usr/lib/eks-a/manifests/bundle-release.yaml \
--registry $PRIVATE_REGISTRY_ENDPOINT \
--insecure=true
-
Modify the cluster config (eksa-mgmt-cluster.yaml) as follows:
- Refer to the Snow configuration
for information on configuring this cluster config for a Snow provider.
- Add Optional
configuration settings as needed.
-
Set Credential Environment Variables
Before you create the initial cluster, you will need to use the credentials and ca-bundles files that are in the Admin instance, and export these environment variables for your AWS Snowball device credentials.
Make sure you use single quotes around the values so that your shell does not interpret the values:
export EKSA_AWS_CREDENTIALS_FILE='/PATH/TO/CREDENTIALS/FILE'
export EKSA_AWS_CA_BUNDLES_FILE='/PATH/TO/CABUNDLES/FILE'
After you have created your eksa-mgmt-cluster.yaml and set your credential environment variables, you will be ready to create the cluster.
-
Create cluster
For a regular cluster create (with internet access), type the following:
eksctl anywhere create cluster \
-f eksa-mgmt-cluster.yaml
For an airgapped cluster create, follow Preparation for airgapped deployments
instructions, then type the following:
eksctl anywhere create cluster \
-f eksa-mgmt-cluster.yaml \
--bundles-override /usr/lib/eks-a/manifests/bundle-release.yaml
-
Once the cluster is created you can use it with the generated KUBECONFIG file in your local directory:
export KUBECONFIG=${PWD}/${CLUSTER_NAME}/${CLUSTER_NAME}-eks-a-cluster.kubeconfig
-
Check the cluster nodes:
To check that the cluster completed, list the machines to see the control plane and worker nodes:
Example command output:
NAMESPACE NAME CLUSTER NODENAME PROVIDERID PHASE AGE VERSION
eksa-system mgmt-etcd-dsxb5 mgmt aws-snow:///192.168.1.231/s.i-8b0b0631da3b8d9e4 Running 4m59s
eksa-system mgmt-md-0-7b7c69cf94-99sll mgmt mgmt-md-0-1-58nng aws-snow:///192.168.1.231/s.i-8ebf6b58a58e47531 Running 4m58s v1.24.9-eks-1-24-7
eksa-system mgmt-srrt8 mgmt mgmt-control-plane-1-xs4t9 aws-snow:///192.168.1.231/s.i-8414c7fcabcf3d7c1 Running 4m58s v1.24.9-eks-1-24-7
...
-
Check the cluster:
You can now use the cluster as you would any Kubernetes cluster.
To try it out, run the test application with:
export CLUSTER_NAME=mgmt
export KUBECONFIG=${PWD}/${CLUSTER_NAME}/${CLUSTER_NAME}-eks-a-cluster.kubeconfig
kubectl apply -f "https://anywhere.eks.amazonaws.com/manifests/hello-eks-a.yaml"
Verify the test application in Deploy test workload
.
Create separate workload clusters
Follow these steps if you want to use your initial cluster to create and manage separate workload clusters.
-
Set License Environment Variable (Optional)
Add a license to any cluster for which you want to receive paid support. If you are creating a licensed cluster, set and export the license variable (see License cluster
if you are licensing an existing cluster):
export EKSA_LICENSE='my-license-here'
-
Generate a workload cluster config:
CLUSTER_NAME=w01
eksctl anywhere generate clusterconfig $CLUSTER_NAME \
--provider snow > eksa-w01-cluster.yaml
Refer to the initial config described earlier for the required and optional settings.
NOTE: Ensure workload cluster object names (Cluster, SnowDatacenterConfig, SnowMachineConfig, etc.) are distinct from management cluster object names.
-
Be sure to set the managementCluster field to identify the name of the management cluster.
For example, the management cluster, mgmt is defined for our workload cluster w01 as follows:
apiVersion: anywhere.eks.amazonaws.com/v1alpha1
kind: Cluster
metadata:
name: w01
spec:
managementCluster:
name: mgmt
-
Create a workload cluster in one of the following ways:
-
GitOps: See Manage separate workload clusters with GitOps
-
Terraform: See Manage separate workload clusters with Terraform
NOTE: snowDatacenterConfig.spec.identityRef and a Snow bootstrap credentials secret need to be specified when provisioning a cluster through GitOps or Terraform, as EKS Anywhere Cluster Controller will not create a Snow bootstrap credentials secret like eksctl CLI does when field is empty.
snowMachineConfig.spec.sshKeyName must be specified to SSH into your nodes when provisioning a cluster through GitOps or Terraform, as the EKS Anywhere Cluster Controller will not generate the keys like eksctl CLI does when the field is empty.
-
eksctl CLI: To create a workload cluster with eksctl, run:
eksctl anywhere create cluster \
-f eksa-w01-cluster.yaml \
--kubeconfig mgmt/mgmt-eks-a-cluster.kubeconfig
As noted earlier, adding the --kubeconfig option tells eksctl to use the management cluster identified by that kubeconfig file to create a different workload cluster.
-
kubectl CLI: The cluster lifecycle feature lets you use kubectl, or other tools that that can talk to the Kubernetes API, to create a workload cluster. To use kubectl, run:
kubectl apply -f eksa-w01-cluster.yaml
To check the state of a cluster managed with the cluster lifecyle feature, use kubectl to show the cluster object with its status.
The status field on the cluster object field holds information about the current state of the cluster.
kubectl get clusters w01 -o yaml
The cluster has been fully upgraded once the status of the Ready condition is marked True.
See the cluster status
guide for more information.
-
Check the workload cluster:
You can now use the workload cluster as you would any Kubernetes cluster.
-
If your workload cluster was created with eksctl,
change your credentials to point to the new workload cluster (for example, w01), then run the test application with:
export CLUSTER_NAME=w01
export KUBECONFIG=${PWD}/${CLUSTER_NAME}/${CLUSTER_NAME}-eks-a-cluster.kubeconfig
kubectl apply -f "https://anywhere.eks.amazonaws.com/manifests/hello-eks-a.yaml"
-
If your workload cluster was created with GitOps or Terraform, the kubeconfig for your new cluster is stored as a secret on the management cluster.
You can get credentials and run the test application as follows:
kubectl get secret -n eksa-system w01-kubeconfig -o jsonpath=‘{.data.value}' | base64 —decode > w01.kubeconfig
export KUBECONFIG=w01.kubeconfig
kubectl apply -f "https://anywhere.eks.amazonaws.com/manifests/hello-eks-a.yaml"
Verify the test application in the deploy test application section.
-
Add more workload clusters:
To add more workload clusters, go through the same steps for creating the initial workload, copying the config file to a new name (such as eksa-w02-cluster.yaml), modifying resource names, and running the create cluster command again.
Next steps:
-
See the Cluster management
section for more information on common operational tasks like deleting the cluster.
-
See the Package management
section for more information on post-creation curated packages installation.
4.8.2 - Configure for Snow
Full EKS Anywhere configuration reference for a AWS Snow cluster.
This is a generic template with detailed descriptions below for reference.
The following additional optional configuration can also be included:
apiVersion: anywhere.eks.amazonaws.com/v1alpha1
kind: Cluster
metadata:
name: my-cluster-name
spec:
clusterNetwork:
cniConfig:
cilium: {}
pods:
cidrBlocks:
- 10.1.0.0/16
services:
cidrBlocks:
- 10.96.0.0/12
controlPlaneConfiguration:
count: 3
endpoint:
host: ""
machineGroupRef:
kind: SnowMachineConfig
name: my-cluster-machines
datacenterRef:
kind: SnowDatacenterConfig
name: my-cluster-datacenter
externalEtcdConfiguration:
count: 3
machineGroupRef:
kind: SnowMachineConfig
name: my-cluster-machines
kubernetesVersion: "1.35"
workerNodeGroupConfigurations:
- count: 1
machineGroupRef:
kind: SnowMachineConfig
name: my-cluster-machines
name: md-0
---
apiVersion: anywhere.eks.amazonaws.com/v1alpha1
kind: SnowDatacenterConfig
metadata:
name: my-cluster-datacenter
spec: {}
---
apiVersion: anywhere.eks.amazonaws.com/v1alpha1
kind: SnowMachineConfig
metadata:
name: my-cluster-machines
spec:
amiID: ""
instanceType: sbe-c.large
sshKeyName: ""
osFamily: ubuntu
devices:
- ""
containersVolume:
size: 25
network:
directNetworkInterfaces:
- index: 1
primary: true
ipPoolRef:
kind: SnowIPPool
name: ip-pool-1
---
apiVersion: anywhere.eks.amazonaws.com/v1alpha1
kind: SnowIPPool
metadata:
name: ip-pool-1
spec:
pools:
- ipStart: 192.168.1.2
ipEnd: 192.168.1.14
subnet: 192.168.1.0/24
gateway: 192.168.1.1
- ipStart: 192.168.1.55
ipEnd: 192.168.1.250
subnet: 192.168.1.0/24
gateway: 192.168.1.1
Cluster Fields
name (required)
Name of your cluster my-cluster-name in this example
clusterNetwork (required)
Network configuration.
clusterNetwork.cniConfig (required)
CNI plugin configuration. Supports cilium.
clusterNetwork.cniConfig.cilium.policyEnforcementMode (optional)
Optionally specify a policyEnforcementMode of default, always or never.
clusterNetwork.cniConfig.cilium.egressMasqueradeInterfaces (optional)
Optionally specify a network interface name or interface prefix used for
masquerading. See EgressMasqueradeInterfaces
option.
clusterNetwork.cniConfig.cilium.skipUpgrade (optional)
When true, skip Cilium maintenance during upgrades. Also see Use a custom
CNI.
clusterNetwork.cniConfig.cilium.routingMode (optional)
Optionally specify the routing mode. Accepts default and direct. Also see RoutingMode
option.
clusterNetwork.cniConfig.cilium.ipv4NativeRoutingCIDR (optional)
Optionally specify the CIDR to use when RoutingMode is set to direct.
When specified, Cilium assumes networking for this CIDR is preconfigured and
hands traffic destined for that range to the Linux network stack without
applying any SNAT.
clusterNetwork.cniConfig.cilium.ipv6NativeRoutingCIDR (optional)
Optionally specify the IPv6 CIDR to use when RoutingMode is set to direct.
When specified, Cilium assumes networking for this CIDR is preconfigured and
hands traffic destined for that range to the Linux network stack without
applying any SNAT.
clusterNetwork.cniConfig.cilium.cniExclusive (optional)
Controls whether Cilium should remove other CNI configuration files.
When true (default), Cilium removes other CNI configs; when false, it leaves them alone.
For more information, see CNI Exclusive Mode configuration.
clusterNetwork.pods.cidrBlocks[0] (required)
The pod subnet specified in CIDR notation. Only 1 pod CIDR block is permitted.
The CIDR block should not conflict with the host or service network ranges.
clusterNetwork.services.cidrBlocks[0] (required)
The service subnet specified in CIDR notation. Only 1 service CIDR block is
permitted.
This CIDR block should not conflict with the host or pod network ranges.
clusterNetwork.dns.resolvConf.path (optional)
File path to a file containing a custom DNS resolver configuration.
controlPlaneConfiguration (required)
Specific control plane configuration for your Kubernetes cluster.
controlPlaneConfiguration.count (required)
Number of control plane nodes
controlPlaneConfiguration.machineGroupRef (required)
Refers to the Kubernetes object with Snow specific configuration for your nodes. See SnowMachineConfig Fields below.
controlPlaneConfiguration.endpoint.host (required)
A unique IP you want to use for the control plane VM in your EKS Anywhere cluster. Choose an IP in your network
range that does not conflict with other devices.
NOTE: This IP should be outside the network DHCP range as it is a floating IP that gets assigned to one of
the control plane nodes for kube-apiserver loadbalancing.
controlPlaneConfiguration.taints (optional)
A list of taints to apply to the control plane nodes of the cluster.
Replaces the default control plane taint. For k8s versions prior to 1.24, it replaces node-role.kubernetes.io/master. For k8s versions 1.24+, it replaces node-role.kubernetes.io/control-plane. The default control plane components will tolerate the provided taints.
Modifying the taints associated with the control plane configuration will cause new nodes to be rolled-out, replacing the existing nodes.
NOTE: The taints provided will be used instead of the default control plane taint.
Any pods that you run on the control plane nodes must tolerate the taints you provide in the control plane configuration.
controlPlaneConfiguration.labels (optional)
A list of labels to apply to the control plane nodes of the cluster. This is in addition to the labels that
EKS Anywhere will add by default.
Modifying the labels associated with the control plane configuration will cause new nodes to be rolled out, replacing
the existing nodes.
workerNodeGroupConfigurations (required)
This takes in a list of node groups that you can define for your workers.
You may define one or more worker node groups.
workerNodeGroupConfigurations[*].count (optional)
Number of worker nodes. (default: 1) It will be ignored if the cluster autoscaler curated package
is installed and autoscalingConfiguration is used to specify the desired range of replicas.
Refers to troubleshooting machine health check remediation not allowed
and choose a sufficient number to allow machine health check remediation.
workerNodeGroupConfigurations[*].machineGroupRef (required)
Refers to the Kubernetes object with Snow specific configuration for your nodes. See SnowMachineConfig Fields below.
workerNodeGroupConfigurations[*].name (required)
Name of the worker node group (default: md-0)
workerNodeGroupConfigurations[*].autoscalingConfiguration.minCount (optional)
Minimum number of nodes for this node group’s autoscaling configuration.
workerNodeGroupConfigurations[*].autoscalingConfiguration.maxCount (optional)
Maximum number of nodes for this node group’s autoscaling configuration.
workerNodeGroupConfigurations[*].taints (optional)
A list of taints to apply to the nodes in the worker node group.
Modifying the taints associated with a worker node group configuration will cause new nodes to be rolled-out, replacing the existing nodes associated with the configuration.
At least one node group must not have NoSchedule or NoExecute taints applied to it.
workerNodeGroupConfigurations[*].labels (optional)
A list of labels to apply to the nodes in the worker node group. This is in addition to the labels that
EKS Anywhere will add by default.
Modifying the labels associated with a worker node group configuration will cause new nodes to be rolled out, replacing
the existing nodes associated with the configuration.
workerNodeGroupConfigurations[*].kubernetesVersion (optional)
The Kubernetes version you want to use for this worker node group. The Kubernetes versions supported by your EKS Anywhere version are tabulated in this
section.
Known issue related to Kubernetes versions whose minor version is a multiple of 10
Must be less than or equal to the cluster kubernetesVersion defined at the root level of the cluster spec. The worker node Kubernetes version must be no more than two minor Kubernetes versions lower than the cluster control plane’s Kubernetes version. Removing workerNodeGroupConfiguration.kubernetesVersion will trigger an upgrade of the node group to the kubernetesVersion defined at the root level of the cluster spec.
externalEtcdConfiguration.count (optional)
Number of etcd members.
externalEtcdConfiguration.machineGroupRef (optional)
Refers to the Kubernetes object with Snow specific configuration for your etcd members. See SnowMachineConfig Fields below.
datacenterRef (required)
Refers to the Kubernetes object with Snow environment specific configuration. See SnowDatacenterConfig Fields below.
kubernetesVersion (required)
The Kubernetes version you want to use for your cluster. The Kubernetes versions supported by your EKS Anywhere version are tabulated in this
section.
Known issue related to Kubernetes versions whose minor version is a multiple of 10
SnowDatacenterConfig Fields
identityRef (required)
Refers to the Kubernetes secret object with Snow devices credentials used to reconcile the cluster.
SnowMachineConfig Fields
amiID (optional)
AMI ID from which to create the machine instance. Snow provider offers an AMI lookup logic which will look for a suitable AMI ID based on the Kubernetes version and osFamily if the field is empty.
instanceType (optional)
Type of the Snow EC2 machine instance. See Quotas for Compute Instances on a Snowball Edge Device
for supported instance types on Snow (Default: sbe-c.large).
osFamily
Operating System on instance machines. Permitted value: ubuntu.
physicalNetworkConnector (optional)
Type of snow physical network connector to use for creating direct network interfaces. Permitted values: SFP_PLUS, QSFP, RJ45 (Default: SFP_PLUS).
sshKeyName (optional)
Name of the AWS Snow SSH key pair you want to configure to access your machine instances.
The default is eksa-default-{cluster-name}-{uuid}.
devices
A device IP list from which to bootstrap and provision machine instances.
network
Custom network setting for the machine instances. DHCP and static IP configurations are supported.
network.directNetworkInterfaces[0].index (optional)
Index number of a direct network interface (DNI) used to clarify the position in the list. Must be no smaller than 1 and no greater than 8.
network.directNetworkInterfaces[0].primary (optional)
Whether the DNI is primary or not. One and only one primary DNI is required in the directNetworkInterfaces list.
network.directNetworkInterfaces[0].vlanID (optional)
VLAN ID to use for the DNI.
network.directNetworkInterfaces[0].dhcp (optional)
Whether DHCP is to be used to assign IP for the DNI.
network.directNetworkInterfaces[0].ipPoolRef (optional)
Refers to a SnowIPPool object which provides a range of ip addresses. When specified, an IP address selected from the pool will be allocated to the DNI.
containersVolume (optional)
Configuration option for customizing containers data storage volume.
containersVolume.size (optional)
Size of the storage for containerd runtime in Gi.
The field is optional for Ubuntu and if specified, the size must be no smaller than 8 Gi.
containersVolume.deviceName (optional)
Containers volume device name.
containersVolume.type (optional)
Type of the containers volume. Permitted values: sbp1, sbg1. (Default: sbp1)
sbp1 stands for capacity-optimized HDD. sbg1 is performance-optimized SSD.
nonRootVolumes (optional)
Configuration options for the non root storage volumes.
nonRootVolumes[0].deviceName (optional)
Non root volume device name. Must be specified and cannot have prefix “/dev/sda” as it is reserved for root volume and containers volume.
nonRootVolumes[0].size (optional)
Size of the storage device for the non root volume. Must be no smaller than 8 Gi.
nonRootVolumes[0].type (optional)
Type of the non root volume. Permitted values: sbp1, sbg1. (Default: sbp1)
sbp1 stands for capacity-optimized HDD. sbg1 is performance-optimized SSD.
SnowIPPool Fields
pools[0].ipStart (optional)
Start address of an IP range.
pools[0].ipEnd (optional)
End address of an IP range.
pools[0].subnet (optional)
An IP subnet for determining whether an IP is within the subnet.
pools[0].gateway (optional)
Gateway of the subnet for routing purpose.
4.9 - Create CloudStack cluster
Create an EKS Anywhere cluster on Apache CloudStack
4.9.1 - Requirements for EKS Anywhere on CloudStack
CloudStack provider requirements for EKS Anywhere
To run EKS Anywhere, you will need:
Prepare Administrative machine
Set up an Administrative machine as described in Install EKS Anywhere
.
Prepare a CloudStack environment
To prepare a CloudStack environment to run EKS Anywhere, you need the following:
-
A CloudStack 4.14 or later environment. CloudStack 4.16 is used for examples in these docs.
-
Capacity to deploy 6-10 VMs.
-
One shared network in CloudStack to use for the cluster. EKS Anywhere clusters need access to CloudStack through the network to enable self-managing and storage capabilities.
-
A Red Hat Enterprise Linux qcow2 image built using the image-builder tool as described in artifacts
.
-
User credentials (CloudStack API key and Secret key) to create VMs and attach networks in CloudStack.
-
Prepare DHCP IP addresses pool
-
One IP address routable from the cluster but excluded from DHCP offering. This IP address is to be used as the Control Plane Endpoint IP. Below are some suggestions to ensure that this IP address is never handed out by your DHCP server. You may need to contact your network engineer.
- Pick an IP address reachable from the cluster subnet which is excluded from DHCP range OR
- Alter DHCP ranges to leave out an IP address(s) at the top and/or the bottom of the range OR
- Create an IP reservation for this IP on your DHCP server. This is usually accomplished by adding a dummy mapping of this IP address to a non-existent mac address.
Each VM will require:
- 2 vCPUs
- 8GB RAM
- 25GB Disk
The administrative machine and the target workload environment will need network access (TCP/443) to:
You need at least the following information before creating the cluster.
See CloudStack configuration
for a complete list of options and Preparing CloudStack
for instructions on creating the assets.
- Static IP Addresses: You will need one IP address for the management cluster control plane endpoint, and a separate one for the controlplane of each workload cluster you add.
Let’s say you are going to have the management cluster and two workload clusters. For those, you would need three IP addresses, one for each. All of those addresses will be configured the same way in the configuration file you will generate for each cluster.
A static IP address will be used for each control plane VM in your EKS Anywhere cluster. Choose IP addresses in your network range that do not conflict with other VMs and make sure they are excluded from your DHCP offering.
An IP address will be the value of the property controlPlaneConfiguration.endpoint.host in the config file of the management cluster. A separate IP address must be assigned for each workload cluster.
- CloudStack datacenter: You need the name of the CloudStack Datacenter plus the following for each Availability Zone (availabilityZones). Most items can be represented by name or ID:
- Account (account): Account with permission to create a cluster (optional, admin by default).
- Credentials (credentialsRef): Credentials provided in an ini file used to access the CloudStack API endpoint. See CloudStack Getting started
for details.
- Domain (domain): The CloudStack domain in which to deploy the cluster (optional, ROOT by default)
- Management endpoint (managementApiEndpoint): Endpoint for a cloudstack client to make API calls to client.
- Zone network (zone.network): Either name or ID of the network.
- CloudStack machine configuration: For each set of machines (for example, you could configure separate set of machines for control plane, worker, and etcd nodes), obtain the following information. This must be predefined in the cloudStack instance and identified by name or ID:
- Compute offering (computeOffering): Choose an existing compute offering (such as
large-instance), reflecting the amount of resources to apply to each VM.
- Operating system (template): Identifies the operating system image to use (such as rhel8-k8s-118).
- Users (users.name): Identifies users and SSH keys needed to access the VMs.
4.9.2 - Preparing CloudStack for EKS Anywhere
Set up a CloudStack cluster to prepare it for EKS Anywhere
Before you can create an EKS Anywhere cluster in CloudStack, you must do some setup on your CloudStack environment.
This document helps you get what you need to fulfill the prerequisites described in the Requirements
and values you need for CloudStack configuration
.
Set up a domain and user credentials
Either use the ROOT domain or create a new domain to deploy your EKS Anywhere cluster.
One or more users are grouped under a domain.
This example creates a user account for the domain with a Domain Administrator role.
From the apachecloudstack console:
-
Select Domains.
-
Select Add Domain.
-
Fill in the Name for the domain (eksa in this example) and select OK.
-
Select Accounts -> Add Account, then fill in the form to add a user with DomainAdmin role, as shown in the following figure:
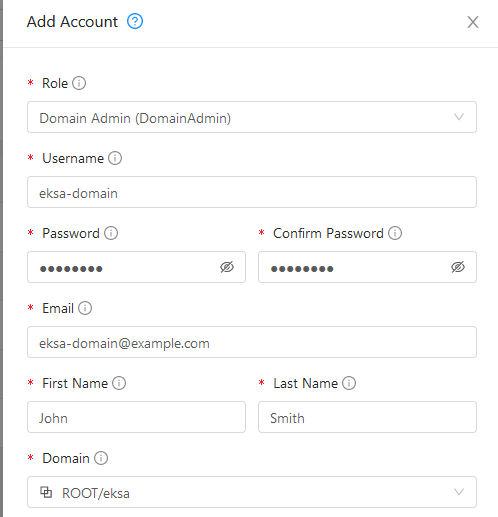
-
To generate API credentials for the user, select Accounts-> -> View Users -> and select the Generate Keys button.
-
Select OK to confirm key generation. The API Key and Secret Key should appear as shown in the following figure:
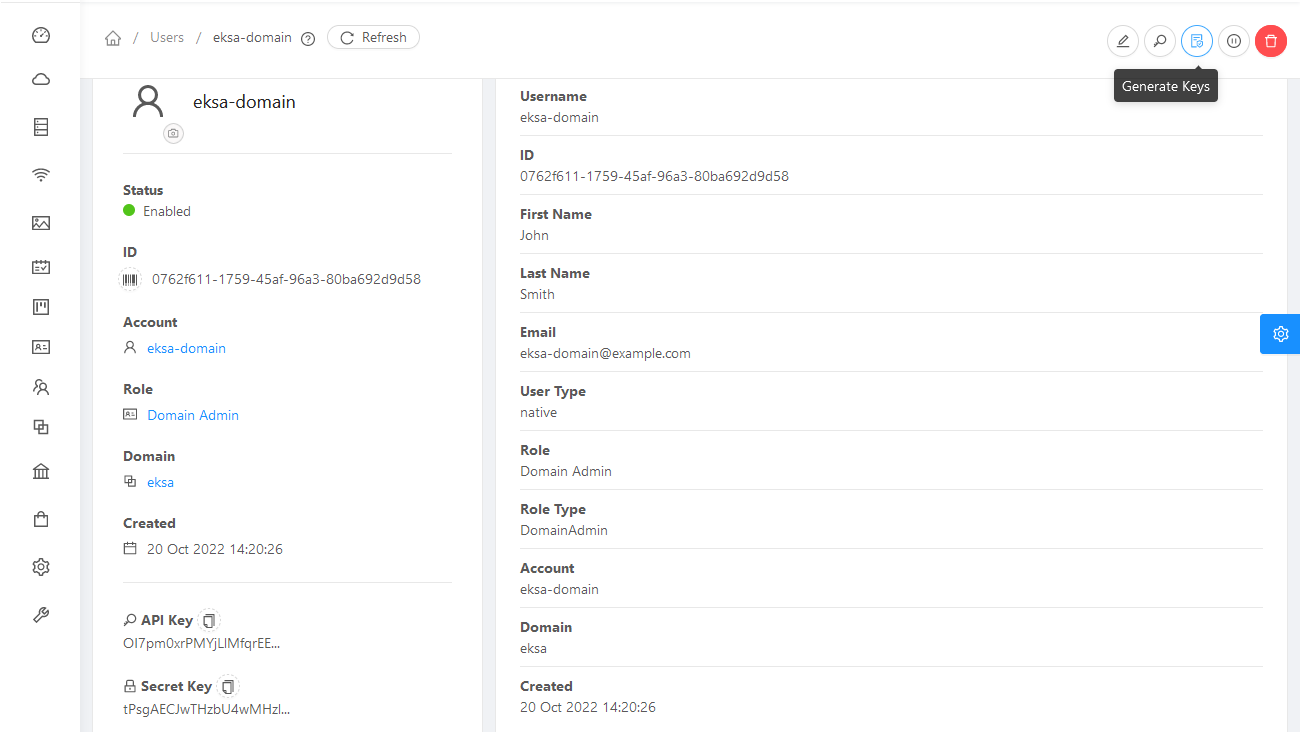
-
Copy the API Key and Secret Key to a credentials file to use when you generate your cluster. For example:
[Global]
api-url = http://10.0.0.2:8080/client/api
api-key = OI7pm0xrPMYjLlMfqrEEj...
secret-key = tPsgAECJwTHzbU4wMH...
Import template
You need to build at least one operating system image and import it as a template to use for your cluster nodes.
Currently, only Red Hat Enterprise Linux 8 images are supported.
To build a RHEL-based image to use with EKS Anywhere, see Build node images
.
-
Make your image accessible from you local machine or from a URL that is accessible to your CloudStack setup.
-
Select Images -> Templates, then select either Register Template from URL or Select local Template. The following figure lets you register a template from URL:
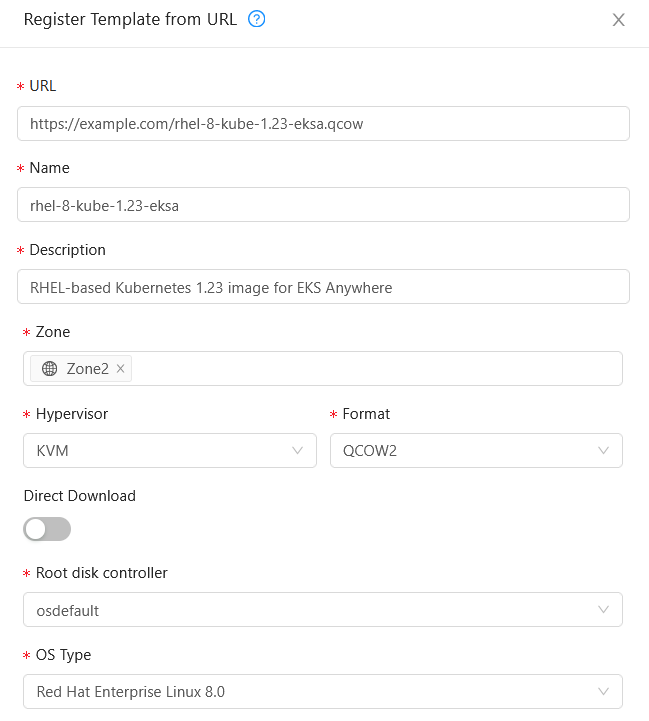
This example imports a RHEL image (QCOW2), identifies the zone from which it will be available, uses KVM as the hypervisor, uses the osdefault Root disk controller, and identifies the OS Type as Red Hat Enterprise Linux 8.0. Select OK to save the template.
-
Note the template name and zone so you can use it later when you deploy your cluster.
Create CloudStack configurations
Take a look at the following CloudStack configuration settings before creating your EKS Anywhere cluster.
You will need to identify many of these assets when you create you cluster specification:
Here is how to get information to go into the CloudStackDatacenterConfig section of the CloudStack cluster configuration file:
-
Domain: Select Domains, then select your domain name from under the ROOT domain. Select View Users, not the user with the Domain Admin role, and consider setting limits to what each user can consume from the Resources and Configure Limits tabs.
-
Zones: Select Infrastructure -> Zones. Find a Zone where you can deploy your cluster or create a new one.
-
Network: Select Network -> Guest networks. Choose a network to use for your cluster or create a new one.
Here is what some of that information would look like in a cluster configuration:
apiVersion: anywhere.eks.amazonaws.com/v1alpha1
kind: CloudStackDatacenterConfig
metadata:
name: my-cluster-name-datacenter
spec:
availabilityZones:
- account: admin
credentialsRef: global
domain: eksa
managementApiEndpoint: ""
name: az-1
zone:
name: Zone2
network:
name: "SharedNet2"
Here is how to get information to go into CloudStackMachineConfig sections of the CloudStack cluster configuration file:
-
computeOffering: Select Service Offerings -> Compute Offerings to see a list of available combinations of CPU cores, CPU, and memory to apply to your node instances. See the following figure for an example:
-
template: Select Images -> Templates to see available operating system image templates.
-
diskOffering: Select Storage -> Volumes, the select Create Volume, if you want to create disk storage to attach to your nodes (optional). You can use this to store logs or other data you want saved outside of the nodes. When you later create the cluster configuration, you can identify things like where you want the device mounted, the type of file system, labels and other information.
-
AffinityGroupIds: Select Compute -> Affinity Groups, then select Add new affinity group (optional). By creating an affinity group, you can tell all VMs from a set of instances to either all run on different physical hosts (anti-affinity) or just run anywhere they can (affinity).
Here is what some of that information would look like in a cluster configuration:
apiVersion: anywhere.eks.amazonaws.com/v1alpha1
kind: CloudStackMachineConfig
metadata:
name: my-cluster-name-cp
spec:
computeOffering:
name: "Medium Instance"
template:
name: "rhel9-kube-1.35-eksa"
diskOffering:
name: "Small"
mountPath: "/data-small"
device: "/dev/vdb"
filesystem: "ext4"
label: "data_disk"
symlinks:
/var/log/kubernetes: /data-small/var/log/kubernetes
affinityGroupIds:
- control-plane-anti-affinity
4.9.3 - Create CloudStack cluster
Create a cluster on CloudStack
Important: AWS CloudStack Availability
Effective with EKS Anywhere release v0.26, AWS will remove the Cluster API providers for CloudStack and AWS Snow from the EKS Anywhere distribution. Following this release, these providers will no longer be maintained, updated, or supported by AWS. Customers currently using these providers are encouraged to find alternative solutions.
EKS Anywhere supports a CloudStack provider for EKS Anywhere deployments.
This document walks you through setting up EKS Anywhere on CloudStack in a way that:
- Deploys an initial cluster on your CloudStack environment. That cluster can be used as a standalone cluster (to run workloads) or a management cluster (to create and manage other clusters)
- Deploys zero or more workload clusters from the management cluster
If your initial cluster is a management cluster, it is intended to stay in place so you can use it later to modify, upgrade, and delete workload clusters.
Using a management cluster makes it faster to provision and delete workload clusters.
Also it lets you keep CloudStack credentials for a set of clusters in one place: on the management cluster.
The alternative is to simply use your initial cluster to run workloads.
See Cluster topologies
for details.
Important
Creating an EKS Anywhere management cluster is the recommended model.
Separating management features into a separate, persistent management cluster
provides a cleaner model for managing the lifecycle of workload clusters (to create, upgrade, and delete clusters), while workload clusters run user applications.
This approach also reduces provider permissions for workload clusters.
Note: Before you create your cluster, you have the option of validating the EKS Anywhere bundle manifest container images by following instructions in the Verify Cluster Images
page.
Prerequisite Checklist
EKS Anywhere needs to:
Also, see the Ports and protocols
page for information on ports that need to be accessible from control plane, worker, and Admin machines.
Steps
The following steps are divided into two sections:
- Create an initial cluster (used as a management or standalone cluster)
- Create zero or more workload clusters from the management cluster
Create an initial cluster
Follow these steps to create an EKS Anywhere cluster that can be used either as a management cluster or as a standalone cluster (for running workloads itself).
-
Optional Configuration
Set License Environment Variable
Add a license to any cluster for which you want to receive paid support. If you are creating a licensed cluster, set and export the license variable (see License cluster
if you are licensing an existing cluster):
export EKSA_LICENSE='my-license-here'
After you have created your eksa-mgmt-cluster.yaml and set your credential environment variables, you will be ready to create the cluster.
Configure Curated Packages
The Amazon EKS Anywhere Curated Packages are only available to customers with the Amazon EKS Anywhere Enterprise Subscription. To request a free trial, talk to your Amazon representative or connect with one here
. Cluster creation will succeed if authentication is not set up, but some warnings may be genered. Detailed package configurations can be found here
.
If you are going to use packages, set up authentication. These credentials should have limited capabilities
:
export EKSA_AWS_ACCESS_KEY_ID="your*access*id"
export EKSA_AWS_SECRET_ACCESS_KEY="your*secret*key"
export EKSA_AWS_REGION="us-west-2"
-
Generate an initial cluster config (named mgmt for this example):
export CLUSTER_NAME=mgmt
eksctl anywhere generate clusterconfig $CLUSTER_NAME \
--provider cloudstack > eksa-mgmt-cluster.yaml
-
Create credential file
Create a credential file (for example, cloud-config) and add the credentials needed to access your CloudStack environment. The file should include:
- api-key: Obtained from CloudStack
- secret-key: Obtained from CloudStack
- api-url: The URL to your CloudStack API endpoint
For example:
[Global]
api-key = -Dk5uB0DE3aWng
secret-key = -0DQLunsaJKxCEEHn44XxP80tv6v_RB0DiDtdgwJ
api-url = http://172.16.0.1:8080/client/api
You can have multiple credential entries.
To match this example, you would enter global as the credentialsRef in the cluster config file for your CloudStack availability zone. You can configure multiple credentials for multiple availability zones.
-
Modify the initial cluster config (eksa-mgmt-cluster.yaml) as follows:
- Refer to Cloudstack configuration
for information on configuring this cluster config for a CloudStack provider.
- Add Optional
configuration settings as needed.
- Create at least two control plane nodes, three worker nodes, and three etcd nodes, to provide high availability and rolling upgrades.
-
Set Environment Variables
Convert the credential file into base64 and set the following environment variable to that value:
export EKSA_CLOUDSTACK_B64ENCODED_SECRET=$(base64 -i cloud-config)
-
Create cluster
For a regular cluster create (with internet access), type the following:
eksctl anywhere create cluster \
-f eksa-mgmt-cluster.yaml \
# --install-packages packages.yaml \ # uncomment to install curated packages at cluster creation
For an airgapped cluster create, follow Preparation for airgapped deployments
instructions, then type the following:
eksctl anywhere create cluster \
-f eksa-mgmt-cluster.yaml \
--bundles-override ./eks-anywhere-downloads/bundle-release.yaml \
# --install-packages packages.yaml \ # uncomment to install curated packages at cluster creation
-
Once the cluster is created you can use it with the generated KUBECONFIG file in your local directory:
export KUBECONFIG=${PWD}/${CLUSTER_NAME}/${CLUSTER_NAME}-eks-a-cluster.kubeconfig
-
Check the cluster nodes:
To check that the cluster completed, list the machines to see the control plane, etcd, and worker nodes:
Example command output
NAMESPACE NAME PROVIDERID PHASE VERSION
eksa-system mgmt-b2xyz cloudstack:/xxxxx Running v1.23.1-eks-1-21-5
eksa-system mgmt-etcd-r9b42 cloudstack:/xxxxx Running
eksa-system mgmt-md-8-6xr-rnr cloudstack:/xxxxx Running v1.23.1-eks-1-21-5
...
The etcd machine doesn’t show the Kubernetes version because it doesn’t run the kubelet service.
-
Check the initial cluster’s CRD:
To ensure you are looking at the initial cluster, list the CRD to see that the name of its management cluster is itself:
kubectl get clusters mgmt -o yaml
Example command output
...
kubernetesVersion: "1.35"
managementCluster:
name: mgmt
workerNodeGroupConfigurations:
...
Note
The initial cluster is now ready to deploy workload clusters.
However, if you just want to use it to run workloads, you can deploy pod workloads directly on the initial cluster without deploying a separate workload cluster and skip the section on running separate workload clusters.
To make sure the cluster is ready to run workloads, run the test application in the
Deploy test workload section.
Create separate workload clusters
Follow these steps if you want to use your initial cluster to create and manage separate workload clusters.
-
Set License Environment Variable (Optional)
Add a license to any cluster for which you want to receive paid support. If you are creating a licensed cluster, set and export the license variable (see License cluster
if you are licensing an existing cluster):
export EKSA_LICENSE='my-license-here'
-
Generate a workload cluster config:
CLUSTER_NAME=w01
eksctl anywhere generate clusterconfig $CLUSTER_NAME \
--provider cloudstack > eksa-w01-cluster.yaml
-
Modify the workload cluster config (eksa-w01-cluster.yaml) as follows.
Refer to the initial config described earlier for the required and optional settings. In particular:
- Ensure workload cluster object names (
Cluster, CloudDatacenterConfig, CloudStackMachineConfig, etc.) are distinct from management cluster object names.
-
Be sure to set the managementCluster field to identify the name of the management cluster.
For example, the management cluster, mgmt is defined for our workload cluster w01 as follows:
apiVersion: anywhere.eks.amazonaws.com/v1alpha1
kind: Cluster
metadata:
name: w01
spec:
managementCluster:
name: mgmt
-
Create a workload cluster in one of the following ways:
-
GitOps: See Manage separate workload clusters with GitOps
-
Terraform: See Manage separate workload clusters with Terraform
NOTE: spec.users[0].sshAuthorizedKeys must be specified to SSH into your nodes when provisioning a cluster through GitOps or Terraform, as the EKS Anywhere Cluster Controller will not generate the keys like eksctl CLI does when the field is empty.
-
eksctl CLI: To create a workload cluster with eksctl, run:
eksctl anywhere create cluster \
-f eksa-w01-cluster.yaml \
# --install-packages packages.yaml \ # uncomment to install curated packages at cluster creation
--kubeconfig mgmt/mgmt-eks-a-cluster.kubeconfig
As noted earlier, adding the --kubeconfig option tells eksctl to use the management cluster identified by that kubeconfig file to create a different workload cluster.
-
kubectl CLI: The cluster lifecycle feature lets you use kubectl, or other tools that that can talk to the Kubernetes API, to create a workload cluster. To use kubectl, run:
kubectl apply -f eksa-w01-cluster.yaml
To check the state of a cluster managed with the cluster lifecyle feature, use kubectl to show the cluster object with its status.
The status field on the cluster object field holds information about the current state of the cluster.
kubectl get clusters w01 -o yaml
The cluster has been fully upgraded once the status of the Ready condition is marked True.
See the cluster status
guide for more information.
-
To check the workload cluster, get the workload cluster credentials and run a test workload:
-
If your workload cluster was created with eksctl,
change your credentials to point to the new workload cluster (for example, w01), then run the test application with:
export CLUSTER_NAME=w01
export KUBECONFIG=${PWD}/${CLUSTER_NAME}/${CLUSTER_NAME}-eks-a-cluster.kubeconfig
kubectl apply -f "https://anywhere.eks.amazonaws.com/manifests/hello-eks-a.yaml"
-
If your workload cluster was created with GitOps or Terraform, the kubeconfig for your new cluster is stored as a secret on the management cluster.
You can get credentials and run the test application as follows:
kubectl get secret -n eksa-system w01-kubeconfig -o jsonpath=‘{.data.value}' | base64 —decode > w01.kubeconfig
export KUBECONFIG=w01.kubeconfig
kubectl apply -f "https://anywhere.eks.amazonaws.com/manifests/hello-eks-a.yaml"
-
Add more workload clusters:
To add more workload clusters, go through the same steps for creating the initial workload, copying the config file to a new name (such as eksa-w02-cluster.yaml), modifying resource names, and running the create cluster command again.
Next steps
-
See the Cluster management
section for more information on common operational tasks like scaling and deleting the cluster.
-
See the Package management
section for more information on post-creation curated packages installation.
Optional configuration
Disable KubeVIP
The KubeVIP deployment used for load balancing Kube API Server requests can be disabled by setting an environment variable that will be interpreted by the eksctl anywhere create cluster command. Disabling the KubeVIP deployment is useful if you wish to use an external load balancer for load balancing Kube API Server requests. When disabling the KubeVIP load balancer you become responsible for hosting the Spec.ControlPlaneConfiguration.Endpoint.Host IP which must route requests to a Kube API Server instance of the cluster being provisioned.
export CLOUDSTACK_KUBE_VIP_DISABLED=true
4.9.4 - CloudStack configuration
Full EKS Anywhere configuration reference for a CloudStack cluster
This is a generic template with detailed descriptions below for reference.
The following additional optional configuration can also be included:
apiVersion: anywhere.eks.amazonaws.com/v1alpha1
kind: Cluster
metadata:
name: my-cluster-name
spec:
clusterNetwork:
cniConfig:
cilium: {}
pods:
cidrBlocks:
- 192.168.0.0/16
services:
cidrBlocks:
- 10.96.0.0/12
controlPlaneConfiguration:
count: 3
endpoint:
host: ""
machineGroupRef:
kind: CloudStackMachineConfig
name: my-cluster-name-cp
taints:
- key: ""
value: ""
effect: ""
labels:
"<key1>": ""
"<key2>": ""
datacenterRef:
kind: CloudStackDatacenterConfig
name: my-cluster-name
externalEtcdConfiguration:
count: 3
machineGroupRef:
kind: CloudStackMachineConfig
name: my-cluster-name-etcd
kubernetesVersion: "1.35"
managementCluster:
name: my-cluster-name
workerNodeGroupConfigurations:
- count: 2
machineGroupRef:
kind: CloudStackMachineConfig
name: my-cluster-name
taints:
- key: ""
value: ""
effect: ""
labels:
"<key1>": ""
"<key2>": ""
---
apiVersion: anywhere.eks.amazonaws.com/v1alpha1
kind: CloudStackDatacenterConfig
metadata:
name: my-cluster-name-datacenter
spec:
availabilityZones:
- account: admin
credentialsRef: global
domain: domain1
managementApiEndpoint: ""
name: az-1
zone:
name: zone1
network:
name: "net1"
---
apiVersion: anywhere.eks.amazonaws.com/v1alpha1
kind: CloudStackMachineConfig
metadata:
name: my-cluster-name-cp
spec:
computeOffering:
name: "m4-large"
users:
- name: capc
sshAuthorizedKeys:
- ssh-rsa AAAA...
template:
name: "rhel8-k8s-118"
diskOffering:
name: "Small"
mountPath: "/data-small"
device: "/dev/vdb"
filesystem: "ext4"
label: "data_disk"
symlinks:
/var/log/kubernetes: /data-small/var/log/kubernetes
affinityGroupIds:
- control-plane-anti-affinity
---
apiVersion: anywhere.eks.amazonaws.com/v1alpha1
kind: CloudStackMachineConfig
metadata:
name: my-cluster-name
spec:
computeOffering:
name: "m4-large"
users:
- name: capc
sshAuthorizedKeys:
- ssh-rsa AAAA...
template:
name: "rhel8-k8s-118"
diskOffering:
name: "Small"
mountPath: "/data-small"
device: "/dev/vdb"
filesystem: "ext4"
label: "data_disk"
symlinks:
/var/log/pods: /data-small/var/log/pods
/var/log/containers: /data-small/var/log/containers
affinityGroupIds:
- worker-affinity
userCustomDetails:
foo: bar
---
apiVersion: anywhere.eks.amazonaws.com/v1alpha1
kind: CloudStackMachineConfig
metadata:
name: my-cluster-name-etcd
spec:
computeOffering: {}
name: "m4-large"
users:
- name: "capc"
sshAuthorizedKeys:
- "ssh-rsa AAAAB3N...
template:
name: "rhel8-k8s-118"
diskOffering:
name: "Small"
mountPath: "/data-small"
device: "/dev/vdb"
filesystem: "ext4"
label: "data_disk"
symlinks:
/var/lib: /data-small/var/lib
affinityGroupIds:
- etcd-affinity
---
Cluster Fields
name (required)
Name of your cluster my-cluster-name in this example
clusterNetwork (required)
Network configuration.
clusterNetwork.cniConfig (required)
CNI plugin configuration. Supports cilium.
clusterNetwork.cniConfig.cilium.policyEnforcementMode (optional)
Optionally specify a policyEnforcementMode of default, always or never.
clusterNetwork.cniConfig.cilium.egressMasqueradeInterfaces (optional)
Optionally specify a network interface name or interface prefix used for
masquerading. See EgressMasqueradeInterfaces
option.
clusterNetwork.cniConfig.cilium.skipUpgrade (optional)
When true, skip Cilium maintenance during upgrades. Also see Use a custom
CNI.
clusterNetwork.cniConfig.cilium.routingMode (optional)
Optionally specify the routing mode. Accepts default and direct. Also see RoutingMode
option.
clusterNetwork.cniConfig.cilium.ipv4NativeRoutingCIDR (optional)
Optionally specify the CIDR to use when RoutingMode is set to direct.
When specified, Cilium assumes networking for this CIDR is preconfigured and
hands traffic destined for that range to the Linux network stack without
applying any SNAT.
clusterNetwork.cniConfig.cilium.ipv6NativeRoutingCIDR (optional)
Optionally specify the IPv6 CIDR to use when RoutingMode is set to direct.
When specified, Cilium assumes networking for this CIDR is preconfigured and
hands traffic destined for that range to the Linux network stack without
applying any SNAT.
clusterNetwork.cniConfig.cilium.cniExclusive (optional)
Controls whether Cilium should remove other CNI configuration files.
When true (default), Cilium removes other CNI configs; when false, it leaves them alone.
For more information, see CNI Exclusive Mode configuration.
clusterNetwork.pods.cidrBlocks[0] (required)
The pod subnet specified in CIDR notation. Only 1 pod CIDR block is permitted.
The CIDR block should not conflict with the host or service network ranges.
clusterNetwork.services.cidrBlocks[0] (required)
The service subnet specified in CIDR notation. Only 1 service CIDR block is
permitted.
This CIDR block should not conflict with the host or pod network ranges.
clusterNetwork.dns.resolvConf.path (optional)
File path to a file containing a custom DNS resolver configuration.
controlPlaneConfiguration (required)
Specific control plane configuration for your Kubernetes cluster.
controlPlaneConfiguration.count (required)
Number of control plane nodes
controlPlaneConfiguration.endpoint.host (required)
A unique IP you want to use for the control plane VM in your EKS Anywhere cluster. Choose an IP in your network
range that does not conflict with other VMs.
NOTE: This IP should be outside the network DHCP range as it is a floating IP that gets assigned to one of
the control plane nodes for kube-apiserver loadbalancing. Suggestions on how to ensure this IP does not cause issues during cluster
creation process are here
controlPlaneConfiguration.machineGroupRef (required)
Refers to the Kubernetes object with CloudStack specific configuration for your nodes. See CloudStackMachineConfig Fields below.
controlPlaneConfiguration.taints (optional)
A list of taints to apply to the control plane nodes of the cluster.
Replaces the default control plane taint, node-role.kubernetes.io/master. The default control plane components will tolerate the provided taints.
Modifying the taints associated with the control plane configuration will cause new nodes to be rolled-out, replacing the existing nodes.
NOTE: The taints provided will be used instead of the default control plane taint node-role.kubernetes.io/master.
Any pods that you run on the control plane nodes must tolerate the taints you provide in the control plane configuration.
controlPlaneConfiguration.labels (optional)
A list of labels to apply to the control plane nodes of the cluster. This is in addition to the labels that
EKS Anywhere will add by default.
A special label value is supported by the CAPC provider:
labels:
cluster.x-k8s.io/failure-domain: ds.meta_data.failuredomain
The ds.meta_data.failuredomain value will be replaced with a failuredomain name where the node is deployed, such as az-1.
Modifying the labels associated with the control plane configuration will cause new nodes to be rolled out, replacing
the existing nodes.
datacenterRef (required)
Refers to the Kubernetes object with CloudStack environment specific configuration. See CloudStackDatacenterConfig Fields below.
externalEtcdConfiguration.count (optional)
Number of etcd members
externalEtcdConfiguration.machineGroupRef (optional)
Refers to the Kubernetes object with CloudStack specific configuration for your etcd members. See CloudStackMachineConfig Fields below.
kubernetesVersion (required)
The Kubernetes version you want to use for your cluster. The Kubernetes versions supported by your EKS Anywhere version are tabulated in this
section.
Known issue related to Kubernetes versions whose minor version is a multiple of 10
managementCluster (required)
Identifies the name of the management cluster.
If this is a standalone cluster or if it were serving as the management cluster for other workload clusters, this will be the same as the cluster name.
workerNodeGroupConfigurations (required)
This takes in a list of node groups that you can define for your workers.
You may define one or more worker node groups.
workerNodeGroupConfigurations[*].count (optional)
Number of worker nodes. (default: 1) It will be ignored if the cluster autoscaler curated package
is installed and autoscalingConfiguration is used to specify the desired range of replicas.
Refers to troubleshooting machine health check remediation not allowed
and choose a sufficient number to allow machine health check remediation.
workerNodeGroupConfigurations[*].machineGroupRef (required)
Refers to the Kubernetes object with CloudStack specific configuration for your nodes. See CloudStackMachineConfig Fields below.
workerNodeGroupConfigurations[*].name (required)
Name of the worker node group (default: md-0)
workerNodeGroupConfigurations[*].autoscalingConfiguration.minCount (optional)
Minimum number of nodes for this node group’s autoscaling configuration.
workerNodeGroupConfigurations[*].autoscalingConfiguration.maxCount (optional)
Maximum number of nodes for this node group’s autoscaling configuration.
workerNodeGroupConfigurations[*].taints (optional)
A list of taints to apply to the nodes in the worker node group.
Modifying the taints associated with a worker node group configuration will cause new nodes to be rolled-out, replacing the existing nodes associated with the configuration.
At least one node group must not have NoSchedule or NoExecute taints applied to it.
workerNodeGroupConfigurations[*].labels (optional)
A list of labels to apply to the nodes in the worker node group. This is in addition to the labels that
EKS Anywhere will add by default.
A special label value is supported by the CAPC provider:
labels:
cluster.x-k8s.io/failure-domain: ds.meta_data.failuredomain
The ds.meta_data.failuredomain value will be replaced with a failuredomain name where the node is deployed, such as az-1.
Modifying the labels associated with a worker node group configuration will cause new nodes to be rolled out, replacing
the existing nodes associated with the configuration.
workerNodeGroupConfigurations[*].kubernetesVersion (optional)
The Kubernetes version you want to use for this worker node group. The Kubernetes versions supported by your EKS Anywhere version are tabulated in this
section.
Known issue related to Kubernetes versions whose minor version is a multiple of 10
Must be less than or equal to the cluster kubernetesVersion defined at the root level of the cluster spec. The worker node Kubernetes version must be no more than two minor Kubernetes versions lower than the cluster control plane’s Kubernetes version. Removing workerNodeGroupConfiguration.kubernetesVersion will trigger an upgrade of the node group to the kubernetesVersion defined at the root level of the cluster spec.
CloudStackDatacenterConfig
availabilityZones.account (optional)
Account used to access CloudStack.
As long as you pass valid credentials, through availabilityZones.credentialsRef, this value is not required.
availabilityZones.credentialsRef (required)
If you passed credentials through the environment variable EKSA_CLOUDSTACK_B64ENCODED_SECRET noted in Create CloudStack production cluster
, you can identify those credentials here.
For that example, you would use the profile name global.
You can instead use a previously created secret on the Kubernetes cluster in the eksa-system namespace.
availabilityZones.domain (optional)
CloudStack domain to deploy the cluster. The default is ROOT.
availabilityZones.managementApiEndpoint (required)
Location of the CloudStack API management endpoint. For example, http://10.11.0.2:8080/client/api.
availabilityZones.{id,name} (required)
Name or ID of the CloudStack zone on which to deploy the cluster.
availabilityZones.zone.network.{id,name} (required)
CloudStack network name or ID to use with the cluster.
CloudStackMachineConfig
In the example above, there are separate CloudStackMachineConfig sections for the control plane (my-cluster-name-cp), worker (my-cluster-name) and etcd (my-cluster-name-etcd) nodes.
computeOffering.{id,name} (required)
Name or ID of the CloudStack compute instance.
users[0].name (optional)
The name of the user you want to configure to access your virtual machines through ssh.
You can add as many users object as you want.
The default is capc.
users[0].sshAuthorizedKeys (optional)
The SSH public keys you want to configure to access your virtual machines through ssh (as described below). Only 1 is supported at this time.
users[0].sshAuthorizedKeys[0] (optional)
This is the SSH public key that will be placed in authorized_keys on all EKS Anywhere cluster VMs so you can ssh into
them. The user will be what is defined under name above. For example:
ssh -i <private-key-file> <user>@<VM-IP>
The default is generating a key in your $(pwd)/<cluster-name> folder when not specifying a value.
template.{id,name} (required)
The VM template to use for your EKS Anywhere cluster. Currently, a VM based on RHEL 8.6 is required.
This can be a name or ID.
The template.name must contain the Cluster.Spec.KubernetesVersion or Cluster.Spec.WorkerNodeGroupConfiguration[].KubernetesVersion version (in case of modular upgrade). For example, if the Kubernetes version is 1.35, the template.name field name should include 1.35, 1_35, 1-35 or 135.
See the Artifacts
page for instructions for building RHEL-based images.
diskOffering (optional)
Name representing a disk you want to mount into nodes for this CloudStackMachineConfig
diskOffering.mountPath (optional)
Mount point on which to mount the disk.
diskOffering.device (optional)
Device name of the disk partition to mount.
diskOffering.filesystem (optional)
File system type used to format the filesystem on the disk.
diskOffering.label (optional)
Label to apply to the disk partition.
symlinks (optional)
Symbolic link of a directory or file you want to mount from the host filesystem to the mounted filesystem.
userCustomDetails (optional)
Add key/value pairs to nodes in a CloudStackMachineConfig.
These can be used for things like identifying sets of nodes that you want to add to a security group that opens selected ports.
affinityGroupIDs (optional)
Group ID to attach to the set of host systems to indicate how affinity is done for services on those systems.
affinity (optional)
Allows you to set pro and anti affinity for the CloudStackMachineConfig.
This can be used in a mutually exclusive fashion with the affinityGroupIDs field.
4.10 - Create Nutanix cluster
Create an EKS Anywhere cluster on Nutanix Cloud Infrastructure with AHV
4.10.1 - Overview
Overview of EKS Anywhere cluster creation on Nutanix
Creating a Nutanix cluster
The following diagram illustrates the cluster creation process for the Nutanix provider.
Start creating a Nutanix cluster
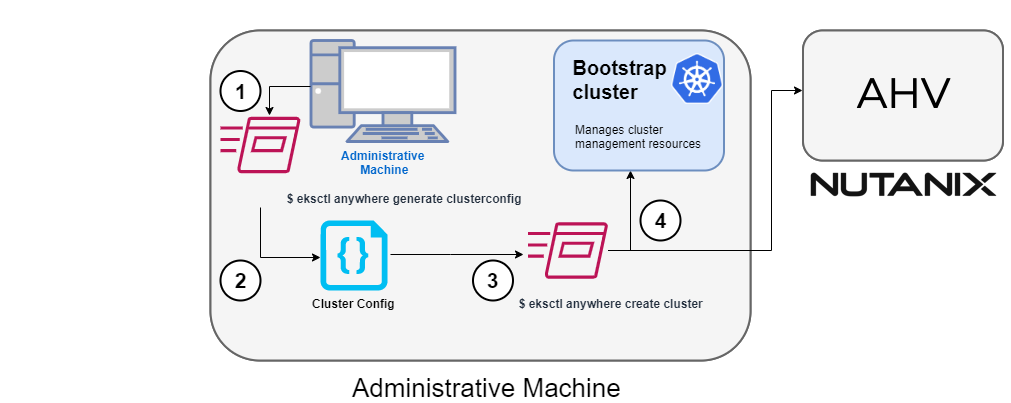
1. Generate a config file for Nutanix
Identify the provider (--provider nutanix) and the cluster name in the eksctl anywhere generate clusterconfig command and direct the output to a cluster config .yaml file.
2. Modify the config file
Modify the generated cluster config file to suit your situation.
Details about this config file can be found on the Nutanix Config
page.
3. Launch the cluster creation
After modifying the cluster configuration file, run the eksctl anywhere create cluster command, providing the cluster config.
The verbosity can be increased to see more details on the cluster creation process (-v=9 provides maximum verbosity).
4. Create bootstrap cluster
The cluster creation process starts with creating a temporary Kubernetes bootstrap cluster on the Administrative machine.
First, the cluster creation process runs a series of commands to validate the Nutanix environment:
- Checks that the Nutanix environment is available.
- Authenticates the Nutanix provider to the Nutanix environment using the supplied Prism Central endpoint information and credentials.
For each of the NutanixMachineConfig objects, the following validations are performed:
- Validates the provided resource configuration (CPU, memory, storage)
- Validates the Nutanix subnet
- Validates the Nutanix Prism Element cluster
- Validates the image
- (Optional) Validates the Nutanix project
If all validations pass, you will see this message:
✅ Nutanix Provider setup is valid
During bootstrap cluster creation, the following messages will be shown:
Creating new bootstrap cluster
Provider specific pre-capi-install-setup on bootstrap cluster
Installing cluster-api providers on bootstrap cluster
Provider specific post-setup
Next, the Nutanix provider will create the machines in the Nutanix environment.
Continuing cluster creation
The following diagram illustrates the activities that occur next:
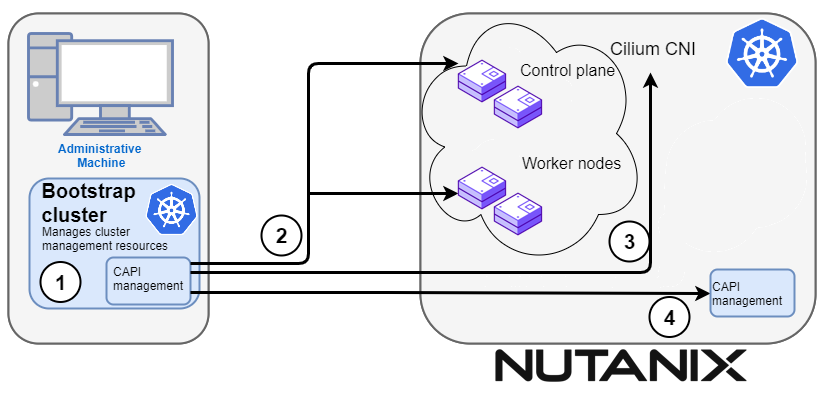
1. CAPI management
Cluster API (CAPI) management will orchestrate the creation of the target cluster in the Nutanix environment.
Creating new workload cluster
2. Create the target cluster nodes
The control plane and worker nodes will be created and configured using the Nutanix provider.
3. Add Cilium networking
Add Cilium as the CNI plugin to use for networking between the cluster services and pods.
Installing networking on workload cluster
4. Moving cluster management to target cluster
CAPI components are installed on the target cluster. Next, cluster management is moved from the bootstrap cluster to the target cluster.
Creating EKS-A namespace
Installing cluster-api providers on workload cluster
Installing EKS-A secrets on workload cluster
Installing resources on management cluster
Moving cluster management from bootstrap to workload cluster
Installing EKS-A custom components (CRD and controller) on workload cluster
Installing EKS-D components on workload cluster
Creating EKS-A CRDs instances on workload cluster
4. Saving cluster configuration file
The cluster configuration file is saved.
Writing cluster config file
5. Delete bootstrap cluster
The bootstrap cluster is no longer needed and is deleted when the target cluster is up and running:
The target cluster can now be used as either:
- A standalone cluster (to run workloads) or
- A management cluster (to optionally create one or more workload clusters)
Creating workload clusters (optional)
The target cluster acts as a management cluster. One or more workload clusters can be managed by this management cluster as described in Create separate workload clusters
:
- Use
eksctl to generate a cluster config file for the new workload cluster.
- Modify the cluster config with a new cluster name and different Nutanix resources.
- Use
eksctl to create the new workload cluster from the new cluster config file.
4.10.2 - Requirements for EKS Anywhere on Nutanix Cloud Infrastructure
Preparing a Nutanix Cloud Infrastructure provider for EKS Anywhere
To run EKS Anywhere, you will need:
Prepare Administrative machine
Set up an Administrative machine as described in Install EKS Anywhere
.
Prepare a Nutanix environment
To prepare a Nutanix environment to run EKS Anywhere, you need the following:
-
A Nutanix environment running AOS 5.20.4+ with AHV and Prism Central 2022.1+
-
Capacity to deploy 6-10 VMs
-
DHCP service or Nutanix IPAM running in your environment in the primary VM network for your workload cluster
-
Prepare DHCP IP addresses pool
-
A VM image imported into the Prism Image Service for the workload VMs
-
User credentials to create VMs and attach networks, etc
-
One IP address routable from cluster but excluded from DHCP/IPAM offering.
This IP address is to be used as the Control Plane Endpoint IP
Below are some suggestions to ensure that this IP address is never handed out by your DHCP server.
You may need to contact your network engineer.
- Pick an IP address reachable from cluster subnet which is excluded from DHCP range OR
- Alter DHCP ranges to leave out an IP address(s) at the top and/or the bottom of the range OR
- Create an IP reservation for this IP on your DHCP server. This is usually accomplished by adding
a dummy mapping of this IP address to a non-existent mac address.
- Block an IP address from the Nutanix IPAM managed network using aCLI
Each VM will require:
- 2 vCPUs
- 4GB RAM
- 40GB Disk
The administrative machine and the target workload environment will need network access (TCP/443) to:
- Prism Central endpoint (must be accessible to EKS Anywhere clusters)
- Prism Element Data Services IP and CVM endpoints (for CSI storage connections)
- public.ecr.aws (for pulling EKS Anywhere container images)
- anywhere-assets.eks.amazonaws.com (to download the EKS Anywhere binaries and manifests)
- distro.eks.amazonaws.com (to download EKS Distro binaries and manifests)
- d2glxqk2uabbnd.cloudfront.net (for EKS Anywhere and EKS Distro ECR container images)
- api.ecr.us-west-2.amazonaws.com (for EKS Anywhere package authentication matching your region)
- d5l0dvt14r5h8.cloudfront.net (for EKS Anywhere package ECR container images)
- api.github.com (only if GitOps is enabled)
- sts.amazonaws.com (only if AWS IAM Authenticator is enabled)
You need to get the following information before creating the cluster:
-
Static IP Addresses:
You will need one IP address for the management cluster control plane endpoint, and a separate one for the controlplane of each workload cluster you add.
Let’s say you are going to have the management cluster and two workload clusters.
For those, you would need three IP addresses, one for each.
All of those addresses will be configured the same way in the configuration file you will generate for each cluster.
A static IP address will be used for control plane API server HA in each of your EKS Anywhere clusters.
Choose IP addresses in your network range that do not conflict with other VMs and make sure they are excluded from your DHCP offering.
An IP address will be the value of the property controlPlaneConfiguration.endpoint.host in the config file of the management cluster.
A separate IP address must be assigned for each workload cluster.
-
Prism Central FQDN or IP Address: The Prism Central fully qualified domain name or IP address.
-
Prism Element Cluster Name: The AOS cluster to deploy the EKS Anywhere cluster on.
-
VM Subnet Name: The VM network to deploy your EKS Anywhere cluster on.
-
Machine Template Image Name: The VM image to use for your EKS Anywhere cluster.
-
additionalTrustBundle (required if using a self-signed PC SSL certificate): The PEM encoded CA trust bundle of the root CA that issued the certificate for Prism Central.
4.10.3 - Preparing Nutanix Cloud Infrastructure for EKS Anywhere
Set up a Nutanix cluster to prepare it for EKS Anywhere
Certain resources must be in place with appropriate user permissions to create an EKS Anywhere cluster using the Nutanix provider.
Configuring Nutanix User
You need a Prism Admin user to create EKS Anywhere clusters on top of your Nutanix cluster.
Build Nutanix AHV node images
Follow the steps outlined in artifacts
to create a Ubuntu-based image for Nutanix AHV and import it into the AOS Image Service.
4.10.4 - Create Nutanix cluster
Create an EKS Anywhere cluster on Nutanix Cloud Infrastructure with AHV
EKS Anywhere supports a Nutanix Cloud Infrastructure (NCI) provider for EKS Anywhere deployments.
This document walks you through setting up EKS Anywhere on Nutanix Cloud Infrastructure with AHV in a way that:
- Deploys an initial cluster in your Nutanix environment. That cluster can be used as a self-managed cluster (to run workloads) or a management cluster (to create and manage other clusters)
- Deploys zero or more workload clusters from the management cluster
If your initial cluster is a management cluster, it is intended to stay in place so you can use it later to modify, upgrade, and delete workload clusters.
Using a management cluster makes it faster to provision and delete workload clusters.
It also lets you keep NCI credentials for a set of clusters in one place: on the management cluster.
The alternative is to simply use your initial cluster to run workloads.
See Cluster topologies
for details.
Important
Creating an EKS Anywhere management cluster is the recommended model.
Separating management features into a separate, persistent management cluster
provides a cleaner model for managing the lifecycle of workload clusters (to create, upgrade, and delete clusters), while workload clusters run user applications.
This approach also reduces provider permissions for workload clusters.
Note: Before you create your cluster, you have the option of validating the EKS Anywhere bundle manifest container images by following instructions in the Verify Cluster Images
page.
Prerequisite Checklist
EKS Anywhere needs to:
Also, see the Ports and protocols
page for information on ports that need to be accessible from control plane, worker, and Admin machines.
Steps
The following steps are divided into two sections:
- Create an initial cluster (used as a management or self-managed cluster)
- Create zero or more workload clusters from the management cluster
Create an initial cluster
Follow these steps to create an EKS Anywhere cluster that can be used either as a management cluster or as a self-managed cluster (for running workloads itself).
-
Optional Configuration
Set License Environment Variable
Add a license to any cluster for which you want to receive paid support. If you are creating a licensed cluster, set and export the license variable (see License cluster
if you are licensing an existing cluster):
export EKSA_LICENSE='my-license-here'
After you have created your eksa-mgmt-cluster.yaml and set your credential environment variables, you will be ready to create the cluster.
Configure Curated Packages
The Amazon EKS Anywhere Curated Packages are only available to customers with the Amazon EKS Anywhere Enterprise Subscription. To request a free trial, talk to your Amazon representative or connect with one here
. Cluster creation will succeed if authentication is not set up, but some warnings may be genered. Detailed package configurations can be found here
.
If you are going to use packages, set up authentication. These credentials should have limited capabilities
:
export EKSA_AWS_ACCESS_KEY_ID="your*access*id"
export EKSA_AWS_SECRET_ACCESS_KEY="your*secret*key"
export EKSA_AWS_REGION="us-west-2"
-
Generate an initial cluster config (named mgmt for this example):
CLUSTER_NAME=mgmt
eksctl anywhere generate clusterconfig $CLUSTER_NAME \
--provider nutanix > eksa-mgmt-cluster.yaml
-
Modify the initial cluster config (eksa-mgmt-cluster.yaml) as follows:
- Refer to Nutanix configuration
for information on configuring this cluster config for a Nutanix provider.
- Add Optional
configuration settings as needed.
- Create at least three control plane nodes, three worker nodes, and three etcd nodes, to provide high availability and rolling upgrades.
-
Set Credential Environment Variables
Before you create the initial cluster, you will need to set and export these environment variables for your Nutanix Prism Central user name and password.
Make sure you use single quotes around the values so that your shell does not interpret the values:
export EKSA_NUTANIX_USERNAME='billy'
export EKSA_NUTANIX_PASSWORD='t0p$ecret'
Note
If you have a username in the form of domain_name/user_name, you must specify it as user_name@domain_name to
avoid errors in cluster creation. For example, nutanix.local/admin should be specified as admin@nutanix.local.
-
Create cluster
For a regular cluster create (with internet access), type the following:
eksctl anywhere create cluster \
-f eksa-mgmt-cluster.yaml \
# --install-packages packages.yaml \ # uncomment to install curated packages at cluster creation
For an airgapped cluster create, follow Preparation for airgapped deployments
instructions, then type the following:
eksctl anywhere create cluster \
-f eksa-mgmt-cluster.yaml \
--bundles-override ./eks-anywhere-downloads/bundle-release.yaml \
# --install-packages packages.yaml \ # uncomment to install curated packages at cluster creation
-
Once the cluster is created, you can access it with the generated KUBECONFIG file in your local directory:
export KUBECONFIG=${PWD}/${CLUSTER_NAME}/${CLUSTER_NAME}-eks-a-cluster.kubeconfig
-
Check the cluster nodes:
To check that the cluster is ready, list the machines to see the control plane, and worker nodes:
kubectl get machines -n eksa-system
Example command output
NAME CLUSTER NODENAME PROVIDERID PHASE AGE VERSION
mgmt-4gtt2 mgmt mgmt-control-plane-1670343878900-2m4ln nutanix://xxxx Running 11m v1.24.7-eks-1-24-4
mgmt-d42xn mgmt mgmt-control-plane-1670343878900-jbfxt nutanix://xxxx Running 11m v1.24.7-eks-1-24-4
mgmt-md-0-9868m mgmt mgmt-md-0-1670343878901-lkmxw nutanix://xxxx Running 11m v1.24.7-eks-1-24-4
mgmt-md-0-njpk2 mgmt mgmt-md-0-1670343878901-9clbz nutanix://xxxx Running 11m v1.24.7-eks-1-24-4
mgmt-md-0-p4gp2 mgmt mgmt-md-0-1670343878901-mbktx nutanix://xxxx Running 11m v1.24.7-eks-1-24-4
mgmt-zkwrr mgmt mgmt-control-plane-1670343878900-jrdkk nutanix://xxxx Running 11m v1.24.7-eks-1-24-4
-
Check the initial cluster’s CRD:
To ensure you are looking at the initial cluster, list the cluster CRD to see that the name of its management cluster is itself:
kubectl get clusters mgmt -o yaml
Example command output
...
kubernetesVersion: "1.35"
managementCluster:
name: mgmt
workerNodeGroupConfigurations:
...
Note
The initial cluster is now ready to deploy workload clusters.
However, if you just want to use it to run workloads, you can deploy pod workloads directly on the initial cluster without deploying a separate workload cluster and skip the section on running separate workload clusters.
To make sure the cluster is ready to run workloads, run the test application in the
Deploy test workload section.
Create separate workload clusters
Follow these steps if you want to use your initial cluster to create and manage separate workload clusters.
-
Set License Environment Variable (Optional)
Add a license to any cluster for which you want to receive paid support. If you are creating a licensed cluster, set and export the license variable (see License cluster
if you are licensing an existing cluster):
export EKSA_LICENSE='my-license-here'
-
Generate a workload cluster config:
CLUSTER_NAME=w01
eksctl anywhere generate clusterconfig $CLUSTER_NAME \
--provider nutanix > eksa-w01-cluster.yaml
Refer to the initial config described earlier for the required and optional settings.
Ensure workload cluster object names (Cluster, NutanixDatacenterConfig, NutanixMachineConfig, etc.) are distinct from management cluster object names.
-
Be sure to set the managementCluster field to identify the name of the management cluster.
For example, the management cluster, mgmt is defined for our workload cluster w01 as follows:
apiVersion: anywhere.eks.amazonaws.com/v1alpha1
kind: Cluster
metadata:
name: w01
spec:
managementCluster:
name: mgmt
-
Create a workload cluster
To create a new workload cluster from your management cluster run this command, identifying:
- The workload cluster YAML file
- The initial cluster’s kubeconfig (this causes the workload cluster to be managed from the management cluster)
eksctl anywhere create cluster \
-f eksa-w01-cluster.yaml \
--kubeconfig mgmt/mgmt-eks-a-cluster.kubeconfig \
# --install-packages packages.yaml \ # uncomment to install curated packages at cluster creation
As noted earlier, adding the --kubeconfig option tells eksctl to use the management cluster identified by that kubeconfig file to create a different workload cluster.
-
Check the workload cluster:
You can now use the workload cluster as you would any Kubernetes cluster.
Change your kubeconfig to point to the new workload cluster (for example, w01), then run the test application with:
export CLUSTER_NAME=w01
export KUBECONFIG=${PWD}/${CLUSTER_NAME}/${CLUSTER_NAME}-eks-a-cluster.kubeconfig
kubectl apply -f "https://anywhere.eks.amazonaws.com/manifests/hello-eks-a.yaml"
Verify the test application in the deploy test application section.
-
Add more workload clusters:
To add more workload clusters, go through the same steps for creating the initial workload, copying the config file to a new name (such as eksa-w02-cluster.yaml), modifying resource names, and running the create cluster command again.
Next steps:
-
See the Cluster management
section for more information on common operational tasks like scaling and deleting the cluster.
-
See the Package management
section for more information on post-creation curated packages installation.
4.10.5 - Configure for Nutanix
Full EKS Anywhere configuration reference for a Nutanix cluster
This is a generic template with detailed descriptions below for reference.
The following additional optional configuration can also be included:
apiVersion: anywhere.eks.amazonaws.com/v1alpha1
kind: Cluster
metadata:
name: mgmt
namespace: default
spec:
clusterNetwork:
cniConfig:
cilium: {}
pods:
cidrBlocks:
- 192.168.0.0/16
services:
cidrBlocks:
- 10.96.0.0/16
controlPlaneConfiguration:
count: 3
endpoint:
host: ""
machineGroupRef:
kind: NutanixMachineConfig
name: mgmt-cp-machine
datacenterRef:
kind: NutanixDatacenterConfig
name: nutanix-cluster
externalEtcdConfiguration:
count: 3
machineGroupRef:
kind: NutanixMachineConfig
name: mgmt-etcd
kubernetesVersion: "1.35"
workerNodeGroupConfigurations:
- count: 3
machineGroupRef:
kind: NutanixMachineConfig
name: mgmt-machine
name: md-0
---
apiVersion: anywhere.eks.amazonaws.com/v1alpha1
kind: NutanixDatacenterConfig
metadata:
name: nutanix-cluster
namespace: default
spec:
endpoint: pc01.cloud.internal
port: 9440
credentialRef:
kind: Secret
name: nutanix-credentials
failureDomains:
- name: failure-domain-01
cluster:
name: nx-cluster-01
type: name
subnets:
- name: vm-network-01
type: name
workerMachineGroups:
- md-0
- name: failure-domain-02
cluster:
name: nx-cluster-02
type: name
subnets:
- name: vm-network-02
type: name
workerMachineGroups:
- md-0
- name: failure-domain-03
cluster:
name: nx-cluster-03
type: name
subnets:
- name: vm-network-03
type: name
workerMachineGroups:
- md-0
ccmExcludeNodeIPs:
- 10.10.10.23
- 10.10.10.24-10.10.10.30
- 10.10.20.0/28
---
apiVersion: anywhere.eks.amazonaws.com/v1alpha1
kind: NutanixMachineConfig
metadata:
annotations:
anywhere.eks.amazonaws.com/control-plane: "true"
name: mgmt-cp-machine
namespace: default
spec:
bootType: legacy
cluster:
name: nx-cluster-01
type: name
image:
name: eksa-ubuntu-2204-kube-v1.35
type: name
memorySize: 4Gi
osFamily: ubuntu
subnet:
name: vm-network
type: name
systemDiskSize: 40Gi
project:
type: name
name: my-project
users:
- name: eksa
sshAuthorizedKeys:
- ssh-rsa AAAA…
vcpuSockets: 2
vcpusPerSocket: 1
additionalCategories:
- key: my-category
value: my-category-value
---
apiVersion: anywhere.eks.amazonaws.com/v1alpha1
kind: NutanixMachineConfig
metadata:
name: mgmt-etcd
namespace: default
spec:
bootType: legacy
cluster:
name: nx-cluster-01
type: name
image:
name: eksa-ubuntu-2204-kube-v1.35
type: name
memorySize: 4Gi
osFamily: ubuntu
subnet:
name: vm-network
type: name
systemDiskSize: 40Gi
project:
type: name
name: my-project
users:
- name: eksa
sshAuthorizedKeys:
- ssh-rsa AAAA…
vcpuSockets: 2
vcpusPerSocket: 1
---
apiVersion: anywhere.eks.amazonaws.com/v1alpha1
kind: NutanixMachineConfig
metadata:
name: mgmt-machine
namespace: default
spec:
bootType: legacy
cluster:
name: nx-cluster-01
type: name
image:
name: eksa-ubuntu-2204-kube-v1.35
type: name
memorySize: 4Gi
osFamily: ubuntu
subnet:
name: vm-network
type: name
systemDiskSize: 40Gi
project:
type: name
name: my-project
users:
- name: eksa
sshAuthorizedKeys:
- ssh-rsa AAAA…
vcpuSockets: 2
vcpusPerSocket: 1
gpus:
- type: deviceID
deviceID: 1234
- type: name
name: my-gpu
---
Cluster Fields
name (required)
Name of your cluster mgmt in this example.
clusterNetwork (required)
Network configuration.
clusterNetwork.cniConfig (required)
CNI plugin configuration. Supports cilium.
clusterNetwork.cniConfig.cilium.policyEnforcementMode (optional)
Optionally specify a policyEnforcementMode of default, always or never.
clusterNetwork.cniConfig.cilium.egressMasqueradeInterfaces (optional)
Optionally specify a network interface name or interface prefix used for
masquerading. See EgressMasqueradeInterfaces
option.
clusterNetwork.cniConfig.cilium.skipUpgrade (optional)
When true, skip Cilium maintenance during upgrades. Also see Use a custom
CNI.
clusterNetwork.cniConfig.cilium.routingMode (optional)
Optionally specify the routing mode. Accepts default and direct. Also see RoutingMode
option.
clusterNetwork.cniConfig.cilium.ipv4NativeRoutingCIDR (optional)
Optionally specify the CIDR to use when RoutingMode is set to direct.
When specified, Cilium assumes networking for this CIDR is preconfigured and
hands traffic destined for that range to the Linux network stack without
applying any SNAT.
clusterNetwork.cniConfig.cilium.ipv6NativeRoutingCIDR (optional)
Optionally specify the IPv6 CIDR to use when RoutingMode is set to direct.
When specified, Cilium assumes networking for this CIDR is preconfigured and
hands traffic destined for that range to the Linux network stack without
applying any SNAT.
clusterNetwork.cniConfig.cilium.cniExclusive (optional)
Controls whether Cilium should remove other CNI configuration files.
When true (default), Cilium removes other CNI configs; when false, it leaves them alone.
For more information, see CNI Exclusive Mode configuration.
clusterNetwork.pods.cidrBlocks[0] (required)
The pod subnet specified in CIDR notation. Only 1 pod CIDR block is permitted.
The CIDR block should not conflict with the host or service network ranges.
clusterNetwork.services.cidrBlocks[0] (required)
The service subnet specified in CIDR notation. Only 1 service CIDR block is
permitted.
This CIDR block should not conflict with the host or pod network ranges.
clusterNetwork.dns.resolvConf.path (optional)
File path to a file containing a custom DNS resolver configuration.
controlPlaneConfiguration (required)
Specific control plane configuration for your Kubernetes cluster.
controlPlaneConfiguration.count (required)
Number of control plane nodes
controlPlaneConfiguration.machineGroupRef (required)
Refers to the Kubernetes object with Nutanix specific configuration for your nodes. See NutanixMachineConfig fields below.
controlPlaneConfiguration.endpoint.host (required)
A unique IP you want to use for the control plane VM in your EKS Anywhere cluster. Choose an IP in your network range that does not conflict with other VMs.
NOTE: This IP should be outside the network DHCP range as it is a floating IP that gets assigned to one of
the control plane nodes for kube-apiserver loadbalancing. Suggestions on how to ensure this IP does not cause issues during cluster
creation process are here
.
workerNodeGroupConfigurations (required)
This takes in a list of node groups that you can define for your workers. You may define one or more worker node groups.
workerNodeGroupConfigurations[*].count (optional)
Number of worker nodes. (default: 1) It will be ignored if the cluster autoscaler curated package
is installed and autoscalingConfiguration is used to specify the desired range of replicas.
Refers to troubleshooting machine health check remediation not allowed
and choose a sufficient number to allow machine health check remediation.
workerNodeGroupConfigurations[*].machineGroupRef (required)
Refers to the Kubernetes object with Nutanix specific configuration for your nodes. See NutanixMachineConfig fields below.
workerNodeGroupConfigurations[*].name (required)
Name of the worker node group (default: md-0)
workerNodeGroupConfigurations[*].autoscalingConfiguration.minCount (optional)
Minimum number of nodes for this node group’s autoscaling configuration.
workerNodeGroupConfigurations[*].autoscalingConfiguration.maxCount (optional)
Maximum number of nodes for this node group’s autoscaling configuration.
workerNodeGroupConfigurations[*].kubernetesVersion (optional)
The Kubernetes version you want to use for this worker node group. The Kubernetes versions supported by your EKS Anywhere version are tabulated in this
section.
Known issue related to Kubernetes versions whose minor version is a multiple of 10
Must be less than or equal to the cluster kubernetesVersion defined at the root level of the cluster spec. The worker node Kubernetes version must be no more than two minor Kubernetes versions lower than the cluster control plane’s Kubernetes version. Removing workerNodeGroupConfiguration.kubernetesVersion will trigger an upgrade of the node group to the kubernetesVersion defined at the root level of the cluster spec.
externalEtcdConfiguration.count (optional)
Number of etcd members
externalEtcdConfiguration.machineGroupRef (optional)
Refers to the Kubernetes object with Nutanix specific configuration for your etcd members. See NutanixMachineConfig fields below.
datacenterRef (required)
Refers to the Kubernetes object with Nutanix environment specific configuration. See NutanixDatacenterConfig fields below.
kubernetesVersion (required)
The Kubernetes version you want to use for your cluster. The Kubernetes versions supported by your EKS Anywhere version are tabulated in this
section.
Known issue related to Kubernetes versions whose minor version is a multiple of 10
NutanixDatacenterConfig Fields
endpoint (required)
The Prism Central server fully qualified domain name or IP address. If the server IP is used, the PC SSL certificate must have an IP SAN configured.
port (required)
The Prism Central server port. (Default: 9440)
credentialRef (required)
Reference to the Kubernetes secret that contains the Prism Central credentials.
insecure (optional)
Set insecure to true if the Prism Central server does not have a valid certificate. This is not recommended for production use cases. (Default: false)
additionalTrustBundle (optional; required if using a self-signed PC SSL certificate)
The PEM encoded CA trust bundle.
The additionalTrustBundle needs to be populated with the PEM-encoded x509 certificate of the Root CA that issued the certificate for Prism Central. Suggestions on how to obtain this certificate are here
.
Example:
additionalTrustBundle: |
-----BEGIN CERTIFICATE-----
<certificate string>
-----END CERTIFICATE-----
-----BEGIN CERTIFICATE-----
<certificate string>
-----END CERTIFICATE-----
failureDomains (optional)
The list of failure domains used for the control plane nodes. Three failure domains are recommended.
NOTE: All the failure domain subnets must be on the same L2 network.
failureDomains[0].name
The name of the failure domain.
failureDomains[0].cluster (required)
Reference to the failure domain Prism Element cluster.
failureDomains[0].cluster.type (required)
Type to identify the failure domain Prism Element cluster. (Permitted values: name or uuid)
failureDomains[0].cluster.name (failureDomains[0].cluster.name or failureDomains[0].cluster.uuid required)
Name of the failure domain Prism Element cluster.
failureDomains[0].cluster.uuid (failureDomains[0].cluster.name or failureDomains[0].cluster.uuid required)
UUID of the failure domain Prism Element cluster.
failureDomains[0].subnets (required)
Reference to the failure domain subnets to be assigned to the VMs.
failureDomains[0].subnets[0].name (failureDomains[0].subnets[0].name or failureDomains[0].subnets[0].uuid required)
Name of the failure domain subnet.
failureDomains[0].subnets[0].type (required)
Type to identify the failure domain subnet. (Permitted values: name or uuid)
failureDomains[0].subnets[0].uuid (failureDomains[0].subnets[0].name or failureDomains[0].subnets[0].uuid required)
UUID of the failure domain subnet.
failureDomains[0].workerMachineGroups (optional)
List of worker machine group names that belong to a specific failure domain. See Cluster.Spec.WorkerNodeGroupConfiguration for more information.
ccmExcludeNodeIPs (optional)
Optional list of valid and properly formatted IP addresses and IP address ranges that should be excluded from the CCM IP pool for nodes. Examples of valid entries include single IP addresses like 10.10.10.23, IP ranges like 10.10.10.24-10.10.10.30, and CIDR blocks like 10.10.20.0/28.
NOTE: Do not include Cluster.Spec.controlPlaneConfiguration.endpoint.host
IP address, it will be ignored by default.
NutanixMachineConfig Fields
bootType (optional)
BootType defines the boot type of the VM. Allowed values legacy, uefi
cluster (required)
Reference to the Prism Element cluster.
cluster.type (required)
Type to identify the Prism Element cluster. (Permitted values: name or uuid)
cluster.name (cluster.name or cluster.uuid required)
Name of the Prism Element cluster.
cluster.uuid (cluster.name or cluster.uuid required)
UUID of the Prism Element cluster.
image (required)
Reference to the OS image used for the system disk.
image.type (required)
Type to identify the OS image. (Permitted values: name or uuid)
image.name (image.name or image.uuid required)
Name of the image
The image.name must contain the Cluster.Spec.KubernetesVersion or Cluster.Spec.WorkerNodeGroupConfiguration[].KubernetesVersion version (in case of modular upgrade). For example, if the Kubernetes version is 1.35, image.name must include 1.35, 1_35, 1-35 or 135.
image.uuid (image.name or image.uuid required)
UUID of the image
The name of the image associated with the uuid must contain the Cluster.Spec.KubernetesVersion or Cluster.Spec.WorkerNodeGroupConfiguration[].KubernetesVersion version (in case of modular upgrade). For example, if the Kubernetes version is 1.35, the name associated with image.uuid field must include 1.35, 1_35, 1-35 or 135.
memorySize (optional)
Size of RAM on virtual machines (Default: 4Gi)
osFamily (optional)
Operating System on virtual machines. Permitted values: ubuntu and redhat. (Default: ubuntu)
subnet (required)
Reference to the subnet to be assigned to the VMs.
subnet.name (subnet.name or subnet.uuid required)
Name of the subnet.
subnet.type (required)
Type to identify the subnet. (Permitted values: name or uuid)
subnet.uuid (subnet.name or subnet.uuid required)
UUID of the subnet.
systemDiskSize (optional)
Amount of storage assigned to the system disk. (Default: 40Gi)
vcpuSockets (optional)
Amount of vCPU sockets. (Default: 2)
vcpusPerSocket (optional)
Amount of vCPUs per socket. (Default: 1)
project (optional)
Reference to an existing project used for the virtual machines.
project.type (required)
Type to identify the project. (Permitted values: name or uuid)
project.name (project.name or project.uuid required)
Name of the project
project.uuid (project.name or project.uuid required)
UUID of the project
additionalCategories (optional)
Reference to a list of existing Nutanix Categories
to be assigned to virtual machines.
additionalCategories[0].key
Nutanix Category to add to the virtual machine.
additionalCategories[0].value
Value of the Nutanix Category to add to the virtual machine
users (optional)
The users you want to configure to access your virtual machines. Only one is permitted at this time.
users[0].name (optional)
The name of the user you want to configure to access your virtual machines through ssh.
The default is eksa if osFamily=ubuntu
users[0].sshAuthorizedKeys (optional)
The SSH public keys you want to configure to access your virtual machines through ssh (as described below). Only 1 is supported at this time.
users[0].sshAuthorizedKeys[0] (optional)
This is the SSH public key that will be placed in authorized_keys on all EKS Anywhere cluster VMs so you can ssh into
them. The user will be what is defined under name above. For example:
ssh -i <private-key-file> <user>@<VM-IP>
The default is generating a key in your $(pwd)/<cluster-name> folder when not specifying a value
gpus (optional)
Reference to the GPUs to be assigned to the VMs.
gpus[0].name (gpus[0].name or gpus[0].deviceID required)
Name of the GPU.
gpus[0].deviceID (gpus[0].name or gpus[0].deviceID required)
Device ID of the GPU.
gpus[0].type (required)
Type to identify the GPU. (Permitted values: name or deviceID)
4.10.6 -
- Prism Central endpoint (must be accessible to EKS Anywhere clusters)
- Prism Element Data Services IP and CVM endpoints (for CSI storage connections)
- public.ecr.aws (for pulling EKS Anywhere container images)
- anywhere-assets.eks.amazonaws.com (to download the EKS Anywhere binaries and manifests)
- distro.eks.amazonaws.com (to download EKS Distro binaries and manifests)
- d2glxqk2uabbnd.cloudfront.net (for EKS Anywhere and EKS Distro ECR container images)
- api.ecr.us-west-2.amazonaws.com (for EKS Anywhere package authentication matching your region)
- d5l0dvt14r5h8.cloudfront.net (for EKS Anywhere package ECR container images)
- api.github.com (only if GitOps is enabled)
- sts.amazonaws.com (only if AWS IAM Authenticator is enabled)
4.11 - Create Docker Cluster (dev only)
Create an EKS Anywhere cluster with Docker on your local machine, laptop, or cloud instance
EKS Anywhere docker provider deployments
EKS Anywhere supports a Docker provider for development and testing use cases only.
This allows you to try EKS Anywhere on your local machine or laptop before deploying to other infrastructure such as vSphere or bare metal.
Prerequisites
System and network requirements
- Mac OS 10.15+ / Ubuntu 20.04.2 LTS or 22.04 LTS / RHEL or Rocky Linux 8.8+
- 4 CPU cores
- 16GB memory
- 30GB free disk space
- If you are running in an airgapped environment, the Admin machine must be amd64.
Here are a few other things to keep in mind:
-
If you are using Ubuntu, use the Docker CE installation instructions to install Docker and not the Snap installation, as described here.
-
If you are using EKS Anywhere v0.15 or earlier and Ubuntu 21.10 or 22.04, you will need to switch from cgroups v2 to cgroups v1. For details, see Troubleshooting Guide.
To get started with EKS Anywhere, you must first install the eksctl CLI and the eksctl anywhere plugin.
This is the primary interface for EKS Anywhere and what you will use to create a local Docker cluster. The EKS Anywhere plugin requires eksctl version 0.66.0 or newer.
Homebrew
Note if you already have eksctl installed, you can install the eksctl anywhere plugin manually following the instructions in the following section.
This package also installs kubectl and aws-iam-authenticator.
brew install aws/tap/eks-anywhere
Manual
Install eksctl
curl "https://github.com/weaveworks/eksctl/releases/latest/download/eksctl_$(uname -s)_amd64.tar.gz" \
--silent --location \
| tar xz -C /tmp
sudo install -m 0755 /tmp/eksctl /usr/local/bin/eksctl
Install the eksctl-anywhere plugin
RELEASE_VERSION=$(curl https://anywhere-assets.eks.amazonaws.com/releases/eks-a/manifest.yaml --silent --location | yq ".spec.latestVersion")
EKS_ANYWHERE_TARBALL_URL=$(curl https://anywhere-assets.eks.amazonaws.com/releases/eks-a/manifest.yaml --silent --location | yq ".spec.releases[] | select(.version==\"$RELEASE_VERSION\").eksABinary.$(uname -s | tr A-Z a-z).uri")
curl $EKS_ANYWHERE_TARBALL_URL \
--silent --location \
| tar xz ./eksctl-anywhere
sudo install -m 0755 ./eksctl-anywhere /usr/local/bin/eksctl-anywhere
Install kubectl. See the Kubernetes documentation
for more information.
export OS="$(uname -s | tr A-Z a-z)" ARCH=$(test "$(uname -m)" = 'x86_64' && echo 'amd64' || echo 'arm64')
curl -LO "https://dl.k8s.io/release/$(curl -L -s https://dl.k8s.io/release/stable.txt)/bin/${OS}/${ARCH}/kubectl"
sudo install -m 0755 ./kubectl /usr/local/bin/kubectl
Create a local Docker cluster
-
Generate a cluster config. The cluster config will contain the settings for your local Docker cluster. The eksctl anywhere generate command populates a cluster config with EKS Anywhere defaults and best practices.
CLUSTER_NAME=mgmt
eksctl anywhere generate clusterconfig $CLUSTER_NAME \
--provider docker > $CLUSTER_NAME.yaml
The command above creates a file named eksa-cluster.yaml with the contents below in the path where it is executed.
The configuration specification is divided into two sections: Cluster and DockerDatacenterConfig.
These are the minimum configuration settings you must provide to create a Docker cluster. You can optionally configure OIDC, etcd, proxy, and GitOps as described here.
apiVersion: anywhere.eks.amazonaws.com/v1alpha1
kind: Cluster
metadata:
name: mgmt
spec:
clusterNetwork:
cniConfig:
cilium: {}
pods:
cidrBlocks:
- 192.168.0.0/16
services:
cidrBlocks:
- 10.96.0.0/12
controlPlaneConfiguration:
count: 1
datacenterRef:
kind: DockerDatacenterConfig
name: mgmt
externalEtcdConfiguration:
count: 1
kubernetesVersion: "1.35"
managementCluster:
name: mgmt
workerNodeGroupConfigurations:
- count: 1
name: md-0
---
apiVersion: anywhere.eks.amazonaws.com/v1alpha1
kind: DockerDatacenterConfig
metadata:
name: mgmt
spec: {}
-
Create Docker Cluster. Note the following command may take several minutes to complete. You can run the command with -v 6 to increase logging verbosity to see the progress of the command.
For a regular cluster create (with internet access), type the following:
eksctl anywhere create cluster -f $CLUSTER_NAME.yaml
For an airgapped cluster create, follow Preparation for airgapped deployments
instructions, then type the following:
eksctl anywhere create cluster -f $CLUSTER_NAME.yaml --bundles-override ./eks-anywhere-downloads/bundle-release.yaml
Expand for sample output:
Performing setup and validations
✅ validation succeeded {"validation": "docker Provider setup is valid"}
Creating new bootstrap cluster
Installing cluster-api providers on bootstrap cluster
Provider specific setup
Creating new workload cluster
Installing networking on workload cluster
Installing cluster-api providers on workload cluster
Moving cluster management from bootstrap to workload cluster
Installing EKS-A custom components (CRD and controller) on workload cluster
Creating EKS-A CRDs instances on workload cluster
Installing GitOps Toolkit on workload cluster
GitOps field not specified, bootstrap flux skipped
Deleting bootstrap cluster
🎉 Cluster created!
----------------------------------------------------------------------------------
The Amazon EKS Anywhere Curated Packages are only available to customers with the
Amazon EKS Anywhere Enterprise Subscription
----------------------------------------------------------------------------------
...
NOTE: to install curated packages during cluster creation, use --install-packages packages.yaml flag
-
Access Docker cluster
Once the cluster is created you can use it with the generated kubeconfig in the local directory.
If you used the same naming conventions as the example above, you will find a eksa-cluster/eksa-cluster-eks-a-cluster.kubeconfig in the directory where you ran the commands.
export KUBECONFIG=${PWD}/${CLUSTER_NAME}/${CLUSTER_NAME}-eks-a-cluster.kubeconfig
kubectl get ns
Example command output
NAME STATUS AGE
capd-system Active 21m
capi-kubeadm-bootstrap-system Active 21m
capi-kubeadm-control-plane-system Active 21m
capi-system Active 21m
capi-webhook-system Active 21m
cert-manager Active 22m
default Active 23m
eksa-packages Active 23m
eksa-system Active 20m
kube-node-lease Active 23m
kube-public Active 23m
kube-system Active 23m
You can now use the cluster like you would any Kubernetes cluster.
-
The following command will deploy a test application:
kubectl apply -f "https://anywhere.eks.amazonaws.com/manifests/hello-eks-a.yaml"
To interact with the deployed application, review the steps in the Deploy test workload page
.
Next steps:
-
See the Cluster management
section for more information on common operational tasks like scaling and deleting the cluster.
-
See the Package management
section for more information on post-creation curated packages installation.
4.12 - Optional Configuration
Optional Config references for EKS Anywhere clusters such as etcd, OS, CNI, IRSA, proxy, and registry mirror
The configuration pages below describe optional features that you can add to your EKS Anywhere provider’s clusterspec file.
See each provider’s installation section for details on which optional features are supported.
4.12.1 - etcd
EKS Anywhere cluster yaml etcd specification reference
Unstacked etcd topology (recommended)
Provider support details
|
vSphere |
Bare Metal |
Nutanix |
CloudStack |
Snow |
| Supported? |
✓ |
|
✓ |
✓ |
✓ |
There are two types of etcd topologies for configuring a Kubernetes cluster:
- Stacked: The etcd members and control plane components are colocated (run on the same node/machines)
- Unstacked/External: With the unstacked or external etcd topology, etcd members have dedicated machines and are not colocated with control plane components
The unstacked etcd topology is recommended for a HA cluster for the following reasons:
- External etcd topology decouples the control plane components and etcd member.
For example, if a control plane-only node fails, or if there is a memory leak in a component like kube-apiserver, it won’t directly impact an etcd member.
- Etcd is resource intensive, so it is safer to have dedicated nodes for etcd, since it could use more disk space or higher bandwidth.
Having a separate etcd cluster for these reasons could ensure a more resilient HA setup.
EKS Anywhere supports both topologies.
In order to configure a cluster with the unstacked/external etcd topology, you need to configure your cluster by updating the configuration file before creating the cluster.
This is a generic template with detailed descriptions below for reference:
apiVersion: anywhere.eks.amazonaws.com/v1alpha1
kind: Cluster
metadata:
name: my-cluster-name
spec:
clusterNetwork:
pods:
cidrBlocks:
- 192.168.0.0/16
services:
cidrBlocks:
- 10.96.0.0/12
cniConfig:
cilium: {}
controlPlaneConfiguration:
count: 1
endpoint:
host: ""
machineGroupRef:
kind: VSphereMachineConfig
name: my-cluster-name-cp
datacenterRef:
kind: VSphereDatacenterConfig
name: my-cluster-name
# etcd configuration
externalEtcdConfiguration:
count: 3
machineGroupRef:
kind: VSphereMachineConfig
name: my-cluster-name-etcd
kubernetesVersion: "1.35"
workerNodeGroupConfigurations:
- count: 1
machineGroupRef:
kind: VSphereMachineConfig
name: my-cluster-name
name: md-0
externalEtcdConfiguration (under Cluster)
External etcd configuration for your Kubernetes cluster.
count (required)
This determines the number of etcd members in the cluster.
The recommended number is 3.
machineGroupRef (required)
Refers to the Kubernetes object with provider specific configuration for your nodes.
4.12.2 - Encrypting Confidential Data at Rest
EKS Anywhere cluster specification for encryption of etcd data at-rest
You can configure EKS Anywhere clusters to encrypt confidential API resource data, such as secrets, at-rest in etcd using a KMS encryption provider.
EKS Anywhere supports a hybrid model for configuring etcd encryption where cluster admins are responsible for deploying and maintaining
the KMS provider on the cluster and EKS Anywhere handles configuring kube-apiserver with the KMS properties.
Because of this model, etcd encryption can only be enabled on cluster upgrades after the KMS provider has been deployed on the cluster.
Note
Currently, etcd encryption is only supported for Nutanix, CloudStack and vSphere.
Support for other providers will be added in a future release.
Before you begin
Before enabling etcd encryption, make sure you have done the following:
Example etcd encryption configuration
The following cluster spec enables etcd encryption configuration:
apiVersion: anywhere.eks.amazonaws.com/v1alpha1
kind: Cluster
metadata:
name: my-cluster
namespace: default
spec:
...
etcdEncryption:
- providers:
- kms:
cachesize: 1000
name: example-kms-config
socketListenAddress: unix:///var/run/kmsplugin/socket.sock
timeout: 3s
resources:
- secrets
Description of etcd encryption fields
etcdEncryption
Key used to specify etcd encryption configuration for a cluster. This field is only supported on cluster upgrades.
-
providers
Key used to specify which encryption provider to use. Currently, only one provider can be configured.
-
resources
Key used to specify a list of resources that should be encrypted using the corresponding encryption provider.
These can be native Kubernetes resources such as secrets and configmaps or custom resource definitions such as clusters.anywhere.eks.amazonaws.com.
Example AWS Encryption Provider DaemonSet
Here’s a sample AWS encryption provider daemonset configuration.
Note
This example doesn’t include any configuration for AWS credentials to call the KMS APIs.
You can configure this daemonset with static creds for an IAM user or use
IRSA for a more secure way to authenticate to AWS.
Expand
apiVersion: apps/v1
kind: DaemonSet
metadata:
labels:
app: aws-encryption-provider
name: aws-encryption-provider
namespace: kube-system
spec:
selector:
matchLabels:
app: aws-encryption-provider
template:
metadata:
labels:
app: aws-encryption-provider
spec:
containers:
- image: <AWS_ENCRYPTION_PROVIDER_IMAGE> # Specify the AWS KMS encryption provider image
name: aws-encryption-provider
resources:
requests:
memory: "64Mi"
cpu: "250m"
limits:
memory: "128Mi"
cpu: "500m"
command:
- /aws-encryption-provider
- --key=<KEY_ARN> # Specify the arn of KMS key to be used for encryption/decryption
- --region=<AWS_REGION> # Specify the region in which the KMS key exists
- --listen=<KMS_SOCKET_LISTEN_ADDRESS> # Specify a socket listen address for the KMS provider. Example: /var/run/kmsplugin/socket.sock
ports:
- containerPort: 8080
protocol: TCP
livenessProbe:
httpGet:
path: /healthz
port: 8080
volumeMounts:
- mountPath: /var/run/kmsplugin
name: var-run-kmsplugin
- mountPath: /root/.aws
name: aws-credentials
tolerations:
- key: "node-role.kubernetes.io/master"
effect: "NoSchedule"
- key: "node-role.kubernetes.io/control-plane"
effect: "NoSchedule"
volumes:
- hostPath:
path: /var/run/kmsplugin
type: DirectoryOrCreate
name: var-run-kmsplugin
- hostPath:
path: /etc/kubernetes/aws
type: DirectoryOrCreate
name: aws-credentials
4.12.3 - Operating system
EKS Anywhere cluster yaml specification for host OS configuration
Host OS Configuration
You can configure certain host OS settings through EKS Anywhere.
Provider support details
|
vSphere |
Bare Metal |
Nutanix |
CloudStack |
Snow |
| Supported? |
✓ |
✓ |
|
|
|
Note
Settings under bottlerocketConfiguration are only supported for osFamily: bottlerocket
The following cluster spec shows an example of how to configure host OS settings:
apiVersion: anywhere.eks.amazonaws.com/v1alpha1
kind: VSphereMachineConfig # Replace "VSphereMachineConfig" with "TinkerbellMachineConfig" for Tinkerbell clusters
metadata:
name: machine-config
spec:
...
hostOSConfiguration:
ntpConfiguration:
servers:
- time-a.ntp.local
- time-b.ntp.local
certBundles:
- name: "bundle_1"
data: |
-----BEGIN CERTIFICATE-----
MIIF1DCCA...
...
es6RXmsCj...
-----END CERTIFICATE-----
-----BEGIN CERTIFICATE-----
...
-----END CERTIFICATE-----
bottlerocketConfiguration:
kubernetes:
allowedUnsafeSysctls:
- "net.core.somaxconn"
- "net.ipv4.ip_local_port_range"
clusterDNSIPs:
- 10.96.0.10
maxPods: 100
kernel:
sysctlSettings:
net.core.wmem_max: "8388608"
net.core.rmem_max: "8388608"
...
boot:
bootKernelParameters:
slub_debug:
- "options,slabs"
...
Host OS Configuration Spec Details
hostOSConfiguration
Top level object used for host OS configurations.
-
ntpConfiguration
Key used for configuring NTP servers on your EKS Anywhere cluster nodes.
-
servers
Servers is a list of NTP servers that should be configured on EKS Anywhere cluster nodes.
-
certBundles
Key used for configuring custom trusted CA certs on your EKS Anywhere cluster nodes. Multiple cert bundles can be configured.
Note
This setting is _only valid_ for Botlerocket OS.
Name of the cert bundle that should be configured on EKS Anywhere cluster nodes. This must be a unique name for each entry
Data of the cert bundle that should be configured on EKS Anywhere cluster nodes. This takes in a PEM formatted cert bundle and can contain more than one CA cert per entry.
4.12.4 - Container Networking Interface
EKS Anywhere cluster yaml cni plugin specification reference
Specifying CNI Plugin in EKS Anywhere cluster spec
Provider support details
|
vSphere |
Bare Metal |
Nutanix |
CloudStack |
Snow |
| Supported? |
✓ |
✓ |
✓ |
✓ |
✓ |
EKS Anywhere currently supports two CNI plugins: Cilium and Kindnet. Only one of them can be selected
for a cluster, and the plugin cannot be changed once the cluster is created.
Up until the 0.7.x releases, the plugin had to be specified using the cni field on cluster spec.
Starting with release 0.8, the plugin should be specified using the new cniConfig field as follows:
-
For selecting Cilium as the CNI plugin:
apiVersion: anywhere.eks.amazonaws.com/v1alpha1
kind: Cluster
metadata:
name: my-cluster-name
spec:
clusterNetwork:
pods:
cidrBlocks:
- 192.168.0.0/16
services:
cidrBlocks:
- 10.96.0.0/12
cniConfig:
cilium: {}
EKS Anywhere selects this as the default plugin when generating a cluster config.
-
Or for selecting Kindnetd as the CNI plugin:
apiVersion: anywhere.eks.amazonaws.com/v1alpha1
kind: Cluster
metadata:
name: my-cluster-name
spec:
clusterNetwork:
pods:
cidrBlocks:
- 192.168.0.0/16
services:
cidrBlocks:
- 10.96.0.0/12
cniConfig:
kindnetd: {}
NOTE: EKS Anywhere allows specifying only 1 plugin for a cluster and does not allow switching the plugins
after the cluster is created.
Helm Values Configuration for Cilium plugin
Starting with recent releases, Cilium can be configured using Helm values directly through the helmValues field. This provides full flexibility to configure any Cilium Helm chart parameter.
When helmValues is specified, it takes precedence over all other Cilium-specific fields in the configuration. The helmValues field accepts standard Cilium Helm chart values in YAML format.
Example configuration using helmValues:
apiVersion: anywhere.eks.amazonaws.com/v1alpha1
kind: Cluster
metadata:
name: my-cluster-name
spec:
clusterNetwork:
pods:
cidrBlocks:
- 192.168.0.0/16
services:
cidrBlocks:
- 10.96.0.0/12
cniConfig:
cilium:
helmValues:
policyEnforcementMode: always
egressMasqueradeInterfaces: eth0
routingMode: native
ipv4NativeRoutingCIDR: 192.168.0.0/16
cni:
exclusive: false
hubble:
enabled: true
relay:
enabled: true
ui:
enabled: true
For a complete list of available Helm values, refer to the official Cilium Helm chart documentation
.
Note
When using helmValues, all legacy Cilium configuration fields (such as policyEnforcementMode, egressMasqueradeInterfaces, routingMode, ipv4NativeRoutingCIDR, ipv6NativeRoutingCIDR, and cniExclusive) are ignored. Configure these parameters within the helmValues field instead.
Policy Configuration options for Cilium plugin
Deprecated
The policyEnforcementMode field is deprecated. Please use helmValues instead. See the Helm Values Configuration
section for details..
Cilium accepts policy enforcement modes from the users to determine the allowed traffic between pods.
The allowed values for this mode are: default, always and never.
Please refer the official Cilium documentation
for more details on how each mode affects
the communication within the cluster and choose a mode accordingly.
You can choose to not set this field so that cilium will be launched with the default mode.
Starting release 0.8, Cilium’s policy enforcement mode can be set through the cluster spec
as follows:
apiVersion: anywhere.eks.amazonaws.com/v1alpha1
kind: Cluster
metadata:
name: my-cluster-name
spec:
clusterNetwork:
pods:
cidrBlocks:
- 192.168.0.0/16
services:
cidrBlocks:
- 10.96.0.0/12
cniConfig:
cilium:
policyEnforcementMode: "always"
Please note that if the always mode is selected, all communication between pods is blocked unless
NetworkPolicy objects allowing communication are created.
In order to ensure that the cluster gets created successfully, EKS Anywhere will create the required
NetworkPolicy objects for all its core components. But it is up to the user to create the NetworkPolicy
objects needed for the user workloads once the cluster is created.
Network policies created by EKS Anywhere for “always” mode
As mentioned above, if Cilium is configured with policyEnforcementMode set to always,
EKS Anywhere creates NetworkPolicy objects to enable communication between
its core components. EKS Anywhere will create NetworkPolicy resources in the following namespaces allowing all ingress/egress traffic by default:
- kube-system
- eksa-system
- All core Cluster API namespaces:
- capi-system
- capi-kubeadm-bootstrap-system
- capi-kubeadm-control-plane-system
- etcdadm-bootstrap-provider-system
- etcdadm-controller-system
- cert-manager
- Infrastructure provider’s namespace (for instance, capd-system OR capv-system)
- If Gitops is enabled, then the gitops namespace (flux-system by default)
This is the NetworkPolicy that will be created in these namespaces for the cluster:
apiVersion: networking.k8s.io/v1
kind: NetworkPolicy
metadata:
name: allow-all-ingress-egress
namespace: test
spec:
podSelector: {}
ingress:
- {}
egress:
- {}
policyTypes:
- Ingress
- Egress
Switching the Cilium policy enforcement mode
The policy enforcement mode for Cilium can be changed as a part of cluster upgrade
through the cli upgrade command.
-
Switching to always mode: When switching from default/never to always mode,
EKS Anywhere will create the required NetworkPolicy objects for its core components (listed above).
This will ensure that the cluster gets upgraded successfully. But it is up to the user to create
the NetworkPolicy objects required for the user workloads.
-
Switching from always mode: When switching from always to default mode, EKS Anywhere
will not delete any of the existing NetworkPolicy objects, including the ones required
for EKS Anywhere components (listed above). The user must delete NetworkPolicy objects as needed.
EgressMasqueradeInterfaces option for Cilium plugin
Deprecated
The egressMasqueradeInterfaces field is deprecated. Please use helmValues instead. See the Helm Values Configuration
section for details.
Cilium accepts the EgressMasqueradeInterfaces option from users to limit which interfaces masquerading is performed on.
The allowed values for this mode are an interface name such as eth0 or an interface prefix such as eth+.
Please refer to the official Cilium documentation
for more details on how this option affects masquerading traffic.
By default, masquerading will be performed on all traffic leaving on a non-Cilium network device. This only has an effect on traffic egressing from a node to an external destination not part of the cluster and does not affect routing decisions.
This field can be set as follows:
apiVersion: anywhere.eks.amazonaws.com/v1alpha1
kind: Cluster
metadata:
name: my-cluster-name
spec:
clusterNetwork:
pods:
cidrBlocks:
- 192.168.0.0/16
services:
cidrBlocks:
- 10.96.0.0/12
cniConfig:
cilium:
egressMasqueradeInterfaces: "eth0"
RoutingMode option for Cilium plugin
Deprecated
The routingMode, ipv4NativeRoutingCIDR, and ipv6NativeRoutingCIDR fields are deprecated. Please use helmValues instead. See the Helm Values Configuration
section for details.
By default all traffic is sent by Cilium over Geneve tunneling on the network. The routingMode option allows users to switch to native routing
instead.
The ipv4NativeRoutingCIDR is required to set the CIDR in which native routing can be performed.
These fields can be set as follows:
apiVersion: anywhere.eks.amazonaws.com/v1alpha1
kind: Cluster
metadata:
name: my-cluster-name
spec:
clusterNetwork:
pods:
cidrBlocks:
- 192.168.0.0/16
services:
cidrBlocks:
- 10.96.0.0/12
cniConfig:
cilium:
routingMode: "direct"
ipv4NativeRoutingCIDR: 192.168.0.0/16
CNI Exclusive Mode configuration
Deprecated
The cniExclusive field is deprecated. Please use helmValues with the cni.exclusive parameter instead. See the Helm Values Configuration
section for details.
The cniExclusive option controls whether Cilium should remove other CNI configuration files from the nodes.
By default, Cilium operates in exclusive mode (cniExclusive: true), which means it will remove any other CNI configuration files to prevent conflicts.
When set to false, Cilium will leave other CNI configuration files alone, allowing for more advanced networking setups or coexistence with other CNI plugins during migration scenarios.
apiVersion: anywhere.eks.amazonaws.com/v1alpha1
kind: Cluster
metadata:
name: my-cluster-name
spec:
clusterNetwork:
pods:
cidrBlocks:
- 192.168.0.0/16
services:
cidrBlocks:
- 10.96.0.0/12
cniConfig:
cilium:
cniExclusive: false
Note
Setting cniExclusive: false is primarily useful for advanced networking scenarios or during CNI migration processes. Most users should leave this at the default value of true to ensure proper CNI operation.
Use a custom CNI
Deprecated
The skipUpgrade field is deprecated. Please use helmValues instead. See the Helm Values Configuration
section for details.
EKS Anywhere can be configured to skip EKS Anywhere’s default Cilium CNI upgrades via the skipUpgrade field.
skipUpgrade can be true or false. When not set, it defaults to false.
When creating a new cluster with skipUpgrade enabled, EKS Anywhere Cilium will be installed as it
is required to successfully provision an EKS Anywhere cluster.
When the cluster successfully provisions, EKS Anywhere Cilium may be uninstalled and replaced with
a different CNI.
Subsequent upgrades to the cluster will not attempt to upgrade or re-install EKS Anywhere Cilium.
Once enabled, skipUpgrade cannot be disabled.
apiVersion: anywhere.eks.amazonaws.com/v1alpha1
kind: Cluster
metadata:
name: my-cluster-name
spec:
clusterNetwork:
pods:
cidrBlocks:
- 192.168.0.0/16
services:
cidrBlocks:
- 10.96.0.0/12
cniConfig:
cilium:
skipUpgrade: true
The Cilium CLI
can be used to uninstall EKS Anywhere Cilium
via cilium uninstall.
See the replacing Cilium task
for a walkthrough on how to successfully replace EKS Anywhere Cilium.
Warning
When uninstalling EKS Anywhere Cilium, nodes will become unhealthy. If nodes are left without a CNI
for longer than 5m the nodes will begin rolling. To maintain a healthy cluster, operators should
immediately install a CNI after uninstalling EKS Anywhere Cilium.
Warning
Clusters created using the Full Lifecycle Controller prior to v0.15 that have removed the EKS Anywhere Cilium CNI must manually populate their cluster.anywhere.eks.amazonaws.com object with the following annotation to ensure EKS Anywhere does not attempt to re-install EKS Anywhere Cilium.
anywhere.eks.amazonaws.com/eksa-cilium: ""
Node IPs configuration option
Starting with release v0.10, the node-cidr-mask-size flag
for Kubernetes controller manager (kube-controller-manager) is configurable via the EKS anywhere cluster spec. The clusterNetwork.nodes being an optional field,
is not generated in the EKS Anywhere spec using generate clusterconfig command. This block for nodes will need to be manually added to the cluster spec under the
clusterNetwork section:
clusterNetwork:
pods:
cidrBlocks:
- 192.168.0.0/16
services:
cidrBlocks:
- 10.96.0.0/12
cniConfig:
cilium: {}
nodes:
cidrMaskSize: 24
If the user does not specify the clusterNetwork.nodes field in the cluster yaml spec, the value for this flag defaults to 24 for IPv4.
Please note that this mask size needs to be greater than the pods CIDR mask size. In the above spec, the pod CIDR mask size is 16
and the node CIDR mask size is 24. This ensures the cluster 256 blocks of /24 networks. For example, node1 will get
192.168.0.0/24, node2 will get 192.168.1.0/24, node3 will get 192.168.2.0/24 and so on.
To support more than 256 nodes, the cluster CIDR block needs to be large, and the node CIDR mask size needs to be
small, to support that many IPs.
For instance, to support 1024 nodes, a user can do any of the following things
- Set the pods cidr blocks to
192.168.0.0/16 and node cidr mask size to 26
- Set the pods cidr blocks to
192.168.0.0/15 and node cidr mask size to 25
Please note that the node-cidr-mask-size needs to be large enough to accommodate the number of pods you want to run on each node.
A size of 24 will give enough IP addresses for about 250 pods per node, however a size of 26 will only give you about 60 IPs.
This is an immutable field, and the value can’t be updated once the cluster has been created.
4.12.5 - IAM Roles for Service Accounts configuration
EKS Anywhere cluster spec for IAM Roles for Service Accounts (IRSA)
IAM Role for Service Account on EKS Anywhere clusters with self-hosted signing keys
IAM Roles for Service Account (IRSA) enables applications running in clusters to authenticate with AWS services using IAM roles. The current solution for leveraging this in EKS Anywhere involves creating your own OIDC provider for the cluster, and hosting your cluster’s public service account signing key. The public keys along with the OIDC discovery document should be hosted somewhere that AWS STS can discover it.
The steps below are based on the guide for configuring IRSA for DIY Kubernetes,
with modifications specific to EKS Anywhere’s cluster provisioning workflow. The main modification is the process of generating the keys.json document. As per the original guide, the user has to create the service account signing keys, and then use that to create the keys.json document prior to cluster creation. This order is reversed for EKS Anywhere clusters, so you will create the cluster first, and then retrieve the service account signing key generated by the cluster, and use it to create the keys.json document. The sections below show how to do this in detail.
Create an OIDC provider and make its discovery document publicly accessible
You must use a single OIDC provider per EKS Anywhere cluster, which is the best practice to prevent a token from one cluster being used with another cluster. These steps describe the process of using a S3 bucket to host the OIDC discovery.json and keys.json documents.
-
Create an S3 bucket to host the public signing keys and OIDC discovery document for your cluster
. Make a note of the $HOSTNAME and $ISSUER_HOSTPATH.
-
Create the OIDC discovery document as follows:
cat <<EOF > discovery.json
{
"issuer": "https://$ISSUER_HOSTPATH",
"jwks_uri": "https://$ISSUER_HOSTPATH/keys.json",
"authorization_endpoint": "urn:kubernetes:programmatic_authorization",
"response_types_supported": [
"id_token"
],
"subject_types_supported": [
"public"
],
"id_token_signing_alg_values_supported": [
"RS256"
],
"claims_supported": [
"sub",
"iss"
]
}
EOF
-
Upload the discovery.json file to the S3 bucket:
aws s3 cp ./discovery.json s3://$S3_BUCKET/.well-known/openid-configuration
-
Create an OIDC provider
for your cluster. Set the Provider URL to https://$ISSUER_HOSTPATH and Audience to sts.amazonaws.com.
-
Make a note of the Provider field of OIDC provider after it is created.
Create (or upgrade) the EKS Anywhere cluster
When creating (or upgrading) the EKS Anywhere cluster, you need to configure the kube-apiserver’s service-account-issuer flag so it can issue and mount projected service account tokens in pods. For this, use the value obtained in the first section for $ISSUER_HOSTPATH as the service-account-issuer. Configure the kube-apiserver by setting this value through the EKS Anywhere cluster spec:
apiVersion: anywhere.eks.amazonaws.com/v1alpha1
kind: Cluster
metadata:
name: my-cluster-name
spec:
podIamConfig:
serviceAccountIssuer: https://$ISSUER_HOSTPATH
Set the remaining fields in cluster spec as required and create the cluster.
Generate keys.json and make it publicly accessible
-
The cluster provisioning workflow generates a pair of service account signing keys. Retrieve the public signing key from the cluster and create a keys.json document with the content.
git clone https://github.com/aws/amazon-eks-pod-identity-webhook
cd amazon-eks-pod-identity-webhook
kubectl get secret ${CLUSTER_NAME}-sa -n eksa-system -o jsonpath={.data.tls\\.crt} | base64 --decode > ${CLUSTER_NAME}-sa.pub
go run ./hack/self-hosted/main.go -key ${CLUSTER_NAME}-sa.pub | jq '.keys += [.keys[0]] | .keys[1].kid = ""' > keys.json
-
Upload the keys.json document to the S3 bucket.
aws s3 cp ./keys.json s3://$S3_BUCKET/keys.json
-
Use a bucket policy
to grant public read access to the discovery.json and keys.json documents:
{
"Version": "2012-10-17",
"Statement": [
{
"Effect": "Allow",
"Principal": "*",
"Action": "s3:GetObject",
"Resource": [
"arn:aws:s3:::$S3_BUCKET/.well-known/openid-configuration",
"arn:aws:s3:::$S3_BUCKET/keys.json"
]
}
]
}
Deploy pod identity webhook
The Amazon Pod Identity Webhook
configures pods with the necessary environment variables and tokens (via file mounts) to interact with AWS services. The webhook will configure any pod associated with a service account that has an eks-amazonaws.com/role-arn annotation.
-
Clone amazon-eks-pod-identity-webhook
.
-
Set the $KUBECONFIG environment variable to the path of the EKS Anywhere cluster.
-
Apply the manifests for the amazon-eks-pod-identity-webhook. The image used here will be pulled from docker.io. Optionally, the image can be imported into (or proxied through) your private registry. Change the IMAGE argument here to your private registry if needed.
make cluster-up IMAGE=amazon/amazon-eks-pod-identity-webhook:latest
Create IAM role for your workload
Each workload (such as ADOT, fluentbit, cert-manager, or custom applications) needs an IAM role with the permissions it requires. Repeat this section for each workload that requires AWS access.
-
Navigate to the AWS IAM Console.
-
Click on the OIDC provider created earlier.
-
Click Assign role.
-
Select Create a new role.
-
Select Web identity as the trusted entity.
-
In the Web identity section:
- If your Identity provider is not auto selected, select it.
- Select
sts.amazonaws.com as the Audience.
-
Click Next.
-
Configure your desired Permissions poilicies.
-
Below is a sample trust policy of IAM role for your pods. Replace ACCOUNT_ID, ISSUER_HOSTPATH, NAMESPACE and SERVICE_ACCOUNT.
Example: Scoped to a service account
{
"Version": "2012-10-17",
"Statement": [
{
"Effect": "Allow",
"Principal": {
"Federated": "arn:aws:iam::ACCOUNT_ID:oidc-provider/ISSUER_HOSTPATH"
},
"Action": "sts:AssumeRoleWithWebIdentity",
"Condition": {
"StringEquals": {
"ISSUER_HOSTPATH:sub": "system:serviceaccount:NAMESPACE:SERVICE_ACCOUNT"
},
}
}
]
}
-
Create the IAM Role and make a note of the Role ARN.
-
Annotate your workload’s ServiceAccount with the IAM role ARN:
Example ServiceAccount:
apiVersion: v1
kind: ServiceAccount
metadata:
name: my-serviceaccount
namespace: default
annotations:
eks.amazonaws.com/role-arn: "arn:aws:iam::ACCOUNT_ID:role/ROLE_NAME"
# optional: Defaults to "sts.amazonaws.com" if not set
eks.amazonaws.com/audience: "sts.amazonaws.com"
# optional: When set to "true", adds AWS_STS_REGIONAL_ENDPOINTS env var
# to containers
eks.amazonaws.com/sts-regional-endpoints: "true"
# optional: Defaults to 86400 for expirationSeconds if not set
# Note: This value can be overwritten if specified in the pod
# annotation as shown in the next step.
eks.amazonaws.com/token-expiration: "86400"
-
See the How to use trust policies with IAM Roles
for more information on trust policies.
Advanced: Sharing an IAM role across multiple clusters
When multiple EKS Anywhere clusters need access to the same AWS resources (e.g., multiple ADOT deployments writing to a shared AMP workspace), you can configure a single IAM role with multiple statements—one per cluster’s OIDC provider.
{
"Version": "2012-10-17",
"Statement": [
{
"Effect": "Allow",
"Principal": {
"Federated": "arn:aws:iam::ACCOUNT_ID:oidc-provider/s3.us-west-2.amazonaws.com/dev-bucket"
},
"Action": "sts:AssumeRoleWithWebIdentity",
"Condition": {
"StringEquals": {
"s3.us-west-2.amazonaws.com/dev-bucket:aud": "sts.amazonaws.com",
"s3.us-west-2.amazonaws.com/dev-bucket:sub": "system:serviceaccount:observability:adot-collector"
}
}
},
{
"Effect": "Allow",
"Principal": {
"Federated": "arn:aws:iam::ACCOUNT_ID:oidc-provider/s3.us-west-2.amazonaws.com/staging-bucket"
},
"Action": "sts:AssumeRoleWithWebIdentity",
"Condition": {
"StringEquals": {
"s3.us-west-2.amazonaws.com/staging-bucket:aud": "sts.amazonaws.com",
"s3.us-west-2.amazonaws.com/staging-bucket:sub": "system:serviceaccount:observability:adot-collector"
}
}
},
{
"Effect": "Allow",
"Principal": {
"Federated": "arn:aws:iam::ACCOUNT_ID:oidc-provider/s3.us-west-2.amazonaws.com/prod-bucket"
},
"Action": "sts:AssumeRoleWithWebIdentity",
"Condition": {
"StringEquals": {
"s3.us-west-2.amazonaws.com/prod-bucket:aud": "sts.amazonaws.com",
"s3.us-west-2.amazonaws.com/prod-bucket:sub": "system:serviceaccount:observability:adot-collector"
}
}
}
]
}
4.12.6 - IAM Authentication
EKS Anywhere cluster yaml specification AWS IAM Authenticator reference
AWS IAM Authenticator support (optional)
Provider support details
|
vSphere |
Bare Metal |
Nutanix |
CloudStack |
Snow |
| Supported? |
✓ |
✓ |
✓ |
✓ |
✓ |
EKS Anywhere can create clusters that support AWS IAM Authenticator-based api server authentication.
In order to add IAM Authenticator support, you need to configure your cluster by updating the configuration file before creating the cluster.
This is a generic template with detailed descriptions below for reference:
apiVersion: anywhere.eks.amazonaws.com/v1alpha1
kind: Cluster
metadata:
name: my-cluster-name
spec:
...
# IAM Authenticator support
identityProviderRefs:
- kind: AWSIamConfig
name: aws-iam-auth-config
---
apiVersion: anywhere.eks.amazonaws.com/v1alpha1
kind: AWSIamConfig
metadata:
name: aws-iam-auth-config
spec:
awsRegion: ""
backendMode:
- ""
mapRoles:
- roleARN: arn:aws:iam::XXXXXXXXXXXX:role/myRole
username: myKubernetesUsername
groups:
- ""
mapUsers:
- userARN: arn:aws:iam::XXXXXXXXXXXX:user/myUser
username: myKubernetesUsername
groups:
- ""
partition: ""
identityProviderRefs (Under Cluster)
List of identity providers you want configured for the Cluster.
This would include a reference to the AWSIamConfig object with the configuration below.
awsRegion (required)
- Description: awsRegion can be any region in the aws partition that the IAM roles exist in.
- Type: string
backendMode (required)
- Description: backendMode configures the IAM authenticator server’s backend mode (i.e. where to source mappings from). We support EKSConfigMap
and CRD
modes supported by AWS IAM Authenticator, for more details refer to backendMode
- Type: string
mapRoles, mapUsers (recommended for EKSConfigMap backend)
partition
- Description: This field is used to set the aws partition that the IAM roles are present in. Default value is
aws.
- Type: string
4.12.7 - OIDC
EKS Anywhere cluster yaml specification OIDC reference
OIDC support (optional)
EKS Anywhere can create clusters that support api server OIDC authentication.
Provider support details
|
vSphere |
Bare Metal |
Nutanix |
CloudStack |
Snow |
| Supported? |
✓ |
✓ |
✓ |
✓ |
✓ |
In order to add OIDC support, you need to configure your cluster by updating the configuration file to include the details below. The OIDC configuration can be added at cluster creation time, or introduced via a cluster upgrade in VMware and CloudStack.
This is a generic template with detailed descriptions below for reference:
apiVersion: anywhere.eks.amazonaws.com/v1alpha1
kind: Cluster
metadata:
name: my-cluster-name
spec:
...
# OIDC support
identityProviderRefs:
- kind: OIDCConfig
name: my-cluster-name
---
apiVersion: anywhere.eks.amazonaws.com/v1alpha1
kind: OIDCConfig
metadata:
name: my-cluster-name
spec:
clientId: ""
groupsClaim: ""
groupsPrefix: ""
issuerUrl: "https://x"
requiredClaims:
- claim: ""
value: ""
usernameClaim: ""
usernamePrefix: ""
identityProviderRefs (Under Cluster)
List of identity providers you want configured for the Cluster.
This would include a reference to the OIDCConfig object with the configuration below.
clientId (required)
- Description: ClientId defines the client ID for the OpenID Connect client
- Type: string
groupsClaim (optional)
- Description: GroupsClaim defines the name of a custom OpenID Connect claim for specifying user groups
- Type: string
groupsPrefix (optional)
- Description: GroupsPrefix defines a string to be prefixed to all groups to prevent conflicts with other authentication strategies
- Type: string
issuerUrl (required)
- Description: IssuerUrl defines the URL of the OpenID issuer, only HTTPS scheme will be accepted
- Type: string
requiredClaims (optional)
List of RequiredClaim objects listed below.
Only one is supported at this time.
requiredClaims[0] (optional)
- Description: RequiredClaim defines a key=value pair that describes a required claim in the ID Token
- Type: object
usernameClaim (optional)
- Description: UsernameClaim defines the OpenID claim to use as the user name.
Note that claims other than the default (‘sub’) is not guaranteed to be unique and immutable
- Type: string
usernamePrefix (optional)
- Description: UsernamePrefix defines a string to be prefixed to all usernames.
If not provided, username claims other than ‘email’ are prefixed by the issuer URL to avoid clashes.
To skip any prefixing, provide the value ‘-’.
- Type: string
4.12.8 - Proxy
EKS Anywhere cluster yaml specification proxy configuration reference
Proxy support (optional)
Provider support details
|
vSphere |
Bare Metal |
Nutanix |
CloudStack |
Snow |
| Supported? |
✓ |
✓ |
✓ |
✓ |
✓ |
You can configure EKS Anywhere to use a proxy to connect to the Internet. This is the
generic template with proxy configuration for your reference:
apiVersion: anywhere.eks.amazonaws.com/v1alpha1
kind: Cluster
metadata:
name: my-cluster-name
spec:
...
proxyConfiguration:
httpProxy: http-proxy-ip:port
httpsProxy: https-proxy-ip:port
noProxy:
- list of no proxy endpoints
Configuring Docker daemon
EKS Anywhere will proxy for you given the above configuration file.
However, to successfully use EKS Anywhere you will also need to ensure your Docker daemon is configured to use the proxy.
This generally means updating your daemon to launch with the HTTPS_PROXY, HTTP_PROXY, and NO_PROXY environment variables.
For an example of how to do this with systemd, please see Docker’s documentation here
.
Configuring EKS Anywhere proxy without config file
For commands using a cluster config file, EKS Anywhere will derive its proxy config from the cluster configuration file.
However, for commands that do not utilize a cluster config file, you can set the following environment variables:
export HTTPS_PROXY=https-proxy-ip:port
export HTTP_PROXY=http-proxy-ip:port
export NO_PROXY=no-proxy-domain.com,another-domain.com,localhost
Proxy Configuration Spec Details
proxyConfiguration (required)
- Description: top level key; required to use proxy.
- Type: object
httpProxy (required)
- Description: HTTP proxy to use to connect to the internet; must be in the format IP:port
- Type: string
- Example:
httpProxy: 192.168.0.1:3218
httpsProxy (required)
- Description: HTTPS proxy to use to connect to the internet; must be in the format IP:port
- Type: string
- Example:
httpsProxy: 192.168.0.1:3218
noProxy (optional)
- Description: list of endpoints that should not be routed through the proxy; can be an IP, CIDR block, or a domain name
- Type: list of strings
- Example
noProxy:
- localhost
- 192.168.0.1
- 192.168.0.0/16
- .example.com
Note
- For Bottlerocket OS, it is required to add the local subnet CIDR range in the
noProxy list.
- For Bare Metal provider, it is required to host hook images locally which should be accessible by admin machines as well as all the nodes without using proxy configuration. Please refer to the documentation for getting hook images here
.
4.12.9 - KubeletConfiguration
EKS Anywhere cluster yaml specification for Kubelet Configuration
Kubelet Configuration Support
Provider support details
|
vSphere |
Bare Metal |
Nutanix |
CloudStack |
Snow |
| Ubuntu 20.04 |
✔ |
✔ |
✔ |
— |
— |
| Ubuntu 22.04 |
✔ |
✔ |
✔ |
— |
— |
| Bottlerocket |
✔ |
— |
— |
— |
— |
| RHEL 8.x |
✔ |
✔ |
✔ |
✔ |
— |
| RHEL 9.x |
— |
— |
✔ |
✔ |
— |
You can configure EKS Anywhere to specify Kubelet settings and configure those for control plane and/or worker nodes starting from v0.20.0. This can be done using kubeletConfiguration.
The following cluster spec shows an example of how to configure kubeletConfiguration:
apiVersion: anywhere.eks.amazonaws.com/v1alpha1
kind: Cluster
metadata:
name: my-cluster-name
spec:
...
...
controlPlaneConfiguration: # Kubelet configuration for Control plane nodes
kubeletConfiguration:
kind: KubeletConfiguration
maxPods: 80
...
workerNodeGroupConfigurations: # Kubelet configuration for Worker nodes
- count: 1
kubeletConfiguration:
kind: KubeletConfiguration
maxPods: 85
...
kubeletConfiguration should contain the configuration to be used by the kubelet while creating or updating a node. It must contain the kind key with the value KubeletConfiguration for EKS Anywhere to process the settings. This configuration must only be used with valid settings as it may cause unexpected behavior from the Kubelet if misconfigured. EKS Anywhere performs a limited set of data type validations for the Kubelet Configuration, however it is ultimately the user’s responsibility to make sure that valid configuration is set for Kubelet Configuration.
More details on the Kubelet Configuration object and its supported fields can be found here
. EKS Anywhere only supports the latest Kubernetes version’s KubeletConfiguration.
Bottlerocket Support
The only provider that supports kubeletConfiguration with Bottlerocket is vSphere. The list of settings that can be configured for Bottlerocket can be found here
. This page also describes other various settings like Kubelet Options. The settings supported by Bottlerocket will have information specific to the Kubelet Configuration keyword in there. Refer to the documentation to learn about the supported fields as well as their data types as they may vary from the upstream object’s data types.
Note that this is the preferred and supported way to specify any Kubelet settings from the release v0.20.0 onwards. Previously the hostOSConfiguration.bottlerocketConfiguration.kubernetes
field was used to specify Bottlerocket Kubernetes settings. That has been deprecated from v0.20.0
Here’s a list of supported fields by Bottlerocket for Kubelet Configuration -
allowedUnsafeSysctlsclusterDNSIPsclusterDomaincontainerLogMaxFilescontainerLogMaxSizecpuCFSQuotacpuManagerPolicycpuManagerPolicyOptionscpuManagerReconcilePeriodeventBursteventRecordQPSevictionHardevictionMaxPodGracePeriodevictionSoftevictionSoftGracePeriodimageGCHighThresholdPercentimageGCLowThresholdPercentkubeAPIBurstkubeAPIQPSkubeReservedmaxPodsmemoryManagerPolicypodPidsLimitproviderIDregistryBurstregistryPullQPSshutdownGracePeriodshutdownGracePeriodCriticalPodssystemReservedtopologyManagerPolicytopologyManagerScope
Special fields
Duplicate fields
The clusterNetwork.dns.resolvConf is the file path to a file containing a custom DNS resolver configuration. This can now be provided in the Kubelet Configuration using the resolvConf field. Note that if both these fields are set, the Kubelet Configuration’s field will take precendence and override the value from the clusterNetwork.dns.resolvConf.
Blocked fields
Fields like providerID or cloudProvider are set by EKS Anywhere and can’t be set by users. This is to maintain seamless support for all providers.
Node Rollouts
Adding, updating, or deleting the Kubelet Configuration will cause node rollouts to the respective nodes that the configuration affects. This is especially important to consider in providers like Baremetal since the node rollouts that are caused by the Kubelet config changes could require extra hardware provisioned depending on your rollout strategy.
4.12.10 - MachineHealthCheck
EKS Anywhere cluster yaml specification for MachineHealthCheck configuration
MachineHealthCheck Support
Provider support details
|
vSphere |
Bare Metal |
Nutanix |
CloudStack |
Snow |
| Supported? |
✓ |
✓ |
✓ |
✓ |
✓ |
You can configure EKS Anywhere to specify timeouts and maxUnhealthy values for machine health checks.
A MachineHealthCheck (MHC) is a resource in Cluster API which allows users to define conditions under which Machines within a Cluster should be considered unhealthy. A MachineHealthCheck is defined on a management cluster and scoped to a particular workload cluster.
Note: Even though the MachineHealthCheck configuration in the EKS-A spec is optional, MachineHealthChecks are still installed for all clusters using the default values mentioned below.
EKS Anywhere allows users to have granular control over MachineHealthChecks in their cluster configuration, with default values (derived from Cluster API) being applied if the MHC is not configured in the spec. The top-level machineHealthCheck field governs the global MachineHealthCheck settings for all Machines (control-plane and worker). These global settings can be overridden through the nested machineHealthCheck field in the control plane configuration and each worker node configuration. If the nested MHC fields are not configured, then the top-level settings are applied to the respective Machines.
The following cluster spec shows an example of how to configure health check timeouts and maxUnhealthy:
apiVersion: anywhere.eks.amazonaws.com/v1alpha1
kind: Cluster
metadata:
name: my-cluster-name
spec:
...
machineHealthCheck: # Top-level MachineHealthCheck configuration
maxUnhealthy: "60%"
nodeStartupTimeout: "10m0s"
unhealthyMachineTimeout: "5m0s"
...
controlPlaneConfiguration: # MachineHealthCheck configuration for Control plane
machineHealthCheck:
maxUnhealthy: 100%
nodeStartupTimeout: "15m0s"
unhealthyMachineTimeout: 10m
...
workerNodeGroupConfigurations:
- count: 1
name: md-0
machineHealthCheck: # MachineHealthCheck configuration for Worker Node Group 0
maxUnhealthy: 100%
nodeStartupTimeout: "10m0s"
unhealthyMachineTimeout: 20m
- count: 1
name: md-1
machineHealthCheck: # MachineHealthCheck configuration for Worker Node Group 1
maxUnhealthy: 100%
nodeStartupTimeout: "10m0s"
unhealthyMachineTimeout: 20m
...
MachineHealthCheck Spec Details
machineHealthCheck (optional)
- Description: top-level key; required to configure global MachineHealthCheck timeouts and
maxUnhealthy.
- Type: object
machineHealthCheck.maxUnhealthy (optional)
- Description: determines the maximum permissible number or percentage of unhealthy Machines in a cluster before further remediation is prevented. This ensures that MachineHealthChecks only remediate Machines when the cluster is healthy.
- Default:
100% for control plane machines, 40% for worker nodes (Cluster API defaults).
- Type: integer (count) or string (percentage)
machineHealthCheck.nodeStartupTimeout (optional)
- Description: determines how long a MachineHealthCheck should wait for a Node to join the cluster, before considering a Machine unhealthy.
- Default:
20m0s for Tinkerbell provider, 10m0s for all other providers.
- Minimum Value (If configured):
30s
- Type: string
machineHealthCheck.unhealthyMachineTimeout (optional)
- Description: determines how long the unhealthy Node conditions (e.g.,
Ready=False, Ready=Unknown) should be matched for, before considering a Machine unhealthy.
- Default:
5m0s
- Type: string
controlPlaneConfiguration.machineHealthCheck (optional)
- Description: Control plane level configuration for MachineHealthCheck timeouts and
maxUnhealthy values.
- Type: object
controlPlaneConfiguration.machineHealthCheck.maxUnhealthy (optional)
- Description: determines the maximum permissible number or percentage of unhealthy control plane Machines in a cluster before further remediation is prevented. This ensures that MachineHealthChecks only remediate Machines when the cluster is healthy.
- Default: Top-level MHC
maxUnhealthy if set or 100% otherwise.
- Type: integer (count) or string (percentage)
controlPlaneConfiguration.machineHealthCheck.nodeStartupTimeout (optional)
- Description: determines how long a MachineHealthCheck should wait for a control plane Node to join the cluster, before considering the Machine unhealthy.
- Default: Top-level MHC
nodeStartupTimeout if set or 20m0s for Tinkerbell provider, 10m0s for all other providers otherwise.
- Minimum Value (if configured):
30s
- Type: string
controlPlaneConfiguration.machineHealthCheck.unhealthyMachineTimeout (optional)
- Description: determines how long the unhealthy conditions (e.g.,
Ready=False, Ready=Unknown) should be matched for a control plane Node, before considering the Machine unhealthy.
- Default: Top-level MHC
nodeStartupTimeout if set or 5m0s otherwise.
- Type: string
workerNodeGroupConfigurations.machineHealthCheck (optional)
- Description: Worker node level configuration for MachineHealthCheck timeouts and
maxUnhealthy values.
- Type: object
workerNodeGroupConfigurations.machineHealthCheck.maxUnhealthy (optional)
- Description: determines the maximum permissible number or percentage of unhealthy worker Machines in a cluster before further remediation is prevented. This ensures that MachineHealthChecks only remediate Machines when the cluster is healthy.
- Default: Top-level MHC
maxUnhealthy if set or 40% otherwise.
- Type: integer (count) or string (percentage)
workerNodeGroupConfigurations.machineHealthCheck.nodeStartupTimeout (optional)
- Description: determines how long a MachineHealthCheck should wait for a worker Node to join the cluster, before considering the Machine unhealthy.
- Default: Top-level MHC
nodeStartupTimeout if set or 20m0s for Tinkerbell provider, 10m0s for all other providers otherwise.
- Minimum Value (if configured):
30s
- Type: string
workerNodeGroupConfigurations.machineHealthCheck.unhealthyMachineTimeout (optional)
- Description: determines how long the unhealthy conditions (e.g.,
Ready=False, Ready=Unknown) should be matched for a worker Node, before considering the Machine unhealthy.
- Default: Top-level MHC
nodeStartupTimeout if set or 5m0s otherwise.
- Type: string
4.12.11 - Registry Mirror
EKS Anywhere cluster specification for registry mirror configuration
Registry Mirror Support (optional)
Provider support details
|
vSphere |
Bare Metal |
Nutanix |
CloudStack |
Snow |
| Supported? |
✓ |
✓ |
✓ |
✓ |
✓ |
You can configure EKS Anywhere to use a local registry mirror for its dependencies. When a registry mirror is configured in the EKS Anywhere cluster specification, EKS Anywhere will use it instead of defaulting to Amazon ECR for its dependencies. For details on how to configure your local registry mirror for EKS Anywhere, see the Configure local registry mirror
section.
See the airgapped documentation page
for instructions on downloading and importing EKS Anywhere dependencies to a local registry mirror.
Registry Mirror Cluster Spec
The following cluster spec shows an example of how to configure registry mirror:
apiVersion: anywhere.eks.amazonaws.com/v1alpha1
kind: Cluster
metadata:
name: my-cluster-name
spec:
...
registryMirrorConfiguration:
endpoint: <private registry IP or hostname>
port: <private registry port>
ociNamespaces:
- registry: <upstream registry IP or hostname>
namespace: <namespace in private registry>
...
caCertContent: |
-----BEGIN CERTIFICATE-----
MIIF1DCCA...
...
es6RXmsCj...
-----END CERTIFICATE-----
Registry Mirror Cluster Spec Details
registryMirrorConfiguration (optional)
- Description: top level key; required to use a private registry.
- Type: object
endpoint (required)
- Description: IP address or hostname of the private registry for pulling images
- Type: string
- Example:
endpoint: 192.168.0.1
port (optional)
- Description: port for the private registry. This is an optional field. If a port
is not specified, the default HTTPS port
443 is used
- Type: string
- Example:
port: 443
ociNamespaces (optional)
-
Description: when you need to mirror multiple registries, you can map each upstream registry to the “namespace” of its mirror. The namespace is appended with the endpoint, <endpoint>/<namespace> to setup the mirror for the registry specified.
Note while using ociNamespaces, you need to specify all the registries that need to be mirrored. This includes an entry for the public.ecr.aws registry to pull EKS Anywhere images from.
-
Type: array
-
Example:
ociNamespaces:
- registry: "public.ecr.aws"
namespace: ""
- registry: "783794618700.dkr.ecr.us-west-2.amazonaws.com"
namespace: "eks-anywhere"
Warning
Currently only public.ecr.aws registry is supported for mirroring with Bottlerocket OS.
caCertContent (optional)
-
Description: certificate Authority (CA) Certificate for the private registry . When using
self-signed certificates it is necessary to pass this parameter in the cluster spec. This must be the individual public CA cert used to sign the registry certificate. This will be added to the cluster nodes so that they are able to pull images from the private registry.
It is also possible to configure CACertContent by exporting an environment variable:
export EKSA_REGISTRY_MIRROR_CA="/path/to/certificate-file"
-
Type: string
-
Example:
CACertContent: |
-----BEGIN CERTIFICATE-----
MIIF1DCCA...
...
es6RXmsCj...
-----END CERTIFICATE-----
authenticate (optional)
- Description: optional field to authenticate with a private registry. When using private registries that
require authentication, it is necessary to set this parameter to
true in the cluster spec.
- Type: boolean
When this value is set to true, the following environment variables need to be set:
export REGISTRY_USERNAME=<username>
export REGISTRY_PASSWORD=<password>
insecureSkipVerify (optional)
- Description: optional field to skip the registry certificate verification. Only use this solution for isolated testing or in a tightly controlled, air-gapped environment. Currently only supported for Ubuntu and RHEL OS.
- Type: boolean
Project configuration
The following projects must be created in your registry before importing the EKS Anywhere images:
bottlerocket
eks-anywhere
eks-distro
eks
cilium-chart
For example, if a registry is available at private-registry.local, then the following projects must be created.
https://private-registry.local/bottlerocket
https://private-registry.local/eks-anywhere
https://private-registry.local/eks-distro
https://private-registry.local/eks
https://private-registry.local/cilium-chart
Admin machine configuration
You must configure the Admin machine with the information it needs to communicate with your registry.
Add the registry’s CA certificate to the list of CA certificates on the Admin machine if your registry uses self-signed certificates.
If your registry uses authentication, the following environment variables must be set on the Admin machine before running the eksctl anywhere import images command.
export REGISTRY_USERNAME=<username>
export REGISTRY_PASSWORD=<password>
4.12.12 - Autoscaling configuration
EKS Anywhere cluster yaml autoscaling specification reference
EKS Anywhere supports autoscaling worker node groups using the Kubernetes Cluster Autoscaler
. The Kubernetes Cluster Autoscaler Curated Package is an image and helm chart installed via the Curated Packages Controller
The helm chart utilizes the Cluster Autoscaler clusterapi mode
to scale resources.
Configure an EKS Anywhere worker node group to be picked up by a Cluster Autoscaler deployment by adding autoscalingConfiguration block to the workerNodeGroupConfiguration.
apiVersion: anywhere.eks.amazonaws.com/v1alpha1
kind: Cluster
metadata:
name: my-cluster-name
spec:
workerNodeGroupConfigurations:
- name: md-0
autoscalingConfiguration:
minCount: 1
maxCount: 5
machineGroupRef:
kind: VSphereMachineConfig
name: worker-machine-a
- name: md-1
autoscalingConfiguration:
minCount: 1
maxCount: 3
machineGroupRef:
kind: VSphereMachineConfig
name: worker-machine-b
Note that if count is specified for the worker node group, it’s value will be ignored during cluster creation as well as cluster upgrade. If only one of minCount or maxCount is specified, then the other will have a default value of 0 and count will have a default value of minCount.
EKS Anywhere automatically applies the following annotations to your MachineDeployment objects for worker node groups with autoscaling enabled. The Cluster Autoscaler component uses these annotations to identify which node groups to autoscale. If a node group is not autoscaling as expected, check for these annotations on the MachineDeployment to troubleshoot.
cluster.x-k8s.io/cluster-api-autoscaler-node-group-min-size: <minCount>
cluster.x-k8s.io/cluster-api-autoscaler-node-group-max-size: <maxCount>
4.12.13 - Skipping validations configuration
EKS Anywhere cluster annotations to skip validations
EKS Anywhere runs a set of validations while performing cluster operations. Some of these validations can be chosen to be skipped.
One such validation EKS Anywhere runs is a check for whether cluster’s control plane ip is in use or not.
- If a cluster is being created using the EKS Anywhere cli, this validation can be skipped by using the
--skip-ip-check flag or by setting the below annotation on the Cluster object.
- If a workload cluster is being created using tools like
kubectl or GitOps, the validation can only be skipped by adding the below annotation.
Configure an EKS Anywhere cluster to skip the validation for checking the uniqueness of the control plane IP by using the anywhere.eks.amazonaws.com/skip-ip-check annotation and setting the value to true like shown below.
apiVersion: anywhere.eks.amazonaws.com/v1alpha1
kind: Cluster
metadata:
annotations:
anywhere.eks.amazonaws.com/skip-ip-check: "true"
name: my-cluster-name
spec:
.
.
.
Note that this annotation is also automatically set if you use the --skip-ip-check flag while running the EKS Anywhere create cluster command.
4.12.14 - GitOps
Configuration reference for GitOps cluster management.
GitOps Support (Optional)
Provider support details
|
vSphere |
Bare Metal |
Nutanix |
CloudStack |
Snow |
| Supported? |
✓ |
✓ |
✓ |
✓ |
✓ |
EKS Anywhere can create clusters that supports GitOps configuration management with Flux.
In order to add GitOps support, you need to configure your cluster by specifying the configuration file with gitOpsRef field when creating or upgrading the cluster.
We currently support two types of configurations: FluxConfig and GitOpsConfig.
Flux Configuration
The flux configuration spec has three optional fields, regardless of the chosen git provider.
Flux Configuration Spec Details
systemNamespace (optional)
- Description: Namespace in which to install the gitops components in your cluster. Defaults to
flux-system
- Type: string
clusterConfigPath (optional)
- Description: The path relative to the root of the git repository where EKS Anywhere will store the cluster configuration files. Defaults to the cluster name
- Type: string
branch (optional)
- Description: The branch to use when committing the configuration. Defaults to
main
- Type: string
EKS Anywhere currently supports two git providers for FluxConfig: Github and Git.
Github provider
Please note that for the Flux config to work successfully with the Github provider, the environment variable EKSA_GITHUB_TOKEN needs to be set with a valid GitHub PAT
.
This is a generic template with detailed descriptions below for reference:
apiVersion: anywhere.eks.amazonaws.com/v1alpha1
kind: Cluster
metadata:
name: my-cluster-name
namespace: default
spec:
...
#GitOps Support
gitOpsRef:
name: my-github-flux-provider
kind: FluxConfig
---
apiVersion: anywhere.eks.amazonaws.com/v1alpha1
kind: FluxConfig
metadata:
name: my-github-flux-provider
namespace: default
spec:
systemNamespace: "my-alternative-flux-system-namespace"
clusterConfigPath: "path-to-my-clusters-config"
branch: "main"
github:
personal: true
repository: myClusterGitopsRepo
owner: myGithubUsername
---
github Configuration Spec Details
repository (required)
- Description: The name of the repository where EKS Anywhere will store your cluster configuration, and sync it to the cluster. If the repository exists, we will clone it from the git provider; if it does not exist, we will create it for you.
- Type: string
owner (required)
- Description: The owner of the Github repository; either a Github username or Github organization name. The Personal Access Token used must belong to the owner if this is a personal repository, or have permissions over the organization if this is not a personal repository.
- Type: string
personal (optional)
- Description: Is the repository a personal or organization repository?
If personal, this value is
true; otherwise, false.
If using an organizational repository (e.g. personal is false) the owner field will be used as the organization when authenticating to github.com
- Default: true
- Type: boolean
Git provider
Before you create a cluster using the Git provider, you will need to set and export the EKSA_GIT_KNOWN_HOSTS and EKSA_GIT_PRIVATE_KEY environment variables.
EKSA_GIT_KNOWN_HOSTS
EKS Anywhere uses the provided known hosts file to verify the identity of the git provider when connecting to it with SSH.
The EKSA_GIT_KNOWN_HOSTS environment variable should be a path to a known hosts file containing entries for the git server to which you’ll be connecting.
For example, if you wanted to provide a known hosts file which allows you to connect to and verify the identity of github.com using a private key based on the key algorithm ecdsa, you can use the OpenSSH utility ssh-keyscan
to obtain the known host entry used by github.com for the ecdsa key type.
EKS Anywhere supports ecdsa, rsa, and ed25519 key types, which can be specified via the sshKeyAlgorithm field of the git provider config.
ssh-keyscan -t ecdsa github.com >> my_eksa_known_hosts
This will produce a file which contains known-hosts entries for the ecdsa key type supported by github.com, mapping the host to the key-type and public key.
github.com ecdsa-sha2-nistp256 AAAAE2VjZHNhLXNoYTItbmlzdHAyNTYAAAAIbmlzdHAyNTYAAABBBEmKSENjQEezOmxkZMy7opKgwFB9nkt5YRrYMjNuG5N87uRgg6CLrbo5wAdT/y6v0mKV0U2w0WZ2YB/++Tpockg=
EKS Anywhere will use the content of the file at the path EKSA_GIT_KNOWN_HOSTS to verify the identity of the remote git server, and the provided known hosts file must contain an entry for the remote host and key type.
EKSA_GIT_PRIVATE_KEY
The EKSA_GIT_PRIVATE_KEY environment variable should be a path to the private key file associated with a valid SSH public key registered with your Git provider.
This key must have permission to both read from and write to your repository.
The key can use the key algorithms rsa, ecdsa, and ed25519.
This key file must have restricted file permissions, allowing only the owner to read and write, such as octal permissions 600.
If your private key file is passphrase protected, you must also set EKSA_GIT_SSH_KEY_PASSPHRASE with that value.
This is a generic template with detailed descriptions below for reference:
apiVersion: anywhere.eks.amazonaws.com/v1alpha1
kind: Cluster
metadata:
name: my-cluster-name
namespace: default
spec:
...
#GitOps Support
gitOpsRef:
name: my-git-flux-provider
kind: FluxConfig
---
apiVersion: anywhere.eks.amazonaws.com/v1alpha1
kind: FluxConfig
metadata:
name: my-git-flux-provider
namespace: default
spec:
systemNamespace: "my-alternative-flux-system-namespace"
clusterConfigPath: "path-to-my-clusters-config"
branch: "main"
git:
repositoryUrl: ssh://git@github.com/myAccount/myClusterGitopsRepo.git
sshKeyAlgorithm: ecdsa
---
git Configuration Spec Details
repositoryUrl (required)
- Description: The URL of an existing repository where EKS Anywhere will store your cluster configuration and sync it to the cluster. For private repositories, the SSH URL will be of the format
ssh://git@provider.com/$REPO_OWNER/$REPO_NAME.git
- Type: string
- Value: A common
repositoryUrl value can be of the format ssh://git@provider.com/$REPO_OWNER/$REPO_NAME.git. This may differ from the default SSH URL given by your provider. Consider these differences between github and CodeCommit URLs:
- The github.com user interface provides an SSH URL containing a
: before the repository owner, rather than a /. Make sure to replace this : with a /, if present.
- The CodeCommit SSH URL must include SSH-KEY-ID in format
ssh://<SSH-Key-ID>@git-codecommit.<region>.amazonaws.com/v1/repos/<repository>.
sshKeyAlgorithm (optional)
- Description: The SSH key algorithm of the private key specified via
EKSA_PRIVATE_KEY_FILE. Defaults to ecdsa
- Type: string
Supported SSH key algorithm types are ecdsa, rsa, and ed25519.
Be sure that this SSH key algorithm matches the private key file provided by EKSA_GIT_PRIVATE_KEY_FILE and that the known hosts entry for the key type is present in EKSA_GIT_KNOWN_HOSTS.
GitOps Configuration
Warning
GitOps Config will be deprecated in v0.11.0 in lieu of using the Flux Config described above.
Please note that for the GitOps config to work successfully the environment variable EKSA_GITHUB_TOKEN needs to be set with a valid GitHub PAT
. This is a generic template with detailed descriptions below for reference:
apiVersion: anywhere.eks.amazonaws.com/v1alpha1
kind: Cluster
metadata:
name: my-cluster-name
namespace: default
spec:
...
#GitOps Support
gitOpsRef:
name: my-gitops
kind: GitOpsConfig
---
apiVersion: anywhere.eks.amazonaws.com/v1alpha1
kind: GitOpsConfig
metadata:
name: my-gitops
namespace: default
spec:
flux:
github:
personal: true
repository: myClusterGitopsRepo
owner: myGithubUsername
fluxSystemNamespace: ""
clusterConfigPath: ""
GitOps Configuration Spec Details
flux (required)
- Description: our supported gitops provider is
flux.
This is the only supported value.
- Type: object
Flux Configuration Spec Details
github (required)
- Description:
github is the only currently supported git provider.
This defines your github configuration to be used by EKS Anywhere and flux.
- Type: object
github Configuration Spec Details
repository (required)
- Description: The name of the repository where EKS Anywhere will store your cluster configuration, and sync it to the cluster.
If the repository exists, we will clone it from the git provider; if it does not exist, we will create it for you.
- Type: string
owner (required)
- Description: The owner of the Github repository; either a Github username or Github organization name.
The Personal Access Token used must belong to the
owner if this is a personal repository, or have permissions over the organization if this is not a personal repository.
- Type: string
personal (optional)
- Description: Is the repository a personal or organization repository?
If personal, this value is
true; otherwise, false.
If using an organizational repository (e.g. personal is false) the owner field will be used as the organization when authenticating to github.com
- Default:
true
- Type: boolean
clusterConfigPath (optional)
- Description: The path relative to the root of the git repository where EKS Anywhere will store the cluster configuration files.
- Default:
clusters/$MANAGEMENT_CLUSTER_NAME
- Type: string
fluxSystemNamespace (optional)
- Description: Namespace in which to install the gitops components in your cluster.
- Default:
flux-system.
- Type: string
branch (optional)
- Description: The branch to use when committing the configuration.
- Default:
main
- Type: string
4.12.15 - Package controller
EKS Anywhere cluster yaml specification for package controller configuration
Package Controller Configuration (optional)
You can specify EKS Anywhere package controller configurations. For more on the curated packages and the package controller, visit the package management
documentation.
The following cluster spec shows an example of how to configure package controller:
apiVersion: anywhere.eks.amazonaws.com/v1alpha1
kind: Cluster
metadata:
name: my-cluster-name
spec:
...
packages:
disable: false
controller:
resources:
requests:
cpu: 100m
memory: 50Mi
limits:
cpu: 750m
memory: 450Mi
Package Controller Configuration Spec Details
packages (optional)
- Description: Top level key; required controller configuration.
- Type: object
packages.disable (optional)
- Description: Disable the package controller.
- Type: bool
- Example:
disable: true
packages.controller (optional)
- Description: Disable the package controller.
- Type: object
packages.controller.resources (optional)
- Description: Resources for the package controller.
- Type: object
packages.controller.resources.limits (optional)
- Description: Resource limits.
- Type: object
packages.controller.resources.limits.cpu (optional)
- Description: CPU limit.
- Type: string
packages.controller.resources.limits.memory (optional)
- Description: Memory limit.
- Type: string
packages.controller.resources.requests (optional)
- Description: Requested resources.
- Type: object
packages.controller.resources.requests.cpu (optional)
- Description: Requested cpu.
- Type: string
packages.controller.resources.limits.memory (optional)
- Description: Requested memory.
- Type: string
packages.cronjob (optional)
- Description: Disable the package controller.
- Type: object
packages.cronjob.disable (optional)
- Description: Disable the cron job.
- Type: bool
- Example:
disable: true
packages.cronjob.resources (optional)
- Description: Resources for the package controller.
- Type: object
packages.cronjob.resources.limits (optional)
- Description: Resource limits.
- Type: object
packages.cronjob.resources.limits.cpu (optional)
- Description: CPU limit.
- Type: string
packages.cronjob.resources.limits.memory (optional)
- Description: Memory limit.
- Type: string
packages.cronjob.resources.requests (optional)
- Description: Requested resources.
- Type: object
packages.cronjob.resources.requests.cpu (optional)
- Description: Requested cpu.
- Type: string
packages.cronjob.resources.limits.memory (optional)
- Description: Requested memory.
- Type: string
4.12.16 - API Server Extra Args
EKS Anywhere cluster yaml specification for Kubernetes API Server Extra Args reference
As of EKS Anywhere version v0.20.0, you can pass additional flags to configure the Kubernetes API server in your EKS Anywhere clusters.
Provider support details
|
vSphere |
Bare Metal |
Nutanix |
CloudStack |
Snow |
| Supported? |
✓ |
✓ |
✓ |
✓ |
✓ |
In order to configure a cluster with API Server extra args, you need to configure your cluster by updating the cluster configuration file to include the details below. The feature flag API_SERVER_EXTRA_ARGS_ENABLED=true needs to be set as an environment variable.
This is a generic template with some example API Server extra args configuration below for reference:
apiVersion: anywhere.eks.amazonaws.com/v1alpha1
kind: Cluster
metadata:
name: my-cluster-name
spec:
...
controlPlaneConfiguration:
apiServerExtraArgs:
...
disable-admission-plugins: "DefaultStorageClass,DefaultTolerationSeconds"
enable-admission-plugins: "NamespaceAutoProvision,NamespaceExists"
The above example configures the disable-admission-plugins and enable-admission-plugins options of the API Server to enable additional admission plugins or disable some of the default ones. You can configure any of the API Server options using the above template.
Reference the Kubernetes documentation
for the list of flags that can be configured for the Kubernetes API server in EKS Anywhere
4.13 -
### clusterNetwork (required)
Network configuration.
### clusterNetwork.cniConfig (required)
CNI plugin configuration. Supports `cilium`.
### clusterNetwork.cniConfig.cilium.policyEnforcementMode (optional)
Optionally specify a policyEnforcementMode of `default`, `always` or `never`.
### clusterNetwork.cniConfig.cilium.egressMasqueradeInterfaces (optional)
Optionally specify a network interface name or interface prefix used for
masquerading. See
EgressMasqueradeInterfaces
option.
### clusterNetwork.cniConfig.cilium.skipUpgrade (optional)
When true, skip Cilium maintenance during upgrades. Also see
Use a custom
CNI.
### clusterNetwork.cniConfig.cilium.routingMode (optional)
Optionally specify the routing mode. Accepts `default` and `direct`. Also see
RoutingMode
option.
### clusterNetwork.cniConfig.cilium.ipv4NativeRoutingCIDR (optional)
Optionally specify the CIDR to use when RoutingMode is set to direct.
When specified, Cilium assumes networking for this CIDR is preconfigured and
hands traffic destined for that range to the Linux network stack without
applying any SNAT.
### clusterNetwork.cniConfig.cilium.ipv6NativeRoutingCIDR (optional)
Optionally specify the IPv6 CIDR to use when RoutingMode is set to direct.
When specified, Cilium assumes networking for this CIDR is preconfigured and
hands traffic destined for that range to the Linux network stack without
applying any SNAT.
### clusterNetwork.cniConfig.cilium.cniExclusive (optional)
Controls whether Cilium should remove other CNI configuration files.
When true (default), Cilium removes other CNI configs; when false, it leaves them alone.
For more information, see
CNI Exclusive Mode configuration.
### clusterNetwork.pods.cidrBlocks[0] (required)
The pod subnet specified in CIDR notation. Only 1 pod CIDR block is permitted.
The CIDR block should not conflict with the host or service network ranges.
### clusterNetwork.services.cidrBlocks[0] (required)
The service subnet specified in CIDR notation. Only 1 service CIDR block is
permitted.
This CIDR block should not conflict with the host or pod network ranges.
### clusterNetwork.dns.resolvConf.path (optional)
File path to a file containing a custom DNS resolver configuration.
5 - Operating System management
Managing node operating systems in EKS Anywhere clusters.
5.1 - Overview
Overview of operating system management for nodes in EKS Anywhere clusters.
Bottlerocket, Ubuntu, and Red Hat Enterprise Linux (RHEL) can be used as operating systems for nodes in EKS Anywhere clusters. You can only use a single operating system per cluster. Bottlerocket is the only operating system distributed and fully supported by AWS. If you are using the other operating systems, you must build the operating system images and configure EKS Anywhere to use the images you built when installing or updating clusters. AWS will assist with troubleshooting and configuration guidance for Ubuntu and RHEL as part of EKS Anywhere Enterprise Subscriptions. For official support for Ubuntu and RHEL operating systems, you must purchase support through their respective vendors.
Reference the table below for the operating systems supported per deployment option for the latest version of EKS Anywhere. See Admin machine
for supported operating systems.
|
vSphere |
Bare metal |
Snow |
CloudStack |
Nutanix |
| Bottlerocket |
✔ |
— |
— |
— |
— |
| Ubuntu |
✔ |
✔ |
✔ |
— |
✔ |
| RHEL |
✔ |
✔ |
— |
✔ |
✔ |
| OS |
Supported Versions |
| Bottlerocket |
1.50.x |
| Ubuntu |
20.04.x, 22.04.x, 24.04.x |
| RHEL |
8.x, 9.x |
With the vSphere, Bare Metal, Snow, CloudStack and Nutanix deployment options, EKS Anywhere provisions the operating system when new machines are deployed during cluster creation, upgrade, and scaling operations. You can configure the operating system to use through the EKS Anywhere cluster spec, which varies by deployment option. See the deployment option sections below for an overview of how the operating system configuration works per deployment option.
vSphere
To configure the operating system to use for EKS Anywhere clusters on vSphere, use the VSphereMachingConfig spec.template field
. The template name corresponds to the template you imported into your vSphere environment. See the Customize OVAs
and Import OVAs
documentation pages for more information. Changing the template after cluster creation will result in the deployment of new machines.
To configure the operating system to use for EKS Anywhere clusters on Bare Metal, use the TinkerbellDatacenterConfig spec.osImageURL field
. This field can be used to stream the operating system from a custom location and is required to use Ubuntu or RHEL. You cannot change the osImageURL after creating your cluster. To upgrade the operating system, you must replace the image at the existing osImageURL location with a new image. Operating system changes are only deployed when an action that triggers a deployment of new machines is triggered, which includes Kubernetes version upgrades only at this time.
Snow
To configure the operating system to use for EKS Anywhere clusters on Snow, use the SnowMachineConfig spec.osFamily field
. At this time, only Ubuntu is supported for use with EKS Anywhere clusters on Snow. You can customize the instance image with the SnowMachineConfig spec.amiID field
and the instance type with the SnowMachineConfig spec.instanceType field
. Changes to these fields after cluster creation will result in the deployment of new machines.
CloudStack
To configure the operating system to use for EKS Anywhere clusters on CloudStack, use the CloudStackMachineConfig spec.template.name field
. At this time, only RHEL is supported for use with EKS Anywhere clusters on CloudStack. Changing the template name field after cluster creation will result in the deployment of new machines.
Nutanix
To configure the operating system to use for EKS Anywhere clusters on Nutanix, use the NutanixMachineConfig spec.image.name field
or the image uuid field. At this time, only Ubuntu and RHEL are supported for use with EKS Anywhere clusters on Nutanix. Changing the image name or uuid field after cluster creation will result in the deployment of new machines.
5.2 - Artifacts
Artifacts associated with this release: OVAs and images.
EKS Anywhere supports three different node operating systems:
- Bottlerocket: For vSphere and Bare Metal providers
- Ubuntu: For vSphere, Bare Metal, Nutanix, and Snow providers
- Red Hat Enterprise Linux (RHEL): For vSphere, CloudStack, Nutanix, and Bare Metal providers
Bottlerocket OVAs and images are distributed by the EKS Anywhere project.
To build your own Ubuntu-based or RHEL-based EKS Anywhere node, see Building node images
.
Prerequisites
Several code snippets on this page use curl and yq commands. Refer to the Tools section
to learn how to install them.
Artifacts for EKS Anywhere Bare Metal clusters are listed below.
If you like, you can download these images and serve them locally to speed up cluster creation.
See descriptions of the osImageURL
and hookImagesURLPath
fields for details.
EKS Anywhere does not distribute Ubuntu or RHEL OS images.
However, see Building node images
for information on how to build EKS Anywhere images from those Linux distributions. Note: if you utilize your Admin Host to build images, you will need to review the DHCP integration provided by Libvirtd and ensure it is disabled. If the Libvirtd DHCP is enabled, the “boots container” will detect a port conflict and terminate.
Using the latest EKS Anywhere version
EKSA_RELEASE_VERSION=$(curl -sL https://anywhere-assets.eks.amazonaws.com/releases/eks-a/manifest.yaml | yq ".spec.latestVersion")
OR
Using a specific EKS Anywhere version
EKSA_RELEASE_VERSION=<EKS-A version>
kernel:
BUNDLE_MANIFEST_URL=$(curl -sL https://anywhere-assets.eks.amazonaws.com/releases/eks-a/manifest.yaml | yq ".spec.releases[] | select(.version==\"$EKSA_RELEASE_VERSION\").bundleManifestUrl")
curl -s $BUNDLE_MANIFEST_URL | yq ".spec.versionsBundles[0].tinkerbell.tinkerbellStack.hook.vmlinuz.amd.uri"
initial ramdisk:
BUNDLE_MANIFEST_URL=$(curl -sL https://anywhere-assets.eks.amazonaws.com/releases/eks-a/manifest.yaml | yq ".spec.releases[] | select(.version==\"$EKSA_RELEASE_VERSION\").bundleManifestUrl")
curl -s $BUNDLE_MANIFEST_URL | yq ".spec.versionsBundles[0].tinkerbell.tinkerbellStack.hook.initramfs.amd.uri"
vSphere artifacts
Bottlerocket OVAs
Bottlerocket vends its VMware variant OVAs using a secure distribution tool called tuftool. Please refer to Download Bottlerocket node images
for instructions on downloading Bottlerocket OVAs. You can also get the download URIs for EKS Anywhere-vended Bottlerocket OVAs from the bundle release by running the following commands:
Using the latest EKS Anywhere version
EKSA_RELEASE_VERSION=$(curl -sL https://anywhere-assets.eks.amazonaws.com/releases/eks-a/manifest.yaml | yq ".spec.latestVersion")
OR
Using a specific EKS Anywhere version
EKSA_RELEASE_VERSION=<EKS-A version>
KUBEVERSION=1.35 # Replace this with the Kubernetes version you wish to use
BUNDLE_MANIFEST_URL=$(curl -sL https://anywhere-assets.eks.amazonaws.com/releases/eks-a/manifest.yaml | yq ".spec.releases[] | select(.version==\"$EKSA_RELEASE_VERSION\").bundleManifestUrl")
curl -s $BUNDLE_MANIFEST_URL | yq ".spec.versionsBundles[] | select(.kubeVersion==\"$KUBEVERSION\").eksD.ova.bottlerocket.uri"
Ubuntu or RHEL OVAs
EKS Anywhere no longer distributes Ubuntu or RHEL OVAs for use with EKS Anywhere clusters.
Building your own Ubuntu or RHEL-based OVAs as described in Building node images
is the only supported way to get that functionality.
There are two categories of tags to be attached to the OVA templates in vCenter.
os: This category represents the OS corresponding to this template. The possible values for this tag are os:bottlerocket, os:redhat and os:ubuntu.
eksdRelease: This category represents the EKS Distro release corresponding to this template. The value for this tag can be obtained programmatically as follows.
Using the latest EKS Anywhere version
EKSA_RELEASE_VERSION=$(curl -sL https://anywhere-assets.eks.amazonaws.com/releases/eks-a/manifest.yaml | yq ".spec.latestVersion")
OR
Using a specific EKS Anywhere version
EKSA_RELEASE_VERSION=<EKS-A version>
KUBEVERSION=1.35 # Replace this with the Kubernetes version you wish to use
BUNDLE_MANIFEST_URL=$(curl -sL https://anywhere-assets.eks.amazonaws.com/releases/eks-a/manifest.yaml | yq ".spec.releases[] | select(.version==\"$EKSA_RELEASE_VERSION\").bundleManifestUrl")
curl -sL $BUNDLE_MANIFEST_URL | yq ".spec.versionsBundles[] | select(.kubeVersion==\"$KUBEVERSION\").eksD.name"
Download Bottlerocket node images
Bottlerocket vends its VMware variant OVAs and Baremetal variants images using a secure distribution tool called tuftool. Please follow instructions down below to
download Bottlerocket node images.
- Install Rust and Cargo
curl https://sh.rustup.rs -sSf | sh
- Install
tuftool using Cargo
CARGO_NET_GIT_FETCH_WITH_CLI=true cargo install --force tuftool
- Download the root role that will be used by
tuftool to download the Bottlerocket images
curl -O "https://cache.bottlerocket.aws/root.json"
sha512sum -c <<< "4fcb272345fd6adb94d4c04834400548178fecb57407ca79bc2c3d20e0428fc9ed3a82cea268d7f9c667b5803524a4f465acd701a86953d5d732bf6ecb064888 root.json"
- Export the desired Kubernetes version. EKS Anywhere currently supports 1.29, 1.30, 1.31, 1.32, 1.33, 1.34, and 1.35.
export KUBEVERSION="1.35"
-
Programmatically retrieve the Bottlerocket version corresponding to this release of EKS-A and Kubernetes version and export it.
Using the latest EKS Anywhere version
EKSA_RELEASE_VERSION=$(curl -sL https://anywhere-assets.eks.amazonaws.com/releases/eks-a/manifest.yaml | yq ".spec.latestVersion")
OR
Using a specific EKS Anywhere version
EKSA_RELEASE_VERSION=<EKS-A version>
Set the Bottlerocket image format to the desired value (ova for the VMware variant or raw for the Baremetal variant)
export BOTTLEROCKET_IMAGE_FORMAT="ova"
BUNDLE_MANIFEST_URL=$(curl -sL https://anywhere-assets.eks.amazonaws.com/releases/eks-a/manifest.yaml | yq ".spec.releases[] | select(.version==\"$EKSA_RELEASE_VERSION\").bundleManifestUrl")
BUILD_TOOLING_COMMIT=$(curl -s $BUNDLE_MANIFEST_URL | yq ".spec.versionsBundles[0].eksD.gitCommit")
export BOTTLEROCKET_VERSION=$(curl -sL https://raw.githubusercontent.com/aws/eks-anywhere-build-tooling/$BUILD_TOOLING_COMMIT/projects/kubernetes-sigs/image-builder/BOTTLEROCKET_RELEASES | yq ".$(echo $KUBEVERSION | tr '.' '-').$BOTTLEROCKET_IMAGE_FORMAT-release-version")
-
Download Bottlerocket node image
a. To download VMware variant Bottlerocket OVA
OVA="bottlerocket-vmware-k8s-${KUBEVERSION}-x86_64-${BOTTLEROCKET_VERSION}.ova"
tuftool download ${TMPDIR:-/tmp/bottlerocket-ovas} --target-name "${OVA}" \
--root ./root.json \
--metadata-url "https://updates.bottlerocket.aws/2020-07-07/vmware-k8s-${KUBEVERSION}/x86_64/" \
--targets-url "https://updates.bottlerocket.aws/targets/"
The above command will download a Bottlerocket OVA. Please refer Deploy an OVA Template
to proceed with the downloaded OVA.
b. To download Baremetal variant Bottlerocket image
IMAGE="bottlerocket-metal-k8s-${KUBEVERSION}-x86_64-${BOTTLEROCKET_VERSION}.img.lz4"
tuftool download ${TMPDIR:-/tmp/bottlerocket-metal} --target-name "${IMAGE}" \
--root ./root.json \
--metadata-url "https://updates.bottlerocket.aws/2020-07-07/metal-k8s-${KUBEVERSION}/x86_64/" \
--targets-url "https://updates.bottlerocket.aws/targets/"
The above command will download a Bottlerocket lz4 compressed image. Decompress and gzip the image with the following
commands and host the image on a webserver for using it for an EKS Anywhere Baremetal cluster.
lz4 --decompress ${TMPDIR:-/tmp/bottlerocket-metal}/${IMAGE} ${TMPDIR:-/tmp/bottlerocket-metal}/bottlerocket.img
gzip ${TMPDIR:-/tmp/bottlerocket-metal}/bottlerocket.img
Building node images
The image-builder CLI lets you build your own Ubuntu-based vSphere OVAs, Nutanix qcow2 images, RHEL-based qcow2 images, or Bare Metal gzip images to use in EKS Anywhere clusters.
The image-builder CLI uses the upstream kubernetes-sigs/image-builder
project by cloning it and applying custom patches from the eks-anywhere-build-tooling
repository.
When you run image-builder, it will pull in all components needed to build images to be used as Kubernetes nodes in an EKS Anywhere cluster, including the latest operating system, Kubernetes control plane components, and EKS Distro security updates, bug fixes, and patches.
When building an image using this tool, you get to choose:
- Operating system type (for example, ubuntu, redhat) and version (Ubuntu only)
- Provider (vsphere, cloudstack, baremetal, ami, nutanix)
- Release channel for EKS Distro (generally aligning with Kubernetes releases)
- vSphere only: configuration file providing information needed to access your vSphere setup
- CloudStack only: configuration file providing information needed to access your CloudStack setup
- Snow AMI only: configuration file providing information needed to customize your Snow AMI build parameters
- Nutanix only: configuration file providing information needed to access Nutanix Prism Central
Because image-builder creates images in the same way that the EKS Anywhere project does for their own testing, images built with that tool are supported.
The table below shows the support matrix for the hypervisor and OS combinations that image-builder supports.
|
vSphere |
Baremetal |
CloudStack |
Nutanix |
Snow |
| Ubuntu |
✓ |
✓ |
|
✓ |
✓ |
| RHEL |
✓ |
✓ |
✓ |
✓ |
|
Prerequisites
To use image-builder, you must meet the following prerequisites:
System requirements
image-builder has been tested on Ubuntu (20.04, 21.04, 22.04), RHEL 8 and Amazon Linux 2 machines. The following system requirements should be met for the machine on which image-builder is run:
- AMD 64-bit architecture
- 50 GB disk space
- 2 vCPUs
- 8 GB RAM
- Baremetal only: Run on a bare metal machine with virtualization enabled
In addition to the requirements in Tools section
, image-builder CLI also requires GNU make <= 4.3 as there are some changes in the latest version (4.4.1) that breaks some Make targets in the image-builder project.
Network connectivity requirements
- public.ecr.aws (to download container images from EKS Anywhere)
- anywhere-assets.eks.amazonaws.com (to download the EKS Anywhere artifacts such as binaries, manifests and OS images)
- distro.eks.amazonaws.com (to download EKS Distro binaries and manifests)
- d2glxqk2uabbnd.cloudfront.net (to pull the EKS Anywhere and EKS Distro ECR container images)
- api.ecr.us-west-2.amazonaws.com (for EKS Anywhere package authentication matching your region)
- d5l0dvt14r5h8.cloudfront.net (for EKS Anywhere package ECR container)
- github.com (to download binaries and tools required for image builds from GitHub releases)
- objects.githubusercontent.com (to download binaries and tools required for image builds from GitHub releases)
- raw.githubusercontent.com (to download binaries and tools required for image builds from GitHub releases)
- releases.hashicorp.com (to download Packer binary for image builds)
- galaxy.ansible.com (to download Ansible packages from Ansible Galaxy)
- vSphere only: VMware vCenter endpoint
- CloudStack only: Apache CloudStack endpoint
- Nutanix only: Nutanix Prism Central endpoint
- Red Hat only: dl.fedoraproject.org (to download RPMs and GPG keys for RHEL image builds)
- Ubuntu only: cdimage.ubuntu.com (to download Ubuntu server ISOs for Ubuntu image builds)
vSphere requirements
image-builder supports both Hashicorp vsphere-iso
and vsphere-clone
Packer Builder for building vSphere OVAs.
Permissions
Configure a user with a role containing the following permissions.
The role can be configured programmatically with the govc command below, or configured in the vSphere UI using the table below as reference.
NOTE: It is recommended to configure the role at Global Permission level. However, if a user has decided to use a specific datastore, network, or resource pool for the image-build process, the role can also be configured with Object-Level Permission. You need to ensure that after configuring object-level permission, the vSphere user being used by image-builder has all the required privilege on these vSphere object.
Create role with global permission
Unfortunately there is no API for managing vSphere Global Permissions, so they must be set on the user via the UI under Administration > Access Control > Global Permissions.
To generate a role named EKSAImageBuilder with the required privileges via govc, run the following:
govc role.create "EKSAImageBuilder" $(curl https://raw.githubusercontent.com/aws/eks-anywhere/main/pkg/config/static/imageBuilderPrivs.json | jq .[] | tr '\n' ' ' | tr -d '"')
If creating a role with these privileges via the UI, refer to the table below.
| Category |
UI Privilege |
Programmatic Privilege |
| Datastore |
Allocate space |
Datastore.AllocateSpace |
| Datastore |
Browse datastore |
Datastore.Browse |
| Datastore |
Low level file operations |
Datastore.FileManagement |
| Network |
Assign network |
Network.Assign |
| Resource |
Assign virtual machine to resource pool |
Resource.AssignVMToPool |
| vApp |
Export |
vApp.Export |
| VirtualMachine |
Configuration > Add new disk |
VirtualMachine.Config.AddNewDisk |
| VirtualMachine |
Configuration > Add or remove device |
VirtualMachine.Config.AddRemoveDevice |
| VirtualMachine |
Configuration > Advanced configuration |
VirtualMachine.Config.AdvancedConfiguration |
| VirtualMachine |
Configuration > Change CPU count |
VirtualMachine.Config.CPUCount |
| VirtualMachine |
Configuration > Change memory |
VirtualMachine.Config.Memory |
| VirtualMachine |
Configuration > Change settings |
VirtualMachine.Config.Settings |
| VirtualMachine |
Configuration > Change Resource |
VirtualMachine.Config.Resource |
| VirtualMachine |
Configuration > Set annotation |
VirtualMachine.Config.Annotation |
| VirtualMachine |
Edit Inventory > Create from existing |
VirtualMachine.Inventory.CreateFromExisting |
| VirtualMachine |
Edit Inventory > Create new |
VirtualMachine.Inventory.Create |
| VirtualMachine |
Edit Inventory > Remove |
VirtualMachine.Inventory.Delete (Optional) |
| VirtualMachine |
Interaction > Configure CD media |
VirtualMachine.Interact.SetCDMedia |
| VirtualMachine |
Interaction > Configure floppy media |
VirtualMachine.Interact.SetFloppyMedia |
| VirtualMachine |
Interaction > Connect devices |
VirtualMachine.Interact.DeviceConnection |
| VirtualMachine |
Interaction > Inject USB HID scan codes |
VirtualMachine.Interact.PutUsbScanCodes |
| VirtualMachine |
Interaction > Power off |
VirtualMachine.Interact.PowerOff (Optional) |
| VirtualMachine |
Interaction > Power on |
VirtualMachine.Interact.PowerOn |
| VirtualMachine |
Provisioning > Create template from virtual machine |
VirtualMachine.Provisioning.CreateTemplateFromVM |
| VirtualMachine |
Provisioning > Mark as template |
VirtualMachine.Provisioning.MarkAsTemplate |
| VirtualMachine |
Provisioning > Mark as virtual machine |
VirtualMachine.Provisioning.MarkAsVM |
| VirtualMachine |
State > Create snapshot |
VirtualMachine.State.CreateSnapshot |
NOTE: The VirtualMachine.Inventory.Delete and VirtualMachine.Interact.PowerOff permissions can be omitted from the EKSAImageBuilder user role. While this will result in non-critical error messages like ==> vsphere-iso.vsphere: ServerFaultCode: Permission to perform this operation was denied. during the cleanup phase, it does not affect the image building process. You will need to manually clean up any remaining virtual machines after the build completes.
Create a role with object-level Permission
A role with object-level permission has to be created through the vSphere UI. Refer to Broadcom’s documentation for this process.
For vSphere 7.0: Using vCenter Server Roles to Assign Privileges
For vSphere 8.0: Using vCenter Server Roles to Assign Privileges
The following example creates a role with object-level permission on a Datastore in vSphere 8.0:
-
Navigate to Administration > Single Sign On > Users and Groups and create a user that will be used to authenticate to the vSphere server.
-
Create a role and configure its permission following the table in the Create role with global permission section.
-
Navigate to Inventory > Storage and identify the datastore that will be used in the image-build process.
-
Right click on the datastore, then click Add Permissions and select the user created in step 1 and the role created in step 2.
Object-level permission can be configured on Network, Datastore and Resource Pool objects.
CloudStack requirements
Refer to the CloudStack Permissions for CAPC
doc for required CloudStack user permissions.
Snow AMI requirements
Packer will require prior authentication with your AWS account to launch EC2 instances for the Snow AMI build. Refer to the Authentication guide for Amazon EBS Packer builder
for possible modes of authentication. We recommend that you run image-builder on a pre-existing Ubuntu EC2 instance and use an IAM instance role with the required permissions
.
Nutanix permissions
Prism Central Administrator permissions are required to build a Nutanix image using image-builder.
Downloading the image-builder CLI
You will need to download the image-builder CLI corresponding to the version of EKS Anywhere you are using. The image-builder CLI can be downloaded using the commands provided below:
Using the latest EKS Anywhere version
EKSA_RELEASE_VERSION=$(curl -sL https://anywhere-assets.eks.amazonaws.com/releases/eks-a/manifest.yaml | yq ".spec.latestVersion")
OR
Using a specific EKS Anywhere version
EKSA_RELEASE_VERSION=<EKS-A version>
cd /tmp
BUNDLE_MANIFEST_URL=$(curl -s https://anywhere-assets.eks.amazonaws.com/releases/eks-a/manifest.yaml | yq ".spec.releases[] | select(.version==\"$EKSA_RELEASE_VERSION\").bundleManifestUrl")
IMAGEBUILDER_TARBALL_URI=$(curl -s $BUNDLE_MANIFEST_URL | yq ".spec.versionsBundles[0].eksD.imagebuilder.uri")
curl -s $IMAGEBUILDER_TARBALL_URI | tar xz ./image-builder
sudo install -m 0755 ./image-builder /usr/local/bin/image-builder
cd -
Required versions of dependencies
EKS Anywhere aligns with the versions of build dependencies (Packer, Packer plugins, Ansible, etc.) that the upstream image-builder
project uses for its builds. These are the versions tested by EKS-A and hence are the recommended versions for users to install for image-building in order to minimize the drift from the tested dependency matrix. The By default, the image-builder CLI runs a validation that checks that users of the CLI adopt the same build toolchain as EKS-A. Thus, if users use a different version of dependencies than what EKS-A recommends, the validation will fail. However if users still wish to use their own versions of dependencies, they may bypass the validation by setting the environment variable EKSA_SKIP_VALIDATE_DEPENDENCIES to true.
You can obtain the required dependency versions for your version of EKS-A by running the following commands:
Using the latest EKS Anywhere version
EKSA_RELEASE_VERSION=$(curl -sL https://anywhere-assets.eks.amazonaws.com/releases/eks-a/manifest.yaml | yq ".spec.latestVersion")
OR
Using a specific EKS Anywhere version
EKSA_RELEASE_VERSION=<EKS-A version>
BUNDLE_MANIFEST_URL=$(curl -sL https://anywhere-assets.eks.amazonaws.com/releases/eks-a/manifest.yaml | yq ".spec.releases[] | select(.version==\"$EKSA_RELEASE_VERSION\").bundleManifestUrl")
BUILD_TOOLING_COMMIT=$(curl -s $BUNDLE_MANIFEST_URL | yq ".spec.versionsBundles[0].eksD.gitCommit")
curl -sL https://raw.githubusercontent.com/aws/eks-anywhere-build-tooling/$BUILD_TOOLING_COMMIT/projects/kubernetes-sigs/image-builder/REQUIRED_DEPENDENCY_VERSIONS.yaml
The output of these commands is a YAML with versions of different build dependencies like Ansible, Packer and its different plugins, Python, etc. You can use these versions as the source of truth for the installation of these dependencies.
NOTE: Users may also skip downloading these dependencies themselves and instead allow upstream image-builder to handle their installation. Since the validation that image-builder runs is itself based on versions from upstream image-builder, this will ensure that the validation always passes.
Build vSphere OVA node images
These steps use image-builder to create an Ubuntu-based or RHEL-based image for vSphere. Before proceeding, ensure that the above system-level, network-level and vSphere-specific prerequisites
have been met.
-
Create a Linux user for running image-builder.
sudo adduser image-builder
Follow the prompt to provide a password for the image-builder user.
-
Add image-builder user to the sudo group and change user as image-builder providing in the password from previous step when prompted.
sudo usermod -aG sudo image-builder
su image-builder
cd /home/$USER
-
Install packages and prepare environment:
sudo apt update -y
sudo apt install jq unzip make -y
sudo snap install yq
mkdir -p /home/$USER/.ssh
echo "HostKeyAlgorithms +ssh-rsa" >> /home/$USER/.ssh/config
echo "PubkeyAcceptedKeyTypes +ssh-rsa" >> /home/$USER/.ssh/config
sudo chmod 600 /home/$USER/.ssh/config
sudo dnf update -y
sudo dnf install jq unzip make wget -y
sudo wget -qO /usr/local/bin/yq https://github.com/mikefarah/yq/releases/latest/download/yq_linux_amd64
mkdir -p /home/$USER/.ssh
echo "HostKeyAlgorithms +ssh-rsa" >> /home/$USER/.ssh/config
echo "PubkeyAcceptedKeyTypes +ssh-rsa" >> /home/$USER/.ssh/config
sudo chmod 600 /home/$USER/.ssh/config
sudo yum update -y
sudo yum install jq unzip make wget -y
sudo wget -qO /usr/local/bin/yq https://github.com/mikefarah/yq/releases/latest/download/yq_linux_amd64
mkdir -p /home/$USER/.ssh
echo "HostKeyAlgorithms +ssh-rsa" >> /home/$USER/.ssh/config
echo "PubkeyAcceptedKeyTypes +ssh-rsa" >> /home/$USER/.ssh/config
sudo chmod 600 /home/$USER/.ssh/config
- Starting with
image-builder version v0.3.0, the minimum required Python version is Python 3.9. However, many Linux distros ship only up to Python 3.8, so you will need to install Python 3.9 from external sources. Refer to the pyenv installation
and usage
documentation to install Python 3.9 and make it the default Python version.
- Once you have Python 3.9, you can install Ansible using
pip.
python3 -m pip install --user "ansible-core==<Ansible version from required dependency file>"
-
Get the latest version of govc:
curl -L -o - "https://github.com/vmware/govmomi/releases/latest/download/govc_$(uname -s)_$(uname -m).tar.gz" | sudo tar -C /usr/local/bin -xvzf - govc
-
Create a vSphere configuration file (for example, vsphere.json):
{
"cluster": "",
"convert_to_template": "",
"create_snapshot": "",
"datacenter": "",
"datastore": "",
"folder": "",
"insecure_connection": "",
"linked_clone": "",
"network": "",
"password": "",
"resource_pool": "",
"template": "",
"username": "",
"vcenter_server": ""
}
The vSphere cluster where the virtual machine is created.
Convert VM to a template.
Create a snapshot so the VM can be used as a base for linked clones.
The vSphere datacenter name. Required if there is more than one datacenter in the vSphere inventory.
The vSphere datastore where the virtual machine is created.
The VM folder where the virtual machine is created..
Do not validate the vCenter Server TLS certificate.
Create the virtual machine as a linked clone from latest snapshot.
The network which the VM will be connected to.
The password used to connect to vSphere.
The vSphere resource pool where the virtual machine is created. If this is not specified, the root resource pool associated with the cluster is used.
The name of the source virtual machine/OVF template to clone (required if using vsphere-clone builder).
The username used to connect to vSphere.
The vCenter Server hostname.
For RHEL images, add the following fields:
{
"iso_url": "<https://endpoint to RHEL ISO endpoint or path to file>",
"iso_checksum": "<for example: ea5f349d492fed819e5086d351de47261c470fc794f7124805d176d69ddf1fcd>",
"iso_checksum_type": "<for example: sha256>",
"rhel_username": "<RHSM username>",
"rhel_password": "<RHSM password>"
}
NOTE: Image-builder currently only supports building RHEL images with the full DVD ISO and does not support minimal ISOs.
-
Create an Ubuntu or Redhat image with vsphere-iso builder:
Ubuntu
To create an Ubuntu-based image, run image-builder with the following options:
--os: ubuntu--os-version: 20.04, 22.04 or 24.04 (default: 20.04)--hypervisor: For vSphere use vsphere--release-channel: Supported Kubernetes version, from 1-28 to 1-34.--vsphere-config: vSphere configuration file (vsphere.json in this example)
image-builder build --os ubuntu --hypervisor vsphere --release-channel 1.35 --vsphere-config vsphere.json
Red Hat Enterprise Linux
To create a RHEL-based image, run image-builder with the following options:
--os: redhat--os-version: 8, 9 (default: 8)--hypervisor: For vSphere use vsphere--release-channel: Supported Kubernetes versions, from 1-28 to 1-34.--vsphere-config: vSphere configuration file (vsphere.json in this example)
image-builder build --os redhat --hypervisor vsphere --release-channel 1.35 --vsphere-config vsphere.json
-
Create an Ubuntu or Red Hat image with vsphere-clone builder:
Vsphere clone builder
support has been added to EKS-A image-builder in v0.7.0. The vsphere clone builder allows user to clone an existing virtual machine/OVF template on vCenter and convert it into an EKS Anywhere node image.
Requirements on base template
The base template needs to have an SSH user named builder with a known password. This is because image-builder will be using this user to establish an SSH connection to the builder machine on vSphere.
The password needs to be set via the following environment variable:
export SSH_PASSWORD=<ssh-password-of-user-builder>
Ubuntu
To create an Ubuntu-based image, run image-builder with the following options:
--os: ubuntu--os-version: 20.04, 22.04 or 24.04 (default: 20.04)--hypervisor: For vSphere use vsphere--release-channel: Supported Kubernetes version, from 1-28 to 1-34.--vsphere-config: vSphere configuration file (vsphere.json in this example)--builder: vSphere builder type used by image-builder, can be iso or clone, defaults to iso.--firmware: Desired firmware for image build, can be bios or efi, defaults to bios
image-builder build --os ubuntu --hypervisor vsphere --builder clone --release-channel 1.35 --vsphere-config vsphere.json
Red Hat Enterprise Linux
To create a RHEL-based image, run image-builder with the following options:
--os: redhat--os-version: 8, 9 (default: 8)--hypervisor: For vSphere use vsphere--release-channel: Supported Kubernetes version, from 1-28 to 1-34.--vsphere-config: vSphere configuration file (vsphere.json in this example)--builder: vSphere builder type used by image-builder, can be iso or clone, defaults to iso.--firmware: Desired firmware for image build, can be bios or efi, defaults to bios
image-builder build --os redhat --hypervisor vsphere --builder clone --release-channel 1.35 --vsphere-config vsphere.json
These steps use image-builder to create an Ubuntu-based or RHEL-based image for Bare Metal. Before proceeding, ensure that the above system-level, network-level and baremetal-specific prerequisites
have been met.
-
Create a Linux user for running image-builder.
sudo adduser image-builder
Follow the prompt to provide a password for the image-builder user.
-
Add image-builder user to the sudo group and change user as image-builder providing in the password from previous step when prompted.
sudo usermod -aG sudo image-builder
su image-builder
cd /home/$USER
-
Install packages and prepare environment:
sudo apt update -y
sudo apt install jq make qemu-kvm libvirt-daemon-system libvirt-clients virtinst cpu-checker libguestfs-tools libosinfo-bin unzip -y
sudo snap install yq
sudo usermod -a -G kvm $USER
sudo chmod 666 /dev/kvm
sudo chown root:kvm /dev/kvm
mkdir -p /home/$USER/.ssh
echo "HostKeyAlgorithms +ssh-rsa" >> /home/$USER/.ssh/config
echo "PubkeyAcceptedKeyTypes +ssh-rsa" >> /home/$USER/.ssh/config
sudo chmod 600 /home/$USER/.ssh/config
sudo dnf update -y
sudo dnf install jq make qemu-kvm libvirt virtinst cpu-checker libguestfs-tools libosinfo unzip wget -y
sudo wget -qO /usr/local/bin/yq https://github.com/mikefarah/yq/releases/latest/download/yq_linux_amd64
sudo usermod -a -G kvm $USER
sudo chmod 666 /dev/kvm
sudo chown root:kvm /dev/kvm
mkdir -p /home/$USER/.ssh
echo "HostKeyAlgorithms +ssh-rsa" >> /home/$USER/.ssh/config
echo "PubkeyAcceptedKeyTypes +ssh-rsa" >> /home/$USER/.ssh/config
sudo chmod 600 /home/$USER/.ssh/config
sudo yum update -y
sudo yum install jq make qemu-kvm libvirt libvirt-clients libguestfs-tools unzip wget -y
sudo wget -qO /usr/local/bin/yq https://github.com/mikefarah/yq/releases/latest/download/yq_linux_amd64
sudo usermod -a -G kvm $USER
sudo chmod 666 /dev/kvm
sudo chown root:kvm /dev/kvm
mkdir -p /home/$USER/.ssh
echo "HostKeyAlgorithms +ssh-rsa" >> /home/$USER/.ssh/config
echo "PubkeyAcceptedKeyTypes +ssh-rsa" >> /home/$USER/.ssh/config
sudo chmod 600 /home/$USER/.ssh/config
- Starting with
image-builder version v0.3.0, the minimum required Python version is Python 3.9. However, many Linux distros ship only up to Python 3.8, so you will need to install Python 3.9 from external sources. Refer to the pyenv installation
and usage
documentation to install Python 3.9 and make it the default Python version.
- Once you have Python 3.9, you can install Ansible using
pip.
python3 -m pip install --user "ansible-core==<Ansible version from required dependency file>"
-
Create an Ubuntu or Red Hat image:
Ubuntu
To create an Ubuntu-based image, run image-builder with the following options:
--os: ubuntu--os-version: 20.04, 22.04 or 24.04 (default: 20.04)--hypervisor: baremetal--release-channel: Supported Kubernetes version, from 1-28 to 1-34.--firmware: Desired firmware for image build, can be bios or efi, defaults to bios--baremetal-config: baremetal config file if using proxy
image-builder build --os ubuntu --hypervisor baremetal --release-channel 1.35
Red Hat Enterprise Linux (RHEL)
RHEL images require a configuration file to identify the location of the RHEL 8 or RHEL 9 ISO image and
Red Hat subscription information. The image-builder command will temporarily consume a Red
Hat subscription that is removed once the image is built.
{
"iso_url": "<https://endpoint to RHEL ISO endpoint or path to file>",
"iso_checksum": "<for example: ea5f349d492fed819e5086d351de47261c470fc794f7124805d176d69ddf1fcd>",
"iso_checksum_type": "<for example: sha256>",
"rhel_username": "<RHSM username>",
"rhel_password": "<RHSM password>",
"extra_rpms": "<space-separated list of RPM packages; useful for adding required drivers or other packages>"
}
Run the image-builder with the following options:
--os: redhat--os-version: 8 or 9 (default: 8)--hypervisor: baremetal--release-channel: Supported Kubernetes version, from 1-28 to 1-34.--firmware: Desired firmware for image build, can be bios or efi, defaults to bios--baremetal-config: Bare metal config file
Image builder only supports building RHEL 9 raw images with EFI firmware. Refer to UEFI Support
to enable image builds with EFI firmware.
image-builder build --os redhat --hypervisor baremetal --release-channel 1.35 --baremetal-config baremetal.json
-
To consume the image, serve it from an accessible web server, then create the bare metal cluster spec
configuring the osImageURL field URL of the image. For example:
osImageURL: "http://<artifact host address>/my-ubuntu-v1.23.9-eks-a-17-amd64.gz"
See descriptions of osImageURL
for further information.
Build CloudStack node images
These steps use image-builder to create a RHEL-based image for CloudStack. Before proceeding, ensure that the above system-level, network-level and CloudStack-specific prerequisites
have been met.
-
Create a Linux user for running image-builder.
sudo adduser image-builder
Follow the prompt to provide a password for the image-builder user.
-
Add image-builder user to the sudo group and change user as image-builder providing in the password from previous step when prompted.
sudo usermod -aG sudo image-builder
su image-builder
cd /home/$USER
-
Install packages and prepare environment:
sudo apt update -y
sudo apt install jq make qemu-kvm libvirt-daemon-system libvirt-clients virtinst cpu-checker libguestfs-tools libosinfo-bin unzip -y
sudo snap install yq
sudo usermod -a -G kvm $USER
sudo chmod 666 /dev/kvm
sudo chown root:kvm /dev/kvm
mkdir -p /home/$USER/.ssh
echo "HostKeyAlgorithms +ssh-rsa" >> /home/$USER/.ssh/config
echo "PubkeyAcceptedKeyTypes +ssh-rsa" >> /home/$USER/.ssh/config
sudo chmod 600 /home/$USER/.ssh/config
sudo dnf update -y
sudo dnf install jq make qemu-kvm libvirt virtinst cpu-checker libguestfs-tools libosinfo unzip wget -y
sudo wget -qO /usr/local/bin/yq https://github.com/mikefarah/yq/releases/latest/download/yq_linux_amd64
sudo usermod -a -G kvm $USER
sudo chmod 666 /dev/kvm
sudo chown root:kvm /dev/kvm
mkdir -p /home/$USER/.ssh
echo "HostKeyAlgorithms +ssh-rsa" >> /home/$USER/.ssh/config
echo "PubkeyAcceptedKeyTypes +ssh-rsa" >> /home/$USER/.ssh/config
sudo chmod 600 /home/$USER/.ssh/config
sudo yum update -y
sudo yum install jq make qemu-kvm libvirt libvirt-clients libguestfs-tools unzip wget -y
sudo wget -qO /usr/local/bin/yq https://github.com/mikefarah/yq/releases/latest/download/yq_linux_amd64
sudo usermod -a -G kvm $USER
sudo chmod 666 /dev/kvm
sudo chown root:kvm /dev/kvm
mkdir -p /home/$USER/.ssh
echo "HostKeyAlgorithms +ssh-rsa" >> /home/$USER/.ssh/config
echo "PubkeyAcceptedKeyTypes +ssh-rsa" >> /home/$USER/.ssh/config
sudo chmod 600 /home/$USER/.ssh/config
- Starting with
image-builder version v0.3.0, the minimum required Python version is Python 3.9. However, many Linux distros ship only up to Python 3.8, so you will need to install Python 3.9 from external sources. Refer to the pyenv installation
and usage
documentation to install Python 3.9 and make it the default Python version.
- Once you have Python 3.9, you can install Ansible using
pip.
python3 -m pip install --user "ansible-core==<Ansible version from required dependency file>"
-
Create a CloudStack configuration file (for example, cloudstack.json) to provide the location of a Red Hat Enterprise Linux 8 ISO image and related checksum and Red Hat subscription information:
{
"iso_url": "<https://endpoint to RHEL ISO endpoint or path to file>",
"iso_checksum": "<for example: ea5f349d492fed819e5086d351de47261c470fc794f7124805d176d69ddf1fcd>",
"iso_checksum_type": "<for example: sha256>",
"rhel_username": "<RHSM username>",
"rhel_password": "<RHSM password>"
}
NOTE: To build the RHEL-based image, image-builder temporarily consumes a Red Hat subscription. That subscription is removed once the image is built.
-
To create a RHEL-based image, run image-builder with the following options:
--os: redhat--os-version: 8 (default: 8)--hypervisor: For CloudStack use cloudstack--release-channel: Supported EKS Distro releases include 1-27, 1-28, 1-29, 1-30 and 1-31.--cloudstack-config: CloudStack configuration file (cloudstack.json in this example)
image-builder build --os redhat --hypervisor cloudstack --release-channel 1.35 --cloudstack-config cloudstack.json
-
To consume the resulting RHEL-based image, add it as a template to your CloudStack setup as described in Preparing CloudStack
.
Build Snow node images
These steps use image-builder to create an Ubuntu-based Amazon Machine Image (AMI) that is backed by EBS volumes for Snow. Before proceeding, ensure that the above system-level, network-level and AMI-specific prerequisites
have been met
-
Create a Linux user for running image-builder.
sudo adduser image-builder
Follow the prompt to provide a password for the image-builder user.
-
Add the image-builder user to the sudo group and switch user to image-builder, providing in the password from previous step when prompted.
sudo usermod -aG sudo image-builder
su image-builder
cd /home/$USER
-
Install packages and prepare environment:
sudo apt update -y
sudo apt install jq unzip make -y
sudo snap install yq
mkdir -p /home/$USER/.ssh
echo "HostKeyAlgorithms +ssh-rsa" >> /home/$USER/.ssh/config
echo "PubkeyAcceptedKeyTypes +ssh-rsa" >> /home/$USER/.ssh/config
sudo chmod 600 /home/$USER/.ssh/config
sudo dnf update -y
sudo dnf install jq unzip make wget -y
sudo wget -qO /usr/local/bin/yq https://github.com/mikefarah/yq/releases/latest/download/yq_linux_amd64
mkdir -p /home/$USER/.ssh
echo "HostKeyAlgorithms +ssh-rsa" >> /home/$USER/.ssh/config
echo "PubkeyAcceptedKeyTypes +ssh-rsa" >> /home/$USER/.ssh/config
sudo chmod 600 /home/$USER/.ssh/config
sudo yum update -y
sudo yum install jq unzip make wget -y
sudo wget -qO /usr/local/bin/yq https://github.com/mikefarah/yq/releases/latest/download/yq_linux_amd64
mkdir -p /home/$USER/.ssh
echo "HostKeyAlgorithms +ssh-rsa" >> /home/$USER/.ssh/config
echo "PubkeyAcceptedKeyTypes +ssh-rsa" >> /home/$USER/.ssh/config
sudo chmod 600 /home/$USER/.ssh/config
- Starting with
image-builder version v0.3.0, the minimum required Python version is Python 3.9. However, many Linux distros ship only up to Python 3.8, so you will need to install Python 3.9 from external sources. Refer to the pyenv installation
and usage
documentation to install Python 3.9 and make it the default Python version.
- Once you have Python 3.9, you can install Ansible using
pip.
python3 -m pip install --user "ansible-core==<Ansible version from required dependency file>"
-
Create an AMI configuration file (for example, ami.json) that contains various AMI parameters. For example:
{
"ami_filter_name": "ubuntu/images/*ubuntu-focal-20.04-amd64-server-*",
"ami_filter_owners": "679593333241",
"ami_regions": "us-east-2",
"aws_region": "us-east-2",
"ansible_extra_vars": "@/home/image-builder/eks-anywhere-build-tooling/projects/kubernetes-sigs/image-builder/packer/ami/ansible_extra_vars.yaml",
"builder_instance_type": "t3.small",
"custom_role_name_list" : ["/home/image-builder/eks-anywhere-build-tooling/projects/kubernetes-sigs/image-builder/ansible/roles/load_additional_files"],
"manifest_output": "/home/image-builder/manifest.json",
"root_device_name": "/dev/sda1",
"volume_size": "25",
"volume_type": "gp3",
}
ami_filter_name
Regular expression to filter a source AMI. (default: ubuntu/images/*ubuntu-focal-20.04-amd64-server-*).
ami_filter_owners
AWS account ID or AWS owner alias such as ‘amazon’, ‘aws-marketplace’, etc. (default: 679593333241 - the AWS Marketplace AWS account ID).
ami_regions
A list of AWS regions to copy the AMI to. (default: us-west-2).
aws_region
The AWS region in which to launch the EC2 instance to create the AMI. (default: us-west-2).
The absolute path to the additional variables to pass to Ansible. These are converted to the --extra-vars command-line argument. This path must be prefix with ‘@’. (default: @/home/image-builder/eks-anywhere-build-tooling/projects/kubernetes-sigs/image-builder/packer/ami/ansible_extra_vars.yaml)
builder_instance_type
The EC2 instance type to use while building the AMI. (default: t3.small).
custom_role_name_list
Array of strings representing the absolute paths of custom Ansible roles to run. This field is mutually exclusive with custom_role_names.
custom_role_names
Space-delimited string of the custom roles to run. This field is mutually exclusive with custom_role_name_list and is provided for compatibility with Ansible’s input format.
manifest_output
The absolute path to write the build artifacts manifest to. If you wish to export the AMI using this manifest, ensure that you provide a path that is not inside the /home/$USER/eks-anywhere-build-tooling path since that will be cleaned up when the build finishes. (default: /home/image-builder/manifest.json).
root_device_name
The device name used by EC2 for the root EBS volume attached to the instance. (default: /dev/sda1).
subnet_id
The ID of the subnet where Packer will launch the EC2 instance. This field is required when using a non-default VPC.
volume_size
The size of the root EBS volume in GiB. (default: 25).
volume_type
The type of root EBS volume, such as gp2, gp3, io1, etc. (default: gp3).
-
To create an Ubuntu-based image, run image-builder with the following options:
--os: ubuntu--os-version: 20.04 or 22.04 (default: 20.04)--hypervisor: For AMI, use ami--release-channel: Supported EKS Distro releases include 1-27, 1-28, 1-29, 1-30 and 1-31.--ami-config: AMI configuration file (ami.json in this example)
image-builder build --os ubuntu --hypervisor ami --release-channel 1.35 --ami-config ami.json
-
After the build, the Ubuntu AMI will be available in your AWS account in the AWS region specified in your AMI configuration file. If you wish to export it as a raw image, you can achieve this using the AWS CLI.
ARTIFACT_ID=$(cat <manifest output location> | jq -r '.builds[0].artifact_id')
AMI_ID=$(echo $ARTIFACT_ID | cut -d: -f2)
IMAGE_FORMAT=raw
AMI_EXPORT_BUCKET_NAME=<S3 bucket to export the AMI to>
AMI_EXPORT_PREFIX=<S3 prefix for the exported AMI object>
EXPORT_RESPONSE=$(aws ec2 export-image --disk-image-format $IMAGE_FORMAT --s3-export-location S3Bucket=$AMI_EXPORT_BUCKET_NAME,S3Prefix=$AMI_EXPORT_PREFIX --image-id $AMI_ID)
EXPORT_TASK_ID=$(echo $EXPORT_RESPONSE | jq -r '.ExportImageTaskId')
The exported image will be available at the location s3://$AMI_EXPORT_BUCKET_NAME/$AMI_EXPORT_PREFIX/$EXPORT_IMAGE_TASK_ID.raw.
Build Nutanix node images
These steps use image-builder to create a Ubuntu-based image for Nutanix AHV and import it into the AOS Image Service. Before proceeding, ensure that the above system-level, network-level and Nutanix-specific prerequisites
have been met.
-
Download an Ubuntu cloud image
or RHEL cloud image
pertaining to your desired OS and OS version and upload it to the AOS Image Service using Prism. You will need to specify the image’s name in AOS as the source_image_name in the nutanix.json config file specified below. You can also skip this step and directly use the image_url field in the config file to provide the URL of a publicly accessible image as source.
-
Create a Linux user for running image-builder.
sudo adduser image-builder
Follow the prompt to provide a password for the image-builder user.
-
Add image-builder user to the sudo group and change user as image-builder providing in the password from previous step when prompted.
sudo usermod -aG sudo image-builder
su image-builder
cd /home/$USER
-
Install packages and prepare environment:
sudo apt update -y
sudo apt install jq unzip make -y
sudo snap install yq
mkdir -p /home/$USER/.ssh
echo "HostKeyAlgorithms +ssh-rsa" >> /home/$USER/.ssh/config
echo "PubkeyAcceptedKeyTypes +ssh-rsa" >> /home/$USER/.ssh/config
sudo chmod 600 /home/$USER/.ssh/config
sudo dnf update -y
sudo dnf install jq unzip make wget -y
sudo wget -qO /usr/local/bin/yq https://github.com/mikefarah/yq/releases/latest/download/yq_linux_amd64
mkdir -p /home/$USER/.ssh
echo "HostKeyAlgorithms +ssh-rsa" >> /home/$USER/.ssh/config
echo "PubkeyAcceptedKeyTypes +ssh-rsa" >> /home/$USER/.ssh/config
sudo chmod 600 /home/$USER/.ssh/config
sudo yum update -y
sudo yum install jq unzip make wget -y
sudo wget -qO /usr/local/bin/yq https://github.com/mikefarah/yq/releases/latest/download/yq_linux_amd64
mkdir -p /home/$USER/.ssh
echo "HostKeyAlgorithms +ssh-rsa" >> /home/$USER/.ssh/config
echo "PubkeyAcceptedKeyTypes +ssh-rsa" >> /home/$USER/.ssh/config
sudo chmod 600 /home/$USER/.ssh/config
- Starting with
image-builder version v0.3.0, the minimum required Python version is Python 3.9. However, many Linux distros ship only up to Python 3.8, so you will need to install Python 3.9 from external sources. Refer to the pyenv installation
and usage
documentation to install Python 3.9 and make it the default Python version.
- Once you have Python 3.9, you can install Ansible using
pip.
python3 -m pip install --user "ansible-core==<Ansible version from required dependency file>"
-
Create a nutanix.json config file. More details on values can be found in the image-builder documentation
. See example below:
{
"nutanix_cluster_name": "Name of PE Cluster",
"source_image_name": "Name of Source Image",
"image_name": "Name of Destination Image",
"image_url": "URL where the source image is hosted",
"image_export": "Exports the raw image to disk if set to true",
"nutanix_subnet_name": "Name of Subnet",
"nutanix_endpoint": "Prism Central IP / FQDN",
"nutanix_insecure": "false",
"nutanix_port": "9440",
"nutanix_username": "PrismCentral_Username",
"nutanix_password": "PrismCentral_Password"
}
For RHEL images, add the following fields:
{
"rhel_username": "<RHSM username>",
"rhel_password": "<RHSM password>"
}
-
Create an Ubuntu or Redhat image:
Ubuntu
To create an Ubuntu-based image, run image-builder with the following options:
--os: ubuntu--os-version: 20.04 or 22.04 (default: 20.04)--hypervisor: For Nutanix use nutanix--release-channel: Supported EKS Distro releases include 1-27, 1-28, 1-29, 1-30 and 1-31.--nutanix-config: Nutanix configuration file (nutanix.json in this example)
image-builder build --os ubuntu --hypervisor nutanix --release-channel 1.35 --nutanix-config nutanix.json
Red Hat Enterprise Linux
To create a RHEL-based image, run image-builder with the following options:
--os: redhat--os-version: 8 or 9 (default: 8)--hypervisor: For Nutanix use nutanix--release-channel: Supported EKS Distro releases include 1-27, 1-28, 1-29, 1-30 and 1-31.--nutanix-config: Nutanix configuration file (nutanix.json in this example)
image-builder build --os redhat --hypervisor nutanix --release-channel 1.35 --nutanix-config nutanix.json
Configuring OS version
image-builder supports an os-version option that allows you to configure which version of the OS you wish to build. If no OS version is supplied, it will build the default for that OS, according to the table below.
| Operating system |
Supported versions |
Corresponding os-version value |
Default os-version value |
Hypervisors supported |
| Ubuntu |
20.04.6 |
20.04 |
20.04 |
All hypervisors except CloudStack |
| 22.04.3 |
22.04 |
| 24.04.1 |
24.04 |
Supported on Baremetal and vSphere |
| RHEL |
8.10 |
8 |
8 |
All hypervisors except AMI |
| 9.6 |
9 |
All hypervisors except AMI |
Configuring Ansible Logging Verbosity
By default image-builder does not display the details of the Ansible tasks during the image-build process. But it allows users to specify logging verbosity for Ansible using the --ansible-verbosity option. The value is in range 0-6.
Building images for a specific EKS Anywhere version
This section provides information about the relationship between image-builder and EKS Anywhere CLI version, and provides instructions on building images pertaining to a specific EKS Anywhere version.
Every release of EKS Anywhere includes a new version of image-builder CLI. For EKS-A releases prior to v0.16.3, the corresponding image-builder CLI builds images for the latest version of EKS-A released thus far. The EKS-A version determines what artifacts will be bundled into the final OS image, i.e., the core Kubernetes components vended by EKS Distro as well as several binaries vended by EKS Anywhere, such as crictl, etcdadm, etc, and users may not always want the latest versions of these, and rather wish to bake in certain specific component versions into the image.
This was improved in image-builder released with EKS-A v0.16.3 to v0.16.5. Now you can override the default latest build behavior to build images corresponding to a specific EKS-A release, including previous releases. This can be achieved by setting the EKSA_RELEASE_VERSION environment variable to the desired EKS-A release (v0.16.0 and above).
For example, if you want to build an image for EKS-A version v0.16.5, you can run the following command.
export EKSA_RELEASE_VERSION=v0.16.5
image-builder build --os <OS> --hypervisor <hypervisor> --release-channel <release channel> --<hypervisor>-config config.json
With image-builder versions v0.2.1 and above (released with EKS-A version v0.17.0), the image-builder CLI has the EKS-A version baked into it, so it will build images pertaining to that release of EKS Anywhere by default. You can override the default version using the eksa-release option.
image-builder build --os <OS> --hypervisor <hypervisor> --release-channel <release channel> --<hypervisor>-config config.json --eksa-release v0.16.5
Building images corresponding to dev versions of EKS-A
Note
Please note that this is not a recommended method for building production images. Images built using this method use development versions of EKS-A and its dependencies. Consider this as an advanced use-case and proceed at your own discretion.
image-builder also provides the option to build images pertaining to dev releases of EKS-A. In the above cases, using a production release of image-builder leads to manifests and images being sourced from production locations. While this is usually the desired behavior, it is sometimes useful to build images pertaining to the development branch. Often, new features or enhancements are added to image-builder or other EKS-A dependency projects, but are only released to production weeks or months later, based on the release cadence. In other cases, users may want to build EKS-A node images for new Kubernetes versions that are available in dev EKS-A releases but have not been officially released yet. This feature of image-builder supports both these use-cases and other similar ones.
This can be achieved using an image-builder CLI that has the dev version of EKS-A (v0.0.0-dev) baked into it, or by passing in v0.0.0-dev to the eksa-release option. For both these methods, you need to set the environment EKSA_USE_DEV_RELEASE to true.
image-builder obtained from a production EKS-A release:
export EKSA_USE_DEV_RELEASE=true
image-builder build --os <OS> --hypervisor <hypervisor> --release-channel <release channel> --<hypervisor>-config config.json --eksa-release v0.0.0-dev
image-builder obtained from a dev EKS-A release:
export EKSA_USE_DEV_RELEASE=true
image-builder build --os <OS> --hypervisor <hypervisor> --release-channel <release channel> --<hypervisor>-config config.json
In both these above approaches, the artifacts embedded into the images will be obtained from the dev release bundle manifest instead of production. This manifest contains the latest artifacts built from the main branch, and is generally more up-to-date than production release artifact versions.
UEFI support
image-builder supports UEFI-enabled images for Ubuntu OVA, Ubuntu Raw and RHEL 9 Raw images. UEFI is turned on by default for Ubuntu Raw image builds, but the default firmware for Ubuntu OVAs and RHEL Raw images is BIOS. This can be toggled with the firmware option.
For example, to build a Kubernetes v1.35 Ubuntu 22.04 OVA with UEFI enabled, you can run the following command.
image-builder build --os ubuntu --hypervisor vsphere --os-version 22.04 --release-channel 1.35 --vsphere-config config.json --firmware efi
The table below shows the possible firmware options for the hypervisor and OS combinations that image-builder supports.
|
vSphere |
Bare Metal |
CloudStack |
Nutanix |
Snow |
| Ubuntu |
bios (default), efi |
efi |
bios |
bios |
bios |
| RHEL |
bios |
bios (RHEL 8), efi (RHEL 9) |
bios |
bios |
bios |
Mounting additional files
image-builder allows you to customize your image by adding files located on your host onto the image at build time. This is helpful when you want your image to have a custom DNS resolver configuration, systemd service unit-files, custom scripts and executables, etc. This option is suppported for all OS and Hypervisor combinations.
To do this, create a configuration file (say, files.json) containing the list of files you want to copy:
{
"additional_files_list": [
{
"src": "<Absolute path of the file on the host machine>",
"dest": "<Absolute path of the location you want to copy the file to on the image",
"owner": "<Name of the user that should own the file>",
"group": "<Name of the group that should own the file>",
"mode": "<The permissions to apply to the file on the image>"
},
...
]
}
You can now run the image-builder CLI with the files-config option, with this configuration file as input.
image-builder build --os <OS> --hypervisor <hypervisor> --release-channel <release channel> --<hypervisor>-config config.json --files-config files.json
Using Proxy Server
image-builder supports proxy-enabled build environments. In order to use proxy server to route outbound requests to the Internet, add the following fields to the hypervisor or provider configuration file (e.g. baremetal.json)
{
"http_proxy": "<http proxy endpoint, for example, http://username:passwd@proxyhost:port>",
"https_proxy": "<https proxy endpoint, for example, https://proxyhost:port/>",
"no_proxy": "<optional comma seperated list of domains that should be excluded from proxying>"
}
In a proxy-enabled environment, image-builder uses wget to download artifacts instead of curl, as curl does not support reading proxy environment variables. In order to add wget to the node OS, add the following to the above json configuration file:
{
"extra_rpms": "wget" #If the node OS being built is RedHat
"extra_debs": "wget" #If the node OS being built is Ubuntu
}
Run image-builder CLI with the hypervisor configuration file
image-builder build --os <OS> --hypervisor <hypervisor> --release-channel <release channel> --<hypervisor>-config config.json
Red Hat Satellite Support
While building Red Hat node images, image-builder uses public Red Hat subscription endpoints to register the build virtual machine with the provided Red Hat account and download required packages.
Alternatively, image-builder can also use a private Red Hat Satellite to register the build virtual machine and pull packages from the Satellite.
In order to use Red Hat Satellite in the image build process follow the steps below.
Prerequisites
- Ensure the host running
image-builder has bi-directional network connectivity with the RedHat Satellite
- Image builder flow only supports RedHat Satellite version >= 6.8
- Add the following Red Hat repositories for the latest 8.x or 9.x (for Nutanix) version on the Satellite and initiate a sync to replicate required packages
- Base OS Rpms
- Base OS - Extended Update Support Rpms
- AppStream - Extended Update Support Rpms
- Create an activation key on the Satellite and ensure library environment is enabled
Build Red Hat node images using Red Hat Satellite
- Add the following fields to the hypervisor or provider configuration file
{
"rhsm_server_hostname": "fqdn of Red Hat Satellite server",
"rhsm_server_release_version": "Version of Red hat OS Packages to pull from Satellite. e.x. 8.8",
"rhsm_activation_key": "activation key from Satellite",
"rhsm_org_id": "org id from Satellite"
}
rhsm_server_release_version should always point to the latest 8.x or 9.x minor Red Hat release synced and available on Red Hat Satellite
- Run
image-builder CLI with the hypervisor configuration file
image-builder build --os <OS> --hypervisor <hypervisor> --release-channel <release channel> --<hypervisor>-config config.json
Red Hat image minor version upgrade behavior
By default, image-builder performs a yum update task during the image-build process, which updates the RHEL minor version to the latest. For example, if a user builds a RHEL image using an ISO of version 9.4, the final image artifact will have RHEL version 9.6.
This is an expected behavior of image-builder. However, if you want to preserve the Red Hat minor version, you can manually specify the rhsm_server_release_version in config.json file to keep Red Hat minor version on the value that you specified.
For example, if you want the Red Hat minor version to remain 9.4, add the following to config.json file:
{
"rhsm_server_release_version": "9.4"
}
Air Gapped Image Building
image-builder supports building node OS images in an air-gapped environment. Currently only building Ubuntu-based node OS images for baremetal provider is supported in air-gapped building mode.
Prerequisites
- Air-gapped image building requires
- private artifacts server e.g. artifactory from JFrog
- private git server.
- Ensure the host running
image-builder has bi-directional network connectivity with the artifacts server and git server
- Artifacts server should have the ability to host and serve, standalone artifacts and Ubuntu OS packages
Building node images in an air-gapped environment
-
Identify the EKS-D release channel (generally aligning with Kubernetes version) to build. For example, 1.34 or 1.35
-
Identify the latest release of EKS-A from changelog
. For example,
-
Run image-builder CLI to download manifests in an environment with internet connectivity
image-builder download manifests
This command will download a tarball containing all currently released and supported EKS-A and EKS-D manifests that are required for image building in an air-gapped environment.
-
Create a local file named download-airgapped-artifacts.sh with the contents below. This script will download the required EKS-A and EKS-D artifacts required for image building.
Click to expand download-airgapped-artifacts.sh script
#!/usr/bin/env bash
set +o nounset
function downloadArtifact() {
local -r artifact_url=${1}
local -r artifact_path_pre=${2}
# Removes hostname from url
artifact_path_post=$(echo ${artifact_url} | sed -E 's:[^/]*//[^/]*::')
artifact_path="${artifact_path_pre}${artifact_path_post}"
curl -sL ${artifact_url} --output ${artifact_path} --create-dirs
}
if [ -z "${EKSA_RELEASE_VERSION}" ]; then
echo "EKSA_RELEASE_VERSION not set. Please refer https://anywhere.eks.amazonaws.com/docs/whatsnew/ or https://github.com/aws/eks-anywhere/releases to get latest EKS-A release"
exit 1
fi
if [ -z "${RELEASE_CHANNEL}" ]; then
echo "RELEASE_CHANNEL not set. Supported EKS Distro releases include 1-27, 1-28, 1-29, 1-30 and 1-31"
exit 1
fi
# Convert RELEASE_CHANNEL to dot schema
kube_version="${RELEASE_CHANNEL/-/.}"
echo "Setting Kube Version: ${kube_version}"
# Create a local directory to download the artifacts
artifacts_dir="eks-a-d-artifacts"
eks_a_artifacts_dir="eks-a-artifacts"
eks_d_artifacts_dir="eks-d-artifacts"
echo "Creating artifacts directory: ${artifacts_dir}"
mkdir ${artifacts_dir}
# Download EKS-A bundle manifest
cd ${artifacts_dir}
bundles_url=$(curl -sL https://anywhere-assets.eks.amazonaws.com/releases/eks-a/manifest.yaml | yq ".spec.releases[] | select(.version==\"$EKSA_RELEASE_VERSION\").bundleManifestUrl")
echo "Identified EKS-A Bundles URL: ${bundles_url}"
echo "Downloading EKS-A Bundles manifest file"
bundles_file_data=$(curl -sL "${bundles_url}" | yq)
# Download EKS-A artifacts
eks_a_artifacts="containerd crictl etcdadm"
for eks_a_artifact in ${eks_a_artifacts}; do
echo "Downloading EKS-A artifact: ${eks_a_artifact}"
artifact_url=$(echo "${bundles_file_data}" | yq e ".spec.versionsBundles[] | select(.kubeVersion==\"${kube_version}\").eksD.${eks_a_artifact}.uri" -)
downloadArtifact ${artifact_url} ${eks_a_artifacts_dir}
done
# Download EKS-D artifacts
echo "Downloading EKS-D manifest file"
eks_d_manifest_url=$(echo "${bundles_file_data}" | yq e ".spec.versionsBundles[] | select(.kubeVersion==\"${kube_version}\").eksD.manifestUrl" -)
eks_d_manifest_file_data=$(curl -sL "${eks_d_manifest_url}" | yq)
# Get EKS-D kubernetes base url from kube-apiserver
eks_d_kube_tag=$(echo "${eks_d_manifest_file_data}" | yq e ".status.components[] | select(.name==\"kubernetes\").gitTag" -)
echo "EKS-D Kube Tag: ${eks_d_kube_tag}"
api_server_artifact="bin/linux/amd64/kube-apiserver.tar"
api_server_artifact_url=$(echo "${eks_d_manifest_file_data}" | yq e ".status.components[] | select(.name==\"kubernetes\").assets[] | select(.name==\"${api_server_artifact}\").archive.uri")
eks_d_base_url=$(echo "${api_server_artifact_url}" | sed -E "s,/${eks_d_kube_tag}/${api_server_artifact}.*,,")
echo "EKS-D Kube Base URL: ${eks_d_base_url}"
# Downloading EKS-D Kubernetes artifacts
eks_d_k8s_artifacts="kube-apiserver.tar kube-scheduler.tar kube-controller-manager.tar kube-proxy.tar pause.tar coredns.tar etcd.tar kubeadm kubelet kubectl"
for eks_d_k8s_artifact in ${eks_d_k8s_artifacts}; do
echo "Downloading EKS-D artifact: Kubernetes - ${eks_d_k8s_artifact}"
artifact_url="${eks_d_base_url}/${eks_d_kube_tag}/bin/linux/amd64/${eks_d_k8s_artifact}"
downloadArtifact ${artifact_url} ${eks_d_artifacts_dir}
done
# Downloading EKS-D etcd artifacts
eks_d_extra_artifacts="etcd cni-plugins"
for eks_d_extra_artifact in ${eks_d_extra_artifacts}; do
echo "Downloading EKS-D artifact: ${eks_d_extra_artifact}"
eks_d_artifact_tag=$(echo "${eks_d_manifest_file_data}" | yq e ".status.components[] | select(.name==\"${eks_d_extra_artifact}\").gitTag" -)
artifact_url=$(echo "${eks_d_manifest_file_data}" | yq e ".status.components[] | select(.name==\"${eks_d_extra_artifact}\").assets[] | select(.name==\"${eks_d_extra_artifact}-linux-amd64-${eks_d_artifact_tag}.tar.gz\").archive.uri")
downloadArtifact ${artifact_url} ${eks_d_artifacts_dir}
done
-
Change mode of the saved file download-airgapped-artifacts.sh to an executable
chmod +x download-airgapped-artifacts.sh
-
Set EKS-A release version and EKS-D release channel as environment variables and execute the script
EKSA_RELEASE_VERSION=<EKS-A version> RELEASE_CHANNEL=1-31 ./download-airgapped-artifacts.sh
Executing this script will create a local directory eks-a-d-artifacts and download the required EKS-A and EKS-D artifacts.
-
Create two repositories, one for EKS-A and one for EKS-D on the private artifacts server.
Upload the contents of eks-a-d-artifacts/eks-a-artifacts to the EKS-A repository. Similarly upload the contents of eks-a-d-artifacts/eks-d-artifacts to the EKS-D repository on the private artifacts server.
Please note, the path of artifacts inside the downloaded directories must be preserved while hosted on the artifacts server.
-
Download and host the base ISO image to the artifacts server.
-
Replicate the following public git repositories to private artifacts server or git servers. Make sure to sync all branches and tags to the private git repo.
-
Replicate public Ubuntu packages to private artifacts server. Please refer your artifact server’s documentation for more detailed instructions.
-
Create a sources.list file that will configure apt commands to use private artifacts server for OS packages
deb [trusted=yes] http://<private-artifacts-server>/debian focal main restricted universe multiverse
deb [trusted=yes] http://<private-artifacts-server>/debian focal-updates main restricted universe multiverse
deb [trusted=yes] http://<private-artifacts-server>/debian focal-backports main restricted universe multiverse
deb [trusted=yes] http://<private-artifacts-server>/debian focal-security main restricted universe multiverse
focal in the above file refers to the code name for the Ubuntu 20.04 release. If using Ubuntu version 22.04, replace focal with jammy.
-
Create a provider or hypervisor configuration file and add the following fields
{
"eksa_build_tooling_repo_url": "https://internal-git-host/eks-anywhere-build-tooling.git",
"image_builder_repo_url": "https://internal-repos/image-builder.git",
"private_artifacts_eksd_fqdn": "http://private-artifacts-server/artifactory/eks-d-artifacts",
"private_artifacts_eksa_fqdn": "http://private-artifacts-server:8081/artifactory/eks-a-artifacts",
"extra_repos": "<full path of sources.list>",
"disable_public_repos": "true",
"iso_url": "http://<private-base-iso-url>/ubuntu-20.04.1-legacy-server-amd64.iso",
"iso_checksum": "<sha256 of the base iso>",
"iso_checksum_type": "sha256"
}
-
Run image-builder CLI with the hypervisor configuration file and the downloaded manifest tarball
image-builder build -os <OS> --hypervisor <hypervisor> --release-channel <release channel> --<hypervisor>-config config.json --airgapped --manifest-tarball <path to eks-a-manifests.tar>
Container Images
6 - Cluster management
Common tasks for managing EKS Anywhere clusters
6.1 - Overview
Overview of EKS Anywhere cluster management
Once you have an EKS Anywhere cluster up and running, there are a number of operational tasks you may need to perform, such as changing cluster configuration, upgrading the cluster Kubernetes version, scaling the cluster, and setting up additional operational software such as ingress/load balancing tools, observability tools, and storage drivers.
Cluster Lifecycle Operations
The tools available for cluster lifecycle operations (create, update, upgrade, scale, delete) vary based on the EKS Anywhere architecture you run. You must use the eksctl CLI for cluster lifecycle operations with standalone clusters and management clusters. If you are running a management / workload cluster architecture, you can use the management cluster to manage one-to-many downstream workload clusters. With the management cluster architecture, you can use the eksctl CLI, any Kubernetes API-compatible client, or Infrastructure as Code (IAC) tooling such as Terraform and GitOps to manage the lifecycle of workload clusters. For details on the differences between the architecture options, reference the Architecture page
.
To perform cluster lifecycle operations for standalone, management, or workload clusters, you modify the EKS Anywhere Cluster specification, which is a Kubernetes Custom Resource for EKS Anywhere clusters. When you modify a field in an existing Cluster specification, EKS Anywhere reconciles the infrastructure and Kubernetes components until they match the new desired state you defined. These operations are asynchronous and you can validate the state of your cluster following the guidance on the Verify Cluster page
. To change a cluster configuration, update the field(s) in the Cluster specification and apply it to your standalone or management cluster. To upgrade the Kubernetes version, update the kubernetesVersion field in the Cluster specification and apply it to your standalone or management cluster. To scale the cluster, update the control plane or worker node count in the Cluster specification and apply it to the standalone or management cluster, or alternatively use Cluster Autoscaler to automate the scaling process. This operational model facilitates a declarative, intent-based pattern for defining and managing Kubernetes clusters that aligns with modern IAC and GitOps practices.
Networking
With EKS Anywhere, each virtual machine or bare metal server in the cluster gets an IP address via DHCP. The mechanics of this process vary for each provider (vSphere, bare metal, etc.) and it is handled automatically by EKS Anywhere during machine provisioning. During cluster creation, you must configure an IP address for the cluster’s control plane endpoint that is not in your DHCP address range but is reachable from your cluster’s subnet. This may require changes to your DHCP server to create an IP reservation. The IP address you specify for your cluster control plane endpoint is used as the virtual IP address for kube-vip
, which EKS Anywhere uses to load balance traffic across the control plane nodes. You cannot change this IP address after cluster creation.
You additionally must configure CIDR blocks for Pods and Services in the Cluster specification during cluster creation. Each node in EKS Anywhere clusters receives an IP range subset from the Pod CIDR block, see Node IPs configuration
for details. EKS Anywhere uses Cilium as the Container Networking Interface (CNI). The Cilium version in EKS Anywhere, “EKS Anywhere Cilium”, contains a subset of the open source Cilium capabilities. EKS Anywhere configures Cilium in Kubernetes host-scope IPAM mode
, which delegates the address allocation to each individual node in the cluster. You can optionally replace the EKS Anywhere Cilium installation with a different CNI after cluster creation. Reference the Custom CNI page
for details.
Security
The Shared Responsibility Model for EKS Anywhere is different than other AWS services that run in AWS Cloud, and it is your responsibility for the ongoing security of EKS Anywhere clusters you operate. Be sure to review and follow the EKS Anywhere Security Best Practices
.
Support
EKS Anywhere is open source and free to use at no cost. To receive support for your EKS Anywhere clusters, you can optionally purchase EKS Anywhere Enterprise Subscriptions
to get 24/7 support from AWS subject matter experts and access to EKS Anywhere Curated Packages
. See the License cluster page
for information on how to apply a license to your EKS Anywhere clusters, and the Generate Support Bundle page
for details on how to create a support bundle that contains diagnostics that AWS uses to troubleshoot and resolve issues.
Ingress & Load Balancing
Most Kubernetes-conformant Ingress and Load Balancing options can be used with EKS Anywhere. EKS Anywhere includes Emissary Ingress
and MetalLB
as EKS Anywhere Curated Packages. For more information on EKS Anywhere Curated Packages, reference the Package Management Overview
.
Observability
Most Kubernetes-conformant observability tools can be used with EKS Anywhere. You can optionally use the EKS Connector to view your EKS Anywhere cluster resources in the Amazon EKS console, reference the Connect to console page
for details. EKS Anywhere includes the AWS Distro for Open Telemetry (ADOT)
and Prometheus
for metrics and tracing as EKS Anywhere Curated Packages. You can use popular tooling such as Fluent Bit for logging, and can track the progress of logging for ADOT on the AWS Observability roadmap
. For more information on EKS Anywhere Curated Packages, reference the Package Management Overview
.
Storage
Most Kubernetes-conformant storage options can be used with EKS Anywhere. For example, you can use the vSphere CSI driver
with EKS Anywhere clusters on vSphere. As of the v0.17.0 EKS Anywhere release, EKS Anywhere no longer installs or manages the vSphere CSI driver automatically, and you must self-manage this add-on. Other popular storage options include Rook/Ceph
, OpenEBS,
, Portworx
, and Netapp Trident
. Please note, if you are using Bottlerocket with EKS Anywhere, Bottlerocket does not currently support iSCSI, see the Bottlerocket GitHub
for details.
6.2 - Upgrade cluster
How to upgrade your cluster to new EKS Anywhere and Kubernetes versions
6.2.1 - Upgrade Overview
Overview of EKS Anywhere and Kubernetes version upgrades
Version upgrades in EKS Anywhere and Kubernetes are events that should be carefully planned, tested, and implemented. New EKS Anywhere and Kubernetes versions can introduce significant changes, and we recommend that you test the behavior of your applications against new EKS Anywhere and Kubernetes versions before you update your production clusters. Cluster backups
should always be performed before initiating an upgrade. When initiating cluster version upgrades, new virtual or bare metal machines are provisioned and the machines on older versions are deprovisioned in a rolling fashion by default.
Unlike Amazon EKS, there are no automatic upgrades in EKS Anywhere and you have full control over when you upgrade. On the end of support date, you can still create new EKS Anywhere clusters with the unsupported Kubernetes version if the EKS Anywhere version you are using includes it. Any existing EKS Anywhere clusters with the unsupported Kubernetes version continue to function. As new Kubernetes versions become available in EKS Anywhere, we recommend that you proactively update your clusters to use the latest available Kubernetes version to remain on versions that receive CVE patches and bug fixes.
Reference the EKS Anywhere Changelog
for information on fixes, features, and changes included in each EKS Anywhere release. For details on the EKS Anywhere version support policy, reference the Versioning page.
Upgrade Version Skew
There are a few dimensions of versioning to consider in your EKS Anywhere deployments:
- Management clusters to workload clusters: Management clusters can be at most 1 EKS Anywhere minor version greater than the EKS Anywhere version of workload clusters. Workload clusters cannot have an EKS Anywhere version greater than management clusters.
- Management components to cluster components: Management components can be at most 1 EKS Anywhere minor version greater than the EKS Anywhere version of cluster components.
- EKS Anywhere version upgrades: Skipping EKS Anywhere minor versions during upgrade is not supported (
v0.23.x to v0.25.x). We recommend you upgrade one EKS Anywhere minor version at a time (v0.23.x to v0.24.x to v0.25.x).
- Kubernetes version upgrades: Skipping Kubernetes minor versions during upgrade is not supported (
v1.33.x to v1.35.x). You must upgrade one Kubernetes minor version at a time (v1.33.x to v1.34.x to v1.35.x).
- Kubernetes control plane and worker nodes: As of Kubernetes v1.28, worker nodes can be up to 3 minor versions lower than the Kubernetes control plane minor version. In earlier Kubernetes versions, worker nodes could be up to 2 minor versions lower than the Kubernetes control plane minor version.
User Interfaces
EKS Anywhere versions for management and standalone clusters must be upgraded with the eksctl anywhere CLI. Kubernetes versions for management, standalone, and workload clusters, and EKS Anywhere versions for workload clusters can be upgraded with the eksctl anywhere CLI or with Kubernetes API-compatible clients such as the kubectl CLI, GitOps, or Terraform. For an overview of the differences between management, standalone, workload clusters, reference the Architecture page.
If you are using the eksctl anywhere CLI, there are eksctl anywhere upgrade plan cluster and eksctl anywhere upgrade cluster commands. The former shows the components and versions that will be upgraded. The latter runs the upgrade, first validating a set of preflight checks and then upgrading your cluster to match the updated spec.
If you are using an Kubernetes API-compatible client, you modify your workload cluster spec yaml and apply the modified yaml to your management cluster. The EKS Anywhere lifecycle controller, which runs on the management cluster, reconciles the desired changes on the workload cluster.
As of EKS Anywhere version v0.19.0, management components can be upgraded separately from cluster components. This is enables you to get the latest updates to the management components such as Cluster API controller, EKS Anywhere controller, and provider-specific controllers without impact to your workload clusters. Management components can only be upgraded with the eksctl anywhere CLI, which has new eksctl anywhere upgrade plan management-components and eksctl anywhere upgrade management-component commands. For more information, reference the Upgrade Management Components page.
Upgrading EKS Anywhere Versions
Each EKS Anywhere version includes all components required to create and manage EKS Anywhere clusters. For example, this includes:
- Administrative / CLI components (
eksctl anywhere CLI, image-builder, diagnostics-collector)
- Management components (Cluster API controller, EKS Anywhere controller, provider-specific controllers)
- Cluster components (Kubernetes, Cilium)
You can find details about each EKS Anywhere releases in the EKS Anywhere release manifest. The release manifest contains references to the corresponding bundle manifest for each EKS Anywhere version. Within the bundle manifest, you will find the components included in a specific EKS Anywhere version. The images running in your deployment use the same URI values specified in the bundle manifest for that component. For example, see the bundle manifest
for EKS Anywhere version v0.25.0.
To upgrade the EKS Anywhere version of a management or standalone cluster, you install a new version of the eksctl anywhere CLI, change the eksaVersion field in your management or standalone cluster’s spec yaml, and then run the eksctl anywhere upgrade management-components -f cluster.yaml (as of EKS Anywhere version v0.19) or eksctl anywhere upgrade cluster -f cluster.yaml command. The eksctl anywhere upgrade cluster command upgrades both management and cluster components.
To upgrade the EKS Anywhere version of a workload cluster, you change the eksaVersion field in your workload cluster’s spec yaml, and apply the new workload cluster’s spec yaml to your management cluster using the eksctl anywhere CLI or with Kubernetes API-compatible clients.
Upgrading Kubernetes Versions
Each EKS Anywhere version supports at least 4 minor versions of Kubernetes. Kubernetes patch version increments are included in EKS Anywhere minor and patch releases. There are two places in the cluster spec where you can configure the Kubernetes version, Cluster.Spec.KubernetesVersion and Cluster.Spec.WorkerNodeGroupConfiguration[].KubernetesVersion. If only Cluster.Spec.KubernetesVersion is set, then that version will apply to both control plane and worker nodes. You can use Cluster.Spec.WorkerNodeGroupConfiguration[].KubernetesVersion to upgrade your worker nodes separately from control plane nodes.
The Cluster.Spec.WorkerNodeGroupConfiguration[].KubernetesVersion cannot be greater than Cluster.Spec.KubernetesVersion. In Kubernetes versions lower than v1.28.0, the Cluster.Spec.WorkerNodeGroupConfiguration[].KubernetesVersion can be at most 2 versions lower than the Cluster.Spec.KubernetesVersion. In Kubernetes versions v1.28.0 or greater, the Cluster.Spec.WorkerNodeGroupConfiguration[].KubernetesVersion can be at most 3 versions lower than the Cluster.Spec.KubernetesVersion.
Upgrade Controls
By default, when you upgrade EKS Anywhere or Kubernetes versions, nodes are upgraded one at a time in a rolling fashion. All control plane nodes are upgraded before worker nodes. To control the speed and behavior of rolling upgrades, you can use the upgradeRolloutStrategy.rollingUpdate.maxSurge and upgradeRolloutStrategy.rollingUpdate.maxUnavailable fields in the cluster spec (available on all providers as of EKS Anywhere version v0.19). The maxSurge setting controls how many new machines can be queued for provisioning simultaneously, and the maxUnavailable setting controls how many machines must remain available during upgrades. For more information on these controls, reference Advanced configuration
for vSphere, CloudStack, Nutanix, and Snow upgrades and Advanced configuration
for bare metal upgrades.
As of EKS Anywhere version v0.19.0, if you are running EKS Anywhere on bare metal, you can use the in-place rollout strategy to upgrade EKS Anywhere and Kubernetes versions, which upgrades the components on the same physical machines without requiring additional server capacity. In-place upgrades are not available for other providers.
6.2.2 - Upgrade Bare Metal cluster
How to perform Bare Metal cluster upgrades
Considerations
- Only EKS Anywhere and Kubernetes version upgrades are supported for Bare Metal clusters. You cannot update other cluster configuration.
- Upgrades should never be run from ephemeral nodes (short-lived systems that spin up and down on a regular basis). If the EKS Anywhere version is lower than
v0.18.0 and upgrade fails, you must not delete the KinD bootstrap cluster Docker container. During an upgrade, the bootstrap cluster contains critical EKS Anywhere components. If it is deleted after a failed upgrade, they cannot be recovered.
- It is highly recommended to run the
eksctl anywhere upgrade cluster command with the --no-timeouts option when the command is executed through automation. This prevents the CLI from timing out and enables cluster operators to fix issues preventing the upgrade from completing while the process is running.
- In EKS Anywhere version
v0.15.0, we introduced the EKS Anywhere cluster lifecycle controller that runs on management clusters and manages workload clusters. The EKS Anywhere lifecycle controller enables you to use Kubernetes API-compatible clients such as kubectl, GitOps, or Terraform for managing workload clusters. In this EKS Anywhere version, the EKS Anywhere cluster lifecycle controller rolls out new nodes in workload clusters when management clusters are upgraded. In EKS Anywhere version v0.16.0, this behavior was changed such that management clusters can be upgraded separately from workload clusters.
- When running workload cluster upgrades after upgrading a management cluster, a machine rollout may be triggered on workload clusters during the workload cluster upgrade, even if the changes to the workload cluster spec didn’t require one (for example scaling down a worker node group).
- Starting with EKS Anywhere
v0.18.0, the osImageURL must include the Kubernetes minor version (Cluster.Spec.KubernetesVersion or Cluster.Spec.WorkerNodeGroupConfiguration[].KubernetesVersion in the cluster spec). For example, if the Kubernetes version is 1.35, the osImageURL must include 1.35, 1_35, 1-35 or 135. If you are upgrading Kubernetes versions, you must have a new OS image with your target Kubernetes version components.
- If you are running EKS Anywhere in an airgapped environment, you must download the new artifacts and images prior to initiating the upgrade. Reference the Airgapped Upgrades page
page for more information.
Upgrade Version Skew
There are a few dimensions of versioning to consider in your EKS Anywhere deployments:
- Management clusters to workload clusters: Management clusters can be at most 1 EKS Anywhere minor version greater than the EKS Anywhere version of workload clusters. Workload clusters cannot have an EKS Anywhere version greater than management clusters.
- Management components to cluster components: Management components can be at most 1 EKS Anywhere minor version greater than the EKS Anywhere version of cluster components.
- EKS Anywhere version upgrades: Skipping EKS Anywhere minor versions during upgrade is not supported (
v0.23.x to v0.25.x). We recommend you upgrade one EKS Anywhere minor version at a time (v0.23.x to v0.24.x to v0.25.x).
- Kubernetes version upgrades: Skipping Kubernetes minor versions during upgrade is not supported (
v1.33.x to v1.35.x). You must upgrade one Kubernetes minor version at a time (v1.33.x to v1.34.x to v1.35.x).
- Kubernetes control plane and worker nodes: As of Kubernetes v1.28, worker nodes can be up to 3 minor versions lower than the Kubernetes control plane minor version. In earlier Kubernetes versions, worker nodes could be up to 2 minor versions lower than the Kubernetes control plane minor version.
Prerequisites
EKS Anywhere upgrades on Bare Metal require at least one spare hardware server for control plane upgrade and one for each worker node group upgrade. During upgrade, the spare hardware server is provisioned with the new version and then an old server is deprovisioned. The deprovisioned server is then reprovisioned with
the new version while another old server is deprovisioned. This happens one at a time until all the control plane components have been upgraded, followed by
worker node upgrades.
Check upgrade components
Before you perform an upgrade, check the current and new versions of components that are ready to upgrade by typing:
eksctl anywhere upgrade plan cluster -f cluster.yaml
The output should appear similar to the following:
Checking new release availability...
NAME CURRENT VERSION NEXT VERSION
EKS-A Management v0.19.0-dev+build.20+a0037f0 v0.19.0-dev+build.26+3bc5008
cert-manager v1.13.2+129095a v1.13.2+bb56494
cluster-api v1.6.1+5efe087 v1.6.1+9cf3436
kubeadm v1.6.1+8ceb315 v1.6.1+82f1c0a
tinkerbell v0.4.0+cdde180 v0.4.0+e848206
kubeadm v1.6.1+6420e1c v1.6.1+2f0b35f
etcdadm-bootstrap v1.0.10+7094b99 v1.0.10+a3f0355
etcdadm-controller v1.0.17+0259550 v1.0.17+ba86997
To format the output in json, add -o json to the end of the command line.
Check hardware availability
Next, you must ensure you have enough available hardware for the rolling upgrade operation to function. This type of upgrade requires you to have one spare hardware server for control plane upgrade and one for each worker node group upgrade. Check prerequisites
for more information.
Available hardware could have been fed to the cluster as extra hardware during a prior create command, or could be fed to the cluster during the upgrade process by providing the hardware CSV file to the upgrade cluster command
.
To check if you have enough available hardware for rolling upgrade, you can use the kubectl command below to check if there are hardware objects with the selector labels corresponding to the controlplane/worker node group and without the ownerName label.
kubectl get hardware -n eksa-system --show-labels
For example, if you want to perform upgrade on a cluster with one worker node group with selector label type=worker-group-1, then you must have an additional hardware object in your cluster with the label type=controlplane (for control plane upgrade) and one with type=worker-group-1 (for worker node group upgrade) that doesn’t have the ownerName label.
In the command shown below, eksa-worker2 matches the selector label and it doesn’t have the ownerName label. Thus, it can be used to perform rolling upgrade of worker-group-1. Similarly, eksa-controlplane-spare will be used for rolling upgrade of control plane.
kubectl get hardware -n eksa-system --show-labels
NAME STATE LABELS
eksa-controlplane type=controlplane,v1alpha1.tinkerbell.org/ownerName=abhnvp-control-plane-template-1656427179688-9rm5f,v1alpha1.tinkerbell.org/ownerNamespace=eksa-system
eksa-controlplane-spare type=controlplane
eksa-worker1 type=worker-group-1,v1alpha1.tinkerbell.org/ownerName=abhnvp-md-0-1656427179689-9fqnx,v1alpha1.tinkerbell.org/ownerNamespace=eksa-system
eksa-worker2 type=worker-group-1
If you don’t have any available hardware that match this requirement in the cluster, you can setup a new hardware CSV
. You can feed this hardware inventory file during the upgrade cluster command
.
Skip BMC connectivity checks for faulty machines
EKS Anywhere validates that all BMC machines are contactable before performing cluster upgrades. If you have faulty BMC machines with connectivity issues or hardware faults, you can skip validation for those specific machines so they don’t block your cluster upgrade.
To skip BMC validation for a machine:
kubectl label machine.bmc.tinkerbell.org <machine-name> \
-n eksa-system \
bmc.tinkerbell.org/skip-contact-check=true
After you have repaired or replaced the faulty hardware and verified that BMC connectivity is restored, remove the skip label to re-enable normal BMC validation for future upgrades:
kubectl label machine.bmc.tinkerbell.org <machine-name> \
-n eksa-system \
bmc.tinkerbell.org/skip-contact-check-
NOTE: The skip label should only be used temporarily during upgrades when a machine has known issues. Once the machine is healthy, remove the label to ensure proper BMC validation in subsequent operations.
To perform a cluster upgrade you can modify your cluster specification kubernetesVersion field to the desired version.
As an example, to upgrade a cluster with version 1.34 to 1.35 you would change your spec as follows:
apiVersion: anywhere.eks.amazonaws.com/v1alpha1
kind: Cluster
metadata:
name: dev
spec:
controlPlaneConfiguration:
count: 1
endpoint:
host: "198.18.99.49"
machineGroupRef:
kind: TinkerbellMachineConfig
name: dev
...
kubernetesVersion: "1.35"
...
NOTE: If you have a custom machine image for your nodes in your cluster config yaml or to upgrade a node or group of nodes to a new operating system version (ie. RHEL 8.7 to RHEL 8.8), you may also need to update your TinkerbellDatacenterConfig
or TinkerbellMachineConfig
with the new operating system image URL osImageURL
.
and then you will run the upgrade cluster command
.
Upgrade cluster command
-
kubectl CLI: The cluster lifecycle feature lets you use kubectl to talk to the Kubernetes API to upgrade a workload cluster. kubectl can also be used for management cluster upgrades (Kubernetes version, scaling, configuration changes), except when upgrading the EKS Anywhere CLI version which requires eksctl anywhere upgrade. To use kubectl, run:
kubectl apply -f eksa-w01-cluster.yaml
--kubeconfig mgmt/mgmt-eks-a-cluster.kubeconfig
To check the state of a cluster managed with the cluster lifecyle feature, use kubectl to show the cluster object with its status.
The status field on the cluster object field holds information about the current state of the cluster.
kubectl get clusters w01 -o yaml
The cluster has been fully upgraded once the status of the Ready condition is marked True.
See the cluster status
guide for more information.
-
GitOps: See Manage separate workload clusters with GitOps
-
Terraform: See Manage separate workload clusters with Terraform
NOTE:For kubectl, GitOps and Terraform:
-
The baremetal controller does not support scaling upgrades and Kubernetes version upgrades in the same request.
-
While scaling a workload cluster if you need to add additional machines, run:
eksctl anywhere generate hardware -z updated-hardware.csv > updated-hardware.yaml
kubectl apply -f updated-hardware.yaml
-
If you want to upgrade multiple workload clusters, make sure that the spare hardware that is available for new nodes to rollout has labels unique to the workload cluster you are trying to upgrade. For instance, for an EKSA cluster named eksa-workload1, the hardware that is assigned for this cluster should have labels that are only going to be used for this cluster like type=eksa-workload1-cp and type=eksa-workload1-worker. Another workload cluster named eksa-workload2 can have labels like type=eksa-workload2-cp and type=eksa-workload2-worker. Please note that even though labels can be arbitrary, they need to be unique for each workload cluster. Not specifying unique cluster labels can cause cluster upgrades to behave in unexpected ways which may lead to unsuccessful upgrades and unstable clusters.
-
eksctl CLI: To upgrade a workload cluster with eksctl, run:
eksctl anywhere upgrade cluster -f cluster.yaml
# --hardware-csv <hardware.csv> \ # uncomment to add more hardware
--kubeconfig mgmt/mgmt-eks-a-cluster.kubeconfig
As noted earlier, adding the --kubeconfig option tells eksctl to use the management cluster identified by that kubeconfig file to create a different workload cluster.
This will upgrade the cluster specification (if specified), upgrade the core components to the latest available versions and apply the changes using the provisioner controllers.
Output
Example output:
✅ control plane ready
✅ worker nodes ready
✅ nodes ready
✅ cluster CRDs ready
✅ cluster object present on workload cluster
✅ upgrade cluster kubernetes version increment
✅ validate immutable fields
🎉 all cluster upgrade preflight validations passed
Performing provider setup and validations
Ensuring etcd CAPI providers exist on management cluster before upgrade
Pausing GitOps cluster resources reconcile
Upgrading core components
Backing up management cluster's resources before upgrading
Upgrading management cluster
Updating Git Repo with new EKS-A cluster spec
Forcing reconcile Git repo with latest commit
Resuming GitOps cluster resources kustomization
Writing cluster config file
🎉 Cluster upgraded!
Cleaning up backup resources
Starting in EKS Anywhere v0.18.0, when upgrading management cluster the CLI depends on the EKS Anywhere Controller to perform the upgrade. In the event an issue occurs and the CLI times out, it may be possible to fix the issue and have the upgrade complete as the EKS Anywhere Controller will continually attempt to complete the upgrade.
During the workload cluster upgrade process, EKS Anywhere pauses the cluster controller reconciliation by adding the paused annotation anywhere.eks.amazonaws.com/paused: true to the EKS Anywhere cluster, provider datacenterconfig and machineconfig resources, before the components upgrade. After upgrade completes, the annotations are removed so that the cluster controller resumes reconciling the cluster. If the CLI execution is interrupted or times out, the controller won’t reconcile changes to the EKS-A objects until these annotations are removed. You can re-run the CLI to restart the upgrade process or remove the annotations manually with kubectl.
Though not recommended, you can manually pause the EKS Anywhere cluster controller reconciliation to perform extended maintenance work or interact with Cluster API objects directly. To do it, you can add the paused annotation to the cluster resource:
kubectl annotate clusters.anywhere.eks.amazonaws.com ${CLUSTER_NAME} -n ${CLUSTER_NAMESPACE} anywhere.eks.amazonaws.com/paused=true
After finishing the task, make sure you resume the cluster reconciliation by removing the paused annotation, so that EKS Anywhere cluster controller can continue working as expected.
kubectl annotate clusters.anywhere.eks.amazonaws.com ${CLUSTER_NAME} -n ${CLUSTER_NAMESPACE} anywhere.eks.amazonaws.com/paused-
NOTE: During management cluster upgrades, the CLI temporarily pauses all workload cluster CAPI resources (clusters.cluster.x-k8s.io) and resumes them after the upgrade completes. If you have manually paused workload clusters, the management cluster upgrade will unpause the CAPI cluster resource even though the EKS Anywhere cluster annotation (anywhere.eks.amazonaws.com/paused) remains unchanged. After the management cluster upgrade completes, re-pause any workload clusters that need to remain paused:
kubectl patch clusters.cluster.x-k8s.io ${CLUSTER_NAME} -n eksa-system \
--type merge -p '{"spec":{"paused": true}}' --kubeconfig ${MGMT_KUBECONFIG}
Upgradeable cluster attributes
Cluster:
kubernetesVersioncontrolPlaneConfiguration.countcontrolPlaneConfiguration.upgradeRolloutStrategy.rollingUpdate.maxSurgeworkerNodeGroupConfigurations.countworkerNodeGroupConfigurations.kubernetesVersion (in case of modular upgrade)workerNodeGroupConfigurations.upgradeRolloutStrategy.rollingUpdate.maxSurgeworkerNodeGroupConfigurations.upgradeRolloutStrategy.rollingUpdate.maxUnavailable
TinkerbellDatacenterConfig:
Advanced configuration for upgrade rollout strategy
EKS Anywhere allows an optional configuration to customize the behavior of upgrades.
upgradeRolloutStrategy can be configured separately for control plane and for each worker node group.
This template contains an example for control plane under the controlPlaneConfiguration section and for worker node group under workerNodeGroupConfigurations:
apiVersion: anywhere.eks.amazonaws.com/v1alpha1
kind: Cluster
metadata:
name: my-cluster-name
spec:
clusterNetwork:
cniConfig:
cilium: {}
pods:
cidrBlocks:
- 192.168.0.0/16
services:
cidrBlocks:
- 10.96.0.0/12
controlPlaneConfiguration:
count: 1
endpoint:
host: "10.61.248.209"
machineGroupRef:
kind: TinkerbellMachineConfig
name: my-cluster-name-cp
upgradeRolloutStrategy:
type: RollingUpdate
rollingUpdate:
maxSurge: 1
datacenterRef:
kind: TinkerbellDatacenterConfig
name: my-cluster-name
kubernetesVersion: "1.35"
managementCluster:
name: my-cluster-name
workerNodeGroupConfigurations:
- count: 2
machineGroupRef:
kind: TinkerbellMachineConfig
name: my-cluster-name
name: md-0
upgradeRolloutStrategy:
type: RollingUpdate
rollingUpdate:
maxSurge: 1
maxUnavailable: 0
---
...
upgradeRolloutStrategy
Configuration parameters for upgrade strategy.
upgradeRolloutStrategy.type
Default: RollingUpdate
Type of rollout strategy. Supported values: RollingUpdate,InPlace.
NOTE: The upgrade rollout strategy type must be the same for all control plane and worker nodes.
upgradeRolloutStrategy.rollingUpdate
Configuration parameters for customizing rolling upgrade behavior.
NOTE: The rolling update parameters can only be configured if upgradeRolloutStrategy.type is RollingUpdate.
upgradeRolloutStrategy.rollingUpdate.maxSurge
Default: 1
This can not be 0 if maxUnavailable is 0.
The maximum number of machines that can be scheduled above the desired number of machines.
Example: When this is set to n, the new worker node group can be scaled up immediately by n when the rolling upgrade starts. Total number of machines in the cluster (old + new) never exceeds (desired number of machines + n). Once scale down happens and old machines are brought down, the new worker node group can be scaled up further ensuring that the total number of machines running at any time does not exceed the desired number of machines + n.
upgradeRolloutStrategy.rollingUpdate.maxUnavailable
Default: 0
This can not be 0 if MaxSurge is 0.
The maximum number of machines that can be unavailable during the upgrade.
This can only be configured for worker nodes.
Example: When this is set to n, the old worker node group can be scaled down by n machines immediately when the rolling upgrade starts. Once new machines are ready, old worker node group can be scaled down further, followed by scaling up the new worker node group, ensuring that the total number of machines unavailable at all times during the upgrade never falls below n.
Rolling Upgrades
The RollingUpdate rollout strategy type allows the specification of two parameters that control the desired behavior of rolling upgrades:
maxSurge - The maximum number of machines that can be scheduled above the desired number of machines. When not specified, the current CAPI default of 1 is used.maxUnavailable - The maximum number of machines that can be unavailable during the upgrade. When not specified, the current CAPI default of 0 is used.
Example configuration:
upgradeRolloutStrategy:
type: RollingUpdate
rollingUpdate:
maxSurge: 1
maxUnavailable: 0 # only configurable for worker nodes
Rolling upgrades with no additional hardware
When maxSurge is set to 0 and maxUnavailable is set to 1, it allows for a rolling upgrade without need for additional hardware. Use this configuration if your workloads can tolerate node unavailability.
NOTE: This could ONLY be used if unavailability of a maximum of 1 node is acceptable. For single node clusters, an additional temporary machine is a must. Alternatively, you may recreate the single node cluster for upgrading and handle data recovery manually.
With this kind of configuration, the rolling upgrade will proceed node by node, deprovision and delete a node fully before re-provisioning it with upgraded version, and re-join it to the cluster. This means that any point during the course of the rolling upgrade, there could be one unavailable node.
In-Place Upgrades
As of EKS Anywhere version v0.19.0, the InPlace rollout strategy type can be used to upgrade the EKS Anywhere and Kubernetes versions by upgrading the components on the same physical machines without requiring additional server capacity.
EKS Anywhere schedules a privileged pod that executes the upgrade logic as a sequence of init containers on each node to be upgraded.
This upgrade logic includes updating the containerd, cri-tools, kubeadm, kubectl and kubelet binaries along with core Kubernetes components and restarting those services.
Due to the nature of this upgrade, temporary downtime of workloads can be expected.
It is best practice to configure your clusters in a way that they are resilient to having one node down.
During in place upgrades, EKS Anywhere pauses machine health checks to ensure that new nodes are not rolled out while the node is temporarily down during the upgrade process.
Moreover, autoscaler configuration is not supported when using InPlace upgrade rollout strategy to further ensure that no new nodes are rolled out unexpectedly.
Example configuration:
upgradeRolloutStrategy:
type: InPlace
Troubleshooting
Attempting to upgrade a cluster with more than 1 minor release will result in receiving the following error.
✅ validate immutable fields
❌ validation failed {"validation": "Upgrade preflight validations", "error": "validation failed with 1 errors: WARNING: version difference between upgrade version (1.21) and server version (1.19) do not meet the supported version increment of +1", "remediation": ""}
Error: failed to upgrade cluster: validations failed
For more errors you can see the troubleshooting section
.
6.2.3 - Upgrade vSphere, CloudStack, Nutanix, or Snow cluster
How to perform vSphere, CloudStack, Nutanix, or Snow cluster upgrades
Considerations
- Upgrades should never be run from ephemeral nodes (short-lived systems that spin up and down on a regular basis). If the EKS Anywhere version is lower than
v0.18.0 and upgrade fails, you must not delete the KinD bootstrap cluster Docker container. During an upgrade, the bootstrap cluster contains critical EKS Anywhere components. If it is deleted after a failed upgrade, they cannot be recovered.
- It is highly recommended to run the
eksctl anywhere upgrade cluster command with the --no-timeouts option when the command is executed through automation. This prevents the CLI from timing out and enables cluster operators to fix issues preventing the upgrade from completing while the process is running.
- In EKS Anywhere version
v0.13.0, we introduced the EKS Anywhere cluster lifecycle controller that runs on management clusters and manages workload clusters. The EKS Anywhere lifecycle controller enables you to use Kubernetes API-compatible clients such as kubectl, GitOps, or Terraform for managing workload clusters. In this EKS Anywhere version, the EKS Anywhere cluster lifecycle controller rolls out new nodes in workload clusters when management clusters are upgraded. In EKS Anywhere version v0.16.0, this behavior was changed such that management clusters can be upgraded separately from workload clusters.
- When running workload cluster upgrades after upgrading a management cluster, a machine rollout may be triggered on workload clusters during the workload cluster upgrade, even if the changes to the workload cluster spec didn’t require one (for example scaling down a worker node group).
- Starting with EKS Anywhere
v0.18.0, the image/template must include the Kubernetes minor version (Cluster.Spec.KubernetesVersion or Cluster.Spec.WorkerNodeGroupConfiguration[].KubernetesVersion in the cluster spec). For example, if the Kubernetes version is 1.24, the image/template must include 1.24, 1_24, 1-24 or 124. If you are upgrading Kubernetes versions, you must have a new image with your target Kubernetes version components.
- If you are running EKS Anywhere on Snow, a new Admin instance is needed when upgrading to new versions of EKS Anywhere. See Upgrade EKS Anywhere AMIs in Snowball Edge devices
to upgrade and use a new Admin instance in Snow devices.
- If you are running EKS Anywhere in an airgapped environment, you must download the new artifacts and images prior to initiating the upgrade. Reference the Airgapped Upgrades page
page for more information.
Upgrade Version Skew
There are a few dimensions of versioning to consider in your EKS Anywhere deployments:
- Management clusters to workload clusters: Management clusters can be at most 1 EKS Anywhere minor version greater than the EKS Anywhere version of workload clusters. Workload clusters cannot have an EKS Anywhere version greater than management clusters.
- Management components to cluster components: Management components can be at most 1 EKS Anywhere minor version greater than the EKS Anywhere version of cluster components.
- EKS Anywhere version upgrades: Skipping EKS Anywhere minor versions during upgrade is not supported (
v0.23.x to v0.25.x). We recommend you upgrade one EKS Anywhere minor version at a time (v0.23.x to v0.24.x to v0.25.x).
- Kubernetes version upgrades: Skipping Kubernetes minor versions during upgrade is not supported (
v1.33.x to v1.35.x). You must upgrade one Kubernetes minor version at a time (v1.33.x to v1.34.x to v1.35.x).
- Kubernetes control plane and worker nodes: As of Kubernetes v1.28, worker nodes can be up to 3 minor versions lower than the Kubernetes control plane minor version. In earlier Kubernetes versions, worker nodes could be up to 2 minor versions lower than the Kubernetes control plane minor version.
Prepare DHCP IP addresses pool
Please make sure to have sufficient available IP addresses in your DHCP pool to cover the new machines. The number of necessary IPs can be calculated from the machine counts and maxSurge config
. For create operation, each machine needs 1 IP. For upgrade operation, control plane and workers need just 1 extra IP (total, not per node) due to rolling upgrade strategy. Each external etcd machine needs 1 extra IP address (ex: 3 etcd nodes would require 3 more IP addresses) because EKS Anywhere needs to create all the new etcd machines before removing any old ones. You will also need additional IPs to be equal to the number used for maxSurge. After calculating the required IPs, please make sure your environment has enough available IPs before performing the upgrade operation.
- Example 1, to create a cluster with 3 control plane node, 2 worker nodes and 3 stacked etcd, you will need at least 5 (3+2+0, as stacked etcd is deployed as part of the control plane nodes) available IPs. To upgrade the same cluster with default maxSurge (0), you will need 1 (1+0+0) additional available IPs.
- Example 2, to create a cluster with 1 control plane node, 2 worker nodes and 3 unstacked (external) etcd nodes, you will need at least 6 (1+2+3) available IPs. To upgrade the same cluster with default maxSurge (0), you will need at least 4 (1+3+0) additional available IPs.
- Example 3, to upgrade a cluster with 1 control plane node, 2 worker nodes and 3 unstacked (external) etcd nodes, with maxSurge set to 2, you will need at least 6 (1+3+2) additional available IPs.
Check upgrade components
Before you perform an upgrade, check the current and new versions of components that are ready to upgrade by typing:
Management Cluster
eksctl anywhere upgrade plan cluster -f mgmt-cluster.yaml
Workload Cluster
eksctl anywhere upgrade plan cluster -f workload-cluster.yaml --kubeconfig mgmt/mgmt-eks-a-cluster.kubeconfig
The output should appear similar to the following:
Checking new release availability...
NAME CURRENT VERSION NEXT VERSION
EKS-A Management v0.19.0-dev+build.170+6a04c21 v0.19.0-dev+build.225+c137128
cert-manager v1.13.2+a34c207 v1.14.2+c0da11a
cluster-api v1.6.1+9bf197f v1.6.2+f120729
kubeadm v1.6.1+2c7274d v1.6.2+8091cf6
vsphere v1.8.5+205ebc5 v1.8.5+65d2d66
kubeadm v1.6.1+46e4754 v1.6.2+44d7c68
etcdadm-bootstrap v1.0.10+43a3235 v1.0.10+e5e6ac4
etcdadm-controller v1.0.17+fc882de v1.0.17+3d9ebdc
To the format output in json, add -o json to the end of the command line.
To perform a cluster upgrade you can modify your cluster specification kubernetesVersion field to the desired version.
As an example, to upgrade a cluster with version 1.34 to 1.35 you would change your spec
apiVersion: anywhere.eks.amazonaws.com/v1alpha1
kind: Cluster
metadata:
name: dev
spec:
controlPlaneConfiguration:
count: 1
endpoint:
host: "198.18.99.49"
machineGroupRef:
kind: VSphereMachineConfig
name: dev
...
kubernetesVersion: "1.35"
...
NOTE: If you have a custom machine image for your nodes you may also need to update your vsphereMachineConfig with a new template. Refer to vSphere Artifacts
to build a new OVA template.
and then you will run the upgrade cluster command
.
Upgrade cluster command
-
kubectl CLI: The cluster lifecycle feature lets you use kubectl to talk to the Kubernetes API to upgrade an EKS Anywhere cluster. For example, to use kubectl to upgrade a management or workload cluster, you can run:
# Upgrade a management cluster with cluster name "mgmt"
kubectl apply -f mgmt-cluster.yaml --kubeconfig mgmt/mgmt-eks-a-cluster.kubeconfig
# Upgrade a workload cluster with cluster name "eksa-w01"
kubectl apply -f eksa-w01-cluster.yaml --kubeconfig mgmt/mgmt-eks-a-cluster.kubeconfig
To check the state of a cluster managed with the cluster lifecyle feature, use kubectl to show the cluster object with its status.
The status field on the cluster object field holds information about the current state of the cluster.
kubectl get clusters w01 -o yaml
The cluster has been fully upgraded once the status of the Ready condition is marked True.
See the cluster status
guide for more information.
-
GitOps: See Manage separate workload clusters with GitOps
-
Terraform: See Manage separate workload clusters with Terraform
Important
For kubectl, GitOps and Terraform
If you want to update the registry mirror
credential with kubectl, GitOps or Terraform, you need to update the registry-credentials secret in the eksa-system namespace of your management cluster. For example with kubectl, you can run:
kubectl edit secret -n eksa-system registry-credentials --kubeconfig mgmt/mgmt-eks-a-cluster.kubeconfig
Replace username and password fields with the base64-encoded values of your new username and password. You can encode the values using the echo command, for example:
echo -n 'newusername' | base64
echo -n 'newpassword' | base64
-
eksctl CLI: To upgrade an EKS Anywhere cluster with eksctl, run:
# Upgrade a management cluster with cluster name "mgmt"
eksctl anywhere upgrade cluster -f mgmt-cluster.yaml
# Upgrade a workload cluster with cluster name "eksa-w01"
eksctl anywhere upgrade cluster -f eksa-w01-cluster.yaml --kubeconfig mgmt/mgmt-eks-a-cluster.kubeconfig
As noted earlier, adding the --kubeconfig option tells eksctl to use the management cluster identified by that kubeconfig file to upgrade a different workload cluster.
This will upgrade the cluster specification (if specified), upgrade the core components to the latest available versions and apply the changes using the provisioner controllers.
Output
Example output:
✅ control plane ready
✅ worker nodes ready
✅ nodes ready
✅ cluster CRDs ready
✅ cluster object present on workload cluster
✅ upgrade cluster kubernetes version increment
✅ validate immutable fields
🎉 all cluster upgrade preflight validations passed
Performing provider setup and validations
Ensuring etcd CAPI providers exist on management cluster before upgrade
Pausing GitOps cluster resources reconcile
Upgrading core components
Backing up management cluster's resources before upgrading
Upgrading management cluster
Updating Git Repo with new EKS-A cluster spec
Forcing reconcile Git repo with latest commit
Resuming GitOps cluster resources kustomization
Writing cluster config file
🎉 Cluster upgraded!
Cleaning up backup resources
Starting in EKS Anywhere v0.18.0, when upgrading management cluster the CLI depends on the EKS Anywhere Controller to perform the upgrade. In the event an issue occurs and the CLI times out, it may be possible to fix the issue and have the upgrade complete as the EKS Anywhere Controller will continually attempt to complete the upgrade.
During the workload cluster upgrade process, EKS Anywhere pauses the cluster controller reconciliation by adding the paused annotation anywhere.eks.amazonaws.com/paused: true to the EKS Anywhere cluster, provider datacenterconfig and machineconfig resources, before the components upgrade. After upgrade completes, the annotations are removed so that the cluster controller resumes reconciling the cluster. If the CLI execution is interrupted or times out, the controller won’t reconcile changes to the EKS-A objects until these annotations are removed. You can re-run the CLI to restart the upgrade process or remove the annotations manually with kubectl.
Though not recommended, you can manually pause the EKS Anywhere cluster controller reconciliation to perform extended maintenance work or interact with Cluster API objects directly. To do it, you can add the paused annotation to the cluster resource:
kubectl annotate clusters.anywhere.eks.amazonaws.com ${CLUSTER_NAME} -n ${CLUSTER_NAMESPACE} anywhere.eks.amazonaws.com/paused=true
After finishing the task, make sure you resume the cluster reconciliation by removing the paused annotation, so that EKS Anywhere cluster controller can continue working as expected.
kubectl annotate clusters.anywhere.eks.amazonaws.com ${CLUSTER_NAME} -n ${CLUSTER_NAMESPACE} anywhere.eks.amazonaws.com/paused-
NOTE: During management cluster upgrades, the CLI temporarily pauses all workload cluster CAPI resources (clusters.cluster.x-k8s.io) and resumes them after the upgrade completes. If you have manually paused workload clusters, the management cluster upgrade will unpause the CAPI cluster resource even though the EKS Anywhere cluster annotation (anywhere.eks.amazonaws.com/paused) remains unchanged. After the management cluster upgrade completes, re-pause any workload clusters that need to remain paused:
kubectl patch clusters.cluster.x-k8s.io ${CLUSTER_NAME} -n eksa-system \
--type merge -p '{"spec":{"paused": true}}' --kubeconfig ${MGMT_KUBECONFIG}
NOTE (vSphere only): If you are upgrading a vSphere cluster created using EKS Anywhere version prior to v0.16.0 that has the vSphere CSI Driver installed in it, please refer to the additional steps listed here
before attempting an upgrade.
Upgradeable Cluster Attributes
EKS Anywhere upgrade supports upgrading more than just the kubernetesVersion,
allowing you to upgrade a number of fields simultaneously with the same procedure.
Upgradeable Attributes
Cluster:
kubernetesVersioncontrolPlaneConfiguration.countcontrolPlaneConfiguration.machineGroupRef.namecontrolPlaneConfiguration.upgradeRolloutStrategy.rollingUpdate.maxSurgeworkerNodeGroupConfigurations.countworkerNodeGroupConfigurations.machineGroupRef.nameworkerNodeGroupConfigurations.kubernetesVersion (in case of modular upgrade)workerNodeGroupConfigurations.upgradeRolloutStrategy.rollingUpdate.maxSurgeworkerNodeGroupConfigurations.upgradeRolloutStrategy.rollingUpdate.maxUnavailableexternalEtcdConfiguration.machineGroupRef.nameidentityProviderRefs (Only for kind:OIDCConfig, kind:AWSIamConfig is immutable)gitOpsRef (Once set, you can’t change or delete the field’s content later)registryMirrorConfiguration (for non-authenticated registry mirror)
endpointportcaCertContentinsecureSkipVerify
VSphereMachineConfig:
datastorediskGiBfoldermemoryMiBnumCPUsresourcePooltemplateusers
NutanixMachineConfig:
vcpusPerSocketvcpuSocketsmemorySizeimageclustersubnetsystemDiskSize
SnowMachineConfig:
amiIDinstanceTypephysicalNetworkConnectorsshKeyNamedevicescontainersVolumeosFamilynetwork
CloudStackDatacenterConfig:
availabilityZones (Can add and remove availability zones provided at least 1 previously configured zone is still present)
CloudStackMachineConfig:
templatecomputeOfferingdiskOfferinguserCustomDetailssymlinksusers
OIDCConfig:
clientIDgroupsClaimgroupsPrefixissuerUrlrequiredClaims.claimrequiredClaims.valueusernameClaimusernamePrefix
AWSIamConfig:
EKS Anywhere upgrade also supports adding more worker node groups post-creation.
To add more worker node groups, modify your cluster config file to define the additional group(s).
Example:
apiVersion: anywhere.eks.amazonaws.com/v1alpha1
kind: Cluster
metadata:
name: dev
spec:
controlPlaneConfiguration:
...
workerNodeGroupConfigurations:
- count: 2
machineGroupRef:
kind: VSphereMachineConfig
name: my-cluster-machines
name: md-0
- count: 2
machineGroupRef:
kind: VSphereMachineConfig
name: my-cluster-machines
name: md-1
...
Worker node groups can use the same machineGroupRef as previous groups, or you can define a new machine configuration for your new group.
Advanced configuration for rolling upgrade
EKS Anywhere allows an optional configuration to customize the behavior of upgrades.
It allows the specification of
Two parameters that control the desired behavior of rolling upgrades:
- maxSurge - The maximum number of machines that can be scheduled above the desired number of machines. When not specified, the current CAPI default of 1 is used.
- maxUnavailable - The maximum number of machines that can be unavailable during the upgrade. When not specified, the current CAPI default of 0 is used.
Example configuration:
upgradeRolloutStrategy:
type: RollingUpdate
rollingUpdate:
maxSurge: 1
maxUnavailable: 0 # only configurable for worker nodes
‘upgradeRolloutStrategy’ configuration can be specified separately for control plane and for each worker node group. This template contains an example for control plane under the ‘controlPlaneConfiguration’ section and for worker node group under ‘workerNodeGroupConfigurations’:
apiVersion: anywhere.eks.amazonaws.com/v1alpha1
kind: Cluster
metadata:
name: my-cluster-name
spec:
controlPlaneConfiguration:
count: 1
endpoint:
host: "xx.xx.xx.xx"
machineGroupRef:
kind: VSphereMachineConfig
name: my-cluster-name-cp
upgradeRolloutStrategy:
type: RollingUpdate
rollingUpdate:
maxSurge: 1
workerNodeGroupConfigurations:
- count: 2
machineGroupRef:
kind: VSphereMachineConfig
name: my-cluster-name
name: md-0
upgradeRolloutStrategy:
type: RollingUpdate
rollingUpdate:
maxSurge: 1
maxUnavailable: 0
---
...
upgradeRolloutStrategy
Configuration parameters for upgrade strategy.
upgradeRolloutStrategy.type
Type of rollout strategy. Currently only RollingUpdate is supported.
upgradeRolloutStrategy.rollingUpdate
Configuration parameters for customizing rolling upgrade behavior.
upgradeRolloutStrategy.rollingUpdate.maxSurge
Default: 1
This can not be 0 if maxUnavailable is 0.
The maximum number of machines that can be scheduled above the desired number of machines.
Example: When this is set to n, the new worker node group can be scaled up immediately by n when the rolling upgrade starts. Total number of machines in the cluster (old + new) never exceeds (desired number of machines + n). Once scale down happens and old machines are brought down, the new worker node group can be scaled up further ensuring that the total number of machines running at any time does not exceed the desired number of machines + n.
upgradeRolloutStrategy.rollingUpdate.maxUnavailable
Default: 0
This can not be 0 if MaxSurge is 0.
The maximum number of machines that can be unavailable during the upgrade.
Example: When this is set to n, the old worker node group can be scaled down by n machines immediately when the rolling upgrade starts. Once new machines are ready, old worker node group can be scaled down further, followed by scaling up the new worker node group, ensuring that the total number of machines unavailable at all times during the upgrade never falls below n.
Resume upgrade after failure
EKS Anywhere supports re-running the upgrade command post-failure as an experimental feature.
If the upgrade command fails, the user can manually fix the issue (when applicable) and simply rerun the same command. At this point, the CLI will skip the completed tasks, restore the state of the operation, and resume the upgrade process.
The completed tasks are stored in the generated folder as a file named <clusterName>-checkpoint.yaml.
This feature is experimental. To enable this feature, export the following environment variable:
export CHECKPOINT_ENABLED=true
Troubleshooting
Attempting to upgrade a cluster with more than 1 minor release will result in receiving the following error.
✅ validate immutable fields
❌ validation failed {"validation": "Upgrade preflight validations", "error": "validation failed with 1 errors: WARNING: version difference between upgrade version (1.21) and server version (1.19) do not meet the supported version increment of +1", "remediation": ""}
Error: failed to upgrade cluster: validations failed
For troubleshooting other common upgrade issues, see the Troubleshooting
documentation.
Update vSphere credentials
To update the vSphere credentials used by EKS Anywhere, see the Update vSphere credentials
page.
6.2.4 - Upgrade airgapped cluster
Upgrading EKS Anywhere clusters in airgapped environments
The procedure to upgrade EKS Anywhere clusters in airgapped environments is similar to the procedure for creating new clusters in airgapped environments. The only difference is that you must upgrade your eksctl anywhere CLI before running the steps to download and import the EKS Anywhere dependencies to your local registry mirror.
Prerequisites
- An existing Admin machine
- The upgraded version of the
eksctl anywhere CLI installed on the Admin machine
- Docker running on the Admin machine
- At least 80GB in storage space on the Admin machine to temporarily store the EKS Anywhere images locally before importing them to your local registry. Currently, when downloading images, EKS Anywhere pulls all dependencies for all infrastructure providers and supported Kubernetes versions.
- The download and import images commands must be run on an amd64 machine to import amd64 images to the registry mirror.
Procedure
-
Download the EKS Anywhere artifacts that contain the list and locations of the EKS Anywhere dependencies. A compressed file eks-anywhere-downloads.tar.gz will be downloaded. You can use the eksctl anywhere download artifacts --dry-run command to see the list of artifacts it will download.
eksctl anywhere download artifacts
-
Decompress the eks-anywhere-downloads.tar.gz file using the following command. This will create an eks-anywhere-downloads folder.
tar -xvf eks-anywhere-downloads.tar.gz
-
Download the EKS Anywhere image dependencies to the Admin machine. This command may take several minutes (10+) to complete. To monitor the progress of the command, you can run with the -v 6 command line argument, which will show details of the images that are being pulled. Docker must be running for the following command to succeed.
eksctl anywhere download images -o images.tar
-
Set up a local registry mirror to host the downloaded EKS Anywhere images and configure your Admin machine with the certificates and authentication information if your registry requires it. For details, refer to the Registry Mirror Configuration documentation.
-
Import images to the local registry mirror using the following command. Set REGISTRY_MIRROR_URL to the url of the local registry mirror you created in the previous step. This command may take several minutes to complete. To monitor the progress of the command, you can run with the -v 6 command line argument. When using self-signed certificates for your registry, you should run with the --insecure command line argument to indicate skipping TLS verification while pushing helm charts and bundles.
export REGISTRY_MIRROR_URL=<registryurl>
eksctl anywhere import images -i images.tar -r ${REGISTRY_MIRROR_URL} \
--bundles ./eks-anywhere-downloads/bundle-release.yaml
-
Optionally import curated packages to your registry mirror. The curated packages images are copied from Amazon ECR to your local registry mirror in a single step, as opposed to separate download and import steps. Follow the Curated Packages documentation.
If the previous steps succeeded, all of the required EKS Anywhere dependencies are now present in your local registry. Before you upgrade your EKS Anywhere cluster, configure registryMirrorConfiguration in your EKS Anywhere cluster specification with the information for your local registry. For details see the Registry Mirror Configuration documentation.
NOTE: If you are running EKS Anywhere on bare metal, you must configure osImageURL and hookImagesURLPath in your EKS Anywhere cluster specification with the location of the upgraded node operating system image and hook OS image. For details, reference the bare metal configuration documentation.
Next Steps
6.2.5 - Upgrade management components
How to upgrade EKS Anywhere management components
Note
The eksctl anywhere upgrade management-components subcommand was added in EKS Anywhere version v0.19.0 for all providers. Management component upgrades can only be done through the eksctl CLI, not through the Kubernetes API.
What are management components?
Management components run on management or standalone clusters and are responsible for managing the lifecycle of workload clusters. Management components include but are not limited to:
- Cluster API controller
- EKS Anywhere cluster lifecycle controller
- Curated Packages controller
- Provider-specific controllers (vSphere, Tinkerbell etc.)
- Tinkerbell services (Boots, Hegel, Rufio, etc.)
- Custom Resource Definitions (CRDs) (clusters, eksareleases, etc.)
Why upgrade management components separately?
The existing eksctl anywhere upgrade cluster command, when run against management or standalone clusters, upgrades both the management and cluster components. When upgrading versions, this upgrade process performs a rolling replacement of nodes in the cluster, which brings operational complexity, and should be carefully planned and executed.
With the new eksctl anywhere upgrade management-components command, you can upgrade management components separately from cluster components. This enables you to get the latest updates to the management components such as Cluster API controller, EKS Anywhere controller, and provider-specific controllers without a rolling replacement of nodes in the cluster, which reduces the operational complexity of the operation.
Check management components versions
You can check the current and new versions of management components with the eksctl anywhere upgrade plan management-components command:
eksctl anywhere upgrade plan management-components -f management-cluster.yaml
The output should appear similar to the following:
NAME CURRENT VERSION NEXT VERSION
EKS-A Management v0.18.3+cc70180 v0.19.0+a672f31
cert-manager v1.13.0+68bec33 v1.13.2+a34c207
cluster-api v1.5.2+b14378d v1.6.0+04c07bc
kubeadm v1.5.2+5762149 v1.6.0+5bf0931
vsphere v1.7.4+6ecf386 v1.8.5+650acfa
etcdadm-bootstrap v1.0.10+c9a5a8a v1.0.10+1ceb898
etcdadm-controller v1.0.16+0ed68e6 v1.0.17+5e33062
Alternatively, you can run the eksctl anywhere upgrade plan cluster command against your management cluster, which shows the version differences for both management and cluster components.
Upgrade management components
To perform the management components upgrade, run the following command:
eksctl anywhere upgrade management-components -f management-cluster.yaml
The output should appear similar to the following:
Performing setup and validations
✅ Docker provider validation
✅ Control plane ready
✅ Cluster CRDs ready
Upgrading core components
Installing new eksa components
🎉 Management components upgraded!
At this point, a new eksarelease custom resource will be available in your management cluster, which means new cluster components that correspond to your current EKS Anywhere version are available for cluster upgrades. You can subsequently run a workload cluster upgrade with the eksctl anywhere upgrade cluster command, or by updating eksaVersion field in your workload cluster’s spec and applying it to your management cluster with Kubernetes API-compatible tooling such as kubectl, GitOps, or Terraform.
6.2.6 - Update vSphere credentials
How to update vSphere credentials used by EKS Anywhere
EKS Anywhere does not currently support updating the vSphere credentials used by EKS Anywhere when upgrading clusters with the eksctl anywhere upgrade command.
It is recommended to use the script maintained with EKS Anywhere to update your vSphere credentials, which automates the steps covered in the Update vSphere credentials manually
section.
Update vSphere credentials with script
You can update all vSphere credentials in related Secret objects used by EKS Anywhere with the vSphere credential update script
in EKS Anywhere GitHub repository. The following steps should be run from your admin machine or the local machine where you host the kubeconfig file for your EKS Anywhere management or standalone cluster.
- Set environment variables on your local machine
- Set the
KUBECONFIG environment variable on your local machine to the kubeconfig file for your EKS Anywhere management or standalone cluster. For example mgmt/mgmt-eks-a-cluster.kubeconfig.
- Set the
EKSA_VSPHERE_USERNAME and EKSA_VSPHERE_PASSWORD environment variables on your local machine with the new vSphere credentials.
export KUBECONFIG='<your-kubeconfig-file>'
export EKSA_VSPHERE_USERNAME='<your-vsphere-username>'
export EKSA_VSPHERE_PASSWORD='<your-vsphere-password>'
- Download the script to your local machine
curl -OL https://raw.githubusercontent.com/aws/eks-anywhere/refs/heads/main/scripts/update_vsphere_credential.sh
- Run the script from your local machine
- Replace
CLUSTER_NAME with the name of your EKS Anywhere cluster and VSPHERE_SERVER_NAME with the name of the vSphere server.
./update_vsphere_credential.sh CLUSTER_NAME VSPHERE_SERVER_NAME
NOTE: If you are using the vSphere CSI in your cluster, you must manually update the vSphere password in the {CLUSTER_NAME}-csi-vsphere-config Secret under the eksa-system namespace. If the annotation kubectl.kubernetes.io/last-applied-configuration exists on the secret object, update password in the kubectl.kubernetes.io/last-applied-configuration field.
Update vSphere credentials manually
Follow the steps below to manually update the vSphere credentials used by EKS Anywhere.
- Update
EKSA_VSPHERE_PASSWORD environment variable to the new password and get the base64 encoded string of the password using echo -n "<YOUR_PASSWORD>" | base64
- Update the following secrets in your vSphere cluster using
kubectl edit command:
{CLUSTER_NAME}-vsphere-credentials under eksa-system namespace - Update password field under data.{CLUSTER_NAME}-cloud-provider-vsphere-credentials under eksa-system namespace - Decode the string under data, in the decoded string (which is the template for Secret object cloud-provider-vsphere-credential under kube-system namespace), update the {CLUSTER_NAME}.password with the base64 encoding of new password, then encode the string and update data field with the encoded string.vsphere-credentials under eksa-system namespace - Update password, passwordCP, passwordCSI field under data.- If annotation
kubectl.kubernetes.io/last-applied-configuration exists on any of the above Secret object, update password in kubectl.kubernetes.io/last-applied-configuration field.
{CLUSTER_NAME}-csi-vsphere-config under eksa-system namespace - If annotation kubectl.kubernetes.io/last-applied-configuration exists on the secret object, update password in kubectl.kubernetes.io/last-applied-configuration field.
6.2.7 -
There are a few dimensions of versioning to consider in your EKS Anywhere deployments:
- Management clusters to workload clusters: Management clusters can be at most 1 EKS Anywhere minor version greater than the EKS Anywhere version of workload clusters. Workload clusters cannot have an EKS Anywhere version greater than management clusters.
- Management components to cluster components: Management components can be at most 1 EKS Anywhere minor version greater than the EKS Anywhere version of cluster components.
- EKS Anywhere version upgrades: Skipping EKS Anywhere minor versions during upgrade is not supported (
v0.23.x to v0.25.x). We recommend you upgrade one EKS Anywhere minor version at a time (v0.23.x to v0.24.x to v0.25.x).
- Kubernetes version upgrades: Skipping Kubernetes minor versions during upgrade is not supported (
v1.33.x to v1.35.x). You must upgrade one Kubernetes minor version at a time (v1.33.x to v1.34.x to v1.35.x).
- Kubernetes control plane and worker nodes: As of Kubernetes v1.28, worker nodes can be up to 3 minor versions lower than the Kubernetes control plane minor version. In earlier Kubernetes versions, worker nodes could be up to 2 minor versions lower than the Kubernetes control plane minor version.
6.3 - Scale cluster
How to scale your cluster
6.3.1 - Scale Bare Metal cluster
How to scale your Bare Metal cluster
When you are horizontally scaling your Bare Metal EKS Anywhere cluster, consider the number of nodes you need for your control plane and for your data plane.
See the Kubernetes Components
documentation to learn the differences between the control plane and the data plane (worker nodes).
Horizontally scaling the cluster is done by increasing the number for the control plane or worker node groups under the Cluster specification.
NOTE: If etcd is running on your control plane (the default configuration) you should scale your control plane in odd numbers (3, 5, 7…).
apiVersion: anywhere.eks.amazonaws.com/v1
kind: Cluster
metadata:
name: test-cluster
spec:
controlPlaneConfiguration:
count: 1 # increase this number to horizontally scale your control plane
...
workerNodeGroupConfigurations:
- count: 1 # increase this number to horizontally scale your data plane
Next, you must ensure you have enough available hardware for the scale-up operation to function. Available hardware could have been fed to the cluster as extra hardware during a prior create command, or could be fed to the cluster during the scale-up process by providing the hardware CSV file to the upgrade cluster command (explained in detail below).
For scale-down operation, you can skip directly to the upgrade cluster command
.
To check if you have enough available hardware for scale up, you can use the kubectl command below to check if there are hardware with the selector labels corresponding to the controlplane/worker node group and without the ownerName label.
kubectl get hardware -n eksa-system --show-labels
For example, if you want to scale a worker node group with selector label type=worker-group-1, then you must have an additional hardware object in your cluster with the label type=worker-group-1 that doesn’t have the ownerName label.
In the command shown below, eksa-worker2 matches the selector label and it doesn’t have the ownerName label. Thus, it can be used to scale up worker-group-1 by 1.
kubectl get hardware -n eksa-system --show-labels
NAME STATE LABELS
eksa-controlplane type=controlplane,v1alpha1.tinkerbell.org/ownerName=abhnvp-control-plane-template-1656427179688-9rm5f,v1alpha1.tinkerbell.org/ownerNamespace=eksa-system
eksa-worker1 type=worker-group-1,v1alpha1.tinkerbell.org/ownerName=abhnvp-md-0-1656427179689-9fqnx,v1alpha1.tinkerbell.org/ownerNamespace=eksa-system
eksa-worker2 type=worker-group-1
If you don’t have any available hardware that match this requirement in the cluster, you can setup a new hardware CSV
. You can feed this hardware inventory file during the upgrade cluster command
.
Upgrade Cluster Command for Scale Up/Down
-
eksctl CLI: To upgrade a workload cluster with eksctl, run:
eksctl anywhere upgrade cluster
-f cluster.yaml
# --hardware-csv <hardware.csv> \ # uncomment to add more hardware
--kubeconfig mgmt/mgmt-eks-a-cluster.kubeconfig
As noted earlier, adding the --kubeconfig option tells eksctl to use the management cluster identified by that kubeconfig file to create a different workload cluster.
-
kubectl CLI: The cluster lifecycle feature lets you use kubectl to talk to the Kubernetes API to scale a workload cluster. kubectl can also be used for management cluster scaling, except when upgrading the EKS Anywhere CLI version which requires eksctl anywhere upgrade. To use kubectl, run:
kubectl apply -f eksa-w01-cluster.yaml --kubeconfig mgmt/mgmt-eks-a-cluster.kubeconfig
To check the state of a cluster managed with the cluster lifecyle feature, use kubectl to show the cluster object with its status.
The status field on the cluster object field holds information about the current state of the cluster.
kubectl get clusters w01 -o yaml
The cluster has been fully upgraded once the status of the Ready condition is marked True.
See the cluster status
guide for more information.
-
GitOps: See Manage separate workload clusters with GitOps
-
Terraform: See Manage separate workload clusters with Terraform
NOTE:For kubectl, GitOps and Terraform:
Selective Server Removal During Scale Down
When scaling down your Bare Metal EKS Anywhere cluster, you may want to remove a specific server rather than letting the system automatically choose which node to remove. By default, Cluster API will remove nodes in a non-deterministic order during scale down operations.
IMPORTANT: Do not attempt to remove specific servers by deleting entries from the hardware CSV file and running the upgrade command. This approach will not have deterministic behavior.
To target a specific server for removal during scale down, use the Cluster API delete annotation
on the corresponding machine resource. This ensures that the specific machine is prioritized for removal during the scale-down operation.
Steps to Remove a Specific Server
-
Identify the target node: First, determine which node you want to remove by listing all nodes in your cluster:
-
Find the corresponding CAPI machine: List all CAPI machines to find the machine resource that corresponds to your target node:
kubectl get machines.cluster.x-k8s.io -n eksa-system
You can also find the specific machine for a node using:
NODE_NAME="your-target-node-name"
kubectl get machines.cluster.x-k8s.io -n eksa-system --no-headers | awk -v node="$NODE_NAME" '$3==node {print $1}'
-
Add the delete annotation: Mark the machine for deletion by adding the Cluster API delete annotation:
MACHINE_NAME="your-machine-name"
kubectl annotate machines.cluster.x-k8s.io $MACHINE_NAME cluster.x-k8s.io/delete-machine=yes -n eksa-system
-
Update your cluster specification: Reduce the node count in your EKS Anywhere cluster specification file:
apiVersion: anywhere.eks.amazonaws.com/v1
kind: Cluster
metadata:
name: test-cluster
spec:
workerNodeGroupConfigurations:
- count: 2 # decrease this number for scale down
-
Apply the scale down operation: Run the upgrade command to perform the scale down:
eksctl anywhere upgrade cluster -f cluster.yaml --kubeconfig mgmt/mgmt-eks-a-cluster.kubeconfig
The annotated machine will be prioritized for removal during the scale-down operation, ensuring that your specific target server is removed from the cluster.
NOTE: The hardware CSV is designed to manage the hardware catalog by creating Hardware
, Machine
, and BMC credential resources. For operational tasks like scaling, always use the cluster specification count and CAPI machine annotations rather than modifying the hardware CSV.
Autoscaling
EKS Anywhere supports autoscaling of worker node groups using the Kubernetes Cluster Autoscaler
and as a curated package
.
See here
and as a curated package
for details on how to configure your cluster spec to autoscale worker node groups for autoscaling.
6.3.2 - Scale CloudStack cluster
How to scale your CloudStack cluster
When you are scaling your CloudStack EKS Anywhere cluster, consider the number of nodes you need for your control plane and for your data plane.
In each case you can scale the cluster manually or automatically.
See the Kubernetes Components
documentation to learn the differences between the control plane and the data plane (worker nodes).
Manual cluster scaling
NOTE: If etcd is running on your control plane (the default configuration) you should scale your control plane in odd numbers (3, 5, 7, and so on).
apiVersion: anywhere.eks.amazonaws.com/v1
kind: Cluster
metadata:
name: test-cluster
spec:
controlPlaneConfiguration:
count: 1 # increase this number to horizontally scale your control plane
...
workerNodeGroupConfigurations:
- count: 1 # increase this number to horizontally scale your data plane
Once you have made configuration updates, you can use eksctl, kubectl, GitOps, or Terraform specified in the upgrade cluster command
to apply those changes.
If you are adding or removing a node, only the terminated nodes will be affected.
Autoscaling
EKS Anywhere supports autoscaling of worker node groups using the Kubernetes Cluster Autoscaler
and as a curated package
.
See here
for details on how to configure your cluster spec to autoscale worker node groups for autoscaling.
6.3.3 - Scale Nutanix cluster
How to scale your Nutanix cluster
When you are scaling your Nutanix EKS Anywhere cluster, consider the number of nodes you need for your control plane and for your data plane.
Each plane can be scaled horizontally (add more nodes) or vertically (provide nodes with more resources).
In each case you can scale the cluster manually or automatically.
See the Kubernetes Components
documentation to learn the differences between the control plane and the data plane (worker nodes).
Manual cluster scaling
Horizontally scaling the cluster is done by increasing the number for the control plane or worker node groups under the Cluster specification.
NOTE: If etcd is running on your control plane (the default configuration) you should scale your control plane in odd numbers (3, 5, 7…).
apiVersion: anywhere.eks.amazonaws.com/v1
kind: Cluster
metadata:
name: test-cluster
spec:
controlPlaneConfiguration:
count: 1 # increase this number to horizontally scale your control plane
...
workerNodeGroupConfigurations:
- count: 1 # increase this number to horizontally scale your data plane
Vertically scaling your cluster is done by updating the machine config spec for your infrastructure provider.
For a Nutanix cluster an example is
apiVersion: anywhere.eks.amazonaws.com/v1
kind: NutanixMachineConfig
metadata:
name: test-machine
namespace: default
spec:
systemDiskSize: 50 # increase this number to make the VM disk larger
vcpuSockets: 8 # increase this number to add vCPUs to your VM
memorySize: 8192 # increase this number to add memory to your VM
Once you have made configuration updates, you can use eksctl, kubectl, GitOps, or Terraform specified in the upgrade cluster command
to apply those changes.
If you are adding or removing a node, only the terminated nodes will be affected.
If you are vertically scaling your nodes, then all nodes will be replaced one at a time.
Autoscaling
EKS Anywhere supports autoscaling of worker node groups using the Kubernetes Cluster Autoscaler
and as a curated package
.
See here
and as a curated package
for details on how to configure your cluster spec to autoscale worker node groups for autoscaling.
6.3.4 - Scale vSphere cluster
How to scale your vSphere cluster
When you are scaling your vSphere EKS Anywhere cluster, consider the number of nodes you need for your control plane and for your data plane.
Each plane can be scaled horizontally (add more nodes) or vertically (provide nodes with more resources).
In each case you can scale the cluster manually or automatically.
See the Kubernetes Components
documentation to learn the differences between the control plane and the data plane (worker nodes).
Manual cluster scaling
Horizontally scaling the cluster is done by increasing the number for the control plane or worker node groups under the Cluster specification.
NOTE: If etcd is running on your control plane (the default configuration) you should scale your control plane in odd numbers (3, 5, 7…).
apiVersion: anywhere.eks.amazonaws.com/v1
kind: Cluster
metadata:
name: test-cluster
spec:
controlPlaneConfiguration:
count: 1 # increase this number to horizontally scale your control plane
...
workerNodeGroupConfigurations:
- count: 1 # increase this number to horizontally scale your data plane
Vertically scaling your cluster is done by updating the machine config spec for your infrastructure provider.
For a vSphere cluster an example is
apiVersion: anywhere.eks.amazonaws.com/v1
kind: VSphereMachineConfig
metadata:
name: test-machine
namespace: default
spec:
diskGiB: 25 # increase this number to make the VM disk larger
numCPUs: 2 # increase this number to add vCPUs to your VM
memoryMiB: 8192 # increase this number to add memory to your VM
Once you have made configuration updates, you can use eksctl, kubectl, GitOps, or Terraform specified in the upgrade cluster command
to apply those changes.
If you are adding or removing a node, only the terminated nodes will be affected.
If you are vertically scaling your nodes, then all nodes will be replaced one at a time.
Autoscaling
EKS Anywhere supports autoscaling of worker node groups using the Kubernetes Cluster Autoscaler
and as a curated package
.
See here
and as a curated package
for details on how to configure your cluster spec to autoscale worker node groups for autoscaling.
6.4 - Nodes
Managing EKS Anywhere nodes
6.4.1 - Manage vSphere VMs with vMotion
Using vMotion to manage vSphere VMs used in clusters
vMotion with EKS Anywhere
VMware vMotion is a feature within vSphere that allows live migration of virtual machines (VMs) between ESXi hypervisor hosts. This document outlines the guidelines for using vMotion to migrate EKS Anywhere nodes between vSphere ESXi hosts using vMotion while ensuring cluster stability.
Considerations for node migration using vMotion
When migrating EKS Anywhere nodes with vMotion, several considerations must be kept in mind, particularly around configuration values defined in the vSphere cluster spec file
. These configurations must remain unchanged during the migration and the infrastructure these configurations represent should also not change.
-
No cross-vCenter vMotion
EKS Anywhere nodes cannot be migrated between different vCenter environments using vMotion. The nodes must remain within the same vCenter instance for proper EKS Anywhere operation. The vCenter Server managing the EKS Anywhere cluster is specified in the VSphereDatacenterConfig section of the EKS Anywhere vSphere cluster spec file
, under the spec.server field, and cannot be changed.
-
vSphere infrastructure settings in VSphereDatacenterConfig
In addition to the vCenter element, two additional elements defined in the VSphereDatacenterConfig section of the EKS Anywhere cluster spec file are immutable must remain unchanged during the vMotion process:
-
datacenter (spec.datacenter) - The datacenter specified in the EKS Anywhere cluster spec file must not change during the vMotion migration. This value refers to the vSphere datacenter that hosts the EKS Anywhere nodes.
-
network (spec.network) - The network defined in the EKS Anywhere cluster spec file must not change during the vMotion migration. This value refers the vSphere network in which the EKS Anywhere nodes are operating. Any changes to this network configuration would disrupt node connectivity and lead to outages in the EKS Anywhere cluster.
-
VMware Storage vMotion is not supported for EKS Anywhere nodes
datastore (spec.datastore) - Defined in the VSphereMachineConfig section of the EKS Anywhere cluster spec file is immutable. This value refers to the vSphere datastore that holds EKS Anywhere node vm backing store. Modifying the datastore during vMotion (storage vMotion) would require a change to this value, which is not supported.
-
Node network configuration stability
The IP address, subnet mask, and default gateway of each EKS Anywhere node must remain unchanged during the vMotion process. Any modifications to the IP address configuration can cause communication failures between the EKS Anywhere nodes, pods, and the control plane, leading to disruptions in EKS Anywhere cluster operations.
-
EKS Anywhere configuration stabiltiy
The EKS Anywhere environment itself should remain unchanged during vMotion. Do not perform or trigger any EKS Anywhere changes or life cycle events while performing vmotion.
Best practices for vMotion with EKS Anywhere clusters
-
Follow VMware vMotion best practices
-
General best practices: Review VMware’s general guidelines for optimal vMotion performance, such as ensuring sufficient CPU, memory, and network resources, and minimizing load on the ESXi hosts during the migration. Refer to the VMware vMotion documentation
for details.
-
VMware vMotion Networking Best Practices: Whenever possible, follow the Networking Best Practices for VMware vMotion
to optimize performance and reduce the risk of issues during the migration process.
-
Use High-Speed Networks: A 10GbE or higher speed network is recommended to ensure smooth vMotion operations for EKS Anywhere nodes, particularly those with large memory footprints.
-
Shared Storage
Shared storage is a requirement for vmotion of EKS Anywhere clusters. Storage such as vSAN, Fiber Channel SAN, or NFS should be shared between the supporting vSphere ESXi hosts for maintaining access to the VM’s backing data without relying on storage vMotion, which is not supported in EKS Anywhere environments.
-
Monitoring before and after migration
To verify cluster health and node stability, monitor the EKS Anywhere nodes and pods before and after the vMotion migration:
- Before migration, run the following commands to check the current health and status of the EKS Anywhere nodes and pods.
- After vMotion activity is completed, run the commands again to verify that the nodes and pods are still operational and healthy.
kubectl get nodes
kubectl get pods -a
-
Infrastructure maintenance during vMotion
It is recommended that no other infrastructure maintenance activities be performed during the vMotion operation. The underlying datacenter infrastructure supporting the network, storage, and server resources utilized by VMware vSphere must remain stable during the vMotion process. Any interruptions in these services could lead to partial or complete failures in the vMotion process, potentially causing the EKS Anywhere nodes to lose connectivity or experience disruptions in normal operations.
6.5 - Networking
Managing networking
6.5.1 - Secure connectivity with CNI and Network Policy
How to validate the setup of Cilium CNI and deploy network policies to secure workload connectivity.
Announcements
- EKS Anywhere release
v0.24.0 introduces the First-Party Supported Cilium as the default Cilium CNI in an EKS Anywhere cluster. The image for First-Party Supported Cilium is available in AWS public ECR gallery https://gallery.ecr.aws/eks/cilium/cilium. It is recommended to use this first-party supported Cilium which has been tested by AWS as the CNI in your cluster.
EKS Anywhere uses Cilium
for pod networking and security.
Cilium is installed by default as a Kubernetes CNI plugin and so is already running in your EKS Anywhere cluster.
This section provides information about:
-
Understanding Cilium components and requirements
-
Validating your Cilium networking setup.
-
Using Cilium to securing workload connectivity using Kubernetes Network Policy.
Cilium Features
The following table lists features available in open source Cilium and indicates which ones are supported by AWS under the Amazon EKS Anywhere Enterprise Subscription.
Expand to see Cilium Features
| Open Source Cilium Feature |
EKS Anywhere Support |
| Networking Routing with tunneling mode |
✔ |
| Networking Routing with native routing mode |
✔ |
| Kubernetes Host Scope IPAM |
✔ |
| Kubernetes Network Policy |
✔ |
| Cilium Network Policy (L3/L4/L7, Clusterwide Policy) |
✔ |
| Egress Masquerade |
✔ |
| CNI Exclusive Configuration |
✔ |
| Policy Enforcement Modes |
✔ |
| Load-Balancing (L3/L4) |
✔ |
| Border Gateway Protocol |
✔ |
| Ingress, Gateway API, Service Mesh |
— |
| Multi-Cluster, Egress Gateway |
— |
| Hubble Network Observability (Metrics, Logs, Prometheus, Grafana, OpenTelemetry) |
— |
Note
Features marked with — are not officially supported by the EKS Anywhere team, but can still be manually enabled on EKS Anywhere Cilium. If you plan to use functionality outside the scope of AWS support, it is recommended to obtain alternative commercial support for Cilium or have the in-house expertise to troubleshoot and contribute fixes to the Cilium project.
Cilium Components
The primary Cilium Agent runs as a DaemonSet on each Kubernetes node. Each cluster also includes a Cilium Operator Deployment to handle certain cluster-wide operations. For EKS Anywhere, Cilium is configured to use the Kubernetes API server as the identity store, so no etcd cluster connectivity is required.
In a properly working environment, each Kubernetes node should have a Cilium Agent pod (cilium-WXYZ) in “Running” and ready (1/1) state.
By default there will be two
Cilium Operator pods (cilium-operator-123456-WXYZ) in “Running” and ready (1/1) state on different Kubernetes nodes for high-availability.
Run the following command to ensure all cilium related pods are in a healthy state.
kubectl get pods -n kube-system | grep cilium
Example output for this command in a 3 node environment is:
kube-system cilium-fsjmd 1/1 Running 0 4m
kube-system cilium-nqpkv 1/1 Running 0 4m
kube-system cilium-operator-58ff67b8cd-jd7rf 1/1 Running 0 4m
kube-system cilium-operator-58ff67b8cd-kn6ss 1/1 Running 0 4m
kube-system cilium-zz4mt 1/1 Running 0 4m
Network Connectivity Requirements
To provide pod connectivity within an on-premises environment, the Cilium agent implements an overlay network using the GENEVE tunneling protocol. As a result,
UDP port 6081 connectivity MUST be allowed by any firewall running between Kubernetes nodes running the Cilium agent.
Allowing ICMP Ping (type = 8, code = 0) as well as TCP port 4240 is also recommended in order for Cilium Agents to validate node-to-node connectivity as
part of internal status reporting.
Validating Connectivity
Install the latest version of Cilium CLI
.
The Cilium CLI has connectivity test functionality to validate proper installation and connectivity within a Kubernetes cluster.
By default, Cilium CLI will run tests in the cilium-test-1 namespace which can be changed by using --test-namespace flag. For example:
Successful test output will show all tests in a “successful” (some tests might be in “skipped”) state. For example:
✅ [cilium-test-1] All 12 tests (139 actions) successful, 72 tests skipped, 0 scenarios skipped.
Afterward, simply delete the namespace to clean-up the connectivity test:
kubectl delete ns cilium-test-1
Kubernetes Network Policy
By default, all Kubernetes workloads within a cluster can talk to any other workloads in the cluster, as well as any workloads outside the cluster. To enable a stronger security posture, Cilium implements the Kubernetes Network Policy specification to provide identity-aware firewalling / segmentation of Kubernetes workloads.
Network policies are defined as Kubernetes YAML specifications that are applied to a particular namespaces to describe that connections should be allowed to or from a given set of pods. These network policies are “identity-aware” in that they describe workloads within the cluster using Kubernetes metadata like namespace and labels, rather than by IP Address.
Basic network policies are validated as part of the above Cilium connectivity check test.
For next steps on leveraging Network Policy, we encourage you to explore:
6.5.2 - Replace EKS Anywhere Cilium with a custom CNI
Replace EKS Anywhere Cilium with a custom CNI
This page provides walkthroughs on replacing the EKS Anywhere Cilium with a custom CNI.
For more information on CNI customization see Use a custom CNI
.
Note
- Starting from EKS Anywhere
v0.24.0 release, the EKS Anywhere default Cilium will change from the Isovalent Cilium to the open-source AWS First-Party Supported Cilium. It is recommended to use this first-party supported Cilium which has been tested by AWS as the CNI in your cluster. When replacing EKS Anywhere Cilium with a custom CNI, it is your responsibility to manage the CNI, including version upgrades and support.
Prerequisites
Add a custom CNI to a new cluster
If an operator intends to uninstall EKS Anywhere Cilium from a new cluster they can enable the skipUpgrade option when creating the cluster.
Any future upgrades to the newly created cluster will not have EKS Anywhere Cilium upgraded.
-
Generate a cluster configuration according to the Getting Started
section.
-
Modify the Cluster object’s spec.clusterNetwork.cniConfig.cilium.skipUpgrade field to equal true.
apiVersion: anywhere.eks.amazonaws.com/v1alpha1
kind: Cluster
metadata:
name: eks-anywhere
spec:
clusterNetwork:
cniConfig:
cilium:
skipUpgrade: true
...
-
Create the cluster according to the Getting Started
guide.
-
Pause reconciliation of the cluster. This ensures EKS Anywhere components do not attempt to remediate issues arising from a missing CNI.
kubectl --kubeconfig=MANAGEMENT_KUBECONFIG -n eksa-system annotate clusters.cluster.x-k8s.io WORKLOAD_CLUSTER_NAME cluster.x-k8s.io/paused=true
-
Uninstall EKS Anywhere Cilium.
-
Install a custom CNI.
-
Resume reconciliation of the cluster object.
kubectl --kubeconfig=MANAGEMENT_KUBECONFIG -n eksa-system annotate clusters.cluster.x-k8s.io WORKLOAD_CLUSTER_NAME cluster.x-k8s.io/paused-
Add a custom CNI to an existing cluster with eksctl
- Modify the existing
Cluster object’s spec.clusterNetwork.cniConfig.cilium.skipUpgrade field to equal true.
apiVersion: anywhere.eks.amazonaws.com/v1alpha1
kind: Cluster
metadata:
name: eks-anywhere
spec:
clusterNetwork:
cniConfig:
cilium:
skipUpgrade: true
...
-
Upgrade the EKS Anywhere cluster
.
-
Pause reconciliation of the cluster. This ensures EKS Anywhere components do not attempt to remediate issues arising from a missing CNI.
kubectl --kubeconfig=MANAGEMENT_KUBECONFIG -n eksa-system annotate clusters.cluster.x-k8s.io WORKLOAD_CLUSTER_NAME cluster.x-k8s.io/paused=true
-
Uninstall EKS Anywhere Cilium.
-
Install a custom CNI.
-
Resume reconciliation of the cluster object.
kubectl --kubeconfig=MANAGEMENT_KUBECONFIG -n eksa-system annotate clusters.cluster.x-k8s.io WORKLOAD_CLUSTER_NAME cluster.x-k8s.io/paused-
Add a custom CNI to an existing cluster with Lifecycle Controller
Warning
Clusters created using the Full Lifecycle Controller prior to v0.15 that have removed the EKS Anywhere Cilium CNI must manually populate their cluster.anywhere.eks.amazonaws.com object with the following annotation to ensure EKS Anywhere does not attempt to re-install EKS Anywhere Cilium.
anywhere.eks.amazonaws.com/eksa-cilium: ""
- Modify the existing
Cluster object’s spec.clusterNetwork.cniConfig.cilium.skipUpgrade field to equal true.
apiVersion: anywhere.eks.amazonaws.com/v1alpha1
kind: Cluster
metadata:
name: eks-anywhere
spec:
clusterNetwork:
cniConfig:
cilium:
skipUpgrade: true
...
-
Apply the cluster configuration to the cluster and await successful object reconciliation.
kubectl apply -f <cluster config path>
-
Pause reconciliation of the cluster. This ensures EKS Anywhere components do not attempt to remediate issues arising from a missing CNI.
kubectl --kubeconfig=MANAGEMENT_KUBECONFIG -n eksa-system annotate clusters.cluster.x-k8s.io WORKLOAD_CLUSTER_NAME cluster.x-k8s.io/paused=true
- Uninstall EKS Anywhere Cilium.
-
Install a custom CNI.
-
Resume reconciliation of the cluster object.
kubectl --kubeconfig=MANAGEMENT_KUBECONFIG -n eksa-system annotate clusters.cluster.x-k8s.io WORKLOAD_CLUSTER_NAME cluster.x-k8s.io/paused-
6.5.3 - Cilium supported by AWS
How to install and manage versions of the Cilium CNI build maintained by AWS for EKS Anywhere clusters
Overview
As of EKS Anywhere v0.24, EKS Anywhere installs an AWS build of Cilium with all the features of open source Cilium as the default Kubernetes CNI plugin. Previous versions of EKS Anywhere included a Cilium build with a limited set of features compared to open source Cilium. With this update, for clusters with an EKS Anywhere Enterprise Subscription license, AWS will continue to provide technical support for Networking Routing (CNI), Identity-Based Network Policy (Labels, CIDR), and Load-Balancing (L3/L4) capabilities of Cilium, but you no longer need to replace the default EKS Anywhere CNI to use other capabilities available with open source Cilium. If you plan to use functionality outside the scope of AWS support, AWS recommends obtaining alternative commercial support for Cilium or have the in-house expertise to troubleshoot and contribute fixes to the Cilium project.
EKS Anywhere supports two approaches for managing the versions of the Cilium build maintained by AWS:
- AWS build of Cilium with automatic version upgrades:: EKS Anywhere automatically manages Cilium installation and upgrades (default behavior)
- AWS build of Cilium with self-managed version upgrades: You manage Cilium deployment using Helm while using AWS-maintained images from the public ECR registry
The AWS build of Cilium version provides images that include security patches and bug fixes validated by Amazon, available at public.ecr.aws/eks/cilium/cilium.
Installing AWS build of Cilium with automatic version upgrades
If you want to use the full open source Cilium version with advanced features, the transition is seamless and requires no configuration changes. AWS provides support for the subset of Cilium features mentioned in the Overview section above. You can customize Cilium settings using the helmValues parameter (see Helm Values Configuration for Cilium Plugin
).
Installing AWS build of Cilium with self-managed version upgrades
If you want to continue managing the Cilium CNI version yourself while using the AWS build of Cilium, you can install the AWS build of Cilium using Helm.
Prerequisites
- Helm 3.x installed
- Access to your EKS Anywhere cluster with
kubectl configured
- Appropriate permissions to manage resources in the
kube-system namespace
Installation
Install the AWS build of Cilium version using Helm (replace 1.17.6-0 with your desired version from https://gallery.ecr.aws/eks/cilium/cilium):
helm install cilium oci://public.ecr.aws/eks/cilium/cilium \
--version 1.17.6-0 \
--namespace kube-system \
--set envoy.enabled=false \
--set ingressController.enabled=false \
--set loadBalancer.l7.backend=none
Pros and Cons
Pros:
- Access to full Cilium open source features with AWS support for a subset of features
- Security patches and bug fixes handled by AWS
- Control over upgrade timing and version selection
- Greater flexibility to customize Cilium configuration
Cons:
- You are responsible for upgrading and validating Cilium versions
- Additional operational overhead for validating that your Cilium version is compatible with your Kubernetes version
- No automatic upgrades during EKS Anywhere cluster upgrades
Migrating from upstream open source Cilium to AWS build of Cilium
If you’re currently running the upstream open source Cilium version and want to switch to the AWS build of Cilium, you can perform an in-place upgrade using Helm. This migration allows you to benefit from images maintained by AWS while preserving your existing Cilium configuration and network policies.
The AWS build of Cilium uses images from the AWS public ECR registry (public.ecr.aws/eks/cilium/cilium) and includes security patches and bug fixes validated by AWS. This upgrade is performed as a rolling update, minimizing disruption to your workloads.
To perform the migration, run :
helm upgrade cilium oci://public.ecr.aws/eks/cilium/cilium \
--version 1.17.6-0 \
--namespace kube-system \
--set envoy.enabled=false \
--set ingressController.enabled=false \
--set loadBalancer.l7.backend=none
Cilium 1.17.6 is the only Cilium version that AWS currently builds.
After the upgrade, verify the installation status:
Expected output showing AWS ECR images:
/¯¯\
/¯¯\__/¯¯\ Cilium: OK
\__/¯¯\__/ Operator: OK
/¯¯\__/¯¯\ Envoy DaemonSet: disabled (using embedded mode)
\__/¯¯\__/ Hubble Relay: disabled
\__/ ClusterMesh: disabled
DaemonSet cilium Desired: 4, Ready: 4/4, Available: 4/4
Deployment cilium-operator Desired: 2, Ready: 2/2, Available: 2/2
Containers: cilium Running: 4
cilium-operator Running: 2
clustermesh-apiserver
hubble-relay
Cluster Pods: 17/17 managed by Cilium
Helm chart version: 1.17.6-0
Image versions cilium public.ecr.aws/eks/cilium/cilium:v1.17.6-0: 4
cilium-operator public.ecr.aws/eks/cilium/operator-generic:v1.17.6-0: 2
After aligning your Cilium installation with the AWS-supported version, you can optionally transition management of Cilium upgrades to EKS Anywhere.This allows EKS Anywhere to automatically upgrade your Cilium deployment to the latest AWS build of Cilium for the Kubernetes you are upgrading to, reducing operational overhead.
To complete the transition:
-
Upgrade Your Cluster: Upgrade your cluster to the latest EKS Anywhere version.
-
Toggle the skipUpgrade Configuration: Modify the skipUpgrade setting in your cluster configuration:
kubectl edit cluster <cluster-name>
Choose one of the following options:
Option 1: Remove the skipUpgrade line entirely and use default settings:
Option 2: Explicitly set skipUpgrade to false:
cilium:
skipUpgrade: false
-
Save and Exit: Save the configuration file and exit the editor.
Once configured, EKS Anywhere will automatically manage Cilium upgrades during cluster upgrades, ensuring compatibility and reducing manual maintenance.
6.5.4 - Multus CNI plugin configuration
EKS Anywhere configuration for Multus CNI plugin
NOTE: Currently, Multus support is only available with the EKS Anywhere Bare Metal provider.
The vSphere and CloudStack providers, do not have multi-network support for cluster machines.
Once multiple network support is added to those clusters, Multus CNI can be supported.
Multus CNI
is a container network interface plugin for Kubernetes that enables attaching multiple network interfaces to pods.
In Kubernetes, each pod has only one network interface by default, other than local loopback.
With Multus, you can create multi-homed pods that have multiple interfaces.
Multus acts a as ‘meta’ plugin that can call other CNI plugins to configure additional interfaces.
Pre-Requisites
Given that Multus CNI is used to create pods with multiple network interfaces, the cluster machines that these pods run on need to have multiple network interfaces attached and configured.
The interfaces on multi-homed pods need to map to these interfaces on the machines.
For Bare Metal clusters using the Tinkerbell provider, the cluster machines need to have multiple network interfaces cabled in and appropriate network configuration put in place during machine provisioning.
Overview of Multus setup
The following diagrams show the result of two applications (app1 and app2) running in pods that use the Multus plugin to communicate over two network interfaces (eth0 and net1) from within the pods.
The Multus plugin uses two network interfaces on the worker node (eth0 and eth1) to provide communications outside of the node.
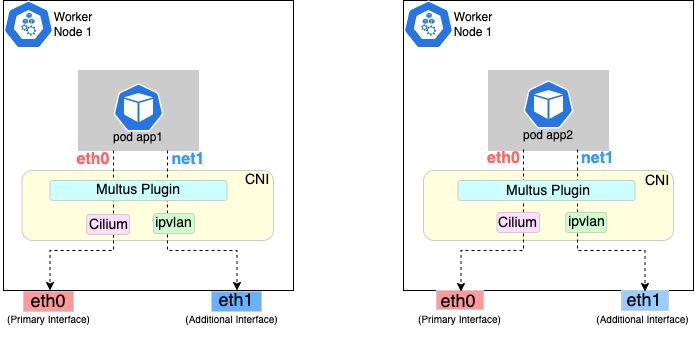
Follow the procedure below to set up Multus as illustrated in the previous diagrams.
Deploying Multus using a Daemonset will spin up pods that install a Multus binary and configure Multus for usage in every node in the cluster.
Here are the steps for doing that.
-
Clone the Multus CNI repo:
git clone https://github.com/k8snetworkplumbingwg/multus-cni.git && cd multus-cni
-
Apply Multus daemonset to your EKS Anywhere cluster:
kubectl apply -f ./deployments/multus-daemonset-thick-plugin.yml
-
Verify that you have Multus pods running:
kubectl get pods --all-namespaces | grep -i multus
-
Check that Multus is running:
kubectl get pods -A | grep multus
Output:
kube-system kube-multus-ds-bmfjs 1/1 Running 0 3d1h
kube-system kube-multus-ds-fk2sk 1/1 Running 0 3d1h
Create Network Attachment Definition
You need to create a Network Attachment Definition for the CNI you wish to use as the plugin for the additional interface.
You can verify that your intended CNI plugin is supported by ensuring that the binary corresponding to that CNI plugin is present in the node’s /opt/cni/bin directory.
Below is an example of a Network Attachment Definition yaml:
cat <<EOF | kubectl create -f -
apiVersion: "k8s.cni.cncf.io/v1"
kind: NetworkAttachmentDefinition
metadata:
name: ipvlan-conf
spec:
config: '{
"cniVersion": "0.3.0",
"type": "ipvlan",
"master": "eth1",
"mode": "l3",
"ipam": {
"type": "host-local",
"subnet": "198.17.0.0/24",
"rangeStart": "198.17.0.200",
"rangeEnd": "198.17.0.216",
"routes": [
{ "dst": "0.0.0.0/0" }
],
"gateway": "198.17.0.1"
}
}'
EOF
Note that eth1 is used as the master parameter.
This master parameter should match the interface name on the hosts in your cluster.
Verify the configuration
Type the following to verify the configuration you created:
kubectl get network-attachment-definitions
kubectl describe network-attachment-definitions ipvlan-conf
Deploy sample applications with network attachment
-
Create a sample application 1 (app1) with network annotation created in the previous steps:
cat <<EOF | kubectl apply -f -
apiVersion: v1
kind: Pod
metadata:
name: app1
annotations:
k8s.v1.cni.cncf.io/networks: ipvlan-conf
spec:
containers:
- name: app1
command: ["/bin/sh", "-c", "trap : TERM INT; sleep infinity & wait"]
image: alpine
EOF
-
Create a sample application 2 (app2) with the network annotation created in the previous step:
cat <<EOF | kubectl apply -f -
apiVersion: v1
kind: Pod
metadata:
name: app2
annotations:
k8s.v1.cni.cncf.io/networks: ipvlan-conf
spec:
containers:
- name: app2
command: ["/bin/sh", "-c", "trap : TERM INT; sleep infinity & wait"]
image: alpine
EOF
-
Verify that the additional interfaces were created on these application pods using the defined network attachment:
kubectl exec -it app1 -- ip a
Output:
1: lo: <LOOPBACK,UP,LOWER_UP> mtu 65536 qdisc noqueue state UNKNOWN qlen 1000
link/loopback 00:00:00:00:00:00 brd 00:00:00:00:00:00
inet 127.0.0.1/8 scope host lo
valid_lft forever preferred_lft forever
inet6 ::1/128 scope host
valid_lft forever preferred_lft forever
*2: net1@if3: <BROADCAST,MULTICAST,NOARP,UP,LOWER_UP,M-DOWN> mtu 1500 qdisc noqueue state UNKNOWN
link/ether 00:50:56:9a:84:3b brd ff:ff:ff:ff:ff:ff
inet 198.17.0.200/24 brd 198.17.0.255 scope global net1
valid_lft forever preferred_lft forever
inet6 fe80::50:5600:19a:843b/64 scope link
valid_lft forever preferred_lft forever*
31: eth0@if32: <BROADCAST,MULTICAST,UP,LOWER_UP,M-DOWN> mtu 1500 qdisc noqueue state UP
link/ether 0a:9e:a0:b4:21:05 brd ff:ff:ff:ff:ff:ff
inet 192.168.1.218/32 scope global eth0
valid_lft forever preferred_lft forever
inet6 fe80::89e:a0ff:feb4:2105/64 scope link
valid_lft forever preferred_lft forever
kubectl exec -it app2 -- ip a
Output:
1: lo: <LOOPBACK,UP,LOWER_UP> mtu 65536 qdisc noqueue state UNKNOWN qlen 1000
link/loopback 00:00:00:00:00:00 brd 00:00:00:00:00:00
inet 127.0.0.1/8 scope host lo
valid_lft forever preferred_lft forever
inet6 ::1/128 scope host
valid_lft forever preferred_lft forever
*2: net1@if3: <BROADCAST,MULTICAST,NOARP,UP,LOWER_UP,M-DOWN> mtu 1500 qdisc noqueue state UNKNOWN
link/ether 00:50:56:9a:84:3b brd ff:ff:ff:ff:ff:ff
inet 198.17.0.201/24 brd 198.17.0.255 scope global net1
valid_lft forever preferred_lft forever
inet6 fe80::50:5600:29a:843b/64 scope link
valid_lft forever preferred_lft forever*
33: eth0@if34: <BROADCAST,MULTICAST,UP,LOWER_UP,M-DOWN> mtu 1500 qdisc noqueue state UP
link/ether b2:42:0a:67:c0:48 brd ff:ff:ff:ff:ff:ff
inet 192.168.1.210/32 scope global eth0
valid_lft forever preferred_lft forever
inet6 fe80::b042:aff:fe67:c048/64 scope link
valid_lft forever preferred_lft forever
Note that both pods got the new interface net1. Also, the additional network interface on each pod got assigned an IP address out of the range specified by the Network Attachment Definition.
-
Test the network connectivity across these pods for Multus interfaces:
kubectl exec -it app1 -- ping -I net1 198.17.0.201
Output:
PING 198.17.0.201 (198.17.0.201): 56 data bytes
64 bytes from 198.17.0.201: seq=0 ttl=64 time=0.074 ms
64 bytes from 198.17.0.201: seq=1 ttl=64 time=0.077 ms
64 bytes from 198.17.0.201: seq=2 ttl=64 time=0.078 ms
64 bytes from 198.17.0.201: seq=3 ttl=64 time=0.077 ms
kubectl exec -it app2 -- ping -I net1 198.17.0.200
Output:
PING 198.17.0.200 (198.17.0.200): 56 data bytes
64 bytes from 198.17.0.200: seq=0 ttl=64 time=0.074 ms
64 bytes from 198.17.0.200: seq=1 ttl=64 time=0.077 ms
64 bytes from 198.17.0.200: seq=2 ttl=64 time=0.078 ms
64 bytes from 198.17.0.200: seq=3 ttl=64 time=0.077 ms
6.6 - Storage
Managing storage
6.6.1 - vSphere storage
Managing storage on vSphere
EKS Anywhere clusters running on vSphere can leverage the vSphere Container Storage Plug-in (also called the vSphere CSI Driver
) for dynamic provisioning of persistent storage volumes on vSphere storage infrastructure. The CSI Driver integrates with the Cloud Native Storage (CNS) component in vCenter for the purpose of volume provisioning via vSAN, attaching and detaching volumes to/from VMs, mounting, formatting, and unmounting volumes on/from pods, snapshots, cloning, dynamic volume expansion, etc.
Bundled vSphere CSI Driver Removal
EKS Anywhere versions prior to v0.16.0 included built-in installation and management of the vSphere CSI Driver in EKS Anywhere clusters. The vSphere CSI driver components in EKS Anywhere included a Kubernetes CSI controller Deployment, a node-driver-registrar DaemonSet, a default Storage Class, and a number of related Secrets and RBAC entities.
In EKS Anywhere version v0.16.0, the built-in vSphere CSI driver feature was deprecated and was removed in EKS Anywhere version v0.17.0. You can still use the vSphere CSI driver with EKS Anywhere to make use of the storage options provided by vSphere in a Kubernetes-native way, but you must manage the installation and operation of the vSphere CSI driver on your EKS Anywhere clusters.
Refer to the vSphere CSI Driver documentation
for the self-managed installation and management procedure. Refer to these compatibiltiy matrices
to determine the correct version of the vSphere CSI Driver for the Kubernetes version and vSphere version you are running with EKS Anywhere.
vSphere CSI Driver Cleanup for Upgrades
If you are using an EKS Anywhere version v0.16.0 or below, you must remove the EKS Anywhere-managed version of the vSphere CSI driver prior to upgrading to EKS Anywhere version v0.17.0 or later. You do not need to run these steps if you are not using the EKS Anywhere-managed version of the vSphere CSI driver. If you are self-managing your vSphere CSI driver installation, it will persist through EKS Anywhere upgrades.
See below for instructions on how to remove the EKS Anywhere vSphere CSI driver objects. You must delete the DaemonSet and Deployment first, as they rely on the other resources.
default namespace
vsphere-csi-controller-role (kind: ClusterRole)
kubectl delete clusterrole vsphere-csi-controller-role
vsphere-csi-controller-binding (kind: ClusterRoleBinding)
kubectl delete clusterrolebinding vsphere-csi-controller-binding
csi.vsphere.vmware.com (kind: CSIDriver)
kubectl delete csidriver csi.vsphere.vmware.com
kube-system namespace
vsphere-csi-node (kind: DaemonSet)
kubectl delete daemonset vsphere-csi-node -n kube-system
vsphere-csi-controller (kind: Deployment)
kubectl delete deployment vsphere-csi-controller -n kube-system
vsphere-csi-controller (kind: ServiceAccount)
kubectl delete serviceaccount vsphere-csi-controller -n kube-system
csi-vsphere-config (kind: Secret)
kubectl delete secret csi-vsphere-config -n kube-system
eksa-system namespace
<cluster-name>-csi (kind: ClusterResourceSet)
kubectl delete clusterresourceset <cluster-name>-csi -n eksa-system
6.7 - Security
Securing your clusters
6.7.1 - Security best practices
Using security best practices with your EKS Anywhere deployments
If you discover a potential security issue in this project, we ask that you notify AWS/Amazon Security via our vulnerability reporting page
.
Please do not create a public GitHub issue for security problems.
This guide provides advice about best practices for EKS Anywhere specific security concerns.
For a more complete treatment of Kubernetes security generally please refer to the official Kubernetes documentation on Securing a Cluster
and the Amazon EKS Best Practices Guide for Security
.
The Shared Responsibility Model and EKS-A
AWS Cloud Services follow the Shared Responsibility Model,
where AWS is responsible for security “of” the cloud, while the customer is responsible for security “in” the cloud.
However, EKS Anywhere is an open-source tool and the distribution of responsibility differs from that of a managed cloud service like EKS.
AWS Responsibilities
AWS is responsible for building and delivering a secure tool.
This tool will provision an initially secure Kubernetes cluster.
AWS is responsible for vetting and securely sourcing the services and tools packaged with EKS Anywhere and the cluster it creates (such as CoreDNS, Cilium, Flux, CAPI, and govc).
The EKS Anywhere build and delivery infrastructure, or supply chain, is secured to the standard of any AWS service and AWS takes responsibility for the secure and reliable delivery of a quality product which provisions a secure and stable Kubernetes cluster.
When the eksctl anywhere plugin is executed, EKS Anywhere components are automatically downloaded from AWS.
eksctl will then perform checksum verification on the components to ensure their authenticity.
AWS is responsible for the secure development and testing of the EKS Anywhere controller and associated custom resource definitions.
AWS is responsible for the secure development and testing of the EKS Anywhere CLI,
and ensuring it handles sensitive data and cluster resources securely.
End user responsibilities
The end user is responsible for the entire EKS Anywhere cluster after it has been provisioned.
AWS provides a mechanism to upgrade the cluster in-place, but it is the responsibility of the end user to perform that upgrade using the provided tools.
End users are responsible for operating their clusters in accordance with Kubernetes security best practices,
and for the ongoing security of the cluster after it has been provisioned.
This includes but is not limited to:
- creation or modification of RBAC roles and bindings
- creation or modification of namespaces
- modification of the default container network interface plugin
- configuration of network ingress and load balancing
- use and configuration of container storage interfaces
- the inclusion of add-ons and other services
End users are also responsible for:
-
The hardware and software which make up the infrastructure layer
(such as vSphere, ESXi, physical servers, and physical network infrastructure).
-
The ongoing maintenance of the cluster nodes, including the underlying guest operating systems.
Additionally, while EKS Anywhere provides a streamlined process for upgrading a cluster to a new Kubernetes version, it is the responsibility of the user to perform the upgrade as necessary.
-
Any applications which run “on” the cluster, including their secure operation, least privilege, and use of well-known and vetted container images.
EKS Anywhere Security Best Practices
This section captures EKS Anywhere specific security best practices.
Please read this section carefully and follow any guidance to ensure the ongoing security and reliability of your EKS Anywhere cluster.
Critical Namespaces
EKS Anywhere creates and uses resources in several critical namespaces.
All of the EKS Anywhere managed namespaces should be treated as sensitive and access should be limited to only the most trusted users and processes.
Allowing additional access or modifying the existing RBAC resources could potentially allow a subject to access the namespace and the resources that it contains.
This could lead to the exposure of secrets or the failure of your cluster due to modification of critical resources.
Here are rules you should follow when dealing with critical namespaces:
-
Avoid creating Roles
in these namespaces or providing users access to them with ClusterRoles
.
For more information about creating limited roles for day-to-day administration and development, please see the official introduction to Role Based Access Control (RBAC)
.
-
Do not modify existing Roles
in these namespaces, bind existing roles to additional subjects
, or create new Roles in the namespace.
-
Do not modify existing ClusterRoles
or bind them to additional subjects.
-
Avoid using the cluster-admin role, as it grants permissions over all namespaces.
-
No subjects except for the most trusted administrators should be permitted to perform ANY action in the critical namespaces.
The critical namespaces include:
eksa-systemeksa-packagesflux-systemcapv-system (or the respective provider you are using)capi-systemcapi-webhook-systemcapi-kubeadm-control-plane-systemcapi-kubeadm-bootstrap-systemcert-manageretcdadm-controller-systemetcdadm-bootstrap-provider-systemkube-system (as with any Kubernetes cluster, this namespace is critical to the functioning of your cluster and should be treated with the highest level of sensitivity.)
Secrets
EKS Anywhere stores sensitive information, like the vSphere credentials and GitHub Personal Access Token, in the cluster as native Kubernetes secrets
.
These secret objects are namespaced, for example in the eksa-system and flux-system namespace, and limiting access to the sensitive namespaces will ensure that these secrets will not be exposed.
Additionally, limit access to the underlying node. Access to the node could allow access to the secret content.
EKS Anywhere also supports encryption-at-rest for Kubernetes secrets. See etcd encryption
for more details.
The EKS Anywhere kubeconfig file
eksctl anywhere create cluster creates an EKS Anywhere-based Kubernetes cluster and outputs a kubeconfig
file with administrative privileges to the $PWD/$CLUSTER_NAME directory.
By default, this kubeconfig file uses certificate-based authentication and contains the user certificate data for the administrative user.
The kubeconfig file grants administrative privileges over your cluster to the bearer and the certificate key should be treated as you would any other private key or administrative password.
The EKS Anywhere-generated kubeconfig file should only be used for interacting with the cluster via eksctl anywhere commands, such as upgrade, and for the most privileged administrative tasks.
For more information about creating limited roles for day-to-day administration and development, please see the official introduction to Role Based Access Control (RBAC)
.
GitOps
GitOps enabled EKS Anywhere clusters maintain a copy of their cluster configuration in the user provided Git repository.
This configuration acts as the source of truth for the cluster.
Changes made to this configuration will be reflected in the cluster configuration.
AWS recommends that you gate any changes to this repository with mandatory pull request reviews.
Carefully review pull requests for changes which could impact the availability of the cluster (such as scaling nodes to 0 and deleting the cluster object) or contain secrets.
GitHub Personal Access Token
Treat the GitHub PAT
used with EKS Anywhere as you would any highly privileged secret, as it could potentially be used to make changes to your cluster by modifying the contents of the cluster configuration file through the GitHub.com
API.
- Never commit the PAT to a Git repository
- Never share the PAT via untrusted channels
- Never grant non-administrative subjects access to the
flux-system namespace where the PAT is stored as a native Kubernetes secret.
Executing EKS Anywhere
Ensure that you execute eksctl anywhere create cluster on a trusted workstation in order to protect the values of sensitive environment variables and the EKS Anywhere generated kubeconfig file.
SSH Access to Cluster Nodes and ETCD Nodes
EKS Anywhere provides the option to configure an ssh authorized key for access to underlying nodes in a cluster, via vsphereMachineConfig.Users.sshAuthorizedKeys.
This grants the associated private key the ability to connect to the cluster via ssh as the user capv with sudo permissions.
The associated private key should be treated as extremely sensitive, as sudo access to the cluster and ETCD nodes can permit access to secret object data and potentially confer arbitrary control over the cluster.
VMWare OVAs
Only download OVAs for cluster nodes from official sources, and do not allow untrusted users or processes to modify the templates used by EKS Anywhere for provisioning nodes.
Keeping Bottlerocket up to date
EKS Anywhere provides the most updated patch of operating systems with every release. It is recommended that your clusters are kept up to date with the latest EKS Anywhere release to ensure you get the latest security updates.
Bottlerocket is an EKS Anywhere supported operating system that can be kept up to date without requiring a cluster update. The Bottlerocket Update Operator
is a Kubernetes update operator that coordinates Bottlerocket updates on hosts in the cluster. Please follow the instructions here
to install Bottlerocket update operator.
EKS Anywhere Baremetal clusters run directly on physical servers in a datacenter. Make sure that the physical infrastructure, including the network, is secure before running EKS Anywhere clusters.
Please follow industry best practices for securing your network and datacenter, including but not limited to the following
- Only allow trusted devices on the network
- Secure the network using a firewall
- Never source hardware from an untrusted vendor
- Inspect and verify the metal servers you are using for the clusters are the ones you intended to use
- If possible, use a separate L2 network for EKS Anywhere baremetal clusters
- Conduct thorough audits of access, users, logs and other exploitable venues periodically
Benchmark tests for cluster hardening
EKS Anywhere creates clusters with server hardening configurations out of the box, via the use of security flags and opinionated default templates. You can verify the security posture of your EKS Anywhere cluster by using a tool called kube-bench
, that checks whether Kubernetes is deployed securely.
kube-bench runs checks documented in the CIS Benchmark for Kubernetes
, such as, pod specification file permissions, disabling insecure arguments, and so on.
Refer to the EKS Anywhere CIS Self-Assessment Guide
for more information on how to evaluate the security configurations of your EKS Anywhere cluster.
Admission Webhooks
Custom admission webhooks are a Kubernetes extension mechanism that can validate or mutate resources before they are persisted to etcd. Webhooks enable use cases such as policy enforcement and security controls, but they can also introduce operational risks.
Misconfigured or faulty admission webhooks can block security patches from being applied to control plane components, prevent security-critical operations such as RBAC updates or certificate rotations, or disrupt critical infrastructure components such as Cilium or CoreDNS.
To protect against these risks, enable the skipAdmissionForSystemResources feature for production clusters running Kubernetes 1.31 or later. This feature prevents custom admission webhooks from interfering with system operations while allowing them to continue validating application workloads.
spec:
controlPlaneConfiguration:
skipAdmissionForSystemResources: true
This protection mechanism uses the same approach as AWS EKS, requires no changes to existing webhook configurations, and protects system resources during cluster upgrades and normal operations while maintaining webhook functionality for application workloads. For detailed information about this feature, including configuration options and protected resources, see the Admission Webhook Protection
documentation.
Additional Webhook Security Best Practices
When deploying custom admission webhooks:
- Use appropriate failure policies: Set
failurePolicy: Ignore for non-critical validations to prevent blocking operations during webhook unavailability
- Scope webhooks carefully: Use
namespaceSelector and objectSelector to limit webhook scope to only the intended resources
- Avoid targeting system resources: Unless absolutely necessary, do not configure webhooks to intercept operations on
kube-system, control plane components, or critical infrastructure
- Monitor webhook health: Implement monitoring and alerting for webhook service availability and response times
- Test thoroughly: Test webhook behavior during cluster upgrades and failure scenarios before deploying to production
- Maintain webhook services: Ensure webhook backend services are highly available and can handle expected load
For more information on admission webhooks, refer to:
6.7.2 - Authenticate cluster with AWS IAM Authenticator
Configure AWS IAM Authenticator to authenticate user access to the cluster
AWS IAM Authenticator Support (optional)
EKS Anywhere supports configuring AWS IAM Authenticator
as an authentication provider for clusters.
When you enable IAM Authenticator on a cluster, EKS Anywhere
- Installs
aws-iam-authenticator server as a DaemonSet on the workload cluster.
- Configures the Kubernetes API Server to communicate with iam authenticator using a token authentication webhook
.
- Creates the necessary ConfigMaps based on user options.
Create IAM Authenticator enabled cluster
Generate your cluster configuration and add the necessary IAM Authenticator configuration. For a full spec reference check AWSIamConfig
.
Create an EKS Anywhere cluster as follows:
CLUSTER_NAME=my-cluster-name
eksctl anywhere create cluster -f ${CLUSTER_NAME}.yaml
Example AWSIamConfig configuration
This example uses a region in the default aws partition and EKSConfigMap as backendMode. Also, the IAM ARNs are mapped to the kubernetes system:masters group.
apiVersion: anywhere.eks.amazonaws.com/v1alpha1
kind: Cluster
metadata:
name: my-cluster-name
spec:
...
# IAM Authenticator
identityProviderRefs:
- kind: AWSIamConfig
name: aws-iam-auth-config
---
apiVersion: anywhere.eks.amazonaws.com/v1alpha1
kind: AWSIamConfig
metadata:
name: aws-iam-auth-config
spec:
awsRegion: us-west-1
backendMode:
- EKSConfigMap
mapRoles:
- roleARN: arn:aws:iam::XXXXXXXXXXXX:role/myRole
username: myKubernetesUsername
groups:
- system:masters
mapUsers:
- userARN: arn:aws:iam::XXXXXXXXXXXX:user/myUser
username: myKubernetesUsername
groups:
- system:masters
partition: aws
Note
When using backend mode
CRD, the
mapRoles and
mapUsers are not required. For more details on configuring CRD mode, refer to
CRD.
Authenticating with IAM Authenticator
After your cluster is created you may now use the mapped IAM ARNs to authenticate to the cluster.
EKS Anywhere generates a KUBECONFIG file in your local directory that uses aws-iam-authenticator client to authenticate with the cluster. The file can be found at
${PWD}/${CLUSTER_NAME}/${CLUSTER_NAME}-aws.kubeconfig
Steps
-
Ensure the IAM role/user ARN mapped in the cluster is configured on the local machine from which you are trying to access the cluster.
-
Install the aws-iam-authenticator client binary on the local machine.
- We recommend installing the binary referenced in the latest
release manifest of the kubernetes version used when creating the cluster.
- The below commands can be used to fetch the installation uri for clusters created with
1.35 kubernetes version and OS linux.
CLUSTER_NAME=my-cluster-name
KUBERNETES_VERSION=1.35
export KUBECONFIG=${PWD}/${CLUSTER_NAME}/${CLUSTER_NAME}-eks-a-cluster.kubeconfig
EKS_D_MANIFEST_URL=$(kubectl get bundles $CLUSTER_NAME -o jsonpath="{.spec.versionsBundles[?(@.kubeVersion==\"$KUBERNETES_VERSION\")].eksD.manifestUrl}")
OS=linux
curl -fsSL $EKS_D_MANIFEST_URL | yq e '.status.components[] | select(.name=="aws-iam-authenticator") | .assets[] | select(.os == '"\"$OS\""' and .type == "Archive") | .archive.uri' -
-
Export the generated IAM Authenticator based KUBECONFIG file.
export KUBECONFIG=${PWD}/${CLUSTER_NAME}/${CLUSTER_NAME}-aws.kubeconfig
-
Run kubectl commands to check cluster access. Example,
Managing AWS IAM Authenticator
EKS Anywhere supports adding, removing, and modifying AWS IAM Authenticator configuration on existing clusters. These operations can be performed using the upgrade cluster command or GitOps.
Add AWS IAM Authenticator to existing cluster
You can add AWS IAM Authenticator to an existing cluster that was created without it.
- Add the
identityProviderRefs section to your cluster configuration and create the AWSIamConfig resource:
apiVersion: anywhere.eks.amazonaws.com/v1alpha1
kind: Cluster
metadata:
name: my-cluster-name
spec:
...
# Add IAM Authenticator to existing cluster
identityProviderRefs:
- kind: AWSIamConfig
name: aws-iam-auth-config
---
apiVersion: anywhere.eks.amazonaws.com/v1alpha1
kind: AWSIamConfig
metadata:
name: aws-iam-auth-config
spec:
awsRegion: us-west-1
backendMode:
- EKSConfigMap
mapRoles:
- roleARN: arn:aws:iam::XXXXXXXXXXXX:role/myRole
username: myKubernetesUsername
groups:
- system:masters
mapUsers:
- userARN: arn:aws:iam::XXXXXXXXXXXX:user/myUser
username: myKubernetesUsername
groups:
- system:masters
partition: aws
- Run the upgrade command:
CLUSTER_NAME=my-cluster-name
eksctl anywhere upgrade cluster -f ${CLUSTER_NAME}.yaml
EKS Anywhere will:
- Install the
aws-iam-authenticator server on the workload cluster
- Configure the Kubernetes API Server with the authentication webhook
- Create the necessary ConfigMaps
- Generate the AWS IAM-based kubeconfig file at
${PWD}/${CLUSTER_NAME}/${CLUSTER_NAME}-aws.kubeconfig
Note
Adding AWS IAM Authenticator to an existing cluster will roll out control plane nodes in the cluster.
Remove AWS IAM Authenticator from cluster
You can remove AWS IAM Authenticator from a cluster that has it enabled.
- Set
identityProviderRefs to an empty array in your cluster configuration:
apiVersion: anywhere.eks.amazonaws.com/v1alpha1
kind: Cluster
metadata:
name: my-cluster-name
spec:
...
# Set to empty array to remove IAM Authenticator
identityProviderRefs: []
Important
You must explicitly set identityProviderRefs: [] (empty array) in your cluster configuration. Simply removing or commenting out the field will not properly remove the IAM Authenticator configuration due to Kubernetes server-side apply merge behavior.
- Run the upgrade command:
CLUSTER_NAME=my-cluster-name
eksctl anywhere upgrade cluster -f ${CLUSTER_NAME}.yaml
EKS Anywhere will:
- Remove the
aws-iam-authenticator server from the workload cluster
- Clean up the authentication webhook configuration
- Remove ConfigMaps and other related resources
- Clean up the AWS IAM-based kubeconfig file
Warning
Removing AWS IAM Authenticator will roll out control plane nodes in the cluster. After removal, users will no longer be able to authenticate using the AWS IAM-based kubeconfig file. Ensure you have alternative authentication methods configured before removing IAM Authenticator.
Modify IAM Authenticator mappings
The mapRoles and mapUsers lists in AWSIamConfig can be modified when running the upgrade cluster command from EKS Anywhere.
As an example, let’s add another IAM user to the above example configuration.
apiVersion: anywhere.eks.amazonaws.com/v1alpha1
kind: AWSIamConfig
metadata:
name: aws-iam-auth-config
spec:
...
mapUsers:
- userARN: arn:aws:iam::XXXXXXXXXXXX:user/myUser
username: myKubernetesUsername
groups:
- system:masters
- userARN: arn:aws:iam::XXXXXXXXXXXX:user/anotherUser
username: anotherKubernetesUsername
partition: aws
and then run the upgrade command
CLUSTER_NAME=my-cluster-name
eksctl anywhere upgrade cluster -f ${CLUSTER_NAME}.yaml
EKS Anywhere now updates the role mappings for IAM authenticator in the cluster and the new user gains access to the cluster.
GitOps
If the cluster has GitOps configured, then AWS IAM Authenticator can be added, removed, or modified by the GitOps controller. For GitOps configuration details refer to Manage Cluster with GitOps
.
Note
GitOps support for the AWSIamConfig is currently only on management or self-managed clusters.
-
Clone your git repo and modify the cluster specification.
The default path for the cluster file is:
clusters/$CLUSTER_NAME/eksa-system/eksa-cluster.yaml
-
To add AWS IAM Authenticator: Add the identityProviderRefs section and AWSIamConfig resource to the cluster specification.
To remove AWS IAM Authenticator: Set identityProviderRefs: [] (empty array) in the cluster specification.
To modify mappings: Update the mapRoles and mapUsers lists in the AWSIamConfig object.
-
Commit the file to your git repository
git add eksa-cluster.yaml
git commit -m 'Update IAM Authenticator configuration'
git push origin main
EKS Anywhere GitOps Controller will apply the changes to the cluster, adding, removing, or updating the IAM authenticator configuration as specified.
6.7.3 - CIS Self-Assessment Guide
CIS Benchmark Self-Assessment Guide for EKS Anywhere clusters
The CIS Benchmark self-assessment guide serves to help EKS Anywhere users evaluate the level of security of the hardened cluster configuration against Kubernetes benchmark controls from the Center for Information Security (CIS). This guide will walk through the various controls and provide updated example commands to audit compliance in EKS Anywhere clusters.
You can verify the security posture of your EKS Anywhere cluster by using a tool called kube-bench
. The ideal way to run the benchmark tests on your EKS Anywhere cluster is to apply the Kube-bench Job YAMLs
to the cluster. This runs the kube-bench tests on a Pod on the cluster, and the logs of the Pod provide the test results.
Kube-bench currently does not support unstacked etcd topology (which is the default for EKS Anywhere), so the following checks are skipped in the default kube-bench Job YAML. If you created your EKS Anywhere cluster with stacked etcd configuration, you can apply the stacked etcd Job YAML
instead.
| Check number |
Check description |
| 1.1.7 |
Ensure that the etcd pod specification file permissions are set to 644 or more restrictive |
| 1.1.8 |
Ensure that the etcd pod specification file ownership is set to root:root |
| 1.1.11 |
Ensure that the etcd data directory permissions are set to 700 or more restrictive |
| 1.1.12 |
Ensure that the etcd data directory ownership is set to etcd:etcd |
The following tests are also skipped, because they are not applicable or enforce settings that might make the cluster unstable.
| Check number |
Check description |
Reason for skipping |
| Controlplane node configuration |
|
|
| 1.2.6 |
Ensure that the –kubelet-certificate-authority argument is set as appropriate |
When generating serving certificates, functionality could break in conjunction with hostname overrides which are required for certain cloud providers |
| 1.2.16 |
Ensure that the admission control plugin PodSecurityPolicy is set |
Enabling Pod Security Policy can cause applications to unexpectedly fail |
| 1.2.32 |
Ensure that the –encryption-provider-config argument is set as appropriate |
Enabling encryption changes how data can be recovered as data is encrypted |
| 1.2.33 |
Ensure that encryption providers are appropriately configured |
Enabling encryption changes how data can be recovered as data is encrypted |
| Worker node configuration |
|
|
| 4.2.6 |
Ensure that the –protect-kernel-defaults argument is set to true |
System level configurations are required before provisioning the cluster in order for this argument to be set to true |
| 4.2.10 |
Ensure that the –tls-cert-file and –tls-private-key-file arguments are set as appropriate |
When generating serving certificates, functionality could break in conjunction with hostname overrides which are required for certain cloud providers |
Note
Running kube-bench on Bottlerocket controlplane nodes currently produces false negatives with respect to pod specification file (manifest) permissions, since the
default configuration does not include the paths in which Bottlerocket places these manifests. This issue is being tracked
here.
6.8 - Observability in EKS Anywhere
Monitoring, Logging, and Tracing for EKS Anywhere Clusters.
6.8.1 - Overview
Overview of observability in EKS Anywhere
Most Kubernetes-conformant observability tools can be used with EKS Anywhere. You can optionally use the EKS Connector to view your EKS Anywhere cluster resources in the Amazon EKS console, reference the Connect to console page
for details. EKS Anywhere includes the AWS Distro for Open Telemetry (ADOT)
and Prometheus
for metrics and tracing as EKS Anywhere Curated Packages. You can use popular tooling such as Fluent Bit
for logging, and can track the progress of logging for ADOT on the AWS Observability roadmap
. For more information on EKS Anywhere Curated Packages, reference the Package Management Overview
.
AWS Integrations
AWS offers comprehensive monitoring, logging, alarming, and dashboard capabilities through services such as Amazon CloudWatch
, Amazon Managed Prometheus (AMP)
, and Amazon Managed Grafana (AMG)
. With CloudWatch, you can take advantage of a highly scalable, AWS-native centralized logging and monitoring solution for EKS Anywhere clusters. With AMP and AMG, you can monitor your containerized applications EKS Anywhere clusters at scale with popular Prometheus and Grafana interfaces.
Resources
- Verify EKS Anywhere cluster status
- Use the EKS Connector to view EKS Anywhere clusters and resources in the EKS console
- Use Fluent Bit and Container Insights to send metrics and logs to CloudWatch
- Use ADOT to send metrics to AMP and AMG
- Expose metrics for EKS Anywhere components
6.8.2 - Verify EKS Anywhere cluster status
Verify the status of EKS Anywhere clusters
Note
- To check the status of a single cluster, configure
kubectl to communicate with the cluster by setting the KUBECONFIG environment variable to point to your cluster’s kubeconfig file.
- To check the status of workload clusters from a management cluster, configure
kubectl with the kubeconfig of the management cluster.
Check cluster nodes
To verify the expected number of cluster nodes are present and running, use the kubectl command to show that nodes are Ready.
Worker nodes are named using the cluster name followed by the worker node group name. In the example below, the cluster name is mgmt and the worker node group name is md-0. The other nodes shown in the response are control plane or etcd nodes.
NAME STATUS ROLES AGE VERSION
mgmt-clrt4 Ready control-plane 3d22h v1.27.1-eks-61789d8
mgmt-md-0-5557f7c7bxsjkdg-l2kpt Ready <none> 3d22h v1.27.1-eks-61789d8
Check cluster machines
To verify that the expected number of cluster machines are present and running, use the kubectl command to show that the machines are Running.
The machine objects are named using the cluster name as a prefix and there should be one created for each node in your cluster. In the example below, the command was run against a management cluster with a single attached workload cluster. When the command is run against a management cluster, all machines for the management cluster and attached workload clusters are shown.
NAMESPACE NAME CLUSTER NODENAME PROVIDERID PHASE AGE VERSION
eksa-system mgmt-clrt4 mgmt mgmt-clrt4 vsphere://421a801c-ac46-f47e-de1f-f070ef990c4d Running 3d22h v1.27.1-eks-1-27-4
eksa-system mgmt-md-0-5557f7c7bxsjkdg-l2kpt mgmt mgmt-md-0-5557f7c7bxsjkdg-l2kpt vsphere://421a4b9b-c457-fc4d-458a-d5092f981c5d Running 3d22h v1.27.1-eks-1-27-4
eksa-system w01-7hzfh w01 w01-7hzfh vsphere://421a642b-f4ef-5764-47f9-5b56efcf8a4b Running 15h v1.27.1-eks-1-27-4
eksa-system w01-etcd-z2ggk w01 vsphere://421ac003-3a1a-7dd9-ac83-bd0c75370cc4 Running 15h
eksa-system w01-md-0-799ffd7946x5gz8w-p94mt w01 w01-md-0-799ffd7946x5gz8w-p94mt vsphere://421a7b77-ca57-dc78-18bf-f361081a2c5e Running 15h v1.27.1-eks-1-27-4
Check cluster components
To verify cluster components are present and running, use the kubectl command to show that the system Pods are Running. The number of Pods may vary based on the infrastructure provider (vSphere, bare metal, Snow, Nutanix, CloudStack), and whether the cluster is a workload cluster or a management cluster.
NAMESPACE NAME READY STATUS RESTARTS AGE
capi-kubeadm-bootstrap-system capi-kubeadm-bootstrap-controller-manager-8665b88c65-v982t 1/1 Running 0 3d22h
capi-kubeadm-control-plane-system capi-kubeadm-control-plane-controller-manager-67595c55d8-z7627 1/1 Running 0 3d22h
capi-system capi-controller-manager-88bdd56b4-wnk66 1/1 Running 0 3d22h
capv-system capv-controller-manager-644d9864dc-hbrcz 1/1 Running 1 (16h ago) 3d22h
cert-manager cert-manager-548579646f-4tgb2 1/1 Running 0 3d22h
cert-manager cert-manager-cainjector-cbb6df554-w5fjx 1/1 Running 0 3d22h
cert-manager cert-manager-webhook-54f748c89b-qnfr2 1/1 Running 0 3d22h
eksa-packages ecr-credential-provider-package-4c7mk 1/1 Running 0 3d22h
eksa-packages ecr-credential-provider-package-nvlkb 1/1 Running 0 3d22h
eksa-packages eks-anywhere-packages-784c6fc8b9-2t5nr 1/1 Running 0 3d22h
eksa-system eksa-controller-manager-76f484bd5b-x6qld 1/1 Running 0 3d22h
etcdadm-bootstrap-provider-system etcdadm-bootstrap-provider-controller-manager-6bcdd4f5d7-wvqw8 1/1 Running 0 3d22h
etcdadm-controller-system etcdadm-controller-controller-manager-6f96f5d594-kqnfw 1/1 Running 0 3d22h
kube-system cilium-lbqdt 1/1 Running 0 3d22h
kube-system cilium-operator-55c4778776-jvrnh 1/1 Running 0 3d22h
kube-system cilium-operator-55c4778776-wjjrk 1/1 Running 0 3d22h
kube-system cilium-psqm2 1/1 Running 0 3d22h
kube-system coredns-69797695c4-kdtjc 1/1 Running 0 3d22h
kube-system coredns-69797695c4-r25vv 1/1 Running 0 3d22h
kube-system etcd-mgmt-clrt4 1/1 Running 0 3d22h
kube-system kube-apiserver-mgmt-clrt4 1/1 Running 0 3d22h
kube-system kube-controller-manager-mgmt-clrt4 1/1 Running 0 3d22h
kube-system kube-proxy-588gj 1/1 Running 0 3d22h
kube-system kube-proxy-hrksw 1/1 Running 0 3d22h
kube-system kube-scheduler-mgmt-clrt4 1/1 Running 0 3d22h
kube-system kube-vip-mgmt-clrt4 1/1 Running 0 3d22h
kube-system vsphere-cloud-controller-manager-7vzjx 1/1 Running 0 3d22h
kube-system vsphere-cloud-controller-manager-cqfs5 1/1 Running 0 3d22h
Check control plane components
You can verify the control plane is present and running by filtering Pods by the control-plane=controller-manager label.
kubectl get pod -A -l control-plane=controller-manager
NAMESPACE NAME READY STATUS RESTARTS AGE
capi-kubeadm-bootstrap-system capi-kubeadm-bootstrap-controller-manager-8665b88c65-v982t 1/1 Running 0 3d21h
capi-kubeadm-control-plane-system capi-kubeadm-control-plane-controller-manager-67595c55d8-z7627 1/1 Running 0 3d21h
capi-system capi-controller-manager-88bdd56b4-wnk66 1/1 Running 0 3d21h
capv-system capv-controller-manager-644d9864dc-hbrcz 1/1 Running 1 (15h ago) 3d21h
eksa-packages eks-anywhere-packages-784c6fc8b9-2t5nr 1/1 Running 0 3d21h
etcdadm-bootstrap-provider-system etcdadm-bootstrap-provider-controller-manager-6bcdd4f5d7-wvqw8 1/1 Running 0 3d21h
etcdadm-controller-system etcdadm-controller-controller-manager-6f96f5d594-kqnfw 1/1 Running 0 3d21h
Check workload clusters from management clusters
Set up CLUSTER_NAME and KUBECONFIG environment variable for the management cluster:
export CLUSTER_NAME=mgmt
export KUBECONFIG=${CLUSTER_NAME}/${CLUSTER_NAME}-eks-a-cluster.kubeconfig
Check control plane resources for all clusters
Use the command below to check the status of cluster control plane resources. This is useful to verify clusters with multiple control plane nodes after an upgrade. The status for the management cluster and all attached workload clusters is shown.
kubectl get kubeadmcontrolplanes.controlplane.cluster.x-k8s.io -n eksa-system
NAME CLUSTER INITIALIZED API SERVER AVAILABLE REPLICAS READY UPDATED UNAVAILABLE AGE VERSION
mgmt mgmt true true 1 1 1 3d22h v1.27.1-eks-1-27-4
w01 w01 true true 1 1 1 0 16h v1.27.1-eks-1-27-4
Use the command below to check the status of a cluster resource. This is useful to verify cluster health after any mutating cluster lifecycle operation. The status for the management cluster and all attached workload clusters is shown.
kubectl get clusters.cluster.x-k8s.io -A -o=custom-columns=NAME:.metadata.name,CONTROLPLANE-READY:.status.controlPlaneReady,INFRASTRUCTURE-READY:.status.infrastructureReady,MANAGED-EXTERNAL-ETCD-INITIALIZED:.status.managedExternalEtcdInitialized,MANAGED-EXTERNAL-ETCD-READY:.status.managedExternalEtcdReady
NAME CONTROLPLANE-READY INFRASTRUCTURE-READY MANAGED-EXTERNAL-ETCD-INITIALIZED MANAGED-EXTERNAL-ETCD-READY
mgmt true true <none> <none>
w01 true true true true
6.8.3 - Configure Kubernetes Audit Policy
Configure Kubernetes audit policy for control plane nodes to enable comprehensive logging and monitoring
Kubernetes Audit Policy Support
EKS Anywhere configures a default audit policy for all clusters to provide basic logging and monitoring of API server requests. This default policy covers essential security events and resource access patterns.
Note
All EKS Anywhere clusters include audit logging with a sensible default policy. The auditPolicyContent field is only needed if you want to customize the audit policy beyond the default configuration.
Customizing Audit Policy (Optional)
If you need to customize the audit policy beyond the default configuration, you can override it by adding the auditPolicyContent field to the controlPlaneConfiguration section of your cluster configuration:
apiVersion: anywhere.eks.amazonaws.com/v1alpha1
kind: Cluster
metadata:
name: my-cluster
spec:
controlPlaneConfiguration:
count: 1
endpoint:
host: "192.168.1.100"
machineGroupRef:
kind: VSphereMachineConfig
name: my-cluster-control-plane
auditPolicyContent: |
apiVersion: audit.k8s.io/v1
kind: Policy
rules:
- level: RequestResponse
resources:
- group: ""
resources:
- pods
- services
- secrets
- configmaps
Updating Audit Policy
To modify the audit policy on an existing cluster:
- Add/Update the
auditPolicyContent in your cluster configuration file
- Run the cluster upgrade command:
eksctl anywhere upgrade cluster -f my-cluster.yaml
The upgrade process will rollout all control plane nodes with updated audit policy configuration.
6.8.4 - Connect EKS Anywhere clusters to the EKS console
Connect an EKS Anywhere cluster to the EKS console
The EKS Connector lets you connect your EKS Anywhere cluster to the EKS console. The connected console displays the EKS Anywhere cluster, its configuration, workloads, and their status.
EKS Connector is a software agent that runs on your EKS Anywhere cluster and registers the cluster with the EKS console
Visit the EKS Connector documentation
for details on how to configure and run the EKS Connector.
6.8.5 - Configure Fluent Bit for CloudWatch
Using Fluent Bit for logging with EKS Anywhere clusters and CloudWatch
Fluent Bit
is an open source, multi-platform log processor and forwarder which allows you to collect data/logs from different sources, then unify and send them to multiple destinations. It’s fully compatible with Docker and Kubernetes environments. Due to its lightweight nature, using Fluent Bit as the log forwarder for EKS Anywhere clusters enables you to stream application logs into Amazon CloudWatch Logs efficiently and reliably.
You can additionally use CloudWatch Container Insights
to collect, aggregate, and summarize metrics and logs from your containerized applications and microservices running on EKS Anywhere clusters. CloudWatch automatically collects metrics for many resources, such as CPU, memory, disk, and network. Container Insights also provides diagnostic information, such as container restart failures, to help you isolate issues and resolve them quickly. You can also set CloudWatch alarms on metrics that Container Insights collects.
On this page, we show how to set up Fluent Bit and Container Insights to send logs and metrics from your EKS Anywhere clusters to CloudWatch.
Prerequisites
- An AWS Account (see AWS documentation
to get started)
- An EKS Anywhere cluster with IAM Roles for Service Account (IRSA) enabled: With IRSA, an IAM role can be associated with a Kubernetes service account. This service account can provide AWS permissions to the containers in any Pod that use the service account, which enables the containers to securely communicate with AWS services. This removes the need to hardcode AWS security credentials as environment variables on your nodes. See the IRSA configuration page
for details.
Note
- The example uses
eksapoc as the EKS Anywhere cluster name. You must adjust the configuration in the examples below if you use a different cluster name. Specifically, make sure to adjust the fluentbit.yaml manifest accordingly.
- The example uses the
us-west-2 AWS Region. You must adjust the configuration in the examples below if you are using a different region.
Before setting up Fluent Bit, first create an IAM Policy and Role to send logs to CloudWatch.
Step 1: Create IAM Policy
-
Go to IAM Policy
in the AWS console.
-
Click on JSON as shown below:
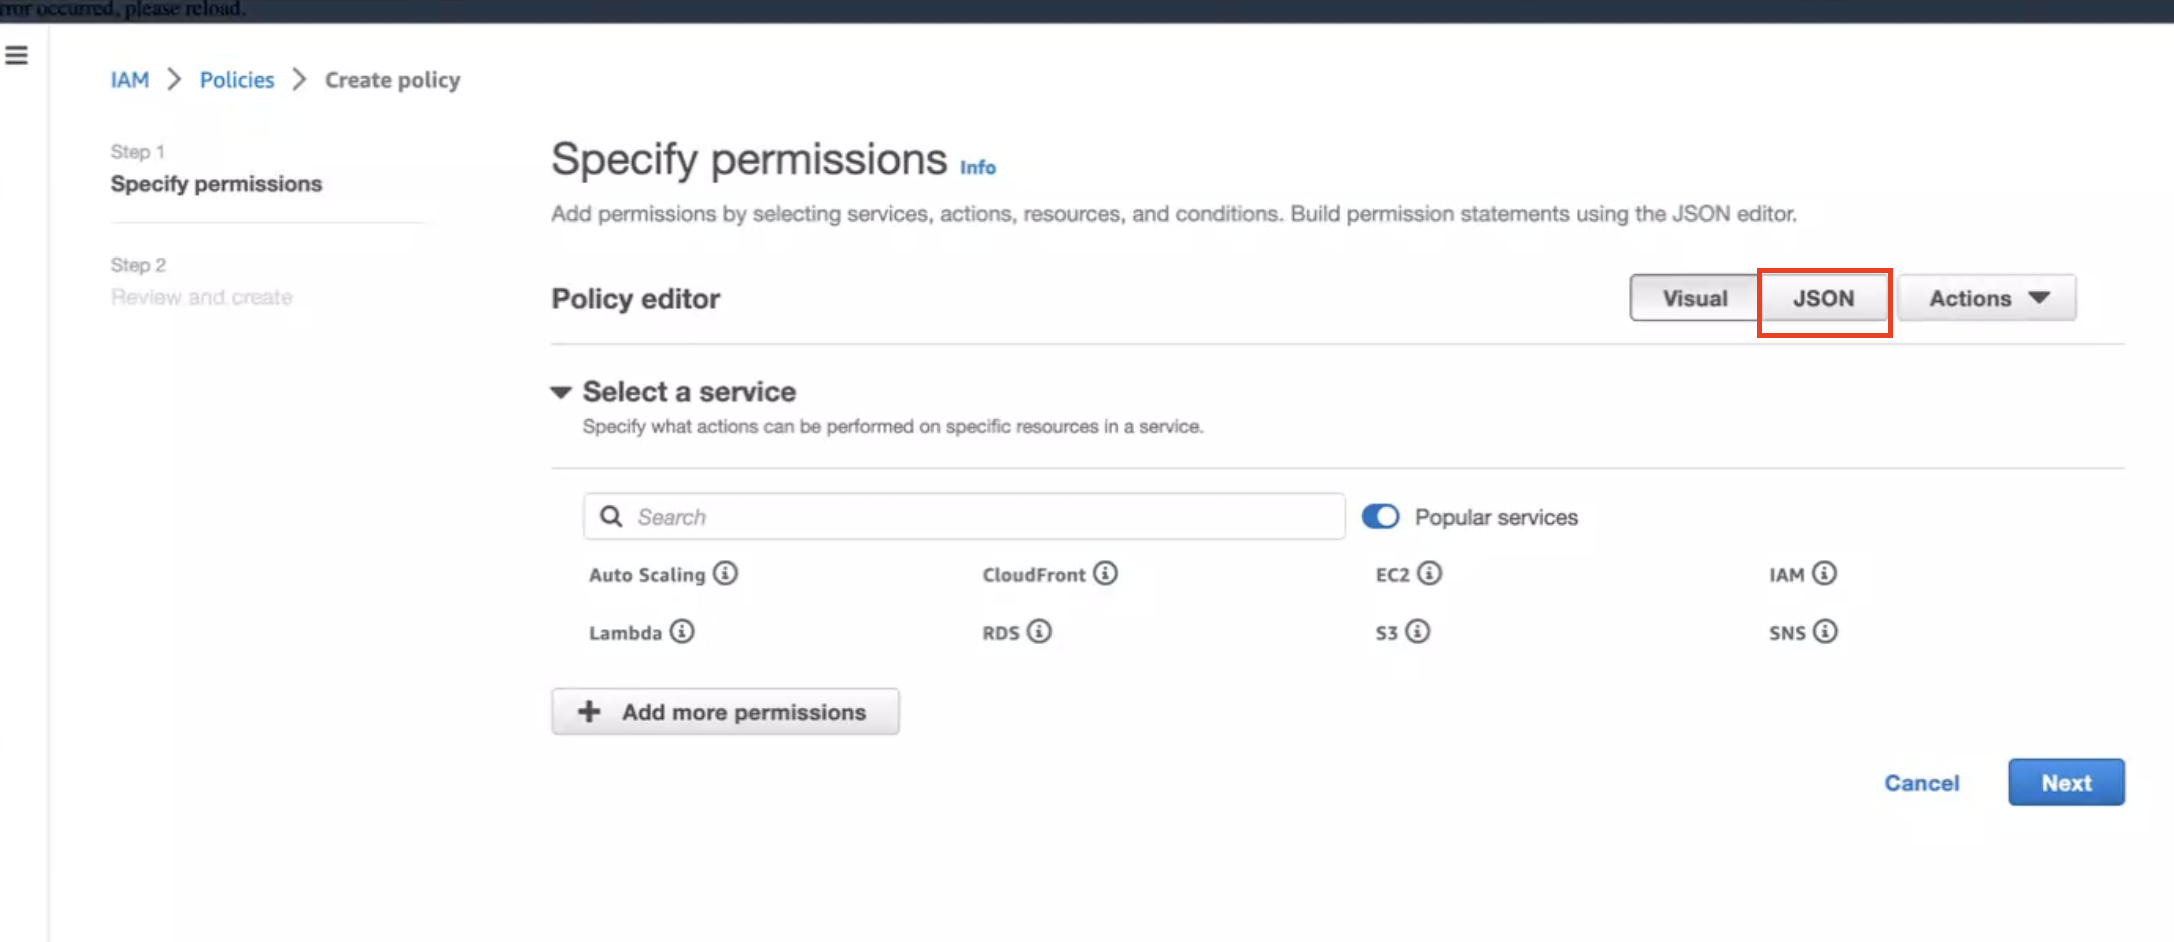
-
Create below policy on the IAM Console. Click on Create Policy as shown:
{
"Version": "2012-10-17",
"Statement": [
{
"Sid": "EKSAnywhereLogging",
"Effect": "Allow",
"Action": "cloudwatch:*",
"Resource": "*"
}
]
}
Step 2: Create IAM Role
-
Go to IAM Role
in the AWS console.
-
Follow the steps as shown below:
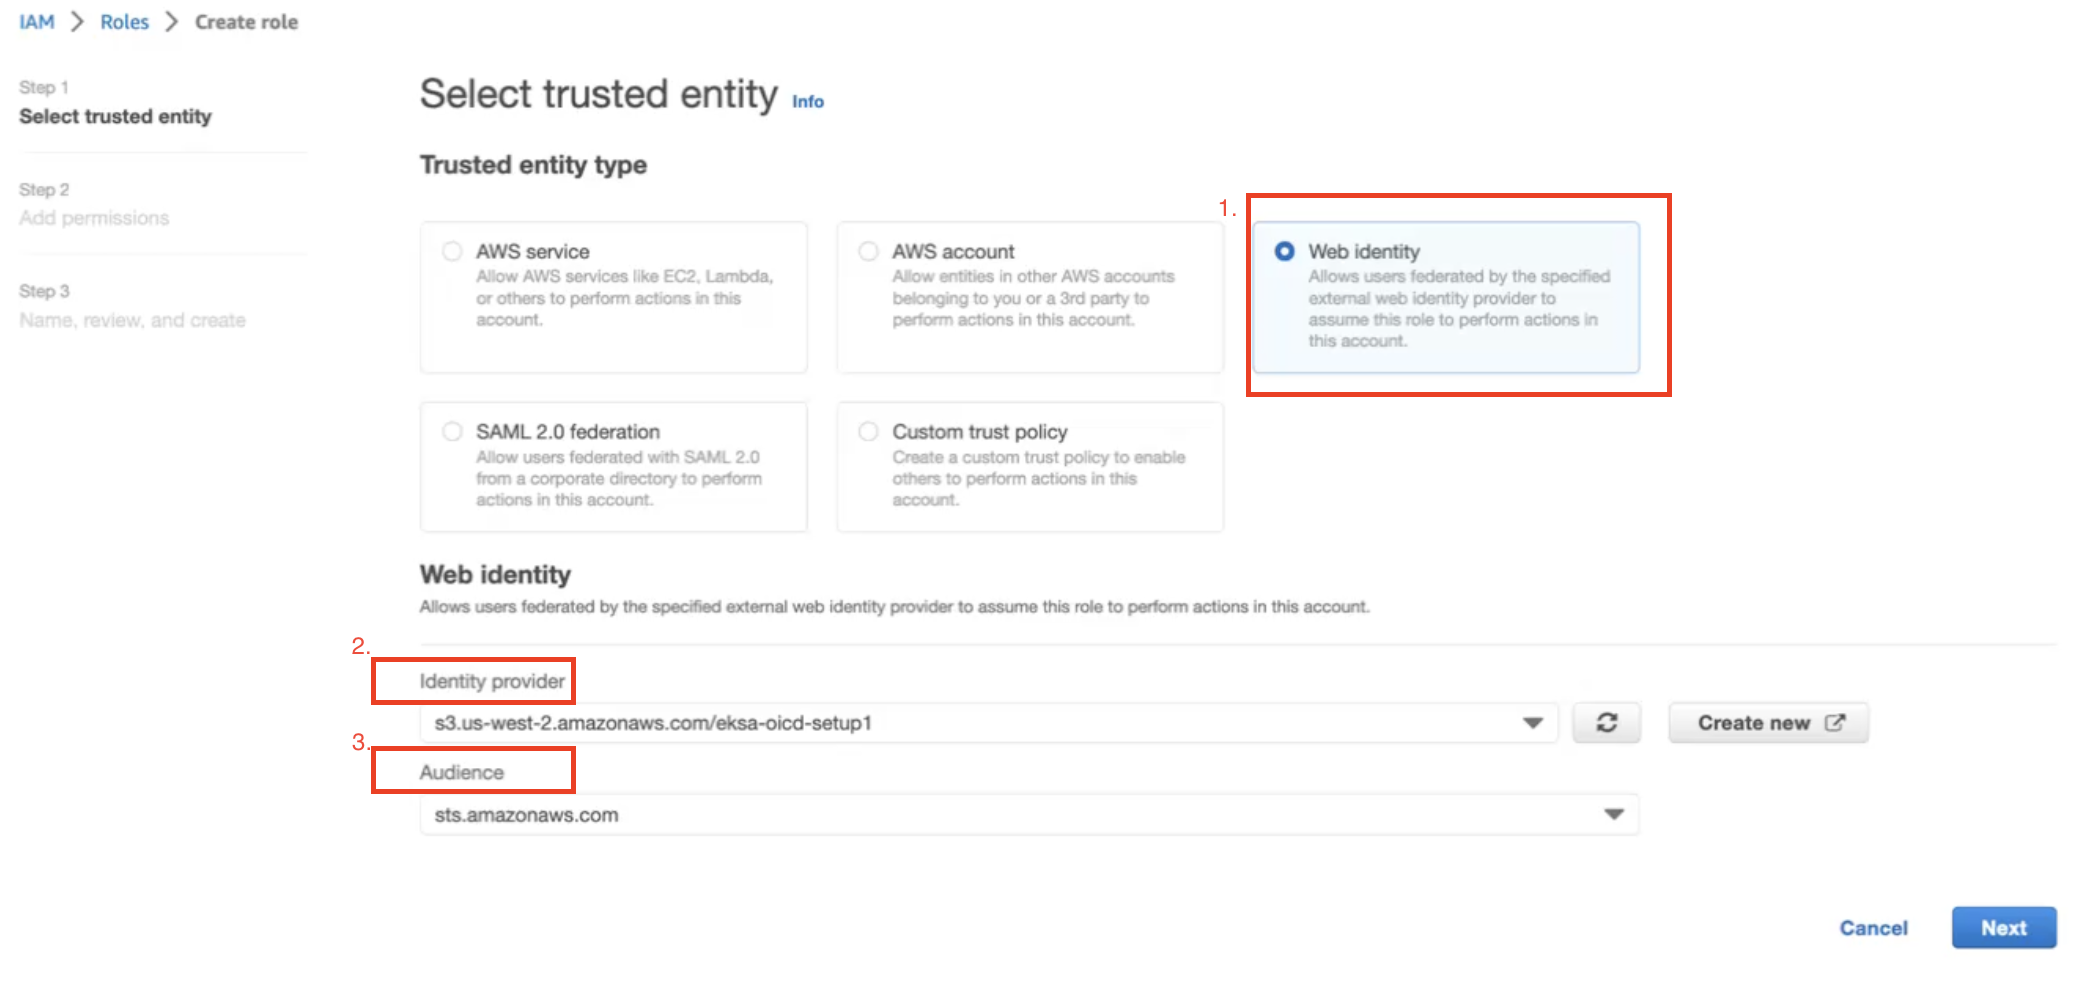
In Identity Provider, enter the OIDC provider you created as a part of IRSA configuration.
In Audience, select sts.amazonaws.com. Click on Next.
-
Select permission name which we have created in Create IAM Policy
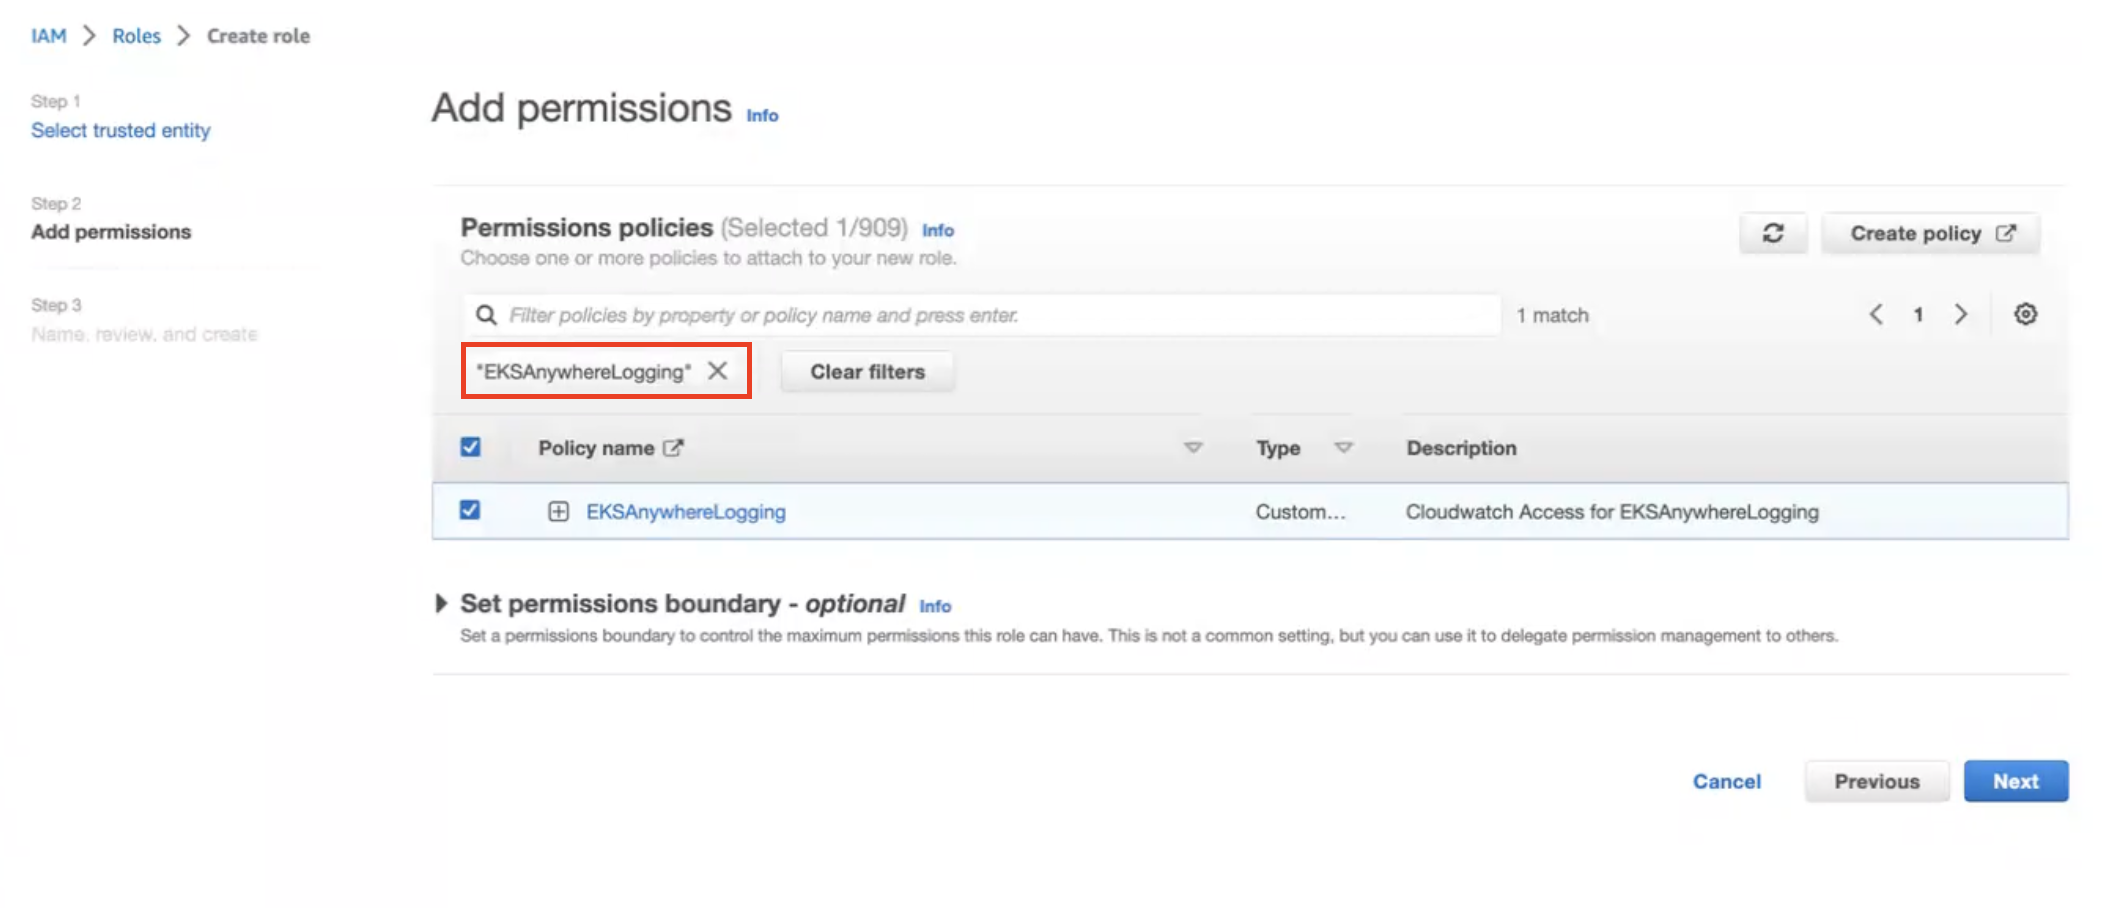
-
Provide a Role name EKSAnywhereLogging and click Next.
-
Copy the ARN as shown below and save it locally for the next step.
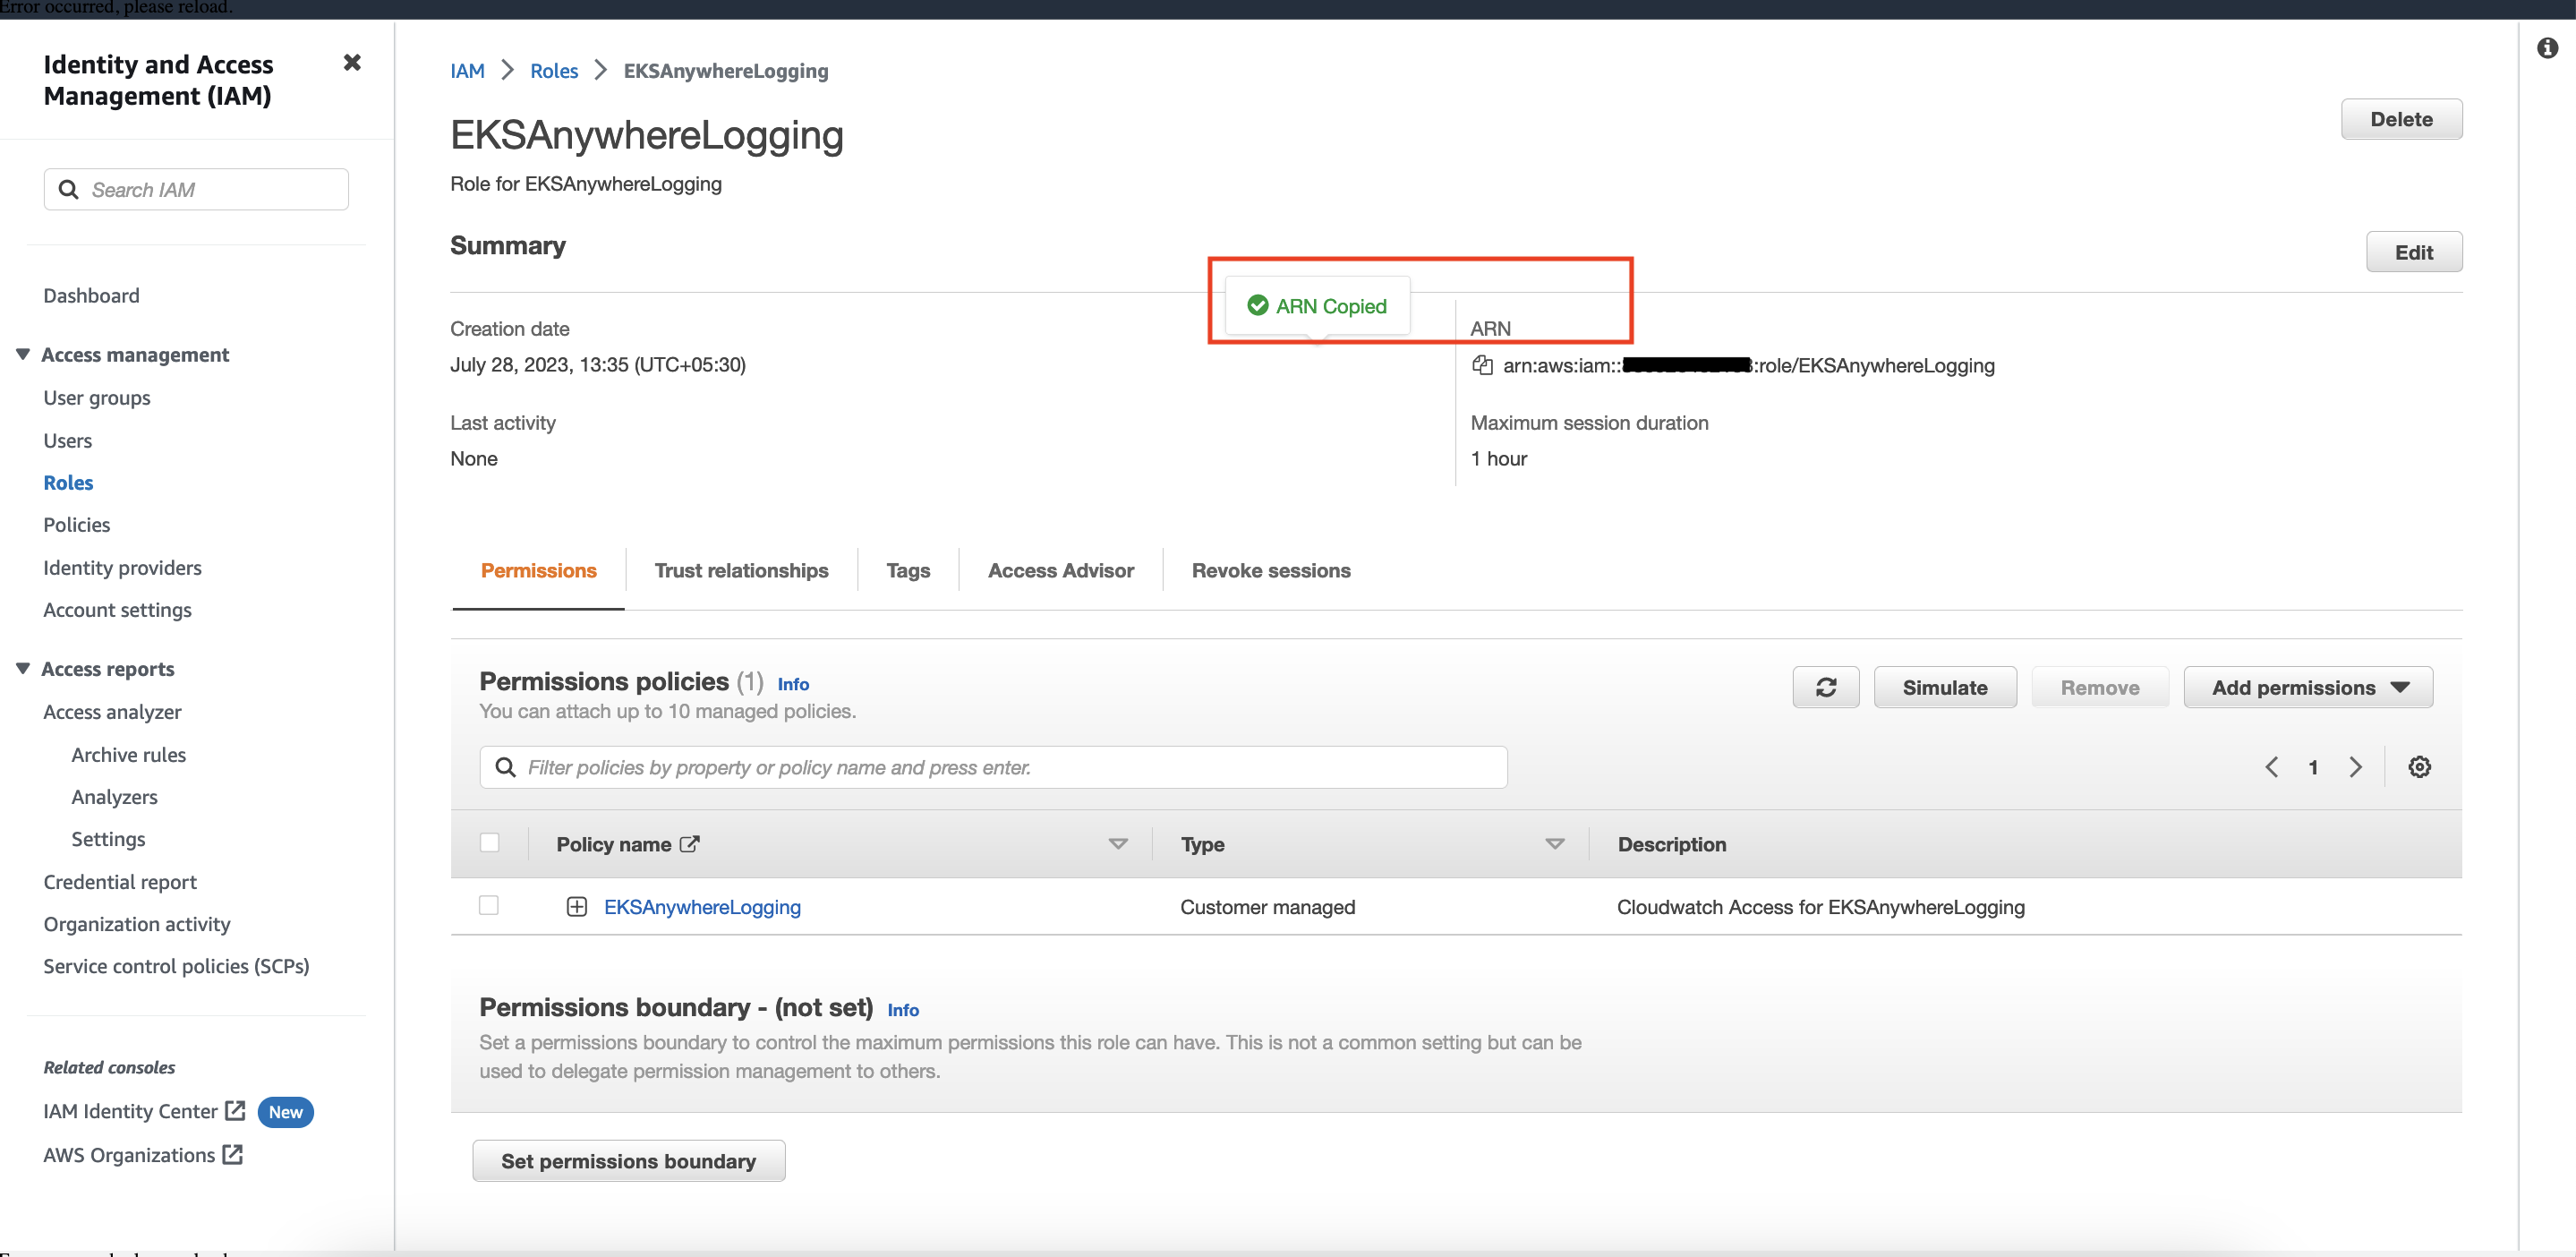
Step 3: Install Fluent Bit
-
Create the amazon-cloudwatch namespace using this command:
kubectl create namespace amazon-cloudwatch
-
Create the Service Account for cloudwatch-agent and fluent-bit under the amazon-cloudwatch namespace. In this section, we will use Role ARN which we saved earlier
. Replace $RoleARN with your actual value.
cat << EOF | kubectl apply -f -
# create cwagent service account and role binding
apiVersion: v1
kind: ServiceAccount
metadata:
name: cloudwatch-agent
namespace: amazon-cloudwatch
annotations:
# set this with value of OIDC_IAM_ROLE
eks.amazonaws.com/role-arn: "$RoleARN"
# optional: Defaults to "sts.amazonaws.com" if not set
eks.amazonaws.com/audience: "sts.amazonaws.com"
# optional: When set to "true", adds AWS_STS_REGIONAL_ENDPOINTS env var
# to containers
eks.amazonaws.com/sts-regional-endpoints: "true"
# optional: Defaults to 86400 for expirationSeconds if not set
# Note: This value can be overwritten if specified in the pod
# annotation as shown in the next step.
eks.amazonaws.com/token-expiration: "86400"
---
apiVersion: v1
kind: ServiceAccount
metadata:
name: fluent-bit
namespace: amazon-cloudwatch
annotations:
# set this with value of OIDC_IAM_ROLE
eks.amazonaws.com/role-arn: "$RoleARN"
# optional: Defaults to "sts.amazonaws.com" if not set
eks.amazonaws.com/audience: "sts.amazonaws.com"
# optional: When set to "true", adds AWS_STS_REGIONAL_ENDPOINTS env var
# to containers
eks.amazonaws.com/sts-regional-endpoints: "true"
# optional: Defaults to 86400 for expirationSeconds if not set
# Note: This value can be overwritten if specified in the pod
# annotation as shown in the next step.
eks.amazonaws.com/token-expiration: "86400"
EOF
The above command creates two Service Accounts:
serviceaccount/cloudwatch-agent created
serviceaccount/fluent-bit created
-
Now deploy Fluent Bit in your EKS Anywhere cluster to scrape and send logs to CloudWatch:
kubectl apply -f "https://anywhere.eks.amazonaws.com/manifests/fluentbit.yaml"
You should see the following output:
clusterrole.rbac.authorization.k8s.io/cloudwatch-agent-role changed
clusterrolebinding.rbac.authorization.k8s.io/cloudwatch-agent-role-binding changed
configmap/cwagentconfig changed
daemonset.apps/cloudwatch-agent changed
configmap/fluent-bit-cluster-info changed
clusterrole.rbac.authorization.k8s.io/fluent-bit-role changed
clusterrolebinding.rbac.authorization.k8s.io/fluent-bit-role-binding changed
configmap/fluent-bit-config changed
daemonset.apps/fluent-bit changed
-
You can verify the DaemonSets have been deployed with the following command:
kubectl -n amazon-cloudwatch get daemonsets
Step 4: Deploy a test application
Deploy a simple test application
to verify your setup is working properly.
Step 5: View cluster logs and metrics
Cloudwatch Logs
-
Open the CloudWatch console
. The link opens the console and displays your current available log groups.
-
Choose the EKS Anywhere clustername that you want to view logs for. The log group name format is /aws/containerinsights/my-EKS-Anywhere-cluster/cluster.
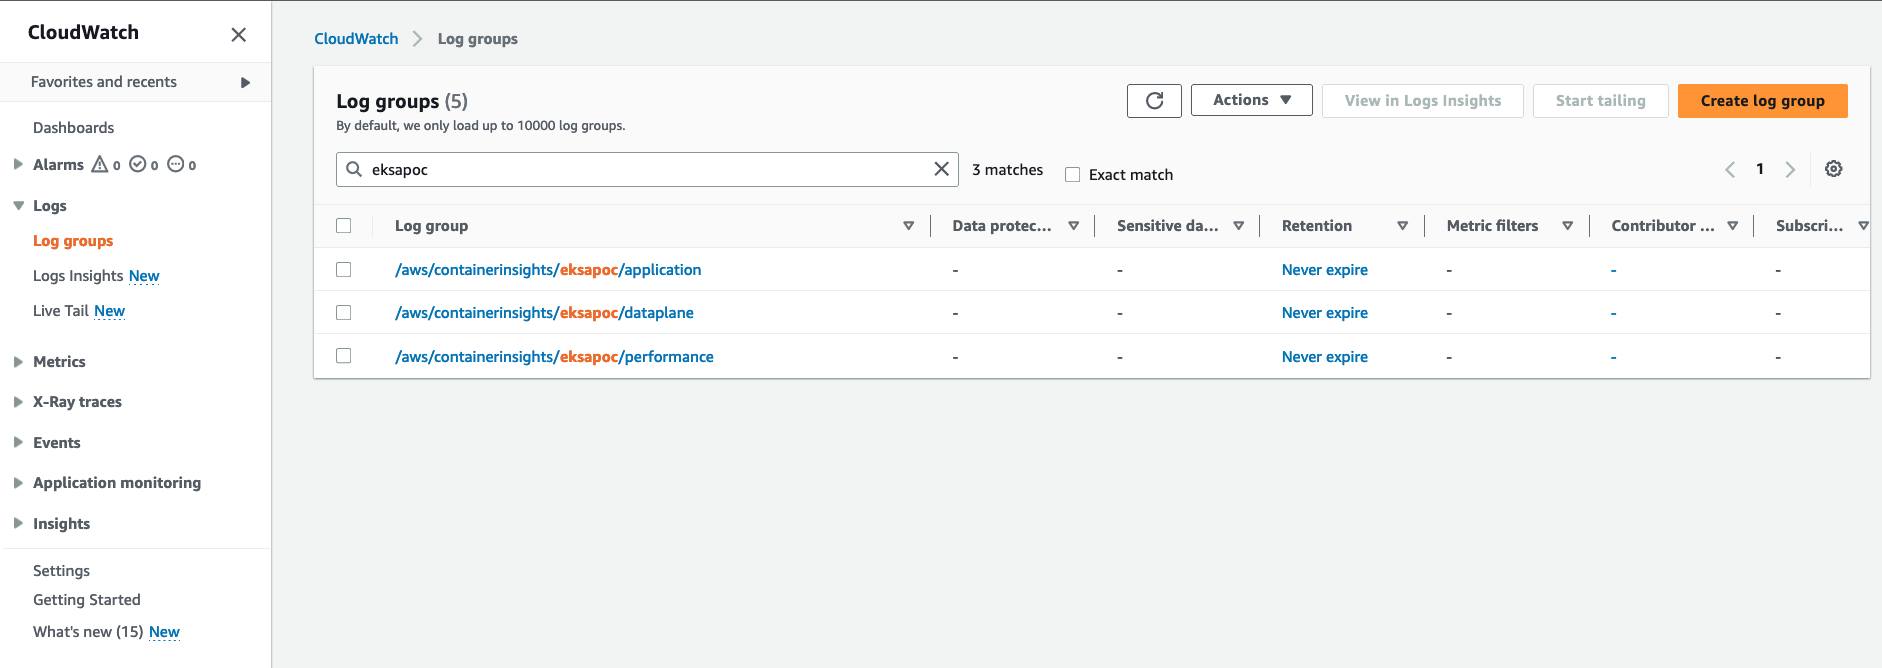
Log group name /aws/containerinsights/my-EKS-Anywhere-cluster/application has log source from /var/log/containers.
Log group name /aws/containerinsights/my-EKS-Anywhere-cluster/dataplane has log source for kubelet.service, kubeproxy.service, and docker.service
-
To view the deployed test application
logs, click on the application LogGroup, and click on Search All
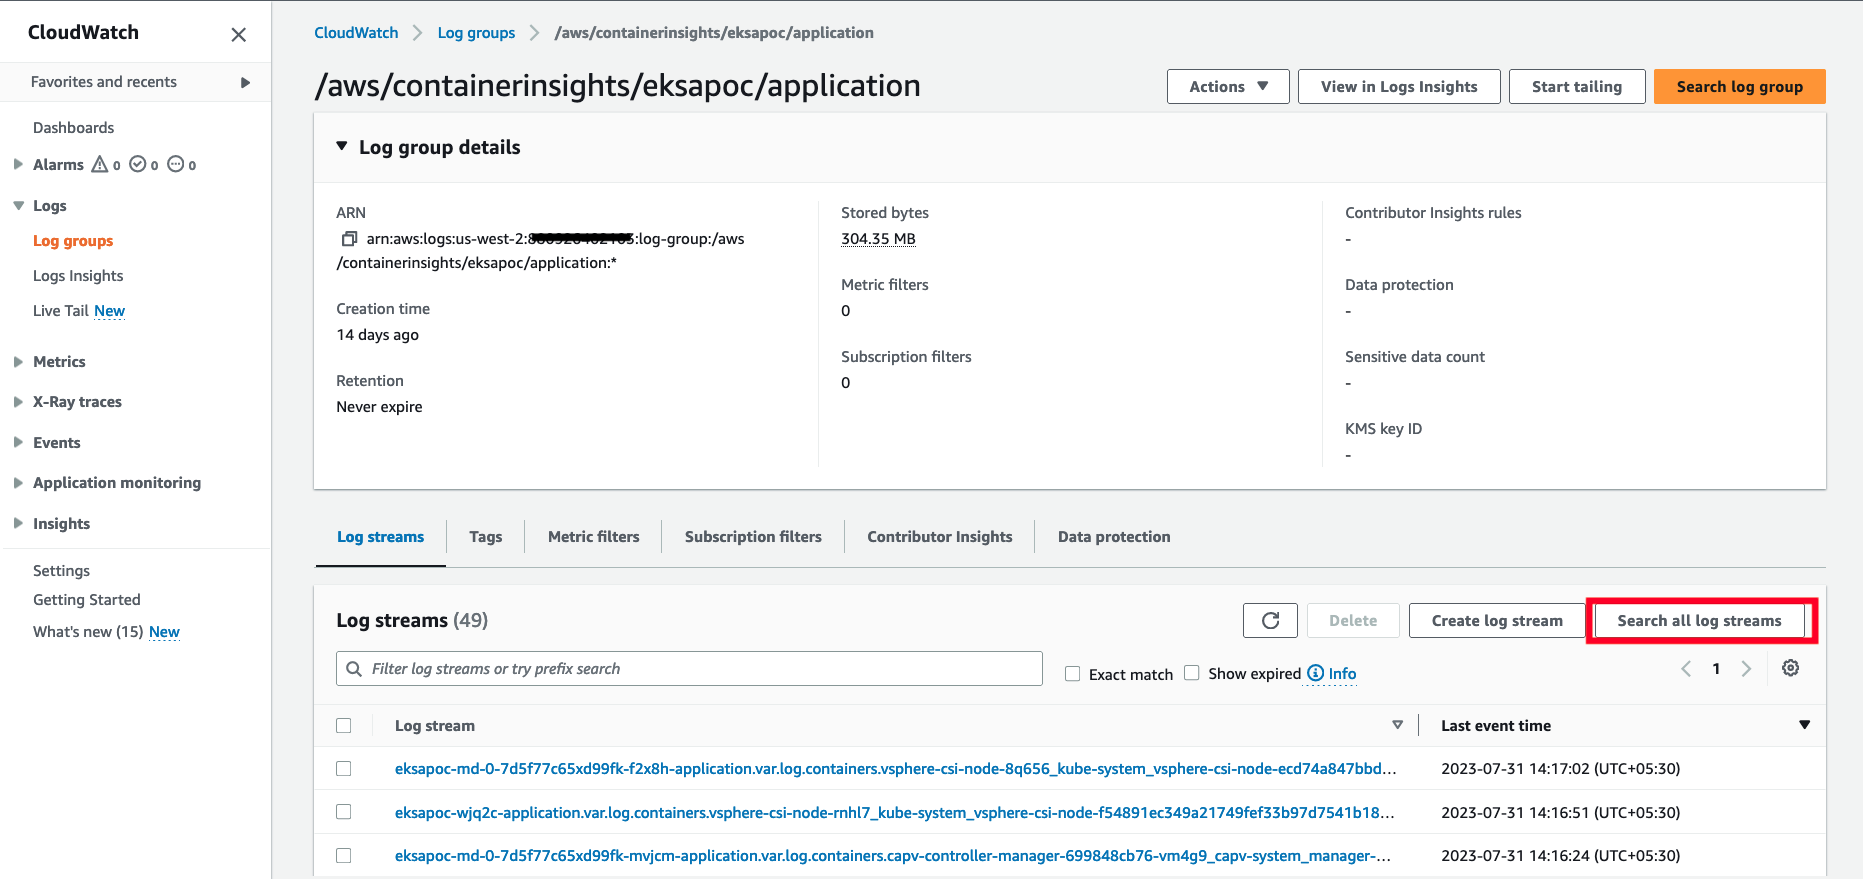
-
Type HTTP 1.1 200 in the search box and press enter. You should see logs as shown below:

Cloudwatch Container Insights
-
Open the CloudWatch console
. The link opens the Container Insights performance Monitoring console and displays a dropdown to select your EKS Clusters.
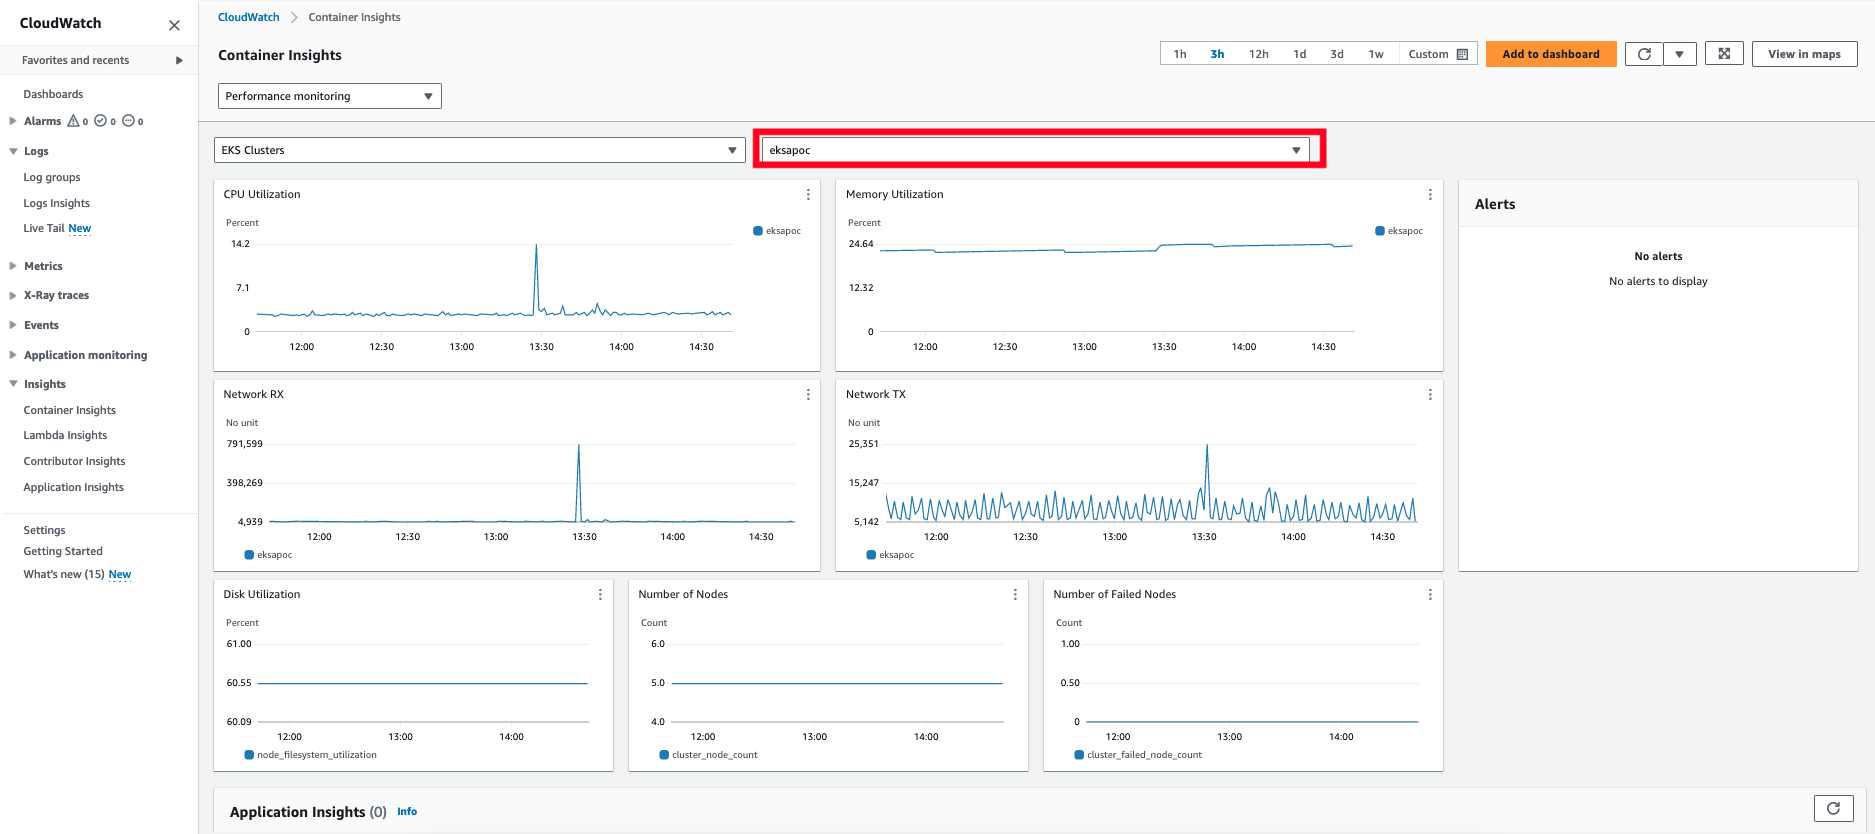
For more details on CloudWatch logs, please refer What is Amazon CloudWatch Logs?
6.8.6 - Expose metrics for EKS Anywhere components
Expose metrics for EKS Anywhere components
Some Kubernetes system components like kube-controller-manager, kube-scheduler, kube-proxy and etcd (Stacked) expose metrics only on the localhost by default. In order to expose metrics for these components so that other monitoring systems like Prometheus can scrape them, you can deploy a proxy as a Daemonset on the host network of the nodes. The proxy pods also need to be configured with control plane tolerations so that they can be scheduled on the control plane nodes.
For etcd metrics, the steps outlined below are applicable only for stacked etcd setup. For Unstacked/External etcd, metrics are already exposed on https://<etcd-machine-ip>:2379/metrics endpoint and can be scraped by Prometheus directly without deploying a proxy.
To configure a proxy for exposing metrics on an EKS Anywhere cluster, you can perform the following steps:
-
Create a config map to store the proxy configuration.
Below is an example ConfigMap if you use HAProxy as the proxy server.
cat << EOF | kubectl apply -f -
apiVersion: v1
kind: ConfigMap
metadata:
name: metrics-proxy
data:
haproxy.cfg: |
defaults
mode http
timeout connect 5000ms
timeout client 5000ms
timeout server 5000ms
default-server maxconn 10
frontend kube-proxy
bind \${NODE_IP}:10249
http-request deny if !{ path /metrics }
default_backend kube-proxy
backend kube-proxy
server kube-proxy 127.0.0.1:10249 check
frontend kube-controller-manager
bind \${NODE_IP}:10257
http-request deny if !{ path /metrics }
default_backend kube-controller-manager
backend kube-controller-manager
server kube-controller-manager 127.0.0.1:10257 ssl verify none check
frontend kube-scheduler
bind \${NODE_IP}:10259
http-request deny if !{ path /metrics }
default_backend kube-scheduler
backend kube-scheduler
server kube-scheduler 127.0.0.1:10259 ssl verify none check
frontend etcd
bind \${NODE_IP}:2381
http-request deny if !{ path /metrics }
default_backend etcd
backend etcd
server etcd 127.0.0.1:2381 check
EOF
-
Create a daemonset for the proxy and mount the config map volume onto the proxy pods.
Below is an example configuration for the HAProxy daemonset.
cat << EOF | kubectl apply -f -
apiVersion: apps/v1
kind: DaemonSet
metadata:
name: metrics-proxy
spec:
selector:
matchLabels:
app: metrics-proxy
template:
metadata:
labels:
app: metrics-proxy
spec:
tolerations:
- key: node-role.kubernetes.io/control-plane
operator: Exists
effect: NoSchedule
hostNetwork: true
containers:
- name: haproxy
image: public.ecr.aws/eks-anywhere/kubernetes-sigs/kind/haproxy:v0.20.0-eks-a-54
env:
- name: NODE_IP
valueFrom:
fieldRef:
apiVersion: v1
fieldPath: status.hostIP
ports:
- name: kube-proxy
containerPort: 10249
- name: kube-ctrl-mgr
containerPort: 10257
- name: kube-scheduler
containerPort: 10259
- name: etcd
containerPort: 2381
volumeMounts:
- mountPath: "/usr/local/etc/haproxy"
name: haproxy-config
volumes:
- configMap:
name: metrics-proxy
name: haproxy-config
EOF
-
Create a new cluster role for the client to access the metrics endpoint of the components.
cat << EOF | kubectl apply -f -
apiVersion: rbac.authorization.k8s.io/v1
kind: ClusterRole
metadata:
name: metrics-reader
rules:
- nonResourceURLs:
- "/metrics"
verbs:
- get
EOF
-
Create a new cluster role binding to bind the above cluster role to the client pod’s service account.
cat << EOF | kubectl apply -f -
apiVersion: rbac.authorization.k8s.io/v1
kind: ClusterRoleBinding
metadata:
name: metrics-reader-binding
subjects:
- kind: ServiceAccount
name: default
namespace: default
roleRef:
kind: ClusterRole
name: metrics-reader
apiGroup: rbac.authorization.k8s.io
EOF
-
Verify that the metrics are exposed to the client pods by running the following commands:
cat << EOF | kubectl apply -f -
apiVersion: v1
kind: Pod
metadata:
name: test-pod
spec:
tolerations:
- key: node-role.kubernetes.io/control-plane
operator: Exists
effect: NoSchedule
containers:
- command:
- /bin/sleep
- infinity
image: curlimages/curl:latest
name: test-container
env:
- name: NODE_IP
valueFrom:
fieldRef:
apiVersion: v1
fieldPath: status.hostIP
EOF
kubectl exec -it test-pod -- sh
export TOKEN=$(cat /var/run/secrets/kubernetes.io/serviceaccount/token)
curl -H "Authorization: Bearer ${TOKEN}" "http://${NODE_IP}:10257/metrics"
curl -H "Authorization: Bearer ${TOKEN}" "http://${NODE_IP}:10259/metrics"
curl -H "Authorization: Bearer ${TOKEN}" "http://${NODE_IP}:10249/metrics"
curl -H "Authorization: Bearer ${TOKEN}" "http://${NODE_IP}:2381/metrics"
6.9 - Backup and restore cluster
How to backup and restore your cluster
6.9.1 - Backup cluster
How to backup your EKS Anywhere cluster
We strongly advise performing regular cluster backups of all the EKS Anywhere clusters. This ensures that you always have an up-to-date cluster state available for restoration in case the cluster experiences issues or becomes unrecoverable. This document outlines the steps for creating the two essential types of backups required for the EKS Anywhere cluster restore process
.
Etcd backup
For optimal cluster maintenance, it is crucial to perform regular etcd backups on all your EKS Anywhere management and workload clusters. Always take an etcd backup before performing an upgrade so it can be used to restore the cluster to a previous state in the event of a cluster upgrade failure. To create an etcd backup for your cluster, follow the guidelines provided in the External etcd backup and restore
section.
Cluster API backup
Since cluster failures primarily occur following unsuccessful cluster upgrades, EKS Anywhere takes the proactive step of automatically creating backups for the Cluster API objects. For the management cluster, it captures the states of both the management cluster and its workload clusters if all the clusters are in ready state. If one of the workload clusters is not ready, EKS Anywhere takes the best effort to backup the management cluster itself. For the workload cluster, it captures the state workload cluster’s Cluster API objects. These backups are stored within the management cluster folder, where the upgrade command is initiated from the Admin machine, and are generated before each management and/or workload cluster upgrade process.
For example, after executing a cluster upgrade command on mgmt-cluster, a backup folder is generated with the naming convention of mgmt-cluster-backup-${timestamp}:
mgmt-cluster/
├── mgmt-cluster-backup-2023-10-11T02_55_56 <------ Folder with a backup of the CAPI objects
├── mgmt-cluster-eks-a-cluster.kubeconfig
├── mgmt-cluster-eks-a-cluster.yaml
└── generated
For workload cluster, a backup folder is generated with the naming convention of wkld-cluster-backup-${timestamp} under mgmt-cluster directory
mgmt-cluster/
├── wkld-cluster-backup-2023-10-11T02_55_56 <------ Folder with a backup of the CAPI objects
├── mgmt-cluster-eks-a-cluster.kubeconfig
├── mgmt-cluster-eks-a-cluster.yaml
└── generated
Although the likelihood of a cluster failure occurring without any associated cluster upgrade operation is relatively low, it is still recommended to manually back up these Cluster API objects on a routine basis. For example, to create a Cluster API backup of a cluster:
MGMT_CLUSTER="mgmt"
MGMT_CLUSTER_KUBECONFIG=${MGMT_CLUSTER}/${MGMT_CLUSTER}-eks-a-cluster.kubeconfig
BACKUP_DIRECTORY=backup-mgmt
# Create the backup directory
mkdir -p ${BACKUP_DIRECTORY}
# Substitute the EKS Anywhere release version with whatever CLI version you are using
EKSA_RELEASE_VERSION=v0.25.0
BUNDLE_MANIFEST_URL=$(curl -s https://anywhere-assets.eks.amazonaws.com/releases/eks-a/manifest.yaml | yq ".spec.releases[] | select(.version==\"$EKSA_RELEASE_VERSION\").bundleManifestUrl")
CLI_TOOLS_IMAGE=$(curl -s $BUNDLE_MANIFEST_URL | yq ".spec.versionsBundles[0].eksa.cliTools.uri")
docker run -i --network host -w $(pwd) -v $(pwd):/$(pwd) --entrypoint clusterctl ${CLI_TOOLS_IMAGE} move \
--namespace eksa-system \
--kubeconfig $MGMT_CLUSTER_KUBECONFIG \
--to-directory ${BACKUP_DIRECTORY}
This saves the Cluster API objects of the management cluster mgmt with all its workload clusters, to a local directory under the backup-mgmt folder.
6.9.2 - Restore cluster
How to restore your EKS Anywhere cluster from backup
In certain unfortunate circumstances, an EKS Anywhere cluster may find itself in an unrecoverable state due to various factors such as a failed cluster upgrade, underlying infrastructure problems, or network issues, rendering the cluster inaccessible through conventional means. This document outlines detailed steps to guide you through the process of restoring a failed cluster from backups in these critical situations.
Prerequisite
Always backup your EKS Anywhere cluster. Refer to the Backup cluster
and make sure you have the updated etcd and Cluster API backup at hand.
Restore a management cluster
As an EKS Anywhere management cluster contains the management components of itself, plus all the workload clusters it manages, the restoration process can be more complicated than just restoring all the objects from the etcd backup. To be more specific, all the core EKS Anywhere and Cluster API custom resources, that manage the lifecycle (provisioning, upgrading, operating, etc.) of the management and its workload clusters, are stored in the management cluster. This includes all the supporting infrastructure, like virtual machines, networks and load balancers. For example, after a failed cluster upgrade, the infrastructure components can change after the etcd backup was taken. Since the backup does not contain the new state of the half upgraded cluster, simply restoring it can create virtual machines UUID and IP mismatches, rendering EKS Anywhere incapable of healing the cluster.
Depending on whether the infrastructure components are changed or not after the etcd backup was taken (for example, if machines are rolled out and recreated and new IP addresses assigned to the machines), different strategy needs to be applied in order to restore the management cluster.
Cluster accessible and the infrastructure components not changed after etcd backup was taken
If the management cluster is still accessible through the API server, and the underlying infrastructure layer (nodes, machines, VMs, etc.) are not changed after the etcd backup was taken, simply follow the External etcd backup and restore
to restore the management cluster itself from the backup.
Warning
Do not apply the etcd restore unless you are very sure that the infrastructure layer is not changed after the etcd backup was taken. In other words, the nodes, machines, VMs, and their assigned IPs need to be exactly the same as when the backup was taken.
Cluster not accessible or infrastructure components changed after etcd backup was taken
If the cluster is no longer accessible in any means, or the infrastructure machines are changed after the etcd backup was taken, restoring this management cluster itself from the outdated etcd backup will not work. Instead, you need to create a new management cluster, and migrate all the EKS Anywhere resources of the old workload clusters to the new one, so that the new management cluster can maintain the new ownership of managing the existing workload clusters. Below is an example of migrating a failed management cluster mgmt-old with its workload clusters w01 and w02 to a new management cluster mgmt-new:
-
Create a new management cluster to which you will be migrating your workload clusters later.
You can define a cluster config similar to your old management cluster, and run cluster creation of the new management cluster with the exact same EKS Anywhere version used to create the old management cluster.
If the original management cluster still exists with old infrastructure running, you need to create a new management cluster with a different cluster name to avoid conflict.
eksctl anywhere create cluster -f mgmt-new.yaml
-
Move the custom resources of all the workload clusters to the new management cluster created above.
Using the vSphere provider as an example, we are moving the Cluster API custom resources, such as vpsherevms, vspheremachines and machines of the workload clusters, from the old management cluster to the new management cluster created in above step. By using the --filter-cluster flag with the clusterctl move command, we are only targeting the custom resources from the workload clusters.
# Use the same cluster name if the newly created management cluster has the same cluster name as the old one
MGMT_CLUSTER_OLD="mgmt-old"
MGMT_CLUSTER_NEW="mgmt-new"
MGMT_CLUSTER_NEW_KUBECONFIG=${MGMT_CLUSTER_NEW}/${MGMT_CLUSTER_NEW}-eks-a-cluster.kubeconfig
WORKLOAD_CLUSTER_1="w01"
WORKLOAD_CLUSTER_2="w02"
# Substitute the workspace path with the workspace you are using
WORKSPACE_PATH="/home/ec2-user/eks-a"
# Retrieve the Cluster API backup folder path that are automatically generated during the cluster upgrade
# This folder contains all the resources that represent the cluster state of the old management cluster along with its workload clusters
CLUSTER_STATE_BACKUP_LATEST=$(ls -Art ${WORKSPACE_PATH}/${MGMT_CLUSTER_OLD} | grep ${MGMT_CLUSTER_OLD}-backup | tail -1)
CLUSTER_STATE_BACKUP_LATEST_PATH=${WORKSPACE_PATH}/${MGMT_CLUSTER_OLD}/${CLUSTER_STATE_BACKUP_LATEST}/
# Substitute the EKS Anywhere release version with the EKS Anywhere version of the original management cluster
EKSA_RELEASE_VERSION=v0.17.3
BUNDLE_MANIFEST_URL=$(curl -s https://anywhere-assets.eks.amazonaws.com/releases/eks-a/manifest.yaml | yq ".spec.releases[] | select(.version==\"$EKSA_RELEASE_VERSION\").bundleManifestUrl")
CLI_TOOLS_IMAGE=$(curl -s $BUNDLE_MANIFEST_URL | yq ".spec.versionsBundles[0].eksa.cliTools.uri")
# The clusterctl move command needs to be executed for each workload cluster.
# It will only move the workload cluster resources from the EKS Anywhere backup to the new management cluster.
# If you have multiple workload clusters, you have to run the command for each cluster as shown below.
# Move workload cluster w01 resources to the new management cluster mgmt-new
docker run -i --network host -w $(pwd) -v $(pwd):/$(pwd) --entrypoint clusterctl ${CLI_TOOLS_IMAGE} move \
--namespace eksa-system \
--filter-cluster ${WORKLOAD_CLUSTER_1} \
--from-directory ${CLUSTER_STATE_BACKUP_LATEST_PATH} \
--to-kubeconfig ${MGMT_CLUSTER_NEW_KUBECONFIG}
# Move workload cluster w02 resources to the new management cluster mgmt-new
docker run -i --network host -w $(pwd) -v $(pwd):/$(pwd) --entrypoint clusterctl ${CLI_TOOLS_IMAGE} move \
--namespace eksa-system \
--filter-cluster ${WORKLOAD_CLUSTER_2} \
--from-directory ${CLUSTER_STATE_BACKUP_LATEST_PATH} \
--to-kubeconfig ${MGMT_CLUSTER_NEW_KUBECONFIG}
-
(Optional) Update the cluster config file of the workload clusters if the new management cluster has a different cluster name than the original management cluster.
You can skip this step if the new management cluster has the same cluster name as the old management cluster.
# workload cluster w01
---
apiVersion: anywhere.eks.amazonaws.com/v1alpha1
kind: Cluster
metadata:
name: w01
namespace: default
spec:
managementCluster:
name: mgmt-new # This needs to be updated with the new management cluster name.
...
# workload cluster w02
---
apiVersion: anywhere.eks.amazonaws.com/v1alpha1
kind: Cluster
metadata:
name: w02
namespace: default
spec:
managementCluster:
name: mgmt-new # This needs to be updated with the new management cluster name.
...
Make sure that apart from the managementCluster field you updated above, all the other cluster configs of the workload clusters need to stay the same as the old workload clusters resources after the old management cluster fails.
-
Apply the updated cluster config of each workload cluster in the new management cluster.
MGMT_CLUSTER_NEW="mgmt-new"
MGMT_CLUSTER_NEW_KUBECONFIG=${MGMT_CLUSTER_NEW}/${MGMT_CLUSTER_NEW}-eks-a-cluster.kubeconfig
kubectl apply -f w01/w01-eks-a-cluster.yaml --kubeconfig ${MGMT_CLUSTER_NEW_KUBECONFIG}
kubectl apply -f w02/w02-eks-a-cluster.yaml --kubeconfig ${MGMT_CLUSTER_NEW_KUBECONFIG}
-
Validate all clusters are in the desired state.
kubectl get clusters -n default -o custom-columns="NAME:.metadata.name,READY:.status.conditions[?(@.type=='Ready')].status" --kubeconfig ${MGMT_CLUSTER_NEW}/${MGMT_CLUSTER_NEW}-eks-a-cluster.kubeconfig
NAME READY
mgmt-new True
w01 True
w02 True
kubectl get clusters.cluster.x-k8s.io -n eksa-system --kubeconfig ${MGMT_CLUSTER_NEW}/${MGMT_CLUSTER_NEW}-eks-a-cluster.kubeconfig
NAME PHASE AGE
mgmt-new Provisioned 11h
w01 Provisioned 11h
w02 Provisioned 11h
kubectl get kcp -n eksa-system --kubeconfig ${MGMT_CLUSTER_NEW}/${MGMT_CLUSTER_NEW}-eks-a-cluster.kubeconfig
NAME CLUSTER INITIALIZED API SERVER AVAILABLE REPLICAS READY UPDATED UNAVAILABLE AGE VERSION
mgmt-new mgmt-new true true 2 2 2 11h v1.27.1-eks-1-27-4
w01 w01 true true 2 2 2 11h v1.27.1-eks-1-27-4
w02 w02 true true 2 2 2 11h v1.27.1-eks-1-27-4
Restore a workload cluster
Cluster accessible and the infrastructure components not changed after etcd backup was taken
Similar to the failed management cluster without infrastructure components change situation, follow the External etcd backup and restore
to restore the workload cluster itself from the backup.
Cluster not accessible or infrastructure components changed after etcd backup was taken
If the workload cluster is still accessible, but the infrastructure machines are changed after the etcd backup was taken, you can still try restoring the cluster itself from the etcd backup. Although doing so is risky: it can potentially cause the node names, IPs and other infrastructure configurations to revert to a state that is no longer valid. Restoring etcd effectively takes a cluster back in time and all clients will experience a conflicting, parallel history. This can impact the behavior of watching components like Kubernetes controller managers, EKS Anywhere cluster controller manager, and Cluster API controller managers.
If the original workload cluster becomes inaccessible or cannot be restored to a healthy state from an outdated etcd, a new workload cluster needs to be created. This new cluster should be managed by the same management cluster that oversaw the original. You must then restore your workload applications to this new cluster from the etcd backup of the original. This ensures the management cluster retains control, with all data from the old cluster intact. Below is an example of applying the etcd backup etcd-snapshot-w01.db from a failed workload cluster w01 to a new cluster w02:
-
Create a new workload cluster to which you will be migrating your workloads and applications from the original failed workload cluster.
You can define a cluster config similar to your old workload cluster, with a different cluster name (if the old workload cluster still exists), and run cluster creation of the new workload cluster with the exact same EKS Anywhere version used to create the old workload cluster.
export MGMT_CLUSTER="mgmt"
export MGMT_CLUSTER_KUBECONFIG=${MGMT_CLUSTER}/${MGMT_CLUSTER}-eks-a-cluster.kubeconfig
eksctl anywhere create cluster -f w02.yaml --kubeconfig $MGMT_CLUSTER_KUBECONFIG
-
Save the config map objects of the new workload cluster to a file.
Save a copy of the new workload cluster’s cluster-info, kube-proxy and kubeadm-config config map objects before the restore. This is necessary as the etcd restore will override the config maps above with the metadata information (certificates, endpoint, etc.) from the old cluster.
export WORKLOAD_CLUSTER_NAME="w02"
export WORKLOAD_CLUSTER_KUBECONFIG=${WORKLOAD_CLUSTER_NAME}/${WORKLOAD_CLUSTER_NAME}-eks-a-cluster.kubeconfig
cat <<EOF >> w02-cm.yaml
$(kubectl get -n kube-public cm cluster-info -oyaml --kubeconfig $WORKLOAD_CLUSTER_KUBECONFIG)
---
$(kubectl get -n kube-system cm kube-proxy -oyaml --kubeconfig $WORKLOAD_CLUSTER_KUBECONFIG)
---
$(kubectl get -n kube-system cm kubeadm-config -oyaml --kubeconfig $WORKLOAD_CLUSTER_KUBECONFIG)
EOF
Manually remove the creationTimestamp, resourceVersion, uid from the config map objects, so that later you can run kubectl apply against this file without errors.
-
Follow the External etcd backup and restore
to restore the old workload cluster’s etcd backup etcd-snapshot-w01.db onto the new workload cluster w02. Use different restore process based on OS family:
Warning
Do not unpause the cluster reconcilers as the workload cluster is not completely setup with required configurations yet. Unpausing the cluster reconcilers might cause unexpected machine rollout and leave the cluster in unhealthy state.
You might notice that after restoring the original etcd backup to the new workload cluster w02, all the nodes go to NotReady state with node names changed to have prefix w01-*. This is because restoring etcd effectively applies the node data from the original cluster which causes a conflicting history and can impact the behavior of watching components like Kubelets, Kubernetes controller managers.
kubectl get nodes --kubeconfig $WORKLOAD_CLUSTER_KUBECONFIG
NAME STATUS ROLES AGE VERSION
w01-bbtdd NotReady control-plane 3d23h v1.27.3-eks-6f07bbc
w01-md-0-66dbcfb56cxng8lc-8ppv5 NotReady <none> 3d23h v1.27.3-eks-6f07bbc
-
Restart Kubelet of the control plane and worker nodes of the new workload cluster after the restore.
For some cases, Kubelet on the node will automatically restart and nodes becomes ready. For other cases, you need to manually restart the Kubelet on all the control plane and worker nodes in order to bring back the nodes to ready state. Kubelet registers the node itself with the apisever which then updates etcd with the correct node data of the new workload cluster w02.
# SSH into the control plane and worker nodes. You must do this for each node.
ssh -i ${SSH_KEY} ${SSH_USERNAME}@<node IP>
sudo su
systemctl restart kubelet
# SSH into the control plane and worker nodes. You must do this for each node.
ssh -i ${SSH_KEY} ${SSH_USERNAME}@<node IP>
apiclient exec admin bash
sheltie
systemctl restart kubelet
-
Add back node-role.kubernetes.io/control-plane label to all the control plane nodes.
kubectl label nodes <control-plane-node-name> node-role.kubernetes.io/control-plane= --kubeconfig $WORKLOAD_CLUSTER_KUBECONFIG
-
Remove the lagacy nodes (if any).
kubectl get nodes --kubeconfig $WORKLOAD_CLUSTER_KUBECONFIG
NAME STATUS ROLES AGE VERSION
w01-bbtdd NotReady control-plane 3d23h v1.27.3-eks-6f07bbc
w01-md-0-66dbcfb56cxng8lc-8ppv5 NotReady <none> 3d23h v1.27.3-eks-6f07bbc
w02-fcbm2j Ready control-plane 91m v1.27.3-eks-6f07bbc
w02-md-0-b7cc67cd4xd86jf-4c9ktp Ready <none> 73m v1.27.3-eks-6f07bbc
kubectl delete node w01-bbtdd --kubeconfig $WORKLOAD_CLUSTER_KUBECONFIG
kubectl delete node w01-md-0-66dbcfb56cxng8lc-8ppv5 --kubeconfig $WORKLOAD_CLUSTER_KUBECONFIG
-
Re-apply the original config map objects of the workload cluster.
Re-apply the cluster-info, kube-proxy and kubeadm-config config map objects we saved in previous step to the workload cluster w02.
kubectl apply -f w02-cm.yaml --kubeconfig $WORKLOAD_CLUSTER_KUBECONFIG
-
Validate the nodes are in ready state.
kubectl get nodes --kubeconfig $WORKLOAD_CLUSTER_KUBECONFIG
NAME STATUS ROLES AGE VERSION
w02-djshz Ready control-plane 9m7s v1.27.3-eks-6f07bbc
w02-md-0-6bbc8dd6d4xbgcjh-wfmb6 Ready <none> 3m55s v1.27.3-eks-6f07bbc
-
Restart the system pods to ensure that they use the config maps you re-applied in previous step.
kubectl rollout restart ds kube-proxy -n kube-system --kubeconfig $WORKLOAD_CLUSTER_KUBECONFIG
-
Unpause the cluster reconcilers
kubectl annotate clusters.anywhere.eks.amazonaws.com $WORKLOAD_CLUSTER_NAME anywhere.eks.amazonaws.com/paused- --kubeconfig=$MGMT_CLUSTER_KUBECONFIG
kubectl patch clusters.cluster.x-k8s.io $WORKLOAD_CLUSTER_NAME --type merge -p '{"spec":{"paused": false}}' -n eksa-system --kubeconfig=$MGMT_CLUSTER_KUBECONFIG
-
Rollout and restart all the machine objects so that the workload cluster has a clean state.
# Substitute the EKS Anywhere release version with whatever CLI version you are using
EKSA_RELEASE_VERSION=v0.25.0
BUNDLE_MANIFEST_URL=$(curl -s https://anywhere-assets.eks.amazonaws.com/releases/eks-a/manifest.yaml | yq ".spec.releases[] | select(.version==\"$EKSA_RELEASE_VERSION\").bundleManifestUrl")
CLI_TOOLS_IMAGE=$(curl -s $BUNDLE_MANIFEST_URL | yq ".spec.versionsBundles[0].eksa.cliTools.uri")
# Rollout restart all the control plane machines
docker run -i --network host -w $(pwd) -v $(pwd):/$(pwd) --entrypoint clusterctl ${CLI_TOOLS_IMAGE} alpha rollout restart kubeadmcontrolplane/${WORKLOAD_CLUSTER_NAME} -n eksa-system --kubeconfig ${MGMT_CLUSTER_KUBECONFIG}
# Rollout restart all the worker machines
# You need to repeat below command for each worker node group
docker run -i --network host -w $(pwd) -v $(pwd):/$(pwd) --entrypoint clusterctl ${CLI_TOOLS_IMAGE} alpha rollout restart machinedeployment/${WORKLOAD_CLUSTER_NAME}-md-0 -n eksa-system --kubeconfig ${MGMT_CLUSTER_KUBECONFIG}
-
Validate the new workload cluster is in the desired state.
kubectl get clusters -n default -o custom-columns="NAME:.metadata.name,READY:.status.conditions[?(@.type=='Ready')].status" --kubeconfig $MGMT_CLUSTER_KUBECONFIG
NAME READY
mgmt True
w02 True
kubectl get clusters.cluster.x-k8s.io -n eksa-system --kubeconfig $MGMT_CLUSTER_KUBECONFIG
NAME PHASE AGE
mgmt Provisioned 11h
w02 Provisioned 11h
kubectl get kcp -n eksa-system --kubeconfig $MGMT_CLUSTER_KUBECONFIG
NAME CLUSTER INITIALIZED API SERVER AVAILABLE REPLICAS READY UPDATED UNAVAILABLE AGE VERSION
mgmt mgmt true true 2 2 2 11h v1.27.1-eks-1-27-4
w02 w02 true true 2 2 2 11h v1.27.1-eks-1-27-4
6.10 - Certificate management
How to renew EKS Anywhere cluster certificates
6.10.1 - Monitoring Certificate Expiration
How to monitor certificate expiration in EKS Anywhere clusters
There are a few ways to check certificate expiration dates depending on your cluster’s accessibility.
Using ClusterCertificateInfo (When cluster is accessible)
When your cluster is accessible via kubectl, use the ClusterCertificateInfo field in the cluster status:
kubectl get cluster <cluster-name> -o json | jq '.status.clusterCertificateInfo'
This will output a list of objects containing the machine name and the number of days until the certificate expires:
[
{
"machine": "my-cluster-control-plane-abc123",
"expiresInDays": 300
},
{
"machine": "my-cluster-control-plane-def456",
"expiresInDays": 300
},
{
"machine": "my-cluster-etcd-ghi789",
"expiresInDays": 300
}
]
The ClusterCertificateInfo field contains a list of machine objects with the following properties:
machine: The name of the machine (control plane or external etcd)expiresInDays: The number of days until the certificate expires
This information is updated periodically as part of the cluster status reconciliation process. The certificate expiration check is performed by connecting to each machine’s API server (port 6443 for control plane) or etcd server (port 2379 for external etcd) and retrieving the certificate expiration date.
Using OpenSSL for Direct Certificate Inspection (When cluster is not accessible)
When the cluster is not accessbile, you can directly check certificates using opessl:
# The expiry time of api-server certificate on control plane node
echo | openssl s_client -connect ${CONTROL_PLANE_IP}:6443 2>/dev/null | openssl x509 -noout -dates
# The expiry time of certificate used by your external etcd server, if you configured one
echo | openssl s_client -connect ${EXTERNAL_ETCD_IP}:2379 2>/dev/null | openssl x509 -noout -dates
Monitoring Best Practices
- Regular Checks: Periodically check certificate expiration to ensure you have enough time to plan for certificate renewal.
- Set Up Alerts: Consider setting up alerts to notify you when certificates are approaching expiration (e.g., 30 days before expiration).
- Proactive Renewal: If certificates are approaching expiration (less than 30 days), plan for certificate renewal using one of the methods described below.
Certificate Renewal
EKS Anywhere automatically rotates certificates when new machines are rolled out during cluster lifecycle operations such as upgrade (ie. EKS Anywhere version upgrades or Kubernetes version upgrades where nodes actually roll out). If you upgrade your cluster at least once a year, as recommended, manual rotation of cluster certificates will not be necessary.
If you need to manually renew certificates, you can use one of the following methods:
6.10.2 - Renew certificates using eksctl anywhere
How to renew EKS Anywhere cluster certificates using the eksctl anywhere CLI
Overview
EKS Anywhere provides a simple and recommended way to renew cluster certificates using the eksctl anywhere renew certificates command. This is the recommended approach for certificate renewal.
Get more information on EKS Anywhere cluster certificates from Monitoring Certificate Expiration
Note
This feature is officially available starting with EKS Anywhere v0.23.1.
However, it can also be used with clusters running older EKS Anywhere versions. To do so, you can download the new EKS Anywhere CLI at version v0.23.1 (or later) and use it to renew your existing cluster’s certificates.
Prerequisites
- Admin machine with:
eksctl anywhere CLI installed- SSH access to all control plane and etcd nodes
Configuration File
Create a YAML configuration file that specifies the cluster details and SSH access information. Example configuration file:
clusterName: my-cluster
os: ubuntu # Options: ubuntu, rhel, bottlerocket
controlPlane:
nodes:
- 192.168.1.10
- 192.168.1.11
- 192.168.1.12
ssh:
sshKey: /path/to/private/key
sshUser: ssh-user
etcd:
nodes:
- 192.168.1.20
- 192.168.1.21
- 192.168.1.22
ssh:
sshKey: /path/to/private/key
sshUser: ssh-user
Configuration Fields
clusterName (required)
Name of the EKS Anywhere cluster.
os (required)
Operating system of the nodes. Permitted values: ubuntu, rhel, bottlerocket.
controlPlane.nodes (optional)
List of control plane node IPs. Node IPs can be omitted if the cluster is accessible.
controlPlane.ssh.sshKey (required)
Path to SSH private key for control plane nodes.
controlPlane.ssh.sshUser (required)
SSH user for control plane nodes.
etcd (optional)
Required only if the cluster uses external etcd nodes.
etcd.nodes (optional)
List of external etcd node IPs. Node IPs can be omitted if the cluster is accessible.
etcd.ssh.sshKey (required if using external etcd)
Path to SSH private key for etcd nodes. Required only if the cluster uses external etcd nodes.
etcd.ssh.sshUser (required if using external etcd)
SSH user for etcd nodes. Required only if the cluster uses external etcd nodes.
Using Password-Protected SSH Keys
If your SSH keys are password protected, you can use environment variables to provide the passphrases instead of including them in the configuration file:
EKSA_SSH_KEY_PASSPHRASE_CP: Passphrase for the control plane SSH keyEKSA_SSH_KEY_PASSPHRASE_ETCD: Passphrase for the etcd SSH key
When using these environment variables, you can leave the sshKey field empty in your configuration file.
Steps to Renew Certificates
-
Create the configuration file as described above (e.g., cert-renewal-config.yaml).
-
Run the certificate renewal command:
eksctl anywhere renew certificates -f cert-renewal-config.yaml
You can set the log level verbosity using the -v or --verbosity flag:
eksctl anywhere renew certificates -f cert-renewal-config.yaml -v 9
You can also specify which component’s certificates to renew using the --component flag:
# Renew only control plane certificates
eksctl anywhere renew certificates -f cert-renewal-config.yaml --component control-plane
# Renew only etcd certificates
eksctl anywhere renew certificates -f cert-renewal-config.yaml --component etcd
This is useful when you want to renew certificates for only specific components rather than all components at once.
Renew certificates for a cluster with accessible nodes
For clusters that are accessible via kubectl, follow these steps:
-
Set the KUBECONFIG environment variable:
export KUBECONFIG=mgmt/mgmt-eks-a-cluster.kubeconfig
-
Create a simplified configuration file without node IPs:
clusterName: my-cluster
os: ubuntu
controlPlane:
ssh:
sshKey: /path/to/private/key
sshUser: ssh-user
etcd:
ssh:
sshKey: /path/to/private/key
sshUser: ssh-user
-
Run the certificate renewal command:
eksctl anywhere renew certificates -f cert-renewal-config.yaml
What the command does
The eksctl anywhere renew certificates command automates the certificate renewal process by:
- Connecting to each node via SSH
- Backing up existing certificates
- For external etcd nodes:
- Regenerating etcd certificates
- Verifying etcd health
- For control plane nodes:
- Renewing all kubeadm certificates
- Restarting static pods
- Updating external etcd key cert (if present)
- Verifying API server health
- Verifying overall cluster health
6.10.3 - Script to renew cluster certificates
Step-by-step guide to renew Kubernetes certificates on EKS Anywhere clusters using a script
Note
While this script-based approach is supported, the recommended method
for certificate renewal is using the eksctl anywhere renew certificates command.
Get more information on EKS Anywhere cluster certificates from Monitoring Certificate Expiration
This script automates:
- Certificate renewal for etcd and control plane nodes
- Cleanup of temporary files if certificates are renewed and cluster is healthy
Prerequisites
- Admin machine with:
kubectl, yq, jq, scp, ssh, and sudo installed
- SSH access to all control plane and etcd nodes
Steps
- Setup environment variable:
export KUBECONFIG=<path-to-management-cluster-kubeconfig>
- Prepare a
keys-config.yaml file
Add node and private key information of your control plane and/or external etcd to a file, such as keys-config.yaml:
clusterName: <cluster-name>
controlPlane:
nodes:
- <control-plane-1-ip>
- <control-plane-2-ip>
- <control-plane-3-ip>
sshKey: <complete-path-to-private-ssh-key>
sshUser: <ssh-user>
etcd:
nodes:
- <external-etcd-1-ip>
- <external-etcd-2-ip>
- <external-etcd-3-ip>
sshKey: <complete-path-to-private-ssh-key>
sshUser: <ssh-user>
- Download the Script
```bash
curl -O https://raw.githubusercontent.com/aws/eks-anywhere/refs/heads/main/scripts/renew_certificates.sh
chmod +x renew_certificates.sh
```
```bash
curl -O https://raw.githubusercontent.com/aws/eks-anywhere/refs/heads/main/scripts/renew_certificates_bottlerocket.sh
chmod +x renew_certificates_bottlerocket.sh
```
- Run the Script as a
sudo user
sudo ./renew_certificates.sh -f keys-config.yaml
What the Script Does
- Backs up:
- All etcd certificates (in case of external etcd)
- Control plane certificates
- Renews external etcd certificates
- Updates the Kubernetes secret
apiserver-etcd-client if api server is reachable
- Renews all kubeadm certificates
- Restarts static control plane pods
- Cleans up temporary certs and backup folders (only if certificates are renewed successfully and cluster is healthy)
6.10.4 - Manual steps to renew certificates
How to rotate certificates for etcd and control plane nodes
Note
While these manual steps renew the certificates, the recommended method
for certificate renewal is using the eksctl anywhere renew certificates command.
Certificates for external etcd and control plane nodes expire after 1 year in EKS Anywhere. This page shows the process for manually rotating certificates.
Get more information on EKS Anywhere cluster certificates from Monitoring Certificate Expiration
The following table lists the cluster certificate files:
| etcd node |
control plane node |
| apiserver-etcd-client |
apiserver-etcd-client |
| ca |
ca |
| etcdctl-etcd-client |
front-proxy-ca |
| peer |
sa |
| server |
etcd/ca.crt |
|
apiserver-kubelet-client |
|
apiserver |
|
front-proxy-client |
NOTE: You can rotate certificates by following the steps given below. You cannot rotate the ca certificate because it is the root certificate. Note that the commands used for Bottlerocket nodes are different than those for Ubuntu and RHEL nodes.
External etcd nodes
If your cluster is using external etcd nodes, you need to renew the etcd node certificates first.
Note
You can check for external etcd nodes by running the following command:
kubectl get etcdadmcluster -A
- SSH into each etcd node and run the following commands. Etcd automatically detects the new certificates and deprecates its old certificates.
# backup certs
cd /etc/etcd
sudo cp -r pki pki.bak
sudo rm pki/*
sudo cp pki.bak/ca.* pki
# run certificates join phase to regenerate the deleted certificates
sudo etcdadm join phase certificates http://eks-a-etcd-dumb-url
# you would be in the admin container when you ssh to the Bottlerocket machine
# open a root shell
sudo sheltie
# pull the image
IMAGE_ID=$(apiclient get | apiclient exec admin jq -r '.settings["host-containers"]["kubeadm-bootstrap"].source')
ctr image pull ${IMAGE_ID}
# backup certs
cd /var/lib/etcd
cp -r pki pki.bak
rm pki/*
cp pki.bak/ca.* pki
# recreate certificates
ctr run \
--mount type=bind,src=/var/lib/etcd/pki,dst=/etc/etcd/pki,options=rbind:rw \
--net-host \
--rm \
${IMAGE_ID} tmp-cert-renew \
/opt/bin/etcdadm join phase certificates http://eks-a-etcd-dumb-url --init-system kubelet
- Verify your etcd node is running correctly
sudo etcdctl --cacert=/etc/etcd/pki/ca.crt --cert=/etc/etcd/pki/etcdctl-etcd-client.crt --key=/etc/etcd/pki/etcdctl-etcd-client.key member list
ETCD_CONTAINER_ID=$(ctr -n k8s.io c ls | grep -w "etcd-io" | cut -d " " -f1 | tail -1)
ctr -n k8s.io t exec -t --exec-id etcd ${ETCD_CONTAINER_ID} etcdctl \
--cacert=/var/lib/etcd/pki/ca.crt \
--cert=/var/lib/etcd/pki/server.crt \
--key=/var/lib/etcd/pki/server.key \
member list
- If the above command fails due to multiple etcd containers existing, then navigate to
/var/log/containers/etcd and confirm which container was running during the issue timeframe (this container would be the ‘stale’ container). Delete this older etcd once you have renewed the certs and the new etcd container will be able to enter a functioning state. If you don’t do this, the two etcd containers will stay indefinitely and the etcd will not recover.
-
Repeat the above steps for all etcd nodes.
-
Save the apiserver-etcd-client crt and key file from one of the etcd nodes. They need to be updated in the following secret in management cluster. You will also need them when renewing the certificates on control plane nodes.
kubectl create secret generic ${cluster-name}-apiserver-etcd-client --from-file=tls.crt=./apiserver-etcd-client.crt --from-file=tls.key=./apiserver-etcd-client.key --type=cluster.x-k8s.io/secret -n eksa-system --dry-run=client -o yaml | kubectl apply -f -
Note
On Bottlerocket control plane nodes, the certificate filename of apiserver-etcd-client is server-etcd-client.crt instead of apiserver-etcd-client.crt.
Control plane nodes
When there are no external etcd nodes, you only need to rotate the certificates for control plane nodes, as etcd certificates are managed by kubeadm when there are no external etcd nodes.
- SSH into each control plane node and run the following commands.
sudo kubeadm certs renew all
# you would be in the admin container when you ssh to the Bottlerocket machine
# open root shell
sudo sheltie
# pull the image
IMAGE_ID=$(apiclient get | apiclient exec admin jq -r '.settings["host-containers"]["kubeadm-bootstrap"].source')
ctr image pull ${IMAGE_ID}
# renew certs
# you may see missing etcd certs error, which is expected if you have external etcd nodes
ctr run \
--mount type=bind,src=/var/lib/kubeadm,dst=/var/lib/kubeadm,options=rbind:rw \
--mount type=bind,src=/var/lib/kubeadm,dst=/etc/kubernetes,options=rbind:rw \
--rm \
${IMAGE_ID} tmp-cert-renew \
/opt/bin/kubeadm certs renew all
- Verify the certificates have been rotated.
sudo kubeadm certs check-expiration
# you may see missing etcd certs error, which is expected if you have external etcd nodes
ctr run \
--mount type=bind,src=/var/lib/kubeadm,dst=/var/lib/kubeadm,options=rbind:rw \
--mount type=bind,src=/var/lib/kubeadm,dst=/etc/kubernetes,options=rbind:rw \
--rm \
${IMAGE_ID} tmp-cert-renew \
/opt/bin/kubeadm certs check-expiration
-
If you have external etcd nodes, manually replace the server-etcd-client.crt and apiserver-etcd-client.key files in the /etc/kubernetes/pki (or /var/lib/kubeadm/pki in Bottlerocket) folder with the files you saved from any etcd node.
cp apiserver-etcd-client.key /tmp/
cp server-etcd-client.crt /tmp/
sudo sheltie
cp /run/host-containerd/io.containerd.runtime.v2.task/default/admin/rootfs/tmp/apiserver-etcd-client.key /var/lib/kubeadm/pki/
cp /run/host-containerd/io.containerd.runtime.v2.task/default/admin/rootfs/tmp/server-etcd-client.crt /var/lib/kubeadm/pki/
-
Restart static control plane pods.
-
For Ubuntu and RHEL: temporarily move all manifest files from /etc/kubernetes/manifests/ and wait for 20 seconds, then move the manifests back to this file location.
-
For Bottlerocket: re-enable the static pods:
# Disable static pods
apiclient get | apiclient exec admin jq -r '.settings.kubernetes["static-pods"] | keys[]' | xargs -n 1 -I {} apiclient set settings.kubernetes.static-pods.{}.enabled=false
# IMPORTANT: Wait 30 seconds to ensure all containers are fully stopped
sleep 30
# Re-enable static pods
apiclient get | apiclient exec admin jq -r '.settings.kubernetes["static-pods"] | keys[]' | xargs -n 1 -I {} apiclient set settings.kubernetes.static-pods.{}.enabled=true
Important
The 30-second sleep between disabling and re-enabling static pods is critical to prevent duplicate containers from being scheduled. Without this sleep, multiple instances of kube-apiserver, kube-scheduler, kube-controller-manager, and etcd may run simultaneously, causing cluster instability and preventing proper certificate rotation.
You can verify Pods restarting by running kubectl from your Admin machine.
-
Repeat the above steps for all control plane nodes.
You can similarly use the above steps to rotate a single certificate instead of all certificates.
Kubelet
If kubeadm certs check-expiration is happy, but kubectl commands against the cluster fail with x509: certificate has expired or is not yet valid, then it’s likely that the kubelet certs did not rotate. To rotate them, SSH back into one of the control plane nodes and do the following.
# backup certs
cd /var/lib/kubelet
cp -r pki pki.bak
rm pki/*
systemctl restart kubelet
Note
When the control plane endpoint is unavailable because the API server pod is not running, the kubelet service may fail to start all static pods in the container runtime. Its logs may contain failed to connect to apiserver.
If this occurs, update kubelet-client-current.pem by running the following commands:
cat /etc/kubernetes/admin.conf | grep client-certificate-data: | sed 's/^.*: //' | base64 -d > /var/lib/kubelet/pki/kubelet-client-current.pem
cat /etc/kubernetes/admin.conf | grep client-key-data: | sed 's/^.*: //' | base64 -d >> /var/lib/kubelet/pki/kubelet-client-current.pem
systemctl restart kubelet
cat /var/lib/kubeadm/admin.conf | grep client-certificate-data: | apiclient exec admin sed 's/^.*: //' | base64 -d > /var/lib/kubelet/pki/kubelet-client-current.pem
cat /var/lib/kubeadm/admin.conf | grep client-key-data: | apiclient exec admin sed 's/^.*: //' | base64 -d >> /var/lib/kubelet/pki/kubelet-client-current.pem
systemctl restart kubelet
Worker nodes
If worker nodes are in Not Ready state and the kubelet fails to bootstrap then it’s likely that the kubelet client-cert kubelet-client-current.pem did not automatically rotate. If this rotation process fails you might see errors such as x509: certificate has expired or is not yet valid in kube-apiserver logs. To fix the issue, do the following:
-
Backup and delete /etc/kubernetes/kubelet.conf (ignore this file for BottleRocket) and /var/lib/kubelet/pki/kubelet-client* from the failed node.
-
From a working control plane node in the cluster that has /etc/kubernetes/pki/ca.key execute kubeadm kubeconfig user --org system:nodes --client-name system:node:$NODE > kubelet.conf. $NODE must be set to the name of the existing failed node in the cluster. Modify the resulted kubelet.conf manually to adjust the cluster name and server endpoint, or pass kubeconfig user --config (modifying kubelet.conf file can be ignored for BottleRocket).
-
For Ubuntu or RHEL nodes, Copy this resulted kubelet.conf to /etc/kubernetes/kubelet.conf on the failed node. Restart the kubelet (systemctl restart kubelet) on the failed node and wait for /var/lib/kubelet/pki/kubelet-client-current.pem to be recreated. Manually edit the kubelet.conf to point to the rotated kubelet client certificates by replacing client-certificate-data and client-key-data with /var/lib/kubelet/pki/kubelet-client-current.pem and /var/lib/kubelet/pki/kubelet-client-current.pem. For BottleRocket, manually copy over the base64 decoded values of client-certificate-data and client-key-data into the kubelet-client-current.pem on worker node.
kubeadm kubeconfig user --org system:nodes --client-name system:node:$NODE > kubelet.conf (from control plane node with renewed `/etc/kubernetes/pki/ca.key`)
cp kubelet.conf /etc/kubernetes/kubelet.conf (on failed worker node)
# From control plane node with renewed certs
# you would be in the admin container when you ssh to the Bottlerocket machine
# open root shell
sudo sheltie
# pull the image
IMAGE_ID=$(apiclient get | apiclient exec admin jq -r '.settings["host-containers"]["kubeadm-bootstrap"].source')
ctr image pull ${IMAGE_ID}
# set NODE value to the failed worker node name.
ctr run \
--mount type=bind,src=/var/lib/kubeadm,dst=/var/lib/kubeadm,options=rbind:rw \
--mount type=bind,src=/var/lib/kubeadm,dst=/etc/kubernetes,options=rbind:rw \
--rm \
${IMAGE_ID} tmp-cert-renew \
/opt/bin/kubeadm kubeconfig user --org system:nodes --client-name system:node:$NODE
# from the stdout base64 decode `client-certificate-data` and `client-key-data`
# copy client-cert to kubelet-client-current.pem on worker node
echo -n `<base64 decoded client-certificate-data value>` > kubelet-client-current.pem
# append client key to kubelet-client-current.pem on worker node
echo -n `<base64 decoded client-key-data value>` >> kubelet-client-current.pem
- Restart the kubelet. Make sure the node becomes
Ready.
See the Kubernetes documentation
for more details on manually updating kubelet client certificate.
Post Renewal
Once all the certificates are valid, verify the kcp object on the affected cluster(s) is not paused by running kubectl describe kcp -n eksa-system | grep cluster.x-k8s.io/paused. If it is paused, then this usually indicates an issue with the etcd cluster. Check the logs for pods under the etcdadm-controller-system namespace for any errors.
If the logs indicate an issue with the etcd endpoints, then you need to update spec.clusterConfiguration.etcd.endpoints in the cluster’s kubeadmconfig resource: kubectl edit kcp -n eksa-system
Example:
etcd:
external:
caFile: /var/lib/kubeadm/pki/etcd/ca.crt
certFile: /var/lib/kubeadm/pki/server-etcd-client.crt
endpoints:
- https://xxx.xxx.xxx.xxx:2379
- https://xxx.xxx.xxx.xxx:2379
- https://xxx.xxx.xxx.xxx:2379
What do I do if my local kubeconfig has expired?
Your local kubeconfig, used to interact with the cluster, contains a certificate that expires after 1 year. When you rotate cluster certificates, a new kubeconfig with a new certificate is created as a Secret in the cluster. If you do not retrieve the new kubeconfig and your local kubeconfig certificate expires, you will receive the following error:
Error: Couldn't get current Server API group list: the server has asked for the client to provide credentials error: you must be logged in to the server.
This error typically occurs when the cluster certificates have been renewed or extended during the upgrade process. To resolve this issue, you need to update your local kubeconfig file with the new cluster credentials.
You can extract your new kubeconfig using the following steps.
- You can extract your new kubeconfig by SSHing to one of the Control Plane nodes, exporting kubeconfig from the secret object, and copying kubeconfig file to
/tmp directory, as shown here:
ssh -i <YOUR_PRIVATE_KEY> <USER_NAME>@<YOUR_CONTROLPLANE_IP> # USER_NAME should be ec2-user for bottlerocket, ubuntu for Ubuntu ControlPlane machine Operating System
export CLUSTER_NAME="<YOUR_CLUSTER_NAME_HERE>"
cat /etc/kubernetes/admin.conf
export KUBECONFIG="/etc/kubernetes/admin.conf"
kubectl get secret ${CLUSTER_NAME}-kubeconfig -n eksa-system -o yaml -o=jsonpath="{.data.value}" | base64 --decode > /tmp/user-admin.kubeconfig
# You would need to be in the admin container when you ssh to the Bottlerocket machine
# open a root shell
sudo sheltie
cat /var/lib/kubeadm/admin.conf
cat /var/lib/kubeadm/admin.conf > /run/host-containerd/io.containerd.runtime.v2.task/default/admin/rootfs/tmp/kubernetes-admin.kubeconfig
exit # exit from the sudo sheltie container
export CLUSTER_NAME="<YOUR_CLUSTER_NAME_HERE>"
export KUBECONFIG="/tmp/kubernetes-admin.kubeconfig"
kubectl get secret ${CLUSTER_NAME}-kubeconfig -n eksa-system -o yaml -o=jsonpath="{.data.value}" | base64 --decode > /tmp/user-admin.kubeconfig
exit # exit from the Control Plane Machine
Note: Install kubectl on the Control Plane Machine using the instructions
here
- From your admin machine, download the kubeconfig file from the ControlPlane node and use it to access your Kubernetes Cluster.
ssh <ADMIN_MACHINE_IP>
export CONTROLPLANE_IP="<CONTROLPLANE_IP_ADDR>"
sftp -i <keypair> <USER_NAME>@${CONTROLPLANE_IP}:/tmp/user-admin.kubeconfig . # USER_NAME should be ec2-user for bottlerocket, ubuntu for Ubuntu ControlPlane machine
ls -ltr
export KUBECONFIG="user-admin.kubeconfig"
kubectl get pods
6.11 - etcd backup and restore
How to Backup and Restore etcd
-
External etcd backup and restore: See the External etcd backup/restore
section for detailed instructions on backing up and restoring external etcd clusters.
-
Stacked etcd backup and restore: For stacked etcd topology, refer to the upstream Kubernetes documentation: Backing up an etcd cluster
.
6.11.1 - External etcd backup and restore
How to Backup and Restore External ETCD
Note
External ETCD topology is supported for vSphere, CloudStack, Snow and Nutanix clusters, but not yet for Bare Metal clusters.
This page contains steps for backing up a cluster by taking an ETCD snapshot, and restoring the cluster from a snapshot.
Use case
EKS-Anywhere clusters use ETCD as the backing store. Taking a snapshot of ETCD backs up the entire cluster data. This can later be used to restore a cluster back to an earlier state if required.
ETCD backups can be taken prior to cluster upgrade, so if the upgrade doesn’t go as planned, you can restore from the backup.
Important
Restoring to a previous cluster state is a destructive and destablizing action to take on a running cluster. It should be considered only when all other options have been exhausted.
If you are able to retrieve data using the Kubernetes API server, then etcd is available and you should not restore using an etcd backup.
6.11.1.1 - Bottlerocket
How to backup and restore External etcd on Bottlerocket OS
Note
External etcd topology is supported for vSphere, CloudStack, Snow and Nutanix clusters, but not yet for Bare Metal clusters.
This guide requires some common shell tools such as:
Make sure you have these installed on your admin machine before continuing.
Admin machine environment variables setup
On your admin machine, set the following environment variables that will later come in handy
export MANAGEMENT_CLUSTER_NAME="eksa-management" # Set this to the management cluster name
export CLUSTER_NAME="eksa-workload" # Set this to name of the cluster you want to backup (management or workload)
export SSH_KEY="path-to-private-ssh-key" # Set this to the cluster's private SSH key path
export SSH_USERNAME="ec2-user" # Set this to the SSH username
export SNAPSHOT_PATH="/tmp/snapshot.db" # Set this to the path where you want the etcd snapshot to be saved
export MANAGEMENT_KUBECONFIG=${MANAGEMENT_CLUSTER_NAME}/${MANAGEMENT_CLUSTER_NAME}-eks-a-cluster.kubeconfig
export CLUSTER_KUBECONFIG=${CLUSTER_NAME}/${CLUSTER_NAME}-eks-a-cluster.kubeconfig
export ETCD_ENDPOINTS=$(kubectl --kubeconfig=${MANAGEMENT_KUBECONFIG} -n eksa-system get machines --selector cluster.x-k8s.io/cluster-name=${CLUSTER_NAME},cluster.x-k8s.io/etcd-cluster=${CLUSTER_NAME}-etcd -ojsonpath='{.items[*].status.addresses[0].address}')
export CONTROL_PLANE_ENDPOINTS=($(kubectl --kubeconfig=${MANAGEMENT_KUBECONFIG} -n eksa-system get machines --selector cluster.x-k8s.io/control-plane-name=${CLUSTER_NAME} -ojsonpath='{.items[*].status.addresses[0].address}'))
Prepare etcd nodes for backup and restore
Install SCP on the etcd nodes:
echo -n ${ETCD_ENDPOINTS} | xargs -I {} -d" " ssh -o StrictHostKeyChecking=no -i ${SSH_KEY} ${SSH_USERNAME}@{} sudo yum -y install openssh-clients
Create etcd Backup
Make sure to setup the admin environment variables
and prepare your ETCD nodes for backup
before moving forward.
-
SSH into one of the etcd nodes
export ETCD_NODE=$(echo -n ${ETCD_ENDPOINTS} | cut -d " " -f1)
ssh -i ${SSH_KEY} ${SSH_USERNAME}@${ETCD_NODE}
-
Drop into Bottlerocket’s root shell
-
Set these environment variables
# get the container ID corresponding to etcd pod
export ETCD_CONTAINER_ID=$(ctr -n k8s.io c ls | grep -w "etcd-io" | head -1 | cut -d " " -f1)
# get the etcd endpoint
export ETCD_ENDPOINT=$(cat /etc/kubernetes/manifests/etcd | grep -wA1 ETCD_ADVERTISE_CLIENT_URLS | tail -1 | grep -oE '[^ ]+$')
-
Create the etcd snapshot
ctr -n k8s.io t exec -t --exec-id etcd ${ETCD_CONTAINER_ID} etcdctl \
--endpoints=${ETCD_ENDPOINT} \
--cacert=/var/lib/etcd/pki/ca.crt \
--cert=/var/lib/etcd/pki/server.crt \
--key=/var/lib/etcd/pki/server.key \
snapshot save /var/lib/etcd/data/etcd-backup.db
ctr -n k8s.io t exec -t --exec-id etcd ${ETCD_CONTAINER_ID} etcdctl \
--endpoints=${ETCD_ENDPOINT} \
--cacert=/var/lib/etcd/pki/ca.crt \
--cert=/var/lib/etcd/pki/server.crt \
--key=/var/lib/etcd/pki/server.key \
snapshot save /var/lib/etcd/data/etcd-backup.db
-
Move the snapshot to another directory and set proper permissions
mv /var/lib/etcd/data/etcd-backup.db /run/host-containerd/io.containerd.runtime.v2.task/default/admin/rootfs/home/ec2-user/snapshot.db
chown 1000 /run/host-containerd/io.containerd.runtime.v2.task/default/admin/rootfs/home/ec2-user/snapshot.db
-
Exit out of etcd node. You will have to type exit twice to get back to the admin machine
-
Copy over the snapshot from the etcd node
scp -i ${SSH_KEY} ${SSH_USERNAME}@${ETCD_NODE}:/home/ec2-user/snapshot.db ${SNAPSHOT_PATH}
You should now have the etcd snapshot in your current working directory.
Restore etcd from Backup
Make sure to setup the admin environment variables
and prepare your etcd nodes for restore
before moving forward.
-
Pause cluster reconciliation
Before starting the process of restoring etcd, you have to pause some cluster reconciliation objects so EKS Anywhere doesn’t try to perform any operations on the cluster while you restore the etcd snapshot.
kubectl annotate clusters.anywhere.eks.amazonaws.com $CLUSTER_NAME anywhere.eks.amazonaws.com/paused=true --kubeconfig=$MANAGEMENT_KUBECONFIG
kubectl patch clusters.cluster.x-k8s.io $CLUSTER_NAME --type merge -p '{"spec":{"paused": true}}' -n eksa-system --kubeconfig=$MANAGEMENT_KUBECONFIG
-
Stop control plane core components
You also need to stop the control plane core components so the Kubernetes API server doesn’t try to communicate with etcd while you perform etcd operations.
- You can use this command to get the control plane node IPs which you can use to SSH
echo -n ${CONTROL_PLANE_ENDPOINTS[@]} | xargs -I {} -d " " echo "{}"
- SSH into the node and stop the core components. You must do this for each control plane node.
# SSH into the control plane node using the IPs printed in previous command
ssh -i ${SSH_KEY} ${SSH_USERNAME}@<Control Plane IP from previous command>
# drop into bottlerocket root shell
sudo sheltie
# create a temporary directory and move the static manifests to it
mkdir -p /tmp/temp-manifests
mv /etc/kubernetes/manifests/* /tmp/temp-manifests
- Exit out of the Bottlerocket node
# exit from bottlerocket's root shell
exit
# exit from bottlerocket node
exit
Repeat these steps for each control plane node.
-
Copy the backed-up etcd snapshot to all the etcd nodes
echo -n ${ETCD_ENDPOINTS} | xargs -I {} -d" " scp -o StrictHostKeyChecking=no -i ${SSH_KEY} ${SNAPSHOT_PATH} ${SSH_USERNAME}@{}:/home/ec2-user
-
Perform the etcd restore
For this step, you have to SSH into each etcd node and run the restore command.
- Get etcd nodes IPs for SSH’ing into the nodes
# This should print out all the etcd IPs
echo -n ${ETCD_ENDPOINTS} | xargs -I {} -d " " echo "{}"
# SSH into the etcd node using the IPs printed in previous command
ssh -i ${SSH_KEY} ${SSH_USERNAME}@<etcd IP from previous command>
# drop into bottlerocket\'s root shell
sudo sheltie
# copy over the etcd snapshot to the appropriate location
cp /run/host-containerd/io.containerd.runtime.v2.task/default/admin/rootfs/home/ec2-user/snapshot.db /var/lib/etcd/data/etcd-snapshot.db
# setup the etcd environment
export ETCD_NAME=$(cat /etc/kubernetes/manifests/etcd | grep -wA1 ETCD_NAME | tail -1 | grep -oE '[^ ]+$')
export ETCD_INITIAL_ADVERTISE_PEER_URLS=$(cat /etc/kubernetes/manifests/etcd | grep -wA1 ETCD_INITIAL_ADVERTISE_PEER_URLS | tail -1 | grep -oE '[^ ]+$')
export ETCD_INITIAL_CLUSTER=$(cat /etc/kubernetes/manifests/etcd | grep -wA1 ETCD_INITIAL_CLUSTER | tail -1 | grep -oE '[^ ]+$')
export INITIAL_CLUSTER_TOKEN="etcd-cluster-1"
# get the container ID corresponding to etcd pod
export ETCD_CONTAINER_ID=$(ctr -n k8s.io c ls | grep -w "etcd-io" | head -1 | cut -d " " -f1)
# run the restore command
ctr -n k8s.io t exec -t --exec-id etcd ${ETCD_CONTAINER_ID} etcdctl \
snapshot restore /var/lib/etcd/data/etcd-snapshot.db \
--name=${ETCD_NAME} \
--initial-cluster=${ETCD_INITIAL_CLUSTER} \
--initial-cluster-token=${INITIAL_CLUSTER_TOKEN} \
--initial-advertise-peer-urls=${ETCD_INITIAL_ADVERTISE_PEER_URLS} \
--cacert=/var/lib/etcd/pki/ca.crt \
--cert=/var/lib/etcd/pki/server.crt \
--key=/var/lib/etcd/pki/server.key
# move the etcd data files out of the container to a temporary location
mkdir -p /tmp/etcd-files
$(ctr -n k8s.io snapshot mounts /tmp/etcd-files/ ${ETCD_CONTAINER_ID})
mv /tmp/etcd-files/${ETCD_NAME}.etcd /tmp/
# stop the etcd pod
mkdir -p /tmp/temp-manifests
mv /etc/kubernetes/manifests/* /tmp/temp-manifests
# backup the previous etcd data files
mv /var/lib/etcd/data/member /var/lib/etcd/data/member.backup
# copy over the new etcd data files to the data directory
mv /tmp/${ETCD_NAME}.etcd/member /var/lib/etcd/data/
# copy the WAL folder for the cluster member data before the restore to the data/member directory
cp -r /var/lib/etcd/data/member.backup/wal /var/lib/etcd/data/member
# re-start the etcd pod
mv /tmp/temp-manifests/* /etc/kubernetes/manifests/
- Cleanup temporary files and folders
# clean up all the temporary files
umount /tmp/etcd-files
rm -rf /tmp/temp-manifests /tmp/${ETCD_NAME}.etcd /tmp/etcd-files/ /var/lib/etcd/data/etcd-snapshot.db
- Exit out of the Bottlerocket node
# exit from bottlerocket's root shell
exit
# exit from bottlerocket node
exit
Repeat this step for each etcd node.
-
Restart control plane core components
- You can use this command to get the control plane node IPs which you can use to SSH
echo -n ${CONTROL_PLANE_ENDPOINTS[@]} | xargs -I {} -d " " echo "{}"
- SSH into the node and restart the core components. You must do this for each control plane node.
# SSH into the control plane node using the IPs printed in previous command
ssh -i ${SSH_KEY} ${SSH_USERNAME}@<Control Plane IP from previous command>
# drop into bottlerocket root shell
sudo sheltie
# move the static manifests back to the right directory
mv /tmp/temp-manifests/* /etc/kubernetes/manifests/
- Exit out of the Bottlerocket node
# exit from bottlerocket's root shell
exit
# exit from bottlerocket node
exit
Repeat these steps for each control plane node.
-
Unpause the cluster reconcilers
Once the etcd restore is complete, you can resume the cluster reconcilers.
kubectl annotate clusters.anywhere.eks.amazonaws.com $CLUSTER_NAME anywhere.eks.amazonaws.com/paused- --kubeconfig=$MANAGEMENT_KUBECONFIG
kubectl patch clusters.cluster.x-k8s.io $CLUSTER_NAME --type merge -p '{"spec":{"paused": false}}' -n eksa-system --kubeconfig=$MANAGEMENT_KUBECONFIG
At this point you should have the etcd cluster restored to snapshot.
To verify, you can run the following commands:
kubectl --kubeconfig=${CLUSTER_KUBECONFIG} get nodes
kubectl --kubeconfig=${CLUSTER_KUBECONFIG} get pods -A
You may also need to restart some deployments/daemonsets manually if they are stuck in an unhealthy state.
6.11.1.2 - Ubuntu and RHEL
How to backup and restore External ETCD on Ubuntu/RHEL OS EKS Anywhere cluster
Note
External etcd topology is supported for vSphere, CloudStack, Snow and Nutanix clusters, but not yet for Bare Metal clusters.
This page contains steps for backing up a cluster by taking an etcd snapshot, and restoring the cluster from a snapshot. These steps are for an EKS Anywhere cluster provisioned using the external etcd topology (selected by default) with Ubuntu OS.
Use case
EKS-Anywhere clusters use etcd as the backing store. Taking a snapshot of etcd backs up the entire cluster data. This can later be used to restore a cluster back to an earlier state if required. Etcd backups can be taken prior to cluster upgrade, so if the upgrade doesn’t go as planned you can restore from the backup.
Backup
Etcd offers a built-in snapshot mechanism. You can take a snapshot using the etcdctl snapshot save or etcdutl snapshot save command by following the steps given below.
Note
The following commands use ec2-user as the username. For EKS Anywhere on vSphere, Bare Metal, and Snow, the default username is ec2-user. For EKS Anywhere on Apache CloudStack, the default username is capc.
For EKS Anywhere on Nutanix, the default username is eksa. The default username cannot be changed.
- Login to any one of the etcd VMs
ssh -i $PRIV_KEY ec2-user@$ETCD_VM_IP
- Run the etcdctl or etcdutl command to take a snapshot with the following steps
sudo su
source /etc/etcd/etcdctl.env
etcdctl snapshot save snapshot.db
chown ec2-user snapshot.db
sudo su
etcdutl snapshot save snapshot.db
chown ec2-user snapshot.db
- Exit the VM. Copy the snapshot from the VM to your local/admin setup where you can save snapshots in a secure place. Before running scp, make sure you don’t already have a snapshot file saved by the same name locally.
scp -i $PRIV_KEY ec2-user@$ETCD_VM_IP:/home/ec2-user/snapshot.db .
NOTE: This snapshot file contains all information stored in the cluster, so make sure you save it securely (encrypt it).
Restore
Restoring etcd is a 2-part process. The first part is restoring etcd using the snapshot, creating a new data-dir for etcd. The second part is replacing the current etcd data-dir with the one generated after restore. During etcd data-dir replacement, we cannot have any kube-apiserver instances running in the cluster. So we will first stop all instances of kube-apiserver and other controlplane components using the following steps for every controlplane VM:
Pausing Etcdadm cluster and control plane machine health check reconcile
During restore, it is required to pause the Etcdadm controller reconcile and the control plane machine healths checks for the target cluster (whether it is management or workload cluster). To do that, you need to add a cluster.x-k8s.io/paused annotation to the target cluster’s etcdadmclusters and machinehealthchecks resources. For example,
kubectl annotate clusters.anywhere.eks.amazonaws.com $CLUSTER_NAME anywhere.eks.amazonaws.com/paused=true --kubeconfig mgmt-cluster.kubeconfig
kubectl patch clusters.cluster.x-k8s.io $CLUSTER_NAME --type merge -p '{"spec":{"paused": true}}' -n eksa-system --kubeconfig mgmt-cluster.kubeconfig
Stopping the controlplane components
- Login to a controlplane VM
ssh -i $PRIV_KEY ec2-user@$CONTROLPLANE_VM_IP
- Stop controlplane components by moving the static pod manifests under a temp directory:
sudo su
mkdir temp-manifests
mv /etc/kubernetes/manifests/*.yaml temp-manifests
- Repeat these steps for all other controlplane VMs
After this you can restore etcd from a saved snapshot using the snapshot save command following the steps given below.
Restoring from the snapshot
- The snapshot file should be made available in every etcd VM of the cluster. You can copy it to each etcd VM using this command:
scp -i $PRIV_KEY snapshot.db ec2-user@$ETCD_VM_IP:/home/ec2-user
- To run the etcdctl or etcdutl snapshot restore command, you need to provide the following configuration parameters:
- name: This is the name of the etcd member. The value of this parameter should match the value used while starting the member. This can be obtained by running:
sudo su
export ETCD_NAME=$(cat /etc/etcd/etcd.env | grep ETCD_NAME | awk -F'=' '{print $2}')
- initial-advertise-peer-urls: This is the advertise peer URL with which this etcd member was configured. It should be the exact value with which this etcd member was started. This can be obtained by running:
export ETCD_INITIAL_ADVERTISE_PEER_URLS=$(cat /etc/etcd/etcd.env | grep ETCD_INITIAL_ADVERTISE_PEER_URLS | awk -F'=' '{print $2}')
- initial-cluster: This should be a comma-separated mapping of etcd member name and its peer URL. For this, get the
ETCD_NAME and ETCD_INITIAL_ADVERTISE_PEER_URLS values for each member and join them. And then use this exact value for all etcd VMs. For example, for a 3 member etcd cluster this is what the value would look like (The command below cannot be run directly without substituting the required variables and is meant to be an example)
export ETCD_INITIAL_CLUSTER=${ETCD_NAME_1}=${ETCD_INITIAL_ADVERTISE_PEER_URLS_1},${ETCD_NAME_2}=${ETCD_INITIAL_ADVERTISE_PEER_URLS_2},${ETCD_NAME_3}=${ETCD_INITIAL_ADVERTISE_PEER_URLS_3}
- initial-cluster-token: Set this to a unique value and use the same value for all etcd members of the cluster. It can be any value such as
etcd-cluster-1 as long as it hasn’t been used before.
- Gather the required env vars for the restore command
cat <<EOF >> restore.env
export ETCD_NAME=$(cat /etc/etcd/etcd.env | grep ETCD_NAME | awk -F'=' '{print $2}')
export ETCD_INITIAL_ADVERTISE_PEER_URLS=$(cat /etc/etcd/etcd.env | grep ETCD_INITIAL_ADVERTISE_PEER_URLS | awk -F'=' '{print $2}')
EOF
cat /etc/etcd/etcdctl.env >> restore.env
-
Make sure you form the correct ETCD_INITIAL_CLUSTER value using all etcd members, and set it as an env var in the restore.env file created in the above step.
-
Once you have obtained all the right values, run the following commands to restore etcd replacing the required values:
sudo su
source restore.env
etcdctl snapshot restore snapshot.db \
--name=${ETCD_NAME} \
--initial-cluster=${ETCD_INITIAL_CLUSTER} \
--initial-cluster-token=etcd-cluster-1 \
--initial-advertise-peer-urls=${ETCD_INITIAL_ADVERTISE_PEER_URLS}
sudo su
source restore.env
etcdutl snapshot restore snapshot.db \
--name=${ETCD_NAME} \
--initial-cluster=${ETCD_INITIAL_CLUSTER} \
--initial-cluster-token=etcd-cluster-1 \
--initial-advertise-peer-urls=${ETCD_INITIAL_ADVERTISE_PEER_URLS}
-
This is going to create a new data-dir for the restored contents under a new directory {ETCD_NAME}.etcd. To start using this, restart etcd with the new data-dir with the following steps:
systemctl stop etcd.service
mv /var/lib/etcd/member /var/lib/etcd/member.bak
mv ${ETCD_NAME}.etcd/member /var/lib/etcd/
- Perform this directory swap on all etcd VMs, and then start etcd again on those VMs
systemctl start etcd.service
NOTE: Until the etcd process is started on all VMs, it might appear stuck on the VMs where it was started first, but this should be temporary.
Starting the controlplane components
- Login to a controlplane VM
ssh -i $PRIV_KEY ec2-user@$CONTROLPLANE_VM_IP
- Start the controlplane components by moving back the static pod manifests from under the temp directory to the /etc/kubernetes/manifests directory:
mv temp-manifests/*.yaml /etc/kubernetes/manifests
- Repeat these steps for all other controlplane VMs
- It may take a few minutes for the kube-apiserver and the other components to get restarted. After this you should be able to access all objects present in the cluster at the time the backup was taken.
Resuming Etcdadm cluster and control plane machine health checks reconcile
Resume Etcdadm cluster reconcile and control plane machine health checks for the target cluster by removing the cluster.x-k8s.io/paused annotation in the target cluster’s resource. For example,
kubectl annotate clusters.anywhere.eks.amazonaws.com $CLUSTER_NAME anywhere.eks.amazonaws.com/paused- --kubeconfig mgmt-cluster.kubeconfig
kubectl patch clusters.cluster.x-k8s.io $CLUSTER_NAME --type merge -p '{"spec":{"paused": false}}' -n eksa-system --kubeconfig mgmt-cluster.kubeconfig
6.12 - Reliability
Features and best practices for reliable cluster operations
This section covers features and best practices for maintaining reliable EKS Anywhere cluster operations and upgrades.
Reliability Features
EKS Anywhere includes mechanisms to help ensure operational reliability:
- Admission Webhook Protection: Prevents custom admission webhooks from interfering with system operations and cluster upgrades
- Cluster Validation: Pre-flight checks identify potential issues before cluster creation or upgrades
- Support Bundle Collection: Diagnostic data collection for troubleshooting
Best Practices
For reliable cluster operations:
- Enable admission webhook protection for production clusters
- Keep clusters up-to-date with the latest EKS Anywhere releases
- Monitor cluster health and resource utilization
- Test upgrades in non-production environments before production
- Maintain backup and disaster recovery procedures
6.12.1 - Admission Webhook Protection
Preventing custom admission webhooks from interfering with cluster operations
Custom admission webhooks installed in Kubernetes clusters can interfere with cluster upgrade operations and normal cluster functioning. EKS Anywhere provides an admission webhook protection mechanism to prevent webhook interference with system operations.
Overview
The admission webhook protection feature uses the upstream EKS-Distro admission webhook exclusion mechanism that AWS EKS uses to protect system operations during cluster upgrades and normal operations. When enabled, custom admission webhooks are prevented from intercepting operations on specific system resources.
Faulty or misconfigured admission webhooks can block cluster upgrades, disrupt networking components such as Cilium, or prevent cluster self-healing by targeting control plane resources. This feature protects critical operations without modifying existing webhook configurations.
Note
This feature is only available for Kubernetes version 1.31 and later. It requires kubeadm v1beta4 API support for configuring API server environment variables.
Configuration
Enable admission webhook protection by adding the skipAdmissionForSystemResources field to your cluster specification:
apiVersion: anywhere.eks.amazonaws.com/v1alpha1
kind: Cluster
metadata:
name: my-cluster
spec:
controlPlaneConfiguration:
skipAdmissionForSystemResources: true
count: 3
endpoint:
host: "198.51.100.10"
machineGroupRef:
kind: VSphereMachineConfig
name: my-cluster-cp
kubernetesVersion: "1.33"
Default Behavior
- Current default:
nil or false (opt-in - feature disabled by default)
- Recommendation: Enable this feature for all production clusters to protect critical system operations
Requirements
- Kubernetes version: 1.31 or later (requires kubeadm v1beta4 API for
extraEnvs support)
- Cluster lifecycle: Can be enabled during cluster creation or via cluster upgrade
- Supported providers: All EKS Anywhere providers
How It Works
When enabled, the feature configures the Kubernetes API server with exclusion rules that bypass custom webhook processing for specific critical operations.
Technical Implementation
-
Exclusion Rules File: Deploys /etc/kubernetes/admission-plugin-exclusion-rules.json to control plane nodes containing targeted exclusion rules
-
API Server Configuration: Sets environment variable EKS_PATCH_EXCLUSION_RULES_FILE=/etc/kubernetes/admission-plugin-exclusion-rules.json
-
Upstream Patch: The EKS-Distro Kubernetes distribution includes an admission webhook exclusion patch that reads these rules and bypasses custom webhook processing for matching operations
Protected Resources
The exclusion rules protect specific critical operations based on resource type, namespace, name patterns, and requesting user identity:
Control Plane Operations
- Leader election leases: kube-controller-manager, kube-scheduler, cilium-operator, cert-manager in kube-system namespace
- ServiceAccount operations: Token requests and ServiceAccount management by kube-controller-manager
- Node leases: All node heartbeat leases in kube-node-lease namespace
RBAC and API Registration
- Cluster-level RBAC: ClusterRoles and ClusterRoleBindings modified by system:apiserver
- Namespace-level RBAC: Roles and RoleBindings in kube-system and kube-public by system:apiserver
- APIService registrations: Core Kubernetes API group registrations by system:apiserver
Critical Networking Components
- Cilium: DaemonSet and operator deployments
- CoreDNS: Deployment operations
- kube-proxy: DaemonSet operations
Flow Control Resources
- FlowSchema: Flow control schema by system:apiserver
- PriorityLevelConfiguration: Priority level configuration by system:apiserver
System Pods
- DaemonSet Pods: Pods in kube-system
- ReplicaSet Pods: Pods in kube-system
For the complete list of exclusion rules, see the admission-plugin-exclusion-rules.json
file in the repository.
Enabling the Feature
New Cluster Creation
Add the configuration when creating a new cluster:
eksctl anywhere create cluster -f cluster.yaml
Where cluster.yaml includes:
spec:
controlPlaneConfiguration:
skipAdmissionForSystemResources: true
Existing Cluster Upgrade
Enable the feature by upgrading an existing cluster:
- Edit your cluster specification to add the field:
spec:
controlPlaneConfiguration:
skipAdmissionForSystemResources: true
- Apply the upgrade:
eksctl anywhere upgrade cluster -f cluster.yaml
The feature will be activated during the control plane upgrade process.
Disabling the Feature
To disable the feature, set the field to false and perform a cluster upgrade:
spec:
controlPlaneConfiguration:
skipAdmissionForSystemResources: false
The API server environment variable and exclusion rules file configuration will be removed during the next cluster reconciliation.
Impact on Custom Webhooks
What Changes
- Custom webhooks will not be invoked for operations on protected system resources
- Webhook processing continues normally for all other resources
- No modifications are made to webhook configurations themselves
What Doesn’t Change
- Custom webhooks continue to process application workloads
- Webhook configurations remain unchanged
- Custom business logic and validation continues for non-system resources
Example Scenario
Consider a ValidatingWebhookConfiguration that targets all DaemonSets with failurePolicy: Fail:
apiVersion: admissionregistration.k8s.io/v1
kind: ValidatingWebhookConfiguration
metadata:
name: custom-webhook
webhooks:
- name: validate.example.com
failurePolicy: Fail
rules:
- apiGroups: ["apps"]
apiVersions: ["v1"]
operations: ["UPDATE"]
resources: ["daemonsets"]
With admission webhook protection disabled:
- Updates to Cilium DaemonSet are blocked if webhook service is unavailable or rejects the request
- Cluster upgrades may fail if Cilium cannot be updated
With admission webhook protection enabled:
- Updates to Cilium DaemonSet bypass the webhook (protected system resource)
- Cluster upgrades proceed successfully
- Updates to your application DaemonSets still invoke the webhook normally
Troubleshooting
Verifying Feature Activation
Check if the feature is active on control plane nodes:
kubectl get kubeadmcontrolplane -n eksa-system <cluster-name> -o yaml
Look for these configurations:
spec:
kubeadmConfigSpec:
clusterConfiguration:
apiServer:
extraEnvs:
- name: EKS_PATCH_EXCLUSION_RULES_FILE
value: /etc/kubernetes/admission-plugin-exclusion-rules.json
extraVolumes:
- name: admission-exclusion-rules
hostPath: /etc/kubernetes/admission-plugin-exclusion-rules.json
mountPath: /etc/kubernetes/admission-plugin-exclusion-rules.json
pathType: File
readOnly: true
files:
- path: /etc/kubernetes/admission-plugin-exclusion-rules.json
owner: root:root
Common Issues
Issue: Feature not taking effect after upgrade
- Solution: Verify the Kubernetes version is 1.31+. Check kubeadm config for extraEnvs support.
Issue: Webhook still blocking system operations
- Solution: Verify the resource is in the protected list. Check API server logs for exclusion rule processing.
Issue: Application webhooks not working
- Solution: Verify webhooks are correctly configured for non-system resources. Protected resources are limited to specific system components.
Best Practices
-
Enable for production clusters: We recommend enabling this feature for all production clusters to prevent upgrade failures
-
Test in non-production first: When enabling on existing clusters, test the upgrade in a non-production environment first
-
Review webhook configurations: Audit existing webhooks to ensure they don’t unnecessarily target system resources
-
Use appropriate failurePolicy: Set webhooks to Ignore for non-critical validations to avoid blocking operations
-
Scope webhooks appropriately: Use namespace and object selectors to limit webhook scope to intended resources
6.13 - Support
Getting support for your clusters
6.13.1 - Purchase EKS Anywhere Enterprise Subscriptions
Steps to purchase EKS Anywhere Enterprise Subscriptions
You can purchase EKS Anywhere Enterprise Subscriptions with the Amazon EKS console, API, or AWS CLI. When you purchase a subscription, you can choose a 1-year term or a 3-year term, and you are billed monthly throughout the term. You can configure your subscription to automatically renew at the end of the term, and you can cancel your subscription within the first 7 days of purchase at no charge. When the status of your subscription is ACTIVE, the subscription term starts, licenses are available for your EKS Anywhere clusters, and the AWS account you used to create the subscription has access to Amazon EKS Anywhere Curated Packages.
For pricing, see the EKS Anywhere Pricing Page.
For more information on subscriptions, see Overview of EKS Anywhere Enterprise Subscriptions.
Create Subscriptions
NOTE: When you purchase a subscription, you have a 7-day grace period to cancel by creating a case at AWS Support Center.
After the 7-day grace period, if you do not cancel, your AWS account is invoiced for the subscription charges. If you use your subscription to file an AWS Support case to receive support for your EKS Anywhere clusters, then the subscription can not be cancelled or refunded, since you have leveraged support as part of the subscription.
NOTE: It is recommended to create subscriptions with the AWS account that will be used to operate the EKS Anywhere clusters. EKS Anywhere subscriptions and the licenses associated with them cannot currently be shared with other AWS accounts via AWS Resource Access Manager (RAM).
Prerequisites
- Before you create a subscription, you must onboard to use AWS License Manager. See the AWS License Manager
documentation for instructions.
- Only auto renewal and tags can be changed after subscription creation. Other attributes such as the subscription name, number of licenses, or term length cannot be modified after subscription creation.
- You can purchase subscriptions in all AWS Regions,
except the Asia Pacific (Thailand), Mexico (Central), AWS GovCloud (US) Regions, and the China Regions.
- An individual subscription can have up to 100 licenses.
- An individual account can have up to 10 subscriptions.
- You can create a single subscription at a time.
AWS Management Console
- Open the Amazon EKS console at https://console.aws.amazon.com/eks/home#/eks-anywhere.
- Click the Create subscription button on the right side of the screen.
- On the Specify subscription details page, select an offer (1 year term or 3 year term).
- Configure the following fields:
- Name - a name for your subscription. It must be unique in your AWS account in the AWS Region you’re creating the subscription in. The name can contain only alphanumeric characters (case-sensitive), hyphens, and underscores. It must start with an alphabetic character and can’t be longer than 100 characters. This value cannot be changed after creating the subscription.
- Number of licenses - the number of licenses to include in the subscription. This value cannot be changed after creating the subscription.
- Auto renewal - if enabled, the subscription will automatically renew at the end of the term.
- (Optional) Configure tags. A tag is a label that you assign to an EKS Anywhere subscription. Each tag consists of a key and an optional value. You can use tags to search and filter your resources.
- Click Next.
- On the Review and purchase page, confirm the specifications for your subscription are correct.
- Click Purchase on the bottom right hand side of the screen to purchase your subscription.
After the subscription is created, the next step is to apply the licenses to your EKS Anywhere clusters. Reference the License cluster
page for instructions.
AWS CLI
To install or update the AWS CLI, reference the AWS documentation.
If you already have the AWS CLI installed, update to the latest version of the CLI before running the following commands.
Create your subscription with the following command. Before running the command, make the following replacements:
- Replace
region-code with the AWS Region that will host your subscription (for example us-west-2). It is recommended to create your subscription in the AWS Region closest to your on-premises deployment.
- Replace
my-subscription with a name for your subscription. It must be unique in your AWS account in the AWS Region you’re creating the subscription in. The name can contain only alphanumeric characters (case-sensitive), hyphens, and underscores. It must start with an alphabetic character and can’t be longer than 100 characters.
- Replace
license-quantity 1 with the number of licenses to include in the subscription.
- Replace
term 'unit=MONTHS,duration=12' with your preferred term length. Valid options for duration are 12 and 36. The only accepted unit is MONTHS.
- Optionally, replace
tags 'environment=prod' with your preferred tags for your subscription.
- Optionally, enable auto renewal with the
--auto-renew flag. Subscriptions will not auto renew by default.
aws eks create-eks-anywhere-subscription \
--region 'region-code' \
--name 'my-subscription' \
--license-quantity 1 \
--term 'unit=MONTHS,duration=12' \
--tags 'environment=prod' \
--no-auto-renew
Expand for sample command output
{
"subscription": {
"id": "e29fd0d2-d8a8-4ed4-be54-c6c0dd0f7964",
"arn": "arn:aws:eks:us-west-2:<account-id>:eks-anywhere-subscription/e29fd0d2-d8a8-4ed4-be54-c6c0dd0f7964",
"name": "my-subscription",
"createdAt": "2023-10-10T08:33:36.869000-05:00",
"effectiveDate": "2023-10-10T08:33:36.869000-05:00",
"expirationDate": "2024-10-10T08:33:36.869000-05:00",
"licenseQuantity": 1,
"licenseType": "CLUSTER",
"term": {
"duration": 12,
"unit": "MONTHS"
},
"status": "CREATING",
"packageRegistry": "<packages-registry>.dkr.ecr.<region>.amazonaws.com",
"autoRenew": false,
"licenseArns": [],
"licenses": [],
"tags": {
"environment": "prod"
}
}
}
It may take several minutes for the subscription to become ACTIVE. You can query the status of your subscription with the following command. Replace my-subscription-id with the id of your subscription. Do not proceed to license your EKS Anywhere clusters until the output of the command returns ACTIVE.
aws eks describe-eks-anywhere-subscription \
--region 'region-code' \
--id 'my-subscription-id' \
--query 'subscription.status'
After the subscription is created, the next step is to apply the licenses to your EKS Anywhere clusters. Reference the License cluster
page for instructions.
View and Update Subscriptions
After you create a subscription, you can only update the auto renewal and tags configurations.
AWS Management Console
- Open the Amazon EKS console at https://console.aws.amazon.com/eks/home#/eks-anywhere.
- Navigate to the Active Subscriptions or Inactive Subscriptions tab.
- Optionally, choose the selection button for your EKS Anywhere subscription and click the Change auto renewal button to change your auto renewal setting.
- Click the link of your EKS Anywhere subscription name to view details including subscription start and end dates, associated licenses, and tags.
- Optionally, edit tags by clicking the Manage Tags button.
AWS CLI
List EKS Anywhere subscriptions
- Replace
region-code with the AWS Region that hosts your subscription(s) (for example us-west-2).
aws eks list-eks-anywhere-subscriptions --region 'region-code'
Expand for sample command output
{
"subscriptions": [
{
"id": "e29fd0d2-d8a8-4ed4-be54-c6c0dd0f7964",
"arn": "arn:aws:eks:<region>:<account-id>:eks-anywhere-subscription/e29fd0d2-d8a8-4ed4-be54-c6c0dd0f7964",
"name": "my-subscription",
"createdAt": "2023-10-10T08:33:36.869000-05:00",
"effectiveDate": "2023-10-10T08:33:36.869000-05:00",
"expirationDate": "2024-10-10T08:33:36.869000-05:00",
"licenseQuantity": 1,
"licenseType": "CLUSTER",
"term": {
"duration": 12,
"unit": "MONTHS"
},
"status": "ACTIVE",
"packageRegistry": "<account-id>.dkr.ecr.<region>.amazonaws.com",
"autoRenew": false,
"licenseArns": [
"arn:aws:license-manager::<account-id>:license:l-4f36acf12e6d491484812927b327c066"
],
"licenses": [
{
"id": "<license-id-string>",
"token": "<license-token-string>"
}
],
"tags": {
"environment": "prod"
}
}
]
}
Describe EKS Anywhere subscriptions
- Replace
region-code with the AWS Region that hosts your subscription (for example us-west-2).
- Replace
my-subscription-id with the id for your subscription (for example e29fd0d2-d8a8-4ed4-be54-c6c0dd0f7964).
- Replace
my-subscription with the name for your subscription.
Get subscription details for a single subscription.
aws eks describe-eks-anywhere-subscription \
--region 'region-code' \
--id 'my-subscription-id'
Expand for sample command output
{
"subscription": {
"id": "e29fd0d2-d8a8-4ed4-be54-c6c0dd0f7964",
"arn": "arn:aws:eks:<region>:<account-id>:eks-anywhere-subscription/e29fd0d2-d8a8-4ed4-be54-c6c0dd0f7964",
"name": "my-subscription",
"createdAt": "2023-10-10T08:33:36.869000-05:00",
"effectiveDate": "2023-10-10T08:33:36.869000-05:00",
"expirationDate": "2024-10-10T08:33:36.869000-05:00",
"licenseQuantity": 1,
"licenseType": "CLUSTER",
"term": {
"duration": 12,
"unit": "MONTHS"
},
"status": "ACTIVE",
"packageRegistry": "<packages-registry>.dkr.ecr.<region>.amazonaws.com",
"autoRenew": false,
"licenseArns": [
"arn:aws:license-manager::<account-id>:license:l-4f36acf12e6d491484812927b327c066"
],
"licenses": [
{
"id": "<license-id-string>",
"token": "<license-token-string>"
}
],
"tags": {
"environment": "prod"
}
}
}
Get subscription id with subscription name.
aws eks list-eks-anywhere-subscriptions \
--region 'region-code' \
--query 'subscriptions[?name==`my-subscription`].id'
Get subscription arn with subscription name.
aws eks list-eks-anywhere-subscriptions \
--region 'region-code' \
--query 'subscriptions[?name==`my-subscription`].arn'
Update EKS Anywhere subscriptions
- Replace
region-code with the AWS Region that hosts your subscription (for example us-west-2).
- Replace
my-subscription-id with the id for your subscription (for example e29fd0d2-d8a8-4ed4-be54-c6c0dd0f7964).
Disable auto renewal
aws eks update-eks-anywhere-subscription \
--region 'region-code' \
--id 'my-subscription-id' \
--no-auto-renew
Expand for sample command output
{
"subscription": {
"id": "e29fd0d2-d8a8-4ed4-be54-c6c0dd0f7964",
"arn": "arn:aws:eks:<region>:<account-id>:eks-anywhere-subscription/e29fd0d2-d8a8-4ed4-be54-c6c0dd0f7964",
"name": "my-subscription",
"createdAt": "2023-10-10T08:33:36.869000-05:00",
"effectiveDate": "2023-10-10T08:33:36.869000-05:00",
"expirationDate": "2024-10-10T08:33:36.869000-05:00",
"licenseQuantity": 1,
"licenseType": "CLUSTER",
"term": {
"duration": 12,
"unit": "MONTHS"
},
"status": "ACTIVE",
"packageRegistry": "<packages-registry>.dkr.ecr.<region>.amazonaws.com",
"autoRenew": false,
"licenseArns": [
"arn:aws:license-manager::<account-id>:license:l-4f36acf12e6d491484812927b327c066"
],
"licenses": [
{
"id": "<license-id-string>",
"token": "<license-token-string>"
}
],
"tags": {
"environment": "prod"
}
}
}
Enable auto renewal
aws eks update-eks-anywhere-subscription \
--region 'region-code' \
--id 'my-subscription-id' \
--auto-renew
Expand for sample command output
{
"subscription": {
"id": "e29fd0d2-d8a8-4ed4-be54-c6c0dd0f7964",
"arn": "arn:aws:eks:<region>:<account-id>:eks-anywhere-subscription/e29fd0d2-d8a8-4ed4-be54-c6c0dd0f7964",
"name": "my-subscription",
"createdAt": "2023-10-10T08:33:36.869000-05:00",
"effectiveDate": "2023-10-10T08:33:36.869000-05:00",
"expirationDate": "2024-10-10T08:33:36.869000-05:00",
"licenseQuantity": 1,
"licenseType": "CLUSTER",
"term": {
"duration": 12,
"unit": "MONTHS"
},
"status": "ACTIVE",
"packageRegistry": "<packages-registry>.dkr.ecr.<region>.amazonaws.com",
"autoRenew": true,
"licenseArns": [
"arn:aws:license-manager::<account-id>:license:l-4f36acf12e6d491484812927b327c066"
],
"licenses": [
{
"id": "<license-id-string>",
"token": "<license-token-string>"
}
],
"tags": {
"environment": "prod"
}
}
}
Update tags
aws eks tag-resource \
--region 'region-code' \
--resource-arn 'my-subscription-arn' \
--tags 'geo=boston'
Delete Subscriptions
NOTE: Only inactive subscriptions can be deleted. Deleting inactive subscriptions removes them from the AWS Management Console view and API responses. To delete any Active Subscriptions, please create a Support Case with AWS Support team.
AWS Management Console
- Open the Amazon EKS console at https://console.aws.amazon.com/eks/home#/eks-anywhere.
- Click the Inactive Subscriptions tab.
- Choose the name of the EKS Anywhere subscription to delete and click the Delete subscription.
- On the delete subscription confirmation screen, choose Delete.
AWS CLI
- Replace
region-code with the AWS Region that hosts your subscription (for example us-west-2).
- Replace
my-subscription-id with the id for your subscription (for example e29fd0d2-d8a8-4ed4-be54-c6c0dd0f7964).
aws eks delete-eks-anywhere-subscription \
--region 'region-code' \
--id 'my-subscription-id'
Expand for sample command output
{
"subscription": {
"id": "e29fd0d2-d8a8-4ed4-be54-c6c0dd0f7964",
"arn": "arn:aws:eks:<region>:<account-id>:eks-anywhere-subscription/e29fd0d2-d8a8-4ed4-be54-c6c0dd0f7964",
"name": "my-subscription",
"createdAt": "2023-10-10T08:33:36.869000-05:00",
"effectiveDate": "2023-10-10T08:33:36.869000-05:00",
"expirationDate": "2024-10-10T08:33:36.869000-05:00",
"licenseQuantity": 1,
"licenseType": "CLUSTER",
"term": {
"duration": 12,
"unit": "MONTHS"
},
"status": "DELETING",
"packageRegistry": "<packages-registry>.dkr.ecr.<region>.amazonaws.com",
"autoRenew": false,
"licenseArns": [
"arn:aws:license-manager::<account-id>:license:l-4f36acf12e6d491484812927b327c066"
],
"licenses": [
{
"id": "<license-id-string>",
"token": "<license-token-string>"
}
],
"tags": {
"environment": "prod"
}
}
}
6.13.2 - License EKS Anywhere cluster
Apply EKS Anywhere Enterprise Subscription licenses to EKS Anywhere clusters
When you purchase an EKS Anywhere Enterprise Subscription, licenses are created in the AWS Region and account you used to purchase the subscription. After purchasing your subscription, you can view your licenses, accept the license grants, and apply the license IDs or license tokens to your EKS Anywhere clusters.
Get license ID string or license token
The two key parts of the license are the license ID string and the license token. In EKS Anywhere versions v0.21.x and below, the license ID string is applied as a Kubernetes Secret to EKS Anywhere clusters and is used for AWS Support cases to validate the cluster is eligible for support. The license token was introduced in EKS Anywhere version v0.22.0 and all existing EKS Anywhere subscriptions have been updated with a license token for each license. The license token is applied in the EKS Anywhere cluster specification.
You can use either the license ID string or the license token when you create AWS Support cases for your EKS Anywhere clusters. To use extended support for Kubernetes versions in EKS Anywhere, available for EKS Anywhere versions v0.22.0 and above, your clusters must have a valid and unexpired license token to be able to create and upgrade clusters using the Kubernetes extended support versions.
AWS Management Console
You can view the licenses for your subscription in the EKS Anywhere section of the EKS console
by clicking on the Name of your active subscription. The licenses panel is shown on the Subscription details page and contains the license ID string and the license token for each license associated with your subscription.
If you are applying a license to an EKS Anywhere cluster using EKS Anywhere version v0.22.0 or above, copy the license token and proceed to Apply license to EKS Anywhere cluster.
If you are applying a license to an EKS Anywhere cluster using EKS Anywhere version v0.21.x or below, copy the license ID string and proceed to Apply license to EKS Anywhere cluster.
AWS CLI
Use the following command to get the license ID strings and license tokens for each license associated with a subscription. Note, the command must be run with the same account that created the subscription.
- Replace
region-code with the AWS Region that hosts your subscription (for example us-west-2).
- Replace
my-subscription in the --query string with the name for your subscription.
aws eks list-eks-anywhere-subscriptions \
--region 'region-code' \
--query 'subscriptions[?name==`my-subscription`].licenses[*]'
If you are applying a license to an EKS Anywhere cluster using EKS Anywhere version v0.22.0 or above, copy the license token and proceed to Apply license to EKS Anywhere cluster.
An example of the license token in the response is shown below in the token field.
[
[
{
"id": "l-58dc5e15eb12396b86e5724db1a710d9",
"token": "eyJhbGciOiJFUzI1NiIsInR5cCI6IkpXVCJ9.eyJsaWNlbnNlSWQiOiJsLTU4ZGM1ABC1ZWI5ODQ5NmI4NmU1NzI0ZGIxYTcxMGQ5IiwibGljZW5zZVZlcnNpb24iOiIxIiwiYmVnaW5WYWxpZGl0eSI6IjIwMjUtMDItMDhUMDA6MDY6MzYuMDAwWiIsImVuZFZhbGlkaXR5IjoiMjAyNi0wMi0wOVQwMDowNjozNi4wMDBaIiwic3Vic2NyaXB0aW9uSWQiOiI0YjMwNmM3Mi1kZmRmLTRlMWUtODQ1OS0wMWU2MWVkOGM1NGM6NWY5MjhiZTQiLCJzdWJzY3JpcHRpb25OYW1lIjoibXktdGVzdC1zdWJzY3JpcHRpb24iLCJhY2NvdW50SWQiOiI2NTkzNTYzOTg0MDQiLCJyZWdpb24iOiJ1cy13ZXN0LTIifQ.72Hiz4RqdNMQnObLTI0gCxT7vj1WBMNU8vvD2v0gbGl2Tas5VT30R-7GXCE6x73G613V6o12kqcnQM6DCwzeSg"
}
]
]
If you are applying a license to an EKS Anywhere cluster using EKS Anywhere version v0.21.x or below, copy the license ID string and proceed to Apply license to EKS Anywhere cluster.
An example of the license ID string in the response is shown below in the id field.
[
[
{
"id": "l-58dc5e15eb12396b86e5724db1a710d9",
"token": "eyJhbGciOiJFUzI1NiIsInR5cCI6IkpXVCJ9.eyJsaWNlbnNlSWQiOiJsLTU4ZGM1ABC1ZWI5ODQ5NmI4NmU1NzI0ZGIxYTcxMGQ5IiwibGljZW5zZVZlcnNpb24iOiIxIiwiYmVnaW5WYWxpZGl0eSI6IjIwMjUtMDItMDhUMDA6MDY6MzYuMDAwWiIsImVuZFZhbGlkaXR5IjoiMjAyNi0wMi0wOVQwMDowNjozNi4wMDBaIiwic3Vic2NyaXB0aW9uSWQiOiI0YjMwNmM3Mi1kZmRmLTRlMWUtODQ1OS0wMWU2MWVkOGM1NGM6NWY5MjhiZTQiLCJzdWJzY3JpcHRpb25OYW1lIjoibXktdGVzdC1zdWJzY3JpcHRpb24iLCJhY2NvdW50SWQiOiI2NTkzNTYzOTg0MDQiLCJyZWdpb24iOiJ1cy13ZXN0LTIifQ.72Hiz4RqdNMQnObLTI0gCxT7vj1WBMNU8vvD2v0gbGl2Tas5VT30R-7GXCE6x73G613V6o12kqcnQM6DCwzeSg"
}
]
]
Apply license to EKS Anywhere cluster
A license can only be bound to one EKS Anywhere cluster at a time, and you can only receive support for your EKS Anywhere cluster if it has a valid and active license. You can only create or update EKS Anywhere clusters with extended support for Kubernetes versions if there is a valid and active license token available for the cluster. Extended support for Kubernetes versions is available in EKS Anywhere versions v0.22.0 and above.
Apply license to EKS Anywhere cluster with version v0.22.0 or above
You can apply a license token to an EKS Anywhere cluster during or after cluster creation for standalone, management, and workload clusters. License tokens are configured in the EKS Anywhere cluster specification in the spec.licenseToken field. An example of a license token configuration in the EKS Anywhere cluster specification is shown below.
apiVersion: anywhere.eks.amazonaws.com/v1alpha1
kind: Cluster
metadata:
name: my-cluster
spec:
kubernetesVersion: "1.28"
licenseToken: "eyJsaWNlbnNlSWQiOiJsLTU4ZGM1ABC1ZWI5ODQ5NmI4NmU1NzI0ZGIxYTcxMGQ5IiwibGljZW5zZVZlcnNpb24iOiIxIiwiYmVnaW5WYWxpZGl0eSI6IjIwMjUtMDItMDhUMDA6MDY6MzYuMDAwWiIsImVuZFZhbGlkaXR5IjoiMjAyNi0wMi0wOVQwMDowNjozNi4wMDBaIiwic3Vic2NyaXB0aW9uSWQiOiI0YjMwNmM3Mi1kZmRmLTRlMWUtODQ1OS0wMWU2MWVkOGM1NGM6NWY5MjhiZTQiLCJzdWJzY3JpcHRpb25OYW1lIjoibXktdGVzdC1zdWJzY3JpcHRpb24iLCJhY2NvdW50SWQiOiI2NTkzNTYzOTg0MDQiLCJyZWdpb24iOiJ1cy13ZXN0LTIifQ.72Hiz4RqdNMQnObLTI0gCxT7vj1WBMNU8vvD2v0gbGl2Tas5VT30R-7GXCE6x73G613V6o12kqcnQM6DCwzeSg"
...
To apply the license token to your cluster, run the eksctl anywhere create or eksctl anywhere upgrade command, or use Kubernetes API-compatible tooling for workload clusters.
eksctl anywhere CLI
New cluster
eksctl anywhere create cluster -f my-cluster.yaml --kubeconfig my-cluster.kubeconfig
Existing cluster
eksctl anywhere upgrade cluster -f my-cluster.yaml --kubeconfig my-cluster.kubeconfig
Kubernetes API-compatible tooling
kubectl apply -f my-cluster.yaml --kubeconfig my-cluster.kubeconfig
Apply license to EKS Anywhere cluster with version v0.21.x or below
You can apply a license ID string to an EKS Anywhere cluster during or after cluster creation for standalone or management clusters. For workload clusters, you must apply the license after cluster creation. In the examples below, the <license-id-string> is the license ID string, for example l-58dc5e15eb12396b86e5724db1a710d9.
To apply a license during standalone or management cluster creation, export the EKSA_LICENSE environment variable before running the eksctl anywhere create cluster command.
export EKSA_LICENSE='<license-id-string>'
To apply a license to an existing cluster, apply the following Secret to your cluster, replacing <license-id-string> with your license ID string.
kubectl apply -f - <<EOF
apiVersion: v1
kind: Secret
metadata:
name: eksa-license
namespace: eksa-system
stringData:
license: "<license-id-string>"
type: Opaque
EOF
AWS CLI commands to view license details
Get license details for all licenses with the AWS CLI
- Replace
region-code with the AWS Region that hosts your subscription (for example us-west-2).
aws license-manager list-received-licenses \
--region 'region-code' \
--filter 'Name=IssuerName,Values=Amazon EKS Anywhere'
Get license details with the AWS CLI
- Replace
region-code with the AWS Region that hosts your subscription (for example us-west-2).
- Replace
my-license-arn with the license ARN returned from the previous command.
aws license-manager get-license \
--region 'region-code' \
--license-arn 'my-license-arn'
Expand for sample command output
{
"License": {
"LicenseArn": "arn:aws:license-manager::<account-id>:license:l-4f36acf12e6d491484812927b327c066",
"LicenseName": "EKS Anywhere license for subscription my-subscription",
"ProductName": "Amazon EKS Anywhere",
"ProductSKU": "EKS Anywhere e29fd0d2-d8a8-4ed4-be54-c6c0dd0f7964:9444bd0d",
"Issuer": {
"Name": "Amazon EKS Anywhere",
"KeyFingerprint": "aws:<account-id>:Amazon EKS Anywhere:issuer-fingerprint"
},
"HomeRegion": "<region>",
"Status": "AVAILABLE",
"Validity": {
"Begin": "2023-10-10T13:33:36.000Z",
"End": "2024-10-11T13:33:36.000Z"
},
"Beneficiary": "<account-id>",
"Entitlements": [
{
"Name": "EKS Anywhere for e29fd0d2-d8a8-4ed4-be54-c6c0dd0f7964",
"MaxCount": 1,
"Overage": false,
"Unit": "Count",
"AllowCheckIn": false
}
],
"ConsumptionConfiguration": {
"RenewType": "None",
"BorrowConfiguration": {
"AllowEarlyCheckIn": true,
"MaxTimeToLiveInMinutes": 527040
}
},
"CreateTime": "1696945150",
"Version": "1"
}
}
6.13.3 - Share access to EKS Anywhere Curated Packages
Share access to EKS Anywhere Curated Packages with other AWS accounts
When an EKS Anywhere Enterprise Subscription is created, the AWS account that created the subscription is granted access to EKS Anywhere Curated Packages in the AWS Region where the subscription is created. To enable access to EKS Anywhere Curated Packages for other AWS accounts in your organization, follow the instructions below. The instructions below use 111111111111 as the source account, and 999999999999 as the destination account.
1. Save EKS Anywhere Curated Packages registry account for your subscription
In this step, you will get the Amazon ECR packages registry account associated with your subscription. Run the following command with the account that created the subscription and save the 12-digit account ID from the output string.
- Replace
region-code with the AWS Region that hosts your subscription (for example us-west-2).
- Replace
my-subscription-id with the id for your subscription (for example e29fd0d2-d8a8-4ed4-be54-c6c0dd0f7964).
aws eks describe-eks-anywhere-subscription \
--region 'region-code' \
--id 'my-subscription-id' \
--query 'subscription.packageRegistry'
The output has the following structure: “.dkr.ecr..amazonaws.com”. Save the <packages-account-id> for the next step.
Alternatively, you can use the following table to identify the packages registry account for the AWS Region hosting your subscription.
Expand for packages registry to AWS Region table
| AWS Region |
Packages Registry Account |
| us-west-2 |
346438352937 |
| us-west-1 |
440460740297 |
| us-east-1 |
331113665574 |
| us-east-2 |
297090588151 |
| ap-east-1 |
804323328300 |
| ap-northeast-1 |
143143237519 |
| ap-northeast-2 |
447311122189 |
| ap-south-1 |
357015164304 |
| ap-south-2 |
388483641499 |
| ap-southeast-1 |
654894141437 |
| ap-southeast-2 |
299286866837 |
| ap-southeast-3 |
703305448174 |
| ap-southeast-4 |
106475008004 |
| ap-southeast-5 |
396913739932 |
| af-south-1 |
783635962247 |
| ca-central-1 |
064352486547 |
| ca-west-1 |
571600859530 |
| eu-central-1 |
364992945014 |
| eu-central-2 |
551422459769 |
| eu-north-1 |
826441621985 |
| eu-south-1 |
787863792200 |
| eu-south-2 |
127214161500 |
| eu-west-1 |
090204409458 |
| eu-west-2 |
371148654473 |
| eu-west-3 |
282646289008 |
| il-central-1 |
131750224677 |
| me-central-1 |
454241080883 |
| me-south-1 |
158698011868 |
| sa-east-1 |
517745584577 |
2. Create an IAM Policy with ECR Login and Read permissions
Run the following with the account that created the subscription (in this example 111111111111).
- Open the IAM console
- In the navigation pane, choose Policies and then choose Create policy
- On the Specify permissions page, select JSON
- Paste the following permission specification into the Policy editor. Replace
<packages-account-id> in the permission specification with the account you saved in the previous step.
{
"Version": "2012-10-17",
"Statement": [
{
"Sid": "ECRRead",
"Effect": "Allow",
"Action": [
"ecr:DescribeImageScanFindings",
"ecr:GetDownloadUrlForLayer",
"ecr:DescribeRegistry",
"ecr:DescribePullThroughCacheRules",
"ecr:DescribeImageReplicationStatus",
"ecr:ListTagsForResource",
"ecr:ListImages",
"ecr:BatchGetImage",
"ecr:DescribeImages",
"ecr:DescribeRepositories",
"ecr:BatchCheckLayerAvailability"
],
"Resource": "arn:aws:ecr:*:<packages-account-id>:repository/*"
},
{
"Sid": "ECRLogin",
"Effect": "Allow",
"Action": [
"ecr:GetAuthorizationToken"
],
"Resource": "*"
}
]
}
- Choose Next
- On the Review and create page, enter a Policy name such as
curated-packages-policy
- Choose Create policy
3. Create an IAM role with permissions for EKS Anywhere Curated Packages
Run the following with the account that created the subscription.
- Open the IAM console
- In the navigation pane, choose Roles and then choose Create role
- On the Select trusted entity page, choose Custom trust policy as the Trusted entity type. Add the following trust policy, replacing
999999999999 with the AWS account receiving permissions. This policy enables account 999999999999 to assume the role.
{
"Version": "2012-10-17",
"Statement": [
{
"Effect": "Allow",
"Principal": {
"AWS": "arn:aws:iam::999999999999:root"
},
"Action": "sts:AssumeRole"
}
]
}
- Choose Next
- On the Add permissions page, search and select the policy you created in the previous step (for example
curated-packages-policy).
- Choose Next
- On the Name, review, and create page, enter a Role name such as
curated-packages-role
- Choose Create role
4. Create an IAM user with permissions to assume the IAM role from the source account
Run the following with the account that is receiving access to curated packages (in this example 999999999999) .
Create a policy to assume the IAM role
- Open the IAM console
- In the navigation pane, choose Policies and then choose Create policy
- On the Specify permissions page, select JSON
- Paste the following permission specification into the Policy editor. Replace
111111111111 with the account used to create the subscription, and curated-packages-role with the name of the role you created in the previous step.
{
"Version": "2012-10-17",
"Statement": {
"Effect": "Allow",
"Action": "sts:AssumeRole",
"Resource": "arn:aws:iam::111111111111:role/curated-packages-role"
}
}
- Choose Next
- On the Review and create page, enter a Policy name such as
curated-packages-assume-role-policy
- Choose Create policy
Create an IAM user to assume the IAM role
- Open the IAM console
- In the navigation pane, choose Users and then choose Create user
- Enter a User name such as
curated-packages-user
- Choose Next
- On the Set permissions page, choose Attach policies directly, and search and select the assume role policy you created above.
- Choose Next
- On the Review and create page, choose Create user
5. Generate access and secret key for IAM user
Run the following with the account that is receiving access to curated packages.
- Open the IAM console
- In the navigation pane, choose Users and the user you created in the previous step.
- On the users detail page in the top Summary section, choose Create access key under Access key 1
- On the Access key best practices & alternatives page, select Command Line Interface (CLI)
- Confirm that you understand the recommendation and want to proceed to create an access key. Choose Next.
- On the Set description tag page, choose Create access key
- On the Retrieve access keys page, copy the Access key and Secret access key to a safe location.
- Choose Done
6. Create an AWS config file for IAM user
Run the following with the account that is receiving access to curated packages.
Create an AWS config file with the assumed role and the access/secret key you generated in the previous step. Replace the values in the example below based on your configuration.
- Replace
region-code with the AWS Region that hosts your subscription (for example us-west-2).
- Replace
role-arn with the role you created in Step 3
- Replace
aws_access_key_id and aws_secret_access_key that you created in Step 5
[default]
source_profile=curated-packages-user
role_arn=arn:aws:iam::111111111111:role/curated-packages-role
region=region-code
[profile curated-packages-user]
aws_access_key_id=AKIAIOSFODNN7EXAMPLE
aws_secret_access_key=wJalrXUtnFEMI/K7MDENG/bPxRfiCYEXAMPLEKEY
7. Add the AWS config to your EKS Anywhere cluster
Run the following with the account that is receiving access to curated packages.
New Clusters
For new standalone or management clusters, pass the AWS config file path that you created in the previous step as the EKSA_AWS_CONFIG_FILE environment variable. The EKS Anywhere CLI detects the environment variable when you run eksctl anywhere create cluster. Note, the credentials are used by the Curated Packages Controller, which should only run on standalone or management clusters.
Existing Clusters
For existing standalone or management clusters, the AWS config information will be passed as a Kubernetes Secret. You need to generate the base64 encoded string from the AWS config file and then pass the encoded string in the config field of the aws-secret Secret in the eksa-packages namespace.
Encode the AWS config file. Replace <aws-config-file> with the name of the file you created in the previous step.
cat <aws-config-file> | base64
Create a yaml specification called aws-secret.yaml, replacing <encoded-aws-config-file> with the encoded output from the previous step.
apiVersion: v1
kind: Secret
metadata:
name: aws-secret
namespace: eksa-packages
type: Opaque
data:
AWS_ACCESS_KEY_ID: ""
AWS_SECRET_ACCESS_KEY: ""
REGION: ""
config: <encoded-aws-config-file>
Apply the Secret to your standalone or management cluster.
kubectl apply -f aws-secret.yaml
6.13.4 - Generate an EKS Anywhere support bundle
Using the EKS Anywhere diagnostics support bundle
This guide covers the use of the EKS Anywhere Support Bundle for troubleshooting and support.
This allows you to gather cluster information, save it to your administrative machine, and perform analysis of the results.
EKS Anywhere leverages troubleshoot.sh
to collect
and analyze
Kubernetes cluster logs, cluster resource information, and other relevant debugging information.
EKS Anywhere has two Support Bundle commands:
eksctl anywhere generate support-bundle will generate a support bundle for your cluster,
collecting relevant information, archiving it locally, and performing analysis of the results.
eksctl anywhere generate support-bundle-config will generate a support bundle config yaml file for you to customize.
Do not add personally identifiable information (PII) or other confidential or sensitive information to your support bundle.
If you provide the support bundle to get support from AWS, it will be accessible to other AWS services, including AWS Support.
Collecting a Support Bundle and running analyzers
eksctl anywhere generate support-bundle
generate support-bundle will allow you to quickly collect relevant logs and cluster resources and save them locally in an archive file.
This archive can then be used to aid in further troubleshooting and debugging.
If you provide a cluster configuration file containing your cluster spec using the -f flag,
generate support-bundle will customize the auto-generated support bundle collectors and analyzers
to match the state of your cluster.
If you provide a support bundle configuration file using the --bundle-config flag,
for example one generated with generate support-bundle-config,
generate support-bundle will use the provided configuration when collecting information from your cluster and analyzing the results.
If you want to generate support bundle in an airgapped environment, the --bundles-manifest flag must be set to the local path
of your eks-a bundles manifest yaml file.
Flags:
--audit-logs Include the latest api server audit log file in the support bundle
--bundle-config string Bundle Config file to use when generating support bundle
-f, --filename string Filename that contains EKS-A cluster configuration
-h, --help Help for support-bundle
--since string Collect pod logs in the latest duration like 5s, 2m, or 3h.
--since-time string Collect pod logs after a specific datetime(RFC3339) like 2021-06-28T15:04:05Z
-w, --w-config string Kubeconfig file to use when creating support bundle for a workload cluster
--bundles-manifest Bundles manifest to use when generating support bundle (required for generating support bundle in airgap environment)
Collecting and analyzing a bundle
You only need to run a single command to generate a support bundle, collect information and analyze the output:
eksctl anywhere generate support-bundle -f my-cluster.yaml
This command will collect the information from your cluster
and run an analysis of the collected information.
The collected information will be saved to your local disk in an archive which can be used for
debugging and obtaining additional in-depth support.
The analysis will be printed to your console.
Collect phase:
$ ./bin/eksctl anywhere generate support-bundle -f ./testcluster100.yaml
⏳ Collecting support bundle from cluster, this can take a while...
Analysis phase:
- URI: ""
isFail: false
isPass: true
isWarn: false
title: gitopsconfigs.anywhere.eks.amazonaws.com
message: gitopsconfigs.anywhere.eks.amazonaws.com is present on the cluster
- URI: ""
isFail: false
isPass: true
isWarn: false
title: vspheredatacenterconfigs.anywhere.eks.amazonaws.com
message: vspheredatacenterconfigs.anywhere.eks.amazonaws.com is present on the cluster
- URI: ""
isFail: false
isPass: true
isWarn: false
title: vspheremachineconfigs.anywhere.eks.amazonaws.com
message: vspheremachineconfigs.anywhere.eks.amazonaws.com is present on the cluster
- URI: ""
isFail: false
isPass: true
isWarn: false
title: capv-controller-manager Status
message: capv-controller-manager is running.
- URI: ""
isFail: false
isPass: true
isWarn: false
title: capv-controller-manager Status
message: capv-controller-manager is running.
- URI: ""
isFail: false
isPass: true
isWarn: false
title: coredns Status
message: coredns is running.
- URI: ""
isFail: false
isPass: true
isWarn: false
title: cert-manager-webhook Status
message: cert-manager-webhook is running.
- URI: ""
isFail: false
isPass: true
isWarn: false
title: cert-manager-cainjector Status
message: cert-manager-cainjector is running.
- URI: ""
isFail: false
isPass: true
isWarn: false
title: cert-manager Status
message: cert-manager is running.
- URI: ""
isFail: false
isPass: true
isWarn: false
title: capi-kubeadm-control-plane-controller-manager Status
message: capi-kubeadm-control-plane-controller-manager is running.
- URI: ""
isFail: false
isPass: true
isWarn: false
title: capi-kubeadm-bootstrap-controller-manager Status
message: capi-kubeadm-bootstrap-controller-manager is running.
- URI: ""
isFail: false
isPass: true
isWarn: false
title: capi-controller-manager Status
message: capi-controller-manager is running.
- URI: ""
isFail: false
isPass: true
isWarn: false
title: capi-controller-manager Status
message: capi-controller-manager is running.
- URI: ""
isFail: false
isPass: true
isWarn: false
title: capi-kubeadm-control-plane-controller-manager Status
message: capi-kubeadm-control-plane-controller-manager is running.
- URI: ""
isFail: false
isPass: true
isWarn: false
title: capi-kubeadm-control-plane-controller-manager Status
message: capi-kubeadm-control-plane-controller-manager is running.
- URI: ""
isFail: false
isPass: true
isWarn: false
title: capi-kubeadm-bootstrap-controller-manager Status
message: capi-kubeadm-bootstrap-controller-manager is running.
- URI: ""
isFail: false
isPass: true
isWarn: false
title: clusters.anywhere.eks.amazonaws.com
message: clusters.anywhere.eks.amazonaws.com is present on the cluster
- URI: ""
isFail: false
isPass: true
isWarn: false
title: bundles.anywhere.eks.amazonaws.com
message: bundles.anywhere.eks.amazonaws.com is present on the cluster
Archive phase:
Support bundle archive created {"path": "support-bundle-2023-08-11T18_17_29.tar.gz"}
Generating a custom Support Bundle configuration for your EKS Anywhere Cluster
EKS Anywhere will automatically generate a support bundle based on your cluster configuration;
however, if you’d like to customize the support bundle to collect specific information,
you can generate your own support bundle configuration yaml for EKS Anywhere to run on your cluster.
eksctl anywhere generate support-bundle-config will generate a default support bundle configuration and print it as yaml.
eksctl anywhere generate support-bundle-config -f myCluster.yaml will generate a support bundle configuration customized to your cluster and print it as yaml.
To run a customized support bundle configuration yaml file on your cluster,
save this output to a file and run the command eksctl anywhere generate support-bundle using the flag --bundle-config.
eksctl anywhere generate support-bundle-config
Flags:
-f, --filename string Filename that contains EKS-A cluster configuration
-h, --help Help for support-bundle-config
6.13.5 -
{
"subscription": {
"id": "e29fd0d2-d8a8-4ed4-be54-c6c0dd0f7964",
"arn": "arn:aws:eks:us-west-2:<account-id>:eks-anywhere-subscription/e29fd0d2-d8a8-4ed4-be54-c6c0dd0f7964",
"name": "my-subscription",
"createdAt": "2023-10-10T08:33:36.869000-05:00",
"effectiveDate": "2023-10-10T08:33:36.869000-05:00",
"expirationDate": "2024-10-10T08:33:36.869000-05:00",
"licenseQuantity": 1,
"licenseType": "CLUSTER",
"term": {
"duration": 12,
"unit": "MONTHS"
},
"status": "CREATING",
"packageRegistry": "<packages-registry>.dkr.ecr.<region>.amazonaws.com",
"autoRenew": false,
"licenseArns": [],
"licenses": [],
"tags": {
"environment": "prod"
}
}
}
6.13.6 -
{
"subscription": {
"id": "e29fd0d2-d8a8-4ed4-be54-c6c0dd0f7964",
"arn": "arn:aws:eks:<region>:<account-id>:eks-anywhere-subscription/e29fd0d2-d8a8-4ed4-be54-c6c0dd0f7964",
"name": "my-subscription",
"createdAt": "2023-10-10T08:33:36.869000-05:00",
"effectiveDate": "2023-10-10T08:33:36.869000-05:00",
"expirationDate": "2024-10-10T08:33:36.869000-05:00",
"licenseQuantity": 1,
"licenseType": "CLUSTER",
"term": {
"duration": 12,
"unit": "MONTHS"
},
"status": "DELETING",
"packageRegistry": "<packages-registry>.dkr.ecr.<region>.amazonaws.com",
"autoRenew": false,
"licenseArns": [
"arn:aws:license-manager::<account-id>:license:l-4f36acf12e6d491484812927b327c066"
],
"licenses": [
{
"id": "<license-id-string>",
"token": "<license-token-string>"
}
],
"tags": {
"environment": "prod"
}
}
}
6.13.7 -
{
"subscription": {
"id": "e29fd0d2-d8a8-4ed4-be54-c6c0dd0f7964",
"arn": "arn:aws:eks:<region>:<account-id>:eks-anywhere-subscription/e29fd0d2-d8a8-4ed4-be54-c6c0dd0f7964",
"name": "my-subscription",
"createdAt": "2023-10-10T08:33:36.869000-05:00",
"effectiveDate": "2023-10-10T08:33:36.869000-05:00",
"expirationDate": "2024-10-10T08:33:36.869000-05:00",
"licenseQuantity": 1,
"licenseType": "CLUSTER",
"term": {
"duration": 12,
"unit": "MONTHS"
},
"status": "ACTIVE",
"packageRegistry": "<packages-registry>.dkr.ecr.<region>.amazonaws.com",
"autoRenew": false,
"licenseArns": [
"arn:aws:license-manager::<account-id>:license:l-4f36acf12e6d491484812927b327c066"
],
"licenses": [
{
"id": "<license-id-string>",
"token": "<license-token-string>"
}
],
"tags": {
"environment": "prod"
}
}
}
6.13.8 -
{
"License": {
"LicenseArn": "arn:aws:license-manager::<account-id>:license:l-4f36acf12e6d491484812927b327c066",
"LicenseName": "EKS Anywhere license for subscription my-subscription",
"ProductName": "Amazon EKS Anywhere",
"ProductSKU": "EKS Anywhere e29fd0d2-d8a8-4ed4-be54-c6c0dd0f7964:9444bd0d",
"Issuer": {
"Name": "Amazon EKS Anywhere",
"KeyFingerprint": "aws:<account-id>:Amazon EKS Anywhere:issuer-fingerprint"
},
"HomeRegion": "<region>",
"Status": "AVAILABLE",
"Validity": {
"Begin": "2023-10-10T13:33:36.000Z",
"End": "2024-10-11T13:33:36.000Z"
},
"Beneficiary": "<account-id>",
"Entitlements": [
{
"Name": "EKS Anywhere for e29fd0d2-d8a8-4ed4-be54-c6c0dd0f7964",
"MaxCount": 1,
"Overage": false,
"Unit": "Count",
"AllowCheckIn": false
}
],
"ConsumptionConfiguration": {
"RenewType": "None",
"BorrowConfiguration": {
"AllowEarlyCheckIn": true,
"MaxTimeToLiveInMinutes": 527040
}
},
"CreateTime": "1696945150",
"Version": "1"
}
}
6.13.9 -
{
"subscriptions": [
{
"id": "e29fd0d2-d8a8-4ed4-be54-c6c0dd0f7964",
"arn": "arn:aws:eks:<region>:<account-id>:eks-anywhere-subscription/e29fd0d2-d8a8-4ed4-be54-c6c0dd0f7964",
"name": "my-subscription",
"createdAt": "2023-10-10T08:33:36.869000-05:00",
"effectiveDate": "2023-10-10T08:33:36.869000-05:00",
"expirationDate": "2024-10-10T08:33:36.869000-05:00",
"licenseQuantity": 1,
"licenseType": "CLUSTER",
"term": {
"duration": 12,
"unit": "MONTHS"
},
"status": "ACTIVE",
"packageRegistry": "<account-id>.dkr.ecr.<region>.amazonaws.com",
"autoRenew": false,
"licenseArns": [
"arn:aws:license-manager::<account-id>:license:l-4f36acf12e6d491484812927b327c066"
],
"licenses": [
{
"id": "<license-id-string>",
"token": "<license-token-string>"
}
],
"tags": {
"environment": "prod"
}
}
]
}
6.13.10 -
| AWS Region |
Packages Registry Account |
| us-west-2 |
346438352937 |
| us-west-1 |
440460740297 |
| us-east-1 |
331113665574 |
| us-east-2 |
297090588151 |
| ap-east-1 |
804323328300 |
| ap-northeast-1 |
143143237519 |
| ap-northeast-2 |
447311122189 |
| ap-south-1 |
357015164304 |
| ap-south-2 |
388483641499 |
| ap-southeast-1 |
654894141437 |
| ap-southeast-2 |
299286866837 |
| ap-southeast-3 |
703305448174 |
| ap-southeast-4 |
106475008004 |
| ap-southeast-5 |
396913739932 |
| af-south-1 |
783635962247 |
| ca-central-1 |
064352486547 |
| ca-west-1 |
571600859530 |
| eu-central-1 |
364992945014 |
| eu-central-2 |
551422459769 |
| eu-north-1 |
826441621985 |
| eu-south-1 |
787863792200 |
| eu-south-2 |
127214161500 |
| eu-west-1 |
090204409458 |
| eu-west-2 |
371148654473 |
| eu-west-3 |
282646289008 |
| il-central-1 |
131750224677 |
| me-central-1 |
454241080883 |
| me-south-1 |
158698011868 |
| sa-east-1 |
517745584577 |
6.13.11 -
{
"subscription": {
"id": "e29fd0d2-d8a8-4ed4-be54-c6c0dd0f7964",
"arn": "arn:aws:eks:<region>:<account-id>:eks-anywhere-subscription/e29fd0d2-d8a8-4ed4-be54-c6c0dd0f7964",
"name": "my-subscription",
"createdAt": "2023-10-10T08:33:36.869000-05:00",
"effectiveDate": "2023-10-10T08:33:36.869000-05:00",
"expirationDate": "2024-10-10T08:33:36.869000-05:00",
"licenseQuantity": 1,
"licenseType": "CLUSTER",
"term": {
"duration": 12,
"unit": "MONTHS"
},
"status": "ACTIVE",
"packageRegistry": "<packages-registry>.dkr.ecr.<region>.amazonaws.com",
"autoRenew": false,
"licenseArns": [
"arn:aws:license-manager::<account-id>:license:l-4f36acf12e6d491484812927b327c066"
],
"licenses": [
{
"id": "<license-id-string>",
"token": "<license-token-string>"
}
],
"tags": {
"environment": "prod"
}
}
}
6.13.12 -
{
"subscription": {
"id": "e29fd0d2-d8a8-4ed4-be54-c6c0dd0f7964",
"arn": "arn:aws:eks:<region>:<account-id>:eks-anywhere-subscription/e29fd0d2-d8a8-4ed4-be54-c6c0dd0f7964",
"name": "my-subscription",
"createdAt": "2023-10-10T08:33:36.869000-05:00",
"effectiveDate": "2023-10-10T08:33:36.869000-05:00",
"expirationDate": "2024-10-10T08:33:36.869000-05:00",
"licenseQuantity": 1,
"licenseType": "CLUSTER",
"term": {
"duration": 12,
"unit": "MONTHS"
},
"status": "ACTIVE",
"packageRegistry": "<packages-registry>.dkr.ecr.<region>.amazonaws.com",
"autoRenew": true,
"licenseArns": [
"arn:aws:license-manager::<account-id>:license:l-4f36acf12e6d491484812927b327c066"
],
"licenses": [
{
"id": "<license-id-string>",
"token": "<license-token-string>"
}
],
"tags": {
"environment": "prod"
}
}
}
6.14 - Manage cluster with GitOps
Use Flux to manage clusters with GitOps
GitOps Support (optional)
EKS Anywhere supports a GitOps
workflow for the management of your cluster.
When you create a cluster with GitOps enabled, EKS Anywhere will automatically commit your cluster configuration to the provided GitHub repository and install a GitOps toolkit on your cluster which watches that committed configuration file.
You can then manage the scale of the cluster by making changes to the version controlled cluster configuration file and committing the changes.
Once a change has been detected by the GitOps controller running in your cluster, the scale of the cluster will be adjusted to match the committed configuration file.
If you’d like to learn more about GitOps, and the associated best practices, check out this introduction from Weaveworks
.
NOTE: Installing a GitOps controller can be done during cluster creation or through upgrade.
In the event that GitOps installation fails, EKS Anywhere cluster creation will continue.
Supported Cluster Properties
Currently, you can manage a subset of cluster properties with GitOps:
Management Cluster
Cluster:
workerNodeGroupConfigurations.countworkerNodeGroupConfigurations.machineGroupRef.name
WorkerNodes VSphereMachineConfig:
datastorediskGiBfoldermemoryMiBnumCPUsresourcePooltemplateusers
Workload Cluster
Cluster:
kubernetesVersioncontrolPlaneConfiguration.countcontrolPlaneConfiguration.machineGroupRef.nameworkerNodeGroupConfigurations.countworkerNodeGroupConfigurations.machineGroupRef.nameidentityProviderRefs (Only for kind:OIDCConfig, kind:AWSIamConfig is immutable)
ControlPlane / Etcd / WorkerNodes VSphereMachineConfig:
datastorediskGiBfoldermemoryMiBnumCPUsresourcePooltemplateusers
OIDCConfig:
clientIDgroupsClaimgroupsPrefixissuerUrlrequiredClaims.claimrequiredClaims.valueusernameClaimusernamePrefix
Any other changes to the cluster configuration in the git repository will be ignored.
If an immutable field has been changed in a Git repository, there are two ways to find the error message:
- If a notification webhook is set up, check the error message in notification channel.
- Check the Flux Kustomization Controller log:
kubectl logs -f -n flux-system kustomize-controller-****** for error message containing text similar to Invalid value: 1: field is immutable
Getting Started with EKS Anywhere GitOps with Github
In order to use GitOps to manage cluster scaling, you need a couple of things:
Create a GitHub Personal Access Token
Create a Personal Access Token (PAT)
to access your provided GitHub repository.
It must be scoped for all repo permissions.
NOTE: GitOps configuration only works with hosted github.com and will not work on a self-hosted GitHub Enterprise instances.
This PAT should have at least the following permissions:
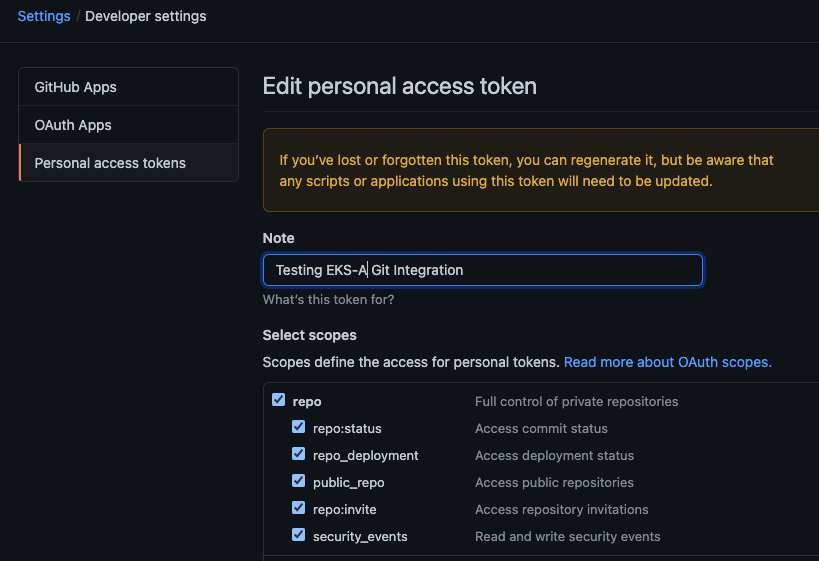
NOTE: The PAT must belong to the owner of the repository or, if using an organization as the owner, the creator of the PAT must have repo permission in that organization.
You need to set your PAT as the environment variable $EKSA_GITHUB_TOKEN to use it during cluster creation:
export EKSA_GITHUB_TOKEN=ghp_MyValidPersonalAccessTokenWithRepoPermissions
Create GitOps configuration repo
If you have an existing repo you can set that as your repository name in the configuration.
If you specify a repo in your FluxConfig which does not exist EKS Anywhere will create it for you.
If you would like to create a new repo you can click here
to create a new repo.
If your repository contains multiple cluster specification files, store them in sub-folders and specify the configuration path
in your cluster specification.
In order to accommodate the management cluster feature, the CLI will now structure the repo directory following a new convention:
clusters
└── management-cluster
├── flux-system
│ └── ...
├── management-cluster
│ └── eksa-system
│ └── eksa-cluster.yaml
│ └── kustomization.yaml
├── workload-cluster-1
│ └── eksa-system
│ └── eksa-cluster.yaml
└── workload-cluster-2
└── eksa-system
└── eksa-cluster.yaml
By default, Flux kustomization reconciles at the management cluster’s root level (./clusters/management-cluster), so both the management cluster and all the workload clusters it manages are synced.
Example GitOps cluster configuration for Github
apiVersion: anywhere.eks.amazonaws.com/v1alpha1
kind: Cluster
metadata:
name: mynewgitopscluster
spec:
... # collapsed cluster spec fields
# Below added for gitops support
gitOpsRef:
kind: FluxConfig
name: my-cluster-name
---
apiVersion: anywhere.eks.amazonaws.com/v1alpha1
kind: FluxConfig
metadata:
name: my-cluster-name
spec:
github:
personal: true
repository: mygithubrepository
owner: mygithubusername
Create a GitOps enabled cluster
Generate your cluster configuration and add the GitOps configuration.
For a full spec reference see the Cluster Spec reference
.
NOTE: After your cluster has been created the cluster configuration will automatically be committed to your git repo.
-
Create an EKS Anywhere cluster with GitOps enabled.
CLUSTER_NAME=gitops
eksctl anywhere create cluster -f ${CLUSTER_NAME}.yaml
Enable GitOps in an existing cluster
You can also install Flux and enable GitOps in an existing cluster by running the upgrade command with updated cluster configuration.
For a full spec reference see the Cluster Spec reference
.
-
Upgrade an EKS Anywhere cluster with GitOps enabled.
CLUSTER_NAME=gitops
eksctl anywhere upgrade cluster -f ${CLUSTER_NAME}.yaml
Test GitOps controller
After your cluster has been created, you can test the GitOps controller by modifying the cluster specification.
-
Clone your git repo and modify the cluster specification.
The default path for the cluster file is:
clusters/$CLUSTER_NAME/eksa-system/eksa-cluster.yaml
-
Modify the workerNodeGroupConfigurations[0].count field with your desired changes.
-
Commit the file to your git repository
git add eksa-cluster.yaml
git commit -m 'Scaling nodes for test'
git push origin main
-
The Flux controller will automatically make the required changes.
If you updated your node count, you can use this command to see the current node state.
Getting Started with EKS Anywhere GitOps with any Git source
You can configure EKS Anywhere to use a generic git repository as the source of truth for GitOps by providing a FluxConfig with a git configuration.
EKS Anywhere requires a valid SSH Known Hosts file and SSH Private key in order to connect to your repository and bootstrap Flux.
Create a Git repository for use by EKS Anywhere and Flux
When using the git provider, EKS Anywhere requires that the configuration repository be pre-initialized.
You may re-use an existing repo or use the same repo for multiple management clusters.
Create the repository through your git provider and initialize it with a README.md documenting the purpose of the repository.
Create a Private Key for use by EKS Anywhere and Flux
EKS Anywhere requires a private key to authenticate to your git repository, push the cluster configuration, and configure Flux for ongoing management and monitoring of that configuration.
The private key should have permissions to read and write from the repository in question.
It is recommended that you create a new private key for use exclusively by EKS Anywhere.
You can use ssh-keygen to generate a new key.
ssh-keygen -t ecdsa -C "my_email@example.com"
Please consult the documentation for your git provider to determine how to add your corresponding public key; for example, if using Github enterprise, you can find the documentation for adding a public key to your github account here
.
Add your private key to your SSH agent on your management machine
When using a generic git provider, EKS Anywhere requires that your management machine has a running SSH agent and the private key be added to that SSH agent.
You can start an SSH agent and add your private key by executing the following in your current session:
eval "$(ssh-agent -s)" && ssh-add $EKSA_GIT_PRIVATE_KEY
Create an SSH Known Hosts file for use by EKS Anywhere and Flux
EKS Anywhere needs an SSH known hosts file to verify the identity of the remote git host.
A path to a valid known hosts file must be provided to the EKS Anywhere command line via the environment variable EKSA_GIT_KNOWN_HOSTS.
For example, if you have a known hosts file at /home/myUser/.ssh/known_hosts that you want EKS Anywhere to use, set the environment variable EKSA_GIT_KNOWN_HOSTS to the path to that file, /home/myUser/.ssh/known_hosts.
export EKSA_GIT_KNOWN_HOSTS=/home/myUser/.ssh/known_hosts
While you can use your pre-existing SSH known hosts file, it is recommended that you generate a new known hosts file for use by EKS Anywhere that contains only the known-hosts entries required for your git host and key type.
For example, if you wanted to generate a known hosts file for a git server located at example.com with key type ecdsa, you can use the OpenSSH utility ssh-keyscan:
ssh-keyscan -t ecdsa example.com >> my_eksa_known_hosts
This will generate a known hosts file which contains only the entry necessary to verify the identity of example.com when using an ecdsa based private key file.
Example FluxConfig cluster configuration for a generic git provider
For a full spec reference see the Cluster Spec reference
.
A common repositoryUrl value can be of the format ssh://git@provider.com/$REPO_OWNER/$REPO_NAME.git. This may differ from the default SSH URL given by your provider. Consider these differences between github and CodeCommit URLs:
- The github.com user interface provides an SSH URL containing a
: before the repository owner, rather than a /. Make sure to replace this : with a /, if present.
- The CodeCommit SSH URL must include SSH-KEY-ID in format
ssh://<SSH-Key-ID>@git-codecommit.<region>.amazonaws.com/v1/repos/<repository>.
apiVersion: anywhere.eks.amazonaws.com/v1alpha1
kind: Cluster
metadata:
name: mynewgitopscluster
spec:
... # collapsed cluster spec fields
# Below added for gitops support
gitOpsRef:
kind: FluxConfig
name: my-cluster-name
---
apiVersion: anywhere.eks.amazonaws.com/v1alpha1
kind: FluxConfig
metadata:
name: my-cluster-name
spec:
git:
repositoryUrl: ssh://git@provider.com/myAccount/myClusterGitopsRepo.git
sshKeyAlgorithm: ecdsa
Manage separate workload clusters using Gitops
Follow these steps if you want to use your initial cluster to create and manage separate workload clusters via Gitops.
Prerequisites
-
An existing EKS Anywhere cluster with Gitops enabled.
If your existing cluster does not have Gitops installed, see Enable Gitops in an existing cluster.
.
-
A cluster configuration file for your new workload cluster.
Create cluster using Gitops
-
Clone your git repo and add the new cluster specification.
Be sure to follow the directory structure defined here
:
clusters/<management-cluster-name>/$CLUSTER_NAME/eksa-system/eksa-cluster.yaml
NOTE: Specify the namespace for all EKS Anywhere objects when you are using GitOps to create new workload clusters (even for the default namespace, use namespace: default on those objects).
Ensure workload cluster object names are distinct from management cluster object names. Be sure to set the managementCluster field to identify the name of the management cluster.
Make sure there is a kustomization.yaml file under the namespace directory for the management cluster. Creating a Gitops enabled management cluster with eksctl should create the kustomization.yaml file automatically.
-
Commit the file to your git repository.
git add clusters/<management-cluster-name>/$CLUSTER_NAME/eksa-system/eksa-cluster.yaml
git commit -m 'Creating new workload cluster'
git push origin main
-
The Flux controller will automatically make the required changes.
You can list the workload clusters managed by the management cluster.
export KUBECONFIG=${PWD}/${MGMT_CLUSTER_NAME}/${MGMT_CLUSTER_NAME}-eks-a-cluster.kubeconfig
kubectl get clusters
-
Check the state of a cluster using kubectl to show the cluster object with its status.
The status field on the cluster object field holds information about the current state of the cluster.
kubectl get clusters w01 -o yaml
The cluster has been fully upgraded once the status of the Ready condition is marked True.
See the cluster status
guide for more information.
-
The kubeconfig for your new cluster is stored as a secret on the management cluster.
You can get credentials and run the test application on your new workload cluster as follows:
kubectl get secret -n eksa-system w01-kubeconfig -o jsonpath='{.data.value}' | base64 —decode > w01.kubeconfig
export KUBECONFIG=w01.kubeconfig
kubectl apply -f "https://anywhere.eks.amazonaws.com/manifests/hello-eks-a.yaml"
Upgrade cluster using Gitops
-
To upgrade the cluster using Gitops, modify the workload cluster yaml file with the desired changes.
As an example, to upgrade a cluster with version 1.34 to 1.35 you would change your spec:
apiVersion: anywhere.eks.amazonaws.com/v1alpha1
kind: Cluster
metadata:
name: dev
namespace: default
spec:
controlPlaneConfiguration:
count: 1
endpoint:
host: "198.18.99.49"
machineGroupRef:
kind: VSphereMachineConfig
name: dev
...
kubernetesVersion: "1.35"
...
NOTE: If you have a custom machine image for your nodes you may also need to update your MachineConfig with a new template.
-
Commit the file to your git repository.
git add eksa-cluster.yaml
git commit -m 'Upgrading kubernetes version on new workload cluster'
git push origin main
For a comprehensive list of upgradeable fields for VSphere, Snow, and Nutanix, see the upgradeable attributes section
.
Delete cluster using Gitops
- To delete the cluster using Gitops, delete the workload cluster yaml file from your repository and commit those changes.
git rm eksa-cluster.yaml
git commit -m 'Deleting workload cluster'
git push origin main
6.15 - Manage cluster with Terraform
Use Terraform to manage EKS Anywhere Clusters
NOTE: Support for using Terraform to manage and modify an EKS Anywhere cluster is available for vSphere, Snow, Bare metal, Nutanix and CloudStack clusters.
This guide explains how you can use Terraform to manage and modify an EKS Anywhere cluster.
The guide is meant for illustrative purposes and is not a definitive approach to building production systems with Terraform and EKS Anywhere.
At its heart, EKS Anywhere is a set of Kubernetes CRDs, which define an EKS Anywhere cluster,
and a controller, which moves the cluster state to match these definitions.
These CRDs, and the EKS-A controller, live on the management cluster or
on a self-managed cluster.
We can manage a subset of the fields in the EKS Anywhere CRDs with any tool that can interact with the Kubernetes API, like kubectl or, in this case, the Terraform Kubernetes provider.
In this guide, we’ll show you how to import your EKS Anywhere cluster into Terraform state and
how to scale your EKS Anywhere worker nodes using the Terraform Kubernetes provider.
Prerequisites
-
An existing EKS Anywhere cluster
-
the latest version of Terraform
-
the latest version of tfk8s
, a tool for converting Kubernetes manifest files to Terraform HCL
Guide
- Create an EKS-A management cluster, or a self-managed stand-alone cluster.
-
Set up the Terraform Kubernetes provider
Make sure your KUBECONFIG environment variable is set
export KUBECONFIG=/path/to/my/kubeconfig.kubeconfig
Set an environment variable with your cluster name:
export MY_EKSA_CLUSTER="myClusterName"
cat << EOF > ./provider.tf
provider "kubernetes" {
config_path = "${KUBECONFIG}"
}
EOF
-
Get tfk8s and use it to convert your EKS Anywhere cluster Kubernetes manifest into Terraform HCL:
- Install tfk8s
- Convert the manifest into Terraform HCL:
kubectl get cluster ${MY_EKSA_CLUSTER} -o yaml | tfk8s --strip -o ${MY_EKSA_CLUSTER}.tf
-
Configure the Terraform cluster resource definition generated in step 2
- Set
metadata.generation as a computed field
. Add the following to your cluster resource configuration
computed_fields = ["metadata.generation"]
field_manager {
force_conflicts = true
}
- Add the
namespace to the metadata of the cluster
- Remove the
generation field from the metadata of the cluster
- Your Terraform cluster resource should look similar to this:
computed_fields = ["metadata.generation"]
field_manager {
force_conflicts = true
}
manifest = {
"apiVersion" = "anywhere.eks.amazonaws.com/v1alpha1"
"kind" = "Cluster"
"metadata" = {
"name" = "MyClusterName"
"namespace" = "default"
}
-
Import your EKS Anywhere cluster into terraform state:
terraform init
terraform import kubernetes_manifest.cluster_${MY_EKSA_CLUSTER} "apiVersion=anywhere.eks.amazonaws.com/v1alpha1,kind=Cluster,namespace=default,name=${MY_EKSA_CLUSTER}"
After you import your cluster, you will need to run terraform apply one time to ensure that the manifest field of your cluster resource is in-sync.
This will not change the state of your cluster, but is a required step after the initial import.
The manifest field stores the contents of the associated kubernetes manifest, while the object field stores the actual state of the resource.
-
Modify Your Cluster using Terraform
- Modify the
count value of one of your workerNodeGroupConfigurations, or another mutable field, in the configuration stored in ${MY_EKSA_CLUSTER}.tf file.
- Check the expected diff between your cluster state and the modified local state via
terraform plan
You should see in the output that the worker node group configuration count field (or whichever field you chose to modify) will be modified by Terraform.
-
Now, actually change your cluster to match the local configuration:
-
Observe the change to your cluster. For example:
Follow these steps if you want to use your initial cluster to create and manage separate workload clusters via Terraform.
NOTE: If you choose to manage your cluster using Terraform, do not use kubectl to edit your cluster objects as this can lead to field manager conflicts.
Prerequisites
- An existing EKS Anywhere cluster imported into Terraform state.
If your existing cluster is not yet imported, see this guide.
.
- A cluster configuration file for your new workload cluster.
-
Create the new cluster configuration Terraform file.
tfk8s -f new-workload-cluster.yaml -o new-workload-cluster.tf
NOTE: Specify the namespace for all EKS Anywhere objects when you are using Terraform to manage your clusters (even for the default namespace, use "namespace" = "default" on those objects).
Ensure workload cluster object names are distinct from management cluster object names. Be sure to set the managementCluster field to identify the name of the management cluster.
-
Ensure that this new Terraform workload cluster configuration exists in the same directory as the management cluster Terraform files.
my/terraform/config/path
├── management-cluster.tf
├── new-workload-cluster.tf
├── provider.tf
├── ...
└──
-
Verify the changes to be applied:
-
If the plan looks as expected, apply those changes to create the new cluster resources:
-
You can list the workload clusters managed by the management cluster.
export KUBECONFIG=${PWD}/${MGMT_CLUSTER_NAME}/${MGMT_CLUSTER_NAME}-eks-a-cluster.kubeconfig
kubectl get clusters
-
Check the state of a cluster using kubectl to show the cluster object with its status.
The status field on the cluster object field holds information about the current state of the cluster.
kubectl get clusters w01 -o yaml
The cluster has been fully upgraded once the status of the Ready condition is marked True.
See the cluster status
guide for more information.
-
The kubeconfig for your new cluster is stored as a secret on the management cluster.
You can get the workload cluster credentials and run the test application on your new workload cluster as follows:
kubectl get secret -n eksa-system w01-kubeconfig -o jsonpath='{.data.value}' | base64 --decode > w01.kubeconfig
export KUBECONFIG=w01.kubeconfig
kubectl apply -f "https://anywhere.eks.amazonaws.com/manifests/hello-eks-a.yaml"
-
To upgrade a workload cluster using Terraform, modify the desired fields in the Terraform resource file.
As an example, to upgrade a cluster with version 1.34 to 1.35 you would modify your Terraform cluster resource:
manifest = {
"apiVersion" = "anywhere.eks.amazonaws.com/v1alpha1"
"kind" = "Cluster"
"metadata" = {
"name" = "MyClusterName"
"namespace" = "default"
}
"spec" = {
"kubernetesVersion" = "1.35"
...
...
}
NOTE: If you have a custom machine image for your nodes you may also need to update your MachineConfig with a new template.
-
Apply those changes:
For a comprehensive list of upgradeable fields for VSphere, Snow, and Nutanix, see the upgradeable attributes section
.
- To delete a workload cluster using Terraform, you will need the name of the Terraform cluster resource.
This can be found on the first line of your cluster resource definition.
terraform destroy --target kubernetes_manifest.cluster_w01
Appendix
Terraform K8s Provider https://registry.terraform.io/providers/hashicorp/kubernetes/latest/docs
tfk8s https://github.com/jrhouston/tfk8s
6.16 - Reboot nodes
How to properly reboot a node in an EKS Anywhere cluster
If you need to reboot a node in your cluster for maintenance or any other reason, performing the following steps will help prevent possible disruption of services on those nodes:
Warning
Rebooting a cluster node as described here is good for all nodes, but is critically important when rebooting a Bottlerocket node running the boots service on a Bare Metal cluster.
If it does go down while running the boots service, the Bottlerocket node will not be able to boot again until the boots service is restored on another machine. This is because Bottlerocket must get its address from a DHCP service.
- On your admin machine, set the following environment variables that will come in handy later
export CLUSTER_NAME=mgmt
export MGMT_KUBECONFIG=${CLUSTER_NAME}/${CLUSTER_NAME}-eks-a-cluster.kubeconfig
-
Backup cluster
This ensures that there is an up-to-date cluster state available for restoration in the case that the cluster experiences issues or becomes unrecoverable during reboot.
-
Verify DHCP lease time will be longer than the maintenance time, and that IPs will be the same before and after maintenance.
This step is critical in ensuring the cluster will be healthy after reboot. If IPs are not preserved before and after reboot, the cluster may not be recoverable.
Warning
If this cannot be verified, do not proceed any further
-
Pause the reconciliation of the cluster being shut down.
This ensures that the EKS Anywhere cluster controller will not reconcile on the nodes that are down and try to remediate them.
- add the paused annotation to the EKSA clusters and CAPI clusters:
kubectl annotate clusters.anywhere.eks.amazonaws.com $CLUSTER_NAME anywhere.eks.amazonaws.com/paused=true --kubeconfig=$MGMT_KUBECONFIG
kubectl patch clusters.cluster.x-k8s.io $CLUSTER_NAME --type merge -p '{"spec":{"paused": true}}' -n eksa-system --kubeconfig=$MGMT_KUBECONFIG
-
For all of the nodes in the cluster, perform the following steps in this order: worker nodes, control plane nodes, and etcd nodes.
-
Cordon the node so no further workloads are scheduled to run on it:
kubectl cordon <node-name>
-
Drain the node of all current workloads:
kubectl drain <node-name>
-
Using the appropriate method for your provider, shut down the node.
-
Perform system maintenance or other tasks you need to do on each node. Then boot up the node in this order: etcd nodes, control plane nodes, and worker nodes.
-
Uncordon the nodes so that they can begin receiving workloads again.
kubectl uncordon <node-name>
-
Remove the paused annotations from EKS Anywhere cluster.
kubectl annotate clusters.anywhere.eks.amazonaws.com $CLUSTER_NAME anywhere.eks.amazonaws.com/paused- --kubeconfig=$MGMT_KUBECONFIG
kubectl patch clusters.cluster.x-k8s.io $CLUSTER_NAME --type merge -p '{"spec":{"paused": false}}' -n eksa-system --kubeconfig=$MGMT_KUBECONFIG
6.17 - Cluster status
What’s in an EKS Anywhere cluster status?
The EKS Anywhere cluster status shows information representing the actual state of the cluster vs the desired cluster specification. This is particularly useful to track the progress of cluster management operations through the cluster lifecyle feature.
Viewing an EKS Anywhere cluster status
First set the CLUSTER_NAME and KUBECONFIG environment variables.
export CLUSTER_NAME=w01
export KUBECONFIG=${CLUSTER_NAME}/${CLUSTER_NAME}-eks-a-cluster.kubeconfig
To view an EKS Anywhere cluster status, use kubectl command show the status of the cluster object.
The output should show the yaml definition of the EKS Anywhere Cluster object which has a status field.
kubectl get clusters $CLUSTER_NAME -o yaml
...
status:
conditions:
- lastTransitionTime: "2023-08-15T20:35:15Z"
status: "True"
type: Ready
- lastTransitionTime: "2023-08-15T20:35:15Z"
status: "True"
type: ControlPlaneInitialized
- lastTransitionTime: "2023-08-15T20:35:15Z"
status: "True"
type: ControlPlaneReady
- lastTransitionTime: "2023-08-15T20:35:15Z"
status: "True"
type: DefaultCNIConfigured
- lastTransitionTime: "2023-08-15T20:35:15Z"
status: "True"
type: WorkersReady
observedGeneration: 2
Cluster status attributes
The following fields may be represented on the cluster status:
status.failureMessage
Descriptive message about a fatal problem while reconciling a cluster
status.failureReason
Machine readable value about a terminal problem while reconciling the cluster set at the same time as the status.failureMessage.
status.conditions
Provides a collection of condition objects that report a high-level assessment of cluster readiness.
status.observedGeneration
This is the latest generation observed, set everytime the status is updated. If this is not the same as the cluster object’s metadata.generation, it means that the status being viewed represents an old generation of the cluster specification and is not up-to-date yet.
Cluster status conditions
Conditions provide a high-level status report representing an assessment of cluster readiness using a collection of conditions each of a particular type. The following condition types are supported:
-
ControlPlaneInitialized - reports the first control plane has been initialized and the cluster is contactable with the kubeconfig. Once this condition is marked True, its value never changes.
-
ControlPlaneReady - reports that the condition of the current state of the control plane with respect to the desired state specified in the Cluster specification. This condition is marked True once the number of control plane nodes in the cluster match the expected number of control plane nodes as defined in the cluster specifications and all the control plane nodes are up to date and ready.
-
DefaultCNIConfigured - reports the configuration state of the default CNI specified in the cluster specifications. It will be marked as True once the default CNI has been successfully configured on the cluster.
However, if the EKS Anywhere default cilium CNI has been configured to skip upgrades
in the cluster specification, then this condition will be marked as False with the reason SkipUpgradesForDefaultCNIConfigured.
-
WorkersReady - reports that the condition of the current state of worker machines versus the desired state specified in the Cluster specification. This condition is marked True once the following conditions are met:
- For worker node groups with autoscaling
configured, number of worker nodes in that group lies between the minCount and maxCount number of worker nodes as defined in the cluster specification.
- For fixed worker node groups, number of worker nodes in that group matches the expected number of worker nodes in those groups as defined in the cluster specification.
- All the worker nodes are up to date and ready.
-
Ready - reports a summary of the following conditions: ControlPlaneInitialized, ControlPlaneReady, and WorkersReady. It indicates an overall operational state of the EKS Anywhere cluster. It will be marked True once the current state of the cluster has fully reached the desired state specified in the Cluster spec.
6.18 - Delete cluster
How to delete an EKS Anywhere cluster
Deleting a workload cluster
Follow these steps to delete your EKS Anywhere cluster that is managed by a separate management cluster.
To delete a workload cluster, you will need:
- name of your workload cluster
- kubeconfig of your workload cluster
- kubeconfig of your management cluster
Run the following commands to delete the cluster:
-
Set up CLUSTER_NAME and KUBECONFIG environment variables:
export CLUSTER_NAME=eksa-w01-cluster
export KUBECONFIG=${CLUSTER_NAME}/${CLUSTER_NAME}-eks-a-cluster.kubeconfig
export MANAGEMENT_KUBECONFIG=<path-to-management-cluster-kubeconfig>
-
Run the delete command:
Deleting a management cluster
Follow these steps to delete your management cluster.
To delete a cluster you will need:
- cluster name or cluster configuration
- kubeconfig of your cluster
Run the following commands to delete the cluster:
-
Set up CLUSTER_NAME and KUBECONFIG environment variables:
export CLUSTER_NAME=mgmt
export KUBECONFIG=${CLUSTER_NAME}/${CLUSTER_NAME}-eks-a-cluster.kubeconfig
-
Run the delete command:
-
If you are running the delete command from the directory which has the cluster folder with ${CLUSTER_NAME}/${CLUSTER_NAME}-eks-a-cluster.yaml:
eksctl anywhere delete cluster ${CLUSTER_NAME}
-
Otherwise, use this command to manually specify the clusterconfig file path:
export CONFIG_FILE=<path-to-config-file>
eksctl anywhere delete cluster -f ${CONFIG_FILE}
Example output:
Performing provider setup and validations
Creating management cluster
Installing cluster-api providers on management cluster
Moving cluster management from workload cluster
Deleting workload cluster
Clean up Git Repo
GitOps field not specified, clean up git repo skipped
🎉 Cluster deleted!
For vSphere, CloudStack, and Nutanix, this will delete all of the VMs that were created in your provider.
For Bare Metal, the servers will be powered off if BMC information has been provided.
If your workloads created external resources such as external DNS entries or load balancer endpoints you may need to delete those resources manually.
6.19 - Verify Cluster Images
How to verify cluster images
Verify Cluster Images
Starting from v0.19.0 release, all the images used in cluster operations are signed using AWS Signer and Notation CLI. Anyone can verify signatures associated with the container images EKS Anywhere uses. Signatures are valid for two years. To verify container images, one would have to perform the following steps:
-
Install and configure the latest version of the AWS CLI. For more information, see Installing or updating the latest version of the AWS CLI
in the AWS Command Line Interface User Guide.
-
Download the container-signing tools from this page
by following step 3.
-
Make sure notation CLI is configured along with the AWS Signer plugin and AWS CLI. Create a JSON file with the following trust policy.
{
"version":"1.0",
"trustPolicies":[
{
"name":"aws-signer-tp",
"registryScopes":[
"*"
],
"signatureVerification":{
"level":"strict"
},
"trustStores":[
"signingAuthority:aws-signer-ts"
],
"trustedIdentities":[
"arn:aws:signer:us-west-2:857151390494:/signing-profiles/notationimageSigningProfileECR_rGorpoAE4o0o"
]
}
]
}
-
Import above trust policy using:
notation policy import <json-file>
-
Get the bundle of the version for which you want to verify an image:
export EKSA_RELEASE_VERSION=v0.19.0
BUNDLE_MANIFEST_URL=$(curl -sL https://anywhere-assets.eks.amazonaws.com/releases/eks-a/manifest.yaml | yq ".spec.releases[] | select(.version==\"$EKSA_RELEASE_VERSION\").bundleManifestUrl")
-
Get the image you want to verify by downloading BUNDLE_MANIFEST_URL file.
-
Run the following command to verify the image signature:
notation verify <image-uri>@<sha256-image-digest>
7 - Curated Package management
Managing EKS Anywhere Curated Packages
EKS Anywhere Curated Packages make it easy to install, configure, and maintain operational components in EKS Anywhere clusters. EKS Anywhere Curated Packages are built, tested, and distributed by AWS to use with EKS Anywhere clusters as part of EKS Anywhere Enterprise Subscriptions.
See Prerequisites
to get started.
Check out EKS Anywhere curated packages concepts
for more details.
7.1 - Overview of curated packages
Components of EKS Anywhere curated packages consist of a controller, a CLI, and artifacts.
Package controller
The package controller is responsible for installing, upgrading, configuring, and removing packages from the cluster. It performs these actions by watching the package and packagebundle custom resources. Moreover, it uses the packagebundle to determine which packages to run and sets appropriate configuration values.
Packages custom resources map to helm charts that the package controller uses to install packages workloads (such as cluster-autoscaler or metrics-server) on your clusters. The packagebundle object is the mapping between the package name and the specific helm chart and images that will be installed.
The package controller only runs on the management cluster, including single-node clusters, to perform the above outlined responsibilities. However, packages may be installed on both management and workload clusters. For more information, see the guide on installing packages on workload clusters.
Package release information is stored in a package bundle manifest. The package controller will continually monitor and download new package bundles. When a new package bundle is downloaded, it will show up as “available” in the PackageBundleController resource’s status.detail field. A package bundle upgrade always requires manual intervention as outlined in the package bundles
docs.
Any changes to a package custom resource will trigger an install, upgrade, configuration or removal of that package. The package controller will use ECR or private registry to get all resources including bundle, helm charts, and container images.
You may install the package controller
after cluster creation to take advantage of curated package features.
Packages CLI
The Curated Packages CLI provides the user experience required to manage curated packages.
Through the CLI, a user is able to discover, create, delete, and upgrade curated packages to a cluster.
These functionalities can be achieved during and after an EKS Anywhere cluster is created.
The CLI provides both imperative and declarative mechanisms to manage curated packages. These
packages will be included as part of a packagebundle that will be provided by the EKS Anywhere team.
Whenever a user requests a package creation through the CLI (eksctl anywhere create package), a custom resource is created on the cluster
indicating the existence of a new package that needs to be installed. When a user executes a delete operation (eksctl anywhere delete package),
the custom resource will be removed from the cluster indicating the need for uninstalling a package.
An upgrade through the CLI (eksctl anywhere upgrade packages) upgrades all packages to the latest release.
Please check out Install EKS Anywhere
to install the eksctl anywhere CLI on your machine.
The create cluster page for each EKS Anywhere provider
describes how to configure and install curated packages at cluster creation time.
Curated packages artifacts
There are three types of build artifacts for packages: the container images, the helm charts and the package bundle manifests. The container images, helm charts and bundle manifests for all of the packages will be built and stored in EKS Anywhere ECR repository. Each package may have multiple versions specified in the packages bundle. The bundle will reference the helm chart tag in the ECR repository. The helm chart will reference the container images for the package.
Installing packages on workload clusters

The package controller only runs on the management cluster. It determines which cluster to install your package on based on the namespace specified in the Package resource.
See an example package below:
apiVersion: packages.eks.amazonaws.com/v1alpha1
kind: Package
metadata:
name: my-hello-eks-anywhere
namespace: eksa-packages-wk0
spec:
config: |
title: "My Hello"
packageName: hello-eks-anywhere
targetNamespace: default
By specifying metadata.namespace: eksa-packages-wk0, the package controller will install the resource on workload cluster wk0.
The pattern for these namespaces is always eksa-packages-<cluster-name>.
By specifying spec.targetNamespace: default, the package controller will install the hello-eks-anywhere package helm chart in the default namespace in cluster wk0.
7.2 - Prerequisites
Prerequisites for using curated packages
Prerequisites
Before installing any curated packages for EKS Anywhere, do the following:
-
Check that the cluster Kubernetes version is v1.21 or above. For example, you could run kubectl get cluster -o yaml <cluster-name> | grep -i kubernetesVersion
-
Check that the version of eksctl anywhere is v0.11.0 or above with the eksctl anywhere version command.
-
It is recommended that the package controller is only installed on the management cluster.
-
Check the existence of package controller:
kubectl get pods -n eksa-packages | grep "eks-anywhere-packages"
If the returned result is empty, you need to install the package controller.
-
Install the package controller if it is not installed:
Install the package controller
Note This command is temporarily provided to ease integration with curated packages. This command will be deprecated in the future
eksctl anywhere install packagecontroller -f $CLUSTER_NAME.yaml
To request a free trial, talk to your Amazon representative or connect with one here
.
Identify AWS account ID for ECR packages registry
The AWS account ID for ECR packages registry depends on the EKS Anywhere Enterprise Subscription.
- For EKS Anywhere Enterprise Subscriptions purchased through the AWS console or APIs the AWS account ID for ECR packages registry varies depending on the region the Enterprise Subscription was purchased. Reference the table in the expanded output below for a mapping of AWS Regions to ECR package registries.
Expand for packages registry to AWS Region table
| AWS Region |
Packages Registry Account |
| us-west-2 |
346438352937 |
| us-west-1 |
440460740297 |
| us-east-1 |
331113665574 |
| us-east-2 |
297090588151 |
| ap-east-1 |
804323328300 |
| ap-northeast-1 |
143143237519 |
| ap-northeast-2 |
447311122189 |
| ap-south-1 |
357015164304 |
| ap-south-2 |
388483641499 |
| ap-southeast-1 |
654894141437 |
| ap-southeast-2 |
299286866837 |
| ap-southeast-3 |
703305448174 |
| ap-southeast-4 |
106475008004 |
| ap-southeast-5 |
396913739932 |
| af-south-1 |
783635962247 |
| ca-central-1 |
064352486547 |
| ca-west-1 |
571600859530 |
| eu-central-1 |
364992945014 |
| eu-central-2 |
551422459769 |
| eu-north-1 |
826441621985 |
| eu-south-1 |
787863792200 |
| eu-south-2 |
127214161500 |
| eu-west-1 |
090204409458 |
| eu-west-2 |
371148654473 |
| eu-west-3 |
282646289008 |
| il-central-1 |
131750224677 |
| me-central-1 |
454241080883 |
| me-south-1 |
158698011868 |
| sa-east-1 |
517745584577 |
- For EKS Anywhere Curated Packages trials or EKS Anywhere Enterprise Subscriptions purchased before October 2023 the AWS account ID for ECR packages registry is
783794618700. This supports pulling images from the following regions.
Expand for AWS Regions table
| AWS Region |
| us-east-2 |
| us-east-1 |
| us-west-1 |
| us-west-2 |
| ap-northeast-3 |
| ap-northeast-2 |
| ap-southeast-1 |
| ap-southeast-2 |
| ap-northeast-1 |
| ca-central-1 |
| eu-central-1 |
| eu-west-1 |
| eu-west-2 |
| eu-west-3 |
| eu-north-1 |
| sa-east-1 |
After identifying the AWS account ID; export it for further reference. Example
export ECR_PACKAGES_ACCOUNT=346438352937
Setup authentication to use curated packages
When you have been notified that your account has been given access to curated packages, create an IAM user in your account with a policy that only allows ECR read access to the Curated Packages repository; similar to this:
{
"Version": "2012-10-17",
"Statement": [
{
"Sid": "ECRRead",
"Effect": "Allow",
"Action": [
"ecr:DescribeImageScanFindings",
"ecr:GetDownloadUrlForLayer",
"ecr:DescribeRegistry",
"ecr:DescribePullThroughCacheRules",
"ecr:DescribeImageReplicationStatus",
"ecr:ListTagsForResource",
"ecr:ListImages",
"ecr:BatchGetImage",
"ecr:DescribeImages",
"ecr:DescribeRepositories",
"ecr:BatchCheckLayerAvailability"
],
"Resource": "arn:aws:ecr:*:<ECR_PACKAGES_ACCOUNT>:repository/*"
},
{
"Sid": "ECRLogin",
"Effect": "Allow",
"Action": [
"ecr:GetAuthorizationToken"
],
"Resource": "*"
}
]
}
Note Use the corresponding EKSA_AWS_REGION prior to cluster creation to choose which region to pull form.
Create credentials for this user and set and export the following environment variables:
export EKSA_AWS_ACCESS_KEY_ID="your*access*id"
export EKSA_AWS_SECRET_ACCESS_KEY="your*secret*key"
export EKSA_AWS_REGION="aws*region"
Make sure you are authenticated with the AWS CLI
export AWS_ACCESS_KEY_ID="your*access*id"
export AWS_SECRET_ACCESS_KEY="your*secret*key"
aws sts get-caller-identity
Login to docker
aws ecr get-login-password --region $EKSA_AWS_REGION | docker login --username AWS --password-stdin $ECR_PACKAGES_ACCOUNT.dkr.ecr.$EKSA_AWS_REGION.amazonaws.com
Verify you can pull an image
docker pull $ECR_PACKAGES_ACCOUNT.dkr.ecr.$EKSA_AWS_REGION.amazonaws.com/emissary-ingress/emissary:v3.9.1-828e7d186ded23e54f6bd95a5ce1319150f7e325
If the image downloads successfully, it worked!
Prepare for using curated packages for airgapped environments
If you are running in an airgapped environment and you set up a local registry mirror, you can copy curated packages from Amazon ECR to your local registry mirror with the following command.
The $KUBEVERSION should be set to the same as the Kubernetes version in spec.kubernetesVersion of your EKS Anywhere cluster specification. When using self-signed certificates for your registry, you should run with the --dst-insecure command line argument to indicate skipping TLS verification while copying curated packages.
eksctl anywhere copy packages \
${REGISTRY_MIRROR_URL}/eks-anywhere \
--kube-version $KUBEVERSION \
--src-chart-registry public.ecr.aws/eks-anywhere \
--src-image-registry ${ECR_PACKAGES_ACCOUNT}.dkr.ecr.${EKSA_AWS_REGION}.amazonaws.com
Once the curated packages images are in your local registry mirror, you must configure the curated packages controller to use your local registry mirror post-cluster creation. Configure the defaultImageRegistry and defaultRegistry settings for the PackageBundleController to point to your local registry mirror by applying a similar yaml definition as the one below to your standalone or management cluster. Existing PackageBundleController can be changed, and you do not need to deploy a new PackageBundleController. See the Packages configuration documentation
for more information.
apiVersion: anywhere.eks.amazonaws.com/v1alpha1
kind: PackageBundleController
metadata:
name: eksa-packages-bundle-controller
namespace: eksa-packages
spec:
defaultImageRegistry: ${REGISTRY_MIRROR_URL}/eks-anywhere
defaultRegistry: ${REGISTRY_MIRROR_URL}/eks-anywhere
Discover curated packages
You can get a list of the available packages from the command line:
export CLUSTER_NAME=<your-cluster-name>
export KUBECONFIG=${PWD}/${CLUSTER_NAME}/${CLUSTER_NAME}-eks-a-cluster.kubeconfig
eksctl anywhere list packages --kube-version 1.35
Example command output:
Package Version(s)
------- ----------
hello-eks-anywhere 0.1.2-a6847010915747a9fc8a412b233a2b1ee608ae76
adot 0.25.0-c26690f90d38811dbb0e3dad5aea77d1efa52c7b
cert-manager 1.9.1-dc0c845b5f71bea6869efccd3ca3f2dd11b5c95f
cluster-autoscaler 9.21.0-1.23-5516c0368ff74d14c328d61fe374da9787ecf437
harbor 2.5.1-ee7e5a6898b6c35668a1c5789aa0d654fad6c913
metallb 0.13.7-758df43f8c5a3c2ac693365d06e7b0feba87efd5
metallb-crds 0.13.7-758df43f8c5a3c2ac693365d06e7b0feba87efd5
metrics-server 0.6.1-eks-1-23-6-c94ed410f56421659f554f13b4af7a877da72bc1
emissary 3.3.0-cbf71de34d8bb5a72083f497d599da63e8b3837b
emissary-crds 3.3.0-cbf71de34d8bb5a72083f497d599da63e8b3837b
prometheus 2.41.0-b53c8be243a6cc3ac2553de24ab9f726d9b851ca
Generate curated packages configuration
The example shows how to install the harbor package from the curated package list
.
export CLUSTER_NAME=<your-cluster-name>
eksctl anywhere generate package harbor --cluster ${CLUSTER_NAME} --kube-version 1.35 > harbor-spec.yaml
7.3 - Packages configuration
Full EKS Anywhere configuration reference for curated packages
This is a generic template with detailed descriptions below for reference. To generate your own package configuration, follow instructions from Package Management
section and modify it using descriptions below.
apiVersion: anywhere.eks.amazonaws.com/v1alpha1
kind: PackageBundleController
metadata:
name: eksa-packages-bundle-controller
namespace: eksa-packages
spec:
activeBundle: v1-21-83
defaultImageRegistry: 783794618700.dkr.ecr.us-west-2.amazonaws.com
defaultRegistry: public.ecr.aws/eks-anywhere
upgradeCheckInterval: 24h0m0s
---
apiVersion: packages.eks.amazonaws.com/v1alpha1
kind: PackageBundle
metadata:
name: package-bundle
namespace: eksa-packages
spec:
packages:
- name: hello-eks-anywhere
source:
repository: hello-eks-anywhere
versions:
- digest: sha256:c31242a2f94a58017409df163debc01430de65ded6bdfc5496c29d6a6cbc0d94
images:
- digest: sha256:26e3f2f9aa546fee833218ece3fe7561971fd905cef40f685fd1b5b09c6fb71d
repository: hello-eks-anywhere
name: 0.1.1-083e68edbbc62ca0228a5669e89e4d3da99ff73b
schema: H4sIAJc5EW...
---
apiVersion: packages.eks.amazonaws.com/v1alpha1
kind: Package
metadata:
name: my-hello-eks-anywhere
namespace: eksa-packages
spec:
config: |
title: "My Hello"
packageName: hello-eks-anywhere
targetNamespace: eksa-packages
API Reference
Packages:
packages.eks.amazonaws.com/v1alpha1
Resource Types:
PackageBundleController
↩ Parent
PackageBundleController is the Schema for the packagebundlecontroller API.
| Name |
Type |
Description |
Required |
| apiVersion |
string |
packages.eks.amazonaws.com/v1alpha1 |
true |
| kind |
string |
PackageBundleController |
true |
| metadata |
object |
Refer to the Kubernetes API documentation for the fields of the `metadata` field. |
true |
| spec |
object |
PackageBundleControllerSpec defines the desired state of PackageBundleController.
|
false |
| status |
object |
PackageBundleControllerStatus defines the observed state of PackageBundleController.
|
false |
PackageBundleController.spec
↩ Parent
PackageBundleControllerSpec defines the desired state of PackageBundleController.
| Name |
Type |
Description |
Required |
| activeBundle |
string |
ActiveBundle is name of the bundle from which packages should be sourced.
|
false |
| bundleRepository |
string |
Repository portion of an OCI address to the bundle
Default: eks-anywhere-packages-bundles
|
false |
| createNamespace |
boolean |
Allow target namespace creation by the controller
Default: false
|
false |
| defaultImageRegistry |
string |
DefaultImageRegistry for pulling images
Default: 783794618700.dkr.ecr.us-west-2.amazonaws.com
|
false |
| defaultRegistry |
string |
DefaultRegistry for pulling helm charts and the bundle
Default: public.ecr.aws/eks-anywhere
|
false |
| logLevel |
integer |
LogLevel controls the verbosity of logging in the controller.
Format: int32
|
false |
| upgradeCheckInterval |
string |
UpgradeCheckInterval is the time between upgrade checks.
The format is that of time's ParseDuration.
Default: 24h
|
false |
| upgradeCheckShortInterval |
string |
UpgradeCheckShortInterval time between upgrade checks if there is a problem.
The format is that of time's ParseDuration.
Default: 1h
|
false |
PackageBundleController.status
↩ Parent
PackageBundleControllerStatus defines the observed state of PackageBundleController.
| Name |
Type |
Description |
Required |
| detail |
string |
Detail of the state.
|
false |
| spec |
object |
Spec previous settings
|
false |
| state |
enum |
State of the bundle controller.
Enum: ignored, active, disconnected, upgrade available
|
false |
PackageBundleController.status.spec
↩ Parent
Spec previous settings
| Name |
Type |
Description |
Required |
| activeBundle |
string |
ActiveBundle is name of the bundle from which packages should be sourced.
|
false |
| bundleRepository |
string |
Repository portion of an OCI address to the bundle
Default: eks-anywhere-packages-bundles
|
false |
| createNamespace |
boolean |
Allow target namespace creation by the controller
Default: false
|
false |
| defaultImageRegistry |
string |
DefaultImageRegistry for pulling images
Default: 783794618700.dkr.ecr.us-west-2.amazonaws.com
|
false |
| defaultRegistry |
string |
DefaultRegistry for pulling helm charts and the bundle
Default: public.ecr.aws/eks-anywhere
|
false |
| logLevel |
integer |
LogLevel controls the verbosity of logging in the controller.
Format: int32
|
false |
| upgradeCheckInterval |
string |
UpgradeCheckInterval is the time between upgrade checks.
The format is that of time's ParseDuration.
Default: 24h
|
false |
| upgradeCheckShortInterval |
string |
UpgradeCheckShortInterval time between upgrade checks if there is a problem.
The format is that of time's ParseDuration.
Default: 1h
|
false |
PackageBundle
↩ Parent
PackageBundle is the Schema for the packagebundle API.
| Name |
Type |
Description |
Required |
| apiVersion |
string |
packages.eks.amazonaws.com/v1alpha1 |
true |
| kind |
string |
PackageBundle |
true |
| metadata |
object |
Refer to the Kubernetes API documentation for the fields of the `metadata` field. |
true |
| spec |
object |
PackageBundleSpec defines the desired state of PackageBundle.
|
false |
| status |
object |
PackageBundleStatus defines the observed state of PackageBundle.
|
false |
PackageBundle.spec
↩ Parent
PackageBundleSpec defines the desired state of PackageBundle.
| Name |
Type |
Description |
Required |
| packages |
[]object |
Packages supported by this bundle.
|
true |
| minControllerVersion |
string |
Minimum required packages controller version
|
false |
PackageBundle.spec.packages[index]
↩ Parent
BundlePackage specifies a package within a bundle.
| Name |
Type |
Description |
Required |
| source |
object |
Source location for the package (probably a helm chart).
|
true |
| name |
string |
Name of the package.
|
false |
| workloadonly |
boolean |
WorkloadOnly specifies if the package should be installed only on the workload cluster
|
false |
PackageBundle.spec.packages[index].source
↩ Parent
Source location for the package (probably a helm chart).
| Name |
Type |
Description |
Required |
| repository |
string |
Repository within the Registry where the package is found.
|
true |
| versions |
[]object |
Versions of the package supported by this bundle.
|
true |
| registry |
string |
Registry in which the package is found.
|
false |
PackageBundle.spec.packages[index].source.versions[index]
↩ Parent
SourceVersion describes a version of a package within a repository.
| Name |
Type |
Description |
Required |
| digest |
string |
Digest is a checksum value identifying the version of the package and its contents.
|
true |
| name |
string |
Name is a human-friendly description of the version, e.g. "v1.0".
|
true |
| dependencies |
[]string |
Dependencies to be installed before the package
|
false |
| images |
[]object |
Images is a list of images used by this version of the package.
|
false |
| schema |
string |
Schema is a base64 encoded, gzipped json schema used to validate package configurations.
|
false |
PackageBundle.spec.packages[index].source.versions[index].images[index]
↩ Parent
VersionImages is an image used by a version of a package.
| Name |
Type |
Description |
Required |
| digest |
string |
Digest is a checksum value identifying the version of the package and its contents.
|
true |
| repository |
string |
Repository within the Registry where the package is found.
|
true |
PackageBundle.status
↩ Parent
PackageBundleStatus defines the observed state of PackageBundle.
| Name |
Type |
Description |
Required |
| state |
enum |
PackageBundleStateEnum defines the observed state of PackageBundle.
Enum: available, ignored, invalid, controller upgrade required
|
true |
| spec |
object |
PackageBundleSpec defines the desired state of PackageBundle.
|
false |
PackageBundle.status.spec
↩ Parent
PackageBundleSpec defines the desired state of PackageBundle.
| Name |
Type |
Description |
Required |
| packages |
[]object |
Packages supported by this bundle.
|
true |
| minControllerVersion |
string |
Minimum required packages controller version
|
false |
PackageBundle.status.spec.packages[index]
↩ Parent
BundlePackage specifies a package within a bundle.
| Name |
Type |
Description |
Required |
| source |
object |
Source location for the package (probably a helm chart).
|
true |
| name |
string |
Name of the package.
|
false |
| workloadonly |
boolean |
WorkloadOnly specifies if the package should be installed only on the workload cluster
|
false |
PackageBundle.status.spec.packages[index].source
↩ Parent
Source location for the package (probably a helm chart).
| Name |
Type |
Description |
Required |
| repository |
string |
Repository within the Registry where the package is found.
|
true |
| versions |
[]object |
Versions of the package supported by this bundle.
|
true |
| registry |
string |
Registry in which the package is found.
|
false |
PackageBundle.status.spec.packages[index].source.versions[index]
↩ Parent
SourceVersion describes a version of a package within a repository.
| Name |
Type |
Description |
Required |
| digest |
string |
Digest is a checksum value identifying the version of the package and its contents.
|
true |
| name |
string |
Name is a human-friendly description of the version, e.g. "v1.0".
|
true |
| dependencies |
[]string |
Dependencies to be installed before the package
|
false |
| images |
[]object |
Images is a list of images used by this version of the package.
|
false |
| schema |
string |
Schema is a base64 encoded, gzipped json schema used to validate package configurations.
|
false |
PackageBundle.status.spec.packages[index].source.versions[index].images[index]
↩ Parent
VersionImages is an image used by a version of a package.
| Name |
Type |
Description |
Required |
| digest |
string |
Digest is a checksum value identifying the version of the package and its contents.
|
true |
| repository |
string |
Repository within the Registry where the package is found.
|
true |
Package
↩ Parent
Package is the Schema for the package API.
| Name |
Type |
Description |
Required |
| apiVersion |
string |
packages.eks.amazonaws.com/v1alpha1 |
true |
| kind |
string |
Package |
true |
| metadata |
object |
Refer to the Kubernetes API documentation for the fields of the `metadata` field. |
true |
| spec |
object |
PackageSpec defines the desired state of an package.
|
false |
| status |
object |
PackageStatus defines the observed state of Package.
|
false |
Package.spec
↩ Parent
PackageSpec defines the desired state of an package.
| Name |
Type |
Description |
Required |
| packageName |
string |
PackageName is the name of the package as specified in the bundle.
|
true |
| config |
string |
Config for the package.
|
false |
| packageVersion |
string |
PackageVersion is a human-friendly version name or sha256 checksum for the package, as specified in the bundle.
|
false |
| targetNamespace |
string |
TargetNamespace defines where package resources will be deployed.
|
false |
Package.status
↩ Parent
PackageStatus defines the observed state of Package.
| Name |
Type |
Description |
Required |
| currentVersion |
string |
Version currently installed.
|
true |
| source |
object |
Source associated with the installation.
|
true |
| detail |
string |
Detail of the state.
|
false |
| spec |
object |
Spec previous settings
|
false |
| state |
enum |
State of the installation.
Enum: initializing, installing, installing dependencies, installed, updating, uninstalling, unknown
|
false |
| targetVersion |
string |
Version to be installed.
|
false |
| upgradesAvailable |
[]object |
UpgradesAvailable indicates upgraded versions in the bundle.
|
false |
Package.status.source
↩ Parent
Source associated with the installation.
| Name |
Type |
Description |
Required |
| digest |
string |
Digest is a checksum value identifying the version of the package and its contents.
|
true |
| registry |
string |
Registry in which the package is found.
|
true |
| repository |
string |
Repository within the Registry where the package is found.
|
true |
| version |
string |
Versions of the package supported.
|
true |
Package.status.spec
↩ Parent
Spec previous settings
| Name |
Type |
Description |
Required |
| packageName |
string |
PackageName is the name of the package as specified in the bundle.
|
true |
| config |
string |
Config for the package.
|
false |
| packageVersion |
string |
PackageVersion is a human-friendly version name or sha256 checksum for the package, as specified in the bundle.
|
false |
| targetNamespace |
string |
TargetNamespace defines where package resources will be deployed.
|
false |
Package.status.upgradesAvailable[index]
↩ Parent
PackageAvailableUpgrade details the package’s available upgrade versions.
| Name |
Type |
Description |
Required |
| tag |
string |
Tag is a specific version number or sha256 checksum for the package upgrade.
|
true |
| version |
string |
Version is a human-friendly version name for the package upgrade.
|
true |
7.4 - Managing the package controller
Installing the package controller
Important
The package controller installation creates a package bundle controller resource for each cluster, thus allowing each to activate a different package bundle version. Ideally, you should never delete this resource because it would mean losing that information and upon re-installing, the latest bundle would be selected. However, you can always go back to the previous bundle version. For more information, see
Managing package bundles.
The package controller is typically installed during cluster creation, but may be disabled intentionally in your cluster.yaml by setting spec.packages.disable to true.
If you created a cluster without the package controller or if the package controller was not properly configured, you may need to manually install it.
-
Enable the package controller in your cluster.yaml, if it was previously disabled:
apiVersion: anywhere.eks.amazonaws.com/v1alpha1
kind: Cluster
metadata:
name: mgmt
spec:
packages:
disable: false
-
Make sure you are authenticated with the AWS CLI. Use the credentials you set up for packages. These credentials should have limited capabilities
:
export AWS_ACCESS_KEY_ID="your*access*id"
export AWS_SECRET_ACCESS_KEY="your*secret*key"
export EKSA_AWS_ACCESS_KEY_ID="your*access*id"
export EKSA_AWS_SECRET_ACCESS_KEY="your*secret*key"
-
Verify your credentials are working:
aws sts get-caller-identity
-
Authenticate docker to the private AWS ECR registry with your AWS credentials. Reference prerequisites to identity the AWS account that houses the EKS Anywhere packages artifacts. Authentication is required to pull images from it.
aws ecr get-login-password | docker login --username AWS --password-stdin $ECR_PACKAGES_ACCOUNT.dkr.ecr.$EKSA_AWS_REGION.amazonaws.com
-
Verify you can pull an image from the packages registry:
docker pull $ECR_PACKAGES_ACCOUNT.dkr.ecr.$EKSA_AWS_REGION.amazonaws.com/emissary-ingress/emissary:v3.9.1-828e7d186ded23e54f6bd95a5ce1319150f7e325
If the image downloads successfully, it worked!
-
Now, install the package controller using the EKS Anywhere Packages CLI:
eksctl anywhere install packagecontroller -f cluster.yaml
The package controller should now be installed!
-
Use kubectl to check the eks-anywhere-packages pod is running in your management cluster:
kubectl get pods -n eksa-packages
NAME READY STATUS RESTARTS AGE
eks-anywhere-packages-55bc54467c-jfhgp 1/1 Running 0 21s
Updating the package credentials
You may need to create or update your credentials which you can do with a command like this. Set the environment variables to the proper values before running the command.
kubectl delete secret -n eksa-packages aws-secret
kubectl create secret -n eksa-packages generic aws-secret \
--from-literal=AWS_ACCESS_KEY_ID=${EKSA_AWS_ACCESS_KEY_ID} \
--from-literal=AWS_SECRET_ACCESS_KEY=${EKSA_AWS_SECRET_ACCESS_KEY} \
--from-literal=REGION=${EKSA_AWS_REGION}
Upgrade the packages controller
EKS Anywhere v0.15.0 (packages controller v0.3.9+) and onwards includes support for the eks-anywhere-packages controller as a self-managed package feature. The package controller now upgrades automatically according to the version specified within the management cluster’s selected package bundle.
For any version prior to v0.3.X, manual steps must be executed to upgrade.
Important
This operation may change your cluster’s selected package bundle to the latest version. However, you can always go back to the previous bundle version. For more information, see
Managing package bundles.
To manually upgrade the package controller, do the following:
- Ensure the namespace will be kept
kubectl annotate namespaces eksa-packages helm.sh/resource-policy=keep
- Uninstall the eks-anywhere-packages helm release
helm uninstall -n eksa-packages eks-anywhere-packages
- Remove the secret called aws-secret (we will need credentials when installing the new version)
kubectl delete secret -n eksa-packages aws-secret
- Install the new version using the latest eksctl-anywhere binary on your management cluster
eksctl anywhere install packagecontroller -f eksa-mgmt-cluster.yaml
7.5 - Packages regional ECR migration
Migrating EKS Anywhere Curated Packages to latest regional ECR repositories
When you purchase an EKS Anywhere Enterprise Subscription through the Amazon EKS console or APIs, the AWS account that purchased the subscription is automatically granted access to EKS Anywhere Curated Packages in the AWS Region where the subscription is created. If you received trial access to EKS Anywhere Curated Packages or if you have an EKS Anywhere Enterprise Subscription that was created before October 2023, then you need to migrate your EKS Anywhere Curated Packages configuration to use the latest ECR regional repositories. This process would cause all the Curated Packages installed on the cluster to rollout and be deployed from the latest ECR regional repositories.
Expand for packages registry to AWS Region table
| AWS Region |
Packages Registry Account |
| us-west-2 |
346438352937 |
| us-west-1 |
440460740297 |
| us-east-1 |
331113665574 |
| us-east-2 |
297090588151 |
| ap-east-1 |
804323328300 |
| ap-northeast-1 |
143143237519 |
| ap-northeast-2 |
447311122189 |
| ap-south-1 |
357015164304 |
| ap-south-2 |
388483641499 |
| ap-southeast-1 |
654894141437 |
| ap-southeast-2 |
299286866837 |
| ap-southeast-3 |
703305448174 |
| ap-southeast-4 |
106475008004 |
| ap-southeast-5 |
396913739932 |
| af-south-1 |
783635962247 |
| ca-central-1 |
064352486547 |
| ca-west-1 |
571600859530 |
| eu-central-1 |
364992945014 |
| eu-central-2 |
551422459769 |
| eu-north-1 |
826441621985 |
| eu-south-1 |
787863792200 |
| eu-south-2 |
127214161500 |
| eu-west-1 |
090204409458 |
| eu-west-2 |
371148654473 |
| eu-west-3 |
282646289008 |
| il-central-1 |
131750224677 |
| me-central-1 |
454241080883 |
| me-south-1 |
158698011868 |
| sa-east-1 |
517745584577 |
Steps for Migration
-
Ensure you have an active EKS Anywhere Enterprise Subscription. For more information, refer Purchase subscriptions.
-
If the AWS account that created the EKS Anywhere Enterprise Subscription through the Amazon EKS console or APIs and the AWS IAM user credentials for curated packages on your existing cluster are different, you need to update the aws-secret object on the cluster with new credentials. Refer Updating the package credentials
.
-
Edit the ecr-credential-provider-package package on the cluster and update matchImages with the correct ECR package registry for the AWS Region where you created your subscription. Example, 346438352937.dkr.ecr.us-west-2.amazonaws.com for us-west-2. Reference the table in the expanded output at the top of this page for a mapping of AWS Regions to ECR package registries.
kubectl edit package ecr-credential-provider-package -n eksa-packages-<cluster name>
This causes ecr-credential-provider-package pods to rollout and the kubelet is configured to use AWS credentials for pulling images from the new regional ECR packages registry.
-
Edit the PackageBundleController object on the cluster and set the defaultImageRegistry and defaultRegistry to point to the ECR package registry for the AWS Region where you created your subscription.
kubectl edit packagebundlecontroller <cluster name> -n eksa-packages
-
Restart the eks-anywhere-packages controller deployment.
kubectl rollout restart deployment eks-anywhere-packages -n eksa-packages
This step causes the package controller to pull down a new package bundle onto the cluster and marks the PackageBundleController as upgrade available. Example
NAMESPACE NAME ACTIVEBUNDLE STATE DETAIL
eksa-packages my-cluster-name v1-28-160 upgrade available v1-28-274 available
-
Edit the PackageBundleController object on the cluster and set the activeBundle field to the new bundle number that is available.
kubectl edit packagebundlecontroller <cluster name> -n eksa-packages
This step causes all the packages on the cluster to be reinstalled and pods rolled out from the new registry.
-
Edit the ecr-credential-provider-package package again and now set the sourceRegistry to point to the ECR package registry for the AWS Region where you created your subscription.
kubectl edit package ecr-credential-provider-package -n eksa-packages-<cluster name>
This causes ecr-credential-provider-package to be reinstalled from the new registry.
7.6 - Managing package bundles
Getting new package bundles
Package bundle resources are created and managed in the management cluster, so first set up the KUBECONFIG environment variable for the management cluster.
export KUBECONFIG=mgmt/mgmt-eks-a-cluster.kubeconfig
The EKS Anywhere package controller periodically checks upstream for the latest package bundle and applies it to your management cluster, except for when in an airgapped environment
. In that case, you would have to get the package bundle manually from outside of the airgapped environment and apply it to your management cluster.
To view the available packagebundles in your cluster, run the following:
kubectl get packagebundles -n eksa-packages
NAMESPACE NAME STATE
eksa-packages v1-27-125 available
To get a package bundle manually, you can use oras to pull the package bundle (bundle.yaml) from the public.ecr.aws/eks-anywhere
repository. (See the ORAS CLI official documentation
for more details)
oras pull public.ecr.aws/eks-anywhere/eks-anywhere-packages-bundles:v1-27-latest
Downloading 1ba8253d19f9 bundle.yaml
Downloaded 1ba8253d19f9 bundle.yaml
Pulled [registry] public.ecr.aws/eks-anywhere/eks-anywhere-packages-bundles:v1-27-latest
Use kubectl to apply the new package bundle to your cluster to make it available for use.
kubectl apply -f bundle.yaml
The package bundle should now be available for use in the management cluster.
kubectl get packagebundles -n eksa-packages
NAMESPACE NAME STATE
eksa-packages v1-27-125 available
eksa-packages v1-27-126 available
Activating a package bundle
There are multiple packagebundlecontrollers resources in the management cluster which allows for each cluster to activate different package bundle versions. The active package bundle determines the versions of the packages that are installed on that cluster.
To view which package bundle is active for each cluster, use the kubectl command to list the packagebundlecontrollers objects in the management cluster.
kubectl get packagebundlecontrollers -A
NAMESPACE NAME ACTIVEBUNDLE STATE DETAIL
eksa-packages mgmt v1-27-125 active
eksa-packages w01 v1-27-125 active
To upgrade the active package bundle for the target cluster, edit the packagebundlecontroller object on the cluster and set the activeBundle field to the new bundle number that is available.
kubectl edit packagebundlecontroller <cluster name> -n eksa-packages
7.7 - Configuration best practices
Best practices with curated packages
Best Practice
Any supported EKS Anywhere curated package should be modified through package yaml files (with kind: Package) and applied through the command kubectl apply -f packageFileName. Modifying objects outside of package yaml files may lead to unpredictable behaviors.
For automatic namespace (targetNamespace) creation, see createNamespace field: PackagebundleController.spec
7.8 - Packages
List of EKS Anywhere curated packages
Curated package list
7.9 - Curated packages troubleshooting
Troubleshooting specific to curated packages
General debugging
The major component of Curated Packages is the package controller. If the container is not running or not running correctly, packages will not be installed. Generally it should be debugged like any other Kubernetes application. The first step is to check that the pod is running.
kubectl get pods -n eksa-packages
You should see at least two pods with running and one or more refresher completed.
NAME READY STATUS RESTARTS AGE
eks-anywhere-packages-69d7bb9dd9-9d47l 1/1 Running 0 14s
eksa-auth-refresher-w82nm 0/1 Completed 0 10s
The describe command might help to get more detail on why there is a problem:
kubectl describe pods -n eksa-packages
Logs of the controller can be seen in a normal Kubernetes fashion:
kubectl logs deploy/eks-anywhere-packages -n eksa-packages controller
To get the general state of the package controller, run the following command:
kubectl get packages,packagebundles,packagebundlecontrollers -A
You should see an active packagebundlecontroller and an available bundle. The packagebundlecontroller should indicate the active bundle. It may take a few minutes to download and activate the latest bundle. The state of the package in this example is installing and there is an error downloading the chart.
NAMESPACE NAME PACKAGE AGE STATE CURRENTVERSION TARGETVERSION DETAIL
eksa-packages-sammy package.packages.eks.amazonaws.com/my-hello hello-eks-anywhere 42h installed 0.1.1-bc7dc6bb874632972cd92a2bca429a846f7aa785 0.1.1-bc7dc6bb874632972cd92a2bca429a846f7aa785 (latest)
eksa-packages-tlhowe package.packages.eks.amazonaws.com/my-hello hello-eks-anywhere 44h installed 0.1.1-083e68edbbc62ca0228a5669e89e4d3da99ff73b 0.1.1-083e68edbbc62ca0228a5669e89e4d3da99ff73b (latest)
NAMESPACE NAME STATE
eksa-packages packagebundle.packages.eks.amazonaws.com/v1-21-83 available
eksa-packages packagebundle.packages.eks.amazonaws.com/v1-23-70 available
eksa-packages packagebundle.packages.eks.amazonaws.com/v1-23-81 available
eksa-packages packagebundle.packages.eks.amazonaws.com/v1-23-82 available
eksa-packages packagebundle.packages.eks.amazonaws.com/v1-23-83 available
NAMESPACE NAME ACTIVEBUNDLE STATE DETAIL
eksa-packages packagebundlecontroller.packages.eks.amazonaws.com/sammy v1-23-70 upgrade available v1-23-83 available
eksa-packages packagebundlecontroller.packages.eks.amazonaws.com/tlhowe v1-21-83 active active
Package controller not running
If you do not see a pod or various resources for the package controller, it may be that it is not installed.
No resources found in eksa-packages namespace.
Most likely the cluster was created with an older version of the EKS Anywhere CLI. Curated packages became generally available with v0.11.0. Use the eksctl anywhere version command to verify you are running a new enough release and you can use the eksctl anywhere install packagecontroller command to install the package controller on an older release.
Error: this command is currently not supported
Error: this command is currently not supported
Curated packages became generally available with version v0.11.0. Use the version command to make sure you are running version v0.11.0 or later:
Error: cert-manager is not present in the cluster
Error: curated packages cannot be installed as cert-manager is not present in the cluster
This is most likely caused by an action to install curated packages at a workload cluster with eksctl anywhere version older than v0.12.0. In order to use packages on workload clusters, please upgrade eksctl anywhere version to v0.12+. The package manager will remotely manage packages on the workload cluster from the management cluster.
Package registry authentication
Error: ImagePullBackOff on Package
If a package fails to start with ImagePullBackOff:
NAME READY STATUS RESTARTS AGE
generated-harbor-jobservice-564d6fdc87 0/1 ImagePullBackOff 0 2d23h
If a package pod cannot pull images, you may not have your AWS credentials set up properly. Verify that your credentials are working properly.
Make sure you are authenticated with the AWS CLI. Use the credentials you set up for packages. These credentials should have limited capabilities
:
export AWS_ACCESS_KEY_ID="your*access*id"
export AWS_SECRET_ACCESS_KEY="your*secret*key"
aws sts get-caller-identity
Login to docker
aws ecr get-login-password |docker login --username AWS --password-stdin 783794618700.dkr.ecr.us-west-2.amazonaws.com
Verify you can pull an image
docker pull 783794618700.dkr.ecr.us-west-2.amazonaws.com/emissary-ingress/emissary:v3.5.1-bf70150bcdfe3a5383ec8ad9cd7eea801a0cb074
If the image downloads successfully, it worked!
You may need to create or update your credentials which you can do with a command like this. Set the environment variables to the proper values before running the command.
kubectl delete secret -n eksa-packages aws-secret
kubectl create secret -n eksa-packages generic aws-secret --from-literal=AWS_ACCESS_KEY_ID=${EKSA_AWS_ACCESS_KEY_ID} --from-literal=AWS_SECRET_ACCESS_KEY=${EKSA_AWS_SECRET_ACCESS_KEY} --from-literal=REGION=${EKSA_AWS_REGION}
Package on workload clusters
Starting at eksctl anywhere version v0.12.0, packages on workload clusters are remotely managed by the management cluster. While interacting with the package resources by the following commands for a workload cluster, please make sure the kubeconfig is pointing to the management cluster that was used to create the workload cluster.
Package manager is not managing packages on workload cluster
If the package manager is not managing packages on a workload cluster, make sure the management cluster has various resources for the workload cluster:
kubectl get packages,packagebundles,packagebundlecontrollers -A
You should see a PackageBundleController for the workload cluster named with the name of the workload cluster and the status should be set. There should be a namespace for the workload cluster as well:
kubectl get ns | grep eksa-packages
Create a PackageBundlecController for the workload cluster if it does not exist (where billy here is the cluster name):
cat <<! | kubectl apply -f -
apiVersion: packages.eks.amazonaws.com/v1alpha1
kind: PackageBundleController
metadata:
name: billy
namespace: eksa-packages
!
Workload cluster is disconnected
Cluster is disconnected:
NAMESPACE NAME ACTIVEBUNDLE STATE DETAIL
eksa-packages packagebundlecontroller.packages.eks.amazonaws.com/billy disconnected initializing target client: getting kubeconfig for cluster "billy": Secret "billy-kubeconfig" not found
In the example above, the secret does not exist which may be that the management cluster is not managing the cluster, the PackageBundleController name is wrong or the secret was deleted.
This also may happen if the management cluster cannot communicate with the workload cluster or the workload cluster was deleted, although the detail would be different.
Error: the server doesn’t have a resource type “packages”
All packages are remotely managed by the management cluster, and packages, packagebundles, and packagebundlecontrollers resources are all deployed on the management cluster. Please make sure the kubeconfig is pointing to the management cluster that was used to create the workload cluster while interacting with package-related resources.
A package command run on a cluster that does not seem to be managed by the management cluster. To get a list of the clusters managed by the management cluster run the following command:
eksctl anywhere get packagebundlecontroller
NAME ACTIVEBUNDLE STATE DETAIL
billy v1-21-87 active
There will be one packagebundlecontroller for each cluster that is being managed. The only valid cluster name in the above example is billy.
7.10 - What's New
New EKS Anywhere Curated Packages releases, features, and fixes
7.10.1 - Changelog
Changelog for Curated packages release
Package Bundle Release (03-12-2026)
Changed
- Cert-Manager
1.18.2 to 1.19.3
- Cluster-Autoscaler chart to
9.55.0
- Harbor
2.12.2 to v2.14.2
- Credential-Provider-Package to
0.4.15
- Metrics-Server
0.8.0 to 0.8.1
Package Bundle Release (12-29-2025)
Changed
- ADOT
0.43.1 to 0.45.1
- Emissary
3.9.1 to 3.10.0
- Metrics-Server
3.12.2 to 3.13.0
- Prometheus
2.55.1 to 3.8.0
Package Bundle Release (11-08-2025)
Changed
- Fix Critical CVEs in all curated packages
- Credential-Provider-Package
0.4.8 to 0.4.9
- Cleanup pkg controller private registry field #1226
- Cert-Manager
1.16.4 to 1.18.2
- Metallb
0.14.9 to 0.15.2
Package Bundle Release (08-19-2025)
Changed
- Upgrade helm version
3.14.3 to 3.18.4
- Credential-Provider-Package
0.4.6 to 0.4.8
- Enable proxy configuration #1216
- Cluster-Autoscaler
9.46.6 to 9.47.0 for Kubernetes version 1.33
- Metallb
- Enable configuration for flag
ignoreExcludeLB
Package Bundle Release (05-22-2025)
Changed
- Fix Critical CVEs in all curated packages
- Harbor
2.12.1 to 2.12.2
- ADOT
0.42.0 to 0.43.1
- Update schema.json
to sync with upstream and support
extraManifests field
- Cert-Manager
1.16.1 to 1.16.4
- Metrics-Server
0.7.2 to 0.7.3
- Credential-Provider-Package
0.4.5 to 0.4.6
- Use session token for ecr aws authentication #1190
- Cluster-Autoscaler
9.43.2 to 9.46.6
Package Bundle Release (02-28-2025)
Changed
- Harbor
2.11.1 to 2.12.1
- ADOT
0.41.1 to 0.42.0
- The
logging exporter is now deprecated
, users should update the config to the debug exporter instead. Example configuration can be found here
Package Bundle Release (12-26-2024)
Changed
- cert-manager
1.15.3 to 1.16.1
- Updated helm patch to include properties for eksa-packages in values.schema.json #4171
- cluster-autoscaler
9.43.0 to 9.43.2
- credential-provider-package
0.4.4 to 0.4.5
- Added support to update both legacy and default path for kubelet-extra-args for ubuntu #1177
- metallb
0.14.8 to 0.14.9
- prometheus
2.54.1 to 2.55.1
Package Bundle Release (10-18-2024)
Changed
- adot
0.40.1 to 0.41.1
- cert-manager
1.14.7 to 1.15.3
-
Startupapicheck image change #3790
As of this release the cert-manager ctl is no longer part of the main repo, it has been broken out into its own project. As such the startupapicheck job uses a new OCI image called startupapicheck. If you run in an environment in which images cannot be pulled, be sure to include the new image.
- cluster-autoscaler
9.37.0 to 9.43.0
- harbor
2.11.0 to 2.11.1
- metrics-server
0.7.1 to 0.7.2
- prometheus
2.54.0 to 2.54.1
7.10.2 - Release Alerts
SNS Alerts for EKS Anywhere Curated Packages releases
EKS Anywhere uses Amazon Simple Notification Service (SNS) to notify availability of a new releasef for Curated Packages.
It is recommended that your clusters are kept up to date with the latest EKS Anywhere Curated Packages.
Please follow the instructions below to subscribe to SNS notification.
- Sign in to your AWS Account
- Select us-east-1 region
- Go to the SNS Console
- In the left navigation pane, choose “Subscriptions”
- On the Subscriptions page, choose “Create subscription”
- On the Create subscription page, in the Details section enter the following information
- Choose Create Subscription
- In few minutes, you will receive an email asking you to confirm the subscription
- Click the confirmation link in the email
7.11 - ADOT Configuration
OpenTelemetry Collector provides a vendor-agnostic solution to receive, process and export telemetry data. It removes the need to run, operate, and maintain multiple agents/collectors. ADOT Collector is an AWS-supported distribution of the OpenTelemetry Collector.
Best Practice
Any supported EKS Anywhere curated package should be modified through package yaml files (with kind: Package) and applied through the command kubectl apply -f packageFileName. Modifying objects outside of package yaml files may lead to unpredictable behaviors.
For automatic namespace (targetNamespace) creation, see createNamespace field: PackagebundleController.spec
Configuration options for ADOT
7.11.1 - ADOT with AMP and AMG
This tutorial demonstrates how to config the ADOT package to scrape metrics from an EKS Anywhere cluster, and send them to Amazon Managed Service for Prometheus
(AMP) and Amazon Managed Grafana
(AMG).
This tutorial walks through the following procedures:
Note
- We included
Test sections below for critical steps to help users to validate they have completed such procedure properly. We recommend going through them in sequence as checkpoints of the progress.
- We recommend creating all resources in the
us-west-2 region.
Create an AMP workspace
An AMP workspace is created to receive metrics from the ADOT package, and respond to query requests from AMG. Follow steps below to complete the set up:
-
Open the AMP console at https://console.aws.amazon.com/prometheus/.
-
Choose region us-west-2 from the top right corner.
-
Click on Create to create a workspace.
-
Type a workspace alias (adot-amp-test as an example), and click on Create workspace.

-
Make notes of the URLs displayed for Endpoint - remote write URL and Endpoint - query URL. You’ll need them when you configure your ADOT package to remote write metrics to this workspace and when you query metrics from this workspace. Make sure the workspace’s Status shows Active before proceeding to the next step.
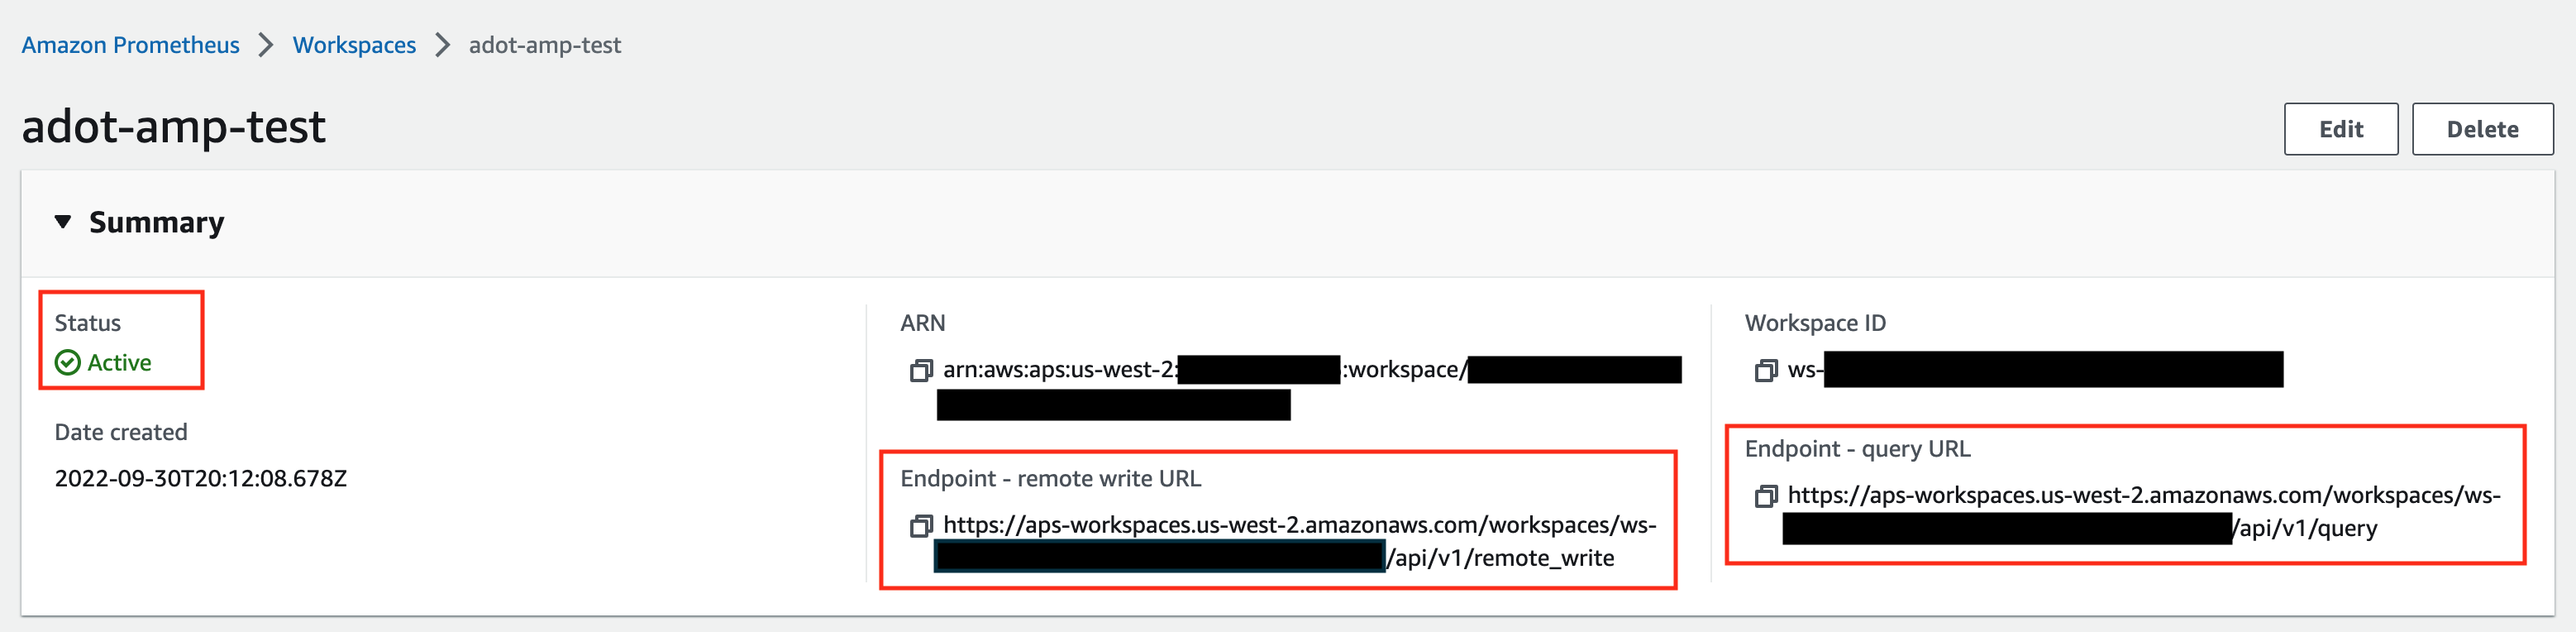
For additional options (i.e. through CLI) and configurations (i.e. add a tag) to create an AMP workspace, refer to AWS AMP create a workspace guide.
Setup IRSA for ADOT
If you haven’t already configured IRSA for your cluster, follow the EKS Anywhere cluster spec for Pod IAM
guide. This one-time setup includes creating an OIDC provider, configuring your cluster, generating keys, and deploying the pod-identity-webhook.
After IRSA infrastructure is configured, create an IAM role for ADOT. Replace <ACCOUNT_ID>, <ISSUER_HOSTPATH> with your values:
-
Create an IAM role with a trust policy that allows the ADOT ServiceAccount to assume it:
{
"Version": "2012-10-17",
"Statement": [
{
"Effect": "Allow",
"Principal": {
"Federated": "arn:aws:iam::<ACCOUNT_ID>:oidc-provider/<ISSUER_HOSTPATH>"
},
"Action": "sts:AssumeRoleWithWebIdentity",
"Condition": {
"StringEquals": {
"<ISSUER_HOSTPATH>:sub": "system:serviceaccount:observability:adot-collector",
"<ISSUER_HOSTPATH>:aud": "sts.amazonaws.com"
}
}
}
]
}
-
Attach an IAM policy with proper AMP access to the IAM role. Below is an example that gives full access to AMP actions and resources. Refer to AMP IAM permissions and policies guide
for more customized options.
{
"Version": "2012-10-17",
"Statement": [
{
"Action": [
"aps:*"
],
"Effect": "Allow",
"Resource": "*"
}
]
}
-
Save the IAM role ARN (e.g., arn:aws:iam::123456789012:role/adot-amp-role). You’ll use this in the ADOT package configuration below.
Install the ADOT package
The ADOT package will be configured with three main components:
-
Prometheus Receiver: Designed to be a drop-in replacement for a Prometheus Server, capable of scraping metrics from microservices instrumented with the Prometheus client library
-
Prometheus Remote Write Exporter: Sends metrics to AMP for long-term storage using the remote write protocol
-
Sigv4 Authentication Extension: Enables ADOT pods to authenticate to AWS services using the IAM role configured via IRSA
The ADOT package can be configured using presets for automatic collector and RBAC setup, explicit rules and config, or both combined.
Using Presets
This approach uses the ADOT helm chart’s preset feature to automatically configure collectors and RBAC permissions.
-
Create an ADOT package configuration file named adot-package.yaml. Review comments carefully and replace everything wrapped with <> tags.
Click to expand ADOT package config with presets
apiVersion: packages.eks.amazonaws.com/v1alpha1
kind: Package
metadata:
name: my-adot
namespace: eksa-packages
spec:
packageName: adot
targetNamespace: observability
config: |
mode: deployment
serviceAccount:
create: true
annotations:
eks.amazonaws.com/role-arn: "<IAM-ROLE-ARN>"
name: "adot-collector"
presets:
kubernetesAttributes:
enabled: true
kubeletMetrics:
enabled: true
clusterRole:
create: true
config:
extensions:
sigv4auth:
region: "us-west-2"
service: "aps"
assume_role:
sts_region: "us-west-2"
receivers:
prometheus:
config:
global:
scrape_interval: 15s
scrape_timeout: 10s
scrape_configs:
- job_name: kubernetes-apiservers
bearer_token_file: /var/run/secrets/kubernetes.io/serviceaccount/token
kubernetes_sd_configs:
- role: endpoints
relabel_configs:
- action: keep
regex: default;kubernetes;https
source_labels:
- __meta_kubernetes_namespace
- __meta_kubernetes_service_name
- __meta_kubernetes_endpoint_port_name
scheme: https
tls_config:
ca_file: /var/run/secrets/kubernetes.io/serviceaccount/ca.crt
insecure_skip_verify: false
- job_name: kubernetes-nodes
bearer_token_file: /var/run/secrets/kubernetes.io/serviceaccount/token
kubernetes_sd_configs:
- role: node
relabel_configs:
- action: labelmap
regex: __meta_kubernetes_node_label_(.+)
- replacement: kubernetes.default.svc:443
target_label: __address__
- regex: (.+)
replacement: /api/v1/nodes/$$1/proxy/metrics
source_labels:
- __meta_kubernetes_node_name
target_label: __metrics_path__
scheme: https
tls_config:
ca_file: /var/run/secrets/kubernetes.io/serviceaccount/ca.crt
insecure_skip_verify: false
- job_name: kubernetes-service-endpoints
kubernetes_sd_configs:
- role: endpoints
relabel_configs:
- action: keep
regex: true
source_labels:
- __meta_kubernetes_service_annotation_prometheus_io_scrape
- action: replace
regex: (https?)
source_labels:
- __meta_kubernetes_service_annotation_prometheus_io_scheme
target_label: __scheme__
- action: replace
regex: (.+)
source_labels:
- __meta_kubernetes_service_annotation_prometheus_io_path
target_label: __metrics_path__
- action: replace
regex: ([^:]+)(?::\d+)?;(\d+)
replacement: $$1:$$2
source_labels:
- __address__
- __meta_kubernetes_service_annotation_prometheus_io_port
target_label: __address__
- action: labelmap
regex: __meta_kubernetes_service_label_(.+)
- action: replace
source_labels:
- __meta_kubernetes_namespace
target_label: kubernetes_namespace
- action: replace
source_labels:
- __meta_kubernetes_service_name
target_label: kubernetes_name
processors:
batch/metrics:
timeout: 60s
exporters:
debug:
verbosity: detailed
prometheusremotewrite:
endpoint: "<AMP-WORKSPACE-ENDPOINT>/api/v1/remote_write" # Replace with your AMP workspace remote write endpoint
auth:
authenticator: sigv4auth
service:
extensions:
- health_check
- sigv4auth
pipelines:
metrics:
receivers: [prometheus]
processors: [batch/metrics]
exporters: [debug, prometheusremotewrite]
-
Install the ADOT package using the configuration file:
eksctl anywhere create packages -f adot-package.yaml
Using Explicit RBAC Rules
For custom configurations, you can explicitly define ClusterRole rules in your package configuration.
-
Create an ADOT package configuration file named adot-package.yaml with explicit RBAC rules. Review comments carefully and replace everything wrapped with <> tags.
Click to expand ADOT package config with explicit rules
apiVersion: packages.eks.amazonaws.com/v1alpha1
kind: Package
metadata:
name: my-adot
namespace: eksa-packages
spec:
packageName: adot
targetNamespace: observability
config: |
mode: deployment
serviceAccount:
create: true
annotations:
eks.amazonaws.com/role-arn: "<IAM-ROLE-ARN>"
name: "adot-collector"
clusterRole:
create: true
rules:
- apiGroups: [""]
resources:
- nodes
- nodes/proxy
- services
- endpoints
- pods
verbs: ["get", "list", "watch"]
- apiGroups: ["extensions"]
resources:
- ingresses
verbs: ["get", "list", "watch"]
- apiGroups: ["discovery.k8s.io"]
resources:
- endpointslices
verbs: ["get", "list", "watch"]
- nonResourceURLs:
- /metrics
verbs: ["get"]
config:
extensions:
sigv4auth:
region: "us-west-2"
service: "aps"
assume_role:
sts_region: "us-west-2"
receivers:
prometheus:
config:
global:
scrape_interval: 15s
scrape_timeout: 10s
scrape_configs:
- job_name: kubernetes-apiservers
bearer_token_file: /var/run/secrets/kubernetes.io/serviceaccount/token
kubernetes_sd_configs:
- role: endpoints
relabel_configs:
- action: keep
regex: default;kubernetes;https
source_labels:
- __meta_kubernetes_namespace
- __meta_kubernetes_service_name
- __meta_kubernetes_endpoint_port_name
scheme: https
tls_config:
ca_file: /var/run/secrets/kubernetes.io/serviceaccount/ca.crt
insecure_skip_verify: false
- job_name: kubernetes-nodes
bearer_token_file: /var/run/secrets/kubernetes.io/serviceaccount/token
kubernetes_sd_configs:
- role: node
relabel_configs:
- action: labelmap
regex: __meta_kubernetes_node_label_(.+)
- replacement: kubernetes.default.svc:443
target_label: __address__
- regex: (.+)
replacement: /api/v1/nodes/$$1/proxy/metrics
source_labels:
- __meta_kubernetes_node_name
target_label: __metrics_path__
scheme: https
tls_config:
ca_file: /var/run/secrets/kubernetes.io/serviceaccount/ca.crt
insecure_skip_verify: false
- job_name: kubernetes-nodes-cadvisor
bearer_token_file: /var/run/secrets/kubernetes.io/serviceaccount/token
kubernetes_sd_configs:
- role: node
relabel_configs:
- action: labelmap
regex: __meta_kubernetes_node_label_(.+)
- replacement: kubernetes.default.svc:443
target_label: __address__
- regex: (.+)
replacement: /api/v1/nodes/$$1/proxy/metrics/cadvisor
source_labels:
- __meta_kubernetes_node_name
target_label: __metrics_path__
scheme: https
tls_config:
ca_file: /var/run/secrets/kubernetes.io/serviceaccount/ca.crt
insecure_skip_verify: false
- job_name: kubernetes-service-endpoints
kubernetes_sd_configs:
- role: endpoints
relabel_configs:
- action: keep
regex: true
source_labels:
- __meta_kubernetes_service_annotation_prometheus_io_scrape
- action: replace
regex: (https?)
source_labels:
- __meta_kubernetes_service_annotation_prometheus_io_scheme
target_label: __scheme__
- action: replace
regex: (.+)
source_labels:
- __meta_kubernetes_service_annotation_prometheus_io_path
target_label: __metrics_path__
- action: replace
regex: ([^:]+)(?::\d+)?;(\d+)
replacement: $$1:$$2
source_labels:
- __address__
- __meta_kubernetes_service_annotation_prometheus_io_port
target_label: __address__
- action: labelmap
regex: __meta_kubernetes_service_annotation_prometheus_io_param_(.+)
replacement: __param_$$1
- action: labelmap
regex: __meta_kubernetes_service_label_(.+)
- action: replace
source_labels:
- __meta_kubernetes_namespace
target_label: kubernetes_namespace
- action: replace
source_labels:
- __meta_kubernetes_service_name
target_label: kubernetes_name
- action: replace
source_labels:
- __meta_kubernetes_pod_node_name
target_label: kubernetes_node
- job_name: kubernetes-service-endpoints-slow
kubernetes_sd_configs:
- role: endpoints
relabel_configs:
- action: keep
regex: true
source_labels:
- __meta_kubernetes_service_annotation_prometheus_io_scrape_slow
- action: replace
regex: (https?)
source_labels:
- __meta_kubernetes_service_annotation_prometheus_io_scheme
target_label: __scheme__
- action: replace
regex: (.+)
source_labels:
- __meta_kubernetes_service_annotation_prometheus_io_path
target_label: __metrics_path__
- action: replace
regex: ([^:]+)(?::\d+)?;(\d+)
replacement: $$1:$$2
source_labels:
- __address__
- __meta_kubernetes_service_annotation_prometheus_io_port
target_label: __address__
- action: labelmap
regex: __meta_kubernetes_service_annotation_prometheus_io_param_(.+)
replacement: __param_$$1
- action: labelmap
regex: __meta_kubernetes_service_label_(.+)
- action: replace
source_labels:
- __meta_kubernetes_namespace
target_label: kubernetes_namespace
- action: replace
source_labels:
- __meta_kubernetes_service_name
target_label: kubernetes_name
- action: replace
source_labels:
- __meta_kubernetes_pod_node_name
target_label: kubernetes_node
scrape_interval: 5m
scrape_timeout: 30s
- job_name: prometheus-pushgateway
kubernetes_sd_configs:
- role: service
relabel_configs:
- action: keep
regex: pushgateway
source_labels:
- __meta_kubernetes_service_annotation_prometheus_io_probe
- job_name: kubernetes-services
kubernetes_sd_configs:
- role: service
metrics_path: /probe
params:
module:
- http_2xx
relabel_configs:
- action: keep
regex: true
source_labels:
- __meta_kubernetes_service_annotation_prometheus_io_probe
- source_labels:
- __address__
target_label: __param_target
- replacement: blackbox
target_label: __address__
- source_labels:
- __param_target
target_label: instance
- action: labelmap
regex: __meta_kubernetes_service_label_(.+)
- source_labels:
- __meta_kubernetes_namespace
target_label: kubernetes_namespace
- source_labels:
- __meta_kubernetes_service_name
target_label: kubernetes_name
- job_name: kubernetes-pods
kubernetes_sd_configs:
- role: pod
relabel_configs:
- action: keep
regex: true
source_labels:
- __meta_kubernetes_pod_annotation_prometheus_io_scrape
- action: replace
regex: (https?)
source_labels:
- __meta_kubernetes_pod_annotation_prometheus_io_scheme
target_label: __scheme__
- action: replace
regex: (.+)
source_labels:
- __meta_kubernetes_pod_annotation_prometheus_io_path
target_label: __metrics_path__
- action: replace
regex: ([^:]+)(?::\d+)?;(\d+)
replacement: $$1:$$2
source_labels:
- __address__
- __meta_kubernetes_pod_annotation_prometheus_io_port
target_label: __address__
- action: labelmap
regex: __meta_kubernetes_pod_annotation_prometheus_io_param_(.+)
replacement: __param_$$1
- action: labelmap
regex: __meta_kubernetes_pod_label_(.+)
- action: replace
source_labels:
- __meta_kubernetes_namespace
target_label: kubernetes_namespace
- action: replace
source_labels:
- __meta_kubernetes_pod_name
target_label: kubernetes_pod_name
- action: drop
regex: Pending|Succeeded|Failed|Completed
source_labels:
- __meta_kubernetes_pod_phase
- job_name: kubernetes-pods-slow
scrape_interval: 5m
scrape_timeout: 30s
kubernetes_sd_configs:
- role: pod
relabel_configs:
- action: keep
regex: true
source_labels:
- __meta_kubernetes_pod_annotation_prometheus_io_scrape_slow
- action: replace
regex: (https?)
source_labels:
- __meta_kubernetes_pod_annotation_prometheus_io_scheme
target_label: __scheme__
- action: replace
regex: (.+)
source_labels:
- __meta_kubernetes_pod_annotation_prometheus_io_path
target_label: __metrics_path__
- action: replace
regex: ([^:]+)(?::\d+)?;(\d+)
replacement: $$1:$$2
source_labels:
- __address__
- __meta_kubernetes_pod_annotation_prometheus_io_port
target_label: __address__
- action: labelmap
regex: __meta_kubernetes_pod_annotation_prometheus_io_param_(.+)
replacement: __param_$1
- action: labelmap
regex: __meta_kubernetes_pod_label_(.+)
- action: replace
source_labels:
- __meta_kubernetes_namespace
target_label: namespace
- action: replace
source_labels:
- __meta_kubernetes_pod_name
target_label: pod
- action: drop
regex: Pending|Succeeded|Failed|Completed
source_labels:
- __meta_kubernetes_pod_phase
processors:
batch/metrics:
timeout: 60s
exporters:
debug:
verbosity: detailed
prometheusremotewrite:
endpoint: "<AMP-WORKSPACE-ENDPOINT>/api/v1/remote_write" # Replace with your AMP workspace remote write endpoint
auth:
authenticator: sigv4auth
service:
extensions:
- health_check
- sigv4auth
pipelines:
metrics:
receivers: [prometheus]
processors: [batch/metrics]
exporters: [debug, prometheusremotewrite]
-
Install the ADOT package:
eksctl anywhere create packages -f adot-package.yaml
Available Presets
The ADOT helm chart provides several presets that automatically configure both collector features and RBAC permissions:
| Preset |
Description |
Auto-Added RBAC Rules |
kubernetesAttributes |
Adds Kubernetes metadata (pod, namespace, etc.) to metrics |
pods, namespaces, replicasets (apps & extensions) |
kubeletMetrics |
Collects metrics from kubelet |
nodes/stats |
clusterMetrics |
Collects cluster-level metrics |
events, namespaces, nodes, pods, services, daemonsets, deployments, replicasets, statefulsets, jobs, cronjobs, horizontalpodautoscalers |
kubernetesEvents |
Collects Kubernetes events |
events (events.k8s.io apiGroup) |
logsCollection |
Collects logs from nodes (best with daemonset mode) |
None (requires host access) |
hostMetrics |
Collects host-level metrics (best with daemonset mode) |
None (requires host access) |
For more details on presets, refer to the OpenTelemetry Collector Kubernetes Components documentation
.
ADOT Package Test
To ensure the ADOT package is installed correctly in the cluster, perform the following tests:
Check pod logs
Check ADOT pod logs using kubectl logs <adot-pod-name> -n <namespace>. It should display logs similar to below.
...
2022-09-30T23:22:59.184Z info service/telemetry.go:103 Setting up own telemetry...
2022-09-30T23:22:59.184Z info service/telemetry.go:138 Serving Prometheus metrics {"address": "0.0.0.0:8888", "level": "basic"}
2022-09-30T23:22:59.185Z info components/components.go:30 In development component. May change in the future. {"kind": "exporter", "data_type": "metrics", "name": "logging", "stability": "in development"}
2022-09-30T23:22:59.186Z info extensions/extensions.go:42 Starting extensions...
2022-09-30T23:22:59.186Z info extensions/extensions.go:45 Extension is starting... {"kind": "extension", "name": "health_check"}
2022-09-30T23:22:59.186Z info healthcheckextension@v0.58.0/healthcheckextension.go:44 Starting health_check extension {"kind": "extension", "name": "health_check", "config": {"Endpoint":"0.0.0.0:13133","TLSSetting":null,"CORS":null,"Auth":null,"MaxRequestBodySize":0,"IncludeMetadata":false,"Path":"/","CheckCollectorPipeline":{"Enabled":false,"Interval":"5m","ExporterFailureThreshold":5}}}
2022-09-30T23:22:59.186Z info extensions/extensions.go:49 Extension started. {"kind": "extension", "name": "health_check"}
2022-09-30T23:22:59.186Z info extensions/extensions.go:45 Extension is starting... {"kind": "extension", "name": "memory_ballast"}
2022-09-30T23:22:59.187Z info ballastextension/memory_ballast.go:52 Setting memory ballast {"kind": "extension", "name": "memory_ballast", "MiBs": 0}
2022-09-30T23:22:59.187Z info extensions/extensions.go:49 Extension started. {"kind": "extension", "name": "memory_ballast"}
2022-09-30T23:22:59.187Z info extensions/extensions.go:45 Extension is starting... {"kind": "extension", "name": "sigv4auth"}
2022-09-30T23:22:59.187Z info extensions/extensions.go:49 Extension started. {"kind": "extension", "name": "sigv4auth"}
2022-09-30T23:22:59.187Z info pipelines/pipelines.go:74 Starting exporters...
2022-09-30T23:22:59.187Z info pipelines/pipelines.go:78 Exporter is starting... {"kind": "exporter", "data_type": "metrics", "name": "logging"}
2022-09-30T23:22:59.187Z info pipelines/pipelines.go:82 Exporter started. {"kind": "exporter", "data_type": "metrics", "name": "logging"}
2022-09-30T23:22:59.187Z info pipelines/pipelines.go:78 Exporter is starting... {"kind": "exporter", "data_type": "metrics", "name": "prometheusremotewrite"}
2022-09-30T23:22:59.187Z info pipelines/pipelines.go:82 Exporter started. {"kind": "exporter", "data_type": "metrics", "name": "prometheusremotewrite"}
2022-09-30T23:22:59.187Z info pipelines/pipelines.go:86 Starting processors...
2022-09-30T23:22:59.187Z info pipelines/pipelines.go:90 Processor is starting... {"kind": "processor", "name": "batch/metrics", "pipeline": "metrics"}
2022-09-30T23:22:59.187Z info pipelines/pipelines.go:94 Processor started. {"kind": "processor", "name": "batch/metrics", "pipeline": "metrics"}
2022-09-30T23:22:59.187Z info pipelines/pipelines.go:98 Starting receivers...
2022-09-30T23:22:59.187Z info pipelines/pipelines.go:102 Receiver is starting... {"kind": "receiver", "name": "prometheus", "pipeline": "metrics"}
2022-09-30T23:22:59.187Z info kubernetes/kubernetes.go:326 Using pod service account via in-cluster config {"kind": "receiver", "name": "prometheus", "pipeline": "metrics", "discovery": "kubernetes"}
2022-09-30T23:22:59.188Z info kubernetes/kubernetes.go:326 Using pod service account via in-cluster config {"kind": "receiver", "name": "prometheus", "pipeline": "metrics", "discovery": "kubernetes"}
2022-09-30T23:22:59.188Z info kubernetes/kubernetes.go:326 Using pod service account via in-cluster config {"kind": "receiver", "name": "prometheus", "pipeline": "metrics", "discovery": "kubernetes"}
2022-09-30T23:22:59.188Z info kubernetes/kubernetes.go:326 Using pod service account via in-cluster config {"kind": "receiver", "name": "prometheus", "pipeline": "metrics", "discovery": "kubernetes"}
2022-09-30T23:22:59.189Z info pipelines/pipelines.go:106 Receiver started. {"kind": "receiver", "name": "prometheus", "pipeline": "metrics"}
2022-09-30T23:22:59.189Z info healthcheck/handler.go:129 Health Check state change {"kind": "extension", "name": "health_check", "status": "ready"}
2022-09-30T23:22:59.189Z info service/collector.go:215 Starting aws-otel-collector... {"Version": "v0.21.1", "NumCPU": 2}
2022-09-30T23:22:59.189Z info service/collector.go:128 Everything is ready. Begin running and processing data.
...
Check AMP endpoint using awscurl
Use awscurl commands below to check if AMP received the metrics data sent by ADOT. The awscurl tool is a curl like tool with AWS Signature Version 4 request signing. The command below should return a status code success.
pip install awscurl
awscurl -X POST --region us-west-2 --service aps "<amp-query-endpoint>?query=up"
Create an AMG workspace and connect to the AMP workspace
An AMG workspace is created to query metrics from the AMP workspace and visualize the metrics in user-selected or user-built dashboards.
Follow steps below to create the AMG workspace:
-
Enable AWS Single-Sign-on (AWS SSO). Refer to IAM Identity Center
for details.
-
Open the Amazon Managed Grafana console at https://console.aws.amazon.com/grafana/.
-
Choose Create workspace.
-
In the Workspace details window, for Workspace name, enter a name for the workspace.
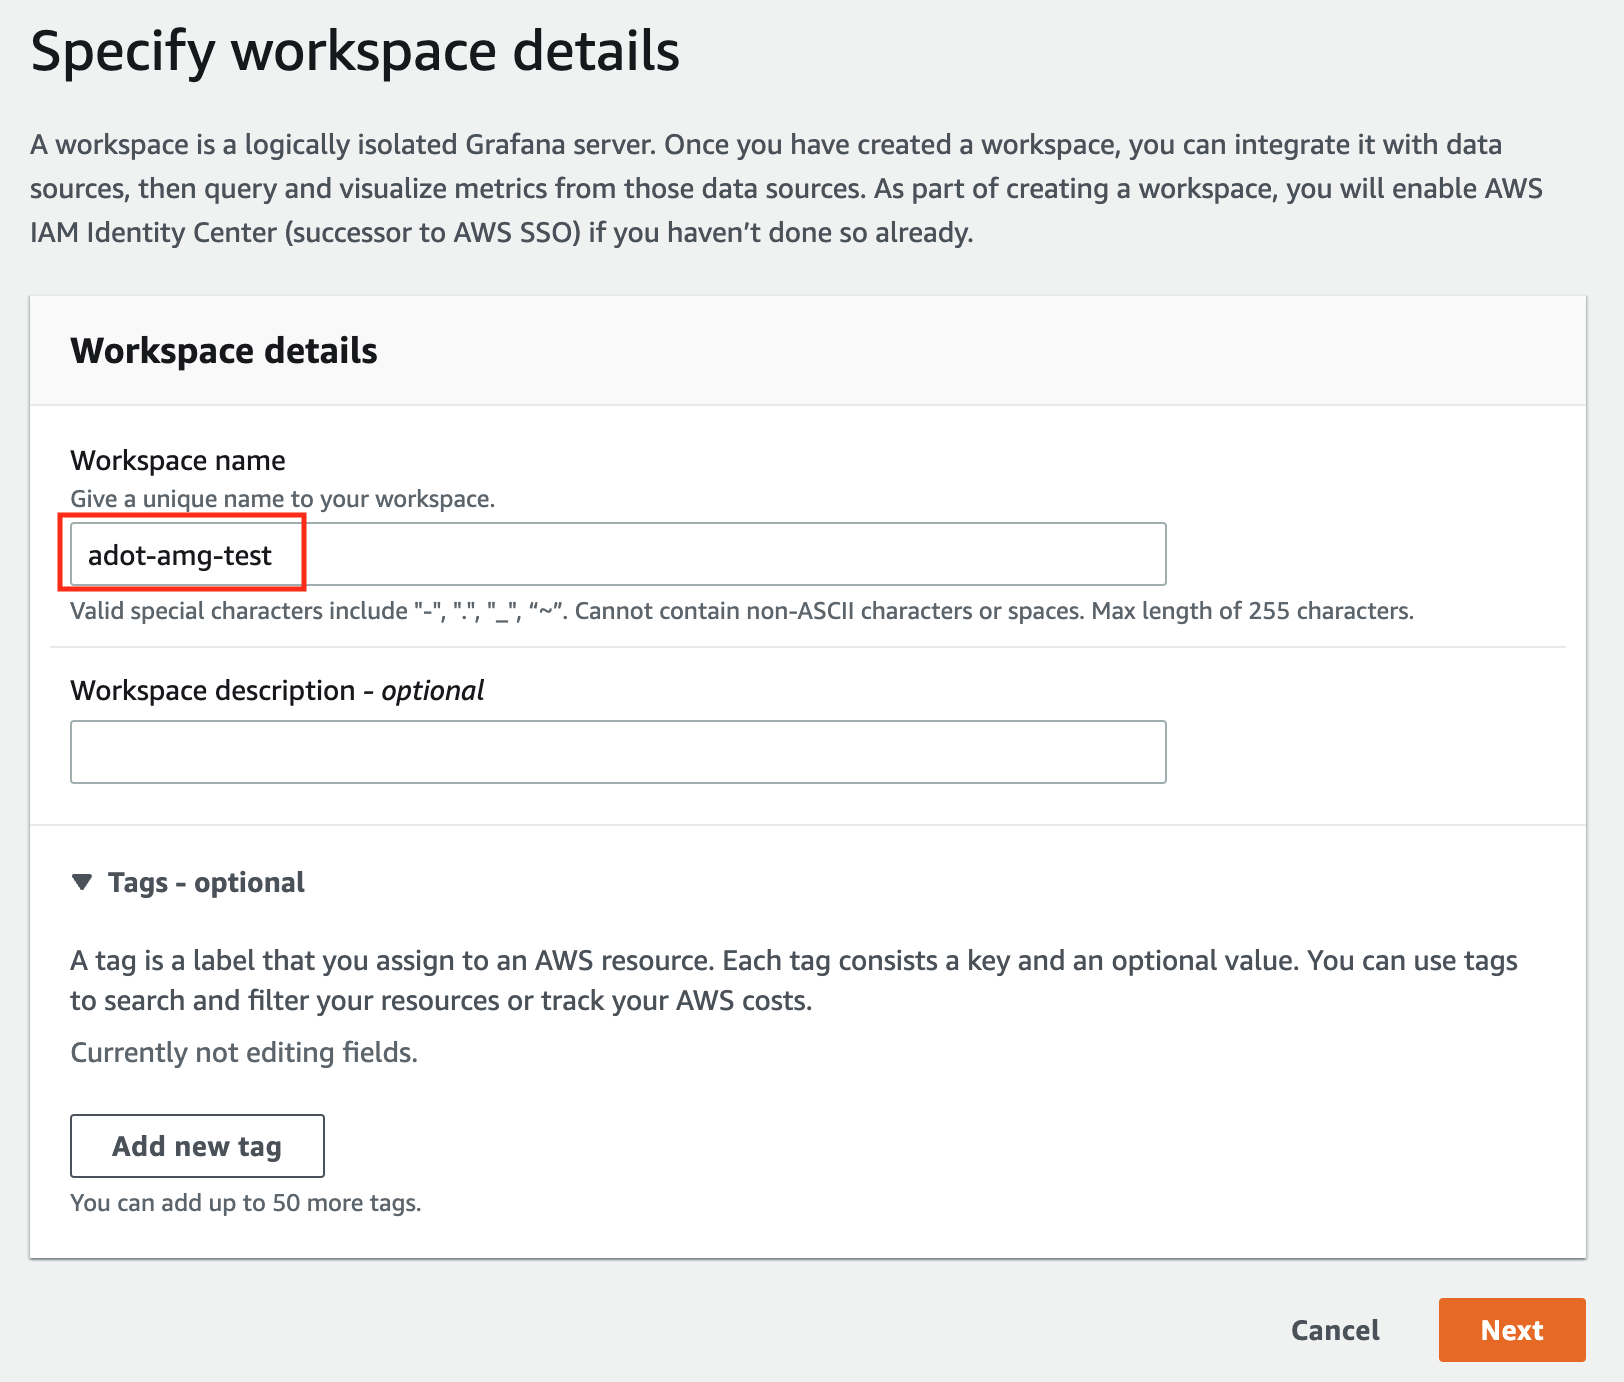
-
In the config settings window, choose Authentication access by AWS IAM Identity Center, and Permission type of Service managed.
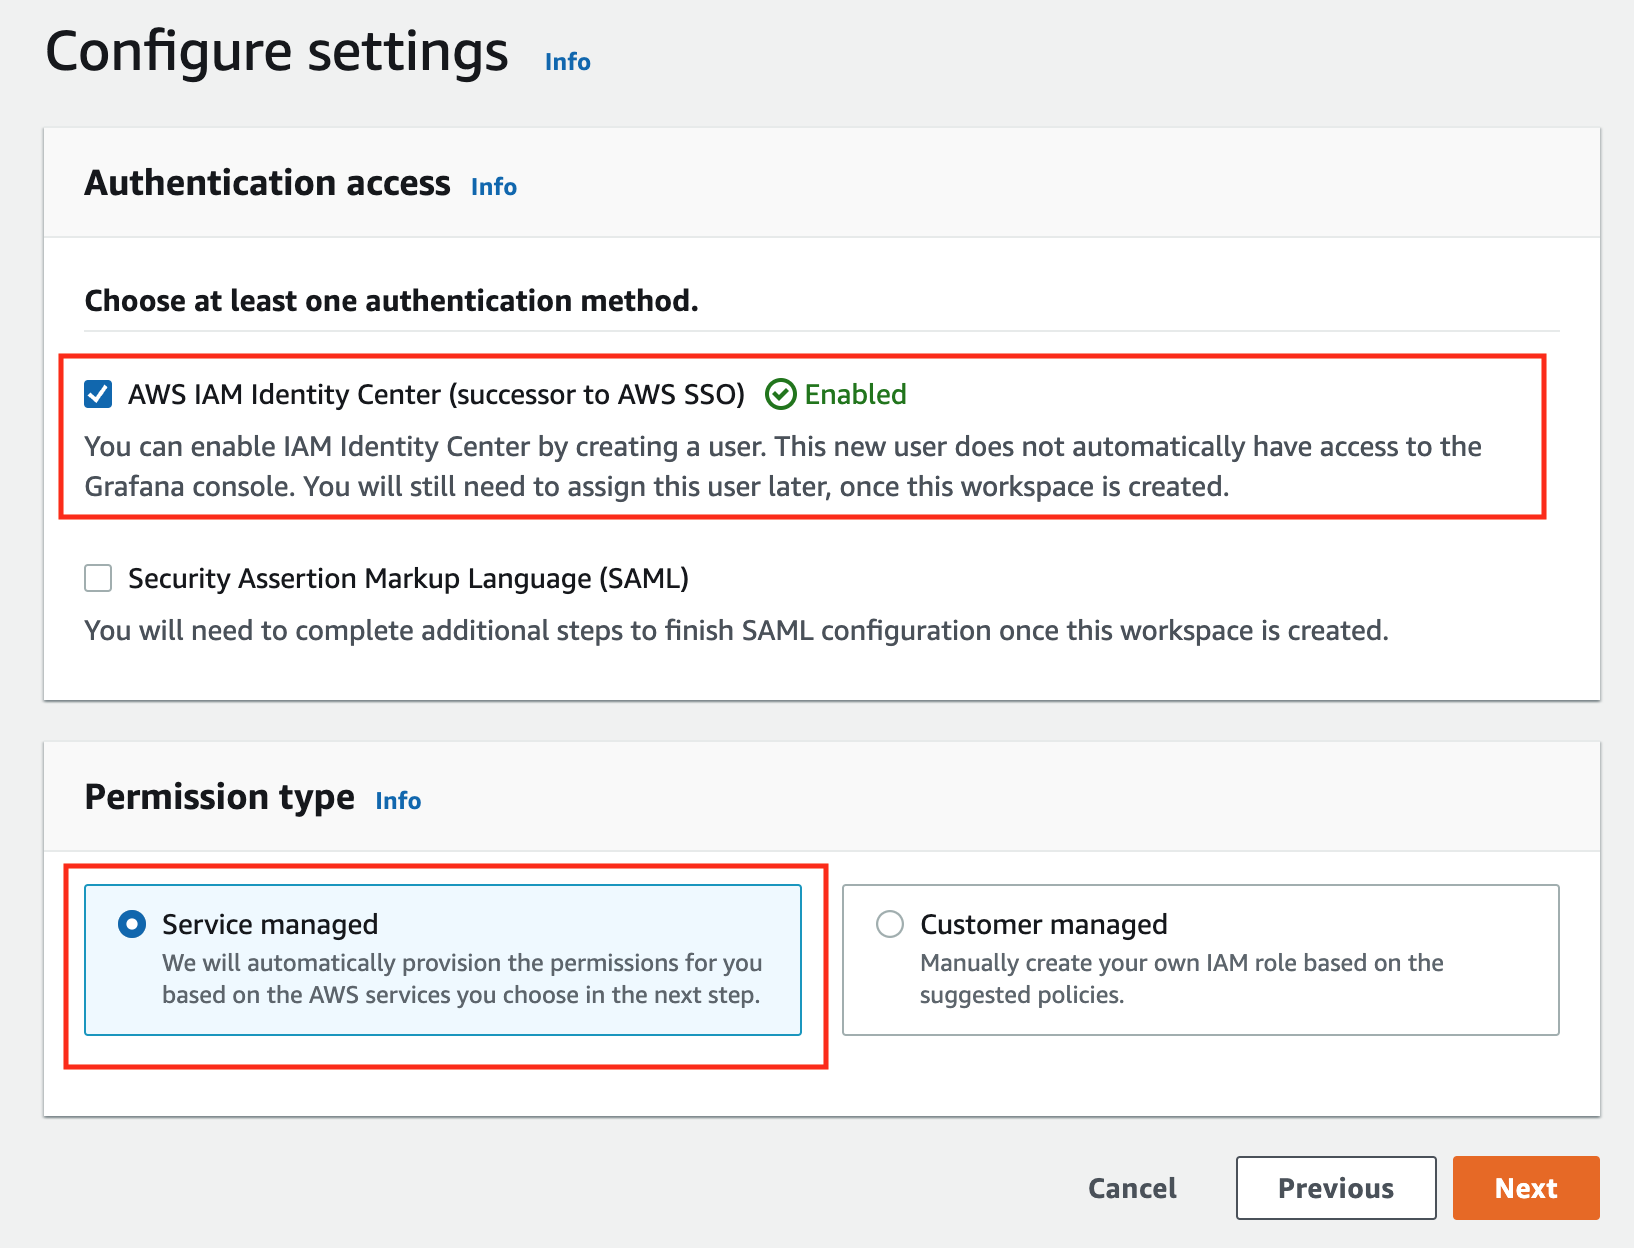
-
In the IAM permission access setting window, choose Current account access, and Amazon Managed Service for Prometheus as data source.
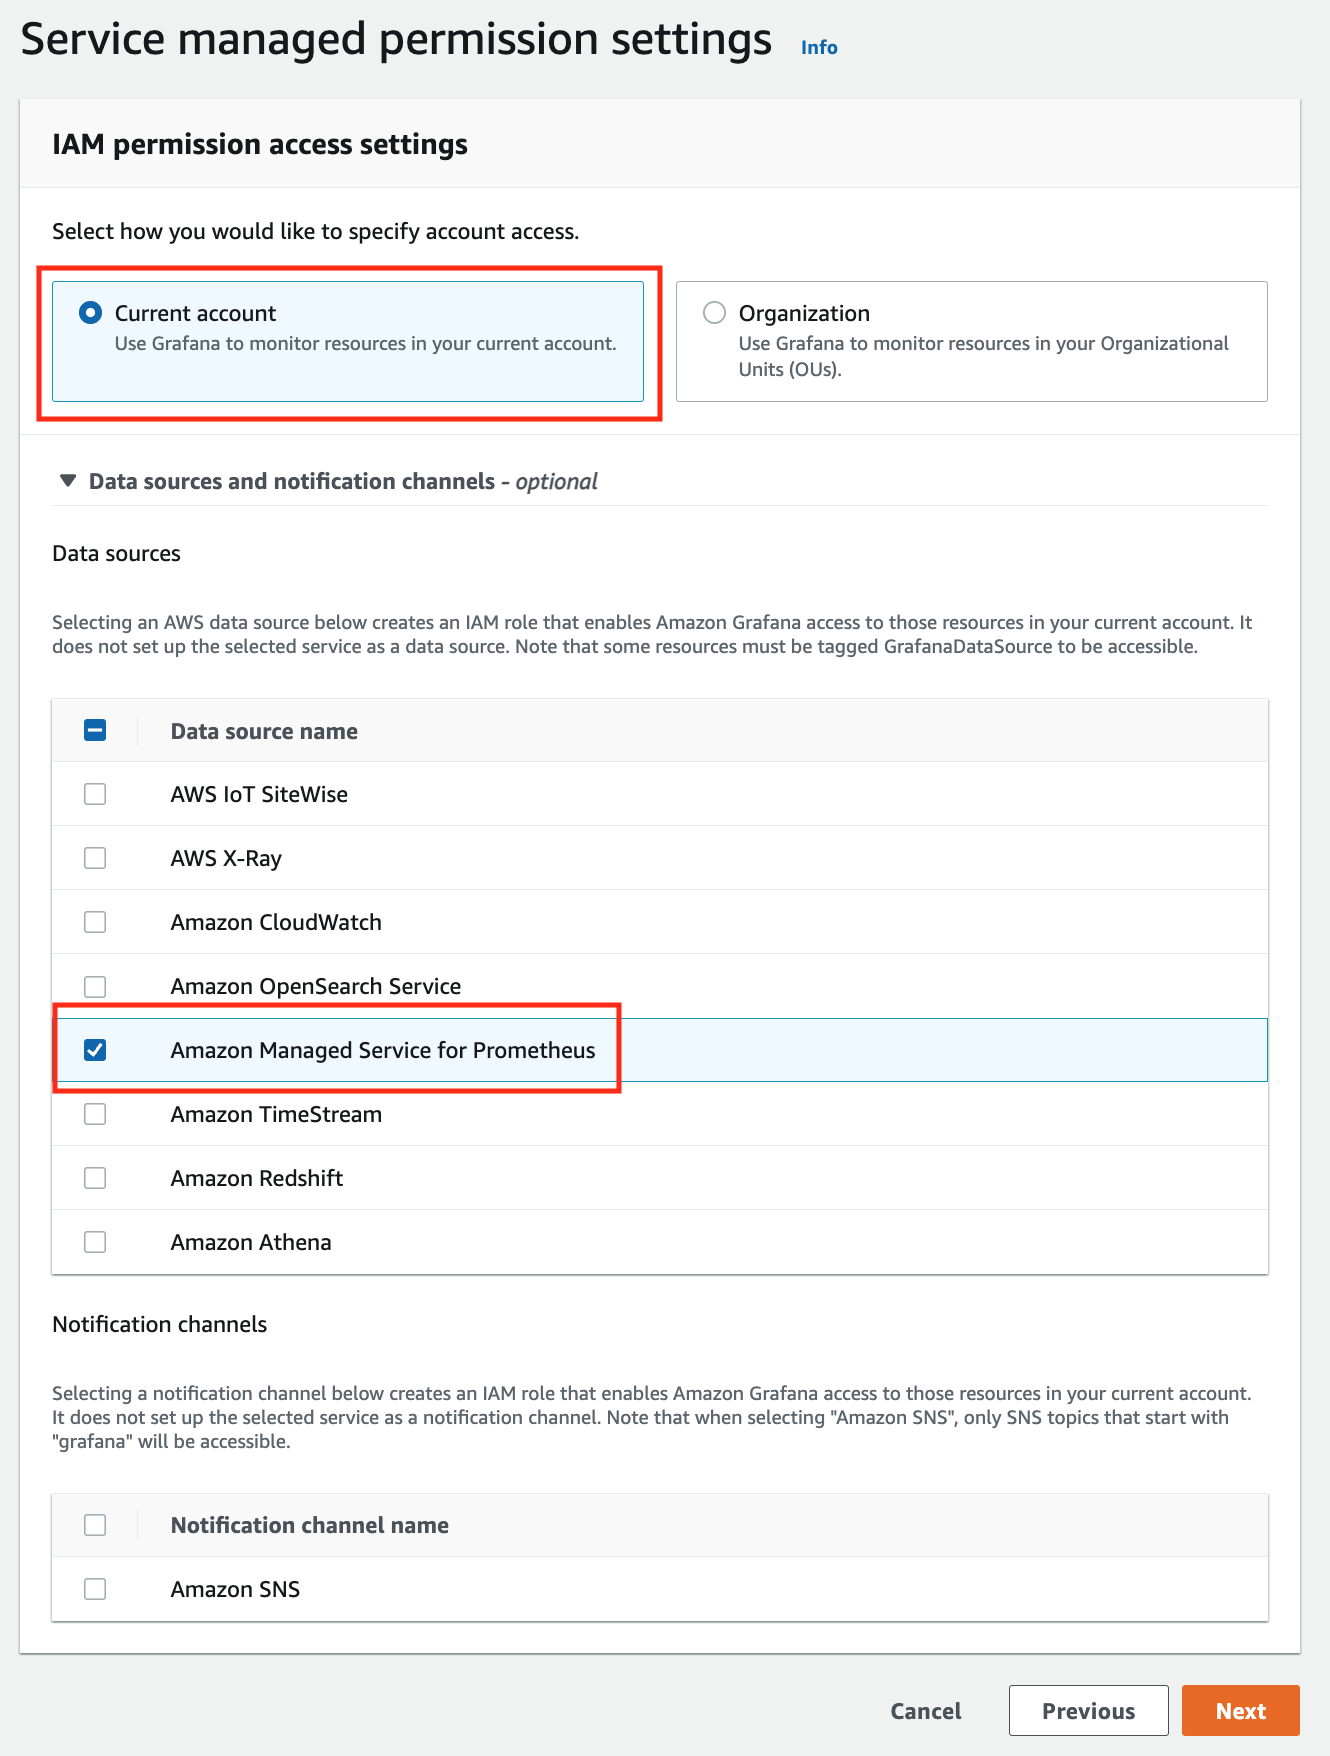
-
Review all settings and click on Create workspace.
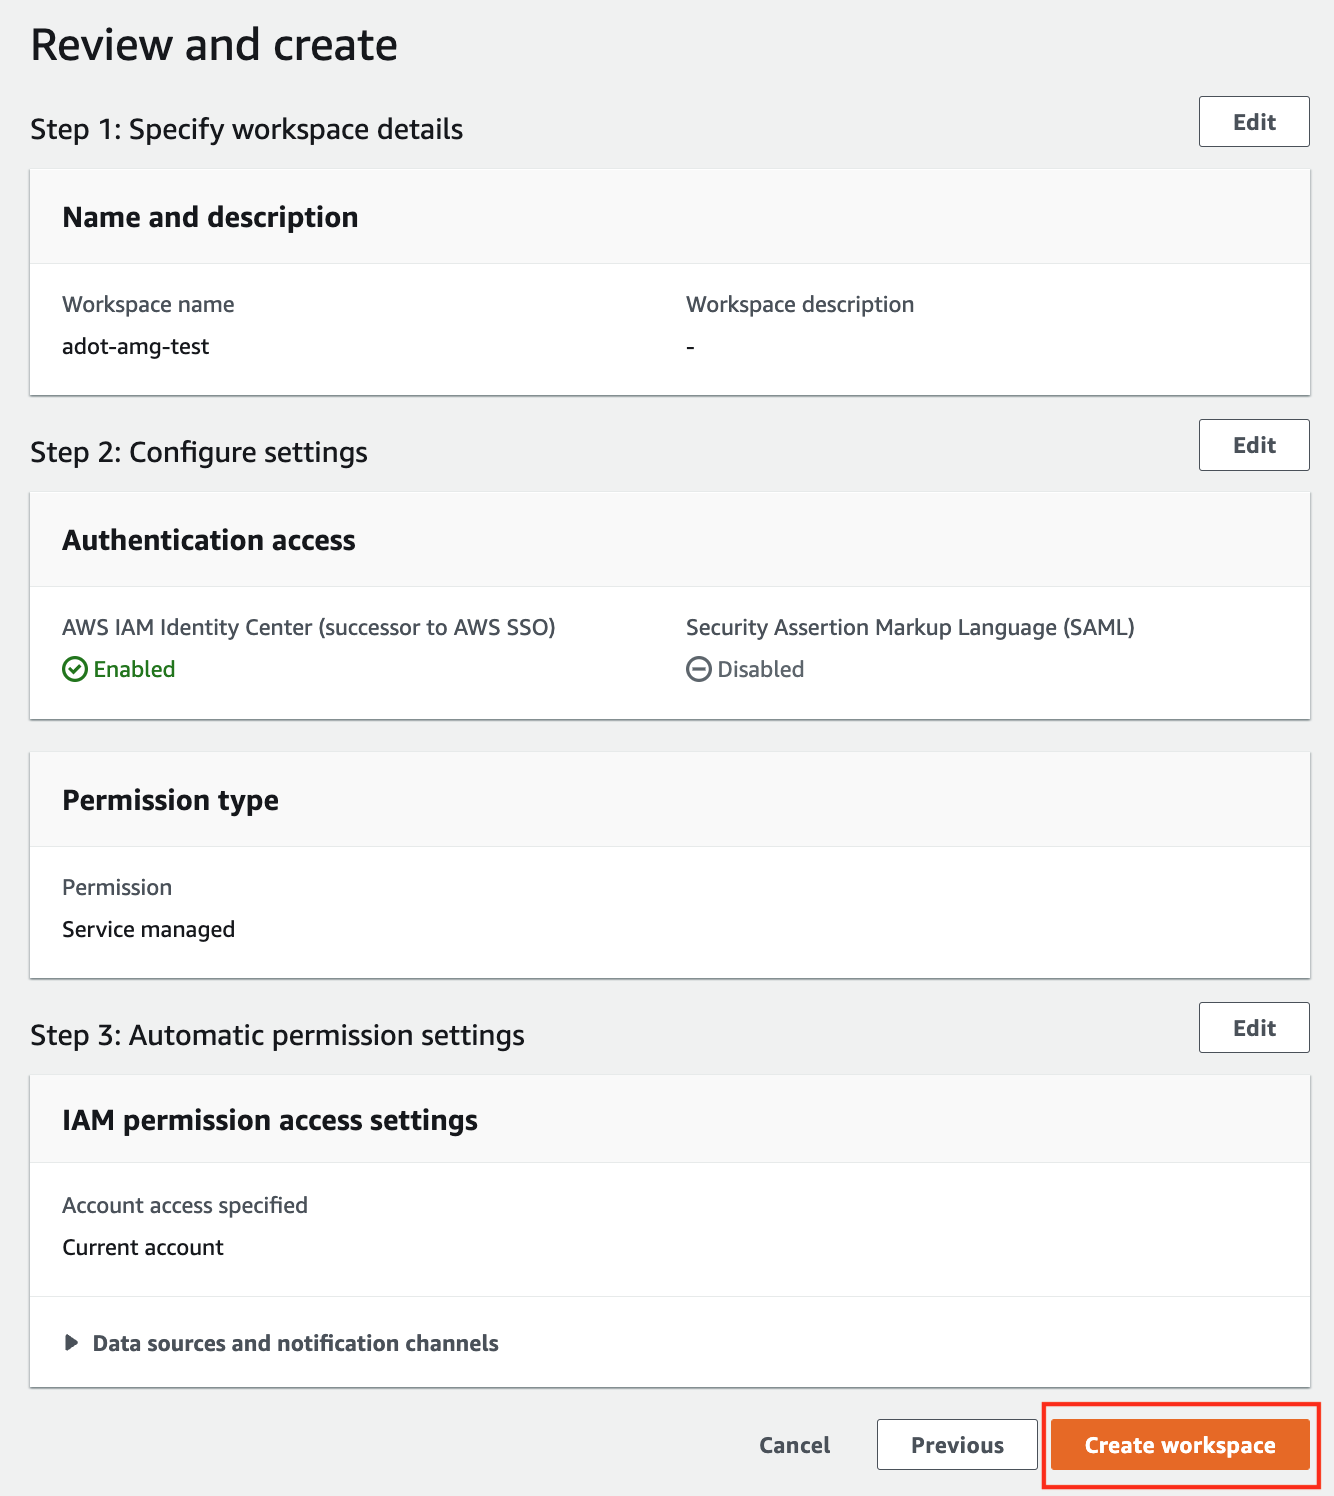
-
Once the workspace shows a Status of Active, you can access it by clicking the Grafana workspace URL. Click on Sign in with AWS IAM Identity Center to finish the authentication.
Follow steps below to add the AMP workspace to AMG:
-
Click on the config sign on the left navigation bar, select Data sources, then choose Prometheus as the Data source.
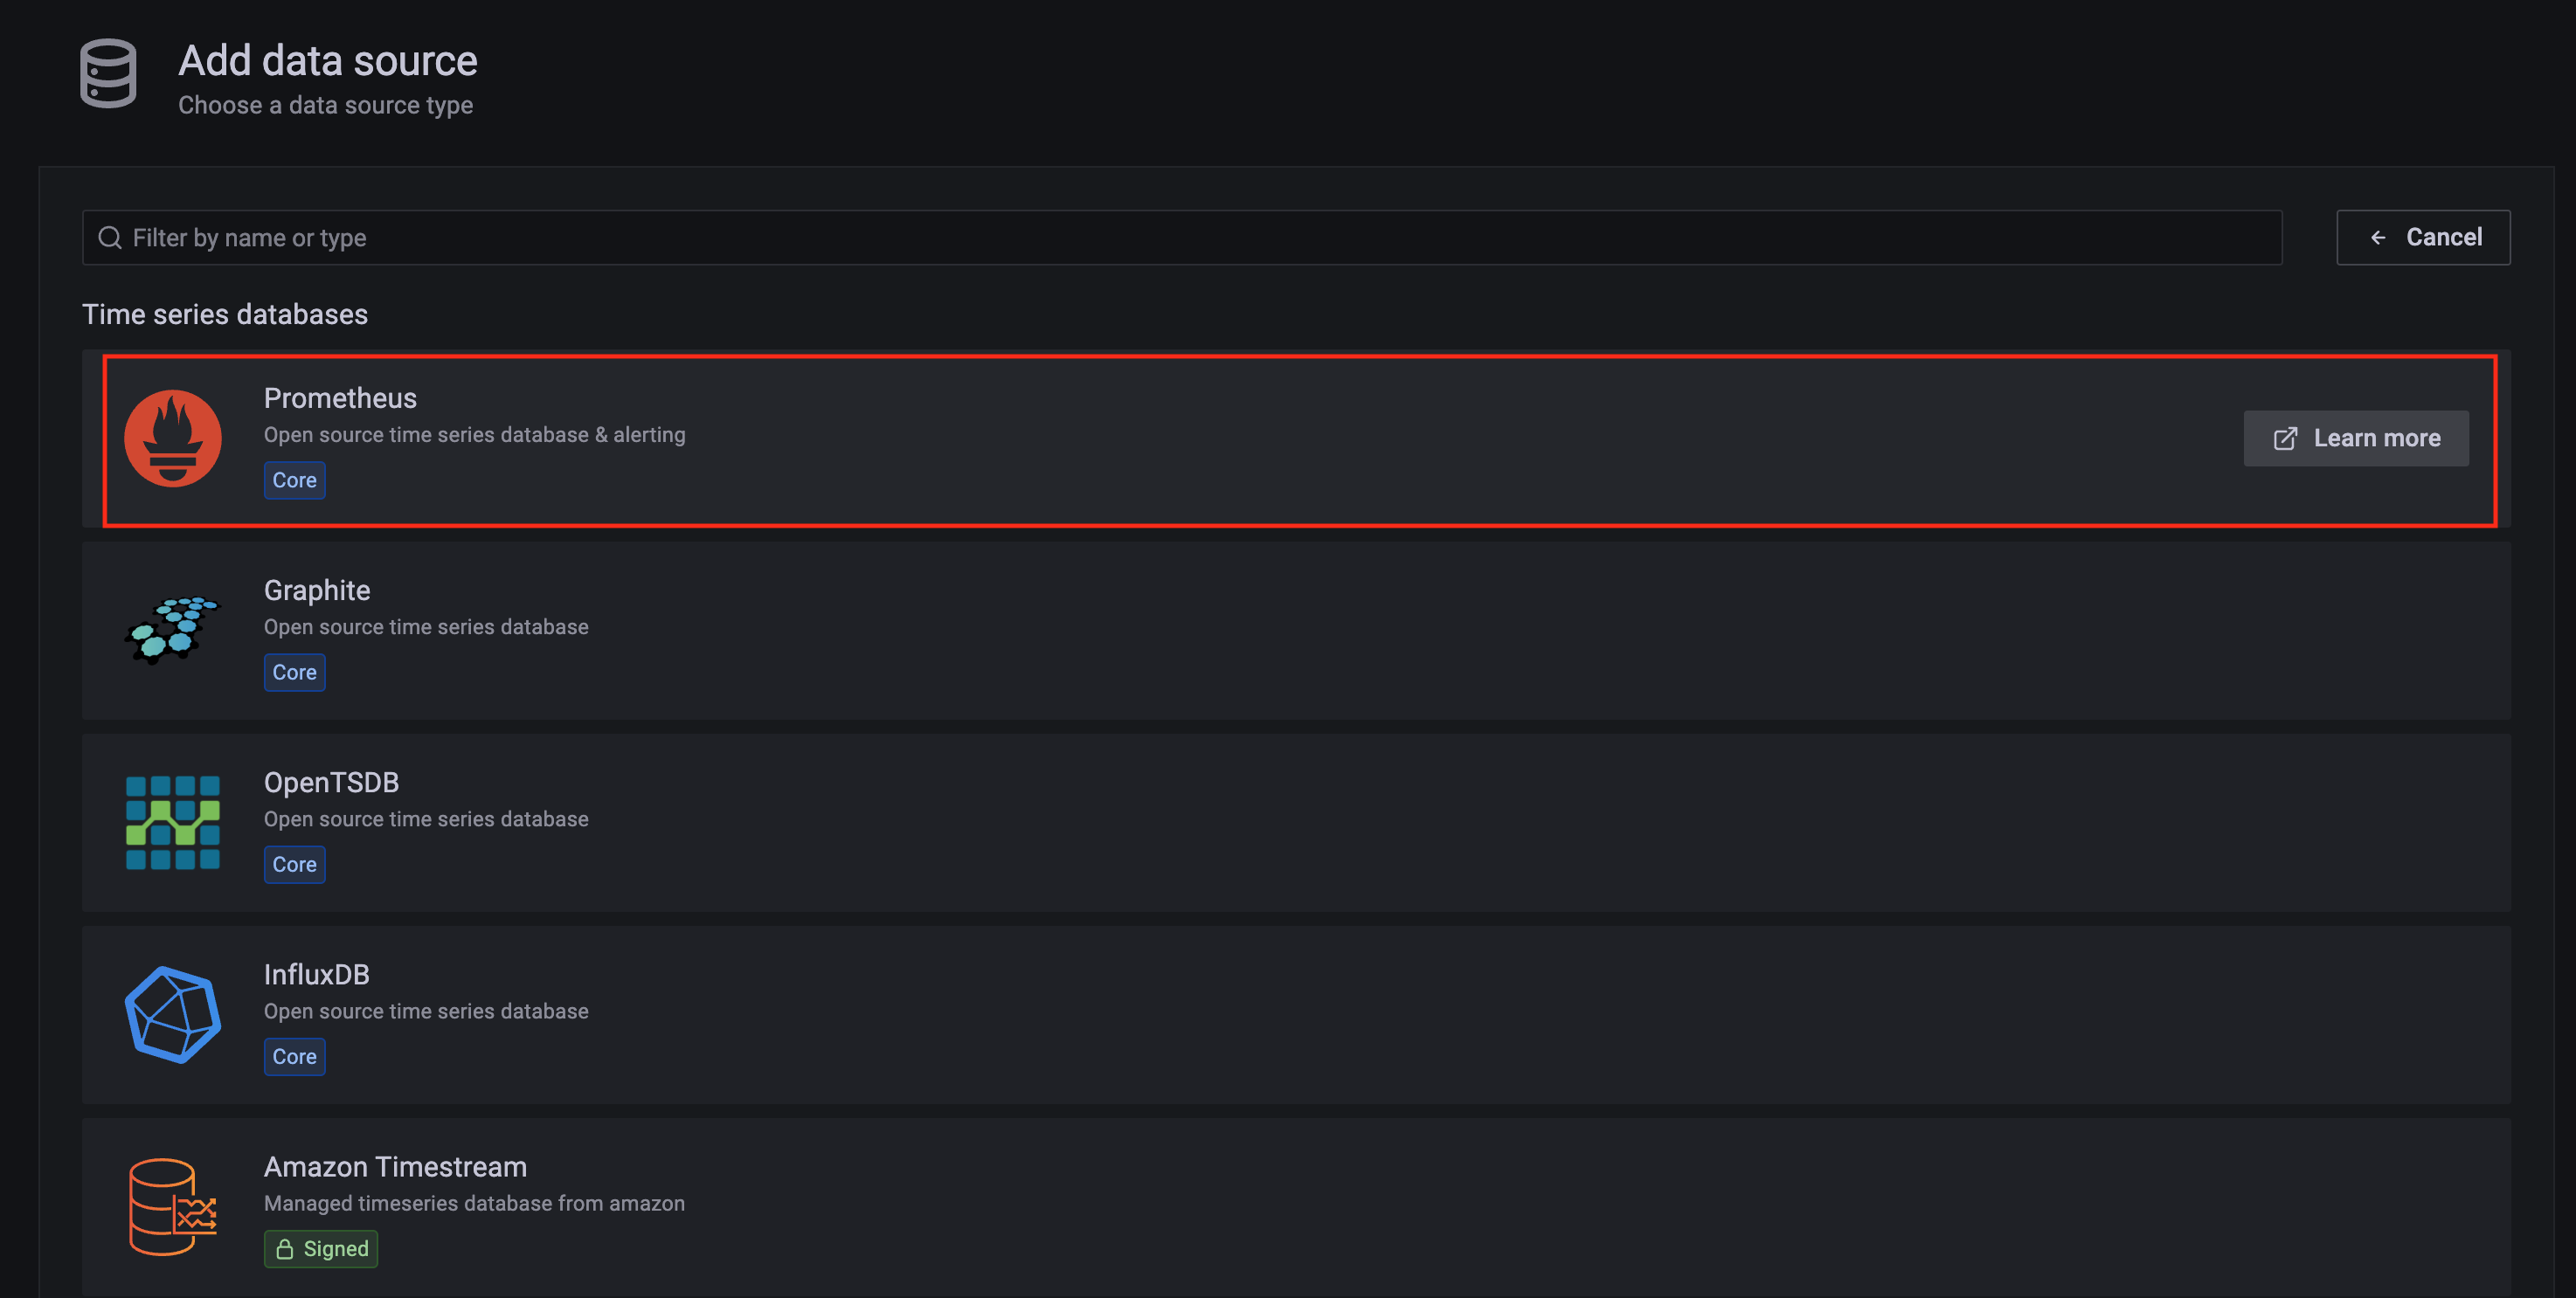
-
Configure Prometheus data source with the following details:
- Name:
AMPDataSource as an example.
- URL: add the AMP workspace remote write URL without the
api/v1/remote_write at the end.
- SigV4 auth: enable.
- Under the SigV4 Auth Details section:
- Authentication Provider: choose
Workspace IAM Role;
- Default Region: choose
us-west-2 (where you created the AMP workspace)
- Select the
Save and test, and a notification data source is working should be displayed.
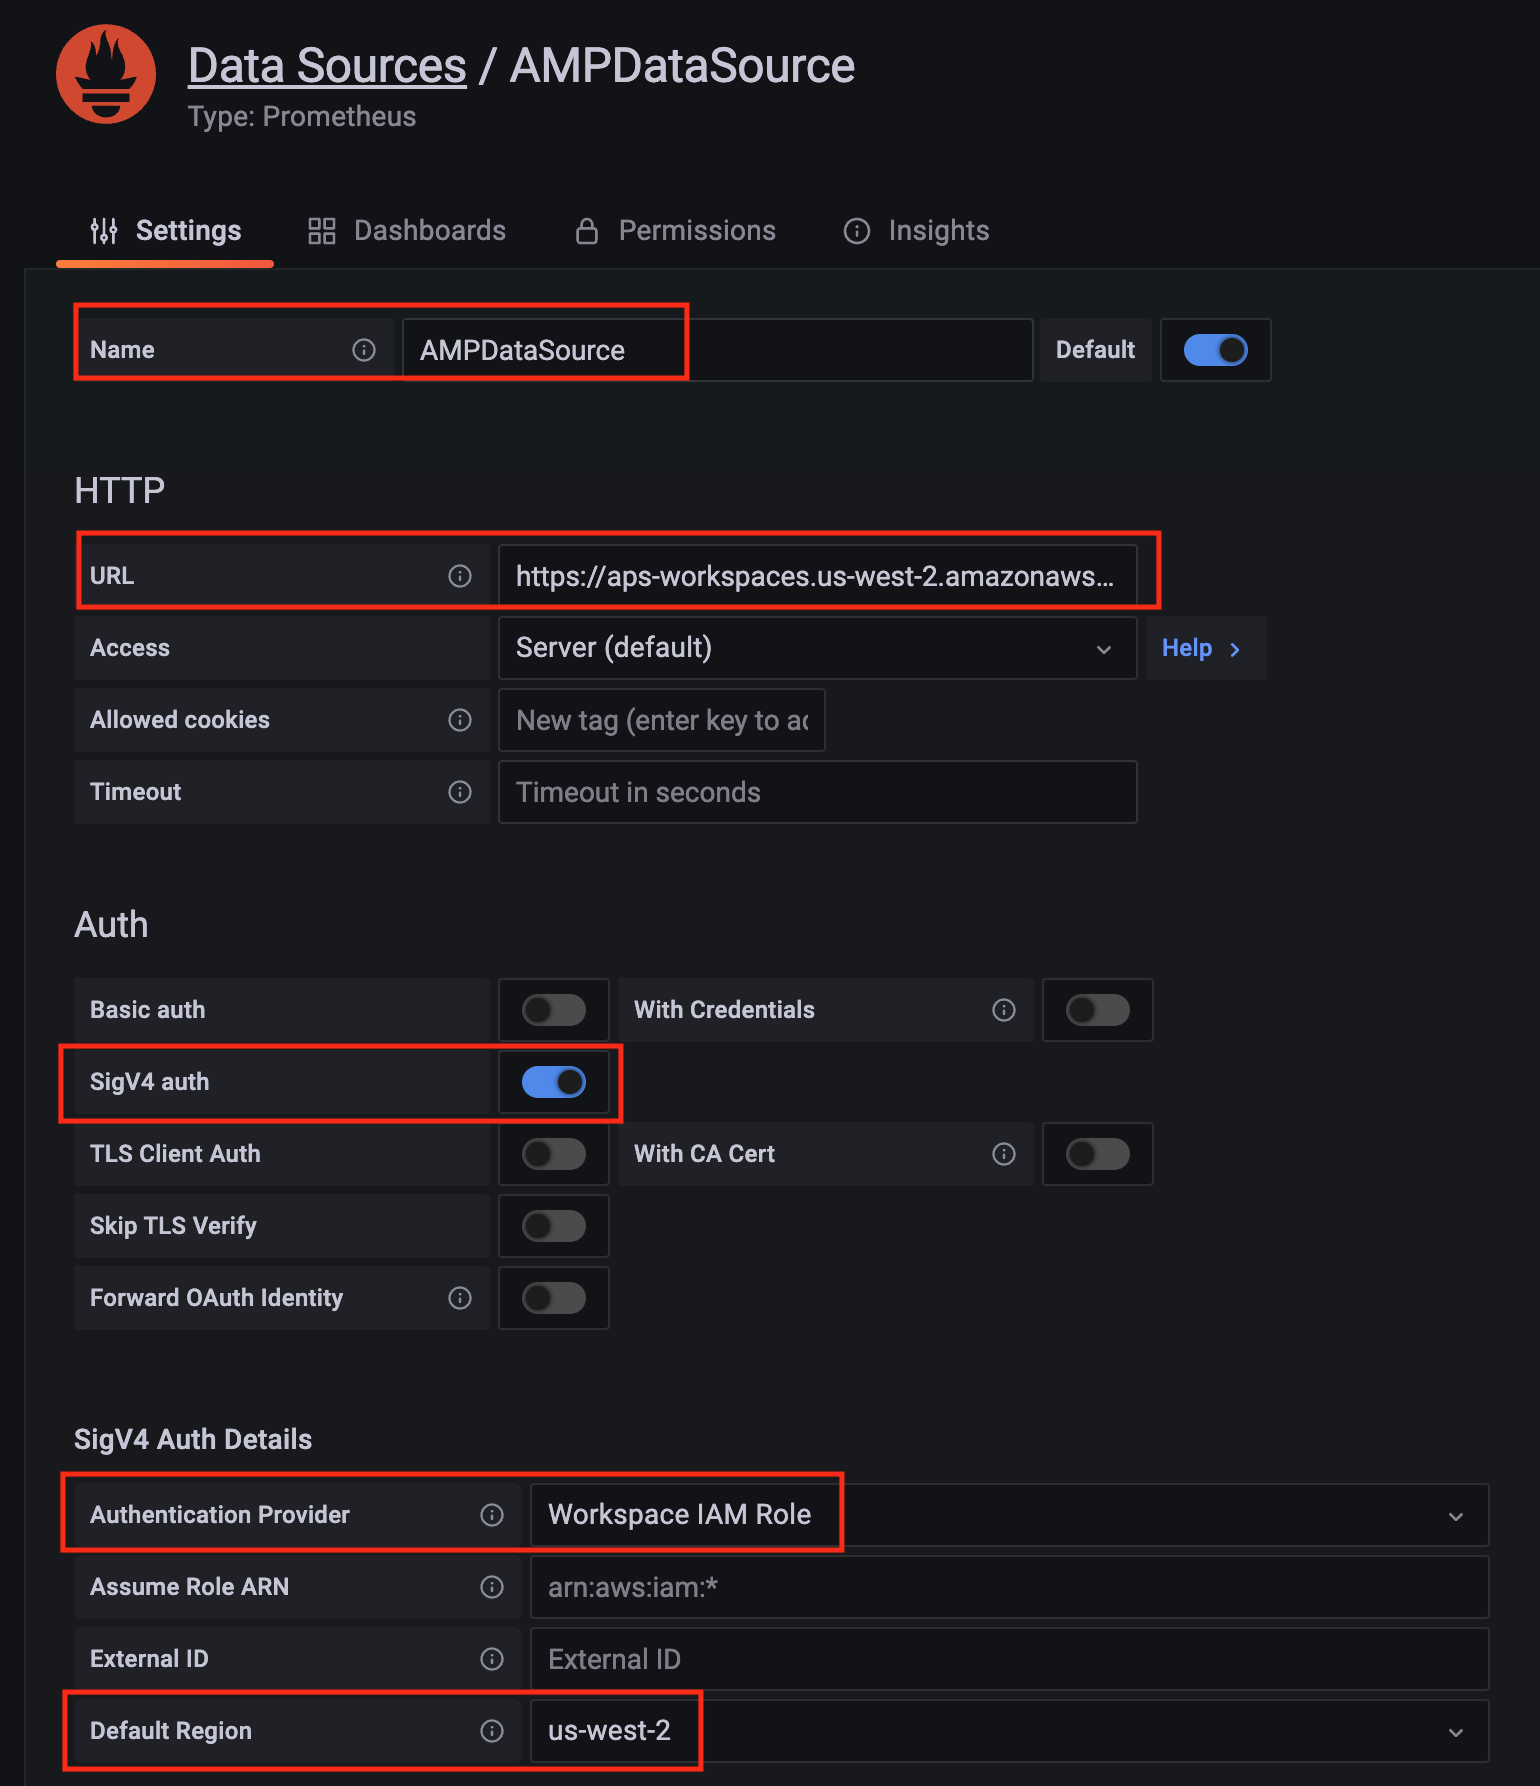
-
Import a dashboard template by clicking on the plus (+) sign on the left navigation bar. In the Import screen, type 3119 in the Import via grafana.com textbox and select Import.
From the dropdown at the bottom, select AMPDataSource and select Import.
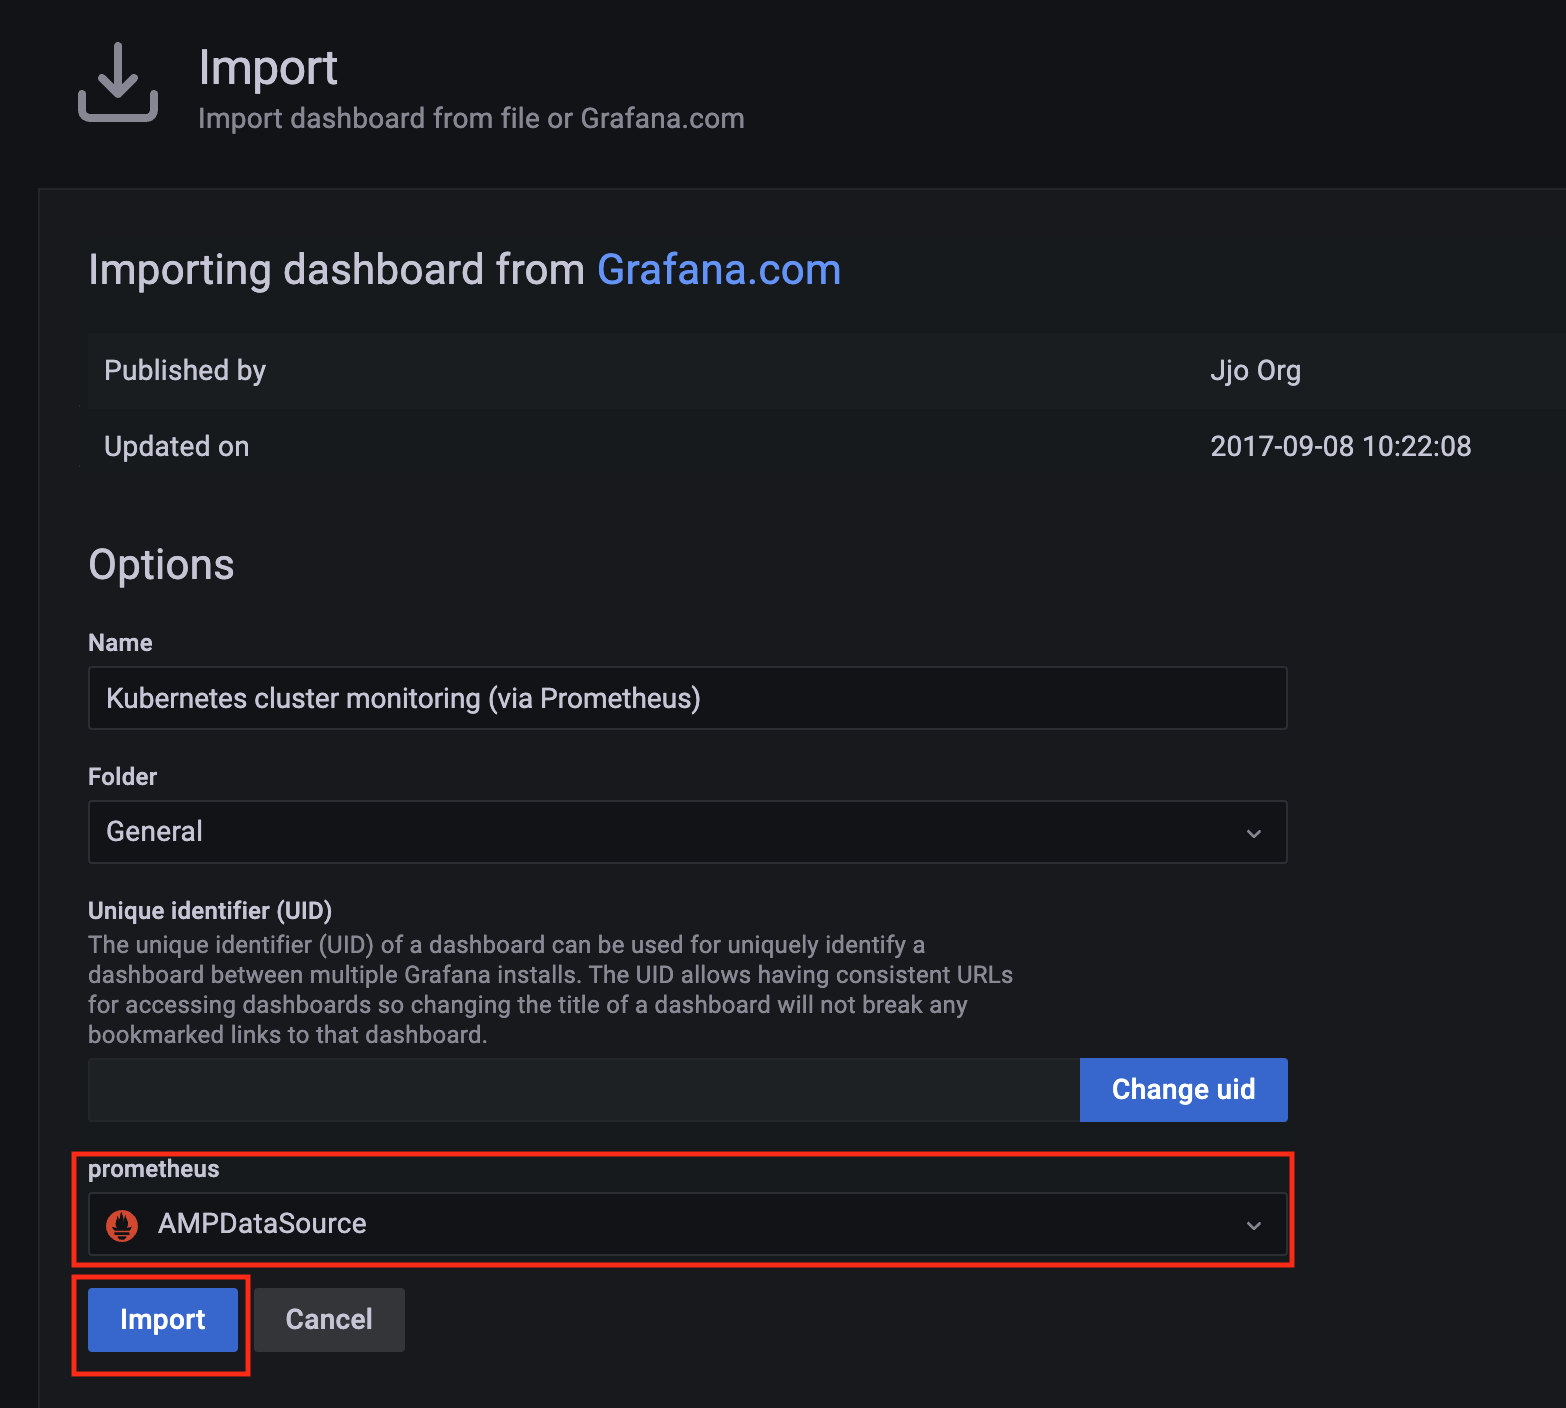
-
A Kubernetes cluster monitoring (via Prometheus) dashboard will be displayed.
7.11.2 - AWS Distro for OpenTelemetry (ADOT)
Install/upgrade/uninstall ADOT
If you have not already done so, make sure your cluster meets the package prerequisites.
Be sure to refer to the troubleshooting guide
in the event of a problem.
Important
- Starting at
eksctl anywhere version v0.12.0, packages on workload clusters are remotely managed by the management cluster.
- While following this guide to install packages on a workload cluster, please make sure the
kubeconfig is pointing to the management cluster that was used to create the workload cluster. The only exception is the kubectl create namespace command below, which should be run with kubeconfig pointing to the workload cluster.
Install
-
Generate the package configuration
eksctl anywhere generate package adot --cluster <cluster-name> > adot.yaml
-
Add the desired configuration to adot.yaml
Please see complete configuration options
for all configuration options and their default values.
Example package file with daemonSet mode and default configuration:
apiVersion: packages.eks.amazonaws.com/v1alpha1
kind: Package
metadata:
name: my-adot
namespace: eksa-packages-<cluster-name>
spec:
packageName: adot
targetNamespace: observability
config: |
mode: daemonset
Example package file with deployment mode and customized collector components to scrap
ADOT collector’s own metrics:
apiVersion: packages.eks.amazonaws.com/v1alpha1
kind: Package
metadata:
name: my-adot
namespace: eksa-packages-<cluster-name>
spec:
packageName: adot
targetNamespace: observability
config: |
mode: deployment
replicaCount: 2
config:
receivers:
prometheus:
config:
scrape_configs:
- job_name: opentelemetry-collector
scrape_interval: 10s
static_configs:
- targets:
- ${MY_POD_IP}:8888
processors:
batch: {}
memory_limiter: null
exporters:
logging:
loglevel: debug
prometheusremotewrite:
endpoint: "<prometheus-remote-write-end-point>"
extensions:
health_check: {}
memory_ballast: {}
service:
pipelines:
metrics:
receivers: [prometheus]
processors: [batch]
exporters: [logging, prometheusremotewrite]
telemetry:
metrics:
address: 0.0.0.0:8888
-
Create the namespace
(If overriding targetNamespace, change observability to the value of targetNamespace)
kubectl create namespace observability
-
Install adot
eksctl anywhere create packages -f adot.yaml
-
Validate the installation
eksctl anywhere get packages --cluster <cluster-name>
Example command output
NAME PACKAGE AGE STATE CURRENTVERSION TARGETVERSION DETAIL
my-adot adot 19h installed 0.25.0-c26690f90d38811dbb0e3dad5aea77d1efa52c7b 0.25.0-c26690f90d38811dbb0e3dad5aea77d1efa52c7b (latest)
Update
To update package configuration, update adot.yaml file, and run the following command:
eksctl anywhere apply package -f adot.yaml
Upgrade
ADOT will automatically be upgraded when a new bundle is activated.
Uninstall
To uninstall ADOT, simply delete the package
eksctl anywhere delete package --cluster <cluster-name> my-adot
7.11.3 - v0.21.1
Configuring ADOT in EKS Anywhere package spec
Example
We included a sample configuration below for reference. For in-depth examples and use cases, please refer to ADOT with AMP and AMG.
apiVersion: packages.eks.amazonaws.com/v1alpha1
kind: Package
metadata:
name: my-adot
namespace: eksa-packages-<cluster-name>
spec:
packageName: adot
targetNamespace: observability
config: |
mode: daemonset
Configurable parameters and default values under spec.config
| Parameter |
Description |
Default |
| General |
|
|
| hostNetwork |
Indicates if the pod should run in the host networking namespace. |
false |
| image.pullPolicy |
Specifies image pull policy: IfNotPresent, Always, Never. |
"IfNotPresent" |
| mode |
Specifies Collector deployment options: daemonset, deployment, or statefulset. |
"daemonset" |
| ports.[*].containerPort |
Specifies containerPort used. |
See footnote |
| ports.[*].enabled |
Indicates if a port is enabled. |
See footnote |
| ports.[*].hostPort |
Specifies hostPort used. |
See footnote |
| ports.[*].protocol |
Specifies protocol used. |
See footnote |
| ports.[*].servicePort |
Specifies servicePort used. |
See footnote |
| resources.limits.cpu |
Specifies CPU resource limits for containers. |
1 |
| resources.limits.memory |
Specifies memory resource limits for containers. |
"2Gi" |
| Config |
|
|
| config.config |
Specifies Collector receiver, processor, exporter, and extensions configurations. Refer to aws-otel-collector
for full details. Note EKS Anywhere ADOT package version matches the exact aws-otel-collector version. |
See footnote |
| config.config.receiver |
Specifies how data gets in the Collector. Receivers can be either push or pull based, and support one or more data source. |
See footnote |
| config.config.processor |
Specifies how processors are run on data between the stage of being received and being exported. Processors are optional though some are recommended.
|
See footnote |
| config.config.exporters |
Specifies how data gets sent to backends/destinations. Exporters can be either push or pull based, and support one or more data source. |
See footnote |
| config.config.extensions |
Specifies tasks that do not involve processing telemetry data. Examples of extensions include health monitoring, service discovery, and data forwarding. Extensions are optional. |
See footnote |
| config.config.service |
Specifies what components are enabled in the Collector based on the configuration found in the receivers, processors, exporters, and extensions sections. If a component is configured, but not defined within the service section, then it is not enabled. |
See footnote |
| Deployment mode only |
|
|
| replicaCount |
Specifies replicaCount for pods. |
1 |
| service.type |
Specifies service types: ClusterIP, NodePort, LoadBalancer, ExternalName. |
"ClusterIP" |
7.11.4 - v0.23.0
Configuring ADOT in EKS Anywhere package spec
Example
We included a sample configuration below for reference. For in-depth examples and use cases, please refer to ADOT with AMP and AMG.
apiVersion: packages.eks.amazonaws.com/v1alpha1
kind: Package
metadata:
name: my-adot
namespace: eksa-packages-<cluster-name>
spec:
packageName: adot
targetNamespace: observability
config: |
mode: daemonset
Configurable parameters and default values under spec.config
| Parameter |
Description |
Default |
| General |
|
|
| hostNetwork |
Indicates if the pod should run in the host networking namespace. |
false |
| image.pullPolicy |
Specifies image pull policy: IfNotPresent, Always, Never. |
"IfNotPresent" |
| mode |
Specifies Collector deployment options: daemonset, deployment, or statefulset. |
"daemonset" |
| ports.[*].containerPort |
Specifies containerPort used. |
See footnote |
| ports.[*].enabled |
Indicates if a port is enabled. |
See footnote |
| ports.[*].hostPort |
Specifies hostPort used. |
See footnote |
| ports.[*].protocol |
Specifies protocol used. |
See footnote |
| ports.[*].servicePort |
Specifies servicePort used. |
See footnote |
| resources.limits.cpu |
Specifies CPU resource limits for containers. |
1 |
| resources.limits.memory |
Specifies memory resource limits for containers. |
"2Gi" |
| Config |
|
|
| config.config |
Specifies Collector receiver, processor, exporter, and extensions configurations. Refer to aws-otel-collector
for full details. Note EKS Anywhere ADOT package version matches the exact aws-otel-collector version. |
See footnote |
| config.config.receiver |
Specifies how data gets in the Collector. Receivers can be either push or pull based, and support one or more data source. |
See footnote |
| config.config.processor |
Specifies how processors are run on data between the stage of being received and being exported. Processors are optional though some are recommended.
|
See footnote |
| config.config.exporters |
Specifies how data gets sent to backends/destinations. Exporters can be either push or pull based, and support one or more data source. |
See footnote |
| config.config.extensions |
Specifies tasks that do not involve processing telemetry data. Examples of extensions include health monitoring, service discovery, and data forwarding. Extensions are optional. |
See footnote |
| config.config.service |
Specifies what components are enabled in the Collector based on the configuration found in the receivers, processors, exporters, and extensions sections. If a component is configured, but not defined within the service section, then it is not enabled. |
See footnote |
| Deployment mode only |
|
|
| replicaCount |
Specifies replicaCount for pods. |
1 |
| service.type |
Specifies service types: ClusterIP, NodePort, LoadBalancer, ExternalName. |
"ClusterIP" |
7.11.5 - v0.25.0
Configuring ADOT in EKS Anywhere package spec
Example
We included a sample configuration below for reference. For in-depth examples and use cases, please refer to ADOT with AMP and AMG.
apiVersion: packages.eks.amazonaws.com/v1alpha1
kind: Package
metadata:
name: my-adot
namespace: eksa-packages-<cluster-name>
spec:
packageName: adot
targetNamespace: observability
config: |
mode: daemonset
Configurable parameters and default values under spec.config
| Parameter |
Description |
Default |
| General |
|
|
| hostNetwork |
Indicates if the pod should run in the host networking namespace. |
false |
| image.pullPolicy |
Specifies image pull policy: IfNotPresent, Always, Never. |
"IfNotPresent" |
| mode |
Specifies Collector deployment options: daemonset, deployment, or statefulset. |
"daemonset" |
| ports.[*].containerPort |
Specifies containerPort used. |
See footnote |
| ports.[*].enabled |
Indicates if a port is enabled. |
See footnote |
| ports.[*].hostPort |
Specifies hostPort used. |
See footnote |
| ports.[*].protocol |
Specifies protocol used. |
See footnote |
| ports.[*].servicePort |
Specifies servicePort used. |
See footnote |
| resources.limits.cpu |
Specifies CPU resource limits for containers. |
1 |
| resources.limits.memory |
Specifies memory resource limits for containers. |
"2Gi" |
| Config |
|
|
| config.config |
Specifies Collector receiver, processor, exporter, and extensions configurations. Refer to aws-otel-collector
for full details. Note EKS Anywhere ADOT package version matches the exact aws-otel-collector version. |
See footnote |
| config.config.receiver |
Specifies how data gets in the Collector. Receivers can be either push or pull based, and support one or more data source. |
See footnote |
| config.config.processor |
Specifies how processors are run on data between the stage of being received and being exported. Processors are optional though some are recommended.
|
See footnote |
| config.config.exporters |
Specifies how data gets sent to backends/destinations. Exporters can be either push or pull based, and support one or more data source. |
See footnote |
| config.config.extensions |
Specifies tasks that do not involve processing telemetry data. Examples of extensions include health monitoring, service discovery, and data forwarding. Extensions are optional. |
See footnote |
| config.config.service |
Specifies what components are enabled in the Collector based on the configuration found in the receivers, processors, exporters, and extensions sections. If a component is configured, but not defined within the service section, then it is not enabled. |
See footnote |
| Deployment mode only |
|
|
| replicaCount |
Specifies replicaCount for pods. |
1 |
| service.type |
Specifies service types: ClusterIP, NodePort, LoadBalancer, ExternalName. |
"ClusterIP" |
7.11.6 - v0.39.0
Configuring ADOT in EKS Anywhere package spec
Example
We included a sample configuration below for reference. For in-depth examples and use cases, please refer to ADOT with AMP and AMG.
apiVersion: packages.eks.amazonaws.com/v1alpha1
kind: Package
metadata:
name: my-adot
namespace: eksa-packages-<cluster-name>
spec:
packageName: adot
targetNamespace: observability
config: |
mode: daemonset
Configurable parameters and default values under spec.config
| Parameter |
Description |
Default |
| General |
|
|
| hostNetwork |
Indicates if the pod should run in the host networking namespace. |
false |
| image.pullPolicy |
Specifies image pull policy: IfNotPresent, Always, Never. |
"IfNotPresent" |
| mode |
Specifies Collector deployment options: daemonset, deployment, or statefulset. |
"daemonset" |
| ports.[*].containerPort |
Specifies containerPort used. |
See footnote |
| ports.[*].enabled |
Indicates if a port is enabled. |
See footnote |
| ports.[*].hostPort |
Specifies hostPort used. |
See footnote |
| ports.[*].protocol |
Specifies protocol used. |
See footnote |
| ports.[*].servicePort |
Specifies servicePort used. |
See footnote |
| resources.limits.cpu |
Specifies CPU resource limits for containers. |
1 |
| resources.limits.memory |
Specifies memory resource limits for containers. |
"2Gi" |
| Config |
|
|
| config.config |
Specifies Collector receiver, processor, exporter, and extensions configurations. Refer to aws-otel-collector
for full details. Note EKS Anywhere ADOT package version matches the exact aws-otel-collector version. |
See footnote |
| config.config.receiver |
Specifies how data gets in the Collector. Receivers can be either push or pull based, and support one or more data source. |
See footnote |
| config.config.processor |
Specifies how processors are run on data between the stage of being received and being exported. Processors are optional though some are recommended.
|
See footnote |
| config.config.exporters |
Specifies how data gets sent to backends/destinations. Exporters can be either push or pull based, and support one or more data source. |
See footnote |
| config.config.extensions |
Specifies tasks that do not involve processing telemetry data. Examples of extensions include health monitoring, service discovery, and data forwarding. Extensions are optional. |
See footnote |
| config.config.service |
Specifies what components are enabled in the Collector based on the configuration found in the receivers, processors, exporters, and extensions sections. If a component is configured, but not defined within the service section, then it is not enabled. |
See footnote |
| Deployment mode only |
|
|
| replicaCount |
Specifies replicaCount for pods. |
1 |
| service.type |
Specifies service types: ClusterIP, NodePort, LoadBalancer, ExternalName. |
"ClusterIP" |
7.11.7 - v0.41.1
Configuring ADOT in EKS Anywhere package spec
Example
We included a sample configuration below for reference. For in-depth examples and use cases, please refer to ADOT with AMP and AMG.
apiVersion: packages.eks.amazonaws.com/v1alpha1
kind: Package
metadata:
name: my-adot
namespace: eksa-packages-<cluster-name>
spec:
packageName: adot
targetNamespace: observability
config: |
mode: daemonset
Configurable parameters and default values under spec.config
| Parameter |
Description |
Default |
| General |
|
|
| hostNetwork |
Indicates if the pod should run in the host networking namespace. |
false |
| image.pullPolicy |
Specifies image pull policy: IfNotPresent, Always, Never. |
"IfNotPresent" |
| mode |
Specifies Collector deployment options: daemonset, deployment, or statefulset. |
"daemonset" |
| ports.[*].containerPort |
Specifies containerPort used. |
See footnote |
| ports.[*].enabled |
Indicates if a port is enabled. |
See footnote |
| ports.[*].hostPort |
Specifies hostPort used. |
See footnote |
| ports.[*].protocol |
Specifies protocol used. |
See footnote |
| ports.[*].servicePort |
Specifies servicePort used. |
See footnote |
| resources.limits.cpu |
Specifies CPU resource limits for containers. |
1 |
| resources.limits.memory |
Specifies memory resource limits for containers. |
"2Gi" |
| Config |
|
|
| config.config |
Specifies Collector receiver, processor, exporter, and extensions configurations. Refer to aws-otel-collector
for full details. Note EKS Anywhere ADOT package version matches the exact aws-otel-collector version. |
See footnote |
| config.config.receiver |
Specifies how data gets in the Collector. Receivers can be either push or pull based, and support one or more data source. |
See footnote |
| config.config.processor |
Specifies how processors are run on data between the stage of being received and being exported. Processors are optional though some are recommended.
|
See footnote |
| config.config.exporters |
Specifies how data gets sent to backends/destinations. Exporters can be either push or pull based, and support one or more data source. |
See footnote |
| config.config.extensions |
Specifies tasks that do not involve processing telemetry data. Examples of extensions include health monitoring, service discovery, and data forwarding. Extensions are optional. |
See footnote |
| config.config.service |
Specifies what components are enabled in the Collector based on the configuration found in the receivers, processors, exporters, and extensions sections. If a component is configured, but not defined within the service section, then it is not enabled. |
See footnote |
| Deployment mode only |
|
|
| replicaCount |
Specifies replicaCount for pods. |
1 |
| service.type |
Specifies service types: ClusterIP, NodePort, LoadBalancer, ExternalName. |
"ClusterIP" |
7.11.8 - v0.42.0
The logging exporter is now deprecated
, users should update the config to the debug exporter instead
Configuring ADOT in EKS Anywhere package spec
Example
We included a sample configuration below for reference. For in-depth examples and use cases, please refer to ADOT with AMP and AMG.
apiVersion: packages.eks.amazonaws.com/v1alpha1
kind: Package
metadata:
name: my-adot
namespace: eksa-packages-<cluster-name>
spec:
packageName: adot
targetNamespace: observability
config: |
mode: daemonset
Configurable parameters and default values under spec.config
| Parameter |
Description |
Default |
| General |
|
|
| hostNetwork |
Indicates if the pod should run in the host networking namespace. |
false |
| image.pullPolicy |
Specifies image pull policy: IfNotPresent, Always, Never. |
"IfNotPresent" |
| mode |
Specifies Collector deployment options: daemonset, deployment, or statefulset. |
"daemonset" |
| ports.[*].containerPort |
Specifies containerPort used. |
See footnote |
| ports.[*].enabled |
Indicates if a port is enabled. |
See footnote |
| ports.[*].hostPort |
Specifies hostPort used. |
See footnote |
| ports.[*].protocol |
Specifies protocol used. |
See footnote |
| ports.[*].servicePort |
Specifies servicePort used. |
See footnote |
| resources.limits.cpu |
Specifies CPU resource limits for containers. |
1 |
| resources.limits.memory |
Specifies memory resource limits for containers. |
"2Gi" |
| Config |
|
|
| config.config |
Specifies Collector receiver, processor, exporter, and extensions configurations. Refer to aws-otel-collector
for full details. Note EKS Anywhere ADOT package version matches the exact aws-otel-collector version. |
See footnote |
| config.config.receiver |
Specifies how data gets in the Collector. Receivers can be either push or pull based, and support one or more data source. |
See footnote |
| config.config.processor |
Specifies how processors are run on data between the stage of being received and being exported. Processors are optional though some are recommended.
|
See footnote |
| config.config.exporters |
Specifies how data gets sent to backends/destinations. Exporters can be either push or pull based, and support one or more data source. |
See footnote |
| config.config.extensions |
Specifies tasks that do not involve processing telemetry data. Examples of extensions include health monitoring, service discovery, and data forwarding. Extensions are optional. |
See footnote |
| config.config.service |
Specifies what components are enabled in the Collector based on the configuration found in the receivers, processors, exporters, and extensions sections. If a component is configured, but not defined within the service section, then it is not enabled. |
See footnote |
| Deployment mode only |
|
|
| replicaCount |
Specifies replicaCount for pods. |
1 |
| service.type |
Specifies service types: ClusterIP, NodePort, LoadBalancer, ExternalName. |
"ClusterIP" |
7.11.9 - v0.43.1
The logging exporter is now deprecated
, users should update the config to the debug exporter instead
Configuring ADOT in EKS Anywhere package spec
Example
For complete configuration examples and use cases, refer to ADOT with AMP and AMG.
Configurable parameters and default values under spec.config
| Parameter |
Description |
Default |
| General |
|
|
| hostNetwork |
Indicates if the pod should run in the host networking namespace. |
false |
| image.pullPolicy |
Specifies image pull policy: IfNotPresent, Always, Never. |
"IfNotPresent" |
| mode |
Specifies Collector deployment options: daemonset, deployment, or statefulset. |
"daemonset" |
| ports.[*].containerPort |
Specifies containerPort used. |
See footnote |
| ports.[*].enabled |
Indicates if a port is enabled. |
See footnote |
| ports.[*].hostPort |
Specifies hostPort used. |
See footnote |
| ports.[*].protocol |
Specifies protocol used. |
See footnote |
| ports.[*].servicePort |
Specifies servicePort used. |
See footnote |
| resources.limits.cpu |
Specifies CPU resource limits for containers. |
1 |
| resources.limits.memory |
Specifies memory resource limits for containers. |
"2Gi" |
| ServiceAccount |
|
|
| serviceAccount.create |
Specifies whether a service account should be created. |
true |
| serviceAccount.annotations |
Annotations to add to the service account (e.g., eks.amazonaws.com/role-arn for IRSA). |
{} |
| serviceAccount.name |
The name of the service account to use. If not set and create is true, a name is generated using the fullname template. |
"" |
| ClusterRole |
|
|
| clusterRole.create |
Specifies whether a clusterRole should be created. Some presets also trigger the creation of a cluster role. |
false |
| clusterRole.annotations |
Annotations to add to the clusterRole. Can be used in combination with presets. |
{} |
| clusterRole.name |
The name of the clusterRole to use. If not set, a name is generated using the fullname template. |
"" |
| clusterRole.rules |
A set of rules as documented in Kubernetes RBAC
. Can be used in combination with presets to add additional rules. |
[] |
| Presets |
|
|
| presets.logsCollection.enabled |
Configures the collector to collect logs. Adds the filelog receiver to the logs pipeline and adds necessary volumes and volume mounts. Best used with mode = daemonset. |
false |
| presets.logsCollection.includeCollectorLogs |
Include ADOT collector’s own logs in collection. |
false |
| presets.logsCollection.storeCheckpoints |
Enables writing checkpoints in /var/lib/otelcol/ host directory. Changes collector’s user to root. |
false |
| presets.hostMetrics.enabled |
Configures the collector to collect host metrics. Adds the hostmetrics receiver to the metrics pipeline. Best used with mode = daemonset. |
false |
| presets.kubernetesAttributes.enabled |
Configures the Kubernetes Processor to add Kubernetes metadata. Adds k8sattributes processor to all pipelines and creates ClusterRole with minimum required RBAC rules. Best used with mode = daemonset. |
false |
| presets.kubernetesAttributes.extractAllPodLabels |
When enabled, the processor extracts all labels for an associated pod and adds them as resource attributes. |
false |
| presets.kubernetesAttributes.extractAllPodAnnotations |
When enabled, the processor extracts all annotations for an associated pod and adds them as resource attributes. |
false |
| presets.kubeletMetrics.enabled |
Configures the collector to collect node, pod, and container metrics from the API server on a kubelet. Adds kubeletstats receiver to the metrics pipeline and adds necessary ClusterRole rules. Best used with mode = daemonset. |
false |
| presets.kubernetesEvents.enabled |
Configures the collector to collect kubernetes events. Adds k8sobjects receiver to the logs pipeline. Best used with mode = deployment or statefulset. |
false |
| presets.clusterMetrics.enabled |
Configures the Kubernetes Cluster Receiver to collect cluster-level metrics. Adds k8s_cluster receiver to the metrics pipeline and adds necessary ClusterRole rules. Best used with mode = deployment or statefulset. |
false |
| Config |
|
|
| config.config |
Specifies Collector receiver, processor, exporter, and extensions configurations. Refer to aws-otel-collector
for full details. Note EKS Anywhere ADOT package version matches the exact aws-otel-collector version. |
See footnote |
| config.config.receiver |
Specifies how data gets in the Collector. Receivers can be either push or pull based, and support one or more data source. |
See footnote |
| config.config.processor |
Specifies how processors are run on data between the stage of being received and being exported. Processors are optional though some are recommended.
|
See footnote |
| config.config.exporters |
Specifies how data gets sent to backends/destinations. Exporters can be either push or pull based, and support one or more data source. |
See footnote |
| config.config.extensions |
Specifies tasks that do not involve processing telemetry data. Examples of extensions include health monitoring, service discovery, and data forwarding. Extensions are optional. |
See footnote |
| config.config.service |
Specifies what components are enabled in the Collector based on the configuration found in the receivers, processors, exporters, and extensions sections. If a component is configured, but not defined within the service section, then it is not enabled. |
See footnote |
| Deployment mode only |
|
|
| replicaCount |
Specifies replicaCount for pods. |
1 |
| service.type |
Specifies service types: ClusterIP, NodePort, LoadBalancer, ExternalName. |
"ClusterIP" |
7.11.10 - v0.45.1
The logging exporter is now deprecated
, users should update the config to the debug exporter instead
Configuring ADOT in EKS Anywhere package spec
Example
For complete configuration examples and use cases, refer to ADOT with AMP and AMG.
Configurable parameters and default values under spec.config
| Parameter |
Description |
Default |
| General |
|
|
| hostNetwork |
Indicates if the pod should run in the host networking namespace. |
false |
| image.pullPolicy |
Specifies image pull policy: IfNotPresent, Always, Never. |
"IfNotPresent" |
| mode |
Specifies Collector deployment options: daemonset, deployment, or statefulset. |
"daemonset" |
| ports.[*].containerPort |
Specifies containerPort used. |
See footnote |
| ports.[*].enabled |
Indicates if a port is enabled. |
See footnote |
| ports.[*].hostPort |
Specifies hostPort used. |
See footnote |
| ports.[*].protocol |
Specifies protocol used. |
See footnote |
| ports.[*].servicePort |
Specifies servicePort used. |
See footnote |
| resources.limits.cpu |
Specifies CPU resource limits for containers. |
1 |
| resources.limits.memory |
Specifies memory resource limits for containers. |
"2Gi" |
| ServiceAccount |
|
|
| serviceAccount.create |
Specifies whether a service account should be created. |
true |
| serviceAccount.annotations |
Annotations to add to the service account (e.g., eks.amazonaws.com/role-arn for IRSA). |
{} |
| serviceAccount.name |
The name of the service account to use. If not set and create is true, a name is generated using the fullname template. |
"" |
| ClusterRole |
|
|
| clusterRole.create |
Specifies whether a clusterRole should be created. Some presets also trigger the creation of a cluster role. |
false |
| clusterRole.annotations |
Annotations to add to the clusterRole. Can be used in combination with presets. |
{} |
| clusterRole.name |
The name of the clusterRole to use. If not set, a name is generated using the fullname template. |
"" |
| clusterRole.rules |
A set of rules as documented in Kubernetes RBAC
. Can be used in combination with presets to add additional rules. |
[] |
| Presets |
|
|
| presets.logsCollection.enabled |
Configures the collector to collect logs. Adds the filelog receiver to the logs pipeline and adds necessary volumes and volume mounts. Best used with mode = daemonset. |
false |
| presets.logsCollection.includeCollectorLogs |
Include ADOT collector’s own logs in collection. |
false |
| presets.logsCollection.storeCheckpoints |
Enables writing checkpoints in /var/lib/otelcol/ host directory. Changes collector’s user to root. |
false |
| presets.hostMetrics.enabled |
Configures the collector to collect host metrics. Adds the hostmetrics receiver to the metrics pipeline. Best used with mode = daemonset. |
false |
| presets.kubernetesAttributes.enabled |
Configures the Kubernetes Processor to add Kubernetes metadata. Adds k8sattributes processor to all pipelines and creates ClusterRole with minimum required RBAC rules. Best used with mode = daemonset. |
false |
| presets.kubernetesAttributes.extractAllPodLabels |
When enabled, the processor extracts all labels for an associated pod and adds them as resource attributes. |
false |
| presets.kubernetesAttributes.extractAllPodAnnotations |
When enabled, the processor extracts all annotations for an associated pod and adds them as resource attributes. |
false |
| presets.kubeletMetrics.enabled |
Configures the collector to collect node, pod, and container metrics from the API server on a kubelet. Adds kubeletstats receiver to the metrics pipeline and adds necessary ClusterRole rules. Best used with mode = daemonset. |
false |
| presets.kubernetesEvents.enabled |
Configures the collector to collect kubernetes events. Adds k8sobjects receiver to the logs pipeline. Best used with mode = deployment or statefulset. |
false |
| presets.clusterMetrics.enabled |
Configures the Kubernetes Cluster Receiver to collect cluster-level metrics. Adds k8s_cluster receiver to the metrics pipeline and adds necessary ClusterRole rules. Best used with mode = deployment or statefulset. |
false |
| Config |
|
|
| config.config |
Specifies Collector receiver, processor, exporter, and extensions configurations. Refer to aws-otel-collector
for full details. Note EKS Anywhere ADOT package version matches the exact aws-otel-collector version. |
See footnote |
| config.config.receiver |
Specifies how data gets in the Collector. Receivers can be either push or pull based, and support one or more data source. |
See footnote |
| config.config.processor |
Specifies how processors are run on data between the stage of being received and being exported. Processors are optional though some are recommended.
|
See footnote |
| config.config.exporters |
Specifies how data gets sent to backends/destinations. Exporters can be either push or pull based, and support one or more data source. |
See footnote |
| config.config.extensions |
Specifies tasks that do not involve processing telemetry data. Examples of extensions include health monitoring, service discovery, and data forwarding. Extensions are optional. |
See footnote |
| config.config.service |
Specifies what components are enabled in the Collector based on the configuration found in the receivers, processors, exporters, and extensions sections. If a component is configured, but not defined within the service section, then it is not enabled. |
See footnote |
| Deployment mode only |
|
|
| replicaCount |
Specifies replicaCount for pods. |
1 |
| service.type |
Specifies service types: ClusterIP, NodePort, LoadBalancer, ExternalName. |
"ClusterIP" |
7.12 - Cert-Manager Configuration
The cert-manager package adds certificates and certificate issuers as resource types in Kubernetes clusters, and simplifies the process of obtaining, renewing and using those certificates.
Best Practice
Any supported EKS Anywhere curated package should be modified through package yaml files (with kind: Package) and applied through the command kubectl apply -f packageFileName. Modifying objects outside of package yaml files may lead to unpredictable behaviors.
For automatic namespace (targetNamespace) creation, see createNamespace field: PackagebundleController.spec
Configuration options for Cert-Manager
7.12.1 - Cert-Manager
Install/update/upgrade/uninstall Cert-Manager
If you have not already done so, make sure your cluster meets the package prerequisites.
Be sure to refer to the troubleshooting guide
in the event of a problem.
Important
- Starting at
eksctl anywhere version v0.12.0, packages on workload clusters are remotely managed by the management cluster.
- While following this guide to install packages on a workload cluster, please make sure the
kubeconfig is pointing to the management cluster that was used to create the workload cluster. The only exception is the kubectl create namespace command below, which should be run with kubeconfig pointing to the workload cluster.
Install on workload cluster
NOTE: The cert-manager package can only be installed on a workload cluster
-
Generate the package configuration
eksctl anywhere generate package cert-manager --cluster <cluster-name> > cert-manager.yaml
-
Add the desired configuration to cert-manager.yaml
Please see complete configuration options
for all configuration options and their default values.
Example package file configuring a cert-manager package to run on a workload cluster.
apiVersion: packages.eks.amazonaws.com/v1alpha1
kind: Package
metadata:
name: my-cert-manager
namespace: eksa-packages-<cluster-name>
spec:
packageName: cert-manager
targetNamespace: <namespace-to-install-component>
-
Create the target namespace on the workload cluster
If you specified a custom targetNamespace (anything other than the default), you must create that namespace on the workload cluster before installing the package. The target namespace is not automatically created.
# Switch kubeconfig to workload cluster
kubectl create namespace <namespace-to-install-component> --kubeconfig <workload-cluster-kubeconfig>
Note
If you are using the default eksa-packages namespace as your target namespace, you can skip this step as it already exists on the cluster.
-
Install Cert-Manager
eksctl anywhere create packages -f cert-manager.yaml
-
Validate the installation
eksctl anywhere get packages --cluster <cluster-name>
Example command output
NAME PACKAGE AGE STATE CURRENTVERSION TARGETVERSION DETAIL
my-cert-manager cert-manager 15s installed 1.9.1-dc0c845b5f71bea6869efccd3ca3f2dd11b5c95f 1.9.1-dc0c845b5f71bea6869efccd3ca3f2dd11b5c95f (latest)
Update
To update package configuration, update cert-manager.yaml file, and run the following command:
eksctl anywhere apply package -f cert-manager.yaml
Upgrade
Cert-Manager will automatically be upgraded when a new bundle is activated.
Uninstall
To uninstall cert-manager, simply delete the package
eksctl anywhere delete package --cluster <cluster-name> cert-manager
7.12.2 - v1.9.1
Configuring Cert-Manager in EKS Anywhere package spec
Example
apiVersion: packages.eks.amazonaws.com/v1alpha1
kind: Package
metadata:
name: my-cert-manager
namespace: eksa-packages-<cluster-name>
spec:
packageName: cert-manager
config: |
global:
logLevel: 4
The following table lists the configurable parameters of the cert-manager package spec and the default values.
| Parameter |
Description |
Default |
| General |
|
|
namespace |
The namespace to use for installing cert-manager package |
cert-manager |
imagePullPolicy |
The image pull policy |
IfNotPresent |
| global |
|
|
global.logLevel |
The log level: integer from 0-6 |
2 |
| Webhook |
|
|
webhook.timeoutSeconds |
The time in seconds to wait for the webhook to connect with the kube-api server |
0 |
7.12.3 - v1.14.5
Configuring Cert-Manager in EKS Anywhere package spec
Example
apiVersion: packages.eks.amazonaws.com/v1alpha1
kind: Package
metadata:
name: my-cert-manager
namespace: eksa-packages-<cluster-name>
spec:
packageName: cert-manager
config: |
global:
logLevel: 4
The following table lists the configurable parameters of the cert-manager package spec and the default values.
| Parameter |
Description |
Default |
| General |
|
|
namespace |
The namespace to use for installing cert-manager package |
cert-manager |
imagePullPolicy |
The image pull policy |
IfNotPresent |
| global |
|
|
global.logLevel |
The log level: integer from 0-6 |
2 |
| Webhook |
|
|
webhook.timeoutSeconds |
The time in seconds to wait for the webhook to connect with the kube-api server |
0 |
7.12.4 - v1.15.3
Configuring Cert-Manager in EKS Anywhere package spec
Example
apiVersion: packages.eks.amazonaws.com/v1alpha1
kind: Package
metadata:
name: my-cert-manager
namespace: eksa-packages-<cluster-name>
spec:
packageName: cert-manager
config: |
global:
logLevel: 4
The following table lists the configurable parameters of the cert-manager package spec and the default values.
| Parameter |
Description |
Default |
| General |
|
|
namespace |
The namespace to use for installing cert-manager package |
cert-manager |
imagePullPolicy |
The image pull policy |
IfNotPresent |
| global |
|
|
global.logLevel |
The log level: integer from 0-6 |
2 |
| Webhook |
|
|
webhook.timeoutSeconds |
The time in seconds to wait for the webhook to connect with the kube-api server |
0 |
7.12.5 - v1.16.1
Configuring Cert-Manager in EKS Anywhere package spec
Example
apiVersion: packages.eks.amazonaws.com/v1alpha1
kind: Package
metadata:
name: my-cert-manager
namespace: eksa-packages-<cluster-name>
spec:
packageName: cert-manager
config: |
global:
logLevel: 4
The following table lists the configurable parameters of the cert-manager package spec and the default values.
| Parameter |
Description |
Default |
| General |
|
|
namespace |
The namespace to use for installing cert-manager package |
cert-manager |
imagePullPolicy |
The image pull policy |
IfNotPresent |
| global |
|
|
global.logLevel |
The log level: integer from 0-6 |
2 |
| Webhook |
|
|
webhook.timeoutSeconds |
The time in seconds to wait for the webhook to connect with the kube-api server |
0 |
7.12.6 - v1.16.4
Configuring Cert-Manager in EKS Anywhere package spec
Example
apiVersion: packages.eks.amazonaws.com/v1alpha1
kind: Package
metadata:
name: my-cert-manager
namespace: eksa-packages-<cluster-name>
spec:
packageName: cert-manager
config: |
global:
logLevel: 4
The following table lists the configurable parameters of the cert-manager package spec and the default values.
| Parameter |
Description |
Default |
| General |
|
|
namespace |
The namespace to use for installing cert-manager package |
cert-manager |
imagePullPolicy |
The image pull policy |
IfNotPresent |
| global |
|
|
global.logLevel |
The log level: integer from 0-6 |
2 |
| Webhook |
|
|
webhook.timeoutSeconds |
The time in seconds to wait for the webhook to connect with the kube-api server |
0 |
7.12.7 - v1.18.2
Configuring Cert-Manager in EKS Anywhere package spec
Example
apiVersion: packages.eks.amazonaws.com/v1alpha1
kind: Package
metadata:
name: my-cert-manager
namespace: eksa-packages-<cluster-name>
spec:
packageName: cert-manager
config: |
global:
logLevel: 4
The following table lists the configurable parameters of the cert-manager package spec and the default values.
| Parameter |
Description |
Default |
| General |
|
|
namespace |
The namespace to use for installing cert-manager package |
cert-manager |
imagePullPolicy |
The image pull policy |
IfNotPresent |
| global |
|
|
global.logLevel |
The log level: integer from 0-6 |
2 |
| Webhook |
|
|
webhook.timeoutSeconds |
The time in seconds to wait for the webhook to connect with the kube-api server |
0 |
7.12.8 - v1.19.3
Configuring Cert-Manager in EKS Anywhere package spec
Example
apiVersion: packages.eks.amazonaws.com/v1alpha1
kind: Package
metadata:
name: my-cert-manager
namespace: eksa-packages-<cluster-name>
spec:
packageName: cert-manager
config: |
global:
logLevel: 4
The following table lists the configurable parameters of the cert-manager package spec and the default values.
| Parameter |
Description |
Default |
| General |
|
|
namespace |
The namespace to use for installing cert-manager package |
cert-manager |
imagePullPolicy |
The image pull policy |
IfNotPresent |
| global |
|
|
global.logLevel |
The log level: integer from 0-6 |
2 |
| Webhook |
|
|
webhook.timeoutSeconds |
The time in seconds to wait for the webhook to connect with the kube-api server |
0 |
7.13 - Cluster Autoscaler Configuration
Cluster Autoscaler is a component that automatically adjusts the size of a Kubernetes Cluster so that all pods have a place to run and there are no unneeded nodes.
Configuration options for Cluster Autoscaler
7.13.1 - Cluster Autoscaler
Install/upgrade/uninstall Cluster Autoscaler
If you have not already done so, make sure your EKS Anywhere cluster meets the package prerequisites.
Refer to the troubleshooting guide
in the event of a problem.
Enable Cluster Autoscaling
-
Ensure you have configured at least one worker node group in your cluster specification to enable autoscaling as outlined in Autoscaling configuration.
Cluster Autoscaler only works on node groups with an autoscalingConfiguration set:
apiVersion: anywhere.eks.amazonaws.com/v1alpha1
kind: Cluster
metadata:
name: <cluster-name>
spec:
...
workerNodeGroupConfigurations:
- autoscalingConfiguration:
minCount: 1
maxCount: 5
machineGroupRef:
kind: VSphereMachineConfig
name: <worker-machine-config-name>
count: 1
name: md-0
-
Generate the package configuration.
eksctl anywhere generate package cluster-autoscaler --cluster <cluster-name> > cluster-autoscaler.yaml
-
Add the desired configuration to cluster-autoscaler.yaml. See configuration options
for all configuration options and their default values. See below for example package files configuring a Cluster Autoscaler package.
For Management Cluster Autoscaling:
apiVersion: packages.eks.amazonaws.com/v1alpha1
kind: Package
metadata:
name: cluster-autoscaler-<cluster-name>
namespace: eksa-packages-<cluster-name>
spec:
packageName: cluster-autoscaler
targetNamespace: default
config: |-
cloudProvider: "clusterapi"
autoDiscovery:
clusterName: "<cluster-name>"
For Workload Cluster Autoscaling (deployed from Management Cluster):
apiVersion: packages.eks.amazonaws.com/v1alpha1
kind: Package
metadata:
name: cluster-autoscaler-<workload-cluster-name>
namespace: eksa-packages-<management-cluster-name>
spec:
packageName: cluster-autoscaler
targetNamespace: eksa-system
config: |-
cloudProvider: "clusterapi"
clusterAPIMode: "kubeconfig-incluster"
clusterAPIKubeconfigSecret: "<workload-cluster-name>-kubeconfig"
autoDiscovery:
clusterName: "<workload-cluster-name>"
Configuration Fields for Workload Cluster Autoscaling:
clusterAPIMode: Set to "kubeconfig-incluster" to enable workload cluster autoscaling from the management clusterclusterAPIKubeconfigSecret: Name of the Kubernetes secret containing the kubeconfig for the workload cluster. EKS Anywhere automatically creates this secret in the management cluster with the naming pattern <workload-cluster-name>-kubeconfigtargetNamespace: Should be set to eksa-system for workload cluster autoscalingautoDiscovery.clusterName: Must match the name of the workload cluster to be autoscaled
Note: The kubeconfig secret for workload clusters is automatically created by EKS Anywhere in the management cluster when a workload cluster is provisioned. This secret provides the necessary credentials for the autoscaler running in the management cluster to manage the workload cluster’s nodes.
-
Install Cluster Autoscaler
eksctl anywhere create packages -f cluster-autoscaler.yaml
-
Validate the installation
eksctl anywhere get packages --cluster <cluster-name>
NAMESPACE NAME PACKAGE AGE STATE CURRENTVERSION TARGETVERSION DETAIL
eksa-packages-mgmt-v-vmc cluster-autoscaler cluster-autoscaler 18h installed 9.21.0-1.21-147e2a701f6ab625452fe311d5c94a167270f365 9.21.0-1.21-147e2a701f6ab625452fe311d5c94a167270f365 (latest)
To verify that autoscaling works, apply the deployment below. You must continue scaling pods until the deployment has pods in a pending state.
This is when Cluster Autoscaler will begin to autoscale your machine deployment.
This process may take a few minutes.
kubectl apply -f https://raw.githubusercontent.com/aws/eks-anywhere/d8575bbd2a85a6c6bbcb1a54868cf7790df56a63/test/framework/testdata/hpa_busybox.yaml
kubectl scale deployment hpa-busybox-test --replicas 100
Update
To update package configuration, update the cluster-autoscaler.yaml file and run the following command:
eksctl anywhere apply package -f cluster-autoscaler.yaml
Update Worker Node Group Autoscaling Configuration
It is possible to change the autoscaling configuration of a worker node group by updating the autoscalingConfiguration in your cluster specification and running a cluster upgrade.
Upgrade
The Cluster Autoscaler can be upgraded by PackageController’s activeBundle field to a newer version.
The curated packages bundle contains the SHAs of the images and helm charts associated with a particular package. When a new version is activated, the Package Controller will reconcile all active packages to their newest versions as defined in the bundle.
The Curated Packages Controller automatically polls the bundle repository for new bundle resources.
The curated packages controller automatically polls for the latest bundle, but requires the activeBundle field on the PackageController resource to be updated before a new bundle will take effect and upgrade the resources.
Uninstall
To uninstall Cluster Autoscaler, delete the package
eksctl anywhere delete package --cluster <cluster-name> cluster-autoscaler
7.13.2 - v9.21.0
Configuring Cluster Autoscaler in EKS Anywhere package spec
| Parameter |
Description |
Default |
| General |
|
|
| cloudProvider |
Cluster Autoscaler cloud provider. This should always be clusterapi.
Example:
cloudProvider: “clusterapi” |
“clusterapi” |
| autoDiscovery.clusterName |
Name of the kubernetes cluster this autoscaler package should autoscale.
Example:
autoDiscovery.clusterName: “mgmt-cluster” |
false |
| clusterAPIMode |
Where Cluster Autoscaler should look for a kubeconfig to communicate with the cluster it will manage. See https://github.com/kubernetes/autoscaler/blob/master/cluster-autoscaler/cloudprovider/clusterapi/README.md#connecting-cluster-autoscaler-to-cluster-api-management-and-workload-clusters
Example:
clusterAPIMode: “incluster-kubeconfig” |
“incluster-incluster” |
| clusterAPICloudConfigPath |
Path to kubeconfig for connecting to Cluster API Management Cluster, only used if clusterAPIMode=kubeconfig-kubeconfig or incluster-kubeconfig
Example:
clusterAPICloudConfigPath: “/etc/kubernetes/value” |
“/etc/kubernetes/mgmt-kubeconfig” |
| clusterAPIKubeconfigSecret |
Name of the Kubernetes secret containing the kubeconfig for the workload cluster. Used when clusterAPIMode=kubeconfig-incluster for workload cluster autoscaling.
Example:
clusterAPIKubeconfigSecret: “workload-cluster-kubeconfig” |
"" |
| extraVolumeSecrets |
Additional volumes to mount from Secrets.
Example:
extraVolumeSecrets: {} |
{} |
7.13.3 - v9.37.0
Configuring Cluster Autoscaler in EKS Anywhere package spec
| Parameter |
Description |
Default |
| General |
|
|
| cloudProvider |
Cluster Autoscaler cloud provider. This should always be clusterapi.
Example:
cloudProvider: “clusterapi” |
“clusterapi” |
| autoDiscovery.clusterName |
Name of the kubernetes cluster this autoscaler package should autoscale.
Example:
autoDiscovery.clusterName: “mgmt-cluster” |
false |
| clusterAPIMode |
Where Cluster Autoscaler should look for a kubeconfig to communicate with the cluster it will manage. See https://github.com/kubernetes/autoscaler/blob/master/cluster-autoscaler/cloudprovider/clusterapi/README.md#connecting-cluster-autoscaler-to-cluster-api-management-and-workload-clusters
Example:
clusterAPIMode: “incluster-kubeconfig” |
“incluster-incluster” |
| clusterAPICloudConfigPath |
Path to kubeconfig for connecting to Cluster API Management Cluster, only used if clusterAPIMode=kubeconfig-kubeconfig or incluster-kubeconfig
Example:
clusterAPICloudConfigPath: “/etc/kubernetes/value” |
“/etc/kubernetes/mgmt-kubeconfig” |
| clusterAPIKubeconfigSecret |
Name of the Kubernetes secret containing the kubeconfig for the workload cluster. Used when clusterAPIMode=kubeconfig-incluster for workload cluster autoscaling.
Example:
clusterAPIKubeconfigSecret: “workload-cluster-kubeconfig” |
"" |
| extraVolumeSecrets |
Additional volumes to mount from Secrets.
Example:
extraVolumeSecrets: {} |
{} |
7.13.4 - v9.43.0
Configuring Cluster Autoscaler in EKS Anywhere package spec
| Parameter |
Description |
Default |
| General |
|
|
| cloudProvider |
Cluster Autoscaler cloud provider. This should always be clusterapi.
Example:
cloudProvider: “clusterapi” |
“clusterapi” |
| autoDiscovery.clusterName |
Name of the kubernetes cluster this autoscaler package should autoscale.
Example:
autoDiscovery.clusterName: “mgmt-cluster” |
false |
| clusterAPIMode |
Where Cluster Autoscaler should look for a kubeconfig to communicate with the cluster it will manage. See https://github.com/kubernetes/autoscaler/blob/master/cluster-autoscaler/cloudprovider/clusterapi/README.md#connecting-cluster-autoscaler-to-cluster-api-management-and-workload-clusters
Example:
clusterAPIMode: “incluster-kubeconfig” |
“incluster-incluster” |
| clusterAPICloudConfigPath |
Path to kubeconfig for connecting to Cluster API Management Cluster, only used if clusterAPIMode=kubeconfig-kubeconfig or incluster-kubeconfig
Example:
clusterAPICloudConfigPath: “/etc/kubernetes/value” |
“/etc/kubernetes/mgmt-kubeconfig” |
| clusterAPIKubeconfigSecret |
Name of the Kubernetes secret containing the kubeconfig for the workload cluster. Used when clusterAPIMode=kubeconfig-incluster for workload cluster autoscaling.
Example:
clusterAPIKubeconfigSecret: “workload-cluster-kubeconfig” |
"" |
| extraVolumeSecrets |
Additional volumes to mount from Secrets.
Example:
extraVolumeSecrets: {} |
{} |
7.13.5 - v9.43.2
Configuring Cluster Autoscaler in EKS Anywhere package spec
| Parameter |
Description |
Default |
| General |
|
|
| cloudProvider |
Cluster Autoscaler cloud provider. This should always be clusterapi.
Example:
cloudProvider: “clusterapi” |
“clusterapi” |
| autoDiscovery.clusterName |
Name of the kubernetes cluster this autoscaler package should autoscale.
Example:
autoDiscovery.clusterName: “mgmt-cluster” |
false |
| clusterAPIMode |
Where Cluster Autoscaler should look for a kubeconfig to communicate with the cluster it will manage. See https://github.com/kubernetes/autoscaler/blob/master/cluster-autoscaler/cloudprovider/clusterapi/README.md#connecting-cluster-autoscaler-to-cluster-api-management-and-workload-clusters
Example:
clusterAPIMode: “incluster-kubeconfig” |
“incluster-incluster” |
| clusterAPICloudConfigPath |
Path to kubeconfig for connecting to Cluster API Management Cluster, only used if clusterAPIMode=kubeconfig-kubeconfig or incluster-kubeconfig
Example:
clusterAPICloudConfigPath: “/etc/kubernetes/value” |
“/etc/kubernetes/mgmt-kubeconfig” |
| clusterAPIKubeconfigSecret |
Name of the Kubernetes secret containing the kubeconfig for the workload cluster. Used when clusterAPIMode=kubeconfig-incluster for workload cluster autoscaling.
Example:
clusterAPIKubeconfigSecret: “workload-cluster-kubeconfig” |
"" |
| extraVolumeSecrets |
Additional volumes to mount from Secrets.
Example:
extraVolumeSecrets: {} |
{} |
7.13.6 - v9.46.6
Configuring Cluster Autoscaler in EKS Anywhere package spec
| Parameter |
Description |
Default |
| General |
|
|
| cloudProvider |
Cluster Autoscaler cloud provider. This should always be clusterapi.
Example:
cloudProvider: “clusterapi” |
“clusterapi” |
| autoDiscovery.clusterName |
Name of the kubernetes cluster this autoscaler package should autoscale.
Example:
autoDiscovery.clusterName: “mgmt-cluster” |
false |
| clusterAPIMode |
Where Cluster Autoscaler should look for a kubeconfig to communicate with the cluster it will manage. See https://github.com/kubernetes/autoscaler/blob/master/cluster-autoscaler/cloudprovider/clusterapi/README.md#connecting-cluster-autoscaler-to-cluster-api-management-and-workload-clusters
Example:
clusterAPIMode: “incluster-kubeconfig” |
“incluster-incluster” |
| clusterAPICloudConfigPath |
Path to kubeconfig for connecting to Cluster API Management Cluster, only used if clusterAPIMode=kubeconfig-kubeconfig or incluster-kubeconfig
Example:
clusterAPICloudConfigPath: “/etc/kubernetes/value” |
“/etc/kubernetes/mgmt-kubeconfig” |
| clusterAPIKubeconfigSecret |
Name of the Kubernetes secret containing the kubeconfig for the workload cluster. Used when clusterAPIMode=kubeconfig-incluster for workload cluster autoscaling.
Example:
clusterAPIKubeconfigSecret: “workload-cluster-kubeconfig” |
"" |
| extraVolumeSecrets |
Additional volumes to mount from Secrets.
Example:
extraVolumeSecrets: {} |
{} |
7.13.7 - v9.47.0
Configuring Cluster Autoscaler in EKS Anywhere package spec
| Parameter |
Description |
Default |
| General |
|
|
| cloudProvider |
Cluster Autoscaler cloud provider. This should always be clusterapi.
Example:
cloudProvider: “clusterapi” |
“clusterapi” |
| autoDiscovery.clusterName |
Name of the kubernetes cluster this autoscaler package should autoscale.
Example:
autoDiscovery.clusterName: “mgmt-cluster” |
false |
| clusterAPIMode |
Where Cluster Autoscaler should look for a kubeconfig to communicate with the cluster it will manage. See https://github.com/kubernetes/autoscaler/blob/master/cluster-autoscaler/cloudprovider/clusterapi/README.md#connecting-cluster-autoscaler-to-cluster-api-management-and-workload-clusters
Example:
clusterAPIMode: “incluster-kubeconfig” |
“incluster-incluster” |
| clusterAPICloudConfigPath |
Path to kubeconfig for connecting to Cluster API Management Cluster, only used if clusterAPIMode=kubeconfig-kubeconfig or incluster-kubeconfig
Example:
clusterAPICloudConfigPath: “/etc/kubernetes/value” |
“/etc/kubernetes/mgmt-kubeconfig” |
| clusterAPIKubeconfigSecret |
Name of the Kubernetes secret containing the kubeconfig for the workload cluster. Used when clusterAPIMode=kubeconfig-incluster for workload cluster autoscaling.
Example:
clusterAPIKubeconfigSecret: “workload-cluster-kubeconfig” |
"" |
| extraVolumeSecrets |
Additional volumes to mount from Secrets.
Example:
extraVolumeSecrets: {} |
{} |
| extraArgs |
Additional arguments to configure. See upstream
|
None |
Example
apiVersion: packages.eks.amazonaws.com/v1alpha1
kind: Package
metadata:
name: generated-cluster-autoscaler
namespace: eksa-packages-<cluster-name>
spec:
packageName: cluster-autoscaler
targetNamespace: default
config: |-
cloudProvider: "clusterapi"
autoDiscovery:
clusterName: "<cluster-name>"
extraArgs:
scale-down-delay-after-add: 2m
scale-down-delay-after-failure: 3m
scale-down-unneeded-time: 2m
7.13.8 - v9.55.0
Configuring Cluster Autoscaler in EKS Anywhere package spec
| Parameter |
Description |
Default |
| General |
|
|
| cloudProvider |
Cluster Autoscaler cloud provider. This should always be clusterapi.
Example:
cloudProvider: “clusterapi” |
“clusterapi” |
| autoDiscovery.clusterName |
Name of the kubernetes cluster this autoscaler package should autoscale.
Example:
autoDiscovery.clusterName: “mgmt-cluster” |
false |
| clusterAPIMode |
Where Cluster Autoscaler should look for a kubeconfig to communicate with the cluster it will manage. See https://github.com/kubernetes/autoscaler/blob/master/cluster-autoscaler/cloudprovider/clusterapi/README.md#connecting-cluster-autoscaler-to-cluster-api-management-and-workload-clusters
Example:
clusterAPIMode: “incluster-kubeconfig” |
“incluster-incluster” |
| clusterAPICloudConfigPath |
Path to kubeconfig for connecting to Cluster API Management Cluster, only used if clusterAPIMode=kubeconfig-kubeconfig or incluster-kubeconfig
Example:
clusterAPICloudConfigPath: “/etc/kubernetes/value” |
“/etc/kubernetes/mgmt-kubeconfig” |
| clusterAPIKubeconfigSecret |
Name of the Kubernetes secret containing the kubeconfig for the workload cluster. Used when clusterAPIMode=kubeconfig-incluster for workload cluster autoscaling.
Example:
clusterAPIKubeconfigSecret: “workload-cluster-kubeconfig” |
"" |
| extraVolumeSecrets |
Additional volumes to mount from Secrets.
Example:
extraVolumeSecrets: {} |
{} |
| extraArgs |
Additional arguments to configure. See upstream
|
None |
Example
apiVersion: packages.eks.amazonaws.com/v1alpha1
kind: Package
metadata:
name: generated-cluster-autoscaler
namespace: eksa-packages-<cluster-name>
spec:
packageName: cluster-autoscaler
targetNamespace: default
config: |-
cloudProvider: "clusterapi"
autoDiscovery:
clusterName: "<cluster-name>"
extraArgs:
scale-down-delay-after-add: 2m
scale-down-delay-after-failure: 3m
scale-down-unneeded-time: 2m
7.14 - Credential Provider Package Configuration
Credential provider package provides a solution to authenticate with private Amazon Elastic Container Registry by utilizing the kubelet image credential provider
Best Practice
Any supported EKS Anywhere curated package should be modified through package yaml files (with kind: Package) and applied through the command kubectl apply -f packageFileName. Modifying objects outside of package yaml files may lead to unpredictable behaviors.
For automatic namespace (targetNamespace) creation, see createNamespace field: PackagebundleController.spec
Configuration options for Credential-Provider-Package
7.14.1 - Credential Provider Package with IAM Roles Anywhere
This tutorial demonstrates how to configure the credential provider package to authenticate using IAM Roles Anywhere
to pull from a private AWS Elastic Container Registry (ECR).
IAM Roles Anywhere enables workloads outside of AWS to access AWS resources by using X.509 digital certificates to obtain temporary AWS credentials. A trust anchor is used to reference a certificate authority with IAM Roles Anywhere. For this use case, the Kubernetes Cluster CA can be registered and each kubelet client’s x509 cert can be used to authenticate to get temporary AWS credentials.
Prerequisites
-
For setting up the certificate authority later, you will need to obtain your cluster’s CA. This can be obtain by:
# Assuming CLUSTER_NAME and KUBECONFIG are set:
kubectl get secret -n eksa-system ${CLUSTER_NAME}-ca -o yaml | yq '.data."tls.crt"' | base64 -d
-
A role should be created to allow read access for curated packages. This role can be extended to include private registries that you would also like to pull from into your cluster. A sample policy for curated packages would be.
{
"Version": "2012-10-17",
"Statement": [
{
"Sid": "ECRRead",
"Effect": "Allow",
"Action": [
"ecr:DescribeImageScanFindings",
"ecr:GetDownloadUrlForLayer",
"ecr:DescribeRegistry",
"ecr:DescribePullThroughCacheRules",
"ecr:DescribeImageReplicationStatus",
"ecr:ListTagsForResource",
"ecr:ListImages",
"ecr:BatchGetImage",
"ecr:DescribeImages",
"ecr:DescribeRepositories",
"ecr:BatchCheckLayerAvailability"
],
"Resource": "arn:aws:ecr:*:783794618700:repository/*"
},
{
"Sid": "ECRLogin",
"Effect": "Allow",
"Action": [
"ecr:GetAuthorizationToken"
],
"Resource": "*"
}
]
}
-
Next create a trust anchor and profile. The trust anchor will be a reference to the CA certificate from step 1 and the profile should point to the role created in step 2. See here
for instructions on creating the trust anchor and profile.
-
Create a secret that will be referenced by the credential-provider-package to authenticate the kubelet with ECR.
# Set PROFILE_ARN, ROLE_ARN, and TRUST_ANCHOR_ARN obtained in previous step
# Set AWS_REGION to region to pull images from
# This will create a file credfile which will then be turned into a secret
cat << EOF >> credfile
[default]
region = $AWS_REGION
credential_process = aws_signing_helper credential-process --certificate /var/lib/kubelet/pki/kubelet-client-current.pem --private-key /var/lib/kubelet/pki/kubelet-client-current.pem --profile-arn $PROFILE_ARN --role-arn $ROLE_ARN --trust-anchor-arn $TRUST_ANCHOR_ARN
EOF
# Create secret, for this example the secret name aws-config is used and the package will be installed in eksa-packages
kubectl create secret generic aws-config --from-file=config=credfile -n eksa-packages
-
Either edit the existing package or delete and create a new credential-provider-package that points towards the new secret. For more information on specific configuration option refer to installation guide
for details]
The example below changes the default secret name from aws-secret to newly created aws-config. It also changes the match images to pull from multiple regions as well as across multiple accounts. Make sure to change cluster-name to match your CLUSTER_NAME
apiVersion: packages.eks.amazonaws.com/v1alpha1
kind: Package
metadata:
name: my-credential-provider-package
namespace: eksa-packages-<clusterName>
annotations:
"helm.sh/resource-policy": keep
"anywhere.eks.aws.com/internal": "true"
spec:
packageName: credential-provider-package
targetNamespace: eksa-packages
config: |-
tolerations:
- key: "node-role.kubernetes.io/master"
operator: "Exists"
effect: "NoSchedule"
- key: "node-role.kubernetes.io/control-plane"
operator: "Exists"
effect: "NoSchedule"
sourceRegistry: public.ecr.aws/eks-anywhere
credential:
- matchImages:
- *.dkr.ecr.*.amazonaws.com
profile: "default"
secretName: aws-config
defaultCacheDuration: "5h"
7.14.2 - Credential Provider Package
Install/upgrade/uninstall Credential Provider Package
If you have not already done so, make sure your cluster meets the package prerequisites.
Be sure to refer to the troubleshooting guide
in the event of a problem.
Important
- Starting at
eksctl anywhere version v0.12.0, packages on workload clusters are remotely managed by the management cluster.
- While following this guide to install packages on a workload cluster, please make sure the
kubeconfig is pointing to the management cluster that was used to create the workload cluster. The only exception is the kubectl create namespace command below, which should be run with kubeconfig pointing to the workload cluster.
Install
By default an instance of this package is installed with the controller to help facilitate authentication for other packages. The following are instructions in case you want to tweak the default values.
-
Generate the package configuration
eksctl anywhere generate package credential-provider-package --cluster <cluster-name> > credential-provider-package.yaml
-
Add the desired configuration to credential-provider-package.yaml
Please see complete configuration options
for all configuration options and their default values.
Example default package using IAM User Credentials installed with the controller
apiVersion: packages.eks.amazonaws.com/v1alpha1
kind: Package
metadata:
name: my-credential-provider-package
namespace: eksa-packages-<clusterName>
annotations:
"helm.sh/resource-policy": keep
"anywhere.eks.aws.com/internal": "true"
spec:
packageName: credential-provider-package
targetNamespace: eksa-packages
config: |-
tolerations:
- key: "node-role.kubernetes.io/master"
operator: "Exists"
effect: "NoSchedule"
- key: "node-role.kubernetes.io/control-plane"
operator: "Exists"
effect: "NoSchedule"
sourceRegistry: public.ecr.aws/eks-anywhere
credential:
- matchImages:
- 783794618700.dkr.ecr.us-west-2.amazonaws.com
profile: "default"
secretName: aws-secret
defaultCacheDuration: "5h"
-
Create the secret. If you are changing the secret, see complete configuration options
for the format of the secret.
-
Create the namespace (if not installing to eksa-packages).
If you are overriding targetNamespace, change eksa-packages to the value of targetNamespace.
kubectl create namespace <namespace-name-here>
-
Install the credential-provider-package
eksctl anywhere create packages -f credential-provider-package.yaml
-
Validate the installation
eksctl anywhere get packages --cluster <cluster-name>
Update
To update package configuration, update credential-provider-package.yaml file and run the following command:
eksctl anywhere apply package -f credential-provider-package.yaml
Upgrade
Credential-Provider-Package will automatically be upgraded when a new bundle is activated.
Uninstall
To uninstall credential-provider-package, simply delete the package:
eksctl anywhere delete package --cluster <cluster-name> my-credential-provider-package
7.14.3 - v0.1.0
Configuring Credential Provider Package in EKS Anywhere package spec
Example
The following is the sample configuration for the credential provider package that is installed by default with the package controller.
Please refer to Credential Provider Package with IAM Roles Anywhere.
apiVersion: packages.eks.amazonaws.com/v1alpha1
kind: Package
metadata:
name: ecr-credential-provider-package
namespace: eksa-packages-<clusterName>
annotations:
"helm.sh/resource-policy": keep
"anywhere.eks.aws.com/internal": "true"
spec:
packageName: credential-provider-package
targetNamespace: eksa-packages
config: |-
tolerations:
- key: "node-role.kubernetes.io/master"
operator: "Exists"
effect: "NoSchedule"
- key: "node-role.kubernetes.io/control-plane"
operator: "Exists"
effect: "NoSchedule"
sourceRegistry: public.ecr.aws/eks-anywhere
credential:
- matchImages:
- 783794618700.dkr.ecr.us-west-2.amazonaws.com
profile: "default"
secretName: aws-secret
defaultCacheDuration: "5h"
In this example, the credential provider will use the secret provided in aws-secret (created automatically on cluster creation) to authenticate to the repository from which curated package images are pulled. Tolerations were also added so that the control plane nodes would also be configured with authentication.
The secret can exist in two forms: either a base64 encoding of a credential config or individual keys for fields.
Example credential
[default]
aws_access_key_id=EXAMPLE_ACCESS_KEY
aws_secret_access_key=EXAMPLE_SECRET_KEY
region=us-west-2
Example secret with separate keys
apiVersion: v1
kind: Secret
metadata:
name: aws-secret
namespace: eksa-packages
data:
AWS_ACCESS_KEY_ID: "QUtJQUlPU0ZPRE5ON0VYQU1QTEUK"
AWS_SECRET_ACCESS_KEY: "d0phbHJYVXRuRkVNSS9LN01ERU5HL2JQeFJmaUNZRVhBTVBMRUtFWQo="
REGION: dXMtd2VzdC0yCg==
apiVersion: v1
kind: Secret
metadata:
name: aws-secret
namespace: eksa-packages
data:
config: W2RlZmF1bHRdCmF3c19hY2Nlc3Nfa2V5X2lkPUFLSUFJT1NGT0ROTjdFWEFNUExFCmF3c19zZWNyZXRfYWNjZXNzX2tleT13SmFsclhVdG5GRU1JL0s3TURFTkcvYlB4UmZpQ1lFWEFNUExFS0VZCnJlZ2lvbj11cy13ZXN0LTI=
type: Opaque
Configurable parameters and default values under spec.config
| Parameter |
Description |
Default |
| General |
|
|
| image.pullPolicy |
Specifies image pull policy: IfNotPresent, Always, Never. |
"IfNotPresent" |
| tolerations |
Kubernetes tolerations
for pod scheduling |
{} |
| Credential |
|
|
| credential |
List of credential providers for authenticating with ECR. Currently only one is supported |
credential:
- secretName: “aws-secret”
matchImages: []
defaultCacheDuration: “1h”
profile: “default |
| secretName |
Name of secret that contains the aws credentials |
"aws-secret" |
| profile |
AWS Profile for secretName |
"default" |
| matchImages |
List of strings used to match against images. See here
for more info
Example to match against any account across multiple regions for ECR:
"*.dkr.ecr.*.amazonaws.com" |
"[]" |
| defaultCacheDuration |
Duration the kubelet will cache credentials in-memory. For ECR it is recommended to keep this value less then 12 hours. |
"5h" |
7.14.4 - v0.4.4
Configuring Credential Provider Package in EKS Anywhere package spec
Example
The following is the sample configuration for the credential provider package that is installed by default with the package controller.
Please refer to Credential Provider Package with IAM Roles Anywhere.
apiVersion: packages.eks.amazonaws.com/v1alpha1
kind: Package
metadata:
name: ecr-credential-provider-package
namespace: eksa-packages-<clusterName>
annotations:
"helm.sh/resource-policy": keep
"anywhere.eks.aws.com/internal": "true"
spec:
packageName: credential-provider-package
targetNamespace: eksa-packages
config: |-
tolerations:
- key: "node-role.kubernetes.io/master"
operator: "Exists"
effect: "NoSchedule"
- key: "node-role.kubernetes.io/control-plane"
operator: "Exists"
effect: "NoSchedule"
sourceRegistry: public.ecr.aws/eks-anywhere
credential:
- matchImages:
- 783794618700.dkr.ecr.us-west-2.amazonaws.com
profile: "default"
secretName: aws-secret
defaultCacheDuration: "5h"
In this example, the credential provider will use the secret provided in aws-secret (created automatically on cluster creation) to authenticate to the repository from which curated package images are pulled. Tolerations were also added so that the control plane nodes would also be configured with authentication.
The secret can exist in two forms: either a base64 encoding of a credential config or individual keys for fields.
Example credential
[default]
aws_access_key_id=EXAMPLE_ACCESS_KEY
aws_secret_access_key=EXAMPLE_SECRET_KEY
region=us-west-2
Example secret with separate keys
apiVersion: v1
kind: Secret
metadata:
name: aws-secret
namespace: eksa-packages
data:
AWS_ACCESS_KEY_ID: "QUtJQUlPU0ZPRE5ON0VYQU1QTEUK"
AWS_SECRET_ACCESS_KEY: "d0phbHJYVXRuRkVNSS9LN01ERU5HL2JQeFJmaUNZRVhBTVBMRUtFWQo="
REGION: dXMtd2VzdC0yCg==
apiVersion: v1
kind: Secret
metadata:
name: aws-secret
namespace: eksa-packages
data:
config: W2RlZmF1bHRdCmF3c19hY2Nlc3Nfa2V5X2lkPUFLSUFJT1NGT0ROTjdFWEFNUExFCmF3c19zZWNyZXRfYWNjZXNzX2tleT13SmFsclhVdG5GRU1JL0s3TURFTkcvYlB4UmZpQ1lFWEFNUExFS0VZCnJlZ2lvbj11cy13ZXN0LTI=
type: Opaque
Configurable parameters and default values under spec.config
| Parameter |
Description |
Default |
| General |
|
|
| image.pullPolicy |
Specifies image pull policy: IfNotPresent, Always, Never. |
"IfNotPresent" |
| tolerations |
Kubernetes tolerations
for pod scheduling |
{} |
| Credential |
|
|
| credential |
List of credential providers for authenticating with ECR. Currently only one is supported |
credential:
- secretName: “aws-secret”
matchImages: []
defaultCacheDuration: “1h”
profile: “default |
| secretName |
Name of secret that contains the aws credentials |
"aws-secret" |
| profile |
AWS Profile for secretName |
"default" |
| matchImages |
List of strings used to match against images. See here
for more info
Example to match against any account across multiple regions for ECR:
"*.dkr.ecr.*.amazonaws.com" |
"[]" |
| defaultCacheDuration |
Duration the kubelet will cache credentials in-memory. For ECR it is recommended to keep this value less then 12 hours. |
"5h" |
7.14.5 - v0.4.15
Configuring Credential Provider Package in EKS Anywhere package spec
Example
The following is the sample configuration for the credential provider package that is installed by default with the package controller.
Please refer to Credential Provider Package with IAM Roles Anywhere.
If you are using proxy, please also set HTTP_PROXY, HTTPS_PROXY, and NO_PROXY under proxy configuration.
apiVersion: packages.eks.amazonaws.com/v1alpha1
kind: Package
metadata:
name: ecr-credential-provider-package
namespace: eksa-packages-<clusterName>
annotations:
"helm.sh/resource-policy": keep
"anywhere.eks.aws.com/internal": "true"
spec:
packageName: credential-provider-package
targetNamespace: eksa-packages
config: |-
proxy:
HTTP_PROXY: ""
HTTPS_PROXY: ""
NO_PROXY: ""
tolerations:
- key: "node-role.kubernetes.io/master"
operator: "Exists"
effect: "NoSchedule"
- key: "node-role.kubernetes.io/control-plane"
operator: "Exists"
effect: "NoSchedule"
sourceRegistry: public.ecr.aws/eks-anywhere
credential:
- matchImages:
- 783794618700.dkr.ecr.us-west-2.amazonaws.com
profile: "default"
secretName: aws-secret
defaultCacheDuration: "5h"
In this example, the credential provider will use the secret provided in aws-secret (created automatically on cluster creation) to authenticate to the repository from which curated package images are pulled. Tolerations were also added so that the control plane nodes would also be configured with authentication.
The secret can exist in two forms: either a base64 encoding of a credential config or individual keys for fields.
Example credential
[default]
aws_access_key_id=EXAMPLE_ACCESS_KEY
aws_secret_access_key=EXAMPLE_SECRET_KEY
region=us-west-2
Example secret with separate keys
apiVersion: v1
kind: Secret
metadata:
name: aws-secret
namespace: eksa-packages
data:
AWS_ACCESS_KEY_ID: "QUtJQUlPU0ZPRE5ON0VYQU1QTEUK"
AWS_SECRET_ACCESS_KEY: "d0phbHJYVXRuRkVNSS9LN01ERU5HL2JQeFJmaUNZRVhBTVBMRUtFWQo="
REGION: dXMtd2VzdC0yCg==
apiVersion: v1
kind: Secret
metadata:
name: aws-secret
namespace: eksa-packages
data:
config: W2RlZmF1bHRdCmF3c19hY2Nlc3Nfa2V5X2lkPUFLSUFJT1NGT0ROTjdFWEFNUExFCmF3c19zZWNyZXRfYWNjZXNzX2tleT13SmFsclhVdG5GRU1JL0s3TURFTkcvYlB4UmZpQ1lFWEFNUExFS0VZCnJlZ2lvbj11cy13ZXN0LTI=
type: Opaque
Configurable parameters and default values under spec.config
| Parameter |
Description |
Default |
| General |
|
|
| image.pullPolicy |
Specifies image pull policy: IfNotPresent, Always, Never. |
"IfNotPresent" |
| tolerations |
Kubernetes tolerations
for pod scheduling |
{} |
| Credential |
|
|
| credential |
List of credential providers for authenticating with ECR. Currently only one is supported |
credential:
- secretName: “aws-secret”
matchImages: []
defaultCacheDuration: “1h”
profile: “default |
| secretName |
Name of secret that contains the aws credentials |
"aws-secret" |
| profile |
AWS Profile for secretName |
"default" |
| matchImages |
List of strings used to match against images. See here
for more info
Example to match against any account across multiple regions for ECR:
"*.dkr.ecr.*.amazonaws.com" |
"[]" |
| defaultCacheDuration |
Duration the kubelet will cache credentials in-memory. For ECR it is recommended to keep this value less then 12 hours. |
"5h" |
7.14.6 - v0.4.5
Configuring Credential Provider Package in EKS Anywhere package spec
Example
The following is the sample configuration for the credential provider package that is installed by default with the package controller.
Please refer to Credential Provider Package with IAM Roles Anywhere.
apiVersion: packages.eks.amazonaws.com/v1alpha1
kind: Package
metadata:
name: ecr-credential-provider-package
namespace: eksa-packages-<clusterName>
annotations:
"helm.sh/resource-policy": keep
"anywhere.eks.aws.com/internal": "true"
spec:
packageName: credential-provider-package
targetNamespace: eksa-packages
config: |-
tolerations:
- key: "node-role.kubernetes.io/master"
operator: "Exists"
effect: "NoSchedule"
- key: "node-role.kubernetes.io/control-plane"
operator: "Exists"
effect: "NoSchedule"
sourceRegistry: public.ecr.aws/eks-anywhere
credential:
- matchImages:
- 783794618700.dkr.ecr.us-west-2.amazonaws.com
profile: "default"
secretName: aws-secret
defaultCacheDuration: "5h"
In this example, the credential provider will use the secret provided in aws-secret (created automatically on cluster creation) to authenticate to the repository from which curated package images are pulled. Tolerations were also added so that the control plane nodes would also be configured with authentication.
The secret can exist in two forms: either a base64 encoding of a credential config or individual keys for fields.
Example credential
[default]
aws_access_key_id=EXAMPLE_ACCESS_KEY
aws_secret_access_key=EXAMPLE_SECRET_KEY
region=us-west-2
Example secret with separate keys
apiVersion: v1
kind: Secret
metadata:
name: aws-secret
namespace: eksa-packages
data:
AWS_ACCESS_KEY_ID: "QUtJQUlPU0ZPRE5ON0VYQU1QTEUK"
AWS_SECRET_ACCESS_KEY: "d0phbHJYVXRuRkVNSS9LN01ERU5HL2JQeFJmaUNZRVhBTVBMRUtFWQo="
REGION: dXMtd2VzdC0yCg==
apiVersion: v1
kind: Secret
metadata:
name: aws-secret
namespace: eksa-packages
data:
config: W2RlZmF1bHRdCmF3c19hY2Nlc3Nfa2V5X2lkPUFLSUFJT1NGT0ROTjdFWEFNUExFCmF3c19zZWNyZXRfYWNjZXNzX2tleT13SmFsclhVdG5GRU1JL0s3TURFTkcvYlB4UmZpQ1lFWEFNUExFS0VZCnJlZ2lvbj11cy13ZXN0LTI=
type: Opaque
Configurable parameters and default values under spec.config
| Parameter |
Description |
Default |
| General |
|
|
| image.pullPolicy |
Specifies image pull policy: IfNotPresent, Always, Never. |
"IfNotPresent" |
| tolerations |
Kubernetes tolerations
for pod scheduling |
{} |
| Credential |
|
|
| credential |
List of credential providers for authenticating with ECR. Currently only one is supported |
credential:
- secretName: “aws-secret”
matchImages: []
defaultCacheDuration: “1h”
profile: “default |
| secretName |
Name of secret that contains the aws credentials |
"aws-secret" |
| profile |
AWS Profile for secretName |
"default" |
| matchImages |
List of strings used to match against images. See here
for more info
Example to match against any account across multiple regions for ECR:
"*.dkr.ecr.*.amazonaws.com" |
"[]" |
| defaultCacheDuration |
Duration the kubelet will cache credentials in-memory. For ECR it is recommended to keep this value less then 12 hours. |
"5h" |
7.14.7 - v0.4.6
Configuring Credential Provider Package in EKS Anywhere package spec
Example
The following is the sample configuration for the credential provider package that is installed by default with the package controller.
Please refer to Credential Provider Package with IAM Roles Anywhere.
apiVersion: packages.eks.amazonaws.com/v1alpha1
kind: Package
metadata:
name: ecr-credential-provider-package
namespace: eksa-packages-<clusterName>
annotations:
"helm.sh/resource-policy": keep
"anywhere.eks.aws.com/internal": "true"
spec:
packageName: credential-provider-package
targetNamespace: eksa-packages
config: |-
tolerations:
- key: "node-role.kubernetes.io/master"
operator: "Exists"
effect: "NoSchedule"
- key: "node-role.kubernetes.io/control-plane"
operator: "Exists"
effect: "NoSchedule"
sourceRegistry: public.ecr.aws/eks-anywhere
credential:
- matchImages:
- 783794618700.dkr.ecr.us-west-2.amazonaws.com
profile: "default"
secretName: aws-secret
defaultCacheDuration: "5h"
In this example, the credential provider will use the secret provided in aws-secret (created automatically on cluster creation) to authenticate to the repository from which curated package images are pulled. Tolerations were also added so that the control plane nodes would also be configured with authentication.
The secret can exist in two forms: either a base64 encoding of a credential config or individual keys for fields.
Example credential
[default]
aws_access_key_id=EXAMPLE_ACCESS_KEY
aws_secret_access_key=EXAMPLE_SECRET_KEY
region=us-west-2
Example secret with separate keys
apiVersion: v1
kind: Secret
metadata:
name: aws-secret
namespace: eksa-packages
data:
AWS_ACCESS_KEY_ID: "QUtJQUlPU0ZPRE5ON0VYQU1QTEUK"
AWS_SECRET_ACCESS_KEY: "d0phbHJYVXRuRkVNSS9LN01ERU5HL2JQeFJmaUNZRVhBTVBMRUtFWQo="
REGION: dXMtd2VzdC0yCg==
apiVersion: v1
kind: Secret
metadata:
name: aws-secret
namespace: eksa-packages
data:
config: W2RlZmF1bHRdCmF3c19hY2Nlc3Nfa2V5X2lkPUFLSUFJT1NGT0ROTjdFWEFNUExFCmF3c19zZWNyZXRfYWNjZXNzX2tleT13SmFsclhVdG5GRU1JL0s3TURFTkcvYlB4UmZpQ1lFWEFNUExFS0VZCnJlZ2lvbj11cy13ZXN0LTI=
type: Opaque
Configurable parameters and default values under spec.config
| Parameter |
Description |
Default |
| General |
|
|
| image.pullPolicy |
Specifies image pull policy: IfNotPresent, Always, Never. |
"IfNotPresent" |
| tolerations |
Kubernetes tolerations
for pod scheduling |
{} |
| Credential |
|
|
| credential |
List of credential providers for authenticating with ECR. Currently only one is supported |
credential:
- secretName: “aws-secret”
matchImages: []
defaultCacheDuration: “1h”
profile: “default |
| secretName |
Name of secret that contains the aws credentials |
"aws-secret" |
| profile |
AWS Profile for secretName |
"default" |
| matchImages |
List of strings used to match against images. See here
for more info
Example to match against any account across multiple regions for ECR:
"*.dkr.ecr.*.amazonaws.com" |
"[]" |
| defaultCacheDuration |
Duration the kubelet will cache credentials in-memory. For ECR it is recommended to keep this value less then 12 hours. |
"5h" |
7.14.8 - v0.4.8
Configuring Credential Provider Package in EKS Anywhere package spec
Example
The following is the sample configuration for the credential provider package that is installed by default with the package controller.
Please refer to Credential Provider Package with IAM Roles Anywhere.
If you are using proxy, please also set HTTP_PROXY, HTTPS_PROXY, and NO_PROXY under proxy configuration.
apiVersion: packages.eks.amazonaws.com/v1alpha1
kind: Package
metadata:
name: ecr-credential-provider-package
namespace: eksa-packages-<clusterName>
annotations:
"helm.sh/resource-policy": keep
"anywhere.eks.aws.com/internal": "true"
spec:
packageName: credential-provider-package
targetNamespace: eksa-packages
config: |-
proxy:
HTTP_PROXY: ""
HTTPS_PROXY: ""
NO_PROXY: ""
tolerations:
- key: "node-role.kubernetes.io/master"
operator: "Exists"
effect: "NoSchedule"
- key: "node-role.kubernetes.io/control-plane"
operator: "Exists"
effect: "NoSchedule"
sourceRegistry: public.ecr.aws/eks-anywhere
credential:
- matchImages:
- 783794618700.dkr.ecr.us-west-2.amazonaws.com
profile: "default"
secretName: aws-secret
defaultCacheDuration: "5h"
In this example, the credential provider will use the secret provided in aws-secret (created automatically on cluster creation) to authenticate to the repository from which curated package images are pulled. Tolerations were also added so that the control plane nodes would also be configured with authentication.
The secret can exist in two forms: either a base64 encoding of a credential config or individual keys for fields.
Example credential
[default]
aws_access_key_id=EXAMPLE_ACCESS_KEY
aws_secret_access_key=EXAMPLE_SECRET_KEY
region=us-west-2
Example secret with separate keys
apiVersion: v1
kind: Secret
metadata:
name: aws-secret
namespace: eksa-packages
data:
AWS_ACCESS_KEY_ID: "QUtJQUlPU0ZPRE5ON0VYQU1QTEUK"
AWS_SECRET_ACCESS_KEY: "d0phbHJYVXRuRkVNSS9LN01ERU5HL2JQeFJmaUNZRVhBTVBMRUtFWQo="
REGION: dXMtd2VzdC0yCg==
apiVersion: v1
kind: Secret
metadata:
name: aws-secret
namespace: eksa-packages
data:
config: W2RlZmF1bHRdCmF3c19hY2Nlc3Nfa2V5X2lkPUFLSUFJT1NGT0ROTjdFWEFNUExFCmF3c19zZWNyZXRfYWNjZXNzX2tleT13SmFsclhVdG5GRU1JL0s3TURFTkcvYlB4UmZpQ1lFWEFNUExFS0VZCnJlZ2lvbj11cy13ZXN0LTI=
type: Opaque
Configurable parameters and default values under spec.config
| Parameter |
Description |
Default |
| General |
|
|
| image.pullPolicy |
Specifies image pull policy: IfNotPresent, Always, Never. |
"IfNotPresent" |
| tolerations |
Kubernetes tolerations
for pod scheduling |
{} |
| Credential |
|
|
| credential |
List of credential providers for authenticating with ECR. Currently only one is supported |
credential:
- secretName: “aws-secret”
matchImages: []
defaultCacheDuration: “1h”
profile: “default |
| secretName |
Name of secret that contains the aws credentials |
"aws-secret" |
| profile |
AWS Profile for secretName |
"default" |
| matchImages |
List of strings used to match against images. See here
for more info
Example to match against any account across multiple regions for ECR:
"*.dkr.ecr.*.amazonaws.com" |
"[]" |
| defaultCacheDuration |
Duration the kubelet will cache credentials in-memory. For ECR it is recommended to keep this value less then 12 hours. |
"5h" |
7.15 - Emissary Configuration
Emissary Ingress is an open-source Kubernetes-native API Gateway + Layer 7 load balancer + Kubernetes Ingress built on Envoy Proxy.
Best Practice
Any supported EKS Anywhere curated package should be modified through package yaml files (with kind: Package) and applied through the command kubectl apply -f packageFileName. Modifying objects outside of package yaml files may lead to unpredictable behaviors.
For automatic namespace (targetNamespace) creation, see createNamespace field: PackagebundleController.spec
Configuration options for Emissary
7.15.1 - Emissary Ingress
Install/upgrade/uninstall Emissary Ingress
If you have not already done so, make sure your cluster meets the package prerequisites.
Be sure to refer to the troubleshooting guide
in the event of a problem.
Important
- Starting at
eksctl anywhere version v0.12.0, packages on workload clusters are remotely managed by the management cluster.
- While following this guide to install packages on a workload cluster, please make sure the
kubeconfig is pointing to the management cluster that was used to create the workload cluster. The only exception is the kubectl create namespace command below, which should be run with kubeconfig pointing to the workload cluster.
- The
emissary-apiext service has a known issue where its TLS certificate expires after one year and does not auto-renew. To resolve this, manually renew the certificate by running kubectl delete --all secrets --namespace=emissary-system followed by kubectl rollout restart deploy/emissary-apiext -n emissary-system prior to certificate expiry.
Install
-
Generate the package configuration
eksctl anywhere generate package emissary --cluster <cluster-name> > emissary.yaml
-
Add the desired configuration to emissary.yaml
Please see complete configuration options
for all configuration options and their default values.
Example package file with standard configuration.
apiVersion: packages.eks.amazonaws.com/v1alpha1
kind: Package
metadata:
name: emissary
namespace: eksa-packages-<cluster-name>
spec:
packageName: emissary
-
Install Emissary
eksctl anywhere create packages -f emissary.yaml
-
Validate the installation
eksctl anywhere get packages --cluster <cluster-name>
Example command output
NAMESPACE NAME PACKAGE AGE STATE CURRENTVERSION TARGETVERSION DETAIL
eksa-packages emissary emissary 2m57s installed 3.0.0-a507e09c2a92c83d65737835f6bac03b9b341467 3.0.0-a507e09c2a92c83d65737835f6bac03b9b341467 (latest)
Update
To update package configuration, update emissary.yaml file, and run the following command:
eksctl anywhere apply package -f emissary.yaml
Upgrade
Emissary will automatically be upgraded when a new bundle is activated.
Uninstall
To uninstall Emissary, simply delete the package
eksctl anywhere delete package --cluster <cluster-name> emissary
7.15.2 - v3.0.0
Configuring Emissary Ingress in EKS Anywhere package spec
| Parameter |
Description |
Default |
| General |
|
|
| hostNetwork |
Whether Emissary will use the host network, useful for on-premise setup .
Example:
hostNetwork: false |
false |
| createDefaultListeners |
Whether Emissary should be created with default listeners, HTTP on port 8080 and HTTPS on port 8443.
Example:
createDefaultListeners: false |
false |
| replicaCount |
Replica count for Emissary to deploy.
Example:
replicaCount: 2 |
2 |
| daemonSet |
Whether to create Emissary as a Daemonset instead of a deployment
Example:
daemonSet: false |
false |
7.15.3 - v3.10.0
Emissary version 3.10.0 has decoupled the CRD portion of the package, and now supports installing multiple instances of the emissary package in the same cluster.
Configuring Emissary Ingress in EKS Anywhere package spec
| Parameter |
Description |
Default |
| General |
|
|
| hostNetwork |
Whether Emissary will use the host network, useful for on-premise setup .
Example:
hostNetwork: false |
false |
| createDefaultListeners |
Whether Emissary should be created with default listeners, HTTP on port 8080 and HTTPS on port 8443.
Example:
createDefaultListeners: false |
false |
| replicaCount |
Replica count for Emissary to deploy.
Example:
replicaCount: 2 |
2 |
| daemonSet |
Whether to create Emissary as a Daemonset instead of a deployment
Example:
daemonSet: false |
false |
7.15.4 - v3.3.0
Emissary version 0.3.3 has decoupled the CRD portion of the package, and now supports installing multiple instances of the emissary package in the same cluster.
Configuring Emissary Ingress in EKS Anywhere package spec
| Parameter |
Description |
Default |
| General |
|
|
| hostNetwork |
Whether Emissary will use the host network, useful for on-premise setup .
Example:
hostNetwork: false |
false |
| createDefaultListeners |
Whether Emissary should be created with default listeners, HTTP on port 8080 and HTTPS on port 8443.
Example:
createDefaultListeners: false |
false |
| replicaCount |
Replica count for Emissary to deploy.
Example:
replicaCount: 2 |
2 |
| daemonSet |
Whether to create Emissary as a Daemonset instead of a deployment
Example:
daemonSet: false |
false |
7.15.5 - v3.9.1
Emissary version 3.9.1 has decoupled the CRD portion of the package, and now supports installing multiple instances of the emissary package in the same cluster.
Configuring Emissary Ingress in EKS Anywhere package spec
| Parameter |
Description |
Default |
| General |
|
|
| hostNetwork |
Whether Emissary will use the host network, useful for on-premise setup .
Example:
hostNetwork: false |
false |
| createDefaultListeners |
Whether Emissary should be created with default listeners, HTTP on port 8080 and HTTPS on port 8443.
Example:
createDefaultListeners: false |
false |
| replicaCount |
Replica count for Emissary to deploy.
Example:
replicaCount: 2 |
2 |
| daemonSet |
Whether to create Emissary as a Daemonset instead of a deployment
Example:
daemonSet: false |
false |
7.16 - Harbor Configuration
Harbor
is an open source trusted cloud native registry project that stores, signs, and scans content. Harbor extends the open source Docker Distribution by adding the functionalities usually required by users such as security, identity and management. Having a registry closer to the build and run environment can improve the image transfer efficiency. Harbor supports replication of images between registries, and also offers advanced security features such as user management, access control and activity auditing. For EKS Anywhere deployments, common use cases for Harbor include:
- Supporting Airgapped
environments.
- Running a registry mirror
that is closer to the build and run environment to improve the image transfer efficiency.
- Following any company policies around image locality.
For additional Harbor use cases see Harbor use cases
.
Best Practice
Any supported EKS Anywhere curated package should be modified through package yaml files (with kind: Package) and applied through the command kubectl apply -f packageFileName. Modifying objects outside of package yaml files may lead to unpredictable behaviors.
For automatic namespace (targetNamespace) creation, see createNamespace field: PackagebundleController.spec
Configuration options for Harbor
7.16.1 - Harbor
Install/upgrade/uninstall Harbor
If you have not already done so, make sure your cluster meets the package prerequisites.
Be sure to refer to the troubleshooting guide
in the event of a problem.
Important
- Starting at
eksctl anywhere version v0.12.0, packages on workload clusters are remotely managed by the management cluster.
- While following this guide to install packages on a workload cluster, please make sure the
kubeconfig is pointing to the management cluster that was used to create the workload cluster. The only exception is the kubectl create namespace command below, which should be run with kubeconfig pointing to the workload cluster.
Install
-
Set the KUBECONFIG environment variable to use the config of the management cluster
export KUBECONFIG=<path to management cluster kubeconfig>
-
Create the harbor namespace on the workload cluster (or management cluster if installing there)
kubectl create namespace harbor
-
Generate the package configuration
eksctl anywhere generate package harbor --cluster <cluster-name> > harbor.yaml
-
Add the desired configuration to harbor.yaml
Please see complete configuration options
for all configuration options and their default values.
Important
- All configuration options are listed in dot notations (e.g.,
expose.tls.enabled) in the doc, but they have to be transformed to hierachical structures when specified in the config section in the YAML spec.
- Harbor web portal is exposed through
NodePort by default, and its default port number is 30003 with TLS enabled and 30002 with TLS disabled.
- TLS is enabled by default for connections to Harbor web portal, and a secret resource named
harbor-tls-secret is required for that purpose. It can be provisioned through cert-manager or manually with the following command using self-signed certificate:
kubectl create secret tls harbor-tls-secret --cert=[path to certificate file] --key=[path to key file] -n eksa-packages
secretKey has to be set as a string of 16 characters for encryption.- Harbor requires persistent storage by default. Ensure your cluster has a StorageClass configured (e.g., vSphere CSI driver for vSphere clusters). If no StorageClass is available, you can disable persistence for testing purposes by adding
persistence.enabled: false to the config, but this is not recommended for production use.
TLS example with auto certificate generation
apiVersion: packages.eks.amazonaws.com/v1alpha1
kind: Package
metadata:
name: my-harbor
namespace: eksa-packages-<cluster-name>
spec:
packageName: harbor
config: |-
secretKey: "use-a-secret-key"
externalURL: https://harbor.eksa.demo:30003
expose:
tls:
certSource: auto
auto:
commonName: "harbor.eksa.demo"
Non-TLS example
apiVersion: packages.eks.amazonaws.com/v1alpha1
kind: Package
metadata:
name: my-harbor
namespace: eksa-packages-<cluster-name>
spec:
packageName: harbor
config: |-
secretKey: "use-a-secret-key"
externalURL: http://harbor.eksa.demo:30002
expose:
tls:
enabled: false
-
Install Harbor
eksctl anywhere create packages -f harbor.yaml
-
Check Harbor
eksctl anywhere get packages --cluster <cluster-name>
Example command output
NAME PACKAGE AGE STATE CURRENTVERSION TARGETVERSION DETAIL
my-harbor harbor 5m34s installed v2.5.1 v2.5.1 (latest)
Harbor web portal is accessible at whatever externalURL is set to. See complete configuration options
for all default values.

Update
To update package configuration, update harbor.yaml file, and run the following command:
eksctl anywhere apply package -f harbor.yaml
Upgrade
Note
- New versions of software packages will be automatically downloaded but not automatically installed. You can always manually run
eksctl to check and install updates.
-
Verify a new bundle is available
eksctl anywhere get packagebundle
Example command output
NAME VERSION STATE
v1.25-120 1.25 active (upgrade available)
v1.26-120 1.26 inactive
-
Upgrade Harbor
eksctl anywhere upgrade packages --bundle-version v1.26-120
-
Check Harbor
eksctl anywhere get packages --cluster <cluster-name>
Example command output
NAME PACKAGE AGE STATE CURRENTVERSION TARGETVERSION DETAIL
my-harbor Harbor 14m installed v2.7.1 v2.7.1 (latest)
Uninstall
-
Uninstall Harbor
Important
- By default, PVCs created for jobservice and registry are not removed during a package delete operation, which can be changed by leaving
persistence.resourcePolicy empty.
eksctl anywhere delete package --cluster <cluster-name> my-harbor
7.16.2 - Harbor use cases
Try some harbor use cases
Proxy a public Amazon Elastic Container Registry (ECR) repository
This use case is to use Harbor to proxy and cache images from a public ECR repository, which helps limit the amount of requests made to a public ECR repository, avoiding consuming too much bandwidth or being throttled by the registry server.
-
Login
Log in to the Harbor web portal with the default credential as shown below
-
Create a registry proxy
Navigate to Registries on the left panel, and then click on NEW ENDPOINT button. Choose Docker Registry as the Provider, and enter public-ecr as the Name, and enter https://public.ecr.aws/ as the Endpoint URL. Save it by clicking on OK.

-
Create a proxy project
Navigate to Projects on the left panel and click on the NEW PROJECT button. Enter proxy-project as the Project Name, check Public access level, and turn on Proxy Cache and choose public-ecr from the pull-down list. Save the configuration by clicking on OK.
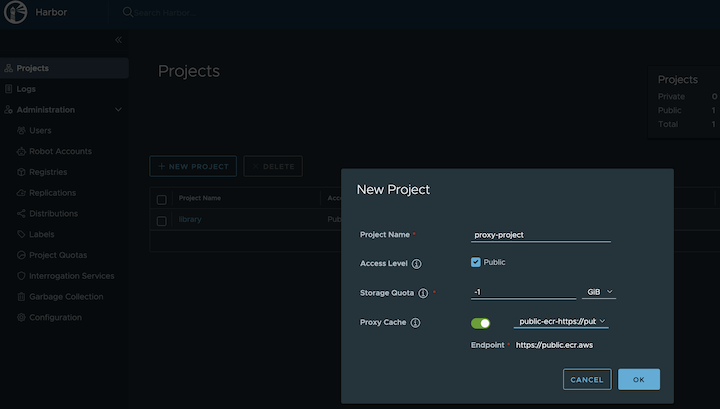
-
Pull images
Note
harbor.eksa.demo:30003 should be replaced with whatever externalURL is set to in the Harbor package YAML file.
docker pull harbor.eksa.demo:30003/proxy-project/cloudwatch-agent/cloudwatch-agent:latest
Proxy a private Amazon Elastic Container Registry (ECR) repository
This use case is to use Harbor to proxy and cache images from a private ECR repository, which helps limit the amount of requests made to a private ECR repository, avoiding consuming too much bandwidth or being throttled by the registry server.
-
Login
Log in to the Harbor web portal with the default credential as shown below
-
Create a registry proxy
In order for Harbor to proxy a remote private ECR registry, an IAM credential with necessary permissions need to be created. Usually, it follows three steps:
-
Policy
This is where you specify all necessary permissions. Please refer to private repository policies
, IAM permissions for pushing an image
and ECR policy examples
to figure out the minimal set of required permissions.
For simplicity, the build-in policy AdministratorAccess is used here.
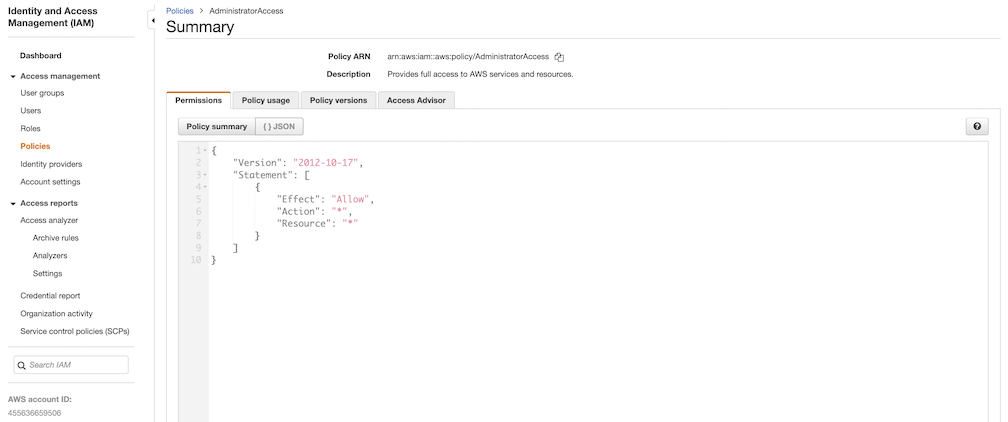
-
User group
This is an easy way to manage a pool of users who share the same set of permissions by attaching the policy to the group.
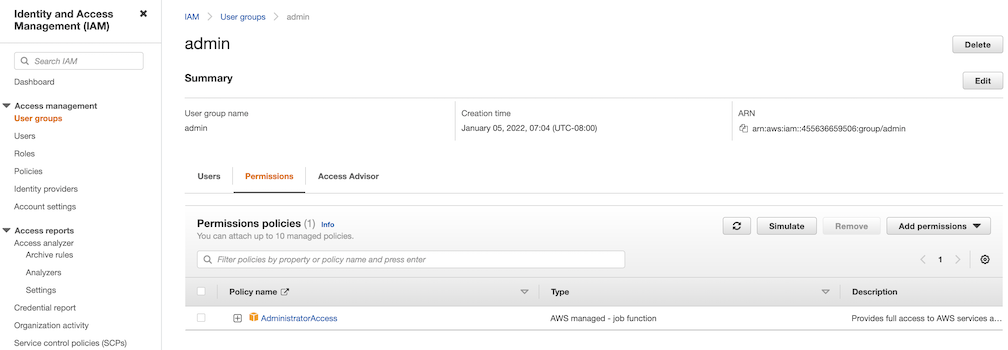
-
User
Create a user and add it to the user group. In addition, please navigate to Security credentials to generate an access key. Access keys consists of two parts: an access key ID and a secret access key. Please save both as they are used in the next step.
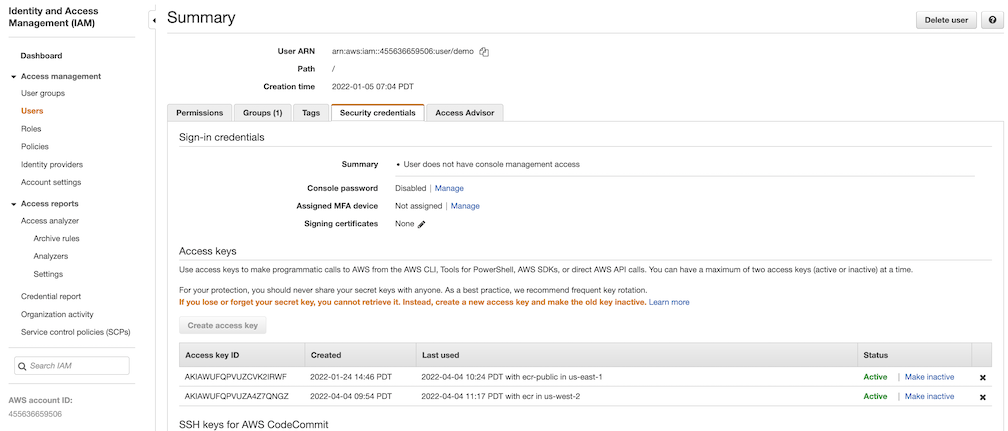
Navigate to Registries on the left panel, and then click on NEW ENDPOINT button. Choose Aws ECR as Provider, and enter private-ecr as Name, https://[ACCOUNT NUMBER].dkr.ecr.us-west-2.amazonaws.com/ as Endpoint URL, use the access key ID part of the generated access key as Access ID, and use the secret access key part of the generated access key as Access Secret. Save it by click on OK.

-
Create a proxy project
Navigate to Projects on the left panel and click on NEW PROJECT button. Enter proxy-private-project as Project Name, check Public access level, and turn on Proxy Cache and choose private-ecr from the pull-down list. Save the configuration by clicking on OK.

-
Pull images
Create a repository in the target private ECR registry
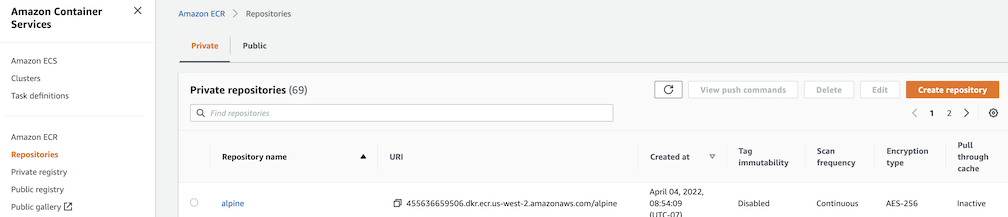
Push an image to the created repository
docker pull alpine
docker tag alpine [ACCOUNT NUMBER].dkr.ecr.us-west-2.amazonaws.com/alpine:latest
docker push [ACCOUNT NUMBER].dkr.ecr.us-west-2.amazonaws.com/alpine:latest
Note
harbor.eksa.demo:30003 should be replaced with whatever externalURL is set to in the Harbor package YAML file.
docker pull harbor.eksa.demo:30003/proxy-private-project/alpine:latest
Repository replication from Harbor to a private Amazon Elastic Container Registry (ECR) repository
This use case is to use Harbor to replicate local images and charts to a private ECR repository in push mode. When a replication rule is set, all resources that match the defined filter patterns are replicated to the destination registry when the triggering condition is met.
-
Login
Log in to the Harbor web portal with the default credential as shown below
-
Create a nonproxy project
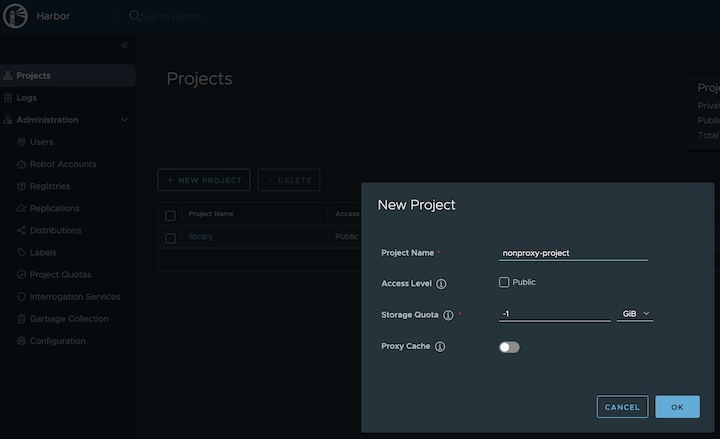
-
Create a registry proxy
In order for Harbor to proxy a remote private ECR registry, an IAM credential with necessary permissions need to be created. Usually, it follows three steps:
-
Policy
This is where you specify all necessary permissions. Please refer to private repository policies
, IAM permissions for pushing an image
and ECR policy examples
to figure out the minimal set of required permissions.
For simplicity, the build-in policy AdministratorAccess is used here.
-
User group
This is an easy way to manage a pool of users who share the same set of permissions by attaching the policy to the group.
-
User
Create a user and add it to the user group. In addition, please navigate to Security credentials to generate an access key. Access keys consists of two parts: an access key ID and a secret access key. Please save both as they are used in the next step.
Navigate to Registries on the left panel, and then click on the NEW ENDPOINT button. Choose Aws ECR as the Provider, and enter private-ecr as the Name, https://[ACCOUNT NUMBER].dkr.ecr.us-west-2.amazonaws.com/ as the Endpoint URL, use the access key ID part of the generated access key as Access ID, and use the secret access key part of the generated access key as Access Secret. Save it by clicking on OK.
-
Create a replication rule
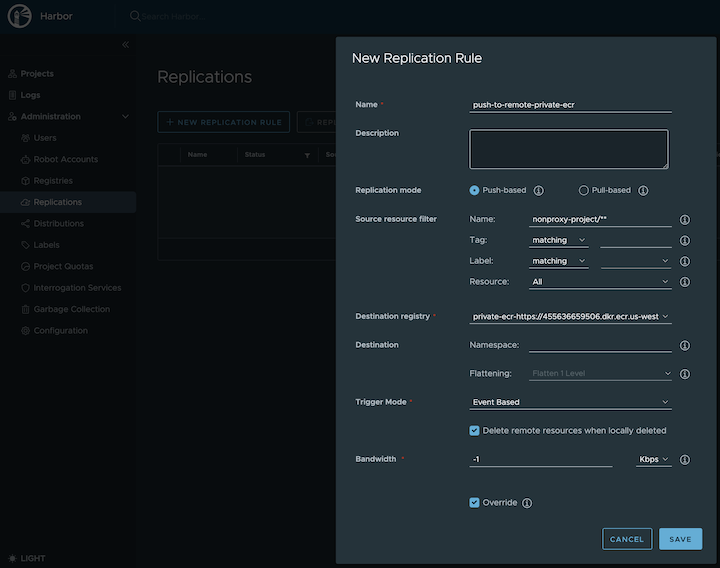
-
Prepare an image
Note
harbor.eksa.demo:30003 should be replaced with whatever externalURL is set to in the Harbor package YAML file.
docker pull alpine
docker tag alpine:latest harbor.eksa.demo:30003/nonproxy-project/alpine:latest
-
Authenticate with Harbor with the default credential as shown below
Note
harbor.eksa.demo:30003 should be replaced with whatever externalURL is set to in the Harbor package YAML file.
docker logout
docker login harbor.eksa.demo:30003
-
Push images
Create a repository in the target private ECR registry
Note
harbor.eksa.demo:30003 should be replaced with whatever externalURL is set to in the Harbor package YAML file.
docker push harbor.eksa.demo:30003/nonproxy-project/alpine:latest
The image should appear in the target ECR repository shortly.
Set up trivy image scanner in an air-gapped environment
This use case is to manually import vulnerability database to Harbor trivy when Harbor is running in an air-gapped environment. All the following commands are assuming Harbor is running in the default namespace.
-
Configure trivy
TLS example with auto certificate generation
apiVersion: packages.eks.amazonaws.com/v1alpha1
kind: Package
metadata:
name: my-harbor
namespace: eksa-packages
spec:
packageName: harbor
config: |-
secretKey: "use-a-secret-key"
externalURL: https://harbor.eksa.demo:30003
expose:
tls:
certSource: auto
auto:
commonName: "harbor.eksa.demo"
trivy:
skipUpdate: true
offlineScan: true
Non-TLS example
apiVersion: packages.eks.amazonaws.com/v1alpha1
kind: Package
metadata:
name: my-harbor
namespace: eksa-packages
spec:
packageName: harbor
config: |-
secretKey: "use-a-secret-key"
externalURL: http://harbor.eksa.demo:30002
expose:
tls:
enabled: false
trivy:
skipUpdate: true
offlineScan: true
If Harbor is already running without the above trivy configurations, run the following command to update both skipUpdate and offlineScan
kubectl edit statefulsets/harbor-helm-trivy
-
Download the vulnerability database to your local host
Please follow oras installation instruction
.
oras pull ghcr.io/aquasecurity/trivy-db:2 -a
-
Upload database to trivy pod from your local host
kubectl cp db.tar.gz harbor-helm-trivy-0:/home/scanner/.cache/trivy -c trivy
-
Set up database on Harbor trivy pod
kubectl exec -it harbor-helm-trivy-0 -c trivy bash
cd /home/scanner/.cache/trivy
mkdir db
mv db.tar.gz db
cd db
tar zxvf db.tar.gz
7.16.3 - v2.5.0
Trivy, Notary and Chartmuseum are not supported at this moment.
Configuring Harbor in EKS Anywhere package spec
The following table lists the configurable parameters of the Harbor package spec and the default values.
| Parameter |
Description |
Default |
| General |
|
|
externalURL |
The external URL for Harbor core service |
https://127.0.0.1:30003 |
imagePullPolicy |
The image pull policy |
IfNotPresent |
logLevel |
The log level: debug, info, warning, error or fatal |
info |
harborAdminPassword |
The initial password of the Harbor admin account. Change it from the portal after launching Harbor |
Harbor12345 |
secretKey |
The key used for encryption. Must be a string of 16 chars |
"" |
| Expose |
|
|
expose.type |
How to expose the service: nodePort or loadBalancer, other values will be ignored and the creation of the service will be skipped. |
nodePort |
expose.tls.enabled |
Enable TLS or not. |
true |
expose.tls.certSource |
The source of the TLS certificate. Set as auto, secret or none and fill the information in the corresponding section: 1) auto: generate the TLS certificate automatically 2) secret: read the TLS certificate from the specified secret. The TLS certificate can be generated manually or by cert manager 3) none: configure no TLS certificate. |
secret |
expose.tls.auto.commonName |
The common name used to generate the certificate. It’s necessary when expose.tls.certSource is set to auto |
|
expose.tls.secret.secretName |
The name of the secret which contains keys named: tls.crt - the certificate; tls.key - the private key |
harbor-tls-secret |
expose.nodePort.name |
The name of the NodePort service |
harbor |
expose.nodePort.ports.http.port |
The service port Harbor listens on when serving HTTP |
80 |
expose.nodePort.ports.http.nodePort |
The node port Harbor listens on when serving HTTP |
30002 |
expose.nodePort.ports.https.port |
The service port Harbor listens on when serving HTTPS |
443 |
expose.nodePort.ports.https.nodePort |
The node port Harbor listens on when serving HTTPS |
30003 |
expose.loadBalancer.name |
The name of the service |
harbor |
expose.loadBalancer.IP |
The IP address of the loadBalancer. It only works when the loadBalancer supports assigning an IP address |
"" |
expose.loadBalancer.ports.httpPort |
The service port Harbor listens on when serving HTTP |
80 |
expose.loadBalancer.ports.httpsPort |
The service port Harbor listens on when serving HTTPS |
30002 |
expose.loadBalancer.annotations |
The annotations attached to the loadBalancer service |
{} |
expose.loadBalancer.sourceRanges |
List of IP address ranges to assign to loadBalancerSourceRanges |
[] |
| Internal TLS |
|
|
internalTLS.enabled |
Enable TLS for the components (core, jobservice, portal, and registry) |
true |
| Persistence |
|
|
persistence.resourcePolicy |
Setting it to keep to avoid removing PVCs during a helm delete operation. Leaving it empty will delete PVCs after the chart is deleted. Does not affect PVCs created for internal database and redis components. |
keep |
persistence.persistentVolumeClaim.registry.size |
The size of the volume |
5Gi |
persistence.persistentVolumeClaim.registry.storageClass |
Specify the storageClass used to provision the volume, or the default StorageClass will be used (the default). Set it to - to disable dynamic provisioning |
"" |
persistence.persistentVolumeClaim.jobservice.size |
The size of the volume |
1Gi |
persistence.persistentVolumeClaim.jobservice.storageClass |
Specify the storageClass used to provision the volume, or the default StorageClass will be used (the default). Set it to - to disable dynamic provisioning |
"" |
persistence.persistentVolumeClaim.database.size |
The size of the volume. If an external database is used, the setting will be ignored |
1Gi |
persistence.persistentVolumeClaim.database.storageClass |
Specify the storageClass used to provision the volume, or the default StorageClass will be used (the default). Set it to - to disable dynamic provisioning. If an external database is used, the setting will be ignored |
"" |
persistence.persistentVolumeClaim.redis.size |
The size of the volume. If an external Redis is used, the setting will be ignored |
1Gi |
persistence.persistentVolumeClaim.redis.storageClass |
Specify the storageClass used to provision the volumem, or the default StorageClass will be used (the default). Set it to - to disable dynamic provisioning. If an external Redis is used, the setting will be ignored |
"" |
| Registry |
|
|
registry.relativeurls |
If true, the registry returns relative URLs in Location headers. The client is responsible for resolving the correct URL. Needed if harbor is behind a reverse proxy |
false |
7.16.4 - v2.5.1
Notary and Chartmuseum are not supported at this moment.
Configuring Harbor in EKS Anywhere package spec
The following table lists the configurable parameters of the Harbor package spec and the default values.
| Parameter |
Description |
Default |
| General |
|
|
externalURL |
The external URL for Harbor core service |
https://127.0.0.1:30003 |
imagePullPolicy |
The image pull policy |
IfNotPresent |
logLevel |
The log level: debug, info, warning, error or fatal |
info |
harborAdminPassword |
The initial password of the Harbor admin account. Change it from the portal after launching Harbor |
Harbor12345 |
secretKey |
The key used for encryption. Must be a string of 16 chars |
"" |
| Expose |
|
|
expose.type |
How to expose the service: nodePort or loadBalancer, other values will be ignored and the creation of the service will be skipped. |
nodePort |
expose.tls.enabled |
Enable TLS or not. |
true |
expose.tls.certSource |
The source of the TLS certificate. Set as auto, secret or none and fill the information in the corresponding section: 1) auto: generate the TLS certificate automatically 2) secret: read the TLS certificate from the specified secret. The TLS certificate can be generated manually or by cert manager 3) none: configure no TLS certificate. |
secret |
expose.tls.auto.commonName |
The common name used to generate the certificate. It’s necessary when expose.tls.certSource is set to auto |
|
expose.tls.secret.secretName |
The name of the secret which contains keys named: tls.crt - the certificate; tls.key - the private key |
harbor-tls-secret |
expose.nodePort.name |
The name of the NodePort service |
harbor |
expose.nodePort.ports.http.port |
The service port Harbor listens on when serving HTTP |
80 |
expose.nodePort.ports.http.nodePort |
The node port Harbor listens on when serving HTTP |
30002 |
expose.nodePort.ports.https.port |
The service port Harbor listens on when serving HTTPS |
443 |
expose.nodePort.ports.https.nodePort |
The node port Harbor listens on when serving HTTPS |
30003 |
expose.loadBalancer.name |
The name of the service |
harbor |
expose.loadBalancer.IP |
The IP address of the loadBalancer. It only works when loadBalancer supports assigning an IP address |
"" |
expose.loadBalancer.ports.httpPort |
The service port Harbor listens on when serving HTTP |
80 |
expose.loadBalancer.ports.httpsPort |
The service port Harbor listens on when serving HTTPS |
30002 |
expose.loadBalancer.annotations |
The annotations attached to the loadBalancer service |
{} |
expose.loadBalancer.sourceRanges |
List of IP address ranges to assign to loadBalancerSourceRanges |
[] |
| Internal TLS |
|
|
internalTLS.enabled |
Enable TLS for the components (core, jobservice, portal, and registry) |
true |
| Persistence |
|
|
persistence.resourcePolicy |
Setting it to keep to avoid removing PVCs during a helm delete operation. Leaving it empty will delete PVCs after the chart is deleted. Does not affect PVCs created for internal database and redis components. |
keep |
persistence.persistentVolumeClaim.registry.size |
The size of the volume |
5Gi |
persistence.persistentVolumeClaim.registry.storageClass |
Specify the storageClass used to provision the volume, or the default StorageClass will be used (the default). Set it to - to disable dynamic provisioning |
"" |
persistence.persistentVolumeClaim.jobservice.size |
The size of the volume |
1Gi |
persistence.persistentVolumeClaim.jobservice.storageClass |
Specify the storageClass used to provision the volume, or the default StorageClass will be used (the default). Set it to - to disable dynamic provisioning |
"" |
persistence.persistentVolumeClaim.database.size |
The size of the volume. If an external database is used, the setting will be ignored |
1Gi |
persistence.persistentVolumeClaim.database.storageClass |
Specify the storageClass used to provision the volume, or the default StorageClass will be used (the default). Set it to - to disable dynamic provisioning. If an external database is used, the setting will be ignored |
"" |
persistence.persistentVolumeClaim.redis.size |
The size of the volume. If an external Redis is used, the setting will be ignored |
1Gi |
persistence.persistentVolumeClaim.redis.storageClass |
Specify the storageClass used to provision the volume, or the default StorageClass will be used (the default). Set it to - to disable dynamic provisioning. If an external Redis is used, the setting will be ignored |
"" |
persistence.persistentVolumeClaim.trivy.size |
The size of the volume |
5Gi |
persistence.persistentVolumeClaim.trivy.storageClass |
Specify the storageClass used to provision the volume, or the default StorageClass will be used (the default). Set it to - to disable dynamic provisioning |
"" |
| Trivy |
|
|
trivy.enabled |
The flag to enable Trivy scanner |
true |
trivy.vulnType |
Comma-separated list of vulnerability types. Possible values os and library. |
os,library |
trivy.severity |
Comma-separated list of severities to be checked |
UNKNOWN,LOW,MEDIUM,HIGH,CRITICAL |
trivy.skipUpdate |
The flag to disable Trivy DB
downloads from GitHub |
false |
trivy.offlineScan |
The flag prevents Trivy from sending API requests to identify dependencies. |
false |
| Registry |
|
|
registry.relativeurls |
If true, the registry returns relative URLs in Location headers. The client is responsible for resolving the correct URL. Needed if harbor is behind a reverse proxy |
false |
7.16.5 - v2.7.1
Notary and Chartmuseum are not supported at this moment.
Configuring Harbor in EKS Anywhere package spec
The following table lists the configurable parameters of the Harbor package spec and the default values.
| Parameter |
Description |
Default |
| General |
|
|
externalURL |
The external URL for Harbor core service |
https://127.0.0.1:30003 |
imagePullPolicy |
The image pull policy |
IfNotPresent |
logLevel |
The log level: debug, info, warning, error or fatal |
info |
harborAdminPassword |
The initial password of the Harbor admin account. Change it from the portal after launching Harbor |
Harbor12345 |
secretKey |
The key used for encryption. Must be a string of 16 chars |
"" |
| Expose |
|
|
expose.type |
How to expose the service: nodePort or loadBalancer, other values will be ignored and the creation of the service will be skipped. |
nodePort |
expose.tls.enabled |
Enable TLS or not. |
true |
expose.tls.certSource |
The source of the TLS certificate. Set as auto, secret or none and fill the information in the corresponding section: 1) auto: generate the TLS certificate automatically 2) secret: read the TLS certificate from the specified secret. The TLS certificate can be generated manually or by cert manager 3) none: configure no TLS certificate. |
secret |
expose.tls.auto.commonName |
The common name used to generate the certificate. It’s necessary when expose.tls.certSource is set to auto |
|
expose.tls.secret.secretName |
The name of the secret which contains keys named: tls.crt - the certificate; tls.key - the private key |
harbor-tls-secret |
expose.nodePort.name |
The name of the NodePort service |
harbor |
expose.nodePort.ports.http.port |
The service port Harbor listens on when serving HTTP |
80 |
expose.nodePort.ports.http.nodePort |
The node port Harbor listens on when serving HTTP |
30002 |
expose.nodePort.ports.https.port |
The service port Harbor listens on when serving HTTPS |
443 |
expose.nodePort.ports.https.nodePort |
The node port Harbor listens on when serving HTTPS |
30003 |
expose.loadBalancer.name |
The name of the service |
harbor |
expose.loadBalancer.IP |
The IP address of the loadBalancer. It only works when loadBalancer supports assigning an IP address |
"" |
expose.loadBalancer.ports.httpPort |
The service port Harbor listens on when serving HTTP |
80 |
expose.loadBalancer.ports.httpsPort |
The service port Harbor listens on when serving HTTPS |
30002 |
expose.loadBalancer.annotations |
The annotations attached to the loadBalancer service |
{} |
expose.loadBalancer.sourceRanges |
List of IP address ranges to assign to loadBalancerSourceRanges |
[] |
| Internal TLS |
|
|
internalTLS.enabled |
Enable TLS for the components (core, jobservice, portal, and registry) |
true |
| Persistence |
|
|
persistence.resourcePolicy |
Setting it to keep to avoid removing PVCs during a helm delete operation. Leaving it empty will delete PVCs after the chart is deleted. Does not affect PVCs created for internal database and redis components. |
keep |
persistence.persistentVolumeClaim.registry.size |
The size of the volume |
5Gi |
persistence.persistentVolumeClaim.registry.storageClass |
Specify the storageClass used to provision the volume, or the default StorageClass will be used (the default). Set it to - to disable dynamic provisioning |
"" |
persistence.persistentVolumeClaim.jobservice.jobLog.size |
The size of the volume |
1Gi |
persistence.persistentVolumeClaim.jobservice.jobLog.storageClass |
Specify the storageClass used to provision the volume, or the default StorageClass will be used (the default). Set it to - to disable dynamic provisioning |
"" |
persistence.persistentVolumeClaim.database.size |
The size of the volume. If an external database is used, the setting will be ignored |
1Gi |
persistence.persistentVolumeClaim.database.storageClass |
Specify the storageClass used to provision the volume, or the default StorageClass will be used (the default). Set it to - to disable dynamic provisioning. If an external database is used, the setting will be ignored |
"" |
persistence.persistentVolumeClaim.redis.size |
The size of the volume. If an external Redis is used, the setting will be ignored |
1Gi |
persistence.persistentVolumeClaim.redis.storageClass |
Specify the storageClass used to provision the volume, or the default StorageClass will be used (the default). Set it to - to disable dynamic provisioning. If an external Redis is used, the setting will be ignored |
"" |
persistence.persistentVolumeClaim.trivy.size |
The size of the volume |
5Gi |
persistence.persistentVolumeClaim.trivy.storageClass |
Specify the storageClass used to provision the volume, or the default StorageClass will be used (the default). Set it to - to disable dynamic provisioning |
"" |
| Trivy |
|
|
trivy.enabled |
The flag to enable Trivy scanner |
true |
trivy.vulnType |
Comma-separated list of vulnerability types. Possible values os and library. |
os,library |
trivy.severity |
Comma-separated list of severities to be checked |
UNKNOWN,LOW,MEDIUM,HIGH,CRITICAL |
trivy.skipUpdate |
The flag to disable Trivy DB
downloads from GitHub |
false |
trivy.offlineScan |
The flag prevents Trivy from sending API requests to identify dependencies. |
false |
| Registry |
|
|
registry.relativeurls |
If true, the registry returns relative URLs in Location headers. The client is responsible for resolving the correct URL. Needed if harbor is behind a reverse proxy |
false |
7.16.6 - v2.10.2
Configuring Harbor in EKS Anywhere package spec
The following table lists the configurable parameters of the Harbor package spec and the default values.
| Parameter |
Description |
Default |
| General |
|
|
externalURL |
The external URL for Harbor core service |
https://127.0.0.1:30003 |
imagePullPolicy |
The image pull policy |
IfNotPresent |
logLevel |
The log level: debug, info, warning, error or fatal |
info |
harborAdminPassword |
The initial password of the Harbor admin account. Change it from the portal after launching Harbor |
Harbor12345 |
secretKey |
The key used for encryption. Must be a string of 16 chars |
"" |
| Expose |
|
|
expose.type |
How to expose the service: nodePort or loadBalancer, other values will be ignored and the creation of the service will be skipped. |
nodePort |
expose.tls.enabled |
Enable TLS or not. |
true |
expose.tls.certSource |
The source of the TLS certificate. Set as auto, secret or none and fill the information in the corresponding section: 1) auto: generate the TLS certificate automatically 2) secret: read the TLS certificate from the specified secret. The TLS certificate can be generated manually or by cert manager 3) none: configure no TLS certificate. |
secret |
expose.tls.auto.commonName |
The common name used to generate the certificate. It’s necessary when expose.tls.certSource is set to auto |
|
expose.tls.secret.secretName |
The name of the secret which contains keys named: tls.crt - the certificate; tls.key - the private key |
harbor-tls-secret |
expose.nodePort.name |
The name of the NodePort service |
harbor |
expose.nodePort.ports.http.port |
The service port Harbor listens on when serving HTTP |
80 |
expose.nodePort.ports.http.nodePort |
The node port Harbor listens on when serving HTTP |
30002 |
expose.nodePort.ports.https.port |
The service port Harbor listens on when serving HTTPS |
443 |
expose.nodePort.ports.https.nodePort |
The node port Harbor listens on when serving HTTPS |
30003 |
expose.loadBalancer.name |
The name of the service |
harbor |
expose.loadBalancer.IP |
The IP address of the loadBalancer. It only works when loadBalancer supports assigning an IP address |
"" |
expose.loadBalancer.ports.httpPort |
The service port Harbor listens on when serving HTTP |
80 |
expose.loadBalancer.ports.httpsPort |
The service port Harbor listens on when serving HTTPS |
30002 |
expose.loadBalancer.annotations |
The annotations attached to the loadBalancer service |
{} |
expose.loadBalancer.sourceRanges |
List of IP address ranges to assign to loadBalancerSourceRanges |
[] |
| Internal TLS |
|
|
internalTLS.enabled |
Enable TLS for the components (core, jobservice, portal, and registry) |
true |
| Persistence |
|
|
persistence.resourcePolicy |
Setting it to keep to avoid removing PVCs during a helm delete operation. Leaving it empty will delete PVCs after the chart is deleted. Does not affect PVCs created for internal database and redis components. |
keep |
persistence.persistentVolumeClaim.registry.size |
The size of the volume |
5Gi |
persistence.persistentVolumeClaim.registry.storageClass |
Specify the storageClass used to provision the volume, or the default StorageClass will be used (the default). Set it to - to disable dynamic provisioning |
"" |
persistence.persistentVolumeClaim.jobservice.jobLog.size |
The size of the volume |
1Gi |
persistence.persistentVolumeClaim.jobservice.jobLog.storageClass |
Specify the storageClass used to provision the volume, or the default StorageClass will be used (the default). Set it to - to disable dynamic provisioning |
"" |
persistence.persistentVolumeClaim.database.size |
The size of the volume. If an external database is used, the setting will be ignored |
1Gi |
persistence.persistentVolumeClaim.database.storageClass |
Specify the storageClass used to provision the volume, or the default StorageClass will be used (the default). Set it to - to disable dynamic provisioning. If an external database is used, the setting will be ignored |
"" |
persistence.persistentVolumeClaim.redis.size |
The size of the volume. If an external Redis is used, the setting will be ignored |
1Gi |
persistence.persistentVolumeClaim.redis.storageClass |
Specify the storageClass used to provision the volume, or the default StorageClass will be used (the default). Set it to - to disable dynamic provisioning. If an external Redis is used, the setting will be ignored |
"" |
persistence.persistentVolumeClaim.trivy.size |
The size of the volume |
5Gi |
persistence.persistentVolumeClaim.trivy.storageClass |
Specify the storageClass used to provision the volume, or the default StorageClass will be used (the default). Set it to - to disable dynamic provisioning |
"" |
| Trivy |
|
|
trivy.enabled |
The flag to enable Trivy scanner |
true |
trivy.vulnType |
Comma-separated list of vulnerability types. Possible values os and library. |
os,library |
trivy.severity |
Comma-separated list of severities to be checked |
UNKNOWN,LOW,MEDIUM,HIGH,CRITICAL |
trivy.skipUpdate |
The flag to disable Trivy DB
downloads from GitHub |
false |
trivy.offlineScan |
The flag prevents Trivy from sending API requests to identify dependencies. |
false |
| Registry |
|
|
registry.relativeurls |
If true, the registry returns relative URLs in Location headers. The client is responsible for resolving the correct URL. Needed if harbor is behind a reverse proxy |
false |
7.16.7 - v2.11.1
Configuring Harbor in EKS Anywhere package spec
The following table lists the configurable parameters of the Harbor package spec and the default values.
| Parameter |
Description |
Default |
| General |
|
|
externalURL |
The external URL for Harbor core service |
https://127.0.0.1:30003 |
imagePullPolicy |
The image pull policy |
IfNotPresent |
logLevel |
The log level: debug, info, warning, error or fatal |
info |
harborAdminPassword |
The initial password of the Harbor admin account. Change it from the portal after launching Harbor |
Harbor12345 |
secretKey |
The key used for encryption. Must be a string of 16 chars |
"" |
| Expose |
|
|
expose.type |
How to expose the service: nodePort or loadBalancer, other values will be ignored and the creation of the service will be skipped. |
nodePort |
expose.tls.enabled |
Enable TLS or not. |
true |
expose.tls.certSource |
The source of the TLS certificate. Set as auto, secret or none and fill the information in the corresponding section: 1) auto: generate the TLS certificate automatically 2) secret: read the TLS certificate from the specified secret. The TLS certificate can be generated manually or by cert manager 3) none: configure no TLS certificate. |
secret |
expose.tls.auto.commonName |
The common name used to generate the certificate. It’s necessary when expose.tls.certSource is set to auto |
|
expose.tls.secret.secretName |
The name of the secret which contains keys named: tls.crt - the certificate; tls.key - the private key |
harbor-tls-secret |
expose.nodePort.name |
The name of the NodePort service |
harbor |
expose.nodePort.ports.http.port |
The service port Harbor listens on when serving HTTP |
80 |
expose.nodePort.ports.http.nodePort |
The node port Harbor listens on when serving HTTP |
30002 |
expose.nodePort.ports.https.port |
The service port Harbor listens on when serving HTTPS |
443 |
expose.nodePort.ports.https.nodePort |
The node port Harbor listens on when serving HTTPS |
30003 |
expose.loadBalancer.name |
The name of the service |
harbor |
expose.loadBalancer.IP |
The IP address of the loadBalancer. It only works when loadBalancer supports assigning an IP address |
"" |
expose.loadBalancer.ports.httpPort |
The service port Harbor listens on when serving HTTP |
80 |
expose.loadBalancer.ports.httpsPort |
The service port Harbor listens on when serving HTTPS |
30002 |
expose.loadBalancer.annotations |
The annotations attached to the loadBalancer service |
{} |
expose.loadBalancer.sourceRanges |
List of IP address ranges to assign to loadBalancerSourceRanges |
[] |
| Internal TLS |
|
|
internalTLS.enabled |
Enable TLS for the components (core, jobservice, portal, and registry) |
true |
| Persistence |
|
|
persistence.resourcePolicy |
Setting it to keep to avoid removing PVCs during a helm delete operation. Leaving it empty will delete PVCs after the chart is deleted. Does not affect PVCs created for internal database and redis components. |
keep |
persistence.persistentVolumeClaim.registry.size |
The size of the volume |
5Gi |
persistence.persistentVolumeClaim.registry.storageClass |
Specify the storageClass used to provision the volume, or the default StorageClass will be used (the default). Set it to - to disable dynamic provisioning |
"" |
persistence.persistentVolumeClaim.jobservice.jobLog.size |
The size of the volume |
1Gi |
persistence.persistentVolumeClaim.jobservice.jobLog.storageClass |
Specify the storageClass used to provision the volume, or the default StorageClass will be used (the default). Set it to - to disable dynamic provisioning |
"" |
persistence.persistentVolumeClaim.database.size |
The size of the volume. If an external database is used, the setting will be ignored |
1Gi |
persistence.persistentVolumeClaim.database.storageClass |
Specify the storageClass used to provision the volume, or the default StorageClass will be used (the default). Set it to - to disable dynamic provisioning. If an external database is used, the setting will be ignored |
"" |
persistence.persistentVolumeClaim.redis.size |
The size of the volume. If an external Redis is used, the setting will be ignored |
1Gi |
persistence.persistentVolumeClaim.redis.storageClass |
Specify the storageClass used to provision the volume, or the default StorageClass will be used (the default). Set it to - to disable dynamic provisioning. If an external Redis is used, the setting will be ignored |
"" |
persistence.persistentVolumeClaim.trivy.size |
The size of the volume |
5Gi |
persistence.persistentVolumeClaim.trivy.storageClass |
Specify the storageClass used to provision the volume, or the default StorageClass will be used (the default). Set it to - to disable dynamic provisioning |
"" |
| Trivy |
|
|
trivy.enabled |
The flag to enable Trivy scanner |
true |
trivy.vulnType |
Comma-separated list of vulnerability types. Possible values os and library. |
os,library |
trivy.severity |
Comma-separated list of severities to be checked |
UNKNOWN,LOW,MEDIUM,HIGH,CRITICAL |
trivy.skipUpdate |
The flag to disable Trivy DB
downloads from GitHub |
false |
trivy.offlineScan |
The flag prevents Trivy from sending API requests to identify dependencies. |
false |
| Registry |
|
|
registry.relativeurls |
If true, the registry returns relative URLs in Location headers. The client is responsible for resolving the correct URL. Needed if harbor is behind a reverse proxy |
false |
7.16.8 - v2.12.1
Configuring Harbor in EKS Anywhere package spec
The following table lists the configurable parameters of the Harbor package spec and the default values.
| Parameter |
Description |
Default |
| General |
|
|
externalURL |
The external URL for Harbor core service |
https://127.0.0.1:30003 |
imagePullPolicy |
The image pull policy |
IfNotPresent |
logLevel |
The log level: debug, info, warning, error or fatal |
info |
harborAdminPassword |
The initial password of the Harbor admin account. Change it from the portal after launching Harbor |
Harbor12345 |
secretKey |
The key used for encryption. Must be a string of 16 chars |
"" |
| Expose |
|
|
expose.type |
How to expose the service: nodePort or loadBalancer, other values will be ignored and the creation of the service will be skipped. |
nodePort |
expose.tls.enabled |
Enable TLS or not. |
true |
expose.tls.certSource |
The source of the TLS certificate. Set as auto, secret or none and fill the information in the corresponding section: 1) auto: generate the TLS certificate automatically 2) secret: read the TLS certificate from the specified secret. The TLS certificate can be generated manually or by cert manager 3) none: configure no TLS certificate. |
secret |
expose.tls.auto.commonName |
The common name used to generate the certificate. It’s necessary when expose.tls.certSource is set to auto |
|
expose.tls.secret.secretName |
The name of the secret which contains keys named: tls.crt - the certificate; tls.key - the private key |
harbor-tls-secret |
expose.nodePort.name |
The name of the NodePort service |
harbor |
expose.nodePort.ports.http.port |
The service port Harbor listens on when serving HTTP |
80 |
expose.nodePort.ports.http.nodePort |
The node port Harbor listens on when serving HTTP |
30002 |
expose.nodePort.ports.https.port |
The service port Harbor listens on when serving HTTPS |
443 |
expose.nodePort.ports.https.nodePort |
The node port Harbor listens on when serving HTTPS |
30003 |
expose.loadBalancer.name |
The name of the service |
harbor |
expose.loadBalancer.IP |
The IP address of the loadBalancer. It only works when loadBalancer supports assigning an IP address |
"" |
expose.loadBalancer.ports.httpPort |
The service port Harbor listens on when serving HTTP |
80 |
expose.loadBalancer.ports.httpsPort |
The service port Harbor listens on when serving HTTPS |
30002 |
expose.loadBalancer.annotations |
The annotations attached to the loadBalancer service |
{} |
expose.loadBalancer.sourceRanges |
List of IP address ranges to assign to loadBalancerSourceRanges |
[] |
| Internal TLS |
|
|
internalTLS.enabled |
Enable TLS for the components (core, jobservice, portal, and registry) |
true |
| Persistence |
|
|
persistence.resourcePolicy |
Setting it to keep to avoid removing PVCs during a helm delete operation. Leaving it empty will delete PVCs after the chart is deleted. Does not affect PVCs created for internal database and redis components. |
keep |
persistence.persistentVolumeClaim.registry.size |
The size of the volume |
5Gi |
persistence.persistentVolumeClaim.registry.storageClass |
Specify the storageClass used to provision the volume, or the default StorageClass will be used (the default). Set it to - to disable dynamic provisioning |
"" |
persistence.persistentVolumeClaim.jobservice.jobLog.size |
The size of the volume |
1Gi |
persistence.persistentVolumeClaim.jobservice.jobLog.storageClass |
Specify the storageClass used to provision the volume, or the default StorageClass will be used (the default). Set it to - to disable dynamic provisioning |
"" |
persistence.persistentVolumeClaim.database.size |
The size of the volume. If an external database is used, the setting will be ignored |
1Gi |
persistence.persistentVolumeClaim.database.storageClass |
Specify the storageClass used to provision the volume, or the default StorageClass will be used (the default). Set it to - to disable dynamic provisioning. If an external database is used, the setting will be ignored |
"" |
persistence.persistentVolumeClaim.redis.size |
The size of the volume. If an external Redis is used, the setting will be ignored |
1Gi |
persistence.persistentVolumeClaim.redis.storageClass |
Specify the storageClass used to provision the volume, or the default StorageClass will be used (the default). Set it to - to disable dynamic provisioning. If an external Redis is used, the setting will be ignored |
"" |
persistence.persistentVolumeClaim.trivy.size |
The size of the volume |
5Gi |
persistence.persistentVolumeClaim.trivy.storageClass |
Specify the storageClass used to provision the volume, or the default StorageClass will be used (the default). Set it to - to disable dynamic provisioning |
"" |
| Trivy |
|
|
trivy.enabled |
The flag to enable Trivy scanner |
true |
trivy.vulnType |
Comma-separated list of vulnerability types. Possible values os and library. |
os,library |
trivy.severity |
Comma-separated list of severities to be checked |
UNKNOWN,LOW,MEDIUM,HIGH,CRITICAL |
trivy.skipUpdate |
The flag to disable Trivy DB
downloads from GitHub |
false |
trivy.offlineScan |
The flag prevents Trivy from sending API requests to identify dependencies. |
false |
| Registry |
|
|
registry.relativeurls |
If true, the registry returns relative URLs in Location headers. The client is responsible for resolving the correct URL. Needed if harbor is behind a reverse proxy |
false |
7.16.9 - v2.12.2
Configuring Harbor in EKS Anywhere package spec
The following table lists the configurable parameters of the Harbor package spec and the default values.
| Parameter |
Description |
Default |
| General |
|
|
externalURL |
The external URL for Harbor core service |
https://127.0.0.1:30003 |
imagePullPolicy |
The image pull policy |
IfNotPresent |
logLevel |
The log level: debug, info, warning, error or fatal |
info |
harborAdminPassword |
The initial password of the Harbor admin account. Change it from the portal after launching Harbor |
Harbor12345 |
secretKey |
The key used for encryption. Must be a string of 16 chars |
"" |
| Expose |
|
|
expose.type |
How to expose the service: nodePort or loadBalancer, other values will be ignored and the creation of the service will be skipped. |
nodePort |
expose.tls.enabled |
Enable TLS or not. |
true |
expose.tls.certSource |
The source of the TLS certificate. Set as auto, secret or none and fill the information in the corresponding section: 1) auto: generate the TLS certificate automatically 2) secret: read the TLS certificate from the specified secret. The TLS certificate can be generated manually or by cert manager 3) none: configure no TLS certificate. |
secret |
expose.tls.auto.commonName |
The common name used to generate the certificate. It’s necessary when expose.tls.certSource is set to auto |
|
expose.tls.secret.secretName |
The name of the secret which contains keys named: tls.crt - the certificate; tls.key - the private key |
harbor-tls-secret |
expose.nodePort.name |
The name of the NodePort service |
harbor |
expose.nodePort.ports.http.port |
The service port Harbor listens on when serving HTTP |
80 |
expose.nodePort.ports.http.nodePort |
The node port Harbor listens on when serving HTTP |
30002 |
expose.nodePort.ports.https.port |
The service port Harbor listens on when serving HTTPS |
443 |
expose.nodePort.ports.https.nodePort |
The node port Harbor listens on when serving HTTPS |
30003 |
expose.loadBalancer.name |
The name of the service |
harbor |
expose.loadBalancer.IP |
The IP address of the loadBalancer. It only works when loadBalancer supports assigning an IP address |
"" |
expose.loadBalancer.ports.httpPort |
The service port Harbor listens on when serving HTTP |
80 |
expose.loadBalancer.ports.httpsPort |
The service port Harbor listens on when serving HTTPS |
30002 |
expose.loadBalancer.annotations |
The annotations attached to the loadBalancer service |
{} |
expose.loadBalancer.sourceRanges |
List of IP address ranges to assign to loadBalancerSourceRanges |
[] |
| Internal TLS |
|
|
internalTLS.enabled |
Enable TLS for the components (core, jobservice, portal, and registry) |
true |
| Persistence |
|
|
persistence.resourcePolicy |
Setting it to keep to avoid removing PVCs during a helm delete operation. Leaving it empty will delete PVCs after the chart is deleted. Does not affect PVCs created for internal database and redis components. |
keep |
persistence.persistentVolumeClaim.registry.size |
The size of the volume |
5Gi |
persistence.persistentVolumeClaim.registry.storageClass |
Specify the storageClass used to provision the volume, or the default StorageClass will be used (the default). Set it to - to disable dynamic provisioning |
"" |
persistence.persistentVolumeClaim.jobservice.jobLog.size |
The size of the volume |
1Gi |
persistence.persistentVolumeClaim.jobservice.jobLog.storageClass |
Specify the storageClass used to provision the volume, or the default StorageClass will be used (the default). Set it to - to disable dynamic provisioning |
"" |
persistence.persistentVolumeClaim.database.size |
The size of the volume. If an external database is used, the setting will be ignored |
1Gi |
persistence.persistentVolumeClaim.database.storageClass |
Specify the storageClass used to provision the volume, or the default StorageClass will be used (the default). Set it to - to disable dynamic provisioning. If an external database is used, the setting will be ignored |
"" |
persistence.persistentVolumeClaim.redis.size |
The size of the volume. If an external Redis is used, the setting will be ignored |
1Gi |
persistence.persistentVolumeClaim.redis.storageClass |
Specify the storageClass used to provision the volume, or the default StorageClass will be used (the default). Set it to - to disable dynamic provisioning. If an external Redis is used, the setting will be ignored |
"" |
persistence.persistentVolumeClaim.trivy.size |
The size of the volume |
5Gi |
persistence.persistentVolumeClaim.trivy.storageClass |
Specify the storageClass used to provision the volume, or the default StorageClass will be used (the default). Set it to - to disable dynamic provisioning |
"" |
| Trivy |
|
|
trivy.enabled |
The flag to enable Trivy scanner |
true |
trivy.vulnType |
Comma-separated list of vulnerability types. Possible values os and library. |
os,library |
trivy.severity |
Comma-separated list of severities to be checked |
UNKNOWN,LOW,MEDIUM,HIGH,CRITICAL |
trivy.skipUpdate |
The flag to disable Trivy DB
downloads from GitHub |
false |
trivy.offlineScan |
The flag prevents Trivy from sending API requests to identify dependencies. |
false |
| Registry |
|
|
registry.relativeurls |
If true, the registry returns relative URLs in Location headers. The client is responsible for resolving the correct URL. Needed if harbor is behind a reverse proxy |
false |
7.16.10 - v2.14.2
Configuring Harbor in EKS Anywhere package spec
The following table lists the configurable parameters of the Harbor package spec and the default values.
| Parameter |
Description |
Default |
| General |
|
|
externalURL |
The external URL for Harbor core service |
https://127.0.0.1:30003 |
imagePullPolicy |
The image pull policy |
IfNotPresent |
logLevel |
The log level: debug, info, warning, error or fatal |
info |
harborAdminPassword |
The initial password of the Harbor admin account. Change it from the portal after launching Harbor |
Harbor12345 |
secretKey |
The key used for encryption. Must be a string of 16 chars |
"" |
| Expose |
|
|
expose.type |
How to expose the service: nodePort or loadBalancer, other values will be ignored and the creation of the service will be skipped. |
nodePort |
expose.tls.enabled |
Enable TLS or not. |
true |
expose.tls.certSource |
The source of the TLS certificate. Set as auto, secret or none and fill the information in the corresponding section: 1) auto: generate the TLS certificate automatically 2) secret: read the TLS certificate from the specified secret. The TLS certificate can be generated manually or by cert manager 3) none: configure no TLS certificate. |
secret |
expose.tls.auto.commonName |
The common name used to generate the certificate. It’s necessary when expose.tls.certSource is set to auto |
|
expose.tls.secret.secretName |
The name of the secret which contains keys named: tls.crt - the certificate; tls.key - the private key |
harbor-tls-secret |
expose.nodePort.name |
The name of the NodePort service |
harbor |
expose.nodePort.ports.http.port |
The service port Harbor listens on when serving HTTP |
80 |
expose.nodePort.ports.http.nodePort |
The node port Harbor listens on when serving HTTP |
30002 |
expose.nodePort.ports.https.port |
The service port Harbor listens on when serving HTTPS |
443 |
expose.nodePort.ports.https.nodePort |
The node port Harbor listens on when serving HTTPS |
30003 |
expose.loadBalancer.name |
The name of the service |
harbor |
expose.loadBalancer.IP |
The IP address of the loadBalancer. It only works when loadBalancer supports assigning an IP address |
"" |
expose.loadBalancer.ports.httpPort |
The service port Harbor listens on when serving HTTP |
80 |
expose.loadBalancer.ports.httpsPort |
The service port Harbor listens on when serving HTTPS |
30002 |
expose.loadBalancer.annotations |
The annotations attached to the loadBalancer service |
{} |
expose.loadBalancer.sourceRanges |
List of IP address ranges to assign to loadBalancerSourceRanges |
[] |
| Internal TLS |
|
|
internalTLS.enabled |
Enable TLS for the components (core, jobservice, portal, and registry) |
true |
| Persistence |
|
|
persistence.resourcePolicy |
Setting it to keep to avoid removing PVCs during a helm delete operation. Leaving it empty will delete PVCs after the chart is deleted. Does not affect PVCs created for internal database and redis components. |
keep |
persistence.persistentVolumeClaim.registry.size |
The size of the volume |
5Gi |
persistence.persistentVolumeClaim.registry.storageClass |
Specify the storageClass used to provision the volume, or the default StorageClass will be used (the default). Set it to - to disable dynamic provisioning |
"" |
persistence.persistentVolumeClaim.jobservice.jobLog.size |
The size of the volume |
1Gi |
persistence.persistentVolumeClaim.jobservice.jobLog.storageClass |
Specify the storageClass used to provision the volume, or the default StorageClass will be used (the default). Set it to - to disable dynamic provisioning |
"" |
persistence.persistentVolumeClaim.database.size |
The size of the volume. If an external database is used, the setting will be ignored |
1Gi |
persistence.persistentVolumeClaim.database.storageClass |
Specify the storageClass used to provision the volume, or the default StorageClass will be used (the default). Set it to - to disable dynamic provisioning. If an external database is used, the setting will be ignored |
"" |
persistence.persistentVolumeClaim.redis.size |
The size of the volume. If an external Redis is used, the setting will be ignored |
1Gi |
persistence.persistentVolumeClaim.redis.storageClass |
Specify the storageClass used to provision the volume, or the default StorageClass will be used (the default). Set it to - to disable dynamic provisioning. If an external Redis is used, the setting will be ignored |
"" |
persistence.persistentVolumeClaim.trivy.size |
The size of the volume |
5Gi |
persistence.persistentVolumeClaim.trivy.storageClass |
Specify the storageClass used to provision the volume, or the default StorageClass will be used (the default). Set it to - to disable dynamic provisioning |
"" |
| Trivy |
|
|
trivy.enabled |
The flag to enable Trivy scanner |
true |
trivy.vulnType |
Comma-separated list of vulnerability types. Possible values os and library. |
os,library |
trivy.severity |
Comma-separated list of severities to be checked |
UNKNOWN,LOW,MEDIUM,HIGH,CRITICAL |
trivy.skipUpdate |
The flag to disable Trivy DB
downloads from GitHub |
false |
trivy.offlineScan |
The flag prevents Trivy from sending API requests to identify dependencies. |
false |
| Registry |
|
|
registry.relativeurls |
If true, the registry returns relative URLs in Location headers. The client is responsible for resolving the correct URL. Needed if harbor is behind a reverse proxy |
false |
7.17 - MetalLB Configuration
MetalLB is a load-balancer implementation for on-premises Kubernetes clusters, using standard routing protocols.
Best Practice
Any supported EKS Anywhere curated package should be modified through package yaml files (with kind: Package) and applied through the command kubectl apply -f packageFileName. Modifying objects outside of package yaml files may lead to unpredictable behaviors.
For automatic namespace (targetNamespace) creation, see createNamespace field: PackagebundleController.spec
7.17.1 - MetalLB
Install/upgrade/uninstall MetalLB
If you have not already done so, make sure your cluster meets the package prerequisites.
Be sure to refer to the troubleshooting guide
in the event of a problem.
Important
- Starting at
eksctl anywhere version v0.12.0, packages on workload clusters are remotely managed by the management cluster.
- While following this guide to install packages on a workload cluster, please make sure the
kubeconfig is pointing to the management cluster that was used to create the workload cluster. The only exception is the kubectl create namespace command below, which should be run with kubeconfig pointing to the workload cluster.
Install
-
Generate the package configuration
eksctl anywhere generate package metallb --cluster <cluster-name> > metallb.yaml
-
Add the desired configuration to metallb.yaml
Please see complete configuration options
for all configuration options and their default values.
Example package file with bgp configuration:
apiVersion: packages.eks.amazonaws.com/v1alpha1
kind: Package
metadata:
name: mylb
namespace: eksa-packages-<cluster-name>
spec:
packageName: metallb
config: |
IPAddressPools:
- name: default
addresses:
- 10.220.0.93/32
- 10.220.0.97-10.220.0.120
BGPAdvertisements:
- ipAddressPools:
- default
BGPPeers:
- peerAddress: 10.220.0.2
peerASN: 65000
myASN: 65002
Example package file with ARP configuration:
apiVersion: packages.eks.amazonaws.com/v1alpha1
kind: Package
metadata:
name: mylb
namespace: eksa-packages
spec:
packageName: metallb
config: |
IPAddressPools:
- name: default
addresses:
- 10.220.0.93/32
- 10.220.0.97-10.220.0.120
L2Advertisements:
- ipAddressPools:
- default
-
Create the namespace
(If overriding targetNamespace, change metallb-system to the value of targetNamespace)
kubectl create namespace metallb-system
-
Install MetalLB
eksctl anywhere create packages -f metallb.yaml
-
Validate the installation
eksctl anywhere get packages --cluster <cluster-name>
Example command output
NAME PACKAGE AGE STATE CURRENTVERSION TARGETVERSION DETAIL
mylb metallb 22h installed 0.13.5-ce5b5de19014202cebd4ab4c091830a3b6dfea06 0.13.5-ce5b5de19014202cebd4ab4c091830a3b6dfea06 (latest)
Update
To update package configuration, update metallb.yaml file, and run the following command:
eksctl anywhere apply package -f metallb.yaml
Upgrade
MetalLB will automatically be upgraded when a new bundle is activated.
Uninstall
To uninstall MetalLB, simply delete the package
eksctl anywhere delete package --cluster <cluster-name> mylb
7.17.2 - v0.12.1
FRRouting
is currently not supported for MetalLB.
Example
apiVersion: packages.eks.amazonaws.com/v1alpha1
kind: Package
metadata:
name: mylb
namespace: eksa-packages-<cluster-name>
spec:
packageName: metallb
targetNamespace: metallb-system
config: |
IPAddressPools:
- name: default
addresses:
- 10.220.0.93/32
- 10.220.0.94/32
- 10.220.0.95/32
- name: bgp
addresses:
- 10.220.0.97-10.220.0.99
L2Advertisements:
- IPAddressPools:
- default
BGPAdvertisements:
- IPAddressPools:
- bgp
BGPPeers:
- myASN: 123
peerASN: 55001
peerAddress: 1.2.3.4
keepaliveTime: 30s
| Parameter |
Description |
Default |
| IPAddressPools[] |
A list of IPAddressPool. |
None |
| L2Advertisements[] |
A list of L2Advertisement. |
None |
| BGPAdvertisements[] |
A list of BGPAdvertisement. |
None |
| BGPPeers[] |
A list of BGPPeer. |
None |
| — |
— |
— |
| IPAddressPool |
A list of IP address ranges over which MetalLB has authority. You can list multiple ranges in a single pool and they will all share the same settings. Each range can be either a CIDR prefix, or an explicit start-end range of IPs. |
|
| name |
Name for the address pool. |
None |
| addresses[] |
A list of string representing CIRD or IP ranges. |
None |
| autoAssign |
AutoAssign flag used to prevent MetalLB from automatic allocation for a pool. |
true |
| — |
— |
— |
| L2Advertisement |
L2Advertisement allows MetalLB to advertise the LoadBalancer IPs provided by the selected pools via L2. |
|
| IPAddressPools[] |
The list of IPAddressPools to advertise via this advertisement, selected by name. |
None |
| — |
— |
— |
| BGPAdvertisement |
BGPAdvertisement allows MetalLB to advertise the IPs coming from the selected IPAddressPools via BGP, setting the parameters of the BGP Advertisement. |
|
| aggregationLength |
The aggregation-length advertisement option lets you “roll up” the /32s into a larger prefix. Defaults to 32. Works for IPv4 addresses. |
32 |
| aggregationLengthV6 |
The aggregation-length advertisement option lets you “roll up” the /128s into a larger prefix. Defaults to 128. Works for IPv6 addresses. |
128 |
| communities[] |
The BGP communities to be associated with the announcement. Each item can be a community of the form 1234:1234 or the name of an alias defined in the Community CRD. |
None |
| IPAddressPools[] |
The list of IPAddressPools to advertise via this advertisement, selected by name. |
None |
| localPref |
The BGP LOCAL_PREF attribute which is used by BGP best path algorithm, Path with higher localpref is preferred over one with lower localpref. |
None |
| — |
— |
— |
| BGPPeer |
Peers for the BGP protocol. |
|
| bfdProfile |
The name of the BFD Profile to be used for the BFD session associated to the BGP session. If not set, the BFD session won’t be set up. |
None |
| holdTime |
Requested BGP hold time, per RFC4271. |
None |
| keepaliveTime |
Requested BGP keepalive time, per RFC4271. |
None |
| myASN |
AS number to use for the local end of the session. |
None |
| password |
Authentication password for routers enforcing TCP MD5 authenticated sessions. |
None |
| peerASN |
AS number to expect from the remote end of the session. |
None |
| peerAddress |
Address to dial when establishing the session. |
None |
| peerPort |
Port to dial when establishing the session. |
179 |
| routerID |
BGP router ID to advertise to the peer. |
None |
| sourceAddress |
Source address to use when establishing the session. |
None |
7.17.3 - v0.13.5
FRRouting
is currently not supported for MetalLB.
Starting at v0.13.5, keys within each config section start with lowercase. For example:
L2Advertisements:
- IPAddressPools:
- default
Becomes:
L2Advertisements:
- ipAddressPools:
- default
Top-level section names remain capitalized as they represent CRDs:
config: |
IPAddressPools:
...
Example
apiVersion: packages.eks.amazonaws.com/v1alpha1
kind: Package
metadata:
name: mylb
namespace: eksa-packages-<cluster-name>
spec:
packageName: metallb
targetNamespace: metallb-system
config: |
IPAddressPools:
- name: default
addresses:
- 10.220.0.93/32
- 10.220.0.94/32
- 10.220.0.95/32
- name: bgp
addresses:
- 10.220.0.97-10.220.0.99
L2Advertisements:
- ipAddressPools:
- default
BGPAdvertisements:
- ipAddressPools:
- bgp
autoAssign: false
BGPPeers:
- myASN: 123
peerASN: 55001
peerAddress: 1.2.3.4
keepaliveTime: 30s
| Parameter |
Description |
Default |
Required |
| IPAddressPools[] |
A list of ip address pools. See IPAddressPool. |
None |
False |
| L2Advertisements[] |
A list of Layer 2 advertisements. See L2Advertisement. |
None |
False |
| BGPAdvertisements[] |
A list of BGP advertisements. See BGPAdvertisement. |
None |
False |
| BGPPeers[] |
A list of BGP peers. See BGPPeer. |
None |
False |
| — |
— |
— |
— |
| IPAddressPool |
A list of IP address ranges over which MetalLB has authority. You can list multiple ranges in a single pool and they will all share the same settings. Each range can be either a CIDR prefix, or an explicit start-end range of IPs. |
|
|
| name |
Name for the address pool. |
None |
True |
| addresses[] |
A list of string representing CIRD or IP ranges. |
None |
True |
| autoAssign |
AutoAssign flag used to prevent MetalLB from automatic allocation for a pool. |
true |
False |
| — |
— |
— |
— |
| L2Advertisement |
L2Advertisement allows MetalLB to advertise the LoadBalancer IPs provided by the selected pools via L2. |
|
|
| ipAddressPools[] |
The list of IPAddressPool names to advertise. |
None |
True |
| name |
Name for the L2Advertisement. |
None |
False |
| — |
— |
— |
— |
| BGPAdvertisement |
BGPAdvertisement allows MetalLB to advertise the IPs coming from the selected ipAddressPools via BGP, setting the parameters of the BGP Advertisement. |
|
|
| aggregationLength |
The aggregation-length advertisement option lets you “roll up” the /32s into a larger prefix. Defaults to 32. Works for IPv4 addresses. |
32 |
False |
| aggregationLengthV6 |
The aggregation-length advertisement option lets you “roll up” the /128s into a larger prefix. Defaults to 128. Works for IPv6 addresses. |
128 |
False |
| communities[] |
The BGP communities to be associated with the announcement. Each item can be a community of the form 1234:1234 or the name of an alias defined in the Community CRD. |
None |
False |
| ipAddressPools[] |
The list of IPAddressPool names to be advertised via BGP. |
None |
True |
| localPref |
The BGP LOCAL_PREF attribute which is used by BGP best path algorithm, Path with higher localpref is preferred over one with lower localpref. |
None |
False |
| peers[] |
List of peer names. Limits the bgppeer to advertise the ips of the selected pools to. When empty, the loadbalancer IP is announced to all the BGPPeers configured. |
None |
False |
| — |
— |
— |
— |
| BGPPeer |
Peers for the BGP protocol. |
|
|
| holdTime |
Requested BGP hold time, per RFC4271. |
None |
False |
| keepaliveTime |
Requested BGP keepalive time, per RFC4271. |
None |
False |
| myASN |
AS number to use for the local end of the session. |
None |
True |
| password |
Authentication password for routers enforcing TCP MD5 authenticated sessions. |
None |
False |
| peerASN |
AS number to expect from the remote end of the session. |
None |
True |
| peerAddress |
Address to dial when establishing the session. |
None |
True |
| peerPort |
Port to dial when establishing the session. |
179 |
False |
| routerID |
BGP router ID to advertise to the peer. |
None |
False |
| sourceAddress |
Source address to use when establishing the session. |
None |
False |
7.17.4 - v0.13.7
FRRouting
is currently not supported for MetalLB.
Starting at v0.13.5, keys within each config section start with lowercase.
See v0.13.5
for details.
Example
apiVersion: packages.eks.amazonaws.com/v1alpha1
kind: Package
metadata:
name: mylb
namespace: eksa-packages-<cluster-name>
spec:
packageName: metallb
targetNamespace: metallb-system
config: |
IPAddressPools:
- name: default
addresses:
- 10.220.0.93/32
- 10.220.0.94/32
- 10.220.0.95/32
- name: bgp
addresses:
- 10.220.0.97-10.220.0.99
L2Advertisements:
- ipAddressPools:
- default
BGPAdvertisements:
- ipAddressPools:
- bgp
autoAssign: false
BGPPeers:
- myASN: 123
peerASN: 55001
peerAddress: 1.2.3.4
keepaliveTime: 30s
| Parameter |
Description |
Default |
Required |
| IPAddressPools[] |
A list of ip address pools. See IPAddressPool. |
None |
False |
| L2Advertisements[] |
A list of Layer 2 advertisements. See L2Advertisement. |
None |
False |
| BGPAdvertisements[] |
A list of BGP advertisements. See BGPAdvertisement. |
None |
False |
| BGPPeers[] |
A list of BGP peers. See BGPPeer. |
None |
False |
| — |
— |
— |
— |
| IPAddressPool |
A list of IP address ranges over which MetalLB has authority. You can list multiple ranges in a single pool and they will all share the same settings. Each range can be either a CIDR prefix, or an explicit start-end range of IPs. |
|
|
| name |
Name for the address pool. |
None |
True |
| addresses[] |
A list of string representing CIRD or IP ranges. |
None |
True |
| autoAssign |
AutoAssign flag used to prevent MetalLB from automatic allocation for a pool. |
true |
False |
| — |
— |
— |
— |
| L2Advertisement |
L2Advertisement allows MetalLB to advertise the LoadBalancer IPs provided by the selected pools via L2. |
|
|
| ipAddressPools[] |
The list of IPAddressPool names to advertise. |
None |
True |
| name |
Name for the L2Advertisement. |
None |
False |
| — |
— |
— |
— |
| BGPAdvertisement |
BGPAdvertisement allows MetalLB to advertise the IPs coming from the selected ipAddressPools via BGP, setting the parameters of the BGP Advertisement. |
|
|
| aggregationLength |
The aggregation-length advertisement option lets you “roll up” the /32s into a larger prefix. Defaults to 32. Works for IPv4 addresses. |
32 |
False |
| aggregationLengthV6 |
The aggregation-length advertisement option lets you “roll up” the /128s into a larger prefix. Defaults to 128. Works for IPv6 addresses. |
128 |
False |
| communities[] |
The BGP communities to be associated with the announcement. Each item can be a community of the form 1234:1234 or the name of an alias defined in the Community CRD. |
None |
False |
| ipAddressPools[] |
The list of IPAddressPool names to be advertised via BGP. |
None |
True |
| localPref |
The BGP LOCAL_PREF attribute which is used by BGP best path algorithm, Path with higher localpref is preferred over one with lower localpref. |
None |
False |
| peers[] |
List of peer names. Limits the bgppeer to advertise the ips of the selected pools to. When empty, the loadbalancer IP is announced to all the BGPPeers configured. |
None |
False |
| — |
— |
— |
— |
| BGPPeer |
Peers for the BGP protocol. |
|
|
| holdTime |
Requested BGP hold time, per RFC4271. |
None |
False |
| keepaliveTime |
Requested BGP keepalive time, per RFC4271. |
None |
False |
| myASN |
AS number to use for the local end of the session. |
None |
True |
| password |
Authentication password for routers enforcing TCP MD5 authenticated sessions. |
None |
False |
| peerASN |
AS number to expect from the remote end of the session. |
None |
True |
| peerAddress |
Address to dial when establishing the session. |
None |
True |
| peerPort |
Port to dial when establishing the session. |
179 |
False |
| routerID |
BGP router ID to advertise to the peer. |
None |
False |
| sourceAddress |
Source address to use when establishing the session. |
None |
False |
| password |
Authentication password for routers enforcing TCP MD5 authenticated sessions. |
None |
False |
| passwordSecret |
passwordSecret is a reference to the authentication secret for BGP Peer. The secret must be of type ‘kubernetes.io/basic-auth’ and the password stored under the “password” key. Example:
passwordSecret:
name: mySecret
namespace: metallb-system |
None |
False |
7.17.5 - v0.14.5
FRRouting
is currently not supported for MetalLB.
Example
apiVersion: packages.eks.amazonaws.com/v1alpha1
kind: Package
metadata:
name: mylb
namespace: eksa-packages-<cluster-name>
spec:
packageName: metallb
targetNamespace: metallb-system
config: |
IPAddressPools:
- name: default
addresses:
- 10.220.0.93/32
- 10.220.0.94/32
- 10.220.0.95/32
- name: bgp
addresses:
- 10.220.0.97-10.220.0.99
L2Advertisements:
- ipAddressPools:
- default
BGPAdvertisements:
- ipAddressPools:
- bgp
autoAssign: false
BGPPeers:
- myASN: 123
peerASN: 55001
peerAddress: 1.2.3.4
keepaliveTime: 30s
| Parameter |
Description |
Default |
Required |
| IPAddressPools[] |
A list of ip address pools. See IPAddressPool. |
None |
False |
| L2Advertisements[] |
A list of Layer 2 advertisements. See L2Advertisement. |
None |
False |
| BGPAdvertisements[] |
A list of BGP advertisements. See BGPAdvertisement. |
None |
False |
| BGPPeers[] |
A list of BGP peers. See BGPPeer. |
None |
False |
| — |
— |
— |
— |
| IPAddressPool |
A list of IP address ranges over which MetalLB has authority. You can list multiple ranges in a single pool and they will all share the same settings. Each range can be either a CIDR prefix, or an explicit start-end range of IPs. |
|
|
| name |
Name for the address pool. |
None |
True |
| addresses[] |
A list of string representing CIRD or IP ranges. |
None |
True |
| autoAssign |
AutoAssign flag used to prevent MetalLB from automatic allocation for a pool. |
true |
False |
| — |
— |
— |
— |
| L2Advertisement |
L2Advertisement allows MetalLB to advertise the LoadBalancer IPs provided by the selected pools via L2. |
|
|
| ipAddressPools[] |
The list of IPAddressPool names to advertise. |
None |
True |
| name |
Name for the L2Advertisement. |
None |
False |
| — |
— |
— |
— |
| BGPAdvertisement |
BGPAdvertisement allows MetalLB to advertise the IPs coming from the selected ipAddressPools via BGP, setting the parameters of the BGP Advertisement. |
|
|
| aggregationLength |
The aggregation-length advertisement option lets you “roll up” the /32s into a larger prefix. Defaults to 32. Works for IPv4 addresses. |
32 |
False |
| aggregationLengthV6 |
The aggregation-length advertisement option lets you “roll up” the /128s into a larger prefix. Defaults to 128. Works for IPv6 addresses. |
128 |
False |
| communities[] |
The BGP communities to be associated with the announcement. Each item can be a community of the form 1234:1234 or the name of an alias defined in the Community CRD. |
None |
False |
| ipAddressPools[] |
The list of IPAddressPool names to be advertised via BGP. |
None |
True |
| localPref |
The BGP LOCAL_PREF attribute which is used by BGP best path algorithm, Path with higher localpref is preferred over one with lower localpref. |
None |
False |
| peers[] |
List of peer names. Limits the bgppeer to advertise the ips of the selected pools to. When empty, the loadbalancer IP is announced to all the BGPPeers configured. |
None |
False |
| — |
— |
— |
— |
| BGPPeer |
Peers for the BGP protocol. |
|
|
| holdTime |
Requested BGP hold time, per RFC4271. |
None |
False |
| keepaliveTime |
Requested BGP keepalive time, per RFC4271. |
None |
False |
| myASN |
AS number to use for the local end of the session. |
None |
True |
| password |
Authentication password for routers enforcing TCP MD5 authenticated sessions. |
None |
False |
| peerASN |
AS number to expect from the remote end of the session. |
None |
True |
| peerAddress |
Address to dial when establishing the session. |
None |
True |
| peerPort |
Port to dial when establishing the session. |
179 |
False |
| routerID |
BGP router ID to advertise to the peer. |
None |
False |
| sourceAddress |
Source address to use when establishing the session. |
None |
False |
| password |
Authentication password for routers enforcing TCP MD5 authenticated sessions. |
None |
False |
| passwordSecret |
passwordSecret is a reference to the authentication secret for BGP Peer. The secret must be of type ‘kubernetes.io/basic-auth’ and the password stored under the “password” key. Example:
passwordSecret:
name: mySecret
namespace: metallb-system |
None |
False |
7.17.6 - v0.14.8
FRRouting
is currently not supported for MetalLB.
Example
apiVersion: packages.eks.amazonaws.com/v1alpha1
kind: Package
metadata:
name: mylb
namespace: eksa-packages-<cluster-name>
spec:
packageName: metallb
targetNamespace: metallb-system
config: |
IPAddressPools:
- name: default
addresses:
- 10.220.0.93/32
- 10.220.0.94/32
- 10.220.0.95/32
- name: bgp
addresses:
- 10.220.0.97-10.220.0.99
L2Advertisements:
- ipAddressPools:
- default
BGPAdvertisements:
- ipAddressPools:
- bgp
autoAssign: false
BGPPeers:
- myASN: 123
peerASN: 55001
peerAddress: 1.2.3.4
keepaliveTime: 30s
| Parameter |
Description |
Default |
Required |
| IPAddressPools[] |
A list of ip address pools. See IPAddressPool. |
None |
False |
| L2Advertisements[] |
A list of Layer 2 advertisements. See L2Advertisement. |
None |
False |
| BGPAdvertisements[] |
A list of BGP advertisements. See BGPAdvertisement. |
None |
False |
| BGPPeers[] |
A list of BGP peers. See BGPPeer. |
None |
False |
| — |
— |
— |
— |
| IPAddressPool |
A list of IP address ranges over which MetalLB has authority. You can list multiple ranges in a single pool and they will all share the same settings. Each range can be either a CIDR prefix, or an explicit start-end range of IPs. |
|
|
| name |
Name for the address pool. |
None |
True |
| addresses[] |
A list of string representing CIRD or IP ranges. |
None |
True |
| autoAssign |
AutoAssign flag used to prevent MetalLB from automatic allocation for a pool. |
true |
False |
| — |
— |
— |
— |
| L2Advertisement |
L2Advertisement allows MetalLB to advertise the LoadBalancer IPs provided by the selected pools via L2. |
|
|
| ipAddressPools[] |
The list of IPAddressPool names to advertise. |
None |
True |
| name |
Name for the L2Advertisement. |
None |
False |
| — |
— |
— |
— |
| BGPAdvertisement |
BGPAdvertisement allows MetalLB to advertise the IPs coming from the selected ipAddressPools via BGP, setting the parameters of the BGP Advertisement. |
|
|
| aggregationLength |
The aggregation-length advertisement option lets you “roll up” the /32s into a larger prefix. Defaults to 32. Works for IPv4 addresses. |
32 |
False |
| aggregationLengthV6 |
The aggregation-length advertisement option lets you “roll up” the /128s into a larger prefix. Defaults to 128. Works for IPv6 addresses. |
128 |
False |
| communities[] |
The BGP communities to be associated with the announcement. Each item can be a community of the form 1234:1234 or the name of an alias defined in the Community CRD. |
None |
False |
| ipAddressPools[] |
The list of IPAddressPool names to be advertised via BGP. |
None |
True |
| localPref |
The BGP LOCAL_PREF attribute which is used by BGP best path algorithm, Path with higher localpref is preferred over one with lower localpref. |
None |
False |
| peers[] |
List of peer names. Limits the bgppeer to advertise the ips of the selected pools to. When empty, the loadbalancer IP is announced to all the BGPPeers configured. |
None |
False |
| — |
— |
— |
— |
| BGPPeer |
Peers for the BGP protocol. |
|
|
| holdTime |
Requested BGP hold time, per RFC4271. |
None |
False |
| keepaliveTime |
Requested BGP keepalive time, per RFC4271. |
None |
False |
| myASN |
AS number to use for the local end of the session. |
None |
True |
| password |
Authentication password for routers enforcing TCP MD5 authenticated sessions. |
None |
False |
| peerASN |
AS number to expect from the remote end of the session. |
None |
True |
| peerAddress |
Address to dial when establishing the session. |
None |
True |
| peerPort |
Port to dial when establishing the session. |
179 |
False |
| routerID |
BGP router ID to advertise to the peer. |
None |
False |
| sourceAddress |
Source address to use when establishing the session. |
None |
False |
| password |
Authentication password for routers enforcing TCP MD5 authenticated sessions. |
None |
False |
| passwordSecret |
passwordSecret is a reference to the authentication secret for BGP Peer. The secret must be of type ‘kubernetes.io/basic-auth’ and the password stored under the “password” key. Example:
passwordSecret:
name: mySecret
namespace: metallb-system |
None |
False |
7.17.7 - v0.14.9
FRRouting
is currently not supported for MetalLB.
Example
apiVersion: packages.eks.amazonaws.com/v1alpha1
kind: Package
metadata:
name: mylb
namespace: eksa-packages-<cluster-name>
spec:
packageName: metallb
targetNamespace: metallb-system
config: |
IPAddressPools:
- name: default
addresses:
- 10.220.0.93/32
- 10.220.0.94/32
- 10.220.0.95/32
- name: bgp
addresses:
- 10.220.0.97-10.220.0.99
L2Advertisements:
- ipAddressPools:
- default
BGPAdvertisements:
- ipAddressPools:
- bgp
autoAssign: false
BGPPeers:
- myASN: 123
peerASN: 55001
peerAddress: 1.2.3.4
keepaliveTime: 30s
| Parameter |
Description |
Default |
Required |
| IPAddressPools[] |
A list of ip address pools. See IPAddressPool. |
None |
False |
| L2Advertisements[] |
A list of Layer 2 advertisements. See L2Advertisement. |
None |
False |
| BGPAdvertisements[] |
A list of BGP advertisements. See BGPAdvertisement. |
None |
False |
| BGPPeers[] |
A list of BGP peers. See BGPPeer. |
None |
False |
| speaker |
A list of speaker flag/parameter. See speaker |
None |
False |
| — |
— |
— |
— |
| IPAddressPool |
A list of IP address ranges over which MetalLB has authority. You can list multiple ranges in a single pool and they will all share the same settings. Each range can be either a CIDR prefix, or an explicit start-end range of IPs. |
|
|
| name |
Name for the address pool. |
None |
True |
| addresses[] |
A list of string representing CIRD or IP ranges. |
None |
True |
| autoAssign |
AutoAssign flag used to prevent MetalLB from automatic allocation for a pool. |
true |
False |
| — |
— |
— |
— |
| L2Advertisement |
L2Advertisement allows MetalLB to advertise the LoadBalancer IPs provided by the selected pools via L2. |
|
|
| ipAddressPools[] |
The list of IPAddressPool names to advertise. |
None |
True |
| name |
Name for the L2Advertisement. |
None |
False |
| — |
— |
— |
— |
| BGPAdvertisement |
BGPAdvertisement allows MetalLB to advertise the IPs coming from the selected ipAddressPools via BGP, setting the parameters of the BGP Advertisement. |
|
|
| aggregationLength |
The aggregation-length advertisement option lets you “roll up” the /32s into a larger prefix. Defaults to 32. Works for IPv4 addresses. |
32 |
False |
| aggregationLengthV6 |
The aggregation-length advertisement option lets you “roll up” the /128s into a larger prefix. Defaults to 128. Works for IPv6 addresses. |
128 |
False |
| communities[] |
The BGP communities to be associated with the announcement. Each item can be a community of the form 1234:1234 or the name of an alias defined in the Community CRD. |
None |
False |
| ipAddressPools[] |
The list of IPAddressPool names to be advertised via BGP. |
None |
True |
| localPref |
The BGP LOCAL_PREF attribute which is used by BGP best path algorithm, Path with higher localpref is preferred over one with lower localpref. |
None |
False |
| peers[] |
List of peer names. Limits the bgppeer to advertise the ips of the selected pools to. When empty, the loadbalancer IP is announced to all the BGPPeers configured. |
None |
False |
| — |
— |
— |
— |
| BGPPeer |
Peers for the BGP protocol. |
|
|
| holdTime |
Requested BGP hold time, per RFC4271. |
None |
False |
| keepaliveTime |
Requested BGP keepalive time, per RFC4271. |
None |
False |
| myASN |
AS number to use for the local end of the session. |
None |
True |
| password |
Authentication password for routers enforcing TCP MD5 authenticated sessions. |
None |
False |
| peerASN |
AS number to expect from the remote end of the session. |
None |
True |
| peerAddress |
Address to dial when establishing the session. |
None |
True |
| peerPort |
Port to dial when establishing the session. |
179 |
False |
| routerID |
BGP router ID to advertise to the peer. |
None |
False |
| sourceAddress |
Source address to use when establishing the session. |
None |
False |
| password |
Authentication password for routers enforcing TCP MD5 authenticated sessions. |
None |
False |
| passwordSecret |
passwordSecret is a reference to the authentication secret for BGP Peer. The secret must be of type ‘kubernetes.io/basic-auth’ and the password stored under the “password” key. Example:
passwordSecret:
name: mySecret
namespace: metallb-system |
None |
False |
| — |
— |
— |
— |
| speaker |
announcing the services via L2 or BGP |
|
|
| ignoreExcludeLB |
ignore the exclude-from-external-load-balancers node label for service announcements. More details
|
False |
False |
Example
apiVersion: packages.eks.amazonaws.com/v1alpha1
kind: Package
metadata:
name: mylb
namespace: eksa-packages-<cluster-name>
spec:
packageName: metallb
targetNamespace: metallb-system
config: |
speaker:
ignoreExcludeLB: true
7.17.8 - v0.15.2
FRRouting
is currently not supported for MetalLB.
Example
apiVersion: packages.eks.amazonaws.com/v1alpha1
kind: Package
metadata:
name: mylb
namespace: eksa-packages-<cluster-name>
spec:
packageName: metallb
targetNamespace: metallb-system
config: |
IPAddressPools:
- name: default
addresses:
- 10.220.0.93/32
- 10.220.0.94/32
- 10.220.0.95/32
- name: bgp
addresses:
- 10.220.0.97-10.220.0.99
L2Advertisements:
- ipAddressPools:
- default
BGPAdvertisements:
- ipAddressPools:
- bgp
autoAssign: false
BGPPeers:
- myASN: 123
peerASN: 55001
peerAddress: 1.2.3.4
keepaliveTime: 30s
| Parameter |
Description |
Default |
Required |
| IPAddressPools[] |
A list of ip address pools. See IPAddressPool. |
None |
False |
| L2Advertisements[] |
A list of Layer 2 advertisements. See L2Advertisement. |
None |
False |
| BGPAdvertisements[] |
A list of BGP advertisements. See BGPAdvertisement. |
None |
False |
| BGPPeers[] |
A list of BGP peers. See BGPPeer. |
None |
False |
| speaker |
A list of speaker flag/parameter. See speaker |
None |
False |
| — |
— |
— |
— |
| IPAddressPool |
A list of IP address ranges over which MetalLB has authority. You can list multiple ranges in a single pool and they will all share the same settings. Each range can be either a CIDR prefix, or an explicit start-end range of IPs. |
|
|
| name |
Name for the address pool. |
None |
True |
| addresses[] |
A list of string representing CIRD or IP ranges. |
None |
True |
| autoAssign |
AutoAssign flag used to prevent MetalLB from automatic allocation for a pool. |
true |
False |
| — |
— |
— |
— |
| L2Advertisement |
L2Advertisement allows MetalLB to advertise the LoadBalancer IPs provided by the selected pools via L2. |
|
|
| ipAddressPools[] |
The list of IPAddressPool names to advertise. |
None |
True |
| name |
Name for the L2Advertisement. |
None |
False |
| — |
— |
— |
— |
| BGPAdvertisement |
BGPAdvertisement allows MetalLB to advertise the IPs coming from the selected ipAddressPools via BGP, setting the parameters of the BGP Advertisement. |
|
|
| aggregationLength |
The aggregation-length advertisement option lets you “roll up” the /32s into a larger prefix. Defaults to 32. Works for IPv4 addresses. |
32 |
False |
| aggregationLengthV6 |
The aggregation-length advertisement option lets you “roll up” the /128s into a larger prefix. Defaults to 128. Works for IPv6 addresses. |
128 |
False |
| communities[] |
The BGP communities to be associated with the announcement. Each item can be a community of the form 1234:1234 or the name of an alias defined in the Community CRD. |
None |
False |
| ipAddressPools[] |
The list of IPAddressPool names to be advertised via BGP. |
None |
True |
| localPref |
The BGP LOCAL_PREF attribute which is used by BGP best path algorithm, Path with higher localpref is preferred over one with lower localpref. |
None |
False |
| peers[] |
List of peer names. Limits the bgppeer to advertise the ips of the selected pools to. When empty, the loadbalancer IP is announced to all the BGPPeers configured. |
None |
False |
| — |
— |
— |
— |
| BGPPeer |
Peers for the BGP protocol. |
|
|
| holdTime |
Requested BGP hold time, per RFC4271. |
None |
False |
| keepaliveTime |
Requested BGP keepalive time, per RFC4271. |
None |
False |
| myASN |
AS number to use for the local end of the session. |
None |
True |
| password |
Authentication password for routers enforcing TCP MD5 authenticated sessions. |
None |
False |
| peerASN |
AS number to expect from the remote end of the session. |
None |
True |
| peerAddress |
Address to dial when establishing the session. |
None |
True |
| peerPort |
Port to dial when establishing the session. |
179 |
False |
| routerID |
BGP router ID to advertise to the peer. |
None |
False |
| sourceAddress |
Source address to use when establishing the session. |
None |
False |
| password |
Authentication password for routers enforcing TCP MD5 authenticated sessions. |
None |
False |
| passwordSecret |
passwordSecret is a reference to the authentication secret for BGP Peer. The secret must be of type ‘kubernetes.io/basic-auth’ and the password stored under the “password” key. Example:
passwordSecret:
name: mySecret
namespace: metallb-system |
None |
False |
| — |
— |
— |
— |
| speaker |
announcing the services via L2 or BGP |
|
|
| ignoreExcludeLB |
ignore the exclude-from-external-load-balancers node label for service announcements. More details
|
False |
False |
Example
apiVersion: packages.eks.amazonaws.com/v1alpha1
kind: Package
metadata:
name: mylb
namespace: eksa-packages-<cluster-name>
spec:
packageName: metallb
targetNamespace: metallb-system
config: |
speaker:
ignoreExcludeLB: true
7.18 - Prometheus Configuration
Prometheus is an open-source systems monitoring and alerting toolkit. It collects and stores metrics as time series data.
Best Practice
Any supported EKS Anywhere curated package should be modified through package yaml files (with kind: Package) and applied through the command kubectl apply -f packageFileName. Modifying objects outside of package yaml files may lead to unpredictable behaviors.
For automatic namespace (targetNamespace) creation, see createNamespace field: PackagebundleController.spec
Configuration options for Prometheus
7.18.1 - Prometheus with Grafana
This tutorial demonstrates how to config the Prometheus package to scrape metrics from an EKS Anywhere cluster, and visualize them in Grafana.
This tutorial walks through the following procedures:
Install the Prometheus package
The Prometheus package creates two components by default:
- Prometheus-server,
which collects metrics from configured targets, and stores the metrics as time series data;
- Node-exporter,
which exposes a wide variety of hardware- and kernel-related metrics for prometheus-server (or an equivalent metrics collector, i.e. ADOT collector) to scrape.
The prometheus-server is pre-configured to scrape the following targets at 1m interval:
- Kubernetes API servers
- Kubernetes nodes
- Kubernetes nodes cadvisor
- Kubernetes service endpoints
- Kubernetes services
- Kubernetes pods
- Prometheus-server itself
If no config modification is needed, a user can proceed to the Prometheus installation guide
.
Prometheus Package Customization
In this section, we cover a few frequently-asked config customizations. After determining the appropriate customization, proceed to the Prometheus installation guide
to complete the package installation. Also refer to Prometheus package spec
for additional config options.
Change prometheus-server global configs
By default, prometheus-server is configured with evaluation_interval: 1m, scrape_interval: 1m, scrape_timeout: 10s. Those values can be overwritten if preferred / needed.
The following config allows the user to do such customization:
apiVersion: packages.eks.amazonaws.com/v1alpha1
kind: Package
metadata:
name: generated-prometheus
namespace: eksa-packages-<cluster-name>
spec:
packageName: prometheus
config: |
server:
global:
evaluation_interval: "30s"
scrape_interval: "30s"
scrape_timeout: "15s"
Run prometheus-server as statefulSets
By default, prometheus-server is created as a deployment with replicaCount equals to 1. If there is a need to increase the replicaCount greater than 1, a user should deploy prometheus-server as a statefulSet instead. This allows multiple prometheus-server pods to share the same data storage.
The following config allows the user to do such customization:
apiVersion: packages.eks.amazonaws.com/v1alpha1
kind: Package
metadata:
name: generated-prometheus
namespace: eksa-packages-<cluster-name>
spec:
packageName: prometheus
config: |
server:
replicaCount: 2
statefulSet:
enabled: true
Disable prometheus-server and use node-exporter only
A user may disable the prometheus-server when:
- they would like to use node-exporter to expose hardware- and kernel-related metrics, while
- they have deployed another metrics collector in the cluster and configured a remote-write storage solution, which fulfills the prometheus-server functionality (check out the ADOT with Amazon Managed Prometheus and Amazon Managed Grafana workshop
to learn how to do so).
The following config allows the user to do such customization:
apiVersion: packages.eks.amazonaws.com/v1alpha1
kind: Package
metadata:
name: generated-prometheus
namespace: eksa-packages-<cluster-name>
spec:
packageName: prometheus
config: |
server:
enabled: false
Disable node-exporter and use prometheus-server only
A user may disable the node-exporter when:
- they would like to deploy multiple prometheus-server packages for a cluster, while
- deploying only one or none node-exporter instance per node.
The following config allows the user to do such customization:
apiVersion: packages.eks.amazonaws.com/v1alpha1
kind: Package
metadata:
name: generated-prometheus
namespace: eksa-packages-<cluster-name>
spec:
packageName: prometheus
config: |
nodeExporter:
enabled: false
Prometheus Package Test
To ensure the Prometheus package is installed correctly in the cluster, a user can perform the following tests.
Access prometheus-server web UI
Port forward Prometheus to local host 9090:
export PROM_SERVER_POD_NAME=$(kubectl get pods --namespace <namespace> -l "app.kubernetes.io/name=prometheus,app.kubernetes.io/component=server" -o jsonpath="{.items[0].metadata.name")
kubectl port-forward $PROM_SERVER_POD_NAME -n <namespace> 9090
Go to http://localhost:9090
to access the web UI.
Run sample queries
Run sample queries in Prometheus web UI to confirm the targets have been configured properly. For example, a user can run the following query to obtain the CPU utilization rate by node.
100 - (avg by(instance) (irate(node_cpu_seconds_total{mode="idle"}[5m])) * 100 )
The output will be displayed on the Graph tab.
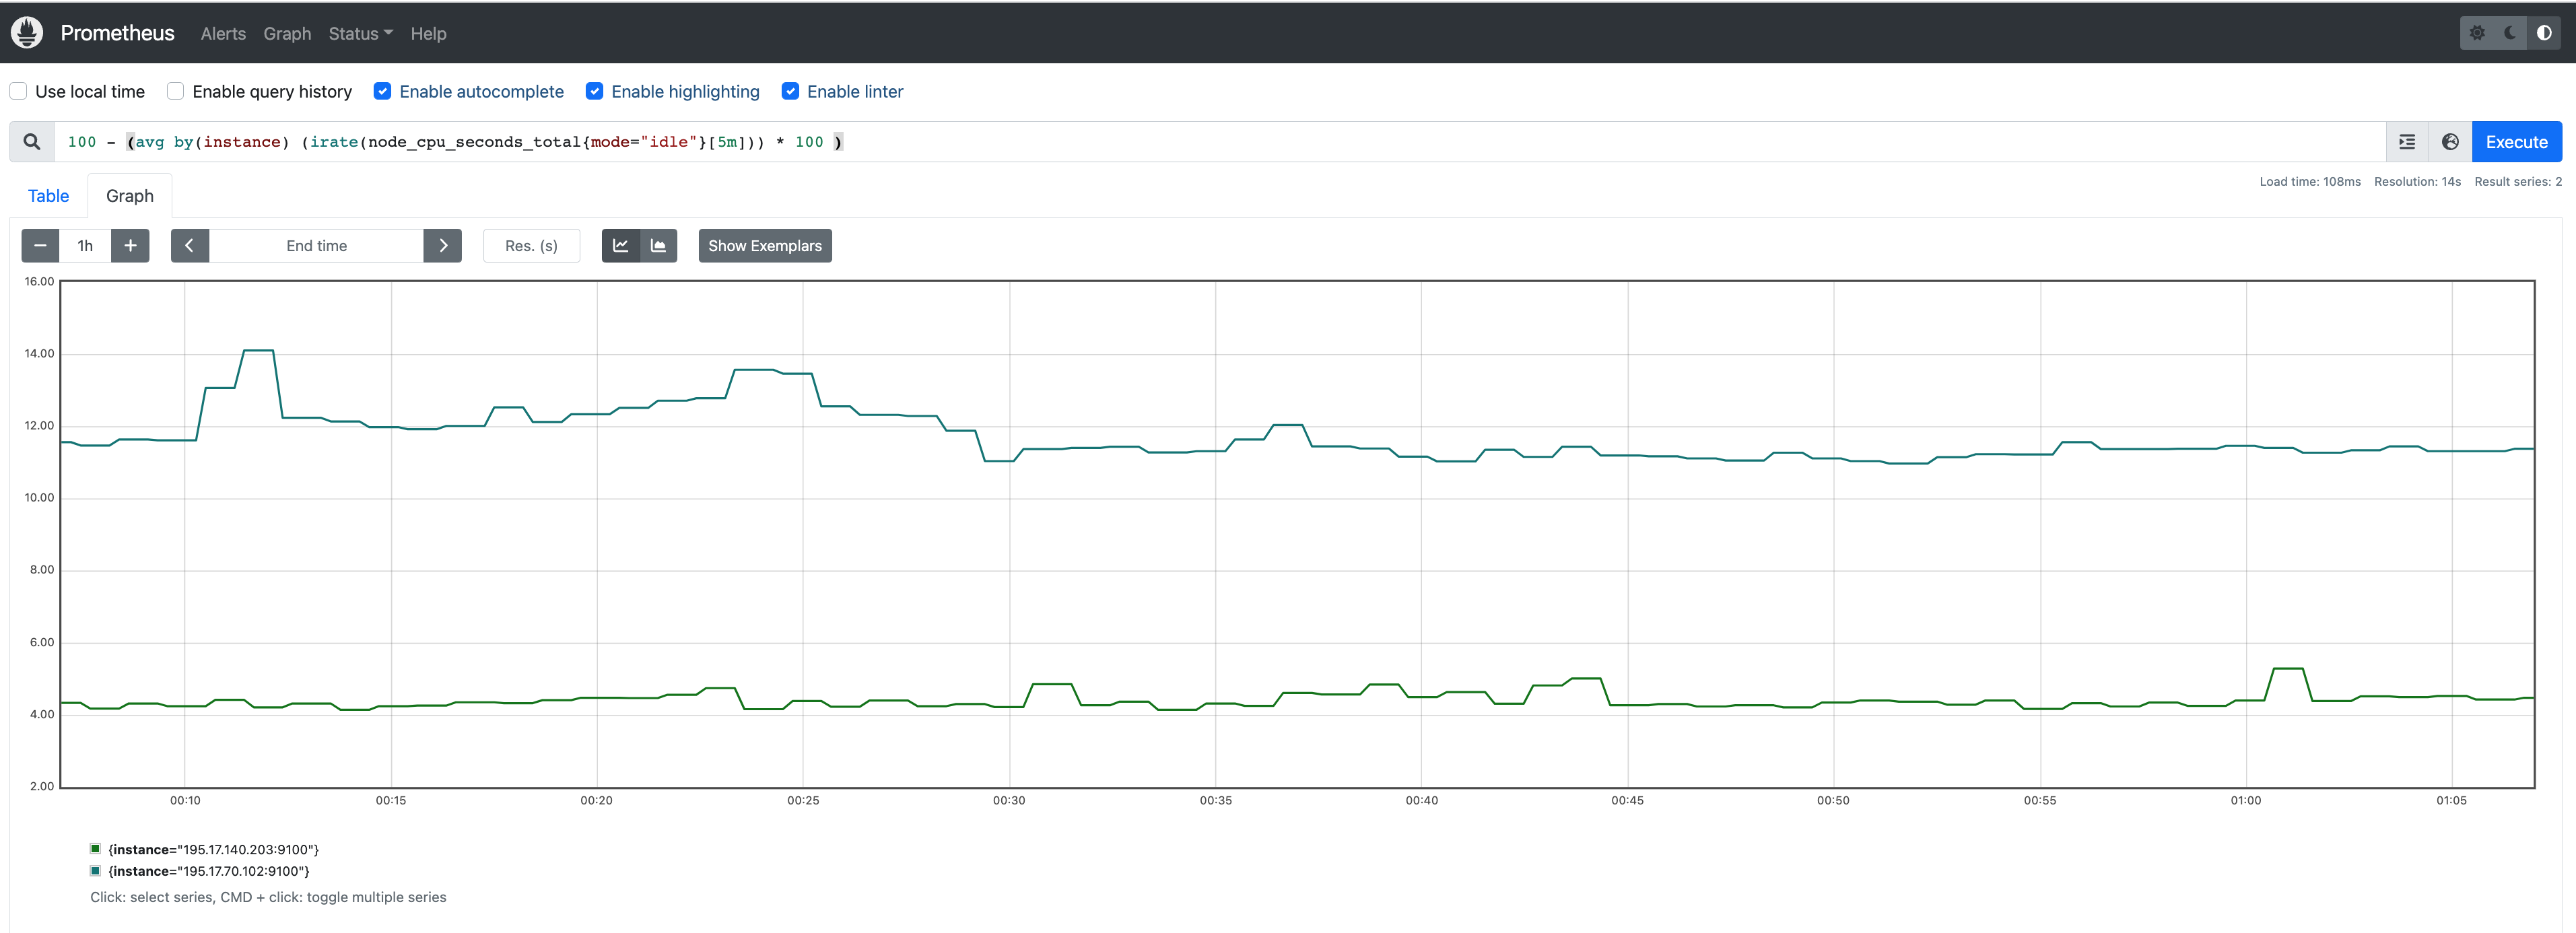
Install Grafana helm charts
A user can install Grafana in the cluster to visualize the Prometheus metrics. We used the Grafana helm chart as an example below, though other deployment methods are also possible.
-
Get helm chart repo info
helm repo add grafana https://grafana.github.io/helm-charts
helm repo update
-
Install the helm chart
helm install my-grafana grafana/grafana
Set up Grafana dashboards
Access Grafana web UI
-
Obtain Grafana login password:
kubectl get secret --namespace default my-grafana -o jsonpath="{.data.admin-password}" | base64 --decode; echo
-
Port forward Grafana to local host 3000:
export GRAFANA_POD_NAME=$(kubectl get pods --namespace default -l "app.kubernetes.io/name=grafana,app.kubernetes.io/instance=my-grafana" -o jsonpath="{.items[0].metadata.name}")
kubectl --namespace default port-forward $GRAFANA_POD_NAME 3000
-
Go to http://localhost:3000
to access the web UI.
Log in with username admin, and password obtained from the Obtain Grafana login password in step 1 above.
Add Prometheus data source
-
Click on the Configuration sign on the left navigation bar, select Data sources, then choose Prometheus as the Data source.

-
Configure Prometheus data source with the following details:
- Name:
Prometheus as an example.
- URL:
http://<prometheus-server-end-point-name>.<namespace>:9090. If the package default values are used, this will be http://generated-prometheus-server.observability:9090.
- Scrape interval:
1m or the value specified by user in the package config.
- Select
Save and test. A notification data source is working should be displayed.
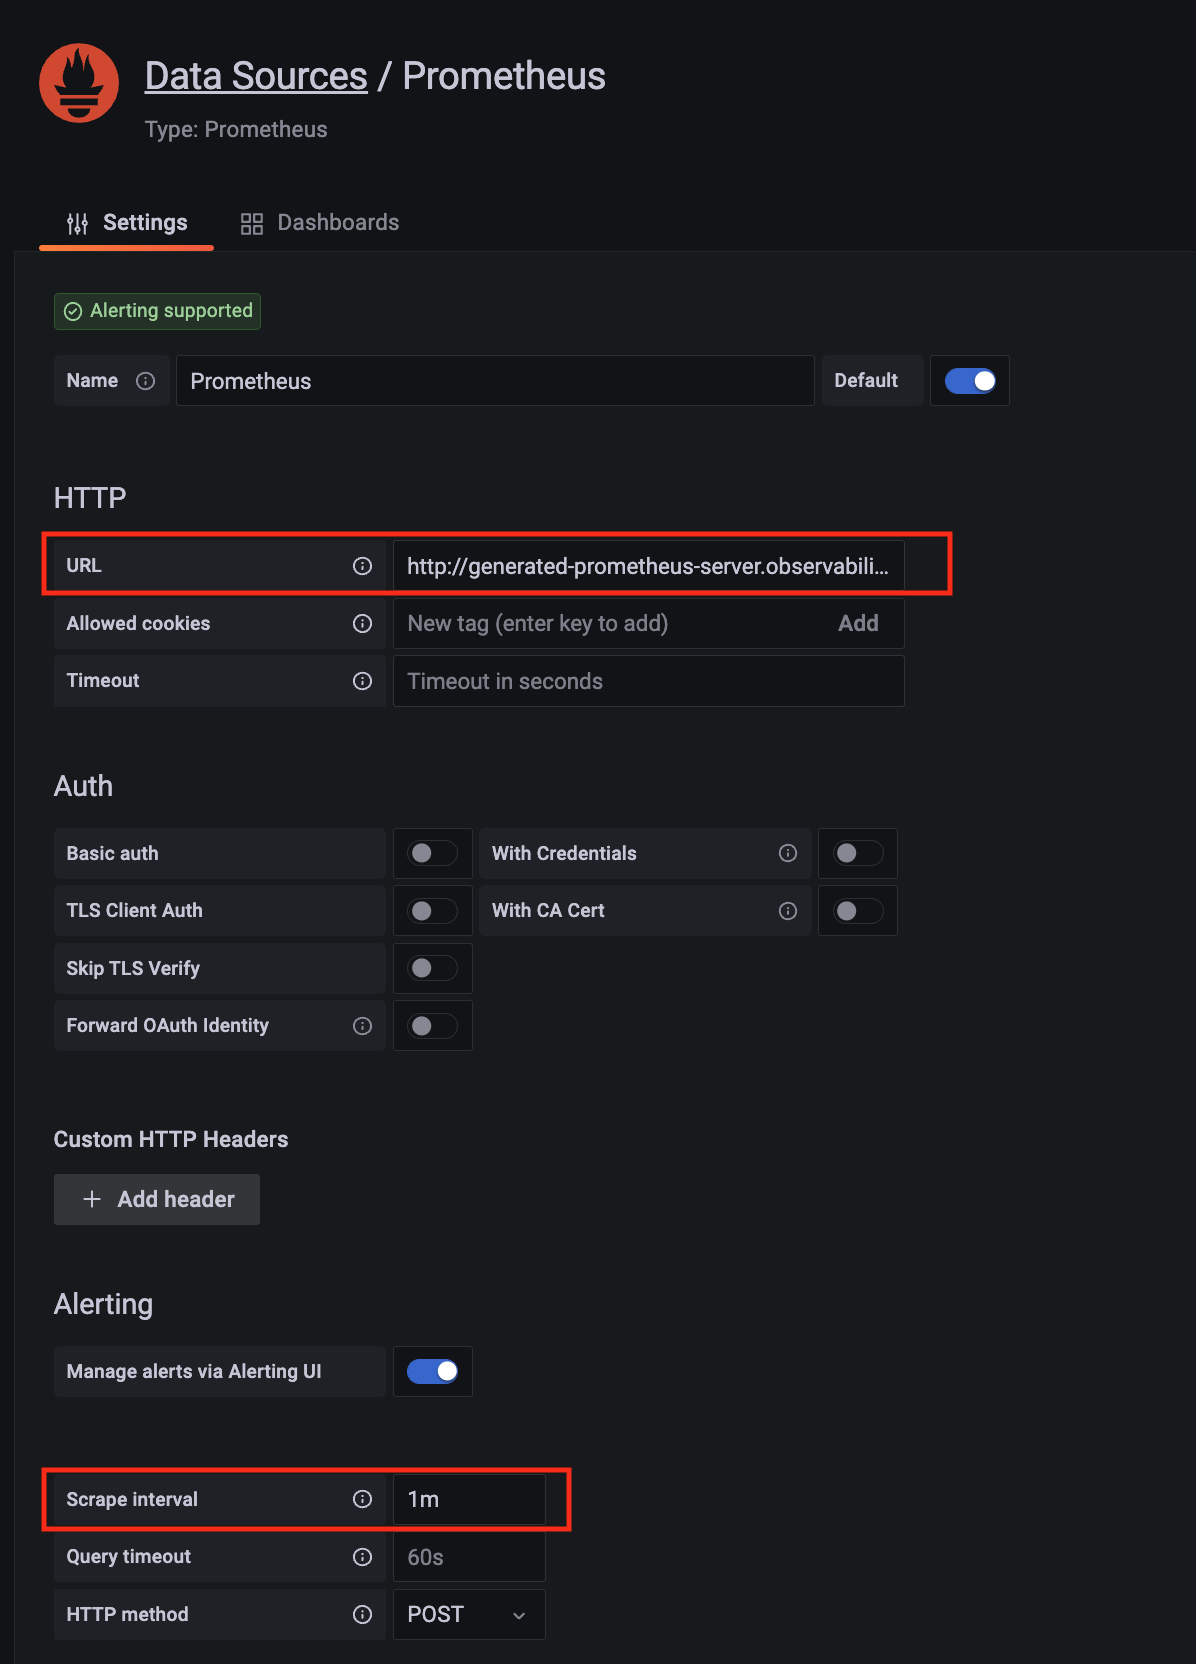
Import dashboard templates
-
Import a dashboard template by hovering over to the Dashboard sign on the left navigation bar, and click on Import. Type 315 in the Import via grafana.com textbox and select Import.
From the dropdown at the bottom, select Prometheus and select Import.

-
A Kubernetes cluster monitoring (via Prometheus) dashboard will be displayed.
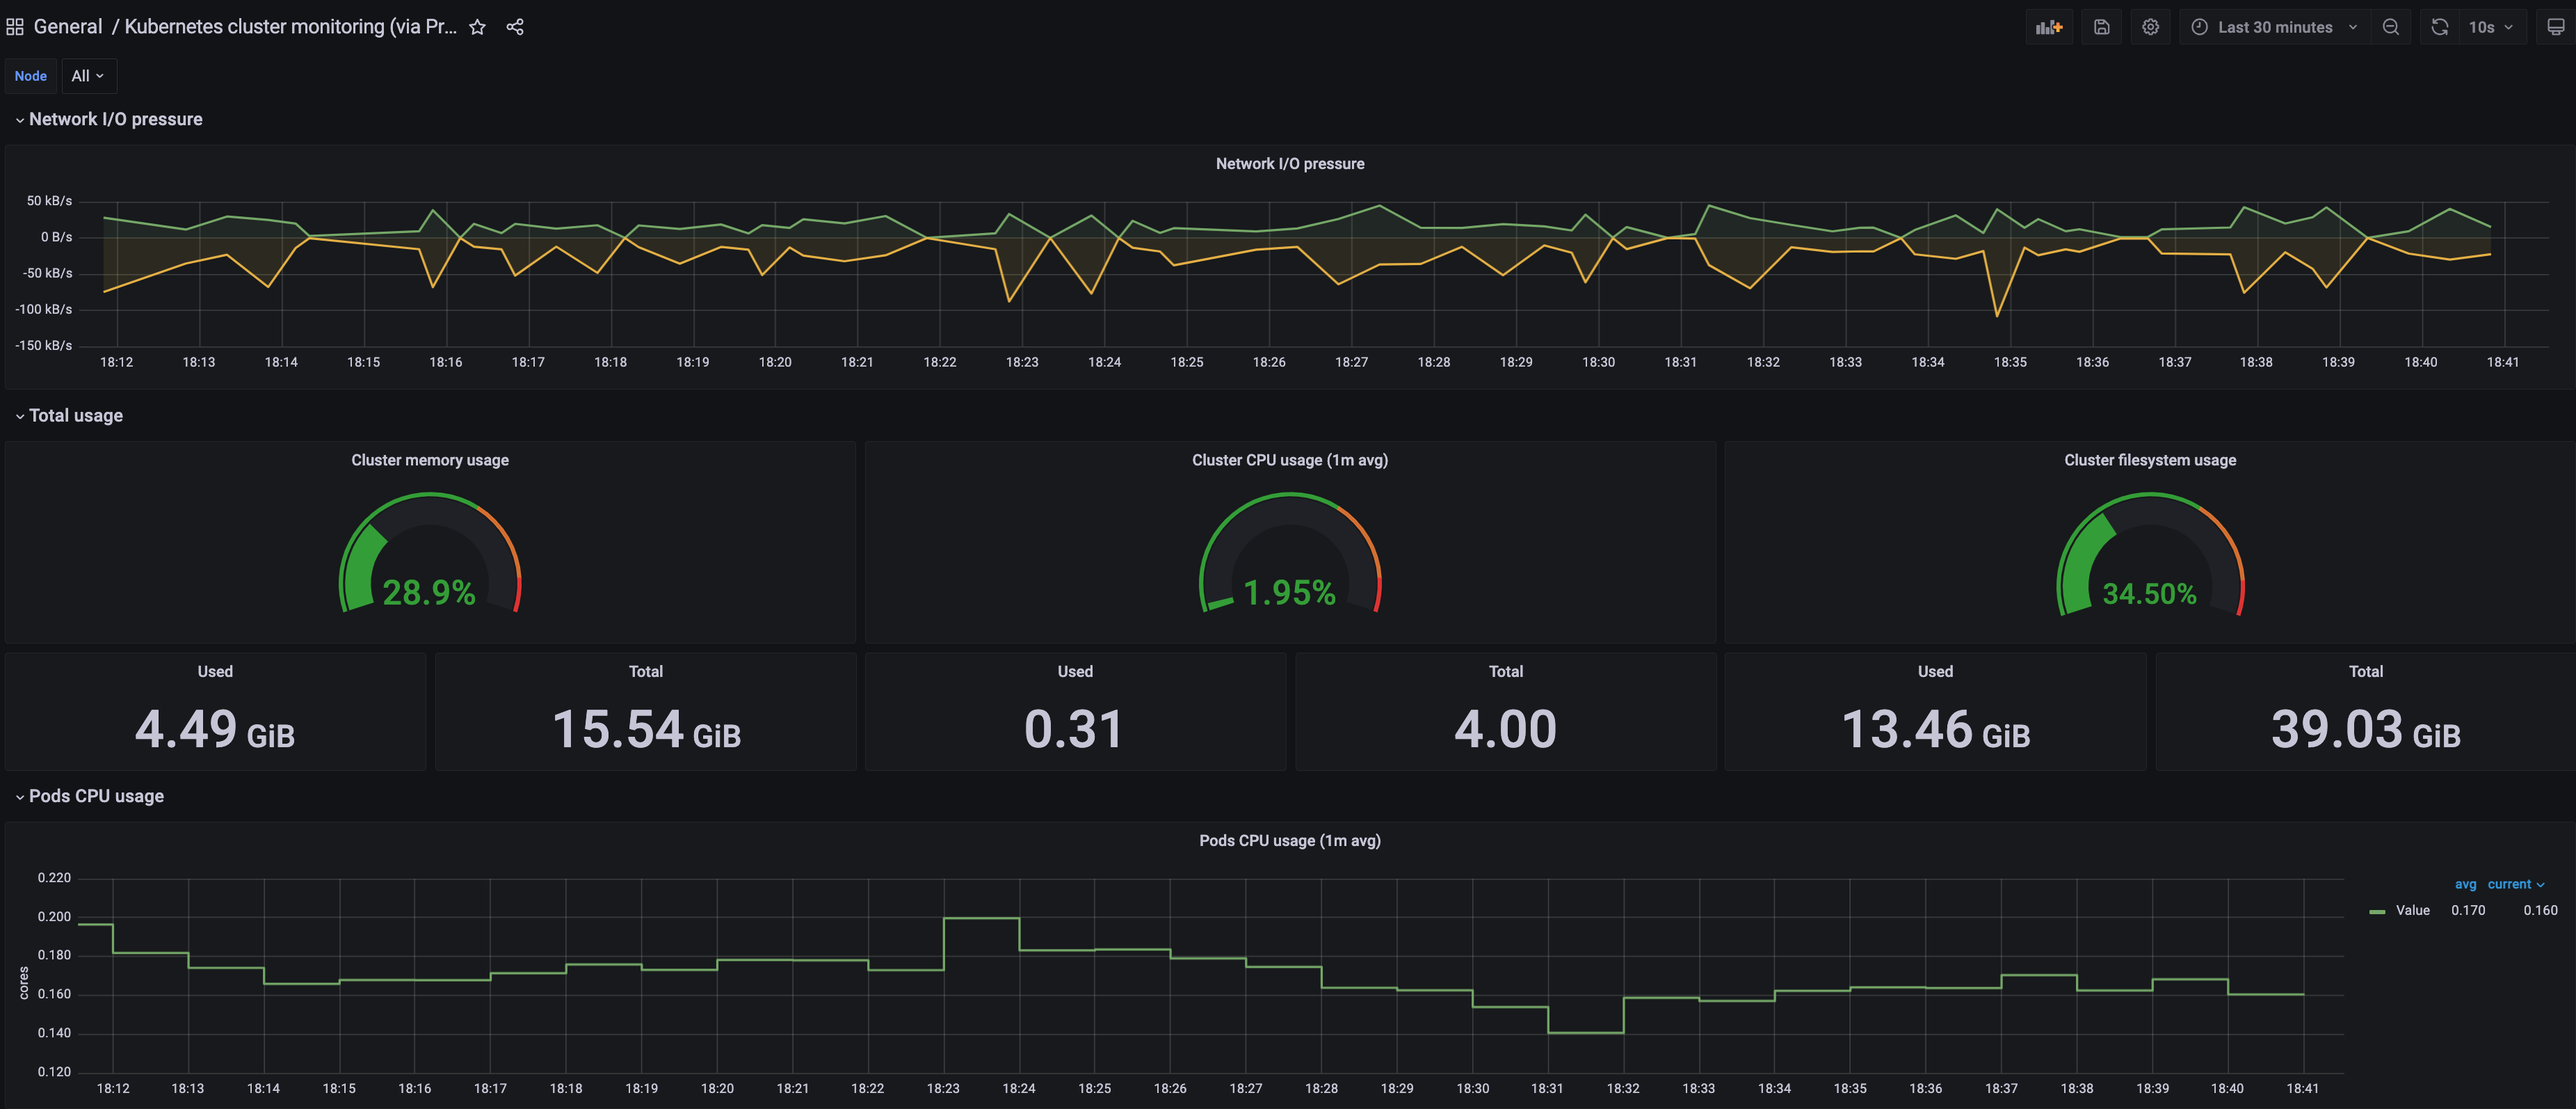
-
Perform the same procedure for template 1860. A Node Exporter Full dashboard will be displayed.

7.18.2 - Prometheus
Install/upgrade/uninstall Prometheus
If you have not already done so, make sure your cluster meets the package prerequisites.
Be sure to refer to the troubleshooting guide
in the event of a problem.
Important
- Starting at
eksctl anywhere version v0.12.0, packages on workload clusters are remotely managed by the management cluster.
- While following this guide to install packages on a workload cluster, please make sure the
kubeconfig is pointing to the management cluster that was used to create the workload cluster. The only exception is the kubectl create namespace command below, which should be run with kubeconfig pointing to the workload cluster.
Install
-
Generate the package configuration
eksctl anywhere generate package prometheus --cluster <cluster-name> > prometheus.yaml
-
Add the desired configuration to prometheus.yaml
Please see complete configuration options
for all configuration options and their default values.
Example package file with default configuration, which enables prometheus-server and node-exporter:
apiVersion: packages.eks.amazonaws.com/v1alpha1
kind: Package
metadata:
name: generated-prometheus
namespace: eksa-packages-<cluster-name>
spec:
packageName: prometheus
Example package file with prometheus-server (or node-exporter) disabled:
apiVersion: packages.eks.amazonaws.com/v1alpha1
kind: Package
metadata:
name: generated-prometheus
namespace: eksa-packages-<cluster-name>
spec:
packageName: prometheus
config: |
# disable prometheus-server
server:
enabled: false
# or disable node-exporter
# nodeExporter:
# enabled: false
Example package file with prometheus-server deployed as a statefulSet with replicaCount 2, and set scrape config to collect Prometheus-server’s own metrics only:
apiVersion: packages.eks.amazonaws.com/v1alpha1
kind: Package
metadata:
name: generated-prometheus
namespace: eksa-packages-<cluster-name>
spec:
packageName: prometheus
targetNamespace: observability
config: |
server:
replicaCount: 2
statefulSet:
enabled: true
serverFiles:
prometheus.yml:
scrape_configs:
- job_name: prometheus
static_configs:
- targets:
- localhost:9090
-
Create the namespace
(If overriding targetNamespace, change observability to the value of targetNamespace)
kubectl create namespace observability
-
Install prometheus
eksctl anywhere create packages -f prometheus.yaml
-
Validate the installation
eksctl anywhere get packages --cluster <cluster-name>
Example command output
NAMESPACE NAME PACKAGE AGE STATE CURRENTVERSION TARGETVERSION DETAIL
eksa-packages-<cluster-name> generated-prometheus prometheus 17m installed 2.41.0-b53c8be243a6cc3ac2553de24ab9f726d9b851ca 2.41.0-b53c8be243a6cc3ac2553de24ab9f726d9b851ca (latest)
Update
To update package configuration, update prometheus.yaml file, and run the following command:
eksctl anywhere apply package -f prometheus.yaml
Upgrade
Prometheus will automatically be upgraded when a new bundle is activated.
Uninstall
To uninstall Prometheus, simply delete the package
eksctl anywhere delete package --cluster <cluster-name> generated-prometheus
7.18.3 - v2.39.1
Configuring Prometheus in EKS Anywhere package spec
Example
apiVersion: packages.eks.amazonaws.com/v1alpha1
kind: Package
metadata:
name: generated-prometheus
namespace: eksa-packages-<cluster-name>
spec:
packageName: prometheus
targetNamespace: observability
config: |
server:
replicaCount: 2
statefulSet:
enabled: true
Configurable parameters and default values under spec.config
| Parameter |
Description |
Default |
| General |
|
|
| rbac.create |
Specifies if clusterRole / role and clusterRoleBinding / roleBinding will be created for prometheus-server and node-exporter |
true |
| sourceRegistry |
Specifies image source registry for prometheus-server and node-exporter |
"783794618700.dkr.ecr.us-west-2.amazonaws.com" |
| Node-Exporter |
|
|
| nodeExporter.enabled |
Indicates if node-exporter is enabled |
true |
| nodeExporter.hostNetwork |
Indicates if node-exporter shares the host network namespace |
true |
| nodeExporter.hostPID |
Indicates if node-exporter shares the host process ID namespace |
true |
| nodeExporter.image.pullPolicy |
Specifies node-exporter image pull policy: IfNotPresent, Always, Never |
"IfNotPresent" |
| nodeExporter.image.repository |
Specifies node-exporter image repository |
"prometheus/node-exporter" |
| nodeExporter.resources |
Specifies resource requests and limits of the node-exporter container. Refer to the Kubernetes API documentation ResourceRequirements
field for more details |
{} |
| nodeExporter.service |
Specifies how to expose node-exporter as a network service |
See footnote |
| nodeExporter.tolerations |
Specifies node tolerations for node-exporter scheduling to nodes with taints. Refer to the Kubernetes API documentation toleration
field for more details. |
See footnote |
| serviceAccounts.nodeExporter.annotations |
Specifies node-exporter service account annotations |
{} |
| serviceAccounts.nodeExporter.create |
Indicates if node-exporter service account will be created |
true |
| serviceAccounts.nodeExporter.name |
Specifies node-exporter service account name |
"" |
| Prometheus-Server |
|
|
| server.enabled |
Indicates if prometheus-server is enabled |
true |
| server.global.evaluation_interval |
Specifies how frequently the prometheus-server rules are evaluated |
"1m" |
| server.global.scrape_interval |
Specifies how frequently prometheus-server will scrape targets |
"1m" |
| server.global.scrape_timeout |
Specifies how long until a prometheus-server scrape request times out |
"10s" |
| server.image.pullPolicy |
Specifies prometheus-server image pull policy: IfNotPresent, Always, Never |
"IfNotPresent" |
| server.image.repository |
Specifies prometheus-server image repository |
"prometheus/prometheus" |
| server.name |
Specifies prometheus-server container name |
"server" |
| server.persistentVolume.accessModes |
Specifies prometheus-server data Persistent Volume access modes |
"ReadWriteOnce" |
| server.persistentVolume.enabled |
Indicates if prometheus-server will create/use a Persistent Volume Claim |
true |
| server.persistentVolume.existingClaim |
Specifies prometheus-server data Persistent Volume existing claim name. It requires server.persistentVolume.enabled: true. If defined, PVC must be created manually before volume will be bound |
"" |
| server.persistentVolume.size |
Specifies prometheus-server data Persistent Volume size |
"8Gi" |
| server.remoteRead |
Specifies prometheus-server remote read configs. Refer to Prometheus docs remote_read
for more details |
[] |
| server.remoteWrite |
Specifies prometheus-server remote write configs. Refer to Prometheus docs remote_write
for more details |
[] |
| server.replicaCount |
Specifies the replicaCount for prometheus-server deployment / statefulSet. Note: server.statefulSet.enabled should be set to true if server.replicaCount is greater than 1 |
1 |
| server.resources |
Specifies resource requests and limits of the prometheus-server container. Refer to the Kubernetes API documentation ResourceRequirements
field for more details |
{} |
| server.retention |
Specifies prometheus-server data retention period |
"15d" |
| server.service |
Specifies how to expose prometheus-server as a network service |
See footnote |
| server.statefulSet.enabled |
Indicates if prometheus-server is deployed as a statefulSet. If set to false, prometheus-server will be deployed as a deployment |
false |
| serverFiles.“prometheus.yml”.scrape_configs |
Specifies a set of targets and parameters for prometheus-server describing how to scrape them. Refer to Prometheus docs scrape_config
for more details |
See footnote |
| serviceAccounts.server.annotations |
Specifies prometheus-server service account annotations |
{} |
| serviceAccounts.server.create |
Indicates if prometheus-server service account will be created |
true |
| serviceAccounts.server.name |
Specifies prometheus-server service account name |
"" |
7.18.4 - v2.41.1
Configuring Prometheus in EKS Anywhere package spec
Example
apiVersion: packages.eks.amazonaws.com/v1alpha1
kind: Package
metadata:
name: generated-prometheus
namespace: eksa-packages-<cluster-name>
spec:
packageName: prometheus
targetNamespace: observability
config: |
server:
replicaCount: 2
statefulSet:
enabled: true
Configurable parameters and default values under spec.config
| Parameter |
Description |
Default |
| General |
|
|
| rbac.create |
Specifies if clusterRole / role and clusterRoleBinding / roleBinding will be created for prometheus-server and node-exporter |
true |
| sourceRegistry |
Specifies image source registry for prometheus-server and node-exporter |
"783794618700.dkr.ecr.us-west-2.amazonaws.com" |
| Node-Exporter |
|
|
| nodeExporter.enabled |
Indicates if node-exporter is enabled |
true |
| nodeExporter.hostNetwork |
Indicates if node-exporter shares the host network namespace |
true |
| nodeExporter.hostPID |
Indicates if node-exporter shares the host process ID namespace |
true |
| nodeExporter.image.pullPolicy |
Specifies node-exporter image pull policy: IfNotPresent, Always, Never |
"IfNotPresent" |
| nodeExporter.image.repository |
Specifies node-exporter image repository |
"prometheus/node-exporter" |
| nodeExporter.resources |
Specifies resource requests and limits of the node-exporter container. Refer to the Kubernetes API documentation ResourceRequirements
field for more details |
{} |
| nodeExporter.service |
Specifies how to expose node-exporter as a network service |
See footnote |
| nodeExporter.tolerations |
Specifies node tolerations for node-exporter scheduling to nodes with taints. Refer to the Kubernetes API documentation toleration
field for more details. |
See footnote |
| serviceAccounts.nodeExporter.annotations |
Specifies node-exporter service account annotations |
{} |
| serviceAccounts.nodeExporter.create |
Indicates if node-exporter service account will be created |
true |
| serviceAccounts.nodeExporter.name |
Specifies node-exporter service account name |
"" |
| Prometheus-Server |
|
|
| server.enabled |
Indicates if prometheus-server is enabled |
true |
| server.global.evaluation_interval |
Specifies how frequently the prometheus-server rules are evaluated |
"1m" |
| server.global.scrape_interval |
Specifies how frequently prometheus-server will scrape targets |
"1m" |
| server.global.scrape_timeout |
Specifies how long until a prometheus-server scrape request times out |
"10s" |
| server.image.pullPolicy |
Specifies prometheus-server image pull policy: IfNotPresent, Always, Never |
"IfNotPresent" |
| server.image.repository |
Specifies prometheus-server image repository |
"prometheus/prometheus" |
| server.name |
Specifies prometheus-server container name |
"server" |
| server.persistentVolume.accessModes |
Specifies prometheus-server data Persistent Volume access modes |
"ReadWriteOnce" |
| server.persistentVolume.enabled |
Indicates if prometheus-server will create/use a Persistent Volume Claim |
true |
| server.persistentVolume.existingClaim |
Specifies prometheus-server data Persistent Volume existing claim name. It requires server.persistentVolume.enabled: true. If defined, PVC must be created manually before volume will be bound |
"" |
| server.persistentVolume.size |
Specifies prometheus-server data Persistent Volume size |
"8Gi" |
| server.remoteRead |
Specifies prometheus-server remote read configs. Refer to Prometheus docs remote_read
for more details |
[] |
| server.remoteWrite |
Specifies prometheus-server remote write configs. Refer to Prometheus docs remote_write
for more details |
[] |
| server.replicaCount |
Specifies the replicaCount for prometheus-server deployment / statefulSet. Note: server.statefulSet.enabled should be set to true if server.replicaCount is greater than 1 |
1 |
| server.resources |
Specifies resource requests and limits of the prometheus-server container. Refer to the Kubernetes API documentation ResourceRequirements
field for more details |
{} |
| server.retention |
Specifies prometheus-server data retention period |
"15d" |
| server.service |
Specifies how to expose prometheus-server as a network service |
See footnote |
| server.statefulSet.enabled |
Indicates if prometheus-server is deployed as a statefulSet. If set to false, prometheus-server will be deployed as a deployment |
false |
| serverFiles.“prometheus.yml”.scrape_configs |
Specifies a set of targets and parameters for prometheus-server describing how to scrape them. Refer to Prometheus docs scrape_config
for more details |
See footnote |
| serviceAccounts.server.annotations |
Specifies prometheus-server service account annotations |
{} |
| serviceAccounts.server.create |
Indicates if prometheus-server service account will be created |
true |
| serviceAccounts.server.name |
Specifies prometheus-server service account name |
"" |
7.18.5 - v2.52.0
Configuring Prometheus in EKS Anywhere package spec
Example
apiVersion: packages.eks.amazonaws.com/v1alpha1
kind: Package
metadata:
name: generated-prometheus
namespace: eksa-packages-<cluster-name>
spec:
packageName: prometheus
targetNamespace: observability
config: |
server:
replicaCount: 2
statefulSet:
enabled: true
Configurable parameters and default values under spec.config
| Parameter |
Description |
Default |
| General |
|
|
| rbac.create |
Specifies if clusterRole / role and clusterRoleBinding / roleBinding will be created for prometheus-server and node-exporter |
true |
| sourceRegistry |
Specifies image source registry for prometheus-server and node-exporter |
"783794618700.dkr.ecr.us-west-2.amazonaws.com" |
| Node-Exporter |
|
|
| nodeExporter.enabled |
Indicates if node-exporter is enabled |
true |
| nodeExporter.hostNetwork |
Indicates if node-exporter shares the host network namespace |
true |
| nodeExporter.hostPID |
Indicates if node-exporter shares the host process ID namespace |
true |
| nodeExporter.image.pullPolicy |
Specifies node-exporter image pull policy: IfNotPresent, Always, Never |
"IfNotPresent" |
| nodeExporter.image.repository |
Specifies node-exporter image repository |
"prometheus/node-exporter" |
| nodeExporter.resources |
Specifies resource requests and limits of the node-exporter container. Refer to the Kubernetes API documentation ResourceRequirements
field for more details |
{} |
| nodeExporter.service |
Specifies how to expose node-exporter as a network service |
See footnote |
| nodeExporter.tolerations |
Specifies node tolerations for node-exporter scheduling to nodes with taints. Refer to the Kubernetes API documentation toleration
field for more details. |
See footnote |
| serviceAccounts.nodeExporter.annotations |
Specifies node-exporter service account annotations |
{} |
| serviceAccounts.nodeExporter.create |
Indicates if node-exporter service account will be created |
true |
| serviceAccounts.nodeExporter.name |
Specifies node-exporter service account name |
"" |
| Prometheus-Server |
|
|
| server.enabled |
Indicates if prometheus-server is enabled |
true |
| server.global.evaluation_interval |
Specifies how frequently the prometheus-server rules are evaluated |
"1m" |
| server.global.scrape_interval |
Specifies how frequently prometheus-server will scrape targets |
"1m" |
| server.global.scrape_timeout |
Specifies how long until a prometheus-server scrape request times out |
"10s" |
| server.image.pullPolicy |
Specifies prometheus-server image pull policy: IfNotPresent, Always, Never |
"IfNotPresent" |
| server.image.repository |
Specifies prometheus-server image repository |
"prometheus/prometheus" |
| server.name |
Specifies prometheus-server container name |
"server" |
| server.persistentVolume.accessModes |
Specifies prometheus-server data Persistent Volume access modes |
"ReadWriteOnce" |
| server.persistentVolume.enabled |
Indicates if prometheus-server will create/use a Persistent Volume Claim |
true |
| server.persistentVolume.existingClaim |
Specifies prometheus-server data Persistent Volume existing claim name. It requires server.persistentVolume.enabled: true. If defined, PVC must be created manually before volume will be bound |
"" |
| server.persistentVolume.size |
Specifies prometheus-server data Persistent Volume size |
"8Gi" |
| server.remoteRead |
Specifies prometheus-server remote read configs. Refer to Prometheus docs remote_read
for more details |
[] |
| server.remoteWrite |
Specifies prometheus-server remote write configs. Refer to Prometheus docs remote_write
for more details |
[] |
| server.replicaCount |
Specifies the replicaCount for prometheus-server deployment / statefulSet. Note: server.statefulSet.enabled should be set to true if server.replicaCount is greater than 1 |
1 |
| server.resources |
Specifies resource requests and limits of the prometheus-server container. Refer to the Kubernetes API documentation ResourceRequirements
field for more details |
{} |
| server.retention |
Specifies prometheus-server data retention period |
"15d" |
| server.service |
Specifies how to expose prometheus-server as a network service |
See footnote |
| server.statefulSet.enabled |
Indicates if prometheus-server is deployed as a statefulSet. If set to false, prometheus-server will be deployed as a deployment |
false |
| serverFiles.“prometheus.yml”.scrape_configs |
Specifies a set of targets and parameters for prometheus-server describing how to scrape them. Refer to Prometheus docs scrape_config
for more details |
See footnote |
| serviceAccounts.server.annotations |
Specifies prometheus-server service account annotations |
{} |
| serviceAccounts.server.create |
Indicates if prometheus-server service account will be created |
true |
| serviceAccounts.server.name |
Specifies prometheus-server service account name |
"" |
7.18.6 - v2.54.1
Configuring Prometheus in EKS Anywhere package spec
Example
apiVersion: packages.eks.amazonaws.com/v1alpha1
kind: Package
metadata:
name: generated-prometheus
namespace: eksa-packages-<cluster-name>
spec:
packageName: prometheus
targetNamespace: observability
config: |
server:
replicaCount: 2
statefulSet:
enabled: true
Configurable parameters and default values under spec.config
| Parameter |
Description |
Default |
| General |
|
|
| rbac.create |
Specifies if clusterRole / role and clusterRoleBinding / roleBinding will be created for prometheus-server and node-exporter |
true |
| sourceRegistry |
Specifies image source registry for prometheus-server and node-exporter |
"783794618700.dkr.ecr.us-west-2.amazonaws.com" |
| Node-Exporter |
|
|
| nodeExporter.enabled |
Indicates if node-exporter is enabled |
true |
| nodeExporter.hostNetwork |
Indicates if node-exporter shares the host network namespace |
true |
| nodeExporter.hostPID |
Indicates if node-exporter shares the host process ID namespace |
true |
| nodeExporter.image.pullPolicy |
Specifies node-exporter image pull policy: IfNotPresent, Always, Never |
"IfNotPresent" |
| nodeExporter.image.repository |
Specifies node-exporter image repository |
"prometheus/node-exporter" |
| nodeExporter.resources |
Specifies resource requests and limits of the node-exporter container. Refer to the Kubernetes API documentation ResourceRequirements
field for more details |
{} |
| nodeExporter.service |
Specifies how to expose node-exporter as a network service |
See footnote |
| nodeExporter.tolerations |
Specifies node tolerations for node-exporter scheduling to nodes with taints. Refer to the Kubernetes API documentation toleration
field for more details. |
See footnote |
| serviceAccounts.nodeExporter.annotations |
Specifies node-exporter service account annotations |
{} |
| serviceAccounts.nodeExporter.create |
Indicates if node-exporter service account will be created |
true |
| serviceAccounts.nodeExporter.name |
Specifies node-exporter service account name |
"" |
| Prometheus-Server |
|
|
| server.enabled |
Indicates if prometheus-server is enabled |
true |
| server.global.evaluation_interval |
Specifies how frequently the prometheus-server rules are evaluated |
"1m" |
| server.global.scrape_interval |
Specifies how frequently prometheus-server will scrape targets |
"1m" |
| server.global.scrape_timeout |
Specifies how long until a prometheus-server scrape request times out |
"10s" |
| server.image.pullPolicy |
Specifies prometheus-server image pull policy: IfNotPresent, Always, Never |
"IfNotPresent" |
| server.image.repository |
Specifies prometheus-server image repository |
"prometheus/prometheus" |
| server.name |
Specifies prometheus-server container name |
"server" |
| server.persistentVolume.accessModes |
Specifies prometheus-server data Persistent Volume access modes |
"ReadWriteOnce" |
| server.persistentVolume.enabled |
Indicates if prometheus-server will create/use a Persistent Volume Claim |
true |
| server.persistentVolume.existingClaim |
Specifies prometheus-server data Persistent Volume existing claim name. It requires server.persistentVolume.enabled: true. If defined, PVC must be created manually before volume will be bound |
"" |
| server.persistentVolume.size |
Specifies prometheus-server data Persistent Volume size |
"8Gi" |
| server.remoteRead |
Specifies prometheus-server remote read configs. Refer to Prometheus docs remote_read
for more details |
[] |
| server.remoteWrite |
Specifies prometheus-server remote write configs. Refer to Prometheus docs remote_write
for more details |
[] |
| server.replicaCount |
Specifies the replicaCount for prometheus-server deployment / statefulSet. Note: server.statefulSet.enabled should be set to true if server.replicaCount is greater than 1 |
1 |
| server.resources |
Specifies resource requests and limits of the prometheus-server container. Refer to the Kubernetes API documentation ResourceRequirements
field for more details |
{} |
| server.retention |
Specifies prometheus-server data retention period |
"15d" |
| server.service |
Specifies how to expose prometheus-server as a network service |
See footnote |
| server.statefulSet.enabled |
Indicates if prometheus-server is deployed as a statefulSet. If set to false, prometheus-server will be deployed as a deployment |
false |
| serverFiles.“prometheus.yml”.scrape_configs |
Specifies a set of targets and parameters for prometheus-server describing how to scrape them. Refer to Prometheus docs scrape_config
for more details |
See footnote |
| serviceAccounts.server.annotations |
Specifies prometheus-server service account annotations |
{} |
| serviceAccounts.server.create |
Indicates if prometheus-server service account will be created |
true |
| serviceAccounts.server.name |
Specifies prometheus-server service account name |
"" |
7.18.7 - v2.55.1
Configuring Prometheus in EKS Anywhere package spec
Example
apiVersion: packages.eks.amazonaws.com/v1alpha1
kind: Package
metadata:
name: generated-prometheus
namespace: eksa-packages-<cluster-name>
spec:
packageName: prometheus
targetNamespace: observability
config: |
server:
replicaCount: 2
statefulSet:
enabled: true
Configurable parameters and default values under spec.config
| Parameter |
Description |
Default |
| General |
|
|
| rbac.create |
Specifies if clusterRole / role and clusterRoleBinding / roleBinding will be created for prometheus-server and node-exporter |
true |
| sourceRegistry |
Specifies image source registry for prometheus-server and node-exporter |
"783794618700.dkr.ecr.us-west-2.amazonaws.com" |
| Node-Exporter |
|
|
| nodeExporter.enabled |
Indicates if node-exporter is enabled |
true |
| nodeExporter.hostNetwork |
Indicates if node-exporter shares the host network namespace |
true |
| nodeExporter.hostPID |
Indicates if node-exporter shares the host process ID namespace |
true |
| nodeExporter.image.pullPolicy |
Specifies node-exporter image pull policy: IfNotPresent, Always, Never |
"IfNotPresent" |
| nodeExporter.image.repository |
Specifies node-exporter image repository |
"prometheus/node-exporter" |
| nodeExporter.resources |
Specifies resource requests and limits of the node-exporter container. Refer to the Kubernetes API documentation ResourceRequirements
field for more details |
{} |
| nodeExporter.service |
Specifies how to expose node-exporter as a network service |
See footnote |
| nodeExporter.tolerations |
Specifies node tolerations for node-exporter scheduling to nodes with taints. Refer to the Kubernetes API documentation toleration
field for more details. |
See footnote |
| serviceAccounts.nodeExporter.annotations |
Specifies node-exporter service account annotations |
{} |
| serviceAccounts.nodeExporter.create |
Indicates if node-exporter service account will be created |
true |
| serviceAccounts.nodeExporter.name |
Specifies node-exporter service account name |
"" |
| Prometheus-Server |
|
|
| server.enabled |
Indicates if prometheus-server is enabled |
true |
| server.global.evaluation_interval |
Specifies how frequently the prometheus-server rules are evaluated |
"1m" |
| server.global.scrape_interval |
Specifies how frequently prometheus-server will scrape targets |
"1m" |
| server.global.scrape_timeout |
Specifies how long until a prometheus-server scrape request times out |
"10s" |
| server.image.pullPolicy |
Specifies prometheus-server image pull policy: IfNotPresent, Always, Never |
"IfNotPresent" |
| server.image.repository |
Specifies prometheus-server image repository |
"prometheus/prometheus" |
| server.name |
Specifies prometheus-server container name |
"server" |
| server.persistentVolume.accessModes |
Specifies prometheus-server data Persistent Volume access modes |
"ReadWriteOnce" |
| server.persistentVolume.enabled |
Indicates if prometheus-server will create/use a Persistent Volume Claim |
true |
| server.persistentVolume.existingClaim |
Specifies prometheus-server data Persistent Volume existing claim name. It requires server.persistentVolume.enabled: true. If defined, PVC must be created manually before volume will be bound |
"" |
| server.persistentVolume.size |
Specifies prometheus-server data Persistent Volume size |
"8Gi" |
| server.remoteRead |
Specifies prometheus-server remote read configs. Refer to Prometheus docs remote_read
for more details |
[] |
| server.remoteWrite |
Specifies prometheus-server remote write configs. Refer to Prometheus docs remote_write
for more details |
[] |
| server.replicaCount |
Specifies the replicaCount for prometheus-server deployment / statefulSet. Note: server.statefulSet.enabled should be set to true if server.replicaCount is greater than 1 |
1 |
| server.resources |
Specifies resource requests and limits of the prometheus-server container. Refer to the Kubernetes API documentation ResourceRequirements
field for more details |
{} |
| server.retention |
Specifies prometheus-server data retention period |
"15d" |
| server.service |
Specifies how to expose prometheus-server as a network service |
See footnote |
| server.statefulSet.enabled |
Indicates if prometheus-server is deployed as a statefulSet. If set to false, prometheus-server will be deployed as a deployment |
false |
| serverFiles.“prometheus.yml”.scrape_configs |
Specifies a set of targets and parameters for prometheus-server describing how to scrape them. Refer to Prometheus docs scrape_config
for more details |
See footnote |
| serviceAccounts.server.annotations |
Specifies prometheus-server service account annotations |
{} |
| serviceAccounts.server.create |
Indicates if prometheus-server service account will be created |
true |
| serviceAccounts.server.name |
Specifies prometheus-server service account name |
"" |
7.18.8 - v3.8.0
Configuring Prometheus in EKS Anywhere package spec
Example
apiVersion: packages.eks.amazonaws.com/v1alpha1
kind: Package
metadata:
name: generated-prometheus
namespace: eksa-packages-<cluster-name>
spec:
packageName: prometheus
targetNamespace: observability
config: |
server:
replicaCount: 2
statefulSet:
enabled: true
Configurable parameters and default values under spec.config
| Parameter |
Description |
Default |
| General |
|
|
| rbac.create |
Specifies if clusterRole / role and clusterRoleBinding / roleBinding will be created for prometheus-server and node-exporter |
true |
| sourceRegistry |
Specifies image source registry for prometheus-server and node-exporter |
"783794618700.dkr.ecr.us-west-2.amazonaws.com" |
| Node-Exporter |
|
|
| nodeExporter.enabled |
Indicates if node-exporter is enabled |
true |
| nodeExporter.hostNetwork |
Indicates if node-exporter shares the host network namespace |
true |
| nodeExporter.hostPID |
Indicates if node-exporter shares the host process ID namespace |
true |
| nodeExporter.image.pullPolicy |
Specifies node-exporter image pull policy: IfNotPresent, Always, Never |
"IfNotPresent" |
| nodeExporter.image.repository |
Specifies node-exporter image repository |
"prometheus/node-exporter" |
| nodeExporter.resources |
Specifies resource requests and limits of the node-exporter container. Refer to the Kubernetes API documentation ResourceRequirements
field for more details |
{} |
| nodeExporter.service |
Specifies how to expose node-exporter as a network service |
See footnote |
| nodeExporter.tolerations |
Specifies node tolerations for node-exporter scheduling to nodes with taints. Refer to the Kubernetes API documentation toleration
field for more details. |
See footnote |
| serviceAccounts.nodeExporter.annotations |
Specifies node-exporter service account annotations |
{} |
| serviceAccounts.nodeExporter.create |
Indicates if node-exporter service account will be created |
true |
| serviceAccounts.nodeExporter.name |
Specifies node-exporter service account name |
"" |
| Prometheus-Server |
|
|
| server.enabled |
Indicates if prometheus-server is enabled |
true |
| server.global.evaluation_interval |
Specifies how frequently the prometheus-server rules are evaluated |
"1m" |
| server.global.scrape_interval |
Specifies how frequently prometheus-server will scrape targets |
"1m" |
| server.global.scrape_timeout |
Specifies how long until a prometheus-server scrape request times out |
"10s" |
| server.image.pullPolicy |
Specifies prometheus-server image pull policy: IfNotPresent, Always, Never |
"IfNotPresent" |
| server.image.repository |
Specifies prometheus-server image repository |
"prometheus/prometheus" |
| server.name |
Specifies prometheus-server container name |
"server" |
| server.persistentVolume.accessModes |
Specifies prometheus-server data Persistent Volume access modes |
"ReadWriteOnce" |
| server.persistentVolume.enabled |
Indicates if prometheus-server will create/use a Persistent Volume Claim |
true |
| server.persistentVolume.existingClaim |
Specifies prometheus-server data Persistent Volume existing claim name. It requires server.persistentVolume.enabled: true. If defined, PVC must be created manually before volume will be bound |
"" |
| server.persistentVolume.size |
Specifies prometheus-server data Persistent Volume size |
"8Gi" |
| server.remoteRead |
Specifies prometheus-server remote read configs. Refer to Prometheus docs remote_read
for more details |
[] |
| server.remoteWrite |
Specifies prometheus-server remote write configs. Refer to Prometheus docs remote_write
for more details |
[] |
| server.replicaCount |
Specifies the replicaCount for prometheus-server deployment / statefulSet. Note: server.statefulSet.enabled should be set to true if server.replicaCount is greater than 1 |
1 |
| server.resources |
Specifies resource requests and limits of the prometheus-server container. Refer to the Kubernetes API documentation ResourceRequirements
field for more details |
{} |
| server.retention |
Specifies prometheus-server data retention period |
"15d" |
| server.service |
Specifies how to expose prometheus-server as a network service |
See footnote |
| server.statefulSet.enabled |
Indicates if prometheus-server is deployed as a statefulSet. If set to false, prometheus-server will be deployed as a deployment |
false |
| serverFiles.“prometheus.yml”.scrape_configs |
Specifies a set of targets and parameters for prometheus-server describing how to scrape them. Refer to Prometheus docs scrape_config
for more details |
See footnote |
| serviceAccounts.server.annotations |
Specifies prometheus-server service account annotations |
{} |
| serviceAccounts.server.create |
Indicates if prometheus-server service account will be created |
true |
| serviceAccounts.server.name |
Specifies prometheus-server service account name |
"" |
7.19 - Metrics Server Configuration
Metrics Server is a scalable, efficient source of container resource metrics for Kubernetes built-in autoscaling pipelines.
Configuration options for Metrics Server
7.19.1 - Metrics Server
Install/upgrade/uninstall Metrics Server
If you have not already done so, make sure your cluster meets the package prerequisites.
Be sure to refer to the troubleshooting guide
in the event of a problem.
Important
- Starting at
eksctl anywhere version v0.12.0, packages on workload clusters are remotely managed by the management cluster.
- While following this guide to install packages on a workload cluster, please make sure the
kubeconfig is pointing to the management cluster that was used to create the workload cluster. The only exception is the kubectl create namespace command below, which should be run with kubeconfig pointing to the workload cluster.
Install
-
Generate the package configuration
eksctl anywhere generate package metrics-server --cluster <cluster-name> > metrics-server.yaml
-
Add the desired configuration to metrics-server.yaml
Please see complete configuration options
for all configuration options and their default values.
Example package file configuring a cluster autoscaler package to run on a management cluster.
apiVersion: packages.eks.amazonaws.com/v1alpha1
kind: Package
metadata:
name: metrics-server
namespace: eksa-packages-<cluster-name>
spec:
packageName: metrics-server
targetNamespace: <namespace-to-install-component>
config: |-
args:
- "--kubelet-insecure-tls"
-
Install Metrics Server
eksctl anywhere create packages -f metrics-server.yaml
-
Validate the installation
eksctl anywhere get packages --cluster <cluster-name>
Example command output
NAME PACKAGE AGE STATE CURRENTVERSION TARGETVERSION DETAIL
metrics-server metrics-server 8h installed 0.6.1-eks-1-23-6-b4c2524fabb3dd4c5f9b9070a418d740d3e1a8a2 0.6.1-eks-1-23-6-b4c2524fabb3dd4c5f9b9070a418d740d3e1a8a2 (latest)
Update
To update package configuration, update metrics-server.yaml file, and run the following command:
eksctl anywhere apply package -f metrics-server.yaml
Upgrade
Metrics Server will automatically be upgraded when a new bundle is activated.
Uninstall
To uninstall Metrics Server, simply delete the package
eksctl anywhere delete package --cluster <cluster-name> metrics-server
7.19.2 - v3.8.2
Configuring Metrics Server in EKS Anywhere package spec
| Parameter |
Description |
Default |
| General |
|
|
| args |
Additional args to provide to metrics-server
Example:
cloudProvider: ["–kubelet-insecure-tls"] |
[] |
7.19.3 - v3.12.1
Configuring Metrics Server in EKS Anywhere package spec
| Parameter |
Description |
Default |
| General |
|
|
| args |
Additional args to provide to metrics-server
Example:
cloudProvider: ["–kubelet-insecure-tls"] |
[] |
7.19.4 - v3.12.2
Configuring Metrics Server in EKS Anywhere package spec
| Parameter |
Description |
Default |
| General |
|
|
| args |
Additional args to provide to metrics-server
Example:
cloudProvider: ["–kubelet-insecure-tls"] |
[] |
7.19.5 - v3.13.0
Configuring Metrics Server in EKS Anywhere package spec
| Parameter |
Description |
Default |
| General |
|
|
| args |
Additional args to provide to metrics-server
Example:
cloudProvider: ["–kubelet-insecure-tls"] |
[] |
7.20 -
| AWS Region |
| us-east-2 |
| us-east-1 |
| us-west-1 |
| us-west-2 |
| ap-northeast-3 |
| ap-northeast-2 |
| ap-southeast-1 |
| ap-southeast-2 |
| ap-northeast-1 |
| ca-central-1 |
| eu-central-1 |
| eu-west-1 |
| eu-west-2 |
| eu-west-3 |
| eu-north-1 |
| sa-east-1 |
8 - Workload management
Common tasks for managing workloads.
8.1 - Deploy test workload
How to deploy a workload to check that your cluster is working properly
We’ve created a simple test application for you to verify your cluster is working properly.
You can deploy it with the following command:
kubectl apply -f "https://anywhere.eks.amazonaws.com/manifests/hello-eks-a.yaml"
To see the new pod running in your cluster, type:
kubectl get pods -l app=hello-eks-a
Example output:
NAME READY STATUS RESTARTS AGE
hello-eks-a-745bfcd586-6zx6b 1/1 Running 0 22m
To check the logs of the container to make sure it started successfully, type:
kubectl logs -l app=hello-eks-a
There is also a default web page being served from the container.
You can forward the deployment port to your local machine with
kubectl port-forward deploy/hello-eks-a 8000:80
Now you should be able to open your browser or use curl to http://localhost:8000
to view the page example application.
Example output:
⬡⬢⬡⬢⬡⬢⬡⬢⬡⬢⬡⬢⬡⬢⬡⬢⬡⬢⬡⬢⬡⬢⬡⬢⬡⬢⬡⬢⬡⬢⬡⬢⬡⬢⬡⬢⬡⬢⬡⬢⬡⬢⬡⬢⬡⬢⬡⬢⬡⬢⬡⬢⬡⬢⬡⬢⬡⬢⬡⬢⬡⬢⬡⬢
Thank you for using
███████╗██╗ ██╗███████╗
██╔════╝██║ ██╔╝██╔════╝
█████╗ █████╔╝ ███████╗
██╔══╝ ██╔═██╗ ╚════██║
███████╗██║ ██╗███████║
╚══════╝╚═╝ ╚═╝╚══════╝
█████╗ ███╗ ██╗██╗ ██╗██╗ ██╗██╗ ██╗███████╗██████╗ ███████╗
██╔══██╗████╗ ██║╚██╗ ██╔╝██║ ██║██║ ██║██╔════╝██╔══██╗██╔════╝
███████║██╔██╗ ██║ ╚████╔╝ ██║ █╗ ██║███████║█████╗ ██████╔╝█████╗
██╔══██║██║╚██╗██║ ╚██╔╝ ██║███╗██║██╔══██║██╔══╝ ██╔══██╗██╔══╝
██║ ██║██║ ╚████║ ██║ ╚███╔███╔╝██║ ██║███████╗██║ ██║███████╗
╚═╝ ╚═╝╚═╝ ╚═══╝ ╚═╝ ╚══╝╚══╝ ╚═╝ ╚═╝╚══════╝╚═╝ ╚═╝╚══════╝
You have successfully deployed the hello-eks-a pod hello-eks-a-c5b9bc9d8-qp6bg
For more information check out
https://anywhere.eks.amazonaws.com
⬡⬢⬡⬢⬡⬢⬡⬢⬡⬢⬡⬢⬡⬢⬡⬢⬡⬢⬡⬢⬡⬢⬡⬢⬡⬢⬡⬢⬡⬢⬡⬢⬡⬢⬡⬢⬡⬢⬡⬢⬡⬢⬡⬢⬡⬢⬡⬢⬡⬢⬡⬢⬡⬢⬡⬢⬡⬢⬡⬢⬡⬢⬡⬢
If you would like to expose your applications with an external load balancer or an ingress controller, you can follow the steps in Adding an external load balancer
.
8.2 - Add an ingress controller
How to deploy an ingress controller for simple host or URL-based HTTP routing into workload running in EKS-A
While you are free to use any Ingress Controller you like with your EKS Anywhere cluster, AWS currently only supports Emissary Ingress.
For information on how to configure a Emissary Ingress curated package for EKS Anywhere, see the Add Emissary Ingress
page.
You may also reference the official emissary documentation
for further configuration details. Operators can also leverage the CNI chaining feature from Isovalent where in both Cilium as the CNI and another CNI can work in a chain mode
.
Setting up Emissary-ingress for Ingress Controller
-
Deploy the Hello EKS Anywhere
test application.
kubectl apply -f "https://anywhere.eks.amazonaws.com/manifests/hello-eks-a.yaml"
-
Set up a load balancer: Set up MetalLB Load Balancer by following the instructions here
-
Install Emissary Ingress: Follow the instructions here Add Emissary Ingress
-
Create Emissary Listeners on your cluster (This is a one time setup).
kubectl apply -f - <<EOF
---
apiVersion: getambassador.io/v3alpha1
kind: Listener
metadata:
name: http-listener
namespace: default
spec:
port: 8080
protocol: HTTP
securityModel: XFP
hostBinding:
namespace:
from: ALL
---
apiVersion: getambassador.io/v3alpha1
kind: Listener
metadata:
name: https-listener
namespace: default
spec:
port: 8443
protocol: HTTPS
securityModel: XFP
hostBinding:
namespace:
from: ALL
EOF
-
Create a Mapping, and Host for your cluster. This Mapping tells Emissary-ingress to route all traffic inbound to the /hello/ path to the Hello EKS Anywhere Service. The name of your hello-eks-anywhere service will be the same as the package name.
kubectl apply -f - <<EOF
---
apiVersion: getambassador.io/v3alpha1
kind: Mapping
metadata:
name: hello-backend
labels:
examplehost: host
spec:
prefix: /hello/
service: hello-eks-a
hostname: "*"
EOF
-
Store the Emissary-ingress load balancer IP address to a local environment variable. You will use this variable to test accessing your service. You can find this if you’re using a setup with MetalLB by finding the namespace you launched your emissary service in, and finding the external IP from the service.
emissary-cluster LoadBalancer 10.100.71.222 195.16.99.64 80:31794/TCP,443:31200/TCP
export EMISSARY_LB_ENDPOINT=195.16.99.64
-
Test the configuration by accessing the service through the Emissary-ingress load balancer.
curl -Lk http://$EMISSARY_LB_ENDPOINT/hello/
⬡⬢⬡⬢⬡⬢⬡⬢⬡⬢⬡⬢⬡⬢⬡⬢⬡⬢⬡⬢⬡⬢⬡⬢⬡⬢⬡⬢⬡⬢⬡⬢⬡⬢⬡⬢⬡⬢⬡⬢⬡⬢⬡⬢⬡⬢⬡⬢⬡⬢⬡⬢⬡⬢⬡⬢⬡⬢⬡⬢⬡⬢⬡⬢⬡⬢⬡⬢⬡⬢
Thank you for using
███████╗██╗ ██╗███████╗
██╔════╝██║ ██╔╝██╔════╝
█████╗ █████╔╝ ███████╗
██╔══╝ ██╔═██╗ ╚════██║
███████╗██║ ██╗███████║
╚══════╝╚═╝ ╚═╝╚══════╝
█████╗ ███╗ ██╗██╗ ██╗██╗ ██╗██╗ ██╗███████╗██████╗ ███████╗
██╔══██╗████╗ ██║╚██╗ ██╔╝██║ ██║██║ ██║██╔════╝██╔══██╗██╔════╝
███████║██╔██╗ ██║ ╚████╔╝ ██║ █╗ ██║███████║█████╗ ██████╔╝█████╗
██╔══██║██║╚██╗██║ ╚██╔╝ ██║███╗██║██╔══██║██╔══╝ ██╔══██╗██╔══╝
██║ ██║██║ ╚████║ ██║ ╚███╔███╔╝██║ ██║███████╗██║ ██║███████╗
╚═╝ ╚═╝╚═╝ ╚═══╝ ╚═╝ ╚══╝╚══╝ ╚═╝ ╚═╝╚══════╝╚═╝ ╚═╝╚══════╝
You have successfully deployed the hello-eks-a pod hello-eks-anywhere-95fb65657-vk9rz
For more information check out
https://anywhere.eks.amazonaws.com
Amazon EKS Anywhere
Run EKS in your datacenter
version: v0.1.2-11d92fc1e01c17601e81c7c29ea4a3db232068a8
⬡⬢⬡⬢⬡⬢⬡⬢⬡⬢⬡⬢⬡⬢⬡⬢⬡⬢⬡⬢⬡⬢⬡⬢⬡⬢⬡⬢⬡⬢⬡⬢⬡⬢⬡⬢⬡⬢⬡⬢⬡⬢⬡⬢⬡⬢⬡⬢⬡⬢⬡⬢⬡⬢⬡⬢⬡⬢⬡⬢⬡⬢⬡⬢⬡⬢⬡⬢
8.3 - Using NVIDIA GPU Operator with EKS Anywhere
How to use the NVIDIA GPU Operator with EKS Anywhere on bare metal
The NVIDIA GPU Operator
allows GPUs to be exposed to applications in Kubernetes clusters much like CPUs. Instead of provisioning a special OS image for GPU nodes with the required drivers and dependencies, a standard OS image can be used for both CPU and GPU nodes. The NVIDIA GPU Operator can be used to provision the required software components for GPUs such as the NVIDIA drivers, Kubernetes device plugin for GPUs, and the NVIDIA Container Toolkit. See the licensing section
of the NVIDIA GPU Operator documentation for information on the NVIDIA End User License Agreements.
In the example on this page, a single-node EKS Anywhere cluster on bare metal is used with an Ubuntu 20.04 image produced from image-builder without modifications and Kubernetes version 1.35.
See the Configure for Bare Metal
page and the Prepare hardware inventory
page for details. If you use cluster spec sample below is used, your hardware inventory definition must have type=cp for the labels field in the hardware inventory for your server.
Expand for a sample cluster spec
apiVersion: anywhere.eks.amazonaws.com/v1alpha1
kind: Cluster
metadata:
name: gpu-test
spec:
clusterNetwork:
cniConfig:
cilium: {}
pods:
cidrBlocks:
- 192.168.0.0/16
services:
cidrBlocks:
- 10.96.0.0/12
controlPlaneConfiguration:
count: 1
endpoint:
host: "<my-cp-ip>"
machineGroupRef:
kind: TinkerbellMachineConfig
name: gpu-test-cp
datacenterRef:
kind: TinkerbellDatacenterConfig
name: gpu-test
kubernetesVersion: "1.35"
---
apiVersion: anywhere.eks.amazonaws.com/v1alpha1
kind: TinkerbellDatacenterConfig
metadata:
name: gpu-test
spec:
tinkerbellIP: "<my-tb-ip>"
osImageURL: "https://<url-for-image>/ubuntu.gz"
---
apiVersion: anywhere.eks.amazonaws.com/v1alpha1
kind: TinkerbellMachineConfig
metadata:
name: gpu-test-cp
spec:
hardwareSelector: {type: "cp"}
osFamily: ubuntu
templateRef: {}
2. Create a single-node EKS Anywhere cluster
- Replace
hardware.csv with the name of your hardware inventory file
- Replace
cluster.yaml with the name of your cluster spec file
eksctl anywhere create cluster --hardware hardware.csv -f cluster.yaml
Expand for sample output
Warning: The recommended number of control plane nodes is 3 or 5
Warning: No configurations provided for worker node groups, pods will be scheduled on control-plane nodes
Performing setup and validations
Private key saved to gpu-test/eks-a-id_rsa. Use 'ssh -i gpu-test/eks-a-id_rsa <username>@<Node-IP-Address>' to login to your cluster node
✅ Tinkerbell Provider setup is valid
✅ Validate OS is compatible with registry mirror configuration
✅ Validate certificate for registry mirror
✅ Validate authentication for git provider
Creating new bootstrap cluster
Provider specific pre-capi-install-setup on bootstrap cluster
Installing cluster-api providers on bootstrap cluster
Provider specific post-setup
Creating new workload cluster
Installing networking on workload cluster
Creating EKS-A namespace
Installing cluster-api providers on workload cluster
Installing EKS-A secrets on workload cluster
Installing resources on management cluster
Moving cluster management from bootstrap to workload cluster
Installing EKS-A custom components (CRD and controller) on workload cluster
Installing EKS-D components on workload cluster
Creating EKS-A CRDs instances on workload cluster
Installing GitOps Toolkit on workload cluster
GitOps field not specified, bootstrap flux skipped
Writing cluster config file
Deleting bootstrap cluster
🎉 Cluster created!
3. Install Helm
curl -fsSL -o get_helm.sh https://raw.githubusercontent.com/helm/helm/master/scripts/get-helm-3 \
&& chmod 700 get_helm.sh \
&& ./get_helm.sh
4. Add NVIDIA Helm Repository
helm repo add nvidia https://helm.ngc.nvidia.com/nvidia \
&& helm repo update
- Replace
<path-to-cluster-folder> with the directory location where your EKS Anywhere cluster folder is located. This is typically in the same directory in which the eksctl anywhere command was run.
- Replace
<cluster-name> with the name of your cluster.
KUBECONFIG=<path-to-cluster-folder>/<cluster-name>-eks-a-cluster.kubeconfig
6. Install NVIDIA GPU Operator
helm install --wait --generate-name \
-n gpu-operator --create-namespace \
nvidia/gpu-operator
7. Validate the operator was installed successfully
kubectl get pods -n gpu-operator
NAME READY STATUS RESTARTS AGE
gpu-feature-discovery-6djnw 1/1 Running 0 5m25s
gpu-operator-1691443998-node-feature-discovery-master-55cfkzbl5 1/1 Running 0 5m55s
gpu-operator-1691443998-node-feature-discovery-worker-dw8m7 1/1 Running 0 5m55s
gpu-operator-59f96d7646-7zcn4 1/1 Running 0 5m55s
nvidia-container-toolkit-daemonset-c2mdf 1/1 Running 0 5m25s
nvidia-cuda-validator-6m4kg 0/1 Completed 0 3m41s
nvidia-dcgm-exporter-jw5wz 1/1 Running 0 5m25s
nvidia-device-plugin-daemonset-8vjrn 1/1 Running 0 5m25s
nvidia-driver-daemonset-6hklg 1/1 Running 0 5m36s
nvidia-operator-validator-2pvzx 1/1 Running 0 5m25s
8. Validate GPU specs
kubectl get node -o json | jq '.items[].metadata.labels'
{
...
"nvidia.com/cuda.driver.major": "535",
"nvidia.com/cuda.driver.minor": "86",
"nvidia.com/cuda.driver.rev": "10",
"nvidia.com/cuda.runtime.major": "12",
"nvidia.com/cuda.runtime.minor": "2",
"nvidia.com/gfd.timestamp": "1691444179",
"nvidia.com/gpu-driver-upgrade-state": "upgrade-done",
"nvidia.com/gpu.compute.major": "7",
"nvidia.com/gpu.compute.minor": "5",
"nvidia.com/gpu.count": "2",
"nvidia.com/gpu.deploy.container-toolkit": "true",
"nvidia.com/gpu.deploy.dcgm": "true",
"nvidia.com/gpu.deploy.dcgm-exporter": "true",
"nvidia.com/gpu.deploy.device-plugin": "true",
"nvidia.com/gpu.deploy.driver": "true",
"nvidia.com/gpu.deploy.gpu-feature-discovery": "true",
"nvidia.com/gpu.deploy.node-status-exporter": "true",
"nvidia.com/gpu.deploy.nvsm": "",
"nvidia.com/gpu.deploy.operator-validator": "true",
"nvidia.com/gpu.family": "turing",
"nvidia.com/gpu.machine": "PowerEdge-R7525",
"nvidia.com/gpu.memory": "15360",
"nvidia.com/gpu.present": "true",
"nvidia.com/gpu.product": "Tesla-T4",
"nvidia.com/gpu.replicas": "1",
"nvidia.com/mig.capable": "false",
"nvidia.com/mig.strategy": "single"
}
9. Run Sample App
Create a gpu-pod.yaml file with the following and apply it to the cluster
apiVersion: v1
kind: Pod
metadata:
name: gpu-pod
spec:
restartPolicy: Never
containers:
- name: cuda-container
image: nvcr.io/nvidia/k8s/cuda-sample:vectoradd-cuda10.2
resources:
limits:
nvidia.com/gpu: 1 # requesting 1 GPU
tolerations:
- key: nvidia.com/gpu operator: Exists
effect: NoSchedule
kubectl apply -f gpu-pod.yaml
10. Confirm Sample App Succeeded
[Vector addition of 50000 elements]
Copy input data from the host memory to the CUDA device
CUDA kernel launch with 196 blocks of 256 threads
Copy output data from the CUDA device to the host memory
Test PASSED
Done
8.4 -
Warning: The recommended number of control plane nodes is 3 or 5
Warning: No configurations provided for worker node groups, pods will be scheduled on control-plane nodes
Performing setup and validations
Private key saved to gpu-test/eks-a-id_rsa. Use 'ssh -i gpu-test/eks-a-id_rsa <username>@<Node-IP-Address>' to login to your cluster node
✅ Tinkerbell Provider setup is valid
✅ Validate OS is compatible with registry mirror configuration
✅ Validate certificate for registry mirror
✅ Validate authentication for git provider
Creating new bootstrap cluster
Provider specific pre-capi-install-setup on bootstrap cluster
Installing cluster-api providers on bootstrap cluster
Provider specific post-setup
Creating new workload cluster
Installing networking on workload cluster
Creating EKS-A namespace
Installing cluster-api providers on workload cluster
Installing EKS-A secrets on workload cluster
Installing resources on management cluster
Moving cluster management from bootstrap to workload cluster
Installing EKS-A custom components (CRD and controller) on workload cluster
Installing EKS-D components on workload cluster
Creating EKS-A CRDs instances on workload cluster
Installing GitOps Toolkit on workload cluster
GitOps field not specified, bootstrap flux skipped
Writing cluster config file
Deleting bootstrap cluster
🎉 Cluster created!
8.5 -
apiVersion: anywhere.eks.amazonaws.com/v1alpha1
kind: Cluster
metadata:
name: gpu-test
spec:
clusterNetwork:
cniConfig:
cilium: {}
pods:
cidrBlocks:
- 192.168.0.0/16
services:
cidrBlocks:
- 10.96.0.0/12
controlPlaneConfiguration:
count: 1
endpoint:
host: "<my-cp-ip>"
machineGroupRef:
kind: TinkerbellMachineConfig
name: gpu-test-cp
datacenterRef:
kind: TinkerbellDatacenterConfig
name: gpu-test
kubernetesVersion: "1.35"
---
apiVersion: anywhere.eks.amazonaws.com/v1alpha1
kind: TinkerbellDatacenterConfig
metadata:
name: gpu-test
spec:
tinkerbellIP: "<my-tb-ip>"
osImageURL: "https://<url-for-image>/ubuntu.gz"
---
apiVersion: anywhere.eks.amazonaws.com/v1alpha1
kind: TinkerbellMachineConfig
metadata:
name: gpu-test-cp
spec:
hardwareSelector: {type: "cp"}
osFamily: ubuntu
templateRef: {}
9 - Troubleshooting
Troubleshooting your EKS Anywhere Cluster
9.1 - Cluster troubleshooting
Troubleshooting EKS Anywhere clusters
This guide covers EKS Anywhere troubleshooting. It is divided into the following sections:
You may want to search this document for a fragment of the error you are seeing.
Troubleshooting knowledge articles
More information on troubleshooting EKS Anywhere is available from the AWS Knowledge Center
including:
General troubleshooting
You may need to adapt the commands in the troubleshooting examples provided on this page for the infrastructure you are using.
Here are examples of what you may see depending on which infrastrurcture you are deploying to:
- capi-system (General)
- capv-system (vSphere)
- capc-system (CloudStack)
- capv-system (Nutanix)
- capd-system (Docker)
- capt-system (Tinkerbell)
Increase eksctl anywhere output
If you’re having trouble running eksctl anywhere you may get more verbose output with the -v 6 option. The highest level of verbosity is -v 9 and the default level of logging is level equivalent to -v 0.
Cannot run Docker commands
The EKS Anywhere binary requires access to run Docker commands without using sudo.
If you’re using a Linux distribution you will need to be using Docker 20.x.x and your user needs to be part of the Docker group.
To add your user to the Docker group you can use.
sudo usermod -a -G docker $USER
Now you need to log out and back in to get the new group permissions.
Minimum requirements for Docker version have not been met
Error: failed to validate Docker: minimum requirements for Docker version have not been met. Install Docker version 20.x.x or above
Ensure you are running Docker 20.x.x for example:
% docker --version
Docker version 20.10.6, build 370c289
Minimum requirements for Docker version have not been met on macOS
Error: EKS Anywhere does not support Docker Desktop versions between 4.3.0 and 4.4.1 on macOS
Error: EKS Anywhere requires Docker Desktop to be configured to use CGroups v1. Please set `deprecatedCgroupv1:true` in your `~/Library/Group\\ Containers/group.com.docker/settings.json` file
Ensure you are running Docker Desktop 4.4.2 or newer and, if you are running EKS Anywhere v0.15 or earlier, have set "deprecatedCgroupv1": true in your settings.json file
% defaults read /Applications/Docker.app/Contents/Info.plist CFBundleShortVersionString
4.42
% docker info --format '{{json .CgroupVersion}}'
"1"
For EKS Anywhere v0.15 and earlier, cgroups v2 is not supported in Ubuntu 21.10+ and 22.04
ERROR: failed to create cluster: could not find a log line that matches "Reached target .*Multi-User System.*|detected cgroup v1"
For EKS Anywhere v0.15 and earlier, if you are using Ubuntu it is recommended to use Ubuntu 20.04 for the Administrative Machine. This is because the EKS Anywhere Bootstrap cluster for those versions requires cgroups v1. Since Ubuntu 21.10 cgroups v2 is enabled by default. You can use Ubuntu 21.10 and 22.04 for the Administrative machine if you configure Ubuntu to use cgroups v1 instead. This is not an issue if you are using macOS for your Administrative machine.
To verify cgroups version
% docker info | grep Cgroup
Cgroup Driver: cgroupfs
Cgroup Version: 2
To use cgroups v1 you need to sudo and edit /etc/default/grub to set GRUB_CMDLINE_LINUX to “systemd.unified_cgroup_hierarchy=0” and reboot.
%sudo <editor> /etc/default/grub
GRUB_CMDLINE_LINUX="systemd.unified_cgroup_hierarchy=0"
sudo update-grub
sudo reboot now
Then verify you are using cgroups v1.
% docker info | grep Cgroup
Cgroup Driver: cgroupfs
Cgroup Version: 1
Pod errors due to too many open files
The bootstrap or EKS Anywhere Docker cluster pods show error: too many open files.
This may be caused by running out of inotify
resources. Resource limits are defined by fs.inotify.max_user_watches and fs.inotify.max_user_instances system variables. For example, in Ubuntu these default to 8192 and 128 respectively, which is not enough to create a cluster with many nodes.
To increase these limits temporarily run the following commands on the host:
sudo sysctl fs.inotify.max_user_watches=524288
sudo sysctl fs.inotify.max_user_instances=512
To make the changes persistent, edit the file /etc/sysctl.conf and add these lines:
fs.inotify.max_user_watches = 524288
fs.inotify.max_user_instances = 512
Reference: https://kind.sigs.k8s.io/docs/user/known-issues/#pod-errors-due-to-too-many-open-files
ECR access denied
Error: failed to create cluster: unable to initialize executables: failed to setup eks-a dependencies: Error response from daemon: pull access denied for public.ecr.aws/***/cli-tools, repository does not exist or may require 'docker login': denied: Your authorization token has expired. Reauthenticate and try again.
All images needed for EKS Anywhere are public and do not need authentication. Old cached credentials could trigger this error.
Remove cached credentials by running:
docker logout public.ecr.aws
Error unmarshaling JSON: while decoding JSON: json: unknown field “spec”
Error: loading config file "cluster.yaml": error unmarshaling JSON: while decoding JSON: json: unknown field "spec"
Use eksctl anywhere create cluster -f cluster.yaml instead of eksctl create cluster -f cluster.yaml to create an EKS Anywhere cluster.
Error: old cluster config file exists under my-cluster, please use a different clusterName to proceed
Error: old cluster config file exists under my-cluster, please use a different clusterName to proceed
The my-cluster directory already exists in the current directory.
Either use a different cluster name or move the directory.
Error: unable to get cluster config from file: kubernetes version 1.3 is not supported by bundles manifest …
NOTE: This issue has been resolved with EKS-Anywhere v0.21.5
Error: unable to get cluster config from file: kubernetes version 1.3 is not supported by bundles manifest ...
If the Kubernetes minor version is a multiple of 10 (1.30, 1.40 and so on) and is not quoted, it is parsed as a float64 instead of a string due to a bug in the underlying Go YAML parser and hence trailing zeros are truncated.
To avoid this issue, make sure you use single or double quotes around your top-level and worker-node-level Kubernetes versions if the minor version is a multiple of 10.
For more context, see the related Github issue
.
| Bad | Good |
|---|
spec:
...
kubernetesVersion: 1.30
...
|
spec:
...
kubernetesVersion: "1.30"
...
|
At least one WorkerNodeGroupConfiguration must not have NoExecute and/or NoSchedule taints
Error: the cluster config file provided is invalid: at least one WorkerNodeGroupConfiguration must not have NoExecute and/or NoSchedule taints
An EKS Anywhere management cluster requires at least one schedulable worker node group to run cluster administration components. Both NoExecute and NoSchedule taints must be absent from the workerNodeGroup for it to be considered schedulable. This validation was removed for workload clusters from v0.19.0 onwards, so now it only applies to management clusters.
To remedy, remove NoExecute and NoSchedule taints from at least one WorkerNodeGroupConfiguration on your management cluster.
Invalid configuration example:
# Invalid workerNodeGroupConfiguration
workerNodeGroupConfigurations: # List of node groups you can define for workers
- count: 1
name: md-0
taints: # NoSchedule taint applied to md-0, not schedulable
- key: "key1"
value: "value1"
effect: "NoSchedule"
- count: 1
name: md-1
taints: # NoExecute taint applied to md-1, not schedulable
- key: "key2"
value: "value2"
effect: "NoExecute"
Valid configuration example:
# Valid workerNodeGroupConfiguration
workerNodeGroupConfigurations: # List of node groups you can define for workers
- count: 1
name: md-0
taints: # NoSchedule taint applied to md-0, not schedulable
- key: "key1"
value: "value1"
effect: "NoSchedule"
- count: 1
name: md-1 # md-1 has no NoSchedule/NoExecute taints applied, is schedulable
Memory or disk resource problem
There are various disk and memory issues on the Admin machine that can cause problems. Make sure:
- Docker is configured with enough memory.
- The system-wide Docker memory configuration provides enough RAM for the bootstrap cluster.
- You do not have unneeded KinD clusters by running
kind get clusters.
- You should delete unneeded clusters with
kind delete cluster --name <cluster-name>. If you do not have kind installed, you can install it from https://kind.sigs.k8s.io/ or use docker ps to see the KinD clusters and run docker stop to stop the cluster.
- You do not have any unneeded Docker containers running with
docker ps.
- Terminate any unneeded Docker containers.
- Make sure Docker isn’t out of disk resources.
- If you don’t have any other Docker containers running you may want to run
docker system prune to clean up disk space.
You may want to restart Docker.
To restart Docker on Ubuntu sudo systemctl restart docker.
Waiting for cert-manager to be available… Error: timed out waiting for the condition
Failed to create cluster {"error": "error initializing capi resources in cluster: error executing init: Fetching providers\nInstalling cert-manager Version=\"v1.1.0\"\nWaiting for cert-manager to be available...\nError: timed out waiting for the condition\n"}
This is likely a memory or disk resource problem
.
You can also try using techniques from Generic cluster unavailable
.
NTP Time sync issue
level=error msg=k8sError error="github.com/cilium/cilium/pkg/k8s/watchers/endpoint_slice.go:91: Failed to watch *v1beta1.EndpointSlice: failed to list *v1beta1.EndpointSlice: Unauthorized" subsys=k8s
You might notice authorization errors if the timestamps on your EKS Anywhere control plane nodes and worker nodes are out-of-sync. Please ensure that all the nodes are configured with the same healthy NTP servers to avoid out-of-sync issues.
Error running bootstrapper cmd: error joining as worker: Error waiting for worker join files: Kubeadm join kubelet-start killed after timeout
You might also notice that the joining of nodes will fail if your Admin machine differs in time compared to your nodes. Make sure to check the server time matches between the two as well.
The connection to the server localhost:8080 was refused
Performing provider setup and validations
Creating new bootstrap cluster
Installing cluster-api providers on bootstrap cluster
Error initializing capi in bootstrap cluster {"error": "error waiting for capi-kubeadm-control-plane-controller-manager in namespace capi-kubeadm-control-plane-system: error executing wait: The connection to the server localhost:8080 was refused - did you specify the right host or port?\n"}
Failed to create cluster {"error": "error waiting for capi-kubeadm-control-plane-controller-manager in namespace capi-kubeadm-control-plane-system: error executing wait: The connection to the server localhost:8080 was refused - did you specify the right host or port?\n"}
Initializing Cluster API components on the bootstrap cluster fails. This is likely a memory or disk resource problem
.
Generic cluster unavailable
Troubleshoot more by inspecting bootstrap cluster or workload cluster (depending on the stage of the failure) using kubectl commands.
kubectl get pods -A --kubeconfig=<kubeconfig>
kubectl get nodes -A --kubeconfig=<kubeconfig>
kubectl logs <podname> -n <namespace> --kubeconfig=<kubeconfig>
....
Kubectl commands return dial tcp: i/o timeout
If you are unable to run kubectl commands on a cluster due to timeout errors, then it is possible that the server endpoint in the kubeconfig does not match the control plane’s endpoint in the infrastructure provider due to kube-vip failing to allocate a virtual IP address to the cluster. If the endpoints do not match, you can ssh into the control plane node to gather logs instead. The kubelet logs can be obtained by running journalctl -u kubelet.service --no-pager. It may also be helpful to look at kube-vip logs, which can be found in the /var/log/pods/kube-system_kube-vip-* directory.
Bottlerocket: Duplicate containers causing kube-vip and API server issues
On Bottlerocket nodes, timeout errors when accessing the cluster API endpoint (e.g., dial tcp <cluster-ip>:6443: i/o timeout or connection timeouts) can be caused by duplicate static pod containers running in the container runtime. This commonly occurs after certificate renewal operations if static pods are not properly stopped before being re-enabled.
Symptoms:
- kubectl commands timeout when trying to reach the cluster API:
Error: Get "https://<cluster-ip>:6443": dial tcp: i/o timeout
- Multiple kube-vip containers running, preventing the virtual IP from being properly assigned
- Multiple instances of kube-apiserver, kube-scheduler, kube-controller-manager, or etcd containers
Diagnosis:
SSH into the Bottlerocket control plane node and check for duplicate containers:
# Check for duplicate kube-apiserver containers
ctr -n k8s.io c ls | grep -i 'kube-apiserver'
# Check for duplicate kube-scheduler containers
ctr -n k8s.io c ls | grep -i 'kube-scheduler'
# Check for duplicate kube-controller-manager containers
ctr -n k8s.io c ls | grep -i 'kube-controller'
# Check for duplicate etcd containers
ctr -n k8s.io c ls | grep -i 'etcd'
# Check for duplicate kube-vip containers
ctr -n k8s.io c ls | grep -i 'kube-vip'
If you see multiple containers for any component (especially kube-vip), you have duplicate containers that need to be removed.
Resolution:
-
For each duplicate container, first kill the task:
# Get the container ID from the list command above
ctr -n k8s.io task kill <container-id>
-
Then remove the container:
ctr -n k8s.io c rm <container-id>
-
Identify and remove stale containers (typically the older ones based on creation time). Keep only the most recent container for each component.
-
After removing duplicates, verify the cluster API is accessible:
# From your admin machine
kubectl get nodes --kubeconfig <cluster-kubeconfig>
-
If kube-vip was affected, verify the virtual IP is now properly assigned to one of the control plane nodes:
# From control plane node
ip addr show | grep <control-plane-vip>
Prevention:
To prevent duplicate containers during certificate renewal or static pod operations, always include a 30-second sleep between disabling and re-enabling static pods. See the manual certificate renewal steps
for the correct procedure.
Verify Cluster Certificates are valid
If kubectl commands are not working due to timeout issues, then it may also be helpful to verify that certificates on the etcd and control plane nodes have not expired.
SSH to one of your etcd nodes and view the etcd container logs in /var/log/containers.
View the control plane certificates by SSHing into one of your control plane nodes and run the following commands to view the validity of the /var/lib/kubeadm certificates and see their expiration dates.
sudo kubeadm certs check-expiration
# you would be in the admin container when you ssh to the Bottlerocket machine
# open a root shell
sudo sheltie
# pull the image
IMAGE_ID=$(apiclient get | apiclient exec admin jq -r '.settings["host-containers"]["kubeadm-bootstrap"].source')
# ctr is the containerd cli.
# For more information, see https://github.com/projectatomic/containerd/blob/master/docs/cli.md
ctr image pull ${IMAGE_ID}
# you may see missing etcd certs error, which is expected if you have external etcd nodes
ctr run \
--mount type=bind,src=/var/lib/kubeadm,dst=/var/lib/kubeadm,options=rbind:rw \
--mount type=bind,src=/var/lib/kubeadm,dst=/etc/kubernetes,options=rbind:rw \
--rm \
${IMAGE_ID} tmp-certs-check \
/opt/bin/kubeadm certs check-expiration
EKS Anywhere typically renews certificates when upgrading a cluster. However, if a cluster has not been upgraded for over a year, then it is necessary to manually renew these certificates. Please see Certificate rotation
to manually rotate expired certificates.
Bootstrap cluster fails to come up
If your bootstrap cluster has problems you may get detailed logs by looking at the files created under the ${CLUSTER_NAME}/logs folder. The capv-controller-manager log file will surface issues with vsphere specific configuration while the capi-controller-manager log file might surface other generic issues with the cluster configuration passed in.
You may also access the logs from your bootstrap cluster directly as below:
export KUBECONFIG=${PWD}/${CLUSTER_NAME}/generated/${CLUSTER_NAME}.kind.kubeconfig
kubectl logs -f -n capv-system -l control-plane="controller-manager" -c manager
It is also useful to start a shell session on the Docker container running the bootstrap cluster by running docker ps and then docker exec -it <container-id> bash the kind container.
Bootstrap cluster fails to come up: node(s) already exist for a cluster with the name
During create and delete CLI, EKS Anywhere tries to create a temporary KinD bootstrap cluster with the name ${CLUSTER_NAME}-eks-a-cluster on the Admin machine. This operation can fail with below error:
Error: creating bootstrap cluster: executing create/delete cluster: ERROR: failed to create/delete cluster: node(s) already exist for a cluster with the name \"cluster-name\"
This indicates that the cluster creation or deletion fails because a bootstrap cluster of the same name already exists. If you are sure the cluster is not being used, you can manually delete the old cluster:
docker ps | grep "${CLUSTER_NAME}-eks-a-cluster-control-plane" | awk '{ print $1 }' | xargs docker rm -f
Once the old KinD bootstrap cluster is deleted, you can rerun the eksctl anywhere create or eksctl anywhere delete command again.
Cluster upgrade fails with management components on bootstrap cluster
Important
KinD cluster is no longer used during upgrade of management cluster from v0.18.0 onwards.
For eksctl anywhere version older than v0.18.0, if a cluster upgrade of a management (or self managed) cluster fails or is halted in the middle, you may be left in a
state where the management resources (CAPI) are still on the KinD bootstrap cluster on the Admin machine. Right now, you will have to
manually move the management resources from the KinD cluster back to the management cluster.
First create a backup:
CLUSTER_NAME=squid
KINDKUBE=${CLUSTER_NAME}/generated/${CLUSTER_NAME}.kind.kubeconfig
MGMTKUBE=${CLUSTER_NAME}/${CLUSTER_NAME}-eks-a-cluster.kubeconfig
DIRECTORY=backup
# Substitute the version with whatever version you are using
CONTAINER=public.ecr.aws/eks-anywhere/cli-tools:v0.12.0-eks-a-19
rm -rf ${DIRECTORY}
mkdir ${DIRECTORY}
docker run -i --network host -w $(pwd) -v /var/run/docker.sock:/var/run/docker.sock -v $(pwd):/$(pwd) --entrypoint clusterctl ${CONTAINER} move \
--namespace eksa-system \
--kubeconfig $KINDKUBE \
--to-directory ${DIRECTORY}
#After the backup, move the management cluster back
docker run -i --network host -w $(pwd) -v /var/run/docker.sock:/var/run/docker.sock -v $(pwd):/$(pwd) --entrypoint clusterctl ${CONTAINER} move \
--to-kubeconfig $MGMTKUBE \
--namespace eksa-system \
--kubeconfig $KINDKUBE
Before you delete your bootstrap KinD cluster, verify there are no import custom resources left on it:
kubectl get crds | grep eks | while read crd rol
do
echo $crd
kubectl get $crd -A
done
Upgrade command stuck on Waiting for external etcd to be ready
There can be a few reasons if the upgrade command is stuck on waiting for external etcd for workload cluster to be ready and eventually times out.
First, check the underlying infrastructure to see if any new etcd machines are created.
No new etcd machines are created in the infrastrure provider
If no etcd machines are created, check the etcdadm-bootstrap-provider-controller-manager, etcdadm-controller-controller-manager, capi-controller-manager, capi-kubeadm-control-plane-controller-manager, and other Cluster API controller logs using the commands mentioned in Generic cluster unavailable
section.
No IP assigned to the new etcd machine
Refer to no IP assigned to a VM
section.
Machines are unhealthy after restoring CAPI control from the backup
When an EKS Anywhere management cluster loses its CAPI resources, you need use the backup stored in the folder to regain the management control. It is possible that after recovering the cluster from CAPI backup, the machine objects are in unhealthy/not ready state. For example:
$ kubectl get machines -n eksa-system
NAME PHASE
cluster1-etcd-2md6m Failed
cluster1-etcd-s8qs5 Failed
cluster1-etcd-vqs6w Failed
cluster1-md-0-75584b4fccxfgs86-pfk22 Failed
cluster1-x6rzc Failed
This can happen when the new machines got rolled out after the backup was taken, thus the backup objects being applied do not have the latest machine configurations. When applying an outdated CAPI backup, the provider machine object is out of sync with the actual infrastructure VM.
etcdadm join failed in etcd machine bootstrap log
When an etcd machine object is not in ready state, you can ssh into the etcd node and check the etcd bootstrap log:
cat /var/log/cloud-init.log
sudo sheltie
journalctl _COMM=host-ctr
If the bootstrap log indicates that the etcadm join operation fail, this can mean that the etcd cluster contains unhealthy member(s). Looking at the log details you can further troubleshoot from below sections.
New etcd machine cannot find the existing etcd cluster members
The edcdadm log shows error that the new etcd machine cannot connect to the existing etcd cluster members. This means the etcdadm-init secret is outdated. To update it, run
kubectl edit secrets <cluster-name>-etcd-init -n eksa-system
and make sure the new etcd machine IP is included in the secret.
New etcd machine cannot join the cluster due to loss of quorum
An etcd cluster needs a majority of nodes, a quorum, to agree on updates to the cluster state. For a cluster with n members, quorum is (n/2)+1. If etcd could not automatically recover and restore quorum, it is possible that there was an unhealthy or broken VM (e.g. a VM without IP assigned) that is still a member of the etcd cluster. You need to find and manually remove the unhealthy member.
To achieve that, first ssh into the etcd node and use etcdctl member list command to detect the unhealthy member.
sudo etcdctl --cacert=/etc/etcd/pki/ca.crt --cert=/etc/etcd/pki/etcdctl-etcd-client.crt --key=/etc/etcd/pki/etcdctl-etcd-client.key member list
ETCD_CONTAINER_ID=$(ctr -n k8s.io c ls | grep -w "etcd-io" | cut -d " " -f1)
ctr -n k8s.io t exec -t --exec-id etcd ${ETCD_CONTAINER_ID} etcdctl \
--cacert=/var/lib/etcd/pki/ca.crt \
--cert=/var/lib/etcd/pki/server.crt \
--key=/var/lib/etcd/pki/server.key \
member list
After identifying the unhealthy member, use etcdctl member remove to remove it from the cluster.
sudo etcdctl --cacert=/etc/etcd/pki/ca.crt --cert=/etc/etcd/pki/etcdctl-etcd-client.crt --key=/etc/etcd/pki/etcdctl-etcd-client.key member remove ${UNHEALTHY_MEMBER_ID}
ctr -n k8s.io t exec -t --exec-id etcd ${ETCD_CONTAINER_ID} etcdctl \
--cacert=/var/lib/etcd/pki/ca.crt \
--cert=/var/lib/etcd/pki/server.crt \
--key=/var/lib/etcd/pki/server.key \
member remove ${UNHEALTHY_MEMBER_ID}
Provider machine does not point to the underlying VMs
Follow the VM restore process in provider-specific section.
Nodes cycling due to insufficient pod CIDRs
Kubernetes controller manager allocates a dedicated CIDR block per node for pod IPs from within clusterNetwork.pods.cidrBlocks. The size of this node CIDR block defaults to /24 and can be adjusted at cluster creation using the optional cidrMaskSize field
.
Since each node requires a CIDR block, the maximum number of nodes in a cluster is limited to the number of non-overlapping subnets of cidrMaskSize that fit in the pods CIDR block. For example, for a pod CIDR block mask of /18 and a node CIDR mask size of /22, a maximum of 16 nodes can be proivisioned since there are 16 subnets of size /22 in the overall /18 block. If more nodes are created than the clusterNetwork.pods.cidrBlocks can accomodate, kube-controller-manager will not be able to allocate a CIDR block to the extra nodes.
This can cause nodes to become NotReady with the following sympotoms:
If more nodes need to be provisioned, either the clusterNetwork.pods.cidrBlocks must be expanded or the node-cidr-mask-size should be reduced.
.
Sometimes a cluster node is crashed but machine health check does not start the proper remediation process to recreate the failed machine. For example, if a worker node is crashed, and running kubectl get mhc ${CLUSTER_NAME}-md-0-worker-unhealthy -n eksa-system -oyaml shows status message below:
Remediation is not allowed, the number of not started or unhealthy machines exceeds maxUnhealthy
EKS Anywhere sets the machine health check’s MaxUnhealthy of the workers in a worker node group to 40%. This means any further remediation is only allowed if at most 40% of the worker machines selected by “selector” are not healthy. If more than 40% of the worker machines are in unhealthy state, the remediation will not be triggered.
For example, if you create an EKS Anywhere cluster with 2 worker nodes in the same worker node group, and one of the worker node is down. The machine health check will not remediate the failed machine because the actual unhealthy machines (50%) in the worker node group already exceeds the maximum percentage of the unhealthy machine (40%) allowed. As a result, the failed machine will not be replaced with new healthy machine and your cluster will be left with single worker node. In this case, we recommend you to scale up the number of worker nodes, for example, to 4. Once the 2 more worker nodes are up and running, it brings the total unhealthy worker machines to 25% which is below the 40% limit. This will trigger the machine health check remediation which replace the unhealthy machine with new one.
Etcd machines with false NodeHealthy condition due to WaitingForNodeRef
When inspecting the Machine CRs, etcd machines might appear as Running but containing a false NodeHealthy condition, with a WaitingForNodeRef reason. This is a purely cosmetic issue that has no impact in the health of your cluster. This has been fixed in more recent versions of EKS-A, so this condition won’t be displayed anymore in etcd machines.
Status:
Addresses:
Address: 144.47.85.93
Type: ExternalIP
Bootstrap Ready: true
Conditions:
Last Transition Time: 2023-05-15T23:13:01Z
Status: True
Type: Ready
Last Transition Time: 2023-05-15T23:12:09Z
Status: True
Type: BootstrapReady
Last Transition Time: 2023-05-15T23:13:01Z
Status: True
Type: InfrastructureReady
Last Transition Time: 2023-05-15T23:12:09Z
Reason: WaitingForNodeRef
Severity: Info
Status: False
Type: NodeHealthy
Infrastructure Ready: true
Last Updated: 2023-05-15T23:13:01Z
Observed Generation: 3
Phase: Running
Machine gets stuck at Provisioned state without providerID set
The VM can be created in the provider infrastructure with proper IP assigned but running kubectl get machines -n eksa-system indicates that the machine is in Provisioned state and never gets to Running.
Check the CAPI controller manager log with k logs -f -n capi-system -l control-plane="controller-manager" --tail -1:
E0218 03:41:53.126751 1 machine_controller_noderef.go:152] controllers/Machine "msg"="Failed to parse ProviderID" "error"="providerID is empty" "providerID"={} "node"="test-cluster-6ffd74bd5b-khxzr"
E0218 03:42:09.155577 1 machine_controller.go:685] controllers/Machine "msg"="Unable to retrieve machine from node" "error"="no matching Machine" "node"="test-cluster-6ffd74bd5b-khxzr"
When inspecting the CAPI machine object, you may find out that the Node.Spec.ProviderID is not set.
This can happen when the workload environment does not have proper network access to the underlying provider infrastructure. For example in vSphere, without the network access to vCenter endpoint, the vsphere-cloud-controller-manager in the workload cluster cannot set node’s providerID, thus the machine will never get to Running state, blocking cluster provisioning from continuing.
To fix it, make sure to validate the network/firewall settings from the workload cluster to the infrastructure provider environment. Read through the Requirements page, especially around the networking requirements in each provider before retrying the cluster provisioning:
Labeling nodes with reserved labels such as node-role.kubernetes.io fails with kubeadm error during bootstrap
If cluster creation or upgrade fails to complete successfully and kubelet throws an error similar to the one below, please refer to this section. The cluster spec for EKS Anywhere create or upgrade should look like:
.
.
controlPlaneConfiguration:
count: 2
endpoint:
host: "192.168.x.x"
labels:
"node-role.kubernetes.io/control-plane": "cp"
workerNodeGroupConfigurations:
- count: 2
labels:
"node-role.kubernetes.io/worker": "worker"
.
.
If your cluster spec looks like the above one for either the control plane configuration and/or worker node configuration, you might run into the below kubelet error:
unknown 'kubernetes.io' or 'k8s.io' labels specified with --node-labels: [node-role.kubernetes.io/worker].
--node-labels in the 'kubernetes.io' namespace must begin with an allowed prefix (kubelet.kubernetes.io, node.kubernetes.io) or be in the specifically allowed set (beta.kubernetes.io/arch, beta.kubernetes.io/instance-type, beta.kubernetes.io/os, failure-domain.beta.kubernetes.io/region, failure-domain.beta.kubernetes.io/zone, kubernetes.io/arch, kubernetes.io/hostname, kubernetes.io/os, node.kubernetes.io/instance-type, topology.kubernetes.io/region, topology.kubernetes.io/zone)
Self-assigning node labels such as node-role.kubernetes.io using the kubelet --node-labels flag is not possible due to a security measure imposed by the NodeRestriction admission controller that kubeadm enables by default.
Assigning such labels to nodes can be done after the bootstrap process has completed:
kubectl label nodes <name> node-role.kubernetes.io/worker=""
For convenience, here are example one-liners to do this post-installation:
# For Kubernetes 1.19 (kubeadm 1.19 sets only the node-role.kubernetes.io/master label)
kubectl get nodes --no-headers -l '!node-role.kubernetes.io/master' -o jsonpath='{range .items[*]}{.metadata.name}{"\n"}' | xargs -I{} kubectl label node {} node-role.kubernetes.io/worker=''
# For Kubernetes >= 1.20 (kubeadm >= 1.20 sets the node-role.kubernetes.io/control-plane label)
kubectl get nodes --no-headers -l '!node-role.kubernetes.io/control-plane' -o jsonpath='{range .items[*]}{.metadata.name}{"\n"}' | xargs -I{} kubectl label node {} node-role.kubernetes.io/worker=''
No static pods is running in container runtime on control plane nodes
When the kubelet systemd service is running on a control plane node and you notice that no static pods
are running, this could be due to a certificate issue. Check the kubelet service logs. If you see error messages like the ones below, renew the kubelet-client-current.pem certificate by following these steps
:
part of the existing bootstrap client certificate in /etc/kubernetes/kubelet/kubeconfig
Loading cert/key pair from "/var/lib/kubelet/pki/kubelet-client-current.pem
"Failed to connect to apiserver" err="Get \"https://10.150.223.2:6443/healthz?timeout=1s\": net/http: request canceled while waiting for connection (Client.Timeout exceeded while awaiting headers)"
Troubleshooting DNS issues in EKSA cluster
DNS resolution is managed by coreDNS, a DNS server deployed as a pod within the cluster, it helps resolve service names to corresponding IP Addresses. If DNS resolution fails, applications maybe unable to connect to services or external endpoints.
DNS Debugging
Verify CoreDNS deployment
Note: For clusters with Management and Workload clusters, below checks should be performed on both Management and Workload Clusters.
-
Check if CoreDNS pods are running
kubectl get pods --namespace=kube-system -l k8s-app=kube-dns
Expected Output:
NAME READY STATUS RESTARTS AGE
...
coredns-7b96bf9f76-5hsxb 1/1 Running 0 1h
coredns-7b96bf9f76-mvmmt 1/1 Running 0 1h
...
-
Check for errors in the DNS pod
kubectl logs --namespace=kube-system -l k8s-app=kube-dns
See if there are any suspicious or unexpected messages in the logs.
-
Verify CoreDNS configuration and ensure it matches with cluster requirement, also verify if forward plugin points to correct DNS servers
kubectl get configmap coredns -n kube-system -o yaml
Example configmap output
apiVersion: v1
kind: ConfigMap
metadata:
name: coredns
namespace: kube-system
data:
Corefile: |
.:53 {
errors
health
kubernetes cluster.local in-addr.arpa ip6.arpa {
pods insecure
upstream
fallthrough in-addr.arpa ip6.arpa
}
prometheus :9153
forward . /etc/resolv.conf
cache 30
loop
reload
loadbalance
}
Test DNS resolution from the cluster
- Create a debug pod
kubectl apply -f https://k8s.io/examples/admin/dns/dnsutils.yaml
- Once that Pod is running, you can exec nslookup in that environment.
kubectl exec -i -t dnsutils -- nslookup <service-name>
- If the DNS server address is missing, check pod’s
/etc/resolv.conf
kubectl exec -ti dnsutils -- cat /etc/resolv.conf
Correcting Incorrect DNS Resolution
If DNS queries return incorrect or outdated IP addresses
-
Ensure that endpoints for service are correct and up-to-date.
kubectl get endpoints <service-name>
-
If CoreDNS is caching DNS responses, ensure the cache TTL is appropriate for your environment. You can edit the cache TTL in CoreDNS ConfigMap.
kubectl -n kube-system edit configmap coredns
Restart the CoreDNS deployment
kubectl rollout restart deployment coredns -n kube-system
Creating new workload cluster hangs or fails
Cluster creation appears to be hung waiting for the Control Plane to be ready.
If the CLI is hung on this message for over 30 mins, something likely failed during the OS provisioning:
Waiting for Control Plane to be ready
Or if cluster creation times out on this step and fails with the following messages:
Support bundle archive created {"path": "support-bundle-2022-06-28T00_41_24.tar.gz"}
Analyzing support bundle {"bundle": "CLUSTER_NAME/generated/bootstrap-cluster-2022-06-28T00:41:24Z-bundle.yaml", "archive": "support-bundle-2022-06-28T00_41_24.tar.gz"}
Analysis output generated {"path": "CLUSTER_NAME/generated/bootstrap-cluster-2022-06-28T00:43:40Z-analysis.yaml"}
collecting workload cluster diagnostics
Error: waiting for workload cluster control plane to be ready: executing wait: error: timed out waiting for the condition on clusters/CLUSTER_NAME
In either of those cases, the following steps can help you determine the problem:
-
Export the kind cluster’s kubeconfig file:
export KUBECONFIG=${PWD}/${CLUSTER_NAME}/generated/${CLUSTER_NAME}.kind.kubeconfig
-
If you have provided BMC information:
-
Check all of the machines that the EKS Anywhere CLI has picked up from the pool of hardware in the CSV file:
kubectl get machines.bmc -A
-
Check if those nodes are powered on. If any of those nodes are not powered on after a while then it could be possible that BMC credentials are invalid. You can verify it by checking the logs:
kubectl get tasks.bmc -n eksa-system
kubectl get tasks.bmc <bmc-name> -n eksa-system -o yaml
Validate BMC credentials are correct if a connection error is observed on the tasks.bmc resource. Note that “IPMI over LAN” or “Redfish” must be enabled in the BMC configuration for the tasks.bmc resource to communicate successfully.
-
If the machine is powered on but you see linuxkit is not running, then Tinkerbell failed to serve the node via iPXE. In this case, you would want to:
-
Check the Boots service logs from the machine where you are running the CLI to see if it received and/or responded to the request:
-
Confirm no other DHCP service responded to the request and check for any errors in the BMC console. Other DHCP servers on the network can result in race conditions and should be avoided by configuring the other server to block all MAC addresses and exclude all IP addresses used by EKS Anywhere.
-
If you see Welcome to LinuxKit, click enter in the BMC console to access the LinuxKit terminal. Run the following commands to check if the tink-worker container is running.
docker ps -a
docker logs <container-id>
-
If the machine has already started provisioning the OS and it’s in irrecoverable state, get the workflow of the provisioning/provisioned machine using:
kubectl get workflows -n eksa-system
kubectl describe workflow/<workflow-name> -n eksa-system
Check all the actions and their status to determine if all actions have been executed successfully or not. If the stream-image has action failed, it’s likely due to a timeout or network related issue. You can also provide your own image_url by specifying osImageURL under datacenter spec.
vSphere troubleshooting
EKSA_VSPHERE_USERNAME is not set or is empty
❌ Validation failed {"validation": "vsphere Provider setup is valid", "error": "failed setup and validations: EKSA_VSPHERE_USERNAME is not set or is empty", "remediation": ""}
Two environment variables need to be set and exported in your environment to create clusters successfully.
Be sure to use single quotes around your user name and password to avoid shell manipulation of these values.
export EKSA_VSPHERE_USERNAME='<vSphere-username>'
export EKSA_VSPHERE_PASSWORD='<vSphere-password>'
vSphere authentication failed
❌ Validation failed {"validation": "vsphere Provider setup is valid", "error": "error validating vCenter setup: vSphere authentication failed: govc: ServerFaultCode: Cannot complete login due to an incorrect user name or password.\n", "remediation": ""}
Error: failed to create cluster: validations failed
Two environment variables need to be set and exported in your environment to create clusters successfully.
Be sure to use single quotes around your user name and password to avoid shell manipulation of these values.
export EKSA_VSPHERE_USERNAME='<vSphere-username>'
export EKSA_VSPHERE_PASSWORD='<vSphere-password>'
Issues detected with selected template
Issues detected with selected template. Details: - -1:-1:VALUE_ILLEGAL: No supported hardware versions among [vmx-15]; supported: [vmx-04, vmx-07, vmx-08, vmx-09, vmx-10, vmx-11, vmx-12, vmx-13].
Our upstream dependency on CAPV makes it a requirement that you use vSphere 6.7 update 3 or newer.
Make sure your ESXi hosts are also up to date.
Waiting for external etcd to be ready
2022-01-19T15:56:57.734Z V3 Waiting for external etcd to be ready {"cluster": "mgmt"}
Debug this problem using techniques from Generic cluster unavailable
.
Timed out waiting for the condition on deployments/capv-controller-manager
Failed to create cluster {"error": "error initializing capi in bootstrap cluster: error waiting for capv-controller-manager in namespace capv-system: error executing wait: error: timed out waiting for the condition on deployments/capv-controller-manager\n"}
Debug this problem using techniques from Generic cluster unavailable
.
Timed out waiting for the condition on clusters/
Failed to create cluster {"error": "error waiting for workload cluster control plane to be ready: error executing wait: error: timed out waiting for the condition on clusters/test-cluster\n"}
This can be an issue with the number of control plane and worker node replicas defined in your cluster yaml file.
Try to start off with a smaller number (3 or 5 is recommended for control plane) in order to bring up the cluster.
This error can also occur because your vCenter server is using self-signed certificates and you have insecure set to true in the generated cluster yaml.
To check if this is the case, run the commands below:
export KUBECONFIG=${PWD}/${CLUSTER_NAME}/generated/${CLUSTER_NAME}.kind.kubeconfig
kubectl get machines
If all the machines are in Provisioning phase, this is most likely the issue.
To resolve the issue, set insecure to false and thumbprint to the TLS thumbprint of your vCenter server in the cluster yaml and try again.
"msg"="discovered IP address"
The aforementioned log message can also appear with an address value of the control plane in either of the ${CLUSTER_NAME}/logs/capv-controller-manager.log file
or the capv-controller-manager pod log which can be extracted with the following command,
export KUBECONFIG=${PWD}/${CLUSTER_NAME}/generated/${CLUSTER_NAME}.kind.kubeconfig
kubectl logs -f -n capv-system -l control-plane="controller-manager" -c manager
Make sure you are choosing a control plane ip in your network range that does not conflict with other VMs.
Generic cluster unavailable
The first thing to look at is: were virtual machines created on your target provider? In the case of vSphere, you should see some VMs in your folder and they should be up. Check the console and if you see:
[FAILED] Failed to start Wait for Network to be Configured.
Make sure your DHCP server is up and working.
For more troubleshooting tips, see the CAPV Troubleshooting
guide.
Machine objects stuck on provisioning state
NOTE: This issue has been resolved with EKS-Anywhere v0.20.x
There is a known issue where connection is lost to vCenter and machine provisioning stops working.
For more context, see the related Github issue
in upstream CAPV repo that is tracking this.
If the machine objects are stuck on provisioning state, first check the corresponding vSphere VM object. If this resource is missing the status, it is likely the CAPV session issue.
To resolve, restart CAPV pod:
kubectl rollout restart deployment -n capv-system capv-controller-manager
Workload VM is created on vSphere but can not power on
A similar issue is the VM does power on but does not show any logs on the console and does not have any IPs assigned.
This issue can occur if the resourcePool that the VM uses does not have enough CPU or memory resources to run a VM.
To resolve this issue, increase the CPU and/or memory reservations or limits for the resourcePool.
Workload VMs start but Kubernetes not working properly
If the workload VMs start, but Kubernetes does not start or is not working properly, you may want to log onto the VMs and check the logs there.
If Kubernetes is at least partially working, you may use kubectl to get the IPs of the nodes:
kubectl get nodes -o=custom-columns="NAME:.metadata.name,IP:.status.addresses[2].address"
If Kubernetes is not working at all, you can get the IPs of the VMs from vCenter or using govc.
When you get the external IP you can ssh into the nodes using the private ssh key associated with the public ssh key you provided in your cluster configuration:
ssh -i <ssh-private-key> <ssh-username>@<external-IP>
Create command stuck on Creating new workload cluster
There can be a few reasons that the create command is stuck on Creating new workload cluster for over 30 min.
First, check the vSphere UI to see if any workload VM are created.
No node VMs are created in vSphere
If no VMs are created, check the capi-controller-manager, capv-controller-manager and capi-kubeadm-control-plane-controller-manager logs using the commands mentioned in Generic cluster unavailable
section.
No IP assigned to a VM
If a VM is created, check to see if it has an IPv4 IP assigned. For example, in BottleRocket machine boot logs, you might see Failed to read current IP data.
If there are no IPv4 IPs assigned to VMs, this is most likely because you don’t have a DHCP server configured for the network configured in the cluster config yaml, OR there are not enough IP addresses available in the DHCP pool to assign to the VMs. Ensure that you have a DHCP server running with enough IP addresses to create a cluster
before running the create or upgrade command again.
To confirm this is a DHCP issue, you could create a new VM in the same network to validate if an IPv4 IP is assigned correctly.
Control Plane IP in clusterconfig is not present on any Control Plane VM
If there are any IPv4 IPs assigned, check if one of the VMs have the controlPlane IP specified in Cluster.spec.controlPlaneConfiguration.endpoint.host in the clusterconfig yaml.
If this IP is not present on any control plane VM, make sure the network has access to the following endpoints:
- vCenter endpoint (must be accessible to EKS Anywhere clusters)
- public.ecr.aws
- anywhere-assets.eks.amazonaws.com (to download the EKS Anywhere binaries, manifests and OVAs)
- distro.eks.amazonaws.com (to download EKS Distro binaries and manifests)
- d2glxqk2uabbnd.cloudfront.net (for EKS Anywhere and EKS Distro ECR container images)
- api.ecr.us-west-2.amazonaws.com (for EKS Anywhere package authentication matching your region)
- d5l0dvt14r5h8.cloudfront.net (for EKS Anywhere package ECR container images)
- api.github.com (only if GitOps is enabled)
- sts.amazonaws.com (only if AWS IAM Authenticator is enabled)
Failed to connect to <vSphere-FQDN>: connection refused on vsphere-cloud-controller-manager
If the IPv4 IPs are assigned to the VM and you have the workload kubeconfig under <cluster-name>/<cluster-name>-eks-a-cluster.kubeconfig, you can use it to check vsphere-cloud-controller-manager logs.
kubectl logs -n kube-system vsphere-cloud-controller-manager-<xxxxx> --kubeconfig <cluster-name>/<cluster-name>-eks-a-cluster.kubeconfig
If you see the message below in the logs, it means your cluster nodes do not have access to vSphere, which is required for the cluster to get to a ready state.
Failed to connect to <vSphere-FQDN>: connection refused
In this case, you need to enable inbound traffic from your cluster nodes on your vCenter’s management network.
Cluster Deletion Fails
If cluster deletion fails, you may need to manually delete the VMs associated with the cluster.
The VMs should be named with the cluster name.
You can power off and delete from disk using the vCenter web user interface.
You may also use govc:
govc find -type VirtualMachine --name '<cluster-name>*'
This will give you a list of virtual machines that should be associated with your cluster.
For each of the VMs you want to delete run:
VM_NAME=vm-to-destroy
govc vm.power -off -force $VM_NAME
govc object.destroy $VM_NAME
Restore VM for machine in vSphere
When a CAPI machine is in not ready state, it is possible that the machine object does not match the underlying VM in vSphere. Instead, the machine is pointing to a VM that does not exist anymore.
In order to solve this, you need to update the vspheremachine and vspherevm objects to point to the new VM running in vSphere. This requires getting the UUID for the new VM (using govc command), and using it to update the biosUUID and providerID fields. Notice that this would create a mismatch between the CAPI resources names (vspheremachine and vspherevm) and the actual VM in vSphere. However, that is only an aesthetic inconvenience, since the mapping is done based on UUID and not name. Once the objects are updated, a machine rollout would replace the VM with a new one, removing the name mismatch problem. You also need to cleanup the error message and error reason from the statuses to resume the reconciliation of these objects. With that done, the machine objects should move to Running state.
vCenter VM Deletion Causes Cluster Stuck in Deleting State with Orphaned Objects
When a VM in vCenter has been deleted, however, your cluster is stuck in a deleting state with the corresponding the CAPI objects left behind, the user has to manually delete a few related resources to recover. The resources of interest related to the VM are the following: machine, vspheremachine, vspherevm, and node.
To clean up the resources in order to recover from this deleting state:
-
Delete the the corresponding CAPI machine object.
kubectl delete machine -n eksa-system <machine-name>
-
If that is stuck, it means that the capi-controller-manager is unable to remove the finalizer from the object, so the user needs force delete the object.
You can do this by editing the machine object using kubectl and removing the finalizers on it.
kubectl edit machine -n eksa-system <machine-name>`
Look for the finalizers field in the metadata section of the resource. remove the finalizers. Save your changes.
metadata:
finalizers:
- finalizer.example.com
Remove the finalizers field under metada and save your changes. After, the object should be deleted.
-
If the capv-controller-manager is unable to to clean up the vspheremachine and vspherevm objects, repeat the steps above for those orphaned objects that are related to the deleted VM.
-
You may also need to manually delete the corresponding orphaned node object using kubectl.
kubectl delete node <node-name>
BottleRocket OS Etcd endpoints have inadvertent IP change
If a cluster becomes inaccessible after etcd VMs IP address change but Control Plane is still reachable,,
ssh into one of the control plane node, check kube-api server container logs in /var/log/containers.
If the api server is having this error where the etcd endpoint is not reachable, the issue can be resolved by 2 ways.
2024-09-06T00:48:14.965194255Z stderr F W0906 00:48:14.965078 1 logging.go:59] [core] [Channel #5 SubChannel #6] grpc: addrConn.createTransport failed to connect to {Addr: "198.18.134.22:2379", ServerName: "198.18.134.22", }. Err: connection error: desc = "transport: Error while dialing: dial tcp 198.18.134.22:2379: operation was canceled
If you have an access to DHCP server and can reboot VMs manually, create DHCP reservations for the etcd VMs using their original IP addresses. Then, reboot the etcd nodes to ensure they obtain the correct IPs.
If you do not have an access to the DHCP server or cannot reboot VMs manually, perform below steps to manually assign old IPs to VMs.
-
ssh into etcd VM using a new IP.
-
Find the correct old IP associated with this VM by looking at the etcd container log file located under /var/log/containers.
-
Run below commands to manually change the new IP to the old IP. You will loose connection to this VM when you delete the new IP from the interface.
sudo sheltie
# old IP will get added as a secondary IP on eth0 interface
ip addr change <old-ip/cidr> dev eth0
# add a default ip route in this VM using the old IP as the source
ip route add default via <router-ip> dev eth0 proto dhcp src <old-ip>
# setup the interface so it will promote the secondary IP address when we remove the first
sysctl net.ipv4.conf.eth0.promote_secondaries=1
# remove the new IP address and confirm
ip addr del <new-ip/cidr> dev eth0
-
ssh into the VM using old IP, confirm the IP has been changed by running ip a command.
-
Perform the above steps for all etcd machines.
The cluster should be accessible again in some time.
NOTE: Make sure to roll out new ETCD VMs based on DHCP lease expiration time to avoid this issue in future.
Troubleshooting GitOps integration
Failed cluster creation can sometimes leave behind cluster configuration files committed to your GitHub.com repository.
Make sure to delete these configuration files before you re-try eksctl anywhere create cluster.
If these configuration files are not deleted, GitOps installation will fail but cluster creation will continue.
They’ll generally be located under the directory
clusters/$CLUSTER_NAME if you used the default path in your flux gitops config.
Delete the entire directory named $CLUSTER_NAME.
Failed cluster creation can sometimes leave behind a completely empty GitHub.com repository.
This can cause the GitOps installation to fail if you re-try the creation of a cluster which uses this repository.
If cluster creation failure leaves behind an empty github repository, please manually delete the created GitHub.com repository before attempting cluster creation again.
Changes not syncing to cluster
Please remember that the only fields currently supported for GitOps are:
Cluster
Cluster.workerNodeGroupConfigurations.countCluster.workerNodeGroupConfigurations.machineGroupRef.name
Worker Nodes
VsphereMachineConfig.diskGiBVsphereMachineConfig.numCPUsVsphereMachineConfig.memoryMiBVsphereMachineConfig.templateVsphereMachineConfig.datastoreVsphereMachineConfig.folderVsphereMachineConfig.resourcePool
If you’ve changed these fields and they’re not syncing to the cluster as you’d expect,
check out the logs of the pod in the source-controller deployment in the flux-system namespaces.
If flux is having a problem connecting to your GitHub repository the problem will be logged here.
$ kubectl get pods -n flux-system
NAME READY STATUS RESTARTS AGE
helm-controller-7d644b8547-k8wfs 1/1 Running 0 4h15m
kustomize-controller-7cf5875f54-hs2bt 1/1 Running 0 4h15m
notification-controller-776f7d68f4-v22kp 1/1 Running 0 4h15m
source-controller-7c4555748d-7c7zb 1/1 Running 0 4h15m
$ kubectl logs source-controller-7c4555748d-7c7zb -n flux-system
A well behaved flux pod will simply log the ongoing reconciliation process, like so:
{"level":"info","ts":"2021-07-01T19:58:51.076Z","logger":"controller.gitrepository","msg":"Reconciliation finished in 902.725344ms, next run in 1m0s","reconciler group":"source.toolkit.fluxcd.io","reconciler kind":"GitRepository","name":"flux-system","namespace":"flux-system"}
{"level":"info","ts":"2021-07-01T19:59:52.012Z","logger":"controller.gitrepository","msg":"Reconciliation finished in 935.016754ms, next run in 1m0s","reconciler group":"source.toolkit.fluxcd.io","reconciler kind":"GitRepository","name":"flux-system","namespace":"flux-system"}
{"level":"info","ts":"2021-07-01T20:00:52.982Z","logger":"controller.gitrepository","msg":"Reconciliation finished in 970.03174ms, next run in 1m0s","reconciler group":"source.toolkit.fluxcd.io","reconciler kind":"GitRepository","name":"flux-system","namespace":"flux-system"}
If there are issues connecting to GitHub, you’ll instead see exceptions in the source-controller log stream.
For example, if the deploy key used by flux has been deleted, you’d see something like this:
{"level":"error","ts":"2021-07-01T20:04:56.335Z","logger":"controller.gitrepository","msg":"Reconciler error","reconciler group":"source.toolkit.fluxcd.io","reconciler kind":"GitRepository","name":"flux-system","namespace":"flux-system","error":"unable to clone 'ssh://git@github.com/youruser/gitops-vsphere-test', error: ssh: handshake failed: ssh: unable to authenticate, attempted methods [none publickey], no supported methods remain"}
Other ways to troubleshoot GitOps integration
If you’re still having problems after deleting any empty EKS Anywhere created GitHub repositories and looking at the source-controller logs.
You can look for additional issues by checking out the deployments in the flux-system and eksa-system namespaces and ensure they’re running and their log streams are free from exceptions.
$ kubectl get deployments -n flux-system
NAME READY UP-TO-DATE AVAILABLE AGE
helm-controller 1/1 1 1 4h13m
kustomize-controller 1/1 1 1 4h13m
notification-controller 1/1 1 1 4h13m
source-controller 1/1 1 1 4h13m
$ kubectl get deployments -n eksa-system
NAME READY UP-TO-DATE AVAILABLE AGE
eksa-controller-manager 1/1 1 1 4h13m
Snow troubleshooting
Device outage
These are some conditions that can cause a device outage:
- Intentional outage (a planned power outage or an outage when moving devices, for example).
- Unintentional outage (a subset of devices or all devices are rebooted, or experiencing network disconnections from the LAN, which make device offline or isolated from the cluster).
NOTE: If all Snowball Edge devices are moved to a different place and connected to a different local network, make sure you use the same subnet, netmask, and gateway for your network configuration. After moving, devices and all node instances need to maintain the original IP addresses. Then, follow the recover cluster procedure to get your cluster up and running again. Otherwise, it might be impossible to resume the cluster.
To recover a cluster
If there is a subset of devices or all devices experience an outage, see Downloading and Installing the Snowball Edge client
to get the Snowball Edge client and then follow these steps:
-
Reboot and unlock all affected devices manually.
// use reboot-device command to reboot device, this may take several minutes
$ path-to-snowballEdge_CLIENT reboot-device --endpoint https://snowball-ip --manifest-file path-to-manifest-file --unlock-code unlock-code
// use describe-device command to check the status of device
$ path-to-snowballEdge_CLIENT describe-device --endpoint https://snowball-ip --manifest-file path-to-manifest-file --unlock-code unlock-code
// when the State in the output of describe-device is LOCKED, run unlock-device
$ path-to-snowballEdge_CLIENT unlock-device --endpoint https://snowball-ip --manifest-file path-to-manifest-file --unlock-code unlock-code
// use describe-device command to check the status of device until device is unlocked
$ path-to-snowballEdge_CLIENT describe-device --endpoint https://snowball-ip --manifest-file path-to-manifest-file --unlock-code unlock-code
-
Get all instance IDs that were part of the cluster by looking up the impacted device IP in the PROVIDERID column.
$ kubectl get machines -A --kubeconfig=cluster-name/cluster-name-eks-a-cluster.kubeconfig
NAMESPACE NAME CLUSTER NODENAME PROVIDERID PHASE AGE VERSION
eksa-system machine-name-1 cluster-name node-name-1 aws-snow:///192.168.1.39/s.i-8319d8c75d54a32cc Running 82s v1.24.9-eks-1-24-7
eksa-system machine-name-2 cluster-name node-name-2 aws-snow:///192.168.1.39/s.i-8d7d3679a1713e403 Running 82s v1.24.9-eks-1-24-7
eksa-system machine-name-3 cluster-name node-name-3 aws-snow:///192.168.1.231/s.i-8201c356fb369c37f Running 81s v1.24.9-eks-1-24-7
eksa-system machine-name-4 cluster-name node-name-4 aws-snow:///192.168.1.39/s.i-88597731b5a4a9044 Running 81s v1.24.9-eks-1-24-7
eksa-system machine-name-5 cluster-name node-name-5 aws-snow:///192.168.1.77/s.i-822f0f46267ad4c6e Running 81s v1.24.9-eks-1-24-7
-
Start all instances on the impacted devices as soon as possible.
$ aws ec2 start-instances --instance-id instance-id-1 instance-id-2 ... --endpoint http://snowball-ip:6078 --profile profile-name
-
Check the balance status of the current cluster after the cluster is ready again.
$ kubectl get machines -A --kubeconfig=cluster-name/cluster-name-eks-a-cluster.kubeconfig
-
Check if you have unstacked etcd machines.
-
If you have unstacked etcd machines, check the provision of unstacked etcd machines. You can find the device IP in the PROVIDERID column.
- If there are more than 1 unstacked etcd machines provisioned on the same device and there are devices with no unstacked etcd machine, you need to rebalance unstacked etcd nodes. Follow the rebalance nodes
procedure to rebalance your unstacked etcd nodes in order to recover high availability.
- If you have your etcd nodes evenly distributed with 1 device having at most 1 etcd node, you are done with the recovery.
-
If you don’t have unstacked etcd machines, check the provision of control plane machines. You can find the device IP in PROVIDERID column.
- If there are more than 1 control plan machines provisioned on the same device and there are devices with no control plane machine, you need to rebalance control plane nodes. Follow the rebalance nodes
procedure to rebalance your control plane nodes in order to recover high availability.
- If you have your control plane nodes evenly distributed with 1 device having at most 1 control plane node, you are done with the recovery.
How to rebalance nodes
-
Confirm the machines you want to delete and get their node name from the NODENAME column.
You can determine which machines need to be deleted by referring to the AGE column. The newly-generated machines have short AGE. Delete those new etcd/control plane machine nodes which are not the only etcd/control plane machine nodes on their devices.
-
Cordon each node so no further workloads are scheduled to run on it.
$ kubectl cordon node-name --ignore-daemonsets --kubeconfig=cluster-name/cluster-name-eks-a-cluster.kubeconfig
-
Drain machine nodes of all current workloads.
$ kubectl drain node-name --ignore-daemonsets --kubeconfig=cluster-name/cluster-name-eks-a-cluster.kubeconfig
-
Delete machine node.
$ kubectl delete node node-name --kubeconfig=cluster-name/cluster-name-eks-a-cluster.kubeconfig
-
Repeat this process until etcd/control plane machine nodes are evenly provisioned.
Device replacement
There might be some reasons which can require device replacement:
- When a subset of devices are determined to be broken and you want to join a new device into current cluster.
- When a subset of devices are offline and come back with a new device IP.
To upgrade a cluster with new devices:
-
Add new certificates to the certificate file and new credentials to the credential file.
-
Change the device list in your cluster yaml configuration file and use the eksctl anywhere upgrade cluster command.
$ eksctl anywhere upgrade cluster -f eks-a-cluster.yaml
Node outage
Unintentional instance outage
When an instance is in exception status (for example, terminated/stopped for some reason), it will be discovered automatically by Amazon EKS Anywhere and there will be a new replacement instance node created after 5 minutes. The new node will be provisioned to devices based on even provision strategy. In this case, the new node will be provisioned to a device with the fewest number of machines of the same type. Sometimes, more than one device will have the same number of machines of this type. Thus, we cannot guarantee it will be provisioned on the original device.
Intentional node replacement
If you want to replace an unhealthy node which didn’t get detected by Amazon EKS Anywhere automatically, you can follow these steps.
NOTE: Do not delete all worker machine nodes or control plane nodes or etcd nodes at the same time. Make sure you delete machine nodes one by one.
-
Cordon nodes so no further workloads are scheduled to run on it.
$ kubectl cordon node-name --ignore-daemonsets --kubeconfig=cluster-name/cluster-name-eks-a-cluster.kubeconfig
-
Drain machine nodes of all current workloads.
$ kubectl drain node-name --ignore-daemonsets --kubeconfig=cluster-name/cluster-name-eks-a-cluster.kubeconfig
-
Delete machine nodes.
$ kubectl delete node node-name --kubeconfig=cluster-name/cluster-name-eks-a-cluster.kubeconfig
-
New nodes will be provisioned automatically. You can check the provision result with the get machines command.
$ kubectl get machines -A --kubeconfig=cluster-name/cluster-name-eks-a-cluster.kubeconfig
Cluster Deletion Fails
If your Amazon EKS Anywhere cluster creation failed and the eksctl anywhere delete cluster -f eksa-cluster.yaml command cannot be run successfully, manually delete a few resources before trying the command again. Run the following commands from the computer on which you set up the AWS configuration and have the Snowball Edge Client installed
. If you are using multiple Snowball Edge devices, run these commands on each.
// get the list of instance ids that are created for Amazon EKS Anywhere cluster,
// that can be identified by cluster name in the tag of the output
$ aws ec2 describe-instances --endpoint http://snowball-ip:8008 --profile profile-name
// the next two commands are for deleting DNI, this needs to be done before deleting instance
$ PATH_TO_Snowball_Edge_CLIENT/bin/snowballEdge describe-direct-network-interfaces --endpoint https://snowball-ip --manifest-file path-to-manifest-file --unlock-code unlock-code
// DNI arn can be found in the output of last command, which is associated with the specific instance id you get from describe-instances
$ PATH_TO_Snowball_Edge_CLIENT/bin/snowballEdge delete-direct-network-interface --direct-network-interface-arn DNI-ARN --endpoint https://snowball-ip --manifest-file path-to-manifest-file --unlock-code unlock-code
// delete instance
$ aws ec2 terminate-instances --instance-id instance-id-1,instance-id-2 --endpoint http://snowball-ip:8008 --profile profile-name
Generate a log file from the Snowball Edge device
You can also generate a log file from the Snowball Edge device for AWS Support. See AWS Snowball Edge Logs
in this guide.
Nutanix troubleshooting
Error creating Nutanix client
Error: error creating nutanix client: username, password and endpoint are required
Verify if the required environment variables are set before creating the clusters:
export EKSA_NUTANIX_USERNAME="<Nutanix-username>"
export EKSA_NUTANIX_PASSWORD="<Nutanix-password>"
Also, make sure the spec.endpoint is correctly configured in the NutanixDatacenterConfig. The value of the spec.endpoint should be the IP or FQDN of Prism Central.
x509: certificate signed by unknown authority
Failure of the nutanix Provider setup is valid validation with the x509: certificate signed by unknown authority message indicates the certificate of the Prism Central endpoint is not trusted.
In case Prism Central is configured with self-signed certificates, it is recommended to configure the additionalTrustBundle in the NutanixDatacenterConfig. More information can be found here
.
10 - Reference
Reference documents for EKS Anywhere configuration
10.1 - eksctl anywhere CLI reference
Details on the options and parameters for eksctl anywhere CLI
The eksctl CLI, with the EKS Anywhere plugin added, lets you create and manage EKS Anywhere clusters.
While a cluster is running, most EKS Anywhere administration can be done using kubectl or other native Kubernetes tools.
Use this page to access individual reference pages for eksctl anywhere commands.
10.1.1 - anywhere
anywhere
Amazon EKS Anywhere
Synopsis
Use eksctl anywhere to build your own self-managing cluster on your hardware with the best of Amazon EKS
Options
-h, --help help for anywhere
-v, --verbosity int Set the log level verbosity
SEE ALSO
10.1.2 - anywhere apply
anywhere apply
Apply resources
Synopsis
Use eksctl anywhere apply to apply resources
Options
-h, --help help for apply
Options inherited from parent commands
-v, --verbosity int Set the log level verbosity
SEE ALSO
10.1.3 - (deprecated) anywhere apply package(s)
anywhere apply package(s)
Apply curated packages
Synopsis
Command “package” is deprecated, use kubectl apply instead
Apply Curated Packages Custom Resources to the cluster
anywhere apply package(s) [flags]
Options
--bundles-override string Override default Bundles manifest (not recommended)
-f, --filename string Filename that contains curated packages custom resources to apply
-h, --help help for package(s)
--kubeconfig string Path to an optional kubeconfig file to use.
Options inherited from parent commands
-v, --verbosity int Set the log level verbosity
SEE ALSO
10.1.4 - anywhere check-images
anywhere check-images
Check images used by EKS Anywhere do exist in the target registry
Synopsis
This command is used to check images used by EKS-Anywhere for cluster provisioning do exist in the target registry
anywhere check-images [flags]
Options
-f, --filename string Filename that contains EKS-A cluster configuration
-h, --help help for check-images
Options inherited from parent commands
-v, --verbosity int Set the log level verbosity
SEE ALSO
10.1.5 - anywhere copy
anywhere copy
Copy resources
Synopsis
Copy EKS Anywhere resources and artifacts
Options
-h, --help help for copy
Options inherited from parent commands
-v, --verbosity int Set the log level verbosity
SEE ALSO
10.1.6 - anywhere copy packages
anywhere copy packages
Copy curated package images and charts from source registries to a destination registry
Synopsis
Copy all the EKS Anywhere curated package images and helm charts from source registries to a destination registry. Registry credentials are fetched from docker config.
anywhere copy packages <destination-registry> [flags]
Options
--dry-run Dry run will show what artifacts would be copied, but not actually copy them
--dst-insecure Skip TLS verification against the destination registry
--dst-plain-http Whether or not to use plain http for destination registry
-h, --help help for packages
--kube-version string The kubernetes version of the package bundle to copy
--src-chart-registry string The source registry that stores helm charts (default src-image-registry)
--src-image-registry string The source registry that stores container images
Options inherited from parent commands
-v, --verbosity int Set the log level verbosity
SEE ALSO
10.1.7 - anywhere create
anywhere create
Create resources
Synopsis
Use eksctl anywhere create to create resources, such as clusters
Options
-h, --help help for create
Options inherited from parent commands
-v, --verbosity int Set the log level verbosity
SEE ALSO
10.1.8 - anywhere create cluster
anywhere create cluster
Create workload cluster
Synopsis
This command is used to create workload clusters
anywhere create cluster -f <cluster-config-file> [flags]
Options
--bundles-override string A path to a custom bundles manifest
--control-plane-wait-timeout string Override the default control plane wait timeout (default "1h0m0s")
--external-etcd-wait-timeout string Override the default external etcd wait timeout (default "1h0m0s")
-f, --filename string Path that contains a cluster configuration
-z, --hardware-csv string Path to a CSV file containing hardware data.
-h, --help help for cluster
--install-packages string Location of curated packages configuration files to install to the cluster
--kubeconfig string Management cluster kubeconfig file
--no-timeouts Disable timeout for all wait operations
--node-startup-timeout string (DEPRECATED) Override the default node startup timeout (Defaults to 20m for Tinkerbell clusters) (default "10m0s")
--per-machine-wait-timeout string Override the default machine wait timeout per machine (default "10m0s")
--skip-ip-check Skip check for whether cluster control plane ip is in use
--skip-validations stringArray Bypass create validations by name. Valid arguments you can pass are --skip-validations=vsphere-user-privilege
--tinkerbell-bootstrap-ip string The IP used to expose the Tinkerbell stack from the bootstrap cluster
--unhealthy-machine-timeout string (DEPRECATED) Override the default unhealthy machine timeout (default "5m0s")
Options inherited from parent commands
-v, --verbosity int Set the log level verbosity
SEE ALSO
10.1.9 - (deprecated) anywhere create package(s)
anywhere create package(s)
Create curated packages
Synopsis
Command “package” is deprecated, use kubectl apply instead
Create Curated Packages Custom Resources to the cluster
anywhere create package(s) [flags]
Options
--bundles-override string Override default Bundles manifest (not recommended)
-f, --filename string Filename that contains curated packages custom resources to create
-h, --help help for package(s)
--kubeconfig string Path to an optional kubeconfig file to use.
Options inherited from parent commands
-v, --verbosity int Set the log level verbosity
SEE ALSO
10.1.10 - anywhere delete
anywhere delete
Delete resources
Synopsis
Use eksctl anywhere delete to delete clusters
Options
-h, --help help for delete
Options inherited from parent commands
-v, --verbosity int Set the log level verbosity
SEE ALSO
10.1.11 - anywhere delete cluster
anywhere delete cluster
Workload cluster
Synopsis
This command is used to delete workload clusters created by eksctl anywhere
anywhere delete cluster (<cluster-name>|-f <config-file>) [flags]
Options
--bundles-override string Override default Bundles manifest (not recommended)
-f, --filename string Filename that contains EKS-A cluster configuration, required if <cluster-name> is not provided
-h, --help help for cluster
--kubeconfig string kubeconfig file pointing to a management cluster
-w, --w-config string Kubeconfig file to use when deleting a workload cluster
Options inherited from parent commands
-v, --verbosity int Set the log level verbosity
SEE ALSO
10.1.12 - (deprecated) anywhere delete package(s)
anywhere delete package(s)
Delete package(s)
Synopsis
Command “package” is deprecated, use kubectl delete package instead
This command is used to delete the curated packages custom resources installed in the cluster
anywhere delete package(s) [flags]
Options
--bundles-override string Override default Bundles manifest (not recommended)
--cluster string Cluster for package deletion.
-h, --help help for package(s)
--kubeconfig string Path to an optional kubeconfig file to use.
Options inherited from parent commands
-v, --verbosity int Set the log level verbosity
SEE ALSO
10.1.13 - anywhere describe
anywhere describe
Describe resources
Synopsis
Use eksctl anywhere describe to show details of a specific resource or group of resources
Options
-h, --help help for describe
Options inherited from parent commands
-v, --verbosity int Set the log level verbosity
SEE ALSO
10.1.14 - (deprecated) anywhere describe package(s)
anywhere describe package(s)
Command “package” is deprecated, use kubectl describe packages instead
Describe curated packages in the cluster
anywhere describe package(s) [flags]
Options
--bundles-override string Override default Bundles manifest (not recommended)
--cluster string Cluster to describe packages.
-h, --help help for package(s)
--kubeconfig string Path to an optional kubeconfig file to use.
Options inherited from parent commands
-v, --verbosity int Set the log level verbosity
SEE ALSO
10.1.15 - anywhere download
anywhere download
Download resources
Synopsis
Use eksctl anywhere download to download artifacts (manifests, bundles) used by EKS Anywhere
Options
-h, --help help for download
Options inherited from parent commands
-v, --verbosity int Set the log level verbosity
SEE ALSO
10.1.16 - anywhere download artifacts
anywhere download artifacts
Download EKS Anywhere artifacts/manifests to a tarball on disk
Synopsis
This command is used to download the S3 artifacts from an EKS Anywhere bundle manifest and package them into a tarball
anywhere download artifacts [flags]
Options
--bundles-override string Override default Bundles manifest (not recommended)
-d, --download-dir string Directory to download the artifacts to (default "eks-anywhere-downloads")
--dry-run Print the manifest URIs without downloading them
-f, --filename string [Deprecated] Filename that contains EKS-A cluster configuration
-h, --help help for artifacts
-r, --retain-dir Do not delete the download folder after creating a tarball
Options inherited from parent commands
-v, --verbosity int Set the log level verbosity
SEE ALSO
10.1.17 - anywhere download images
anywhere download images
Download all eks-a images to disk
Synopsis
Creates a tarball containing all necessary images
to create an eks-a cluster for any of the supported
Kubernetes versions.
anywhere download images [flags]
Options
--bundles-override string Override default Bundles manifest (not recommended)
-h, --help help for images
--include-packages this flag no longer works, use copy packages instead (DEPRECATED: use copy packages command)
--insecure Flag to indicate skipping TLS verification while downloading helm charts
-o, --output string Output tarball containing all downloaded images
Options inherited from parent commands
-v, --verbosity int Set the log level verbosity
SEE ALSO
10.1.18 - anywhere exp
anywhere exp
experimental commands
Synopsis
Use eksctl anywhere experimental commands
Options
-h, --help help for exp
Options inherited from parent commands
-v, --verbosity int Set the log level verbosity
SEE ALSO
10.1.19 - anywhere exp validate
anywhere exp validate
Validate resource or action
Synopsis
Use eksctl anywhere validate to validate a resource or action
Options
-h, --help help for validate
Options inherited from parent commands
-v, --verbosity int Set the log level verbosity
SEE ALSO
10.1.20 - anywhere exp validate create
anywhere exp validate create
Validate create resources
Synopsis
Use eksctl anywhere validate create to validate the create action on resources, such as cluster
Options
-h, --help help for create
Options inherited from parent commands
-v, --verbosity int Set the log level verbosity
SEE ALSO
10.1.21 - anywhere exp validate create cluster
anywhere exp validate create cluster
Validate create cluster
Synopsis
Use eksctl anywhere validate create cluster to validate the create cluster action
anywhere exp validate create cluster -f <cluster-config-file> [flags]
Options
-f, --filename string Filename that contains EKS-A cluster configuration
-z, --hardware-csv string Path to a CSV file containing hardware data.
-h, --help help for cluster
--tinkerbell-bootstrap-ip string Override the local tinkerbell IP in the bootstrap cluster
Options inherited from parent commands
-v, --verbosity int Set the log level verbosity
SEE ALSO
10.1.22 - anywhere exp vsphere
anywhere exp vsphere
Utility vsphere operations
Synopsis
Use eksctl anywhere vsphere to perform utility operations on vsphere
Options
-h, --help help for vsphere
Options inherited from parent commands
-v, --verbosity int Set the log level verbosity
SEE ALSO
10.1.23 - anywhere exp vsphere setup
anywhere exp vsphere setup
Setup vSphere objects
Synopsis
Use eksctl anywhere vsphere setup to configure vSphere objects
Options
-h, --help help for setup
Options inherited from parent commands
-v, --verbosity int Set the log level verbosity
SEE ALSO
10.1.24 - anywhere exp vsphere setup user
anywhere exp vsphere setup user
Setup vSphere user
Synopsis
Use eksctl anywhere vsphere setup user to configure EKS Anywhere vSphere user
anywhere exp vsphere setup user -f <config-file> [flags]
Options
-f, --filename string Filename containing vsphere setup configuration
--force Force flag. When set, setup user will proceed even if the group and role objects already exist. Mutually exclusive with --password flag, as it expects the user to already exist. default: false
-h, --help help for user
-p, --password string Password for creating new user
Options inherited from parent commands
-v, --verbosity int Set the log level verbosity
SEE ALSO
10.1.25 - anywhere generate
anywhere generate
Generate resources
Synopsis
Use eksctl anywhere generate to generate resources, such as clusterconfig yaml
Options
-h, --help help for generate
Options inherited from parent commands
-v, --verbosity int Set the log level verbosity
SEE ALSO
10.1.26 - anywhere generate clusterconfig
anywhere generate clusterconfig
Generate cluster config
Synopsis
This command is used to generate a cluster config yaml for the create cluster command
anywhere generate clusterconfig <cluster-name> (max 80 chars) [flags]
Options
-h, --help help for clusterconfig
-p, --provider string Provider to use (vsphere or tinkerbell or docker)
Options inherited from parent commands
-v, --verbosity int Set the log level verbosity
SEE ALSO
10.1.27 - anywhere generate hardware
anywhere generate hardware
Generate hardware files
Synopsis
Generate Kubernetes hardware YAML manifests for each Hardware entry in the source.
anywhere generate hardware [flags]
Options
-z, --hardware-csv string Path to a CSV file containing hardware data.
-h, --help help for hardware
-o, --output string Path to output hardware YAML.
Options inherited from parent commands
-v, --verbosity int Set the log level verbosity
SEE ALSO
10.1.28 - anywhere generate packages
anywhere generate packages
Generate package(s) configuration
Synopsis
Generates Kubernetes configuration files for curated packages
anywhere generate packages [flags] package
Options
--bundles-override string Override default Bundles manifest (not recommended)
--cluster string Name of cluster for package generation
-h, --help help for packages
--kube-version string Kubernetes Version of the cluster to be used. Format <major>.<minor>
--kubeconfig string Path to an optional kubeconfig file to use.
--registry string Used to specify an alternative registry for package generation
Options inherited from parent commands
-v, --verbosity int Set the log level verbosity
SEE ALSO
10.1.29 - anywhere generate support-bundle
anywhere generate support-bundle
Generate a support bundle
Synopsis
This command is used to create a support bundle to troubleshoot a cluster
anywhere generate support-bundle -f my-cluster.yaml [flags]
Options
--audit-logs Include the latest api server audit log file in the support bundle
--bundle-config string Bundle Config file to use when generating support bundle
-f, --filename string Filename that contains EKS-A cluster configuration
-h, --help help for support-bundle
--since string Collect pod logs in the latest duration like 5s, 2m, or 3h.
--since-time string Collect pod logs after a specific datetime(RFC3339) like 2021-06-28T15:04:05Z
-w, --w-config string Kubeconfig file to use when creating support bundle for a workload cluster
--bundles-manifest Bundles manifest to use when generating support bundle (required for generating support bundle in airgap environment)
Options inherited from parent commands
-v, --verbosity int Set the log level verbosity
SEE ALSO
10.1.30 - anywhere generate support-bundle-config
anywhere generate support-bundle-config
Generate support bundle config
Synopsis
This command is used to generate a default support bundle config yaml
anywhere generate support-bundle-config [flags]
Options
-f, --filename string Filename that contains EKS-A cluster configuration
-h, --help help for support-bundle-config
Options inherited from parent commands
-v, --verbosity int Set the log level verbosity
SEE ALSO
10.1.31 - anywhere generate tinkerbelltemplateconfig
anywhere generate tinkerbelltemplateconfig
Generate TinkerbellTemplateConfig objects
Synopsis
Generate TinkerbellTemplateConfig objects for your cluster specification.
The TinkerbellTemplateConfig is part of an EKS Anywhere bare metal cluster
specification. When no template config is specified on TinkerbellMachineConfig
objects, EKS Anywhere generates the template config internally. The template
config defines the actions for provisioning a bare metal host such as streaming
an OS image to disk. Actions vary based on the OS - see the EKS Anywhere
documentation for more details on the individual actions.
The template config include it in your bare metal cluster specification and
reference it in the TinkerbellMachineConfig object using the .spec.templateRef
field.
anywhere generate tinkerbelltemplateconfig [flags]
Options
--bundles-override string A path to a custom bundles manifest
-f, --filename string Path that contains a cluster configuration
-h, --help help for tinkerbelltemplateconfig
--tinkerbell-bootstrap-ip string The IP used to expose the Tinkerbell stack from the bootstrap cluster
Options inherited from parent commands
-v, --verbosity int Set the log level verbosity
SEE ALSO
10.1.32 - anywhere get
anywhere get
Get resources
Synopsis
Use eksctl anywhere get to display one or many resources
Options
-h, --help help for get
Options inherited from parent commands
-v, --verbosity int Set the log level verbosity
SEE ALSO
10.1.33 - (deprecated) anywhere get package(s)
anywhere get package(s)
Get package(s)
Synopsis
Command “package” is deprecated, use kubectl get packages instead
This command is used to display the curated packages installed in the cluster
anywhere get package(s) [flags]
Options
--bundles-override string Override default Bundles manifest (not recommended)
--cluster string Cluster to get list of packages.
-h, --help help for package(s)
--kubeconfig string Path to an optional kubeconfig file.
-o, --output string Specifies the output format (valid option: json, yaml)
Options inherited from parent commands
-v, --verbosity int Set the log level verbosity
SEE ALSO
10.1.34 - (deprecated) anywhere get packagebundle(s)
anywhere get packagebundle(s)
Get packagebundle(s)
Synopsis
Command “packagebundle” is deprecated, use kubectl get packagebundle instead
This command is used to display the currently supported packagebundles
anywhere get packagebundle(s) [flags]
Options
--bundles-override string Override default Bundles manifest (not recommended)
-h, --help help for packagebundle(s)
--kubeconfig string Path to an optional kubeconfig file.
-o, --output string Specifies the output format (valid option: json, yaml)
Options inherited from parent commands
-v, --verbosity int Set the log level verbosity
SEE ALSO
10.1.35 - (deprecated) anywhere get packagebundlecontroller(s)
anywhere get packagebundlecontroller(s)
Get packagebundlecontroller(s)
Synopsis
Command “packagebundlecontroller” is deprecated, use kubectl get packagebundlecontroller instead
This command is used to display the current packagebundlecontrollers
anywhere get packagebundlecontroller(s) [flags]
Options
--bundles-override string Override default Bundles manifest (not recommended)
-h, --help help for packagebundlecontroller(s)
--kubeconfig string Path to an optional kubeconfig file.
-o, --output string Specifies the output format (valid option: json, yaml)
Options inherited from parent commands
-v, --verbosity int Set the log level verbosity
SEE ALSO
10.1.36 - anywhere import
anywhere import
Import resources
Synopsis
Use eksctl anywhere import to import resources, such as images and helm charts
Options
-h, --help help for import
Options inherited from parent commands
-v, --verbosity int Set the log level verbosity
SEE ALSO
10.1.37 - anywhere import images
anywhere import images
Import images and charts to a registry from a tarball
Synopsis
Import all the images and helm charts necessary for EKS Anywhere clusters into a registry.
Use this command in conjunction with download images, passing it output tarball as input to this command.
anywhere import images [flags]
Options
-b, --bundles string Bundles file to read artifact dependencies from
-h, --help help for images
--include-packages Flag to indicate inclusion of curated packages in imported images (DEPRECATED: use copy packages command)
-i, --input string Input tarball containing all images and charts to import
--insecure Flag to indicate skipping TLS verification while pushing helm charts and bundles
-r, --registry string Registry where to import images and charts
Options inherited from parent commands
-v, --verbosity int Set the log level verbosity
SEE ALSO
10.1.38 - anywhere install
anywhere install
Install resources to the cluster
Synopsis
Use eksctl anywhere install to install resources into a cluster
Options
-h, --help help for install
Options inherited from parent commands
-v, --verbosity int Set the log level verbosity
SEE ALSO
10.1.39 - (deprecated) anywhere install package
anywhere install package
Install package
Synopsis
Command “package” is deprecated, use kubectl apply instead
This command is used to Install a curated package. Use list to discover curated packages
anywhere install package [flags] package
Options
--bundles-override string Override default Bundles manifest (not recommended)
--cluster string Target cluster for installation.
-h, --help help for package
--kube-version string Kubernetes Version of the cluster to be used. Format <major>.<minor>
--kubeconfig string Path to an optional kubeconfig file to use.
-n, --package-name string Custom name of the curated package to install
--registry string Used to specify an alternative registry for discovery
--set stringArray Provide custom configurations for curated packages. Format key:value
Options inherited from parent commands
-v, --verbosity int Set the log level verbosity
SEE ALSO
10.1.40 - anywhere install packagecontroller
anywhere install packagecontroller
Install packagecontroller on the cluster
Synopsis
This command is used to Install the packagecontroller on to an existing cluster
anywhere install packagecontroller [flags]
Options
--bundles-override string Override default Bundles manifest (not recommended)
-f, --filename string Filename that contains EKS-A cluster configuration
-h, --help help for packagecontroller
--kubeConfig string Management cluster kubeconfig file
Options inherited from parent commands
-v, --verbosity int Set the log level verbosity
SEE ALSO
10.1.41 - anywhere list
anywhere list
List resources
Synopsis
Use eksctl anywhere list to list images and artifacts used by EKS Anywhere
Options
-h, --help help for list
Options inherited from parent commands
-v, --verbosity int Set the log level verbosity
SEE ALSO
10.1.42 - anywhere list images
anywhere list images
Generate a list of images used by EKS Anywhere
Synopsis
This command is used to generate a list of images used by EKS-Anywhere for cluster provisioning
anywhere list images [flags]
Options
--bundles-override string Override default Bundles manifest (not recommended)
-f, --filename string Filename that contains EKS-A cluster configuration
-h, --help help for images
Options inherited from parent commands
-v, --verbosity int Set the log level verbosity
SEE ALSO
10.1.43 - anywhere list ovas
anywhere list ovas
List the OVAs that are supported by current version of EKS Anywhere
Synopsis
This command is used to list the vSphere OVAs from the EKS Anywhere bundle manifest for the current version of the EKS Anywhere CLI
anywhere list ovas [flags]
Options
--bundles-override string Override default Bundles manifest (not recommended)
-f, --filename string Filename that contains EKS-A cluster configuration
-h, --help help for ovas
Options inherited from parent commands
-v, --verbosity int Set the log level verbosity
SEE ALSO
10.1.44 - anywhere list packages
anywhere list packages
Lists curated packages available to install
anywhere list packages [flags]
Options
--bundles-override string Override default Bundles manifest (not recommended)
--cluster string Name of cluster for package list.
-h, --help help for packages
--kube-version string Kubernetes version <major>.<minor> of the packages to list, for example: "1.35".
--kubeconfig string Path to a kubeconfig file to use when source is a cluster.
--registry string Specifies an alternative registry for packages discovery.
Options inherited from parent commands
-v, --verbosity int Set the log level verbosity
SEE ALSO
10.1.45 - anywhere renew
anywhere renew
Renew resources
Synopsis
This command is used to renew resources for EKS Anywhere
Options
-h, --help help for renew
Options inherited from parent commands
-v, --verbosity int Set the log level verbosity
SEE ALSO
10.1.46 - anywhere renew certificates
anywhere renew certificates
Renew EKS Anywhere cluster certificates
Synopsis
This command is used to renew certificates for EKS Anywhere clusters
For detailed documentation on this command, see Renew certificates using eksctl anywhere
.
anywhere renew certificates -f <config-file> [flags]
Options
--component string Component to renew certificates for (control-plane or etcd)
-f, --filename string Path to the certificate renewal configuration file
-h, --help help for certificates
Options inherited from parent commands
-v, --verbosity int Set the log level verbosity
SEE ALSO
10.1.47 - anywhere upgrade
anywhere upgrade
Upgrade resources
Synopsis
Use eksctl anywhere upgrade to upgrade resources, such as clusters
Options
-h, --help help for upgrade
Options inherited from parent commands
-v, --verbosity int Set the log level verbosity
SEE ALSO
10.1.48 - anywhere upgrade cluster
anywhere upgrade cluster
Upgrade workload cluster
Synopsis
This command is used to upgrade workload clusters
anywhere upgrade cluster [flags]
Options
--bundles-override string A path to a custom bundles manifest
--control-plane-wait-timeout string Override the default control plane wait timeout (default "1h0m0s")
--external-etcd-wait-timeout string Override the default external etcd wait timeout (default "1h0m0s")
-f, --filename string Path that contains a cluster configuration
-z, --hardware-csv string Path to a CSV file containing hardware data.
-h, --help help for cluster
--kubeconfig string Management cluster kubeconfig file
--no-timeouts Disable timeout for all wait operations
--node-startup-timeout string (DEPRECATED) Override the default node startup timeout (Defaults to 20m for Tinkerbell clusters) (default "10m0s")
--per-machine-wait-timeout string Override the default machine wait timeout per machine (default "10m0s")
--skip-validations stringArray Bypass upgrade validations by name. Valid arguments you can pass are --skip-validations=pod-disruption,vsphere-user-privilege,eksa-version-skew
--unhealthy-machine-timeout string (DEPRECATED) Override the default unhealthy machine timeout (default "5m0s")
-w, --w-config string Kubeconfig file to use when upgrading a workload cluster
Options inherited from parent commands
-v, --verbosity int Set the log level verbosity
SEE ALSO
10.1.49 - anywhere upgrade management-components
anywhere upgrade management-components
Upgrade management components in a management cluster
Synopsis
The term management components encompasses all Kubernetes controllers and their CRDs present in the management cluster that are responsible for reconciling your EKS Anywhere (EKS-A) cluster. This command is specifically designed to facilitate the upgrade of these management components. Post this upgrade, the cluster itself can be upgraded by updating the ‘eksaVersion’ field in your EKS-A Cluster object.
anywhere upgrade management-components [flags]
Options
--bundles-override string A path to a custom bundles manifest
-f, --filename string Path that contains a cluster configuration
-h, --help help for management-components
Options inherited from parent commands
-v, --verbosity int Set the log level verbosity
SEE ALSO
10.1.50 - (deprecated) anywhere upgrade packages
anywhere upgrade packages
Command “packages” is deprecated, refer to https://anywhere.eks.amazonaws.com/docs/packages/packagebundles for upgrading
Upgrade all curated packages to the latest version
anywhere upgrade packages [flags]
Options
--bundle-version string Bundle version to use
--bundles-override string Override default Bundles manifest (not recommended)
--cluster string Cluster to upgrade.
-h, --help help for packages
--kubeconfig string Path to an optional kubeconfig file to use.
Options inherited from parent commands
-v, --verbosity int Set the log level verbosity
SEE ALSO
10.1.51 - anywhere upgrade plan
anywhere upgrade plan
Provides information for a resource upgrade
Synopsis
Use eksctl anywhere upgrade plan to get information for a resource upgrade
Options
-h, --help help for plan
Options inherited from parent commands
-v, --verbosity int Set the log level verbosity
SEE ALSO
10.1.52 - anywhere upgrade plan cluster
anywhere upgrade plan cluster
Provides new release versions for the next cluster upgrade
Synopsis
Provides a list of target versions for upgrading the core components in the workload cluster
anywhere upgrade plan cluster [flags]
Options
--bundles-override string Override default Bundles manifest (not recommended)
-f, --filename string Filename that contains EKS-A cluster configuration
-h, --help help for cluster
--kubeconfig string Management cluster kubeconfig file
-o, --output string Output format: text|json (default "text")
Options inherited from parent commands
-v, --verbosity int Set the log level verbosity
SEE ALSO
10.1.53 - anywhere upgrade plan management-components
anywhere upgrade plan management-components
Lists the current and target versions for upgrading the management components in a management cluster
Synopsis
Provides a list of current and target versions for upgrading the management components in a management cluster. The term management components encompasses all Kubernetes controllers and their CRDs present in the management cluster that are responsible for reconciling your EKS Anywhere (EKS-A) cluster
anywhere upgrade plan management-components [flags]
Options
--bundles-override string Override default Bundles manifest (not recommended)
-f, --filename string Filename that contains EKS-A cluster configuration
-h, --help help for management-components
--kubeconfig string Management cluster kubeconfig file
-o, --output string Output format: text|json (default "text")
Options inherited from parent commands
-v, --verbosity int Set the log level verbosity
SEE ALSO
10.1.54 - anywhere version
anywhere version
Get the eksctl anywhere version
Synopsis
This command prints the version of eksctl anywhere
anywhere version [flags]
Options
-h, --help help for version
Options inherited from parent commands
-v, --verbosity int Set the log level verbosity
SEE ALSO
11 - Community
Guidelines for community contribution
We work hard to provide a high-quality Kubernetes installer for EKS,
and we greatly value feedback and contributions from our community. Please
review the contribution guidelines
before
submitting any issues
or
pull requests
to ensure we have
all the necessary information to respond to your bug report or contribution
effectively. If you have a concern with a security vulnerability, please
review our reporting a vulnerability policy
.
11.1 - Contributing Guidelines
How to best contribute to the project
Thank you for your interest in contributing to our project. Whether it’s a bug report, new feature, correction, or additional
documentation, we greatly value feedback and contributions from our community.
Please read through this document before submitting any issues or pull requests to ensure we have all the necessary
information to effectively respond to your bug report or contribution.
General Guidelines
Pull Requests
Make sure to keep Pull Requests small and functional to make them easier to review, understand, and look up in commit history.
This repository uses “Squash and Commit” to keep our history clean and make it easier to revert changes based on PR.
Adding the appropriate documentation, unit tests and e2e tests as part of a feature is the responsibility of the
feature owner, whether it is done in the same Pull Request or not.
Pull Requests should follow the “subject: message” format, where the subject describes what part of the code is being
modified.
Refer to the template
for more information on what goes into a PR description.
Design Docs
A contributor proposes a design with a PR on the repository to allow for revisions and discussions.
If a design needs to be discussed before formulating a document for it, make use of GitHub Discussions to
involve the community on the discussion.
GitHub Discussions
GitHub Discussions are used for feature requests (that don’t have actionable items/issues), questions, and anything else
the community would like to share.
Categories:
- Q/A - Questions
- Proposals - Feature requests and other suggestions
- Show and tell - Anything that the community would like to share
- General - Everything else (possibly announcements as well)
GitHub Issues
GitHub Issues are used to file bugs, work items, and feature requests with actionable items/issues (Please refer to the
“Reporting Bugs/Feature Requests” section below for more information).
Labels:
- “<area>” - area of project that issue is related to (create, upgrade, flux, test, etc.)
- “priority/p<n>” - priority of task based on following numbers
- p0: need to do right away
- p1: don’t have a set time but need to do
- p2: not currently being tracked (backlog)
- “status/<status>” - status of the issue (notstarted, implementation, etc.)
- “kind/<kind>” - type of issue (bug, feature, enhancement, docs, etc.)
Refer to the template
for more information on
what goes into an issue description.
GitHub Milestones
GitHub Milestones are used to plan work that is currently being tracked.
- next: changes for next release
- next+1: won’t make next release but the following
- techdebt: used to keep track of techdebt items, separate ongoing effort from release action items
- oncall: used to keep track of issues needing active follow-up
- backlog: items that don’t have a home in the others
GitHub Projects (or tasks within a GitHub Issue)
GitHub Projects are used to keep track of bigger features that are made up of a collection of issues.
Certain features can also have a tracking issue that contains a checklist of tasks that
link to other issues.
Reporting Bugs/Feature Requests
We welcome you to use the GitHub issue tracker to report bugs or suggest features that have actionable items/issues
(as opposed to introducing a feature request on GitHub Discussions).
When filing an issue, please check existing open, or recently closed, issues to make sure somebody else hasn’t already
reported the issue. Please try to include as much information as you can. Details like these are incredibly useful:
- A reproducible test case or series of steps
- The version of the code being used
- Any modifications you’ve made relevant to the bug
- Anything unusual about your environment or deployment
Contributing via Pull Requests
Contributions via pull requests are much appreciated. Before sending us a pull request, please ensure that:
- You are working against the latest source on the main branch.
- You check existing open, and recently merged, pull requests to make sure someone else hasn’t addressed the problem already.
- You open an issue to discuss any significant work - we would hate for your time to be wasted.
To send us a pull request, please:
- Fork the repository.
- Modify the source; please focus on the specific change you are contributing. If you also reformat all the code, it
will be hard for us to focus on your change.
- Ensure local tests pass.
- Commit to your fork using clear commit messages.
- Send us a pull request, answering any default questions in the pull request interface.
- Pay attention to any automated CI failures reported in the pull request, and stay involved in the conversation.
GitHub provides additional document on forking a repository
and
creating a pull request
.
Finding contributions to work on
Looking at the existing issues is a great way to find something to contribute on. As our projects, by default, use the
default GitHub issue labels (enhancement/bug/duplicate/help wanted/invalid/question/wontfix), looking at any ‘help wanted’
and ‘good first issue’ issues are a great place to start.
Code of Conduct
This project has adopted the Amazon Open Source Code of Conduct
.
For more information see the Code of Conduct FAQ
or contact
opensource-codeofconduct@amazon.com with any additional questions or comments.
Security issue notifications
If you discover a potential security issue in this project we ask that you notify AWS/Amazon Security via our
vulnerability reporting page
. Please do not create a
public GitHub issue.
Licensing
See the LICENSE
file for our project’s licensing. We will ask you to confirm the licensing of your contribution.
11.2 - Contributing to documentation
Guidelines for contributing to EKS Anywhere documentation
EKS Anywhere documentation uses the Hugo
site generator and the Docsy
theme. To get started contributing:
Style issues
-
EKS Anywhere: Always refer to EKS Anywhere as EKS Anywhere and NOT EKS-A or EKS-Anywhere.
-
Line breaks: Put each sentence on its own line and don’t do a line break in the middle of a sentence.
We are using a modified Semantic Line Breaking
in that we are requiring a break at the end of every sentence, but not at commas or other semantic boundaries.
-
Headings: Use sentence case in headings. So do “Cluster specification reference” and not “Cluster Specification Reference”
-
Cross references: To cross reference to another doc in the EKS Anywhere docs set, use relref in the link so that Hugo will test it and fail the build for links not found. Also, use relative paths to point to other content in the docs set. Here is an example of a cross reference (code and results):
See the [troubleshooting section]({ {< relref "../troubleshooting" >} } ) page.
See the troubleshooting section
page.
-
Notes, Warnings, etc.: You can use this form for notes:
{{% alert title=“Note” color=“primary” %}}
<put note here, multiple paragraphs are allowed>
{{% /alert %}}
Note
<put note here, multiple paragraphs are allowed>
-
Embedding content: If you want to read in content from a separate file, you can use the following format.
Do this if you think the content might be useful in multiple pages:
{{% content “./newfile.md” %}}
-
General style issues: Unless otherwise instructed, follow the Kubernetes Documentation Style Guide
for formatting and presentation guidance.
-
Creating images: Screen shots and other images should be published in PNG format.
For complex diagrams, create them in SVG format, then export the image to PNG and store both in the EKS Anywhere GitHub site’s docs/static/images
directory.
To include an image in a docs page, use the following format:

You can use tools such as draw.io
or image creation programs, such as inkscape, to create SVG diagrams.
Use a white background for images and have cropping focus on the content you are highlighing (in other words, don’t show a whole web page if you are only interested in one field).
Where to put content
- Yaml examples: Put full yaml file examples into the EKS Anywhere GitHub site’s docs/static/manifests
directory.
In kubectl examples, you can point to those files using:
https://anywhere.eks.amazonaws.com/manifests/whatever.yaml
- Generic instructions for creating a cluster should go into the getting started
documentation for the appropriate provider.
- Instructions that are specific to an EKS Anywhere provider should go into the appropriate provider section.
Contributing docs for third-party solutions
To contribute documentation describing how to use third-party software products or projects with EKS Anywhere, follow these guidelines.
Docs for third-party software in EKS Anywhere
Documentation PRs for EKS Anywhere that describe third-party software that is included in EKS Anywhere are acceptable, provided they meet the quality standards described in the Tips described below. This includes:
- Software bundled with EKS Anywhere (for example, Cilium docs
)
- Supported platforms on which EKS Anywhere runs (for example, VMware vSphere
)
- Curated software that is packaged by the EKS Anywhere project to run EKS Anywhere. This includes documentation for Harbor local registry, Ingress controller, and Prometheus, Grafana, and Fluentd monitoring and logging.
Docs for third-party software NOT in EKS Anywhere
Documentation for software that is not part of EKS Anywhere software can still be added to EKS Anywhere docs by meeting one of the following criteria:
- Partners: Documentation PRs for software from vendors listed on the EKS Anywhere Partner page
) can be considered to add to the EKS Anywhere docs.
Links point to partners from the Compare EKS Anywhere to EKS
page and other content can be added to EKS Anywhere documentation for features from those partners.
Contact the AWS container partner team if you are interested in becoming a partner: aws-container-partners@amazon.com
Tips for contributing third-party docs
The Kubernetes docs project itself describes a similar approach to docs covering third-party software in the How Docs Handle Third Party and Dual Sourced Content
blog.
In line with these general guidelines, we recommend that even acceptable third-party docs contributions to EKS Anywhere:
- Not be dual-sourced: The project does not allow content that is already published somewhere else.
You can provide links to that content, if it is relevant. Heavily rewriting such content to be EKS Anywhere-specific might be acceptable.
- Not be marketing oriented. The content shouldn’t sell a third-party products or make vague claims of quality.
- Not outside the scope of EKS Anywhere: Just because some projects or products of a partner are appropriate for EKS Anywhere docs, it doesn’t mean that any project or product by that partner can be documented in EKS Anywhere.
- Stick to the facts: So, for example, docs about third-party software could say: “To set up load balancer ABC, do XYZ” or “Make these modifications to improve speed and efficiency.” It should not make blanket statements like: “ABC load balancer is the best one in the industry.”
- EKS features: Features that relate to EKS which runs in AWS or requires an AWS account should link to the official documentation
as much as possible.
11.3 - Code of Conduct
Details on the project code of conduct
This project has adopted the
Amazon Open Source Code of Conduct
.
For more information, see the
Code of Conduct FAQ
or contact
opensource-codeofconduct@amazon.com with any additional questions or comments.
11.4 - Project governance
Roles and responsibilities of the project
This document lays out the guidelines under which the EKS Anywhere project will be governed.
The goal is to make sure that the roles and responsibilities are well-defined and clarify how decisions are made.
Roles
In the context of EKS Anywhere, we consider the following roles:
- Users … everyone using EKS Anywhere, typically willing to provide feedback on EKS Anywhere by proposing features and/or filing issues.
- Contributors … everyone contributing code, documentation, examples, testing infra, and participating in feature proposals as well as design discussions.
- Maintainers … are responsible for engaging with and assisting contributors to iterate on the contributions until it reaches acceptable quality.
Maintainers can decide whether the contributions can be accepted into the project or rejected.
Communication
The primary mechanism for communication will be via the #eks channel
on the Kubernetes Slack community.
All features and bug fixes will be tracked as issues in GitHub.
All decisions will be documented in GitHub issues.
In the future, we may consider using a public mailing list, which can be better archived.
Release Management
The release process will be governed by AWS and will coincide with the release of EKS.
Roadmap Planning
Maintainers will share roadmap and release versions as milestones in GitHub.