Preparing vSphere for EKS Anywhere
Certain resources must be in place with appropriate user permissions to create an EKS Anywhere cluster using the vSphere provider.
Configuring Folder Resources
Create a VM folder:
For each user that needs to create workload clusters, have the vSphere administrator create a VM folder. That folder will host:
- A nested folder for the management cluster and another one for each workload cluster.
- Each cluster VM in its own nested folder under this folder.
vm/
├── YourVMFolder/
    ├── mgmt-cluster <------ Folder with vms for management cluster
        ├── mgmt-cluster-7c2sp
        ├── mgmt-cluster-etcd-2pbhp
        ├── mgmt-cluster-md-0-5c5844bcd8xpjcln-9j7xh
    ├── worload-cluster-0 <------ Folder with vms for workload cluster 0
        ├── workload-cluster-0-8dk3j
        ├── workload-cluster-0-etcd-20ksa
        ├── workload-cluster-0-md-0-6d964979ccxbkchk-c4qjf
    ├── worload-cluster-1 <------ Folder with vms for workload cluster 1
        ├── workload-cluster-1-59cbn
        ├── workload-cluster-1-etcd-qs6wv
        ├── workload-cluster-1-md-0-756bcc99c9-9j7xh
To see how to create folders on vSphere, see the vSphere Create a Folder documentation.
Configuring vSphere User, Group, and Roles
You need a vSphere user with the right privileges to let you create EKS Anywhere clusters on top of your vSphere cluster.
Configure via EKSA CLI
To configure a new user via CLI, you will need two things:
- a set of vSphere admin credentials with the ability to create users and groups. If you do not have the rights to create new groups and users, you can invoke govc commands directly as outlined here.
- a
user.yamlfile:
apiVersion: "eks-anywhere.amazon.com/v1"
kind: vSphereUser
spec:
  username: "eksa"                # optional, default eksa
  group: "MyExistingGroup"        # optional, default EKSAUsers
  globalRole: "MyGlobalRole"      # optional, default EKSAGlobalRole
  userRole: "MyUserRole"          # optional, default EKSAUserRole
  adminRole: "MyEKSAAdminRole"    # optional, default EKSACloudAdminRole
  datacenter: "MyDatacenter"
  vSphereDomain: "vsphere.local"  # this should be the domain used when you login, e.g. YourUsername@vsphere.local
  connection:
    server: "https://my-vsphere.internal.acme.com"
    insecure: false
  objects:
    networks:
      - !!str "/MyDatacenter/network/My Network"
    datastores:
      - !!str "/MyDatacenter/datastore/MyDatastore2"
    resourcePools:
      - !!str "/MyDatacenter/host/Cluster-03/MyResourcePool" # NOTE: see below if you do not want to use a resource pool
    folders:
      - !!str "/MyDatacenter/vm/OrgDirectory/MyVMs"
    templates:
      - !!str "/MyDatacenter/vm/Templates/MyTemplates"
NOTE: If you do not want to create a resource pool, you can instead specify the cluster directly as /MyDatacenter/host/Cluster-03 in user.yaml, where Cluster-03 is your cluster name. In your cluster spec, you will need to specify /MyDatacenter/host/Cluster-03/Resources for the resourcePool field.
Set the admin credentials as environment variables:
export EKSA_VSPHERE_USERNAME=<ADMIN_VSPHERE_USERNAME>
export EKSA_VSPHERE_PASSWORD=<ADMIN_VSPHERE_PASSWORD>
If the user does not already exist, you can create the user and all the specified group and role objects by running:
eksctl anywhere exp vsphere setup user -f user.yaml --password '<NewUserPassword>'
If the user or any of the group or role objects already exist, use the force flag instead to overwrite Group-Role-Object mappings for the group, roles, and objects specified in the user.yaml config file:
eksctl anywhere exp vsphere setup user -f user.yaml --force
Please note that there is one more manual step to configure global permissions here .
Configure via govc
If you do not have the rights to create a new user, you can still configure the necessary roles and permissions using the govc cli .
#! /bin/bash
# govc calls to configure a user with minimal permissions
set -x
set -e

EKSA_USER='<Username>@<UserDomain>'
USER_ROLE='EKSAUserRole'
GLOBAL_ROLE='EKSAGlobalRole'
ADMIN_ROLE='EKSACloudAdminRole'

FOLDER_VM='/YourDatacenter/vm/YourVMFolder'
FOLDER_TEMPLATES='/YourDatacenter/vm/Templates'

NETWORK='/YourDatacenter/network/YourNetwork'
DATASTORE='/YourDatacenter/datastore/YourDatastore'
RESOURCE_POOL='/YourDatacenter/host/Cluster-01/Resources/YourResourcePool'

govc role.create "$GLOBAL_ROLE" $(curl https://raw.githubusercontent.com/aws/eks-anywhere/main/pkg/config/static/globalPrivs.json | jq .[] | tr '\n' ' ' | tr -d '"')

govc role.create "$USER_ROLE" $(curl https://raw.githubusercontent.com/aws/eks-anywhere/main/pkg/config/static/eksUserPrivs.json | jq .[] | tr '\n' ' ' | tr -d '"')

govc role.create "$ADMIN_ROLE" $(curl https://raw.githubusercontent.com/aws/eks-anywhere/main/pkg/config/static/adminPrivs.json | jq .[] | tr '\n' ' ' | tr -d '"')

govc permissions.set -group=false -principal "$EKSA_USER"  -role "$GLOBAL_ROLE" /

govc permissions.set -group=false -principal "$EKSA_USER"  -role "$ADMIN_ROLE" "$FOLDER_VM"

govc permissions.set -group=false -principal "$EKSA_USER"  -role "$ADMIN_ROLE" "$FOLDER_TEMPLATES"

govc permissions.set -group=false -principal "$EKSA_USER"  -role "$USER_ROLE" "$NETWORK"

govc permissions.set -group=false -principal "$EKSA_USER"  -role "$USER_ROLE" "$DATASTORE"

govc permissions.set -group=false -principal "$EKSA_USER"  -role "$USER_ROLE" "$RESOURCE_POOL"
NOTE: If you do not want to create a resource pool, you can instead specify the cluster directly as /MyDatacenter/host/Cluster-03 in user.yaml, where Cluster-03 is your cluster name. In your cluster spec, you will need to specify /MyDatacenter/host/Cluster-03/Resources for the resourcePool field.
Please note that there is one more manual step to configure global permissions here .
Configure via UI
Add a vCenter User
Ask your VSphere administrator to add a vCenter user that will be used for the provisioning of the EKS Anywhere cluster in VMware vSphere.
- Log in with the vSphere Client to the vCenter Server.
- Specify the user name and password for a member of the vCenter Single Sign-On Administrators group.
- Navigate to the vCenter Single Sign-On user configuration UI.
- From the Home menu, select Administration.
- Under Single Sign On, click Users and Groups.
- If vsphere.local is not the currently selected domain, select it from the drop-down menu. You cannot add users to other domains.
- On the Users tab, click Add.
- Enter a user name and password for the new user. The maximum number of characters allowed for the user name is 300. You cannot change the user name after you create a user. The password must meet the password policy requirements for the system.
- Click Add.
For more details, see vSphere Add vCenter Single Sign-On Users documentation.
Create and define user roles
When you add a user for creating clusters, that user initially has no privileges to perform management operations. So you have to add this user to groups with the required permissions, or assign a role or roles with the required permission to this user.
Three roles are needed to be able to create the EKS Anywhere cluster:
-
Create a global custom role: For example, you could name this EKS Anywhere Global. Define it for the user on the vCenter domain level and its children objects. Create this role with the following privileges:
> Content Library * Add library item * Check in a template * Check out a template * Create local library * Update files > vSphere Tagging * Assign or Unassign vSphere Tag * Assign or Unassign vSphere Tag on Object * Create vSphere Tag * Create vSphere Tag Category * Delete vSphere Tag * Delete vSphere Tag Category * Edit vSphere Tag * Edit vSphere Tag Category * Modify UsedBy Field For Category * Modify UsedBy Field For Tag > Sessions * Validate session -
Create a user custom role: The second role is also a custom role that you could call, for example, EKSAUserRole. Define this role with the following objects and children objects.
- The pool resource level and its children objects. This resource pool that our EKS Anywhere VMs will be part of.
- The storage object level and its children objects. This storage that will be used to store the cluster VMs.
- The network VLAN object level and its children objects. This network that will host the cluster VMs.
- The VM and Template folder level and its children objects.
Create this role with the following privileges:
> Content Library * Add library item * Check in a template * Check out a template * Create local library > Datastore * Allocate space * Browse datastore * Low level file operations > Folder * Create folder > vSphere Tagging * Assign or Unassign vSphere Tag * Assign or Unassign vSphere Tag on Object * Create vSphere Tag * Create vSphere Tag Category * Delete vSphere Tag * Delete vSphere Tag Category * Edit vSphere Tag * Edit vSphere Tag Category * Modify UsedBy Field For Category * Modify UsedBy Field For Tag > Network * Assign network > Resource * Assign virtual machine to resource pool > Scheduled task * Create tasks * Modify task * Remove task * Run task > Profile-driven storage * Profile-driven storage view > Storage views * View > vApp * Import > Virtual machine * Change Configuration - Add existing disk - Add new disk - Add or remove device - Advanced configuration - Change CPU count - Change Memory - Change Settings - Configure Raw device - Extend virtual disk - Modify device settings - Remove disk * Edit Inventory - Create from existing - Create new - Remove * Interaction - Power off - Power on * Provisioning - Clone template - Clone virtual machine - Create template from virtual machine - Customize guest - Deploy template - Mark as template - Read customization specifications * Snapshot management - Create snapshot - Remove snapshot - Revert to snapshot -
Create a default Administrator role: The third role is the default system role Administrator that you define to the user on the folder level and its children objects (VMs and OVA templates) that was created by the VSphere admistrator for you.
To create a role and define privileges check Create a vCenter Server Custom Role and Defined Privileges pages.
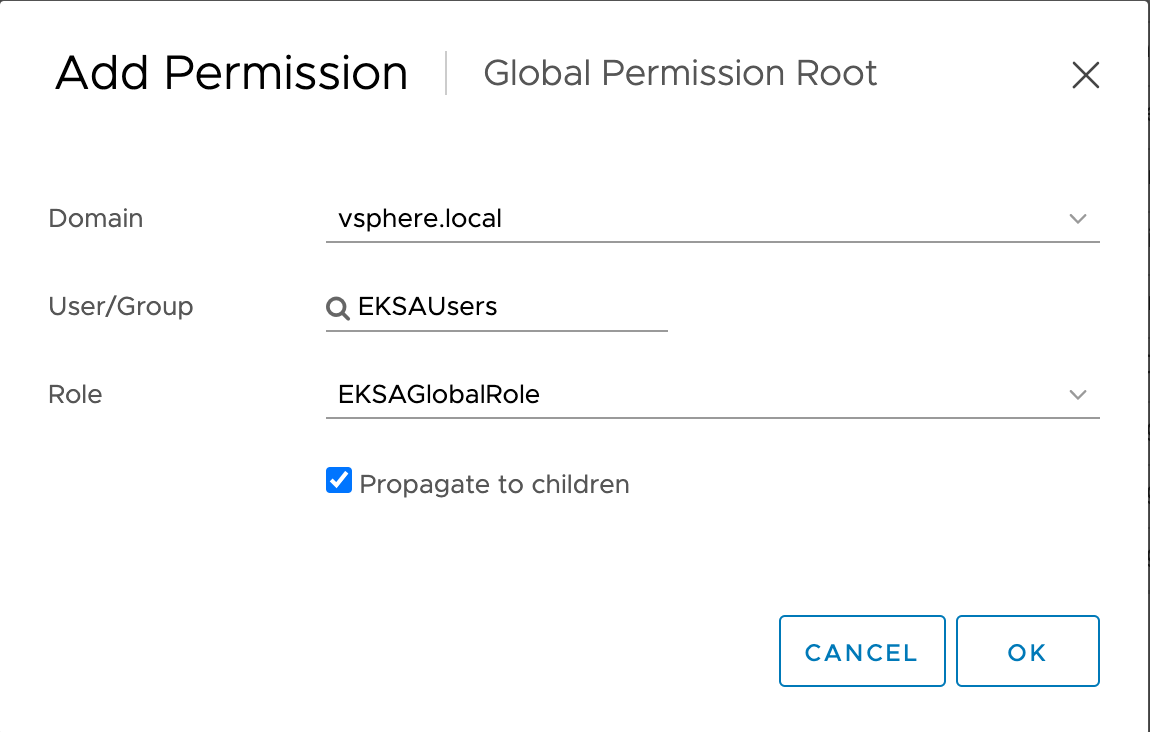
Manually set Global Permissions role in Global Permissions UI
vSphere does not currently support a public API for setting global permissions. Because of this, you will need to manually assign the Global Role you created to your user or group in the Global Permissions UI.
Make sure to select the Propagate to children box so the permissions get propagated down properly.
Deploy an OVA Template
If the user creating the cluster has permission and network access to create and tag a template, you can skip these steps because EKS Anywhere will automatically download the OVA and create the template if it can. If the user does not have the permissions or network access to create and tag the template, follow this guide. The OVA contains the operating system (Ubuntu, Bottlerocket, or RHEL) for a specific EKS Distro Kubernetes release and EKS Anywhere version. The following example uses Ubuntu as the operating system, but a similar workflow would work for Bottlerocket or RHEL.
Steps to deploy the OVA
- Go to the artifacts page and download or build the OVA template with the newest EKS Distro Kubernetes release to your computer.
- Log in to the vCenter Server.
- Right-click the folder you created above and select Deploy OVF Template. The Deploy OVF Template wizard opens.
- On the Select an OVF template page, select the Local file option, specify the location of the OVA template you downloaded to your computer, and click Next.
- On the Select a name and folder page, enter a unique name for the virtual machine or leave the default generated name, if you do not have other templates with the same name within your vCenter Server virtual machine folder. The default deployment location for the virtual machine is the inventory object where you started the wizard, which is the folder you created above. Click Next.
- On the Select a compute resource page, select the resource pool where to run the deployed VM template, and click Next.
- On the Review details page, verify the OVF or OVA template details and click Next.
- On the Select storage page, select a datastore to store the deployed OVF or OVA template and click Next.
- On the Select networks page, select a source network and map it to a destination network. Click Next.
- On the Ready to complete page, review the page and Click Finish. For details, see Deploy an OVF or OVA Template
To build your own Ubuntu OVA template check the Building your own Ubuntu OVA section.
To use the deployed OVA template to create the VMs for the EKS Anywhere cluster, you have to tag it with specific values for the os and eksdRelease keys.
The value of the os key is the operating system of the deployed OVA template, which is ubuntu in our scenario.
The value of the eksdRelease holds kubernetes and the EKS-D release used in the deployed OVA template.
Check the following Customize OVAs
page for more details.
Steps to tag the deployed OVA template:
- Go to the artifacts page and take notes of the tags and values associated with the OVA template you deployed in the previous step.
- In the vSphere Client, select Menu → Tags & Custom Attributes.
- Select the Tags tab and click Tags.
- Click New.
- In the Create Tag dialog box, copy the
ostag name associated with your OVA that you took notes of, which in our case isos:ubuntuand paste it as the name for the first tag required. - Specify the tag category
osif it exist or create it if it does not exist. - Click Create.
- Now to add the release tag, repeat steps 2-4.
- In the Create Tag dialog box, copy the
ostag name associated with your OVA that you took notes of, which in our case iseksdRelease:kubernetes-1-21-eks-8and paste it as the name for the second tag required. - Specify the tag category
eksdReleaseif it exist or create it if it does not exist. - Click Create.
- Navigate to the VM and Template tab.
- Select the folder that was created.
- Select deployed template and click Actions.
- From the drop-down menu, select Tags and Custom Attributes → Assign Tag.
- Select the tags we created from the list and confirm the operation.