Overview
Creating a Bare Metal cluster
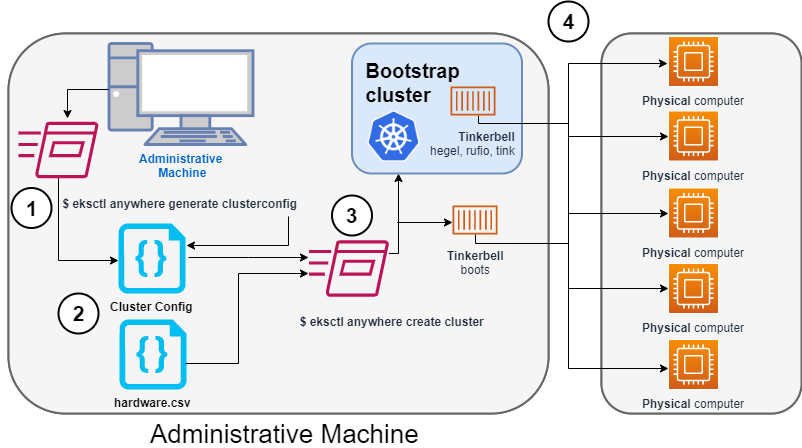
The following diagram illustrates what happens when you create an EKS Anywhere cluster on bare metal. You can run EKS Anywhere on bare metal as a single node cluster with the Kubernetes control plane and workloads co-located on a single server, as a multi-node cluster with the Kubernetes control plane and workloads co-located on the same servers, and as a multi-node cluster with the Kubernetes control plane and worker nodes on different, dedicated servers.
Start creating a Bare Metal cluster
1. Generate a config file for Bare Metal
Identify the provider (--provider tinkerbell) and the cluster name to the eksctl anywhere generate clusterconfig command and direct the output into a cluster config .yaml file.
2. Modify the config file and hardware CSV file
Modify the generated cluster config file to suit your situation.
Details about this config file are contained on the Bare Metal Config
page.
Create a hardware configuration file (hardware.csv) as described in Prepare hardware inventory
.
3. Launch the cluster creation
Run the eksctl anywhere create cluster command, providing the cluster config and hardware CSV files.
To see details on the cluster creation process, increase verbosity (-v=9 provides maximum verbosity).
4. Create bootstrap cluster and provision hardware
The cluster creation process starts by creating a temporary Kubernetes bootstrap cluster on the Administrative machine. Containerized components of the Tinkerbell provisioner run either as pods on the bootstrap cluster (Hegel, Rufio, and Tink) or directly as containers on Docker (Boots). Those Tinkerbell components drive the provisioning of the operating systems and Kubernetes components on each of the physical computers.
With the information gathered from the cluster specification and the hardware CSV file, three custom resource definitions (CRDs) are created. These include:
- Hardware custom resources: Which store hardware information for each machine
- Template custom resources: Which store the tasks and actions
- Workflow custom resources: Which put together the complete hardware and template information for each machine. There are different workflows for control plane and worker nodes.
As the bootstrap cluster comes up and Tinkerbell components are started, you should see messages like the following:
$ eksctl anywhere create cluster --hardware-csv hardware.csv -f eksa-mgmt-cluster.yaml
Performing setup and validations
Tinkerbell Provider setup is valid
Validate certificate for registry mirror
Create preflight validations pass
Creating new bootstrap cluster
Provider specific pre-capi-install-setup on bootstrap cluster
Installing cluster-api providers on bootstrap cluster
Provider specific post-setup
Creating new workload cluster
At this point, Tinkerbell will try to boot up the machines in the target cluster.
Continuing cluster creation
Tinkerbell takes over the activities for creating provisioning the Bare Metal machines to become the new target cluster. See Overview of Tinkerbell in EKS Anywhere for examples of commands you can run to watch over this process.
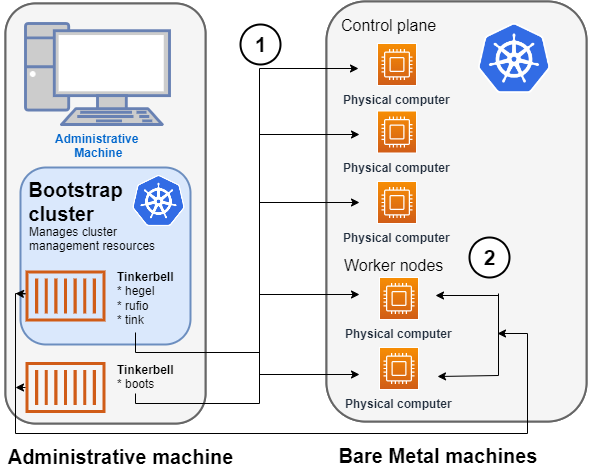
1. Tinkerbell network boots and configures nodes
- Rufio uses BMC information to set the power state for the first control plane node it wants to provision.
- When the node boots from its NIC, it talks to the Boots DHCP server, which fetches the kernel and initramfs (HookOS) needed to network boot the machine.
- With HookOS running on the node, the operating system identified by
IMG_URLin the cluster specification is copied to the identifiedDEST_DISKon the machine. - The Hegel components provides data stores that contain information used by services such as cloud-init to configure each system.
- Next, the workflow is run on the first control plane node, followed by network booting and running the workflow for each subsequent control plane node.
- Once the control plane is up, worker nodes are network booted and workflows are run to deploy each node.
2. Tinkerbell components move to the target cluster
Once all the defined nodes are added to the cluster, the Tinkerbell components and associated data are moved to run as pods on worker nodes in the new workload cluster.
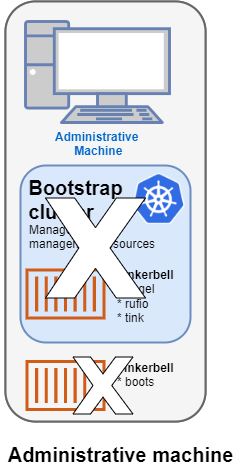
Deleting Tinkerbell from Admin machine
All Tinkerbell-related pods and containers are then deleted from the Admin machine.
Further management of tinkerbell and related information can be done using from the new cluster, using tools such as kubectl.
Using Tinkerbell on EKS Anywhere
The sections below step through how Tinkerbell is integrated with EKS Anywhere to deploy a Bare Metal cluster. While based on features described in Tinkerbell Documentation , EKS Anywhere has modified and added to Tinkerbell components such that the entire Tinkerbell stack is now Kubernetes-friendly and can run on a Kubernetes cluster.
Create bare metal CSV file
The information that Tinkerbell uses to provision machines for the target EKS Anywhere cluster needs to be gathered in a CSV file with the following format:
hostname,bmc_ip,bmc_username,bmc_password,mac,ip_address,netmask,gateway,nameservers,labels,disk
eksa-cp01,10.10.44.1,root,PrZ8W93i,CC:48:3A:00:00:01,10.10.50.2,255.255.254.0,10.10.50.1,8.8.8.8,type=cp,/dev/sda
...
Each physical, bare metal machine is represented by a comma-separated list of information on a single line. It includes information needed to identify each machine (the NIC’s MAC address), network boot the machine, point to the disk to install on, and then configure and start the installed system. See Preparing hardware inventory for details on the content and format of that file.
Modify the cluster specification file
Before you create a cluster using the Bare Metal configuration file, you can make Tinkerbell-related changes to that file. In particular, TinkerbellDatacenterConfig fields, TinkerbellMachineConfig fields, and Tinkerbell Actions can be added or modified.
Tinkerbell actions vary based on the operating system you choose for your EKS Anywhere cluster. Actions are stored internally and not shown in the generated cluster specification file, so you must add those sections yourself to change from the defaults (see Ubuntu TinkerbellTemplateConfig example and Bottlerocket TinkerbellTemplateConfig example for details).
In most cases, you don’t need to touch the default actions.
However, you might want to modify an action (for example to change kexec to a reboot action if the hardware requires it) or add an action to further configure the installed system.
Examples in Advanced Bare Metal cluster configuration show a few actions you might want to add.
Once you have made all your modifications, you can go ahead and create the cluster. The next section describes how Tinkerbell works during cluster creation to provision your Bare Metal machines and prepare them to join the EKS Anywhere cluster.