Multus CNI plugin configuration
NOTE: Currently, Multus support is only available with the EKS Anywhere Bare Metal provider. The vSphere and CloudStack providers, do not have multi-network support for cluster machines. Once multiple network support is added to those clusters, Multus CNI can be supported.
Multus CNI is a container network interface plugin for Kubernetes that enables attaching multiple network interfaces to pods. In Kubernetes, each pod has only one network interface by default, other than local loopback. With Multus, you can create multi-homed pods that have multiple interfaces. Multus acts a as ‘meta’ plugin that can call other CNI plugins to configure additional interfaces.
Pre-Requisites
Given that Multus CNI is used to create pods with multiple network interfaces, the cluster machines that these pods run on need to have multiple network interfaces attached and configured. The interfaces on multi-homed pods need to map to these interfaces on the machines.
For Bare Metal clusters using the Tinkerbell provider, the cluster machines need to have multiple network interfaces cabled in and appropriate network configuration put in place during machine provisioning.
Overview of Multus setup
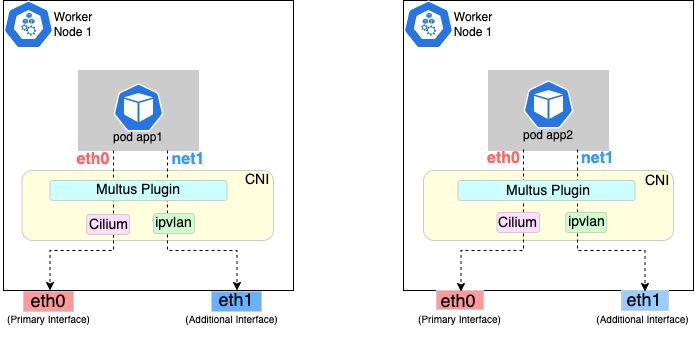
The following diagrams show the result of two applications (app1 and app2) running in pods that use the Multus plugin to communicate over two network interfaces (eth0 and net1) from within the pods. The Multus plugin uses two network interfaces on the worker node (eth0 and eth1) to provide communications outside of the node.
Follow the procedure below to set up Multus as illustrated in the previous diagrams.
Install and configure Multus
Deploying Multus using a Daemonset will spin up pods that install a Multus binary and configure Multus for usage in every node in the cluster. Here are the steps for doing that.
-
Clone the Multus CNI repo:
git clone https://github.com/k8snetworkplumbingwg/multus-cni.git && cd multus-cni -
Apply Multus daemonset to your EKS Anywhere cluster:
kubectl apply -f ./deployments/multus-daemonset-thick-plugin.yml -
Verify that you have Multus pods running:
kubectl get pods --all-namespaces | grep -i multus -
Check that Multus is running:
kubectl get pods -A | grep multusOutput:
kube-system kube-multus-ds-bmfjs     1/1      Running      0      3d1h
kube-system kube-multus-ds-fk2sk     1/1      Running      0      3d1h
Create Network Attachment Definition
You need to create a Network Attachment Definition for the CNI you wish to use as the plugin for the additional interface.
You can verify that your intended CNI plugin is supported by ensuring that the binary corresponding to that CNI plugin is present in the node’s /opt/cni/bin directory.
Below is an example of a Network Attachment Definition yaml:
cat <<EOF | kubectl create -f -
apiVersion: "k8s.cni.cncf.io/v1"
kind: NetworkAttachmentDefinition
metadata:
   name: ipvlan-conf
spec:
   config: '{
      "cniVersion": "0.3.0",
      "type": "ipvlan",
      "master": "eth1",
      "mode": "l3",
      "ipam": {
         "type": "host-local",
         "subnet": "198.17.0.0/24",
         "rangeStart": "198.17.0.200",
         "rangeEnd": "198.17.0.216",
         "routes": [
             { "dst": "0.0.0.0/0" }
         ],
         "gateway": "198.17.0.1"
      }
 }'
EOF
Note that eth1 is used as the master parameter.
This master parameter should match the interface name on the hosts in your cluster.
Verify the configuration
Type the following to verify the configuration you created:
kubectl get network-attachment-definitions
kubectl describe network-attachment-definitions ipvlan-conf
Deploy sample applications with network attachment
-
Create a sample application 1 (app1) with network annotation created in the previous steps:
cat <<EOF | kubectl apply -f - apiVersion: v1 kind: Pod metadata: name: app1 annotations: k8s.v1.cni.cncf.io/networks: ipvlan-conf spec: containers: - name: app1 command: ["/bin/sh", "-c", "trap : TERM INT; sleep infinity & wait"] image: alpine EOF -
Create a sample application 2 (app2) with the network annotation created in the previous step:
cat <<EOF | kubectl apply -f - apiVersion: v1 kind: Pod metadata: name: app2 annotations: k8s.v1.cni.cncf.io/networks: ipvlan-conf spec: containers: - name: app2 command: ["/bin/sh", "-c", "trap : TERM INT; sleep infinity & wait"] image: alpine EOF -
Verify that the additional interfaces were created on these application pods using the defined network attachment:
kubectl exec -it app1 -- ip aOutput:
1: lo: <LOOPBACK,UP,LOWER_UP> mtu 65536 qdisc noqueue state UNKNOWN qlen 1000
    link/loopback 00:00:00:00:00:00 brd 00:00:00:00:00:00
    inet 127.0.0.1/8 scope host lo
       valid_lft forever preferred_lft forever
    inet6 ::1/128 scope host
       valid_lft forever preferred_lft forever
*2: net1@if3: <BROADCAST,MULTICAST,NOARP,UP,LOWER_UP,M-DOWN> mtu 1500 qdisc noqueue state UNKNOWN
    link/ether 00:50:56:9a:84:3b brd ff:ff:ff:ff:ff:ff
    inet 198.17.0.200/24 brd 198.17.0.255 scope global net1
       valid_lft forever preferred_lft forever
    inet6 fe80::50:5600:19a:843b/64 scope link
       valid_lft forever preferred_lft forever*
31: eth0@if32: <BROADCAST,MULTICAST,UP,LOWER_UP,M-DOWN> mtu 1500 qdisc noqueue state UP
    link/ether 0a:9e:a0:b4:21:05 brd ff:ff:ff:ff:ff:ff
    inet 192.168.1.218/32 scope global eth0
       valid_lft forever preferred_lft forever
    inet6 fe80::89e:a0ff:feb4:2105/64 scope link
       valid_lft forever preferred_lft forever
kubectl exec -it app2 -- ip aOutput:
1: lo: <LOOPBACK,UP,LOWER_UP> mtu 65536 qdisc noqueue state UNKNOWN qlen 1000
    link/loopback 00:00:00:00:00:00 brd 00:00:00:00:00:00
    inet 127.0.0.1/8 scope host lo
       valid_lft forever preferred_lft forever
    inet6 ::1/128 scope host
       valid_lft forever preferred_lft forever
*2: net1@if3: <BROADCAST,MULTICAST,NOARP,UP,LOWER_UP,M-DOWN> mtu 1500 qdisc noqueue state UNKNOWN
    link/ether 00:50:56:9a:84:3b brd ff:ff:ff:ff:ff:ff
    inet 198.17.0.201/24 brd 198.17.0.255 scope global net1
       valid_lft forever preferred_lft forever
    inet6 fe80::50:5600:29a:843b/64 scope link
       valid_lft forever preferred_lft forever*
33: eth0@if34: <BROADCAST,MULTICAST,UP,LOWER_UP,M-DOWN> mtu 1500 qdisc noqueue state UP
    link/ether b2:42:0a:67:c0:48 brd ff:ff:ff:ff:ff:ff
    inet 192.168.1.210/32 scope global eth0
       valid_lft forever preferred_lft forever
    inet6 fe80::b042:aff:fe67:c048/64 scope link
       valid_lft forever preferred_lft forever
Note that both pods got the new interface net1. Also, the additional network interface on each pod got assigned an IP address out of the range specified by the Network Attachment Definition.
-
Test the network connectivity across these pods for Multus interfaces:
kubectl exec -it app1 -- ping -I net1 198.17.0.201Output:
PING 198.17.0.201 (198.17.0.201): 56 data bytes
64 bytes from 198.17.0.201: seq=0 ttl=64 time=0.074 ms
64 bytes from 198.17.0.201: seq=1 ttl=64 time=0.077 ms
64 bytes from 198.17.0.201: seq=2 ttl=64 time=0.078 ms
64 bytes from 198.17.0.201: seq=3 ttl=64 time=0.077 ms
kubectl exec -it app2 -- ping -I net1 198.17.0.200Output:
PING 198.17.0.200 (198.17.0.200): 56 data bytes
64 bytes from 198.17.0.200: seq=0 ttl=64 time=0.074 ms
64 bytes from 198.17.0.200: seq=1 ttl=64 time=0.077 ms
64 bytes from 198.17.0.200: seq=2 ttl=64 time=0.078 ms
64 bytes from 198.17.0.200: seq=3 ttl=64 time=0.077 ms