DHCP options for EKS Anywhere
In order to facilitate network booting machines, EKS Anywhere bare metal runs its own DHCP server, Boots (a standalone service in the Tinkerbell stack). There can be numerous reasons why you may want to use an existing DHCP service instead of Boots: Security, compliance, access issues, existing layer 2 constraints, existing automation, and so on.
In environments where there is an existing DHCP service, this DHCP service can be configured to interoperate with EKS Anywhere. This document will cover how to make your existing DHCP service interoperate with EKS Anywhere bare metal. In this scenario EKS Anywhere will have no layer 2 DHCP responsibilities.
Note: Currently, Boots is responsible for more than just DHCP. So Boots can’t be entirely avoided in the provisioning process.
Additional Services in Boots
- HTTP and TFTP servers for iPXE binaries
- HTTP server for iPXE script
- Syslog server (receiver)
Process
As a prerequisite, your existing DHCP must serve host/address/static reservations
for all machines that EKS Anywhere bare metal will be provisioning. This means that the IPAM details you enter into your hardware.csv
must be used to create host/address/static reservations in your existing DHCP service.
Now, you configure your existing DHCP service to provide the location of the iPXE binary and script. This is a two-step interaction between machines and the DHCP service and enables the provisioning process to start.
-
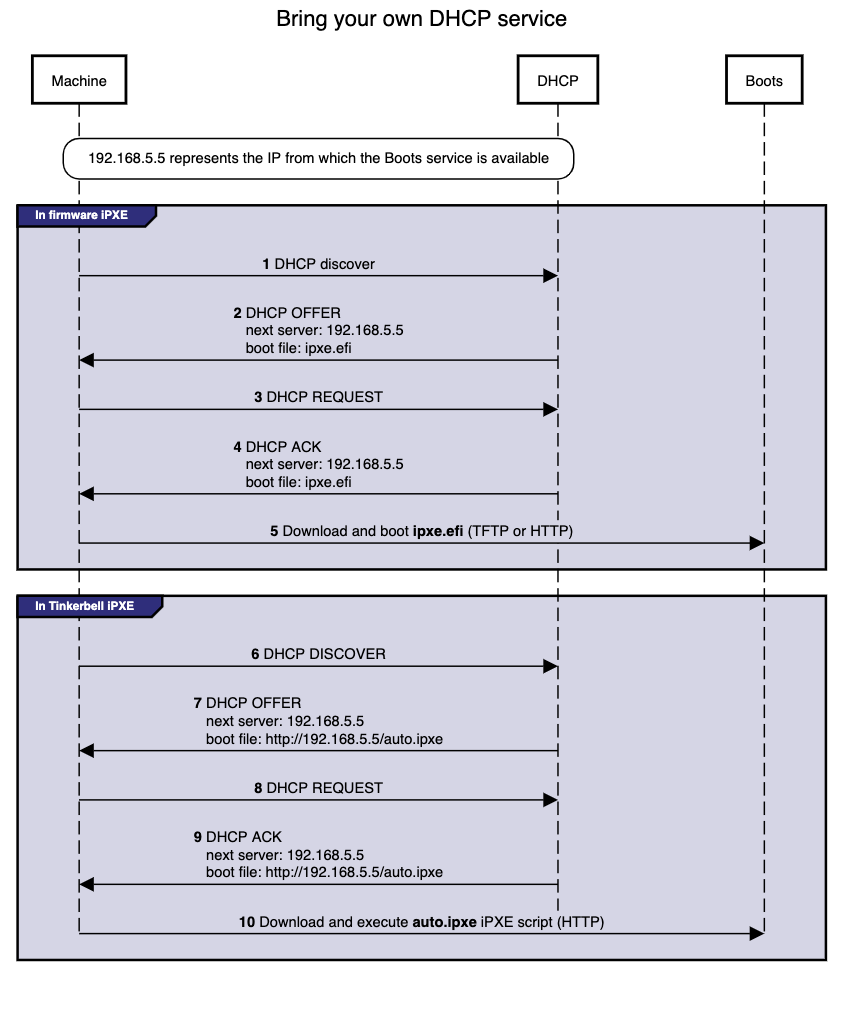
Step 1: The machine broadcasts a request to network boot. Your existing DHCP service then provides the machine with all IPAM info as well as the location of the Tinkerbell iPXE binary (
ipxe.efi). The machine configures its network interface with the IPAM info then downloads the Tinkerbell iPXE binary from the location provided by the DHCP service and runs it. -
Step 2: Now with the Tinkerbell iPXE binary loaded and running, iPXE again broadcasts a request to network boot. The DHCP service again provides all IPAM info as well as the location of the Tinkerbell iPXE script (
auto.ipxe). iPXE configures its network interface using the IPAM info and then downloads the Tinkerbell iPXE script from the location provided by the DHCP service and runs it.
Note The
auto.ipxeis an iPXE script that tells iPXE from where to download the HookOS kernel and initrd so that they can be loaded into memory.
The following diagram illustrates the process described above. Note that the diagram only describes the network booting parts of the DHCP interaction, not the exchange of IPAM info.
Configuration
Below you will find code snippets showing how to add the two-step process from above to an existing DHCP service. Each config checks if DHCP option 77 (user class option
) equals “Tinkerbell”. If it does match, then the Tinkerbell iPXE script (auto.ipxe) will be served. If option 77 does not match, then the iPXE binary (ipxe.efi) will be served.
DHCP option: next server
Most DHCP services define a next server option. This option generally corresponds to either DHCP option 66 or the DHCP header sname, reference.
This option is used to tell a machine where to download the initial bootloader, reference.
Special consideration is required for the next server value when using EKS Anywhere to create your initial management cluster. This is because during this initial create phase a temporary bootstrap cluster is created and used to provision the management cluster.
The bootstrap cluster runs the Tinkerbell stack. When the management cluster is successfully created, the Tinkerbell stack is redeployed to the management cluster and the bootstrap cluster is deleted. This means that the IP address of the Tinkerbell stack will change.
As a temporary and one-time step, the IP address used by the existing DHCP service for next server will need to be the IP address of the temporary bootstrap cluster. This will be the IP of the Admin node or if you use the cli flag --tinkerbell-bootstrap-ip then that IP should be used for the next server in your existing DHCP service.
Once the management cluster is created, the IP address used by the existing DHCP service for next server will need to be updated to the tinkerbellIP. This IP is defined in your cluster spec at tinkerbellDatacenterConfig.spec.tinkerbellIP. The next server IP will not need to be updated again.
Note: The upgrade phase of a management cluster or the creation of any workload clusters will not require you to change the
next serverIP in the config of your existing DHCP service.
Code snippets
The following code snippets are generic examples of the config needed to enable the two-step process to an existing DHCP service. It does not cover the IPAM info that is also required.
dnsmasq.conf
dhcp-match=tinkerbell, option:user-class, Tinkerbell
dhcp-boot=tag:!tinkerbell,ipxe.efi,none,192.168.2.112
dhcp-boot=tag:tinkerbell,http://192.168.2.112/auto.ipxe
kea.json
{
    "Dhcp4": {
        "client-classes": [
            {
                "name": "tinkerbell",
                "test": "substring(option[77].hex,0,10) == 'Tinkerbell'",
                "boot-file-name": "http://192.168.2.112/auto.ipxe"
            },
            {
                "name": "default",
                "test": "not(substring(option[77].hex,0,10) == 'Tinkerbell')",
                "boot-file-name": "ipxe.efi"
            }
        ],
        "subnet4": [
            {
                "next-server": "192.168.2.112"
            }
        ]
    }
}
dhcpd.conf
 if exists user-class and option user-class = "Tinkerbell" {
     filename "http://192.168.2.112/auto.ipxe";
 } else {
     filename "ipxe.efi";
 }
 next-server "192.168.1.112";
Please follow the ipxe.org guide on how to configure Microsoft DHCP server.